
シェア:
Benjamin AronovはVonageの開発者支援者です。彼はRuby on Railsのバックグラウンドを持つ実績のあるコミュニティ・ビルダーです。Benjaminは故郷であるテルアビブのビーチを楽しんでいる。テルアビブを拠点に、世界最高のスタートアップの創設者たちと出会い、学ぶことができる。技術以外では、完璧なパン・オ・ショコラを求めて世界中を旅するのが好き。
Node.jsとVonageでリアルタイムのインタラクティブなRCSエクスペリエンスを構築する
所要時間:1 分
リッチ・コミュニケーション・サービス(RCS)は、ブランドがファンや顧客と関わる方法を変えています。世界的なスポーツイベントや音楽フェスティバルを運営している場合でも、よりリッチでインタラクティブな会話を構築したい場合でも、RCSは以下を提供します。 革新的なメッセージング機能を提供します。
このチュートリアルでは、RCSを組み合わせます。 を組み合わせます。, スタンドアロン・リッチ・カードそして リッチカードカルーセルを単一のシームレスなユーザージャーニーに統合することで、スポーツ、音楽、その他あらゆるリアルタイムのユーザ体験に適応させることができます。すべてVonage メッセージAPI!
>> TL;DR:GitHubの GitHubのプロジェクト全体を見る
RCSを使えば、SMSをはるかに超えることができます。リッチメディア、インタラクティブなボタン、リアルタイムのフィードバックにより、次のことが可能になります:
エンゲージメントとコンバージョンを高める
パーソナライズされたコンテンツを即座に配信
ユーザーのデフォルト・メッセージング・アプリ内で、記憶に残るブランド体験を創造する。
今日は、ダイナミックでマルチステップな体験を通してユーザーをガイドするアプリを作ります。この例は、ライブイベント、ファン投票、限定オファーに最適です。
ユーザー・ジャーニーの仕組みはこうだ:
ユーザーが受け取る「誰が勝つか?(ブラジル、ドイツ、引き分け)
ユーザーがブラジルをタップ → 「マン・オブ・ザ・マッチ」の投票カードを受け取る(ロナウジーニョ、ロナウド、ペレ)
ロナウジーニョをタップ → ロナウジーニョグッズの回転木馬を受け取る
このフローは、音楽イベントや製品発表会など、あらゆるリアルタイム体験のために簡単に拡張できる。
始める前に必要なもの
Node.jsのインストールマシンに
ngrokのインストールローカルサーバーを公開するために
Vonage APIアカウント
登録されたRCSビジネスメッセージング(RBM)エージェント
テスト用のRCS対応携帯電話
>> 注:Vonage経由のRCSには管理アカウントが必要です。デベロッパーモードへのアクセスについては、Vonageアカウントマネージャーにお問い合わせください。お問い合わせ 営業チームまでご連絡ください。にご連絡ください。
To complete this tutorial, you will need a Vonage API account. If you don’t have one already, you can sign up today and start building with free credit. Once you have an account, you can find your API Key and API Secret at the top of the Vonage API Dashboard.

あなたのNodeアプリケーションは比較的シンプルで、コードをクリーンで最新のベストプラクティスに保つために、少しモジュール化された構成になるでしょう。しかし、Nodeアプリを作成する前に、Messages APIを使用するVonageアプリを作成し、ngrok依存関係を実行することから始めます。
VonageからWebhookを受信するには、ローカルサーバーがインターネット経由でアクセスできる必要があります。ngrok を使用してサーバーを公開します。ターミナルで
ngrok http 3000ngrokが提供するHTTPS URLに注意してください:
例 https://your-ngrok-subdomain.ngrok.io
詳しくは ngrok でのテストを使ったテストについては、開発者ポータルツールをご覧ください。
Vonageアプリケーションを Vonageダッシュボード.アプリに名前を付け、メッセージ機能をオンにします。
 Creating a new Vonage Messages API application for an RCS-based interactive football experience
Vonageアプリケーションの設定で
インバウンドURLを
https://YOUR_NGROK_URL/inbound.ステータスURLを
https://example.com/rcs_status.
** メッセージのステータスは今後の記事で取り上げる。ボタンをクリックして公開鍵と秘密鍵を生成します。作成した
private.keyファイルをプロジェクトのルート・ディレクトリ(rcs-interactive-football)に移動してください。変更を保存する。
次に、"外部アカウントをリンクする "タブをクリックして、RCSエージェントをリンクします:
 Dashboard view showing the Vonage-Node-RCS application linked to the Vonage RoR RCS external account, with voice and message capabilities enabled.
私たちはシンプルでフラットなアプリケーションを心がけています。このアプリケーションは GitHub リポジトリをご覧ください。
ファイル構成は次のようになる:
rcs-interactive-football/
├── index.js
├── config.js
├── messageTemplates.js
├── messagingService.js
├── .env
├── package.json
└── private.key
それでは、新しいディレクトリを作成し、Node.jsプロジェクトを初期化してください:
mkdir rcs-interactive-football
cd rcs-interactive-football
npm init -y必要なノードパッケージを ノードパッケージマネージャ:
npm install express dotenv @vonage/server-sdkexpress:ウェブサーバーを作成します。dotenv:環境変数を安全にロードします。@vonage/server-sdk:VonageノードSDK Vonage Node SDKMessages API と相互作用するための
そしてプロジェクトファイルを作成する:
touch index.js config.js messageTemplates.js messagingService.js .envこれで private.keyファイルをプロジェクトのルートに移動します。
には .envファイルに、Vonage の認証情報と設定を追加します:
VONAGE_APPLICATION_ID=your_application_id
VONAGE_API_SIGNATURE_SECRET=your_api_secret
VONAGE_PRIVATE_KEY=./private.key
RCS_SENDER_ID=your_rbm_agent_id
PORT=3000VONAGE_APPLICATION_ID:VonageアプリケーションID。 APIダッシュボード.VONAGE_API_SIGNATURE_SECRET= あなたのVonageシグネチャーの秘密。アカウント設定 アカウント設定.VONAGE_PRIVATE_KEY:秘密鍵ファイル。RCS_SENDER_ID:あなたのRBM SenderID (ブランド名)。SenderIDには、スペースを入れないなどの特別なフォーマットが必要です。不明な場合は、アカウント マネージャーに確認してください。PORT:Expressサーバーのポート番号。
このアプリは、すべての設定可能な値(環境変数、画像URL、外部リンク)を1つのconfig.jsファイルに集約しています。これにより、コンテンツとロジックがきれいに分離されます。このアプローチにより、変更される可能性のある値の真実のソースが1つになります。この構成により、コアメッセージフローを維持したまま、メディアアセットの入れ替えや商品リンクの更新を素早く行うことができます。
// config.js
require('dotenv').config();
module.exports = {
  port: process.env.PORT || 3000,
  vonage: {
    applicationId: process.env.VONAGE_APPLICATION_ID,
    privateKey: process.env.VONAGE_PRIVATE_KEY,
    signatureSecret: process.env.VONAGE_API_SIGNATURE_SECRET,
  },
  rcsSenderId: process.env.RCS_SENDER_ID,
  images: {
    footballMatch: "https://github.com/Vonage-Community/tutorial-messages-node-rcs_realtime_football/blob/main/public/football_match.png?raw=true",
    manOfMatch: "https://github.com/Vonage-Community/tutorial-messages-node-rcs_realtime_football/blob/main/public/man_of_match.png?raw=true",
    jersey: "https://github.com/Vonage-Community/tutorial-messages-node-rcs_realtime_football/blob/main/public/ronaldinho_jersey.png?raw=true",
    photo: "https://github.com/Vonage-Community/tutorial-messages-node-rcs_realtime_football/blob/main/public/ronaldinho_photo.png?raw=true",
    tshirt: "https://github.com/Vonage-Community/tutorial-messages-node-rcs_realtime_football/blob/main/public/ronaldinho_shirt.png?raw=true",
  },
  merchLinks: {
    jersey: "https://www.ebay.com/b/Ronaldinho-International-Club-Soccer-Fan-Jerseys/2887/bn_16948843",
    photo: "https://www.ebay.com/shop/ronaldinho-signed-photo?_nkw=ronaldinho+signed+photo",
    tshirt: "https://www.ebay.com/itm/236003366810?_skw=ronaldinho+tshirt",
  }
};
次に messageTemplate.jsファイルを埋める。messageTemplates.jsモジュールは、すべてのRCSメッセージ構造を、プレゼンテーションとビジネス・ロジックを分離した、クリーンで再利用可能な関数にカプセル化します。
各テンプレート関数(返信候補、スタンドアロンリッチカード、リッチカードカルーセル)は同じパターンに従います。電話番号パラメータを受け取り、configモジュールから適切なメディアとURLを取り込み、Vonage APIに対応した適切なフォーマットのRCSメッセージオブジェクトを返します。
このモジュラーアプローチにより、当社のインタラクティブフローは理解しやすく、変更しやすくなっており、開発者は複雑なメッセージングロジックを読み解くことなく、独自のリアルタイムエンゲージメントシナリオにテンプレートを素早く適応させることができます。
例えば メッセージでは 例返信の例
vonage.messages.send({
  messageType: 'custom',
  channel: Channels.RCS,
  custom: {
    contentMessage: {
      text: 'What do you think of Vonage APIs?',
      suggestions: [
        {
          reply: {
            text: 'They\''re great!',
            postbackData: 'suggestion_1',
          },
        },
        {
          reply: {
            text: 'They\'re awesome!',
            postbackData: 'suggestion_2',
          },
        },
      ],
    },
  },
  to: MESSAGES_TO_NUMBER,
  from: RCS_SENDER_ID,
})
同様に initialMessage関数を 関数を作成することができます。モジュールで作成できます。このモジュール化されたバージョンは、受信者とSenderIDを抽象化します:
// messageTemplates.js
const config = require('./config');
module.exports = {

  // Initial Suggested Reply Message to Kick-off
  initialMessage: (to) => ({
    to,
    from: config.rcsSenderId,
    channel: 'rcs',
    message_type: 'custom',
    custom: {
      contentMessage: {
        text: "Who will win?",
        suggestions: [
          { reply: { text: "Brazil", postbackData: "brazil" }},
          { reply: { text: "Germany", postbackData: "germany" }},
          { reply: { text: "Draw", postbackData: "draw" }},
        ]
      }
    }
  })
};引き続き、RCSスタンドアロン・リッチカードとRCSリッチカード・カルーセルのテンプレートを追加する。これらはさらに、configモジュールから取得したメディアを抽象化する。まず、スタンドアロン・カードは、ユーザーがマン・オブ・ザ・マッチに投票するためのものです:
  // Standalone Rich Card for voting on Man of the Match
   manOfTheMatchMessage: (to) => ({
    to,
    from: config.rcsSenderId,
    channel: 'rcs',
    message_type: 'custom',
    custom: {
      contentMessage: {
        richCard: {
          standaloneCard: {
            thumbnailImageAlignment: "RIGHT",
            cardOrientation: "VERTICAL",
            cardContent: {
              title: "Vote Now!",
              description: "Who was the man of the match?",
              media: {
                height: "TALL",
                contentInfo: {
                  fileUrl: config.images.manOfMatch,
                  forceRefresh: true
                }
              },
              suggestions: [
                { reply: { text: "Ronaldinho", postbackData: "ronaldinho" } },
                { reply: { text: "Ronaldo", postbackData: "ronaldo" } },
                { reply: { text: "Pele", postbackData: "pele" } }
              ]
            }
          }
        }
      }
    }
})そして最後に、ユーザーが購入できる商品を表示するRCSカルーセルのメッセージテンプレートを作成します。
// RCS Rich Card Carousel for Player Merch to Present
  playerMerchCarousel: (to) => ({
    to,
    from: config.rcsSenderId,
    channel: 'rcs',
    message_type: 'custom',
    custom: {
      contentMessage: {
        richCard: {
          carouselCard: {
            cardWidth: "MEDIUM",
            cardContents: [
              {
                title: "Ronaldinho Jersey",
                description: "Authentic gameworn kit.",
                media: {
                  height: "TALL",
                  contentInfo: {
                    fileUrl: config.images.jersey,
                    forceRefresh: true
                  }
                },
                suggestions: [
                  {
                    action: {
                      text: "Buy now",
                      postbackData: "buy_now_jersey",
                      openUrlAction: {
                        url: config.merchLinks.jersey
                      }
                    }
                  }
                ]
              },
              {
                title: "Autographed Photo",
                description: "Timeless photo signed by Ronaldinho himself.",
                media: {
                  height: "TALL",
                  contentInfo: {
                    fileUrl: config.images.photo,
                    forceRefresh: true
                  }
                },
                suggestions: [
                  {
                    action: {
                      text: "Buy now",
                      postbackData: "buy_now_photo",
                      openUrlAction: {
                        url: config.merchLinks.photo
                      }
                    }
                  }
                ]
              },
              {
                title: "Fan T-shirt",
                description: "100% Cotton, 100% Passion.",
                media: {
                  height: "TALL",
                  contentInfo: {
                    fileUrl: config.images.tshirt,
                    forceRefresh: true
                  }
                },
                suggestions: [
                  {
                    action: {
                      text: "Buy now",
                      postbackData: "buy_now_shirt",
                      openUrlAction: {
                        url: config.merchLinks.tshirt
                      }
                    }
                  }
                ]
              }
            ]
          }
        }
      }
    }
})>>完全な messagesTemplate.jsファイル
コンフィギュレーションとメッセージ・テンプレートがセットアップできたので、Vonage APIのインタラクションを抽象化するメッセージング・サービスを作ってみよう。messagingService.jsモジュールは、すでに作成したメッセージテンプレートを受け取り、実際にAPIを通してメッセージを送信するために必要な機能を追加します。
まず、設定を使ってVonageクライアントを初期化してみよう:
// messagingService.js
const { Vonage } = require('@vonage/server-sdk');
const config = require('./config');
const messageTemplates = require('./messageTemplates');

// Initialize the Vonage client with our application credentials
const vonage = new Vonage({
  applicationId: config.vonage.applicationId,
  privateKey: require('fs').readFileSync(config.vonage.privateKey)
});これで vonageクライアントの準備ができたので sendInitialMessage機能を作ることができます:
module.exports = {

  sendInitialMessage: async (to) => {
    try {
      const msg = messageTemplates.initialMessage(to);
      const response = await vonage.messages.send(msg);
      console.log(`Initial message sent successfully`);
      return response;
    } catch (error) {
      console.error('Error sending initial message:', error);
      throw error;
    }
  }
}さらに2つの関数( sendManOfTheMatchMessageと sendPlayerMerchCarousel )を作ります:
sendManOfTheMatchMessage: async (to) => {
    try {
      const msg = messageTemplates.manOfTheMatchMessage(to);
      const response = await vonage.messages.send(msg);
      console.log(`Man of the Match message sent successfully`);
      return response;
    } catch (error) {
      console.error('Error sending Man of the Match message:', error);
      throw error;
    }
  },

  sendPlayerMerchCarousel: async (to) => {
    try {
      const msg = messageTemplates.playerMerchCarousel(to);
      const response = await vonage.messages.send(msg);
      console.log(`Merchandise carousel sent successfully`);
      return response;
    } catch (error) {
      console.error('Error sending merchandise carousel:', error);
      throw error;
    }
  }
>>完全な messagesService.jsファイル
では、いよいよすべてを index.jsファイルにすべてをまとめよう。ここでExpressサーバーを作成し、ルートを設定し、RCS体験をダイナミックで魅力的なものにするインタラクティブ・フロー・ロジックを実装する。
まず、Expressを設定し、基本的なミドルウェアをセットアップして、JSONとURLエンコードされたリクエストを処理できるようにする:
// index.js
const express = require('express');

const { verifySignature } = require('@vonage/jwt');
const config = require('./config');
const messagingService = require('./messagingService');

// Initialize Express app
const app = express();
app.use(express.json());
app.use(express.urlencoded());

// Constants
const PORT = config.port;
const VONAGE_API_SIGNATURE_SECRET = config.vonage.signatureSecret;

// Simple home route to confirm server is running
app.get('/', (req, res) => {
  res.send('RCS Interactive Football Demo - Server is running!');
});
このルートによって、ユーザーとの会話を手動で開始することができます。PostmanやcURLを使って、最初の "Who will win? "メッセージを開始することができます。
app.post('/send-initial-message', async (req, res) => {
    const toNumber = req.body.to;

    try {
      await messagingService.sendInitialMessage(toNumber);
      res.status(200).json({ message: 'Initial message sent successfully.' });
    } catch (error) {
      console.error('Error in /send-initial-message:', error);
      res.status(500).json({ error: 'Internal server error.' });
    }
  });
さて、ここからが最も重要な部分です。ユーザーのレスポンスを処理し、インタラクティブなフローを作成するウェブフックハンドラです。
Vonageは、ユーザがRCSメッセージと相互作用するときにWebhookコールバックを送信します。そこで、チャネル・タイプとメッセージ・タイプをチェックする:
if (inboundMessage.channel === 'rcs' && inboundMessage.message_type === 'reply')そして、そのインタラクションは、返信の提案、カード上のボタン、またはカルーセルアイテムから来ることを期待しています。リッチカードは postbackData属性を使いますが、返信提案の場合は id:
const userSelection = inboundMessage.reply?.postbackData || inboundMessage.reply?.id;
すべてをまとめると inboundウェブフックは次のようになる:
app.post('/inbound', async (req, res) => {
  // Verify the message signature for security
  const token = req.headers.authorization?.split(' ')[1];

   if (!token || !verifySignature(token, VONAGE_API_SIGNATURE_SECRET)) {
      console.error('Invalid signature');
      return res.status(401).json({ error: 'Invalid signature' });
    }

  const inboundMessage = req.body;

  // Only process RCS reply messages
  if (inboundMessage.channel === 'rcs' && inboundMessage.message_type === 'reply') {
	// Retrieve the postbackData for RCS Cards, id for Suggested Replies
         const userSelection = inboundMessage.reply?.postbackData || inboundMessage.reply?.id;

    const userNumber = inboundMessage.from;

    // Log the inbound message for debugging
    console.log(`User ${userNumber} selected: ${userSelection}`);

    try {
      // Handle different user selections based on our interactive flow
      switch (userSelection) {
        case 'brazil':
          // User selected Brazil - send man of the match voting
          console.log(`Sending man of the match message to ${userNumber}`);
          await messagingService.sendManOfTheMatchMessage(userNumber);
          break;

        case 'ronaldinho':
          // User selected Ronaldinho - send merchandise carousel
          console.log(`Sending player merchandise carousel to ${userNumber}`);
          await messagingService.sendPlayerMerchCarousel(userNumber);
          break;

        default:
          // For any other selection, log a confirmation message to the service
          console.log(`Sending confirmation for ${userSelection} to ${userNumber}`);
      }

      // Always return 200 OK to Vonage
      res.status(200).end();
    } catch (error) {
      console.error('Error processing inbound message:', error);
      res.status(500).json({ error: 'Internal server error' });
    }
  } else {
    // Not an RCS reply message
    console.log('Received non-RCS reply message');
    res.status(200).end();
  }
});

// Start the server
app.listen(PORT, () => {
  console.log(`Server is running on port ${PORT}`);
  console.log('RCS Interactive Football Demo is ready!');
});
>>完全な index.jsファイル
ngrok タブとは別に新しいターミナルタブを開き、Express サーバーを起動します:
node index.jsPostmanやcURLのようなツールを使って、受信者の電話番号を入力したPOSTリクエストをエンドポイントに送信する。 /send-initial-messageエンドポイントに送信します:
curl -X POST https://YOUR_NGROK_URL/send-initial-message \
  -H "Content-Type: application/json" \
-d '{"to": "YOUR_RCS_TEST_NUMBER"}'インタラクティブな流れがあなたのデバイス上で展開されるのをご覧ください!
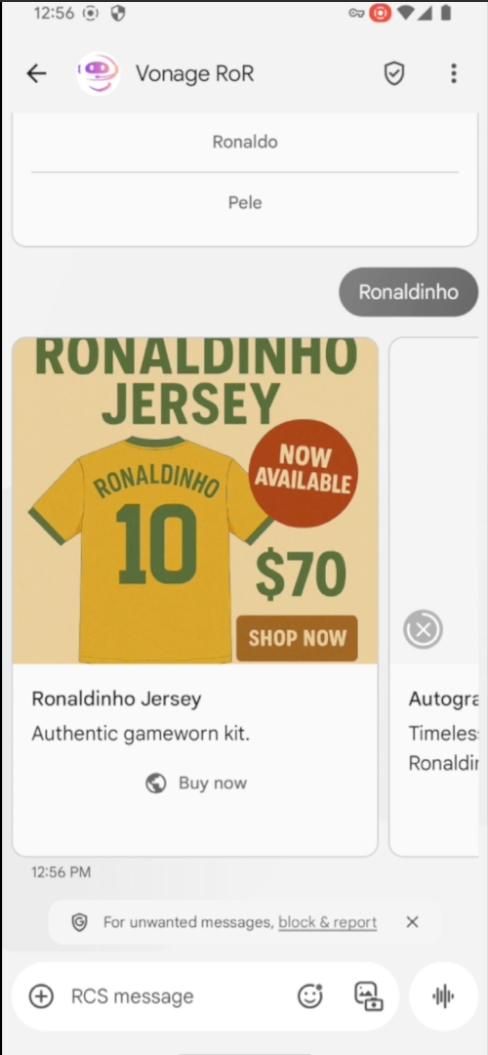 Example of an RCS Rich Card showcasing a Ronaldinho jersey as part of an interactive football campaign
よくやった!Node.jsとVonage Messages APIを使って、リアルタイムのマルチステップRCSエクスペリエンスを構築しました。モジュール式で再利用が簡単です。このパターンは、スポーツ、音楽、小売、または迅速なインタラクションとリアルなエンゲージメントが必要なあらゆるイベントに最適です。
とはいえ、私たちが作り出したのはフローの1つの枝だけだ。もしユーザーが ドイツを選ぶか、試合が 引き分け何も起こりません!これが次のステップだ。テンプレートとアーキテクチャは準備できているので、これらのパスを追加するのは簡単です。
しかし、そこで立ち止まってはいけない!
これをVonageの新しい デバイスロケーションAPI.ユーザーがスタジアムにいたり、パブで観戦していることがわかれば、最もインパクトのあるタイミングでこのインタラクティブなRCSフローをトリガーすることができます。
残りのフローを構築したり、独自のイベントアプリにこのフローを組み込んだりしたら、ぜひお知らせください。ぜひ見せてください。タグ VonageDevにタグ付けするか Vonage開発者コミュニティSlackにアクセスしてください。