Using the Subaccounts API
Overview
This topic describes a use case where a partner uses the Subaccounts API to successfully manage end customers.
Prerequisites
You should be familiar with the main concepts associated with the Subaccounts API.
Creating a subaccount
A Partner decides to create a subaccount for each end customer and is therefore able to use distinct API credentials for each of the end customers and see their spending. This is illustrated in the following diagram:
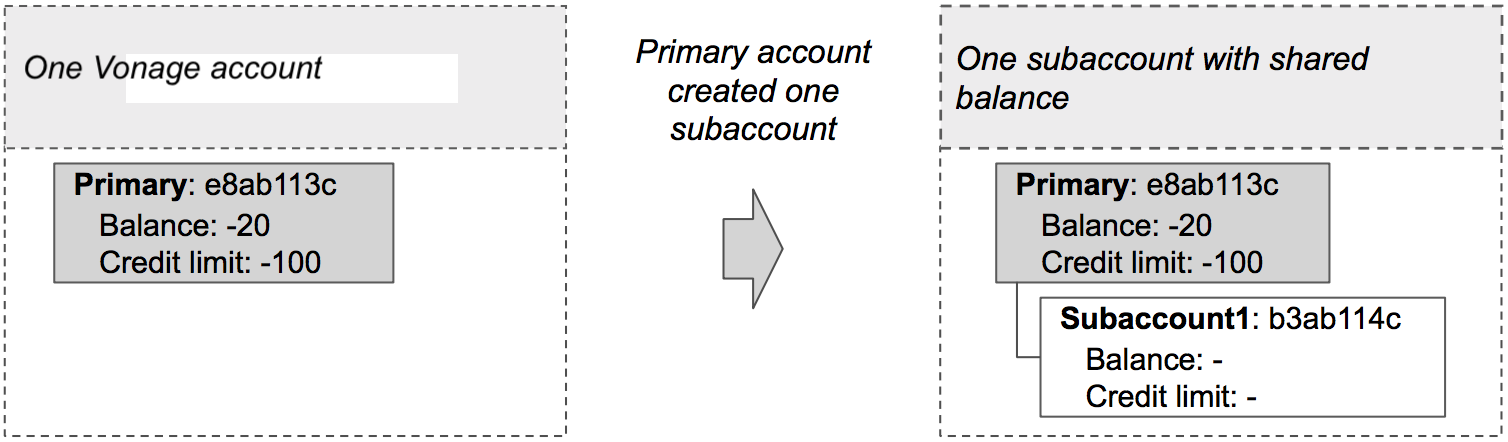
To create a subaccount the following code can be used:
Write the code
Add the following to create-subaccount.sh:
curl -X "POST" "https://api.nexmo.com/accounts/$VONAGE_API_KEY/subaccounts" -u $VONAGE_API_KEY:$VONAGE_API_SECRET   \
     -H "Content-Type: application/json"  \
-d $'{"name":"'$NEW_SUBACCOUNT_NAME'", "secret":"'$NEW_SUBACCOUNT_SECRET'"}'Run your code
Save this file to your machine and run it:
Prerequisites
npm install @vonage/subaccountsCreate a file named create-subaccount.js and add the following code:
const { SubAccounts } = require('@vonage/subaccounts');

const subAccountClient = new SubAccounts({
  apiKey: VONAGE_API_KEY,
  apiSecret: VONAGE_API_SECRET,
});Write the code
Add the following to create-subaccount.js:
subAccountClient.createSubAccount({
  name: NEW_SUBACCOUNT_NAME,
  secret: NEW_SUBACCOUNT_SECRET,
})
  .then((newSubAccount) => console.log(newSubAccount))
.catch((error) => console.error(error));Run your code
Save this file to your machine and run it:
Prerequisites
Add the following to build.gradle:
implementation 'com.vonage:server-sdk-kotlin:2.1.1'Create a file named CreateSubaccount and add the following code to the main method:
val client = Vonage {
    apiKey(VONAGE_API_KEY)
    apiSecret(VONAGE_API_SECRET)
}Write the code
Add the following to the main method of the CreateSubaccount file:
val subaccount = client.subaccounts.createSubaccount(
    name = SUBACCOUNT_NAME,
    secret = SUBACCOUNT_SECRET
)Run your code
We can use the application plugin for Gradle to simplify the running of our application. Update your build.gradle with the following:
apply plugin: 'application'
mainClassName = project.hasProperty('main') ? project.getProperty('main') : ''
Run the following gradle command to execute your application, replacing com.vonage.quickstart.kt.subaccounts with the package containing CreateSubaccount:
Prerequisites
Add the following to build.gradle:
implementation 'com.vonage:server-sdk:9.3.1'Create a file named CreateSubaccount and add the following code to the main method:
VonageClient client = VonageClient.builder()
		.apiKey(VONAGE_API_KEY)
		.apiSecret(VONAGE_API_SECRET)
.build();Write the code
Add the following to the main method of the CreateSubaccount file:
Account subaccount = client.getSubaccountsClient().createSubaccount(
		CreateSubaccountRequest.builder()
			.name(SUBACCOUNT_NAME)
			.secret(SUBACCOUNT_SECRET)
			.build()
);Run your code
We can use the application plugin for Gradle to simplify the running of our application. Update your build.gradle with the following:
apply plugin: 'application'
mainClassName = project.hasProperty('main') ? project.getProperty('main') : ''
Run the following gradle command to execute your application, replacing com.vonage.quickstart.subaccounts with the package containing CreateSubaccount:
Prerequisites
Install-Package VonageCreate a file named CreateSubAccountRequest.cs and add the following code:
using Vonage;
using Vonage.Request;Add the following to CreateSubAccountRequest.cs:
var credentials = Credentials.FromApiKeyAndSecret(VONAGE_API_KEY, VONAGE_API_SECRET);
var client = new VonageClient(credentials);Write the code
Add the following to CreateSubAccountRequest.cs:
var request = Vonage.SubAccounts.CreateSubAccount.CreateSubAccountRequest.Build()
    .WithName(NEW_SUBACCOUNT_NAME)
    .WithSecret(NEW_SUBACCOUNT_SECRET)
    .Create();
var response = await client.SubAccountsClient.CreateSubAccountAsync(request);Prerequisites
composer require vonage/clientCreate a file named create-subaccount.php and add the following code:
$basic = new \Vonage\Client\Credentials\Basic(VONAGE_API_KEY, VONAGE_API_SECRET);
$client = new \Vonage\Client($basic);Write the code
Add the following to create-subaccount.php:
$account = new \Vonage\Subaccount\SubaccountObjects\Account();
$account->setName(NEW_SUBACCOUNT_NAME);
$account->setSecret(NEW_SUBACCOUNT_SECRET);

$client->subaccount()->createSubaccount(VONAGE_API_KEY, $account);Run your code
Save this file to your machine and run it:
Prerequisites
pip install vonage python-dotenvWrite the code
Add the following to create-subaccount.py:
from vonage import Auth, Vonage
from vonage_subaccounts import NewSubaccount, SubaccountOptions

client = Vonage(Auth(api_key=VONAGE_API_KEY, api_secret=VONAGE_API_SECRET))

response: NewSubaccount = client.subaccounts.create_subaccount(
    SubaccountOptions(name=SUBACCOUNT_NAME, secret=SUBACCOUNT_SECRET)
)

print(response)Run your code
Save this file to your machine and run it:
Prerequisites
gem install vonageCreate a file named create-subaccount.rb and add the following code:
client = Vonage::Client.new(
  api_key: VONAGE_API_KEY,
  api_secret: VONAGE_API_SECRET
)Write the code
Add the following to create-subaccount.rb:
client.subaccounts.create(
  name: NEW_SUBACCOUNT_NAME,
  secret: NEW_SUBACCOUNT_SECRET
)Run your code
Save this file to your machine and run it:
Transferring credit
The Partner could not control spending among its end customers because they all shared the same balance. One end customer used to occasionally consume all shared balance effectively blocking access to the Vonage APIs for other Partner’s end customers. The Partner decided to set individual balance and allocate a credit limit to that end customer.
NOTE: The Partner could have made their accounts prepaid.
Each subaccount can be allocated an individual balance, and a credit limit, as show in the following diagram:
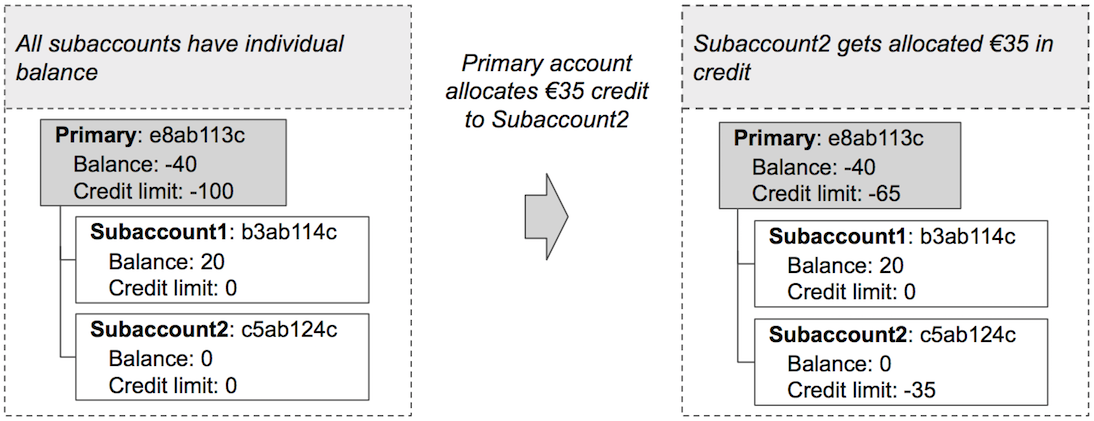
The following code snippet illustrates allocating a specified amount of credit to a subaccount:
Write the code
Add the following to transfer-credit.sh:
curl -X "POST" "https://api.nexmo.com/accounts/$VONAGE_API_KEY/credit-transfers" -u $VONAGE_API_KEY:$VONAGE_API_SECRET   \
     -H "Content-Type: application/json"  \
-d $'{"from":"'$VONAGE_API_KEY'", "to":"'$SUBACCOUNT_KEY'", "amount": '$AMOUNT'}'Run your code
Save this file to your machine and run it:
Prerequisites
npm install @vonage/subaccountsCreate a file named transfer-credit.js and add the following code:
const { SubAccounts } = require('@vonage/subaccounts');

const subAccountClient = new SubAccounts({
  apiKey: VONAGE_API_KEY,
  apiSecret: VONAGE_API_SECRET,
});Write the code
Add the following to transfer-credit.js:
subAccountClient.transferCredit({
  from: VONAGE_API_KEY,
  to: SUBACCOUNT_KEY,
  amount: AMOUNT,
})
  .then((creditTransfer) => console.log(creditTransfer))
.catch((error) => console.error(error));Run your code
Save this file to your machine and run it:
Prerequisites
Add the following to build.gradle:
implementation 'com.vonage:server-sdk-kotlin:2.1.1'Create a file named TransferCredit and add the following code to the main method:
val client = Vonage {
    apiKey(VONAGE_API_KEY)
    apiSecret(VONAGE_API_SECRET)
}Write the code
Add the following to the main method of the TransferCredit file:
val receipt = client.subaccounts.transferCredit(
    from = VONAGE_API_KEY,
    to = SUBACCOUNT_KEY,
    amount = SUBACCOUNT_CREDIT_AMOUNT
)Run your code
We can use the application plugin for Gradle to simplify the running of our application. Update your build.gradle with the following:
apply plugin: 'application'
mainClassName = project.hasProperty('main') ? project.getProperty('main') : ''
Run the following gradle command to execute your application, replacing com.vonage.quickstart.kt.subaccounts with the package containing TransferCredit:
Prerequisites
Add the following to build.gradle:
implementation 'com.vonage:server-sdk:9.3.1'Create a file named TransferCredit and add the following code to the main method:
VonageClient client = VonageClient.builder()
		.apiKey(VONAGE_API_KEY)
		.apiSecret(VONAGE_API_SECRET)
.build();Write the code
Add the following to the main method of the TransferCredit file:
MoneyTransfer receipt = client.getSubaccountsClient().transferCredit(
		MoneyTransfer.builder()
			.from(VONAGE_API_KEY).to(SUBACCOUNT_KEY)
			.amount(SUBACCOUNT_CREDIT_AMOUNT).build()
);
System.out.println("Transfer successful: "+receipt.getId());Run your code
We can use the application plugin for Gradle to simplify the running of our application. Update your build.gradle with the following:
apply plugin: 'application'
mainClassName = project.hasProperty('main') ? project.getProperty('main') : ''
Run the following gradle command to execute your application, replacing com.vonage.quickstart.subaccounts with the package containing TransferCredit:
Prerequisites
Install-Package VonageCreate a file named TransferCreditRequest.cs and add the following code:
using Vonage;
using Vonage.Request;
using Vonage.SubAccounts.TransferAmount;Add the following to TransferCreditRequest.cs:
var credentials = Credentials.FromApiKeyAndSecret(VONAGE_API_KEY, VONAGE_API_SECRET);
var client = new VonageClient(credentials);Write the code
Add the following to TransferCreditRequest.cs:
var request = TransferAmountRequest.Build()
    .WithFrom(VONAGE_API_KEY)
    .WithTo(SUBACCOUNT_KEY)
    .WithAmount(amount)
    .Create();
var response = await client.SubAccountsClient.TransferCreditAsync(request);Prerequisites
composer require vonage/clientCreate a file named transfer-credit.php and add the following code:
$client = new \Vonage\Client($basic);
Write the code
Add the following to transfer-credit.php:
$transferRequest = new \Vonage\Subaccount\Request\TransferBalanceRequest(VONAGE_API_KEY);
$transferRequest
    ->setFrom(VONAGE_API_KEY)
    ->setTo(SUBACCOUNT_KEY)
    ->setAmount(250);

$subaccount = $client->subaccount()->makeBalanceTransfer($transferRequest);Run your code
Save this file to your machine and run it:
Prerequisites
pip install vonage python-dotenvWrite the code
Add the following to transfer-credit.py:
from vonage import Auth, Vonage
from vonage_subaccounts import Transfer, TransferRequest

client = Vonage(Auth(api_key=VONAGE_API_KEY, api_secret=VONAGE_API_SECRET))

request = TransferRequest(
    from_=VONAGE_API_KEY, to=SUBACCOUNT_KEY, amount=SUBACCOUNT_CREDIT_AMOUNT
)

response: Transfer = client.subaccounts.transfer_credit(request)

print(response)Run your code
Save this file to your machine and run it:
Prerequisites
gem install vonageCreate a file named transfer-credit.rb and add the following code:
client = Vonage::Client.new(
  api_key: VONAGE_API_KEY,
  api_secret: VONAGE_API_SECRET
)Write the code
Add the following to transfer-credit.rb:
client.subaccounts.transfer_credit(
  from: VONAGE_API_KEY,
  to: SUBACCOUNT_KEY,
  amount: AMOUNT
)Run your code
Save this file to your machine and run it:
Checking the balance of all subaccounts
The Partner decides to put monitoring in place. It is possible to periodically check the balance of all of subaccounts using the following code snippet:
Write the code
Add the following to get-subaccounts.sh:
curl "https://api.nexmo.com/accounts/$VONAGE_API_KEY/subaccounts" -u $VONAGE_API_KEY:$VONAGE_API_SECRETRun your code
Save this file to your machine and run it:
Prerequisites
npm install @vonage/subaccountsCreate a file named get-subaccounts.js and add the following code:
const { SubAccounts } = require('@vonage/subaccounts');

const subAccountClient = new SubAccounts({
  apiKey: VONAGE_API_KEY,
  apiSecret: VONAGE_API_SECRET,
});Write the code
Add the following to get-subaccounts.js:
subAccountClient.getSubAccounts()
  .then((subAccounts) => console.log(subAccounts))
.catch((error) => console.error(error));Run your code
Save this file to your machine and run it:
Prerequisites
Add the following to build.gradle:
implementation 'com.vonage:server-sdk-kotlin:2.1.1'Create a file named ListSubaccounts and add the following code to the main method:
val client = Vonage {
    apiKey(VONAGE_API_KEY)
    apiSecret(VONAGE_API_SECRET)
}Write the code
Add the following to the main method of the ListSubaccounts file:
val subaccounts = client.subaccounts.listSubaccounts()Run your code
We can use the application plugin for Gradle to simplify the running of our application. Update your build.gradle with the following:
apply plugin: 'application'
mainClassName = project.hasProperty('main') ? project.getProperty('main') : ''
Run the following gradle command to execute your application, replacing com.vonage.quickstart.kt.subaccounts with the package containing ListSubaccounts:
Prerequisites
Add the following to build.gradle:
implementation 'com.vonage:server-sdk:9.3.1'Create a file named ListSubaccounts and add the following code to the main method:
VonageClient client = VonageClient.builder()
		.apiKey(VONAGE_API_KEY)
		.apiSecret(VONAGE_API_SECRET)
.build();Write the code
Add the following to the main method of the ListSubaccounts file:
ListSubaccountsResponse response = client.getSubaccountsClient().listSubaccounts();Run your code
We can use the application plugin for Gradle to simplify the running of our application. Update your build.gradle with the following:
apply plugin: 'application'
mainClassName = project.hasProperty('main') ? project.getProperty('main') : ''
Run the following gradle command to execute your application, replacing com.vonage.quickstart.subaccounts with the package containing ListSubaccounts:
Prerequisites
Install-Package VonageCreate a file named GetSubAccountsRequest.cs and add the following code:
using Vonage;
using Vonage.Request;Add the following to GetSubAccountsRequest.cs:
var credentials = Credentials.FromApiKeyAndSecret(VONAGE_API_KEY, VONAGE_API_SECRET);
var client = new VonageClient(credentials);Write the code
Add the following to GetSubAccountsRequest.cs:
var response = await client.SubAccountsClient.GetSubAccountsAsync();Prerequisites
composer require vonage/clientCreate a file named get-subaccounts.php and add the following code:
$basic = new \Vonage\Client\Credentials\Basic(VONAGE_API_KEY, VONAGE_API_SECRET);
$client = new \Vonage\Client($basic);Write the code
Add the following to get-subaccounts.php:
$subaccounts = $client->subaccount()->getSubaccounts(VONAGE_API_KEY);Run your code
Save this file to your machine and run it:
Prerequisites
pip install vonage python-dotenvWrite the code
Add the following to list-subaccounts.py:
from vonage import Auth, Vonage
from vonage_subaccounts import ListSubaccountsResponse

client = Vonage(Auth(api_key=VONAGE_API_KEY, api_secret=VONAGE_API_SECRET))

response: ListSubaccountsResponse = client.subaccounts.list_subaccounts()

print(response)Run your code
Save this file to your machine and run it:
Prerequisites
gem install vonageCreate a file named list-subaccounts.rb and add the following code:
client = Vonage::Client.new(
  api_key: VONAGE_API_KEY,
  api_secret: VONAGE_API_SECRET
)Write the code
Add the following to list-subaccounts.rb:
response = client.subaccounts.listRun your code
Save this file to your machine and run it:
Additional credit allocation
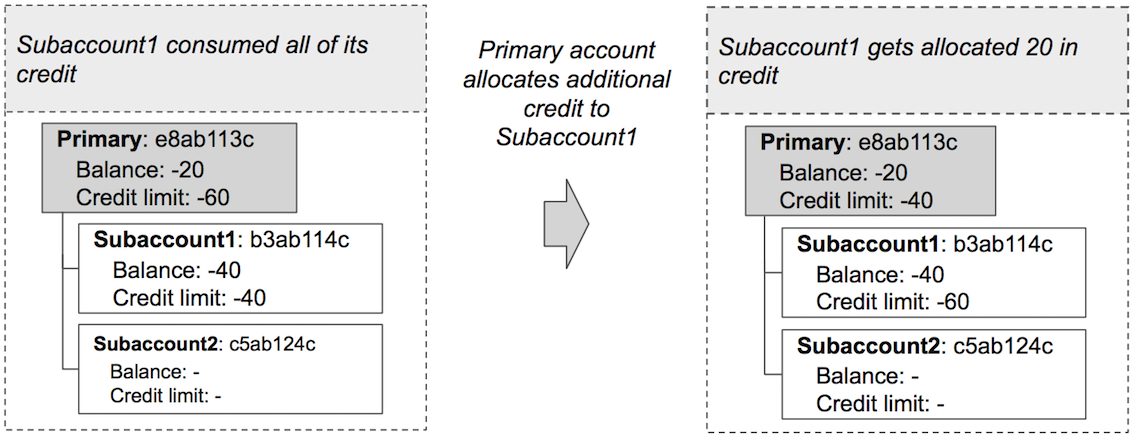
After some time, the Partner noticed that the end customer 1 (subaccount1) used up all of its credit (40 out of 40) and could not make any more API calls. The Partner had a choice of either waiting for the end customer 1 to pay them (and then in turn making a payment to Vonage and transferring a corresponding balance to the subaccount) or increasing the end customer’s credit limit immediately so that end customer 1 can continue using the Vonage API. The Partner decided to allocate additional credit. The Partner has 40 = |-60| - |-20| available credit, and decides to allocate 20 to the subaccount. This is illustrated in the following diagram:
End of month balance transfers
At the end of the month the Partner received a |-20| + |-50| = €70 invoice from Vonage (for all spending from all its accounts). End customer 1 (subaccount1) covered 45 out of €50 that it had spent. Thus, the Partner transferred €45 to subaccount1's balance. This is illustrated in the following diagram:
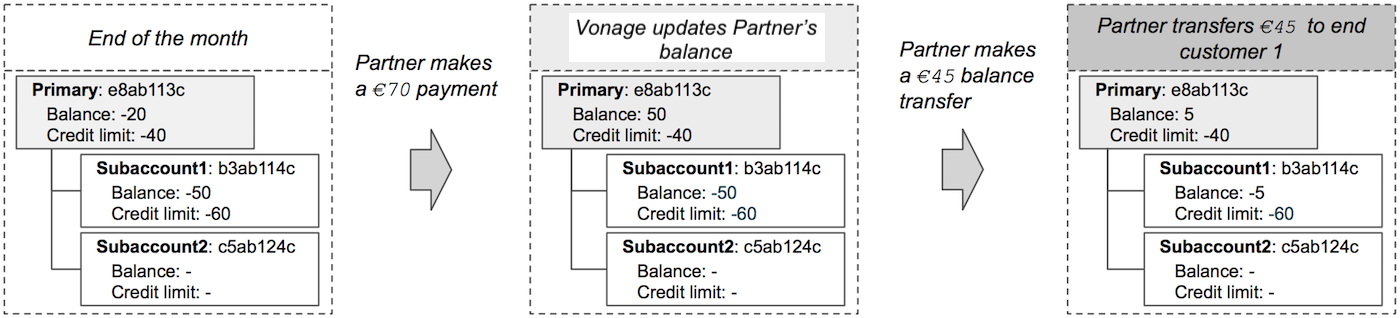
The following code shows how to transfer balance to a subaccount:
Write the code
Add the following to transfer-balance.sh:
curl -X "POST" "https://api.nexmo.com/accounts/$VONAGE_API_KEY/balance-transfers" -u $VONAGE_API_KEY:$VONAGE_API_SECRET \
     -H "Content-Type: application/json"  \
-d $'{"from":"'$VONAGE_API_KEY'", "to":"'$SUBACCOUNT_KEY'", "amount": '$AMOUNT'}'Run your code
Save this file to your machine and run it:
Prerequisites
npm install @vonage/subaccountsCreate a file named transfer-balance.js and add the following code:
const { SubAccounts } = require('@vonage/subaccounts');

const subAccountClient = new SubAccounts({
  apiKey: VONAGE_API_KEY,
  apiSecret: VONAGE_API_SECRET,
});Write the code
Add the following to transfer-balance.js:
subAccountClient.transferBalance({
  from: VONAGE_API_KEY,
  to: SUBACCOUNT_KEY,
  amount: AMOUNT,
})
  .then((balanceTransfer) => console.log(balanceTransfer))
.catch((error) => console.error(error));Run your code
Save this file to your machine and run it:
Prerequisites
Add the following to build.gradle:
implementation 'com.vonage:server-sdk-kotlin:2.1.1'Create a file named TransferBalance and add the following code to the main method:
val client = Vonage {
    apiKey(VONAGE_API_KEY)
    apiSecret(VONAGE_API_SECRET)
}Write the code
Add the following to the main method of the TransferBalance file:
val receipt = client.subaccounts.transferBalance(
    from = VONAGE_API_KEY,
    to = SUBACCOUNT_KEY,
    amount = SUBACCOUNT_BALANCE_AMOUNT
)Run your code
We can use the application plugin for Gradle to simplify the running of our application. Update your build.gradle with the following:
apply plugin: 'application'
mainClassName = project.hasProperty('main') ? project.getProperty('main') : ''
Run the following gradle command to execute your application, replacing com.vonage.quickstart.kt.subaccounts with the package containing TransferBalance:
Prerequisites
Add the following to build.gradle:
implementation 'com.vonage:server-sdk:9.3.1'Create a file named TransferBalance and add the following code to the main method:
VonageClient client = VonageClient.builder()
		.apiKey(VONAGE_API_KEY)
		.apiSecret(VONAGE_API_SECRET)
.build();Write the code
Add the following to the main method of the TransferBalance file:
MoneyTransfer receipt = client.getSubaccountsClient().transferBalance(
		MoneyTransfer.builder()
			.from(VONAGE_API_KEY).to(SUBACCOUNT_KEY)
			.amount(SUBACCOUNT_BALANCE_AMOUNT).build()
);
System.out.println("Transfer successful: "+receipt.getId());Run your code
We can use the application plugin for Gradle to simplify the running of our application. Update your build.gradle with the following:
apply plugin: 'application'
mainClassName = project.hasProperty('main') ? project.getProperty('main') : ''
Run the following gradle command to execute your application, replacing com.vonage.quickstart.subaccounts with the package containing TransferBalance:
Prerequisites
Install-Package VonageCreate a file named TransferBalanceRequest.cs and add the following code:
using Vonage;
using Vonage.Request;
using Vonage.SubAccounts.TransferAmount;Add the following to TransferBalanceRequest.cs:
var credentials = Credentials.FromApiKeyAndSecret(VONAGE_API_KEY, VONAGE_API_SECRET);
var client = new VonageClient(credentials);Write the code
Add the following to TransferBalanceRequest.cs:
var request = TransferAmountRequest.Build()
    .WithFrom(VONAGE_API_KEY)
    .WithTo(SUBACCOUNT_KEY)
    .WithAmount(amount)
    .Create();
var response = await client.SubAccountsClient.TransferBalanceAsync(request);Prerequisites
composer require vonage/clientCreate a file named transfer-balance.php and add the following code:
$basic = new \Vonage\Client\Credentials\Basic(VONAGE_API_KEY, VONAGE_API_SECRET);
$client = new \Vonage\Client($basic);Write the code
Add the following to transfer-balance.php:
$transferRequest = new \Vonage\Subaccount\Request\TransferBalanceRequest(VONAGE_API_KEY);
$transferRequest
    ->setFrom(VONAGE_API_KEY)
    ->setTo(SUBACCOUNT_KEY)
    ->setAmount(250);

$subaccount = $client->subaccount()->makeBalanceTransfer($transferRequest);Run your code
Save this file to your machine and run it:
Prerequisites
pip install vonage python-dotenvWrite the code
Add the following to transfer-balance.py:
from vonage import Auth, Vonage
from vonage_subaccounts import Transfer, TransferRequest

client = Vonage(Auth(api_key=VONAGE_API_KEY, api_secret=VONAGE_API_SECRET))

request = TransferRequest(
    from_=VONAGE_API_KEY, to=SUBACCOUNT_KEY, amount=SUBACCOUNT_BALANCE_AMOUNT
)

transfer: Transfer = client.subaccounts.transfer_balance(request)

print(transfer)Run your code
Save this file to your machine and run it:
Prerequisites
gem install vonageCreate a file named transfer-balance.rb and add the following code:
client = Vonage::Client.new(
  api_key: VONAGE_API_KEY,
  api_secret: VONAGE_API_SECRET
)Write the code
Add the following to transfer-balance.rb:
client.subaccounts.transfer_balance(
  from: VONAGE_API_KEY,
  to: SUBACCOUNT_KEY,
  amount: AMOUNT
)Run your code
Save this file to your machine and run it:
Suspending a subaccount
The Partner liked the ability to control the spending of the subaccount and decided to assign individual balance and €30 credit to the end customer 2 (subaccount2). The Partner, who was monitoring the spending of its subaccounts spending, noticed that subaccount2 consumed €25 of its balance. Alarmed by subaccount2's spending rate, the Partner decided to temporarily suspend subaccount2. The code to suspend a subaccount is shown here:
Write the code
Add the following to suspend-subaccount.sh:
curl -X "PATCH" "https://api.nexmo.com/accounts/$VONAGE_API_KEY/subaccounts/$SUBACCOUNT_KEY" -u $VONAGE_API_KEY:$VONAGE_API_SECRET \
     -H "Content-Type: application/json"  \
-d $'{"suspended":true}'Run your code
Save this file to your machine and run it:
Prerequisites
npm install @vonage/subaccountsCreate a file named suspend-subaccount.js and add the following code:
const { SubAccounts } = require('@vonage/subaccounts');

const subAccountClient = new SubAccounts({
  apiKey: VONAGE_API_KEY,
  apiSecret: VONAGE_API_SECRET,
});Write the code
Add the following to suspend-subaccount.js:
subAccountClient.updateSubAccount(
  SUBACCOUNT_KEY,
  { suspended: true },
)
  .then((subAccount) => console.log(subAccount))
.catch((error) => console.error(error));Run your code
Save this file to your machine and run it:
Prerequisites
Add the following to build.gradle:
implementation 'com.vonage:server-sdk-kotlin:2.1.1'Create a file named SuspendSubaccount and add the following code to the main method:
val client = Vonage {
    apiKey(VONAGE_API_KEY)
    apiSecret(VONAGE_API_SECRET)
}Write the code
Add the following to the main method of the SuspendSubaccount file:
val subaccount = client.subaccounts.subaccount(SUBACCOUNT_KEY).suspended(true)Run your code
We can use the application plugin for Gradle to simplify the running of our application. Update your build.gradle with the following:
apply plugin: 'application'
mainClassName = project.hasProperty('main') ? project.getProperty('main') : ''
Run the following gradle command to execute your application, replacing com.vonage.quickstart.kt.subaccounts with the package containing SuspendSubaccount:
Prerequisites
Add the following to build.gradle:
implementation 'com.vonage:server-sdk:9.3.1'Create a file named DeactivateSubaccount and add the following code to the main method:
VonageClient client = VonageClient.builder()
		.apiKey(VONAGE_API_KEY)
		.apiSecret(VONAGE_API_SECRET)
.build();Write the code
Add the following to the main method of the DeactivateSubaccount file:
Account subaccount = client.getSubaccountsClient().updateSubaccount(
		UpdateSubaccountRequest.builder(SUBACCOUNT_KEY).suspended(true).build()
);Run your code
We can use the application plugin for Gradle to simplify the running of our application. Update your build.gradle with the following:
apply plugin: 'application'
mainClassName = project.hasProperty('main') ? project.getProperty('main') : ''
Run the following gradle command to execute your application, replacing com.vonage.quickstart.subaccounts with the package containing DeactivateSubaccount:
Prerequisites
Install-Package VonageCreate a file named SuspendAccountRequest.cs and add the following code:
using Vonage;
using Vonage.Request;
using Vonage.SubAccounts.UpdateSubAccount;Add the following to SuspendAccountRequest.cs:
var credentials = Credentials.FromApiKeyAndSecret(VONAGE_API_KEY, VONAGE_API_SECRET);
var client = new VonageClient(credentials);Write the code
Add the following to SuspendAccountRequest.cs:
var request = UpdateSubAccountRequest.Build().WithSubAccountKey(SUBACCOUNT_KEY)
    .SuspendAccount()
    .Create();
var response = await client.SubAccountsClient.UpdateSubAccountAsync(request);Prerequisites
composer require vonage/clientCreate a file named suspend-subaccount.php and add the following code:
$basic = new \Vonage\Client\Credentials\Basic(VONAGE_API_KEY, VONAGE_API_SECRET);
$client = new \Vonage\Client($basic);Write the code
Add the following to suspend-subaccount.php:
$account = new \Vonage\Subaccount\SubaccountObjects\Account();
$account->setSuspended(true);

$subaccount = $client->subaccount()->updateSubaccount(VONAGE_API_KEY, SUBACCOUNT_KEY, $account);Run your code
Save this file to your machine and run it:
Prerequisites
pip install vonage python-dotenvWrite the code
Add the following to suspend-subaccount.py:
from vonage import Auth, Vonage
from vonage_subaccounts import ModifySubaccountOptions, Subaccount

client = Vonage(Auth(api_key=VONAGE_API_KEY, api_secret=VONAGE_API_SECRET))

response: Subaccount = client.subaccounts.modify_subaccount(
    subaccount_api_key=SUBACCOUNT_KEY,
    options=ModifySubaccountOptions(suspended=True),
)

print(response)Run your code
Save this file to your machine and run it:
Prerequisites
gem install vonageCreate a file named suspend-subaccount.rb and add the following code:
client = Vonage::Client.new(
  api_key: VONAGE_API_KEY,
  api_secret: VONAGE_API_SECRET
)Write the code
Add the following to suspend-subaccount.rb:
client.subaccounts.update(
  subaccount_key: SUBACCOUNT_KEY,
  suspended: true
)Run your code
Save this file to your machine and run it:
Reactivating a subaccount
After discussions with subaccount2, the Partner decides to reactivate subaccount2's account. This can be achieved using the following code:
Write the code
Add the following to reactivate-subaccount.sh:
curl -X "PATCH" "https://api.nexmo.com/accounts/$VONAGE_API_KEY/subaccounts/$SUBACCOUNT_KEY" -u $VONAGE_API_KEY:$VONAGE_API_SECRET \
     -H "Content-Type: application/json"  \
-d $'{"suspended":false}'Run your code
Save this file to your machine and run it:
Prerequisites
npm install @vonage/subaccountsCreate a file named reactivate-subaccount.js and add the following code:
const { SubAccounts } = require('@vonage/subaccounts');

const subAccountClient = new SubAccounts({
  apiKey: VONAGE_API_KEY,
  apiSecret: VONAGE_API_SECRET,
});Write the code
Add the following to reactivate-subaccount.js:
subAccountClient.updateSubAccount(
  SUBACCOUNT_KEY,
  { suspended: false },
)
  .then((subAccount) => console.log(subAccount))
.catch((error) => console.error(error));Run your code
Save this file to your machine and run it:
Prerequisites
Add the following to build.gradle:
implementation 'com.vonage:server-sdk-kotlin:2.1.1'Create a file named ReactivateSubaccount and add the following code to the main method:
val client = Vonage {
    apiKey(VONAGE_API_KEY)
    apiSecret(VONAGE_API_SECRET)
}Write the code
Add the following to the main method of the ReactivateSubaccount file:
val subaccount = client.subaccounts.subaccount(SUBACCOUNT_KEY).suspended(false)Run your code
We can use the application plugin for Gradle to simplify the running of our application. Update your build.gradle with the following:
apply plugin: 'application'
mainClassName = project.hasProperty('main') ? project.getProperty('main') : ''
Run the following gradle command to execute your application, replacing com.vonage.quickstart.kt.subaccounts with the package containing ReactivateSubaccount:
Prerequisites
Add the following to build.gradle:
implementation 'com.vonage:server-sdk:9.3.1'Create a file named ReactivateSubaccount and add the following code to the main method:
VonageClient client = VonageClient.builder()
		.apiKey(VONAGE_API_KEY)
		.apiSecret(VONAGE_API_SECRET)
.build();Write the code
Add the following to the main method of the ReactivateSubaccount file:
Account subaccount = client.getSubaccountsClient().updateSubaccount(
		UpdateSubaccountRequest.builder(SUBACCOUNT_KEY).suspended(false).build()
);Run your code
We can use the application plugin for Gradle to simplify the running of our application. Update your build.gradle with the following:
apply plugin: 'application'
mainClassName = project.hasProperty('main') ? project.getProperty('main') : ''
Run the following gradle command to execute your application, replacing com.vonage.quickstart.subaccounts with the package containing ReactivateSubaccount:
Prerequisites
Install-Package VonageCreate a file named EnableAccountRequest.cs and add the following code:
using Vonage;
using Vonage.Request;
using Vonage.SubAccounts.UpdateSubAccount;Add the following to EnableAccountRequest.cs:
var credentials = Credentials.FromApiKeyAndSecret(VONAGE_API_KEY, VONAGE_API_SECRET);
var client = new VonageClient(credentials);Write the code
Add the following to EnableAccountRequest.cs:
var request = UpdateSubAccountRequest.Build().WithSubAccountKey(SUBACCOUNT_KEY)
    .EnableAccount()
    .Create();
var response = await client.SubAccountsClient.UpdateSubAccountAsync(request);Prerequisites
composer require vonage/clientCreate a file named reactivate-subaccount.php and add the following code:
$basic = new \Vonage\Client\Credentials\Basic(VONAGE_API_KEY, VONAGE_API_SECRET);
$client = new \Vonage\Client($basic);Write the code
Add the following to reactivate-subaccount.php:
$account = new \Vonage\Subaccount\SubaccountObjects\Account();
$account->setSuspended(false);

$subaccount = $client->subaccount()->updateSubaccount(VONAGE_API_KEY, SUBACCOUNT_KEY, $account);Run your code
Save this file to your machine and run it:
Prerequisites
pip install vonage python-dotenvWrite the code
Add the following to reactivate-subaccount.py:
from vonage import Auth, Vonage
from vonage_subaccounts import ModifySubaccountOptions, Subaccount

client = Vonage(Auth(api_key=VONAGE_API_KEY, api_secret=VONAGE_API_SECRET))

response: Subaccount = client.subaccounts.modify_subaccount(
    subaccount_api_key=SUBACCOUNT_KEY,
    options=ModifySubaccountOptions(suspended=False),
)

print(response)Run your code
Save this file to your machine and run it:
Prerequisites
gem install vonageCreate a file named reactivate-subaccount.rb and add the following code:
client = Vonage::Client.new(
  api_key: VONAGE_API_KEY,
  api_secret: VONAGE_API_SECRET
)Write the code
Add the following to reactivate-subaccount.rb:
client.subaccounts.update(
  subaccount_key: SUBACCOUNT_KEY,
  suspended: false
)Run your code
Save this file to your machine and run it:
Summary
In this topic you have seen how to use the Subaccounts API to manage end customers in typical scenarios.