RCS Agent Builder [BETA]
The Vonage RCS Agent Builder provides a streamlined process for managing RCS (Rich Communication Services) agents. Developers and operations teams can effectively manage campaigns across carriers and regions by centralizing the setup, verification, deployment, and monitoring of RCS agents:
- Centralized Dashboard Management - Create, configure, and monitor agents through a unified platform. Access all management tools in one location for simplified operations.
- Automated Agent Verification - Use the RCS Agent Builder verification process to authenticate your business identity. Verified agents improve message credibility and prevent unauthorized access.
- Direct Carrier Deployment - Deploy agents to selected carriers and countries directly from the management interface. Ensure proper configuration and compliance before launch.
- Detailed Error Handling - The platform provides granular error codes to help identify and resolve issues during setup, verification, or deployment.
- US and International Onboarding Flows - The Agent Builder now provides a differentiated onboarding experience for US agents versus International (INTL) agents, with country/carrier selection surfaced earlier in the wizard.
Note: If you do not see the RCS Agent Builder in your dashboard, or if you experience any issues accessing these features, please contact your Vonage account manager for enablement and onboarding support.
Using the RCS Agent Builder
The RCS agent management process follows a clear sequence, from agent creation through deployment and live monitoring.
To begin, Access the RCS Agent Builder.
Then, Create and Configure an Agent:
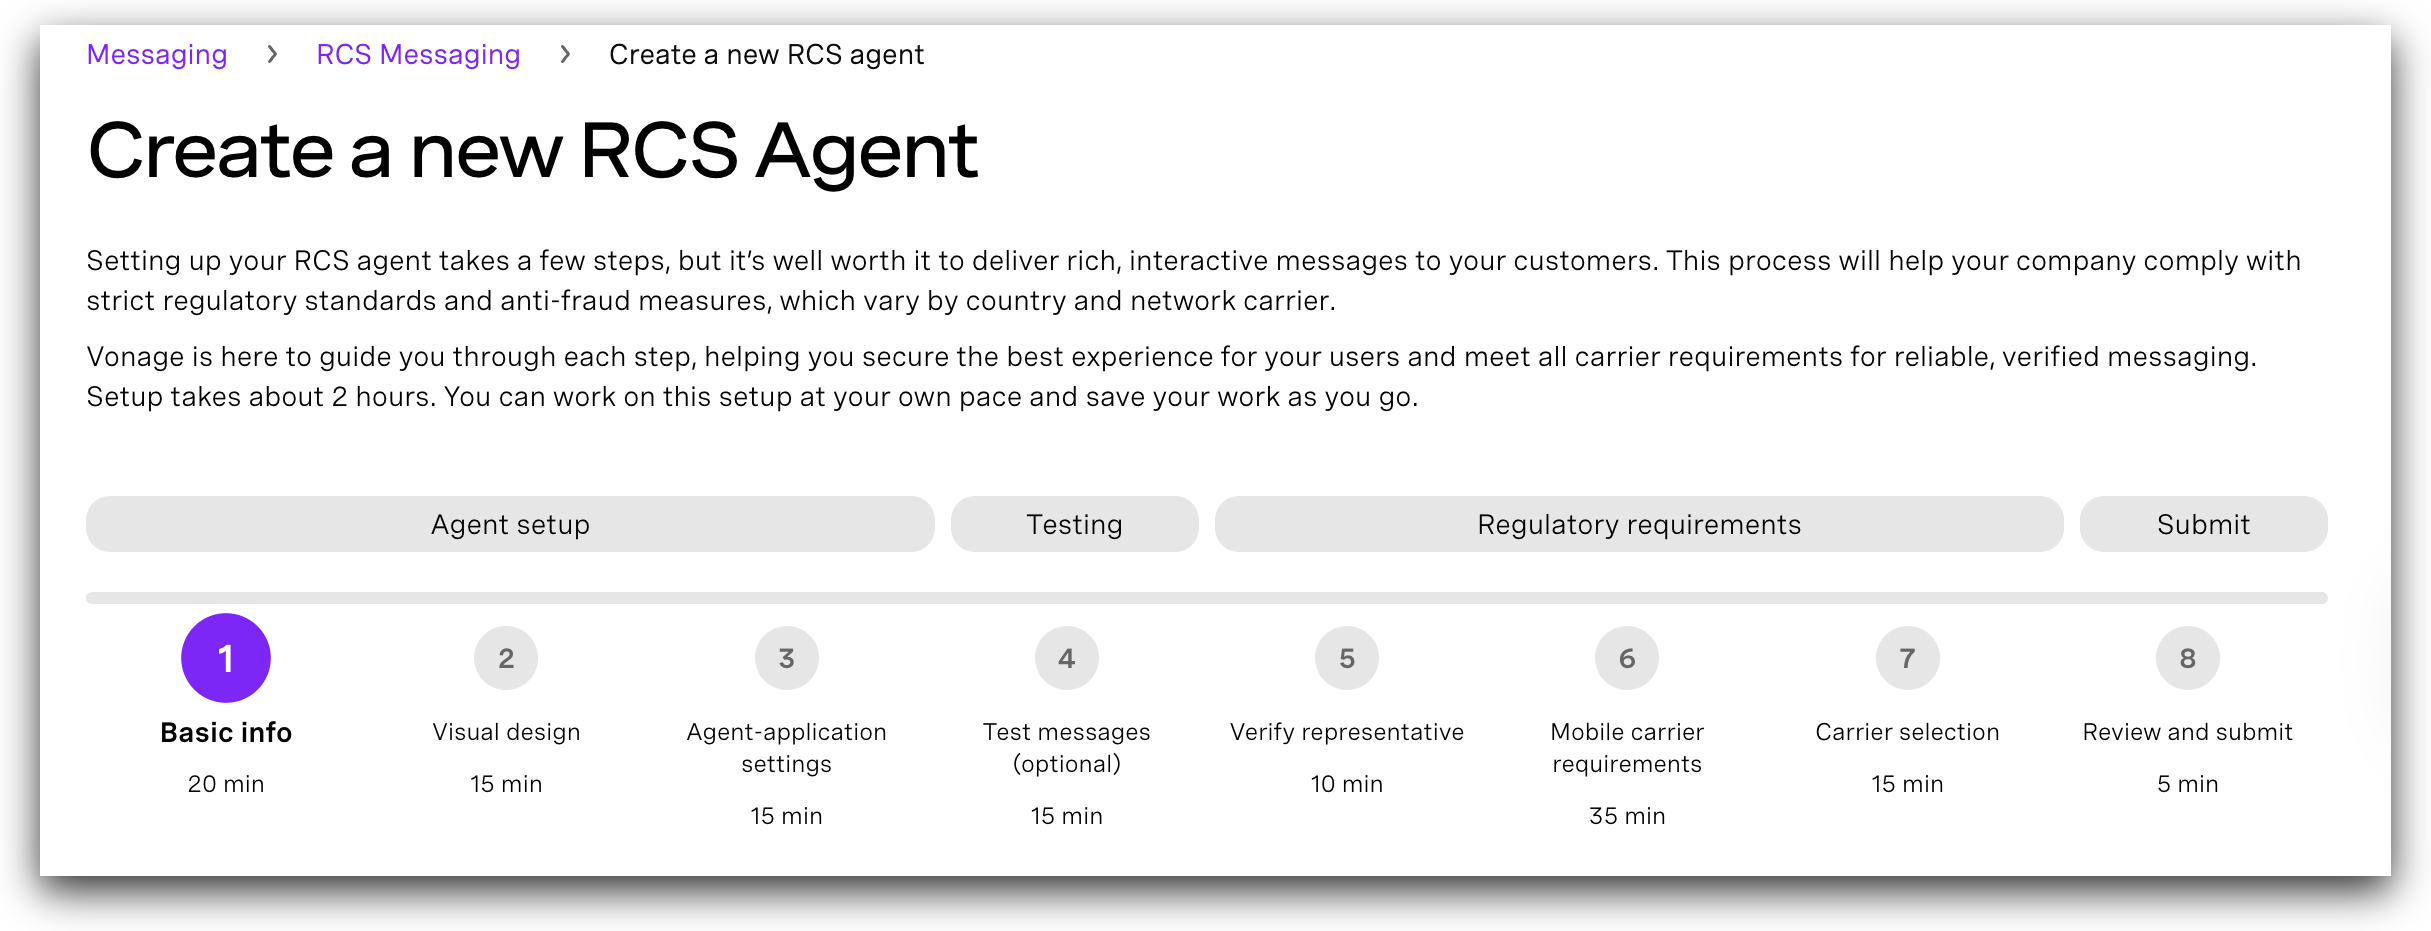
Step 1: Create a new RCS Agent
Step 2: Carrier and Country Selection
Step 3: Define Visual Design
Step 4: Configure Agent-Application Settings
Step 5: Test the Agent
Step 6: Verify the Brand
Step 7: Submit Details for Carrier Requirements
Step 8: Review and Submit the Agent
Access the RCS Agent Builder
You can access the RCS Agent Builder by clicking on the link below:
or by navigating to it from within the Vonage API Dashboard:
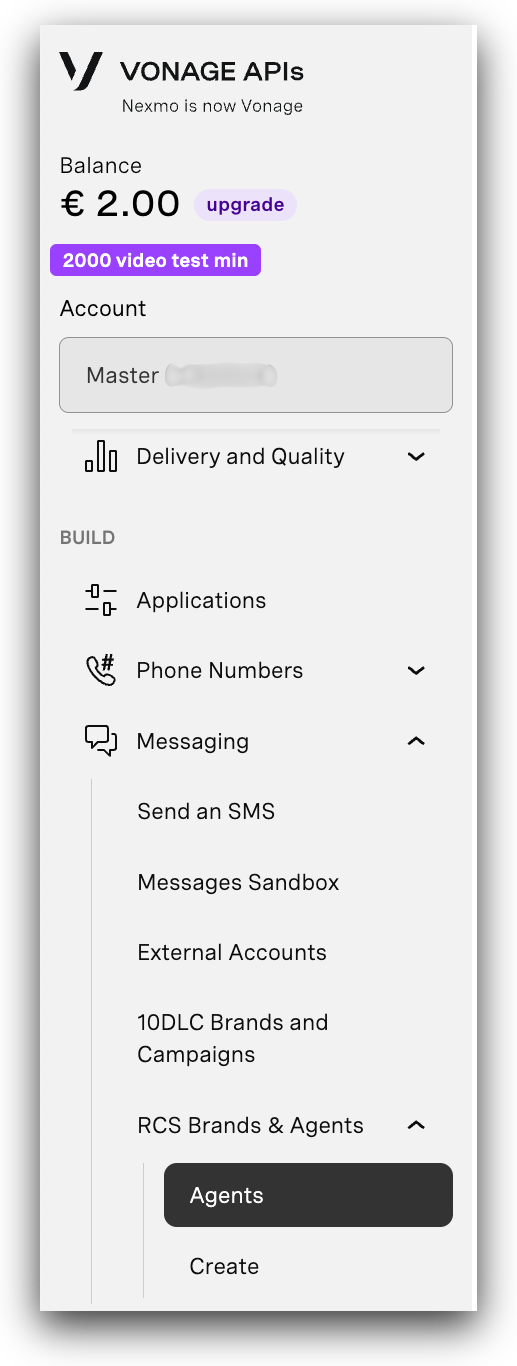
- Log in to the Vonage API Dashboard.
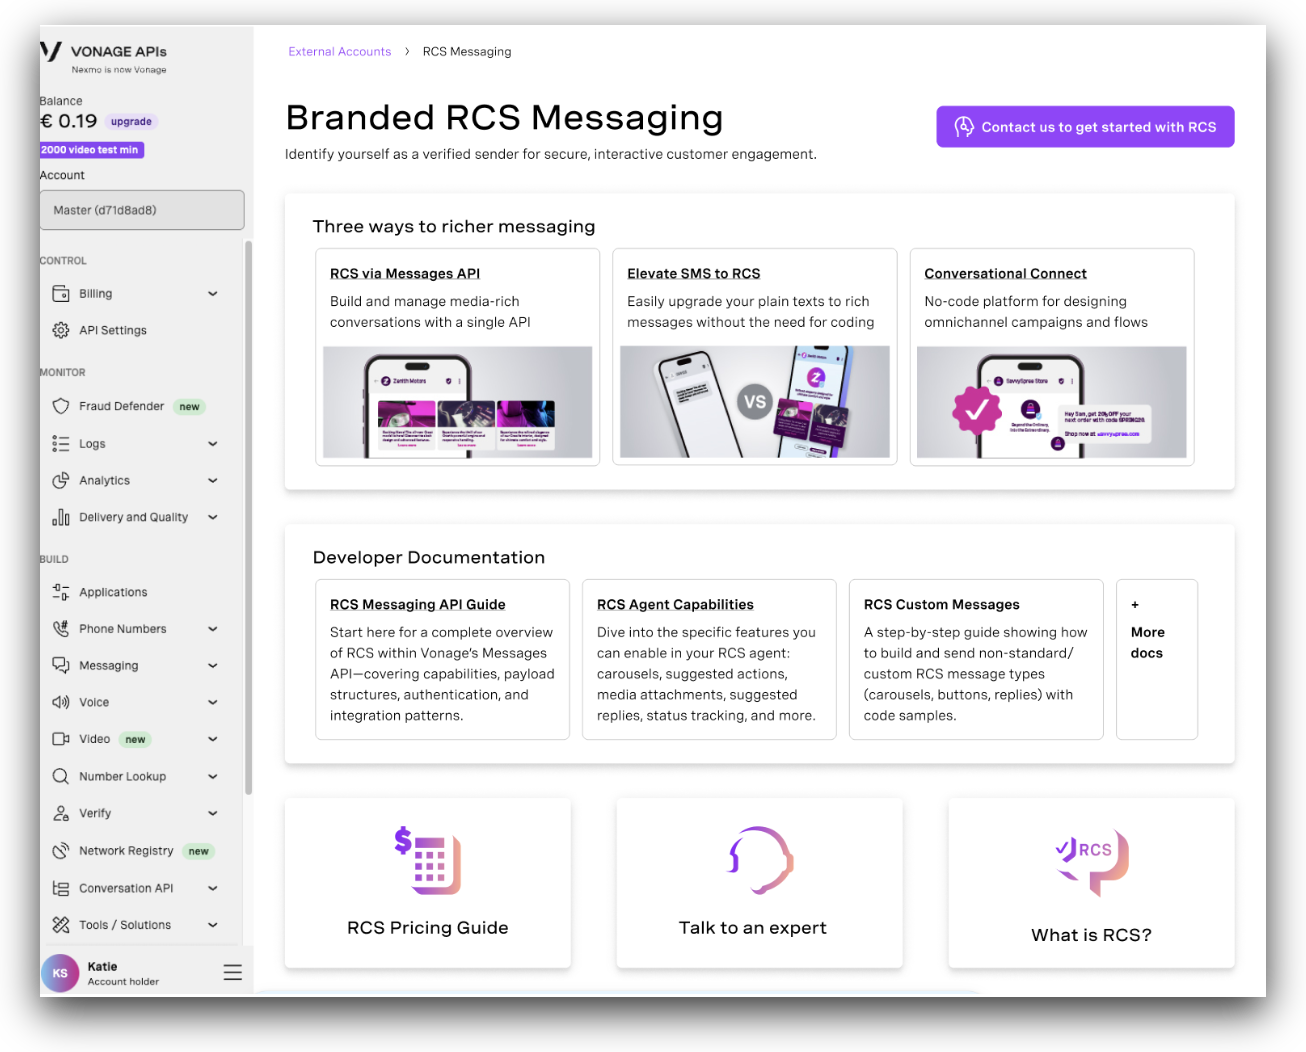
- Go to Messaging > RCS Agent Builder. The RCS Messaging page opens. From the landing page, you can explore RCS features, view pricing, and open the developer documentation.
If RCS is not enabled for your account, you will see a Contact Us button in the top right:
If RCS is enabled for your account, you will see the button to Build a new RCS agent:
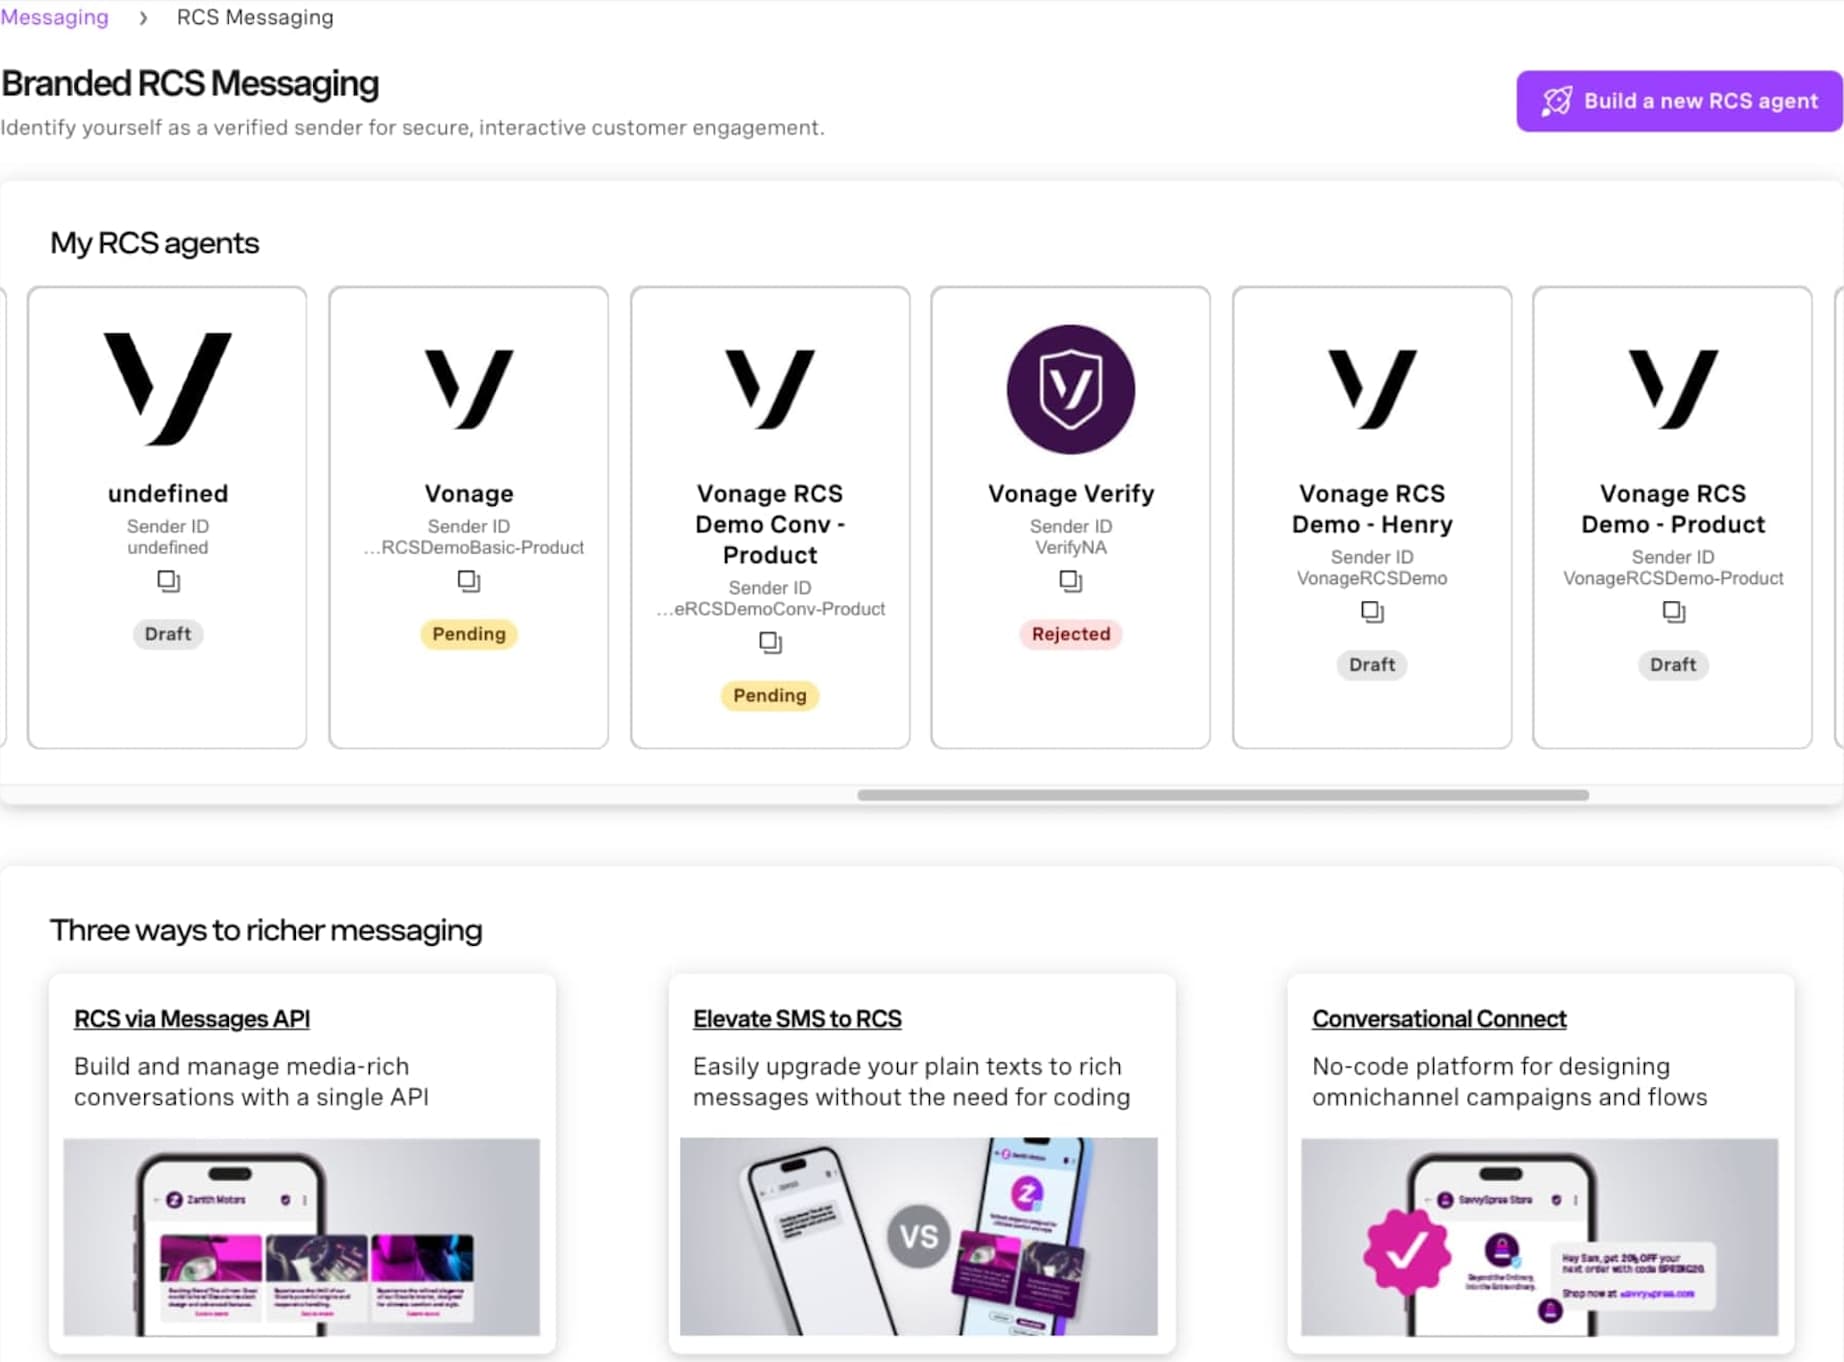
- To start creating a new agent, find and click the Build a new RCS agent button.
Create and Configure an Agent
Set up a new RCS agent through the Vonage API dashboard. This process involves registering the agent, defining its visual identity, and configuring its application settings.
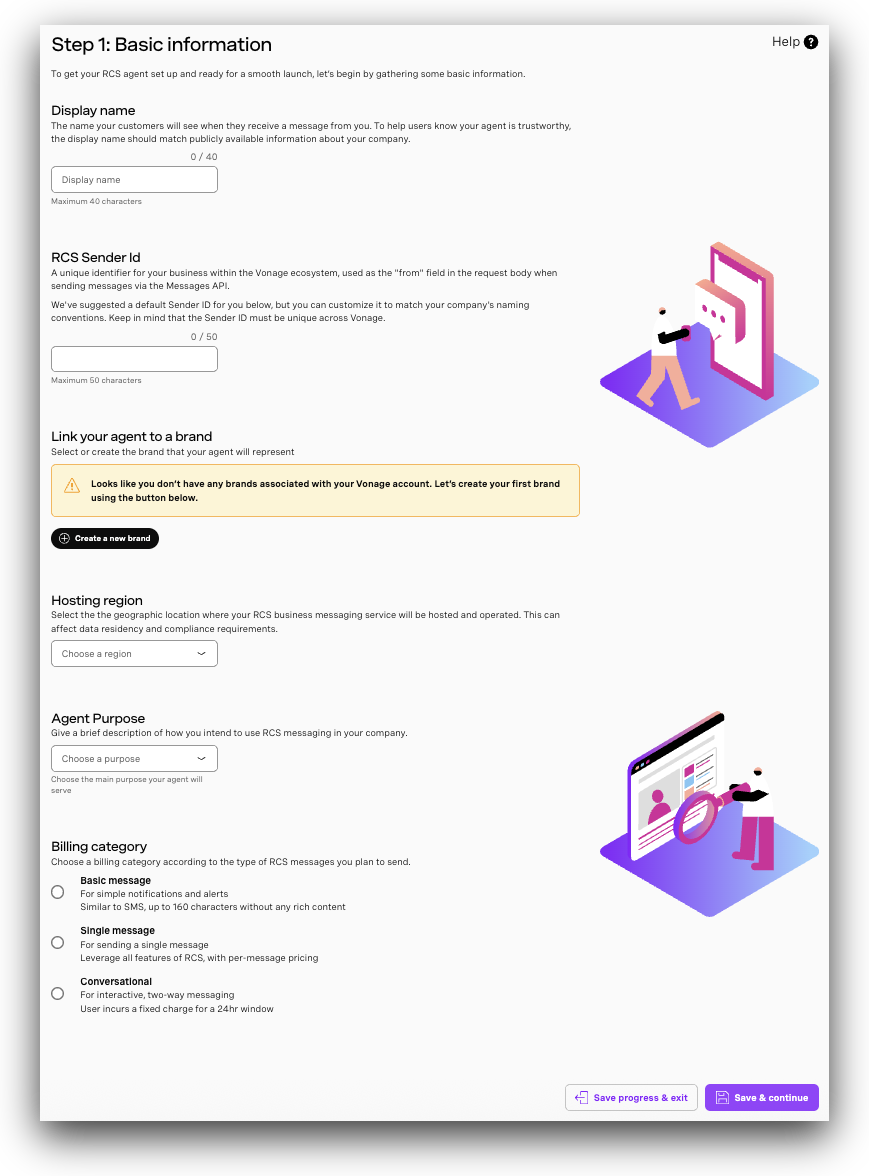
Create a new RCS Agent
- In the Create an RCS Agent form, fill in all of the required fields:
| Field name | Description |
|---|---|
| Agent Display Name | The name of your agent will appear to users in their messaging app. |
| RCS Sender ID (Cannot be changed later) | Unique sender identifier on the Vonage platform. For internal Vonage use only — not visible to end users. Cannot be blank, contain whitespace, or be changed after creation. |
| Brand Details | Your public-facing business name & its details. This can be shared across multiple RCS agents. |
| Vonage Account Manager Email Address | Email address of your Vonage Account Manager. This links the agent to the correct account team. |
| Agent Description | Use Case (Cannot be changed later). Select the nature of the message being sent using the radio buttonoptions: One-Time Password (OTP), Transactional, Promotional, or Multi-Use. Note: OTP cannot be executed by multi-use agents. Choose carefully- this selection affects carrier approval requirements downstream. |
| Hosting Region (Cannot be changed later) | Select the geographic location where your RCS business messaging service will be hosted and operated. This affects data residency and compliance requirements. Available options: North America, Europe, Asia Pacific. |
| Use Case (Cannot be changed later) | Select the nature of the message being sent using the radiobutton options: One-Time Password (OTP), Transactional, Promotional, or Multi-Use. Note: OTP cannot be executed by Multi-Use agents. Choose carefully — this selection affects carrier approval requirements downstream. Note for Brazil: Multi-Use agents are not supported. If your use caserequires multiple message types (e.g., Transactional and Promotional),you must create a separate agent for each use case. |
| Billing Category (Cannot be changed later) | Specifies the pricing model: Non-Conversational (per-message billing for A2P and P2A) or Conversational (session-based billing for two-way messaging). Note for US agents: Conversational billing is not currently applicable. To learn more, refer to the RCS Billing guide. |
| Message Type | Select the types of RCS messages your agent will send (e.g., Rich, Rich Media for US; Basic, Single for INTL). |
Reseller? If you are creating this agent on behalf of another brand or company, you will see a Reseller checkbox at the top of Step 1. If you select Yes, an additional field will appear to capture the Reseller POC Email — the email address of the reseller contact person who will receive all agent status notifications.
US agents only: When the United States is selected as a target country, multi-country selection is disabled. You must create a separate agent for other countries. You cannot test multiple countries on a US agent, but you can test multiple countries on a INTL agent.
Brand Details
A Brand Details modal is now available to capture additional business registration information required for carrier submissions. The following fields are collected:
| Field name | Description |
|---|---|
| Organization Name (Legal Name) | The exact registered business name that matches your tax documents. |
| Legal Form | The legal structure of your business entity (e.g., Corporation, LLC, Partnership). |
| Legal Entity Type | Classification of your business entity for regulatory purposes (e.g., Private Company, Public Company). |
| Country of Registration | The country where your business is legally registered and incorporated. |
| Federal Tax ID | Your 9-digit Federal Tax ID/EIN (e.g., 12-3456789). Required for US agents. |
| Stock Symbol | Trading symbol for publicly traded companies (leave empty for private companies). |
| Address Line 1 / 2 | Street address of your registered business location. |
| City / State / ZIP | City, state/province, and ZIP or postal code for your registered business address. |
- Click Save & continue to proceed to the next step.
Carrier and Country Selection
Country and carrier selection has been moved to Step 2 (earlier in the wizard) so that country -specific requirements are surfaced upfront, reducing rework later in the process.
In the Carrier and Country Selection step, use the dropdown list to select carriers by country.
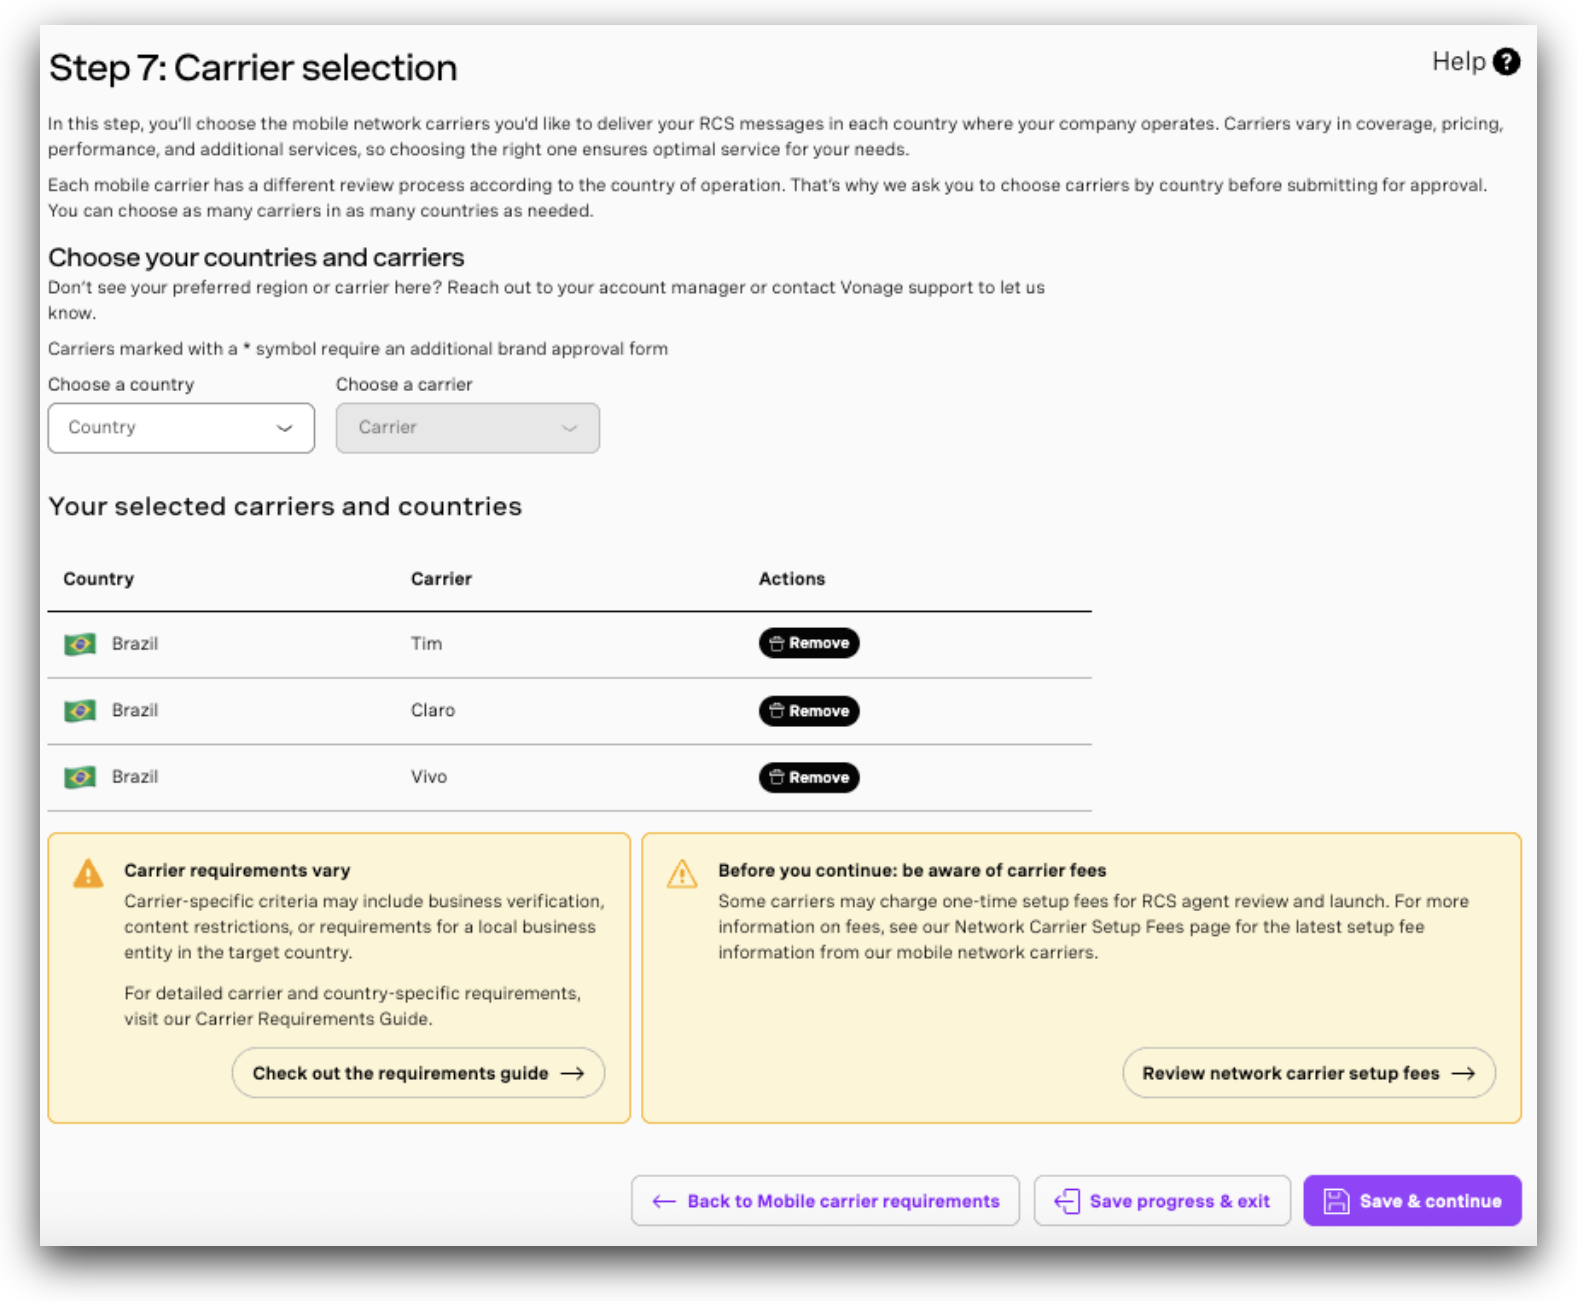
- Add each desired carrier and ensure you cover all regions where you plan to send RCS messages.
- Each country may have specific requirements that will be surfaced in subsequent steps.
- US agents: Only United States carriers (AT&T, T-Mobile, Verizon) are available for selection. Multi-country selection is not supported for US agents.
- INTL agents: Multiple countries and carriers can be selected.
Note for Spain: Carrier approval statuses for Spain may remain in a Pending state on the portal even after approval. Status updates will be received separately via email from rbm-support@vonage.com.
- Click Save & continue to proceed.
Define Visual Design
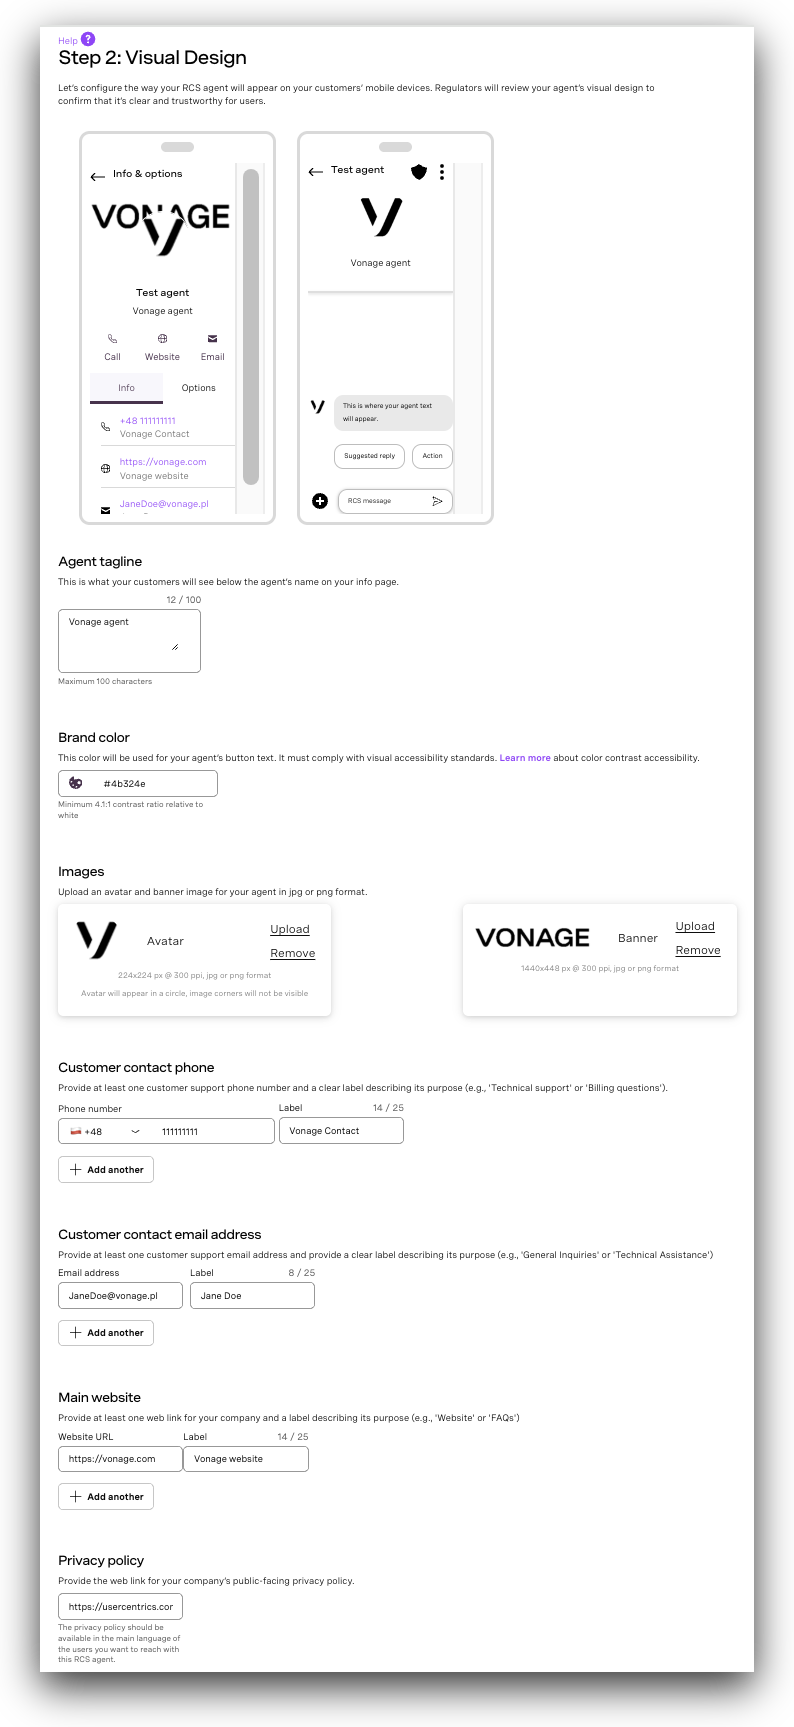
- In the Visual Design section, provide required branding elements:
Display and Visual Identity:
| Field name | Description |
|---|---|
| Agent Tagline | A brief, brand-aligned phrase that summarizes the agent's purpose or value (100 character limit). For US agents: this must not be a slogan — it should capture directions for customers (e.g., "Get instant support and updates from Vonage."). |
| Brand Color | The primary color used in UI elements (hex format, e.g., #000000) that meets WCAG 2.1 contrast ratio of 4.5:1 for legibility. |
| Banner Image | The image shown at the top of the sender's profile. JPEG/JPG or PNG, 1440×448 px, max size: 200 kB. Note: the banner image is only visible to Android users. |
| Logo Image | Sender's avatar image. JPEG/JPG or PNG, 224×224 px, max size: 50 kB. |
Contact Details:
| Field name | Description |
|---|---|
| Support Phone | End-user contact number in E.164 format (e.g., +1234567890). This is for end-user customer care — not the internal requester. For US agents: must be a US phone number. For Germany and UK, this field may be left blank if your company does not have a customer service phone line. |
| Phone Label | Label to describe the phone number (e.g., "Customer Care", "Support"). |
| Support Email | Official contact email for end-user customer care in standard format (e.g., support@brand.com). This is not for the internal requester. |
| Email Label | Display label for the email (e.g., "Helpdesk", "Reach Us"). |
| Website URL | Brand's public website (starts with https://). |
| Website Label | Label to show alongside the website link (e.g., "Visit Us"). |
Legal Information:
| Field name | Description |
|---|---|
| Privacy Policy URL | Publicly accessible link to the brand's privacy policy. Must begin with https:// and be in English, on the same domain as the business website. |
| Terms of Service URL | Public URL linking to the terms & conditions. Must begin with https:// and be in English, on the same domain as the business website. |
- Preview how the agent will appear in the messaging interface.
- Click Save & continue to move forward.
Configure Agent-Application Settings
In this section, configure the necessary connections so that your agent can send and receive updates, trigger events, and interact with other applications.
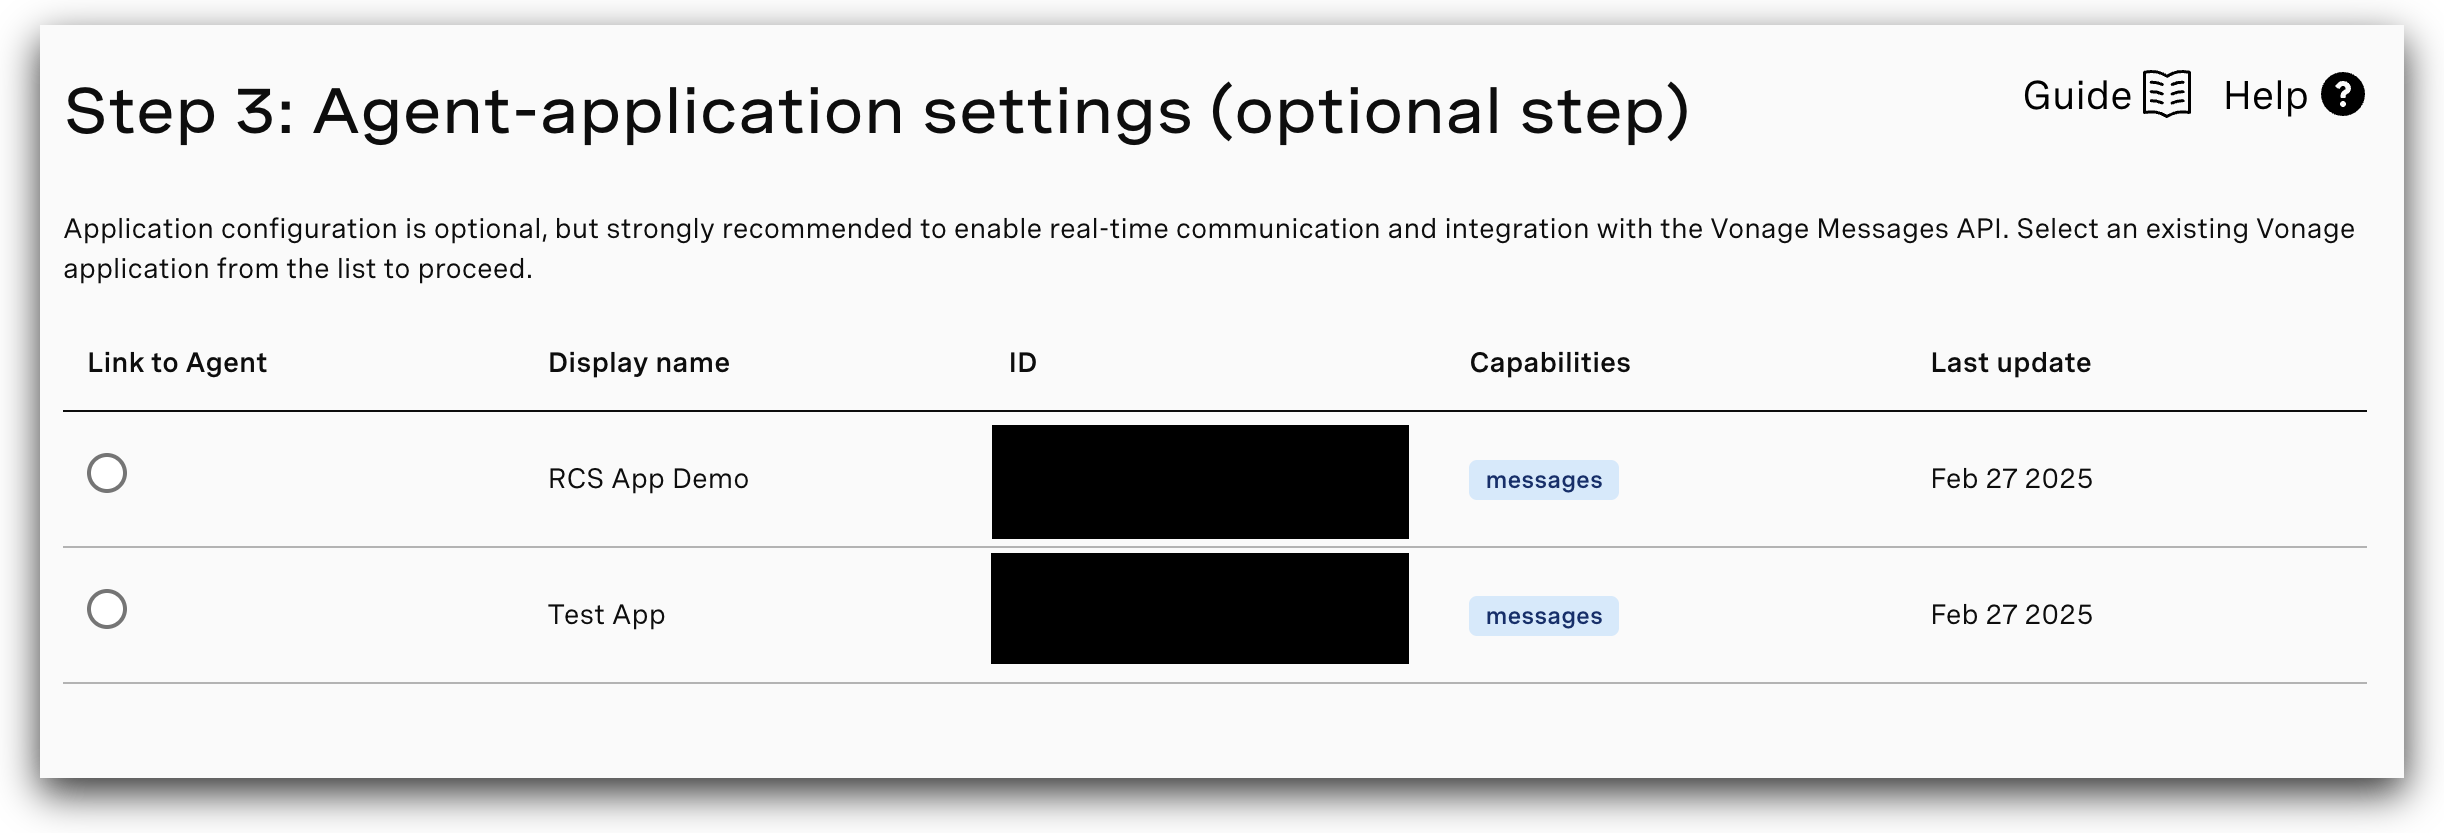
- Do one of the following:
- Select an existing application from the list.
- Click Create a new application to register a new one.
- Once the configuration is complete, click Save & continue.
Test the Agent
After configuring your agent, proceed with tests to ensure the agent is ready for deployment.
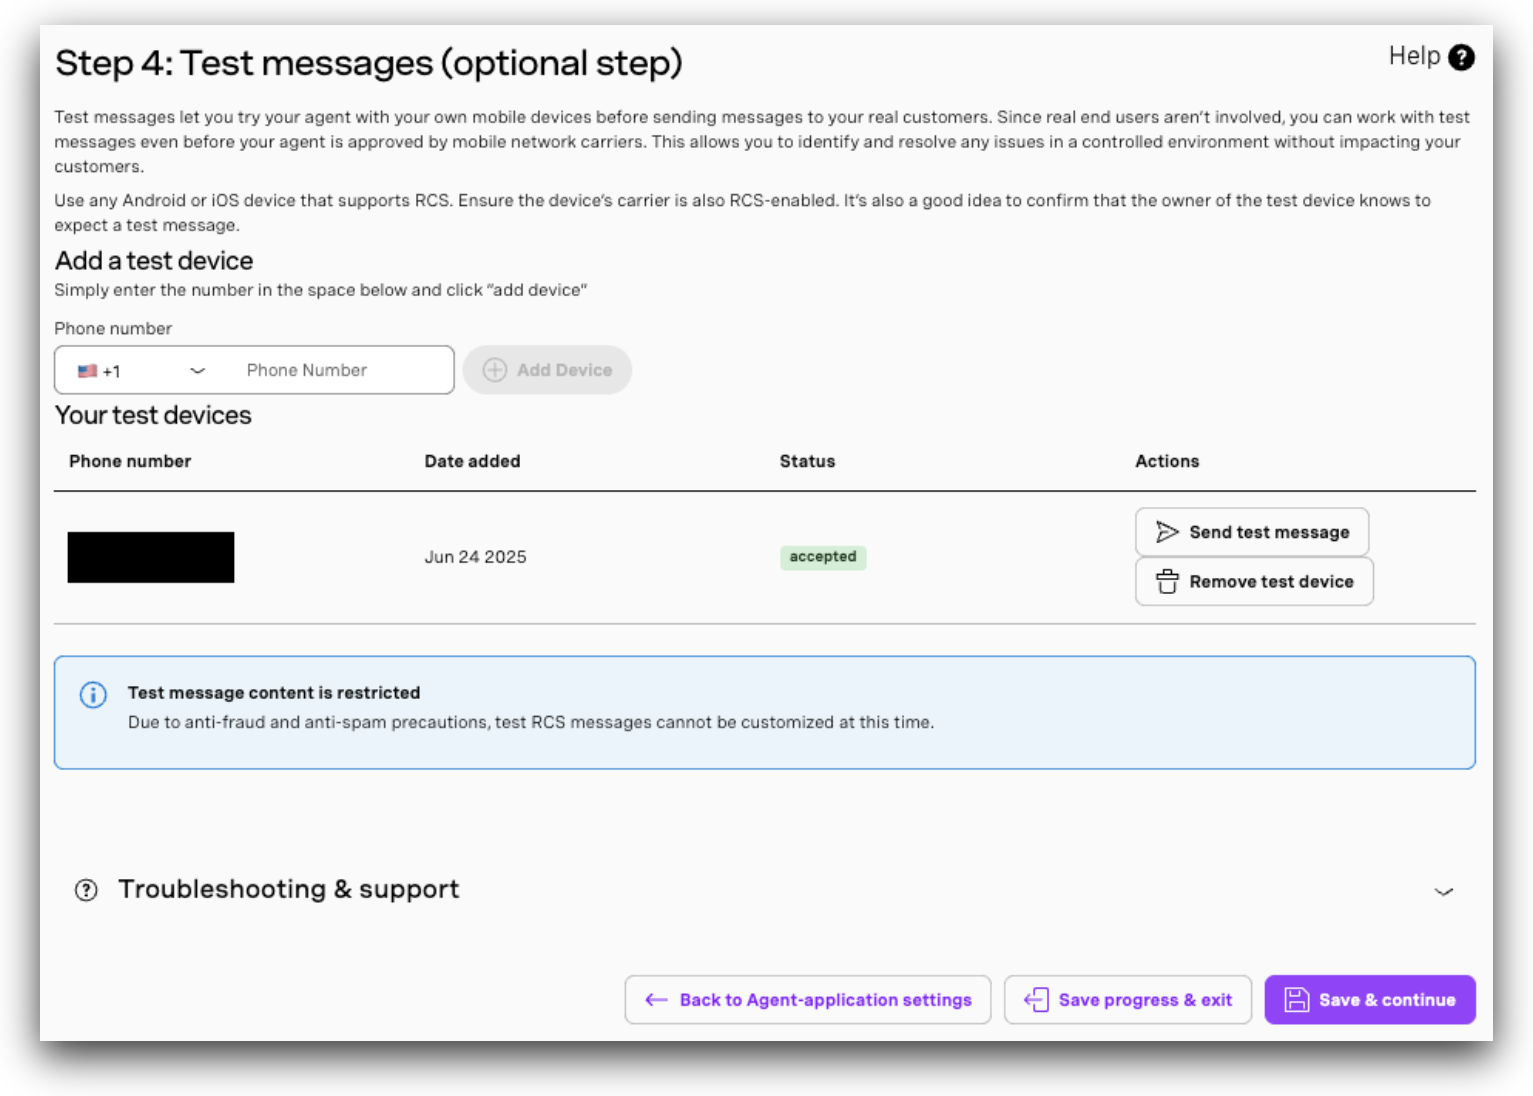
Add Test Devices
Before you add your test device, you must ensure it is configured for RCS testing:
- To check if RCS is supported for your device, see RCS Supported Devices.
- Activate RCS chat features: Ensure RCS is enabled on your test device beforeproceeding:
- Android: Open the Messages app, go to Settings and confirm that Chat features (RCS) are turned on and connected.
- iPhone (iOS 18+): Go to Settings > Messages > RCS Messaging and toggle the setting to activate RCS features. Note that RCS on iPhone is only available through specific carriers.
See How can I check if RCS is active on my device? for more detailed instructions.
Once your device is configured, you can add it as a test device to validate your agent setup in a controlled environment:
- In the Test Messages step, enter one or more phone numbers (in E.164 format) that are associated with test devices.
Note: Only allow-listed test devices can receive RCS test traffic during this phase. A maximum of 50 test devices can be added per agent. For US-based RCS agents, testing can begin only after the agent has been successfully registered and approved by the participating carriers. Your Account Manager will notify you once the agent is ready for testing.
- Respond to RBM tester prompt (Google RBM providers only): You may receive a Google RBM tester invitation via SMS once the number is allowlisted. If prompted, click or tap "Make me a tester" and wait for confirmation before proceeding to the next step.
- Click Send test message to send test messages and verify functionality prior to launch.
Note: After you add the test device, you can send RCS messages from the portal or through the Messages API.
- Once you've added the necessary test devices, click Save & continue to proceed with the verification process.
Verify the Brand
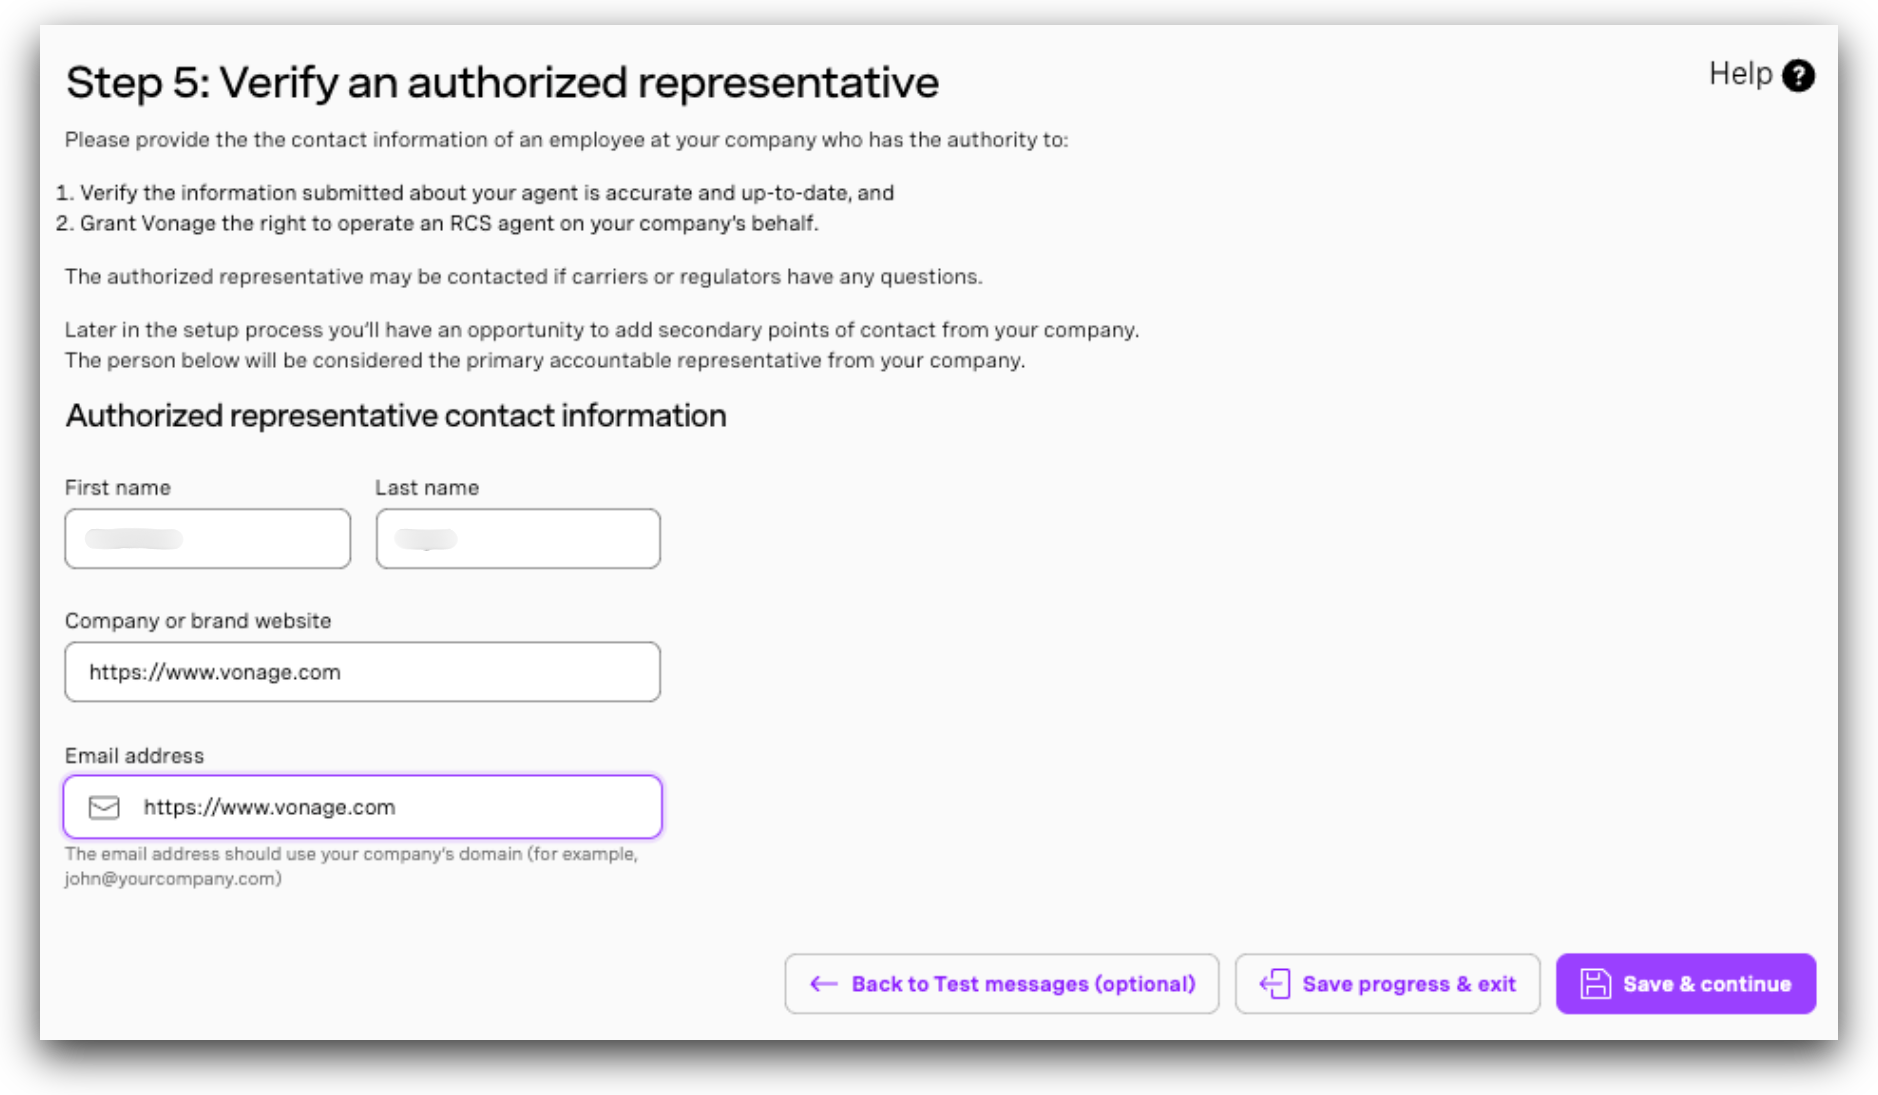
Agent verification is required to confirm your business identity and permit Vonage to operate on your behalf. Once verified, the agent gains access to RBM messaging features and trusted sender status. You must supply contact information for a verified employee at the brand who can attest to your authority and the accuracy of the submitted agent information.
Brand verification must be completed before submitting your agent for its initial launch on any carrier. Verification is only required once per agent, regardless of how many carriers the agent is launched on or whether those launches are managed by Google or directly by carriers. Once approved, your agent appears and functions for RBM-enabled users on the approved networks.
In the form shown below:
- Provide contact information for an authorized representative who can confirm your organization’s identity. This individual must have the authority to verify agent details and approve Vonage's role as the RCS service provider. Fill in the representative's full name, company email address, phone number, and title.
- Click Verify email address, save & continue to initiate verification and save.
Note: After submitting, you will receive an email from Google asking the authorized representative to confirm the agent's details. Monitor your inbox for this email - including your spam folder. Vonage recommends copying your Vonage account contact in your reply to ensure they remain informed. For a full overview of what to expect during the US launch process, see US RCS Registration and Launch Process: Steps and What to Expect.
Understanding Brand Verification
| Question | Answer |
|---|---|
| What is it? | Brand verification is the process where a verified representative of the brand confirms the agent's registration details and authorizes you to manage the agent as a messaging partner. This step is required before launching the agent. |
| What details are needed? | Contact information for a verified brand employee who can confirm your authority and the accuracy of the submitted agent details. |
| When should it be submitted? | Before submitting the agent for its first launch on any carrier. |
| Is verification required for every carrier launch? | No. Verification is only needed once per agent, regardless of the number of carrier launches or whether the launch is managed by Google or directly by carriers. |
| How often will the brand be contacted? | Google-managed launches: The brand is contacted only during the first launch. Once verified, the agent stays approved for all future Google-managed launches. Carrier-managed launches: Carriers may contact the brand individually as part of their own approval process. |
Submit Details for Carrier Requirements
Carrier approval is required before your agent can launch in production environments.
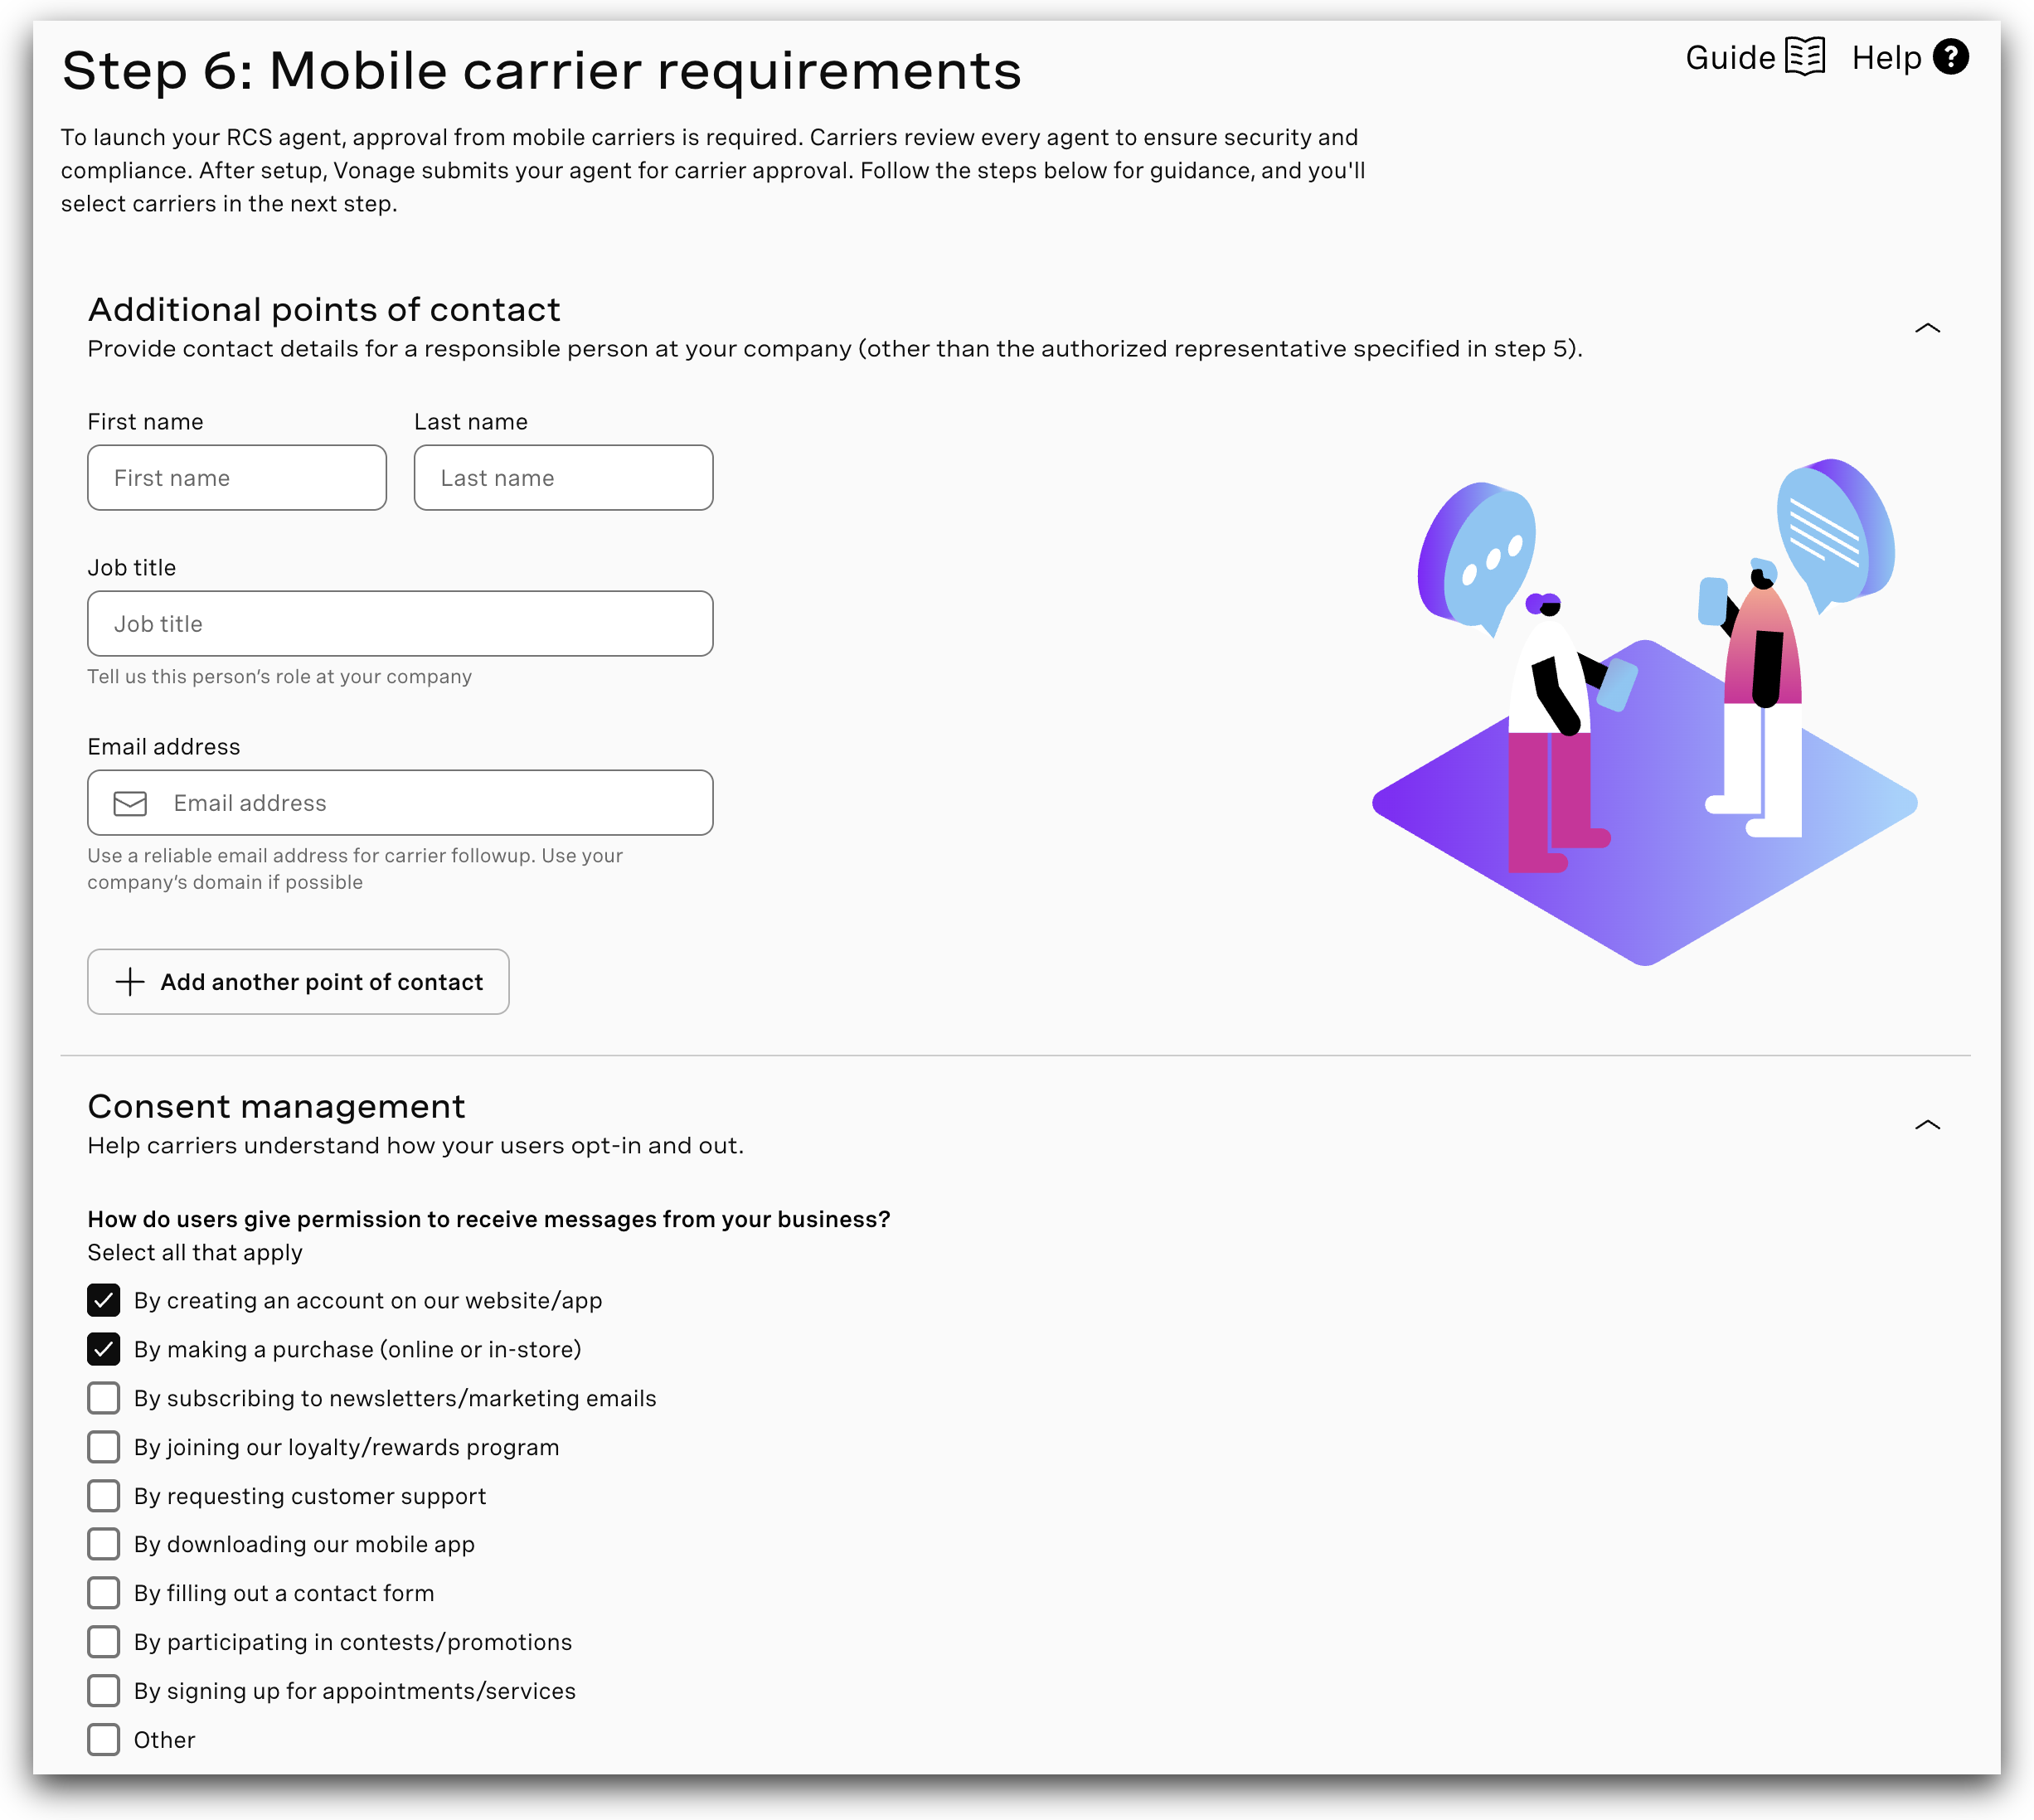
- In the Mobile carrier requirements step, provide all necessary details.
- Ensure the information aligns with the business profile associated with the agent.
- Click Save & continue to final step.
Additional Points of Contact
Include the full name, job title, and email address of the brand’s main point of contact for agent onboarding.
Consent Management
The Consent Management section ensures that all messaging sent through your RCS agent complies with industry regulations, Google RBM policies, and customer privacy expectations.
Opt-In Details
| Question | What to provide |
|---|---|
| How do users provide permission to receive messages? | Select all applicable opt-in methods (e.g., account creation, purchase, marketing email subscription, in-agent via QR code or button). |
| Where do users encounter the opt-in process? | Indicate all locations (website, mobile app, physical store, in-agent). |
| Links to consent pages (if applicable) | Provide relevant URLs where consent is collected digitally. |
| What exact text do users see when opting in? | Paste the precise opt-in notice shown to the user, including message types, frequency, opt-out instructions, and links to Terms of Service and Privacy Policy. |
Opt-Out Details
| Question | What to provide |
|---|---|
| How can users opt out? | Select all supported opt-out methods (e.g., replying "STOP", unsubscribe buttons, customer support, app settings). |
| Do you honor opt-outs immediately? | Specify how quickly your system processes an opt-out request. |
| What message does your agent send when a user opts out? | Choose a default message or provide a custom response confirming the opt-out. |
Engagement Flows
The Engagement Flows section defines when your RCS agent initiates communication with users and how users interact with your messages. Providing this information ensures transparency, supports Google RBM approval requirements, and helps confirm that your messaging behavior is consistent, predictable, and aligned with user expectations.
This section is divided into two parts: Trigger Description and Interaction Description.
Trigger Description
| Question | What to provide |
|---|---|
| What triggers your business to send the first message to users? | Select all relevant triggers (purchase completion, account creation, delivery updates, appointment reminders, authentication requests, promotional campaigns, etc.). |
| How often do you send messages per user per month? | Choose an estimated monthly volume range (e.g., 1–2, 3–5, 6–10 messages). |
Interaction Description
Select all supported interaction types (simple replies, buttons/quick actions, authentication, order management, appointment management, payments, customer support, product browsing, surveys, location sharing, file sharing, etc.).
US-Specific Fields - shown only when United States is selected
The following additional fields are required for US carrier submissions and are dynamically displayed when the United States is selected as a target country:
| Field name | Description |
|---|---|
| Program Summary | A 1–2 paragraph summary covering: who you are and what your business does; the content types that will be sent; where the call-to-action will be located; and how new participants opt into the RBM program. Add this at the end of Step 7 after completing all other fields. |
| CTA Language | The exact Call to Action language that will prompt consumers to enroll in this program (e.g., "Text YES to receive messages from [Brand]. Message and data rates may apply. Reply STOP to opt out."). |
| Help Interaction | The message your agent sends when a user sends the HELP keyword (e.g., "For help, visit [URL] or contact [email]. Reply STOP to unsubscribe."). |
| Sample Alerts / Content Interactions | Provide 3–10 standalone message templates categorized by use case (e.g., Order Confirmation, Shipping Update, Account Alert). Include actual message text exactly as it will be sent. Must align with the use case and triggers described earlier. |
| Organic Website Traffic | Monthly organic website traffic (visitor count). Required for T-Mobile beta program evaluation. |
| RBM Traffic Forecast (Monthly) | Estimated monthly RCS message volume you expect to send. |
| Existing Short Code Traffic (T-Mobile beta only) | Indicate whether you currently have an active SMS short code with existing traffic. |
| Short Code Number / Monthly Traffic (T-Mobile beta only) | Your existing SMS short code number and monthly message volume (if applicable). |
Agent Access & Demo
The Agent Access section describes how end users discover your RCS agent and initiate conversations. This information is essential for Google RBM and carrier partners to validate accessibility, confirm onboarding flows, and ensure users can easily start and manage interactions with your business. Accurate details help reviewers understand your entry points and verify that your access methods are both compliant and user-friendly.
This section covers how users reach your agent, the instructions provided to them, and the mandatory demonstration media required for approval.
Agent Access Methods
Select all relevant access points through which users can enter your RCS experience:
- Business-initiated messages (pre-selected)
- QR code scanning
- Short code texting
- Website integration
- Mobile app integration
- Social media links
- Email campaign links
- Google Business Profile
- Customer service referrals
- Other (custom access method)
Instructions Provided to Users
Provide any guidance shown to users to help them start a conversation (e.g., "Scan this QR code to chat with us on RCS.", "Tap the 'Message Us' button on our website.").
Demonstration Media
| Media type | Requirements |
|---|---|
| Video URL (Required) | A 2–3 minute demonstration video showing: how a user accesses your agent; a working sample flow; the opt-out mechanism functioning correctly (e.g., replying STOP and receiving confirmation). Supported formats: MP4, WebM, MOV. Max 200 MB per file. At least 1 video required. |
| Screenshots (Optional but Recommended) | Upload screenshots demonstrating key interactions: opt-in flow with START message, welcome confirmation, sample RCS messages, HELP keyword response, STOP/opt-out confirmation. Images must be clear and readable. |
Note: For US carriers, Vibes will generate a QR code for carrier reviewers to use during the approval process.
Click Save and continue to the final step.
Review and Submit the Agent
Before submitting your RCS agent for provisioning, review all the details to ensure accuracy and completeness.
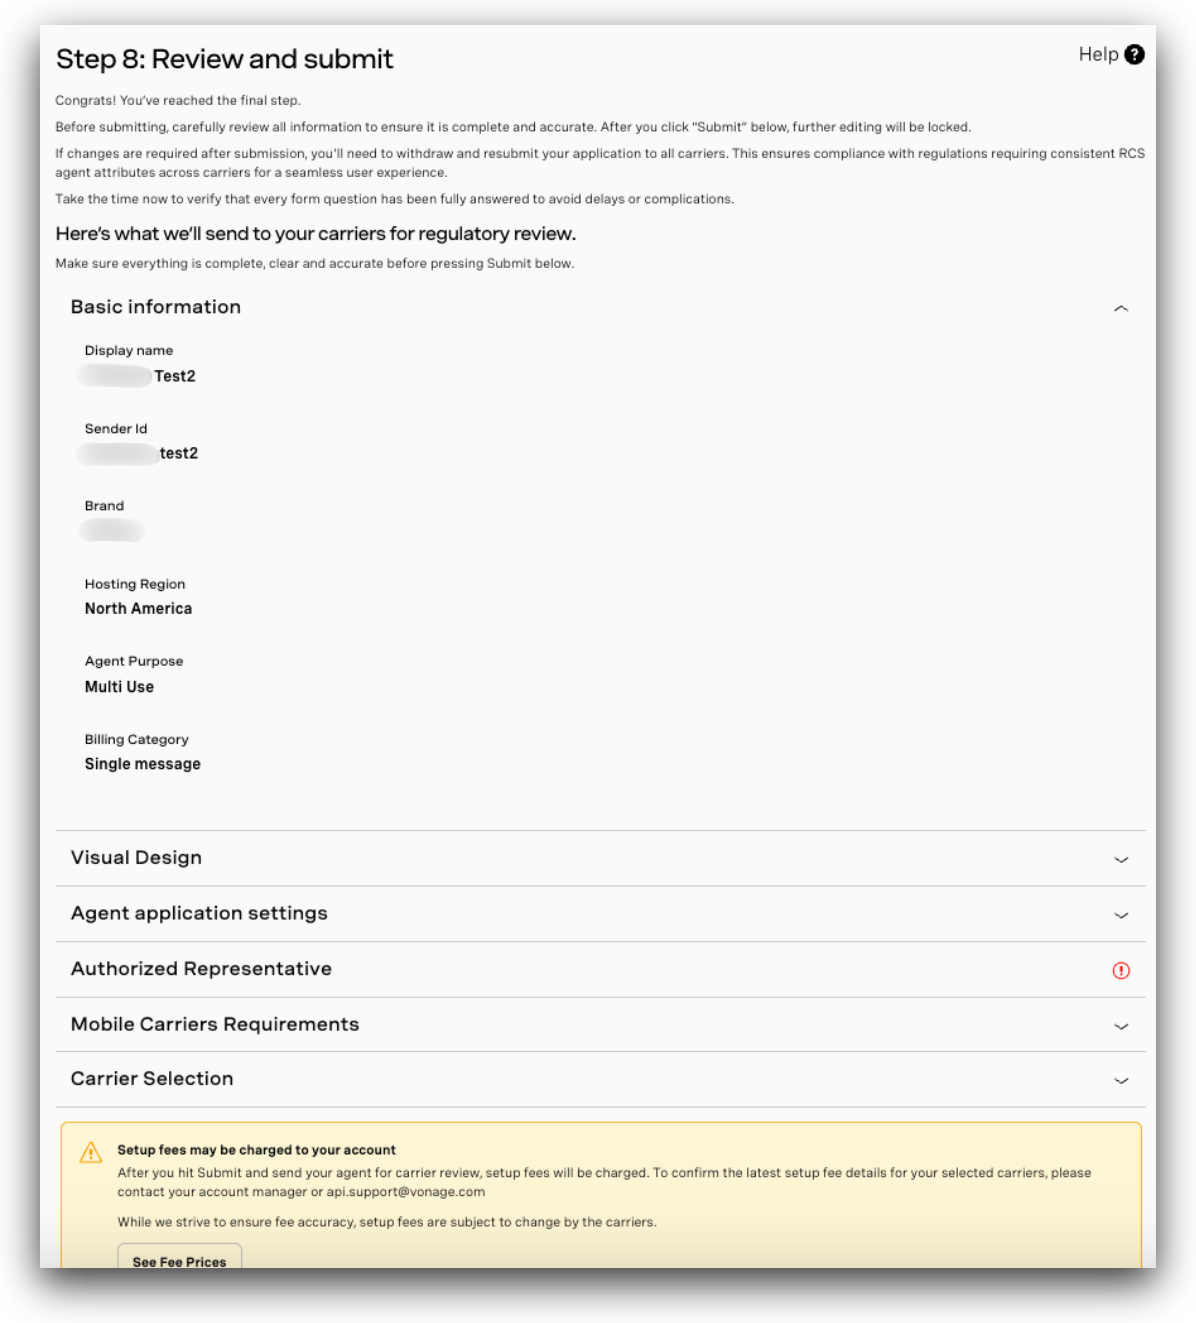
- Carefully check all configuration, business, and carrier details.
Important: Once submitted, you will not be able to modify any information via the portal. If changes are needed after submission, contact rbm-support@vonage.com.
- You must acknowledge your understanding of applicable setup fees before submission.
- After reviewing and accepting the terms, click Confirm & submit to send the agent configuration for final processing.
Manage and Monitor Agents
After submission, you can continue managing your RCS agents through the My agents section of the Vonage API dashboard.
- Navigate to My Agents to view the status of submitted agents, monitor progress, and access configuration details.
- Use the dashboard to track verification, carrier approval, and launch status.
- The Agent Name and Sender ID are displayed in the page header throughout the wizard to help you identify which agent you are working on — particularly useful when managing multiple agents simultaneously.
Agent Editing Rules:
-
If the agent has not been submitted to carriers: You can update agent details directly from the portal — except for key attributes such as billing category, hosting region, use case, RCS Sender ID, or other critical configuration fields.
-
If the agent has already been submitted to carriers: You cannot edit the agent via the portal. Contact rbm-support@vonage.com to request modifications. This process involves: (1) unlaunching the agent from the carrier(s), (2) applying the requested changes, and (3) re-submitting the agent for carrier launch approval.
Note: Editing an agent will require re-submission of the carrier approval form for all selected carriers. Ensure that all updates are reviewed carefully before saving. Changes to banner, logo, or verified display features post-launch require unlaunching the agent from all carriers and restarting the entire approval process.
Agent Status Details:
Once submitted to carriers, the agent will appear in a Pending state. Based on the carrier review, the status may change to Launched or Rejected.
Important: If any additional information is required to proceed with your agent launch, Vonage will contact you via rbm-support@vonage.com. Please ensure this email is allow-listed to avoid missing important updates.
Legacy RCS Agents: Legacy RCS agents created via APIs have been synced to the dashboard for visibility. They appear in read-only (non-editable) mode with limited details displayed.