Fraud Defender Onboarding
A step by step guide to set up Fraud Defender protections.
Follow the steps on this guide to assure your account is properly set up to limit your exposure to fraudulent activity.
Please note: If you manage several API keys, you'll need to set Fraud Defender up for each of them.
1. Review & Manage Fraud Notifications Recipients
Make sure you will receive Fraud Defender notifications and manage additional recipients (additional recipients can only be managed by the account owner / primary user).
-
Log in to your Vonage account.
-
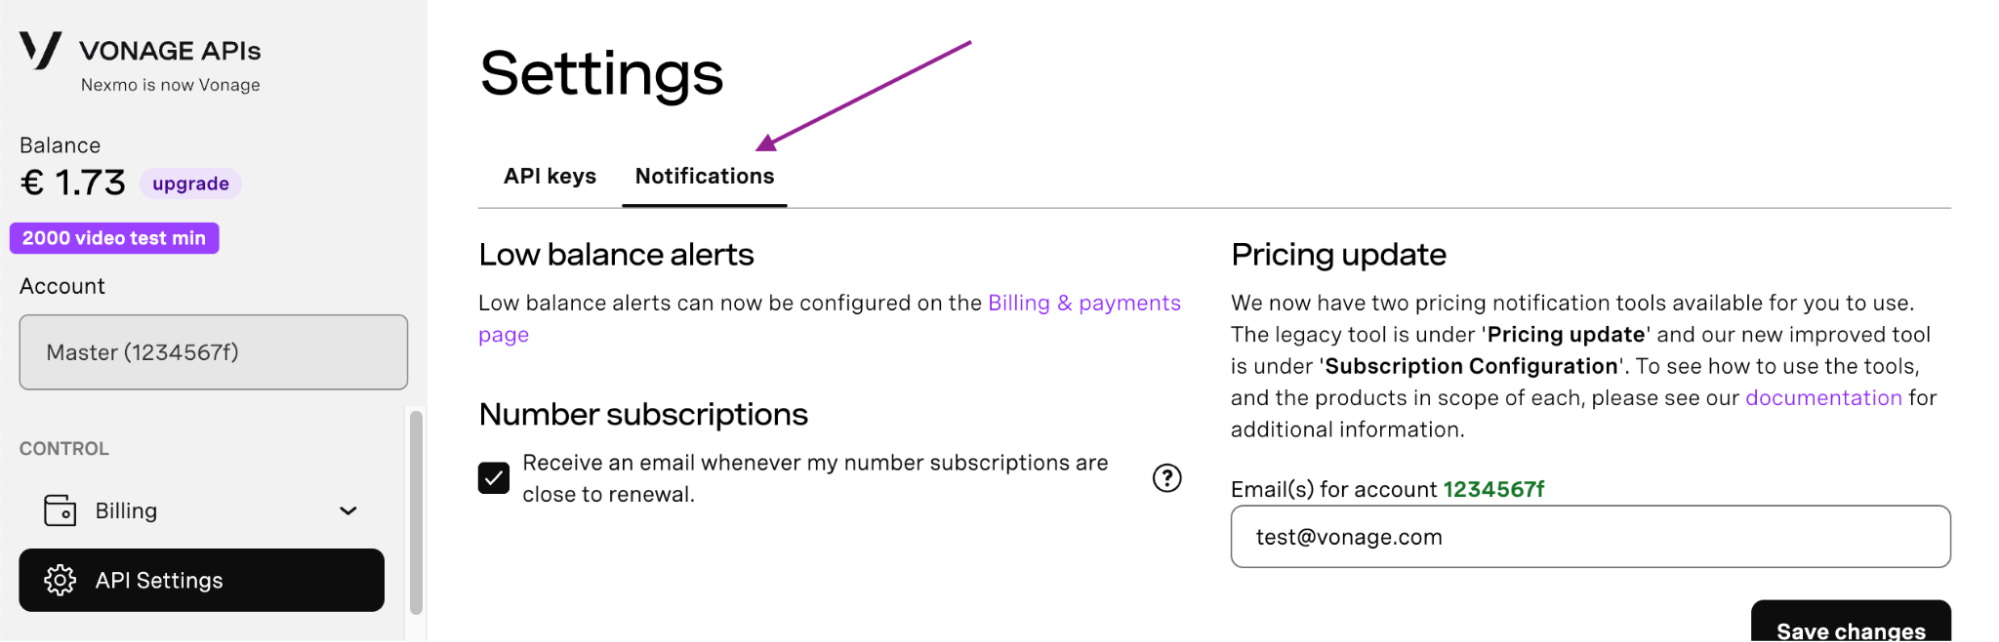
Go to API Settings.
-
Click on the Notifications tab.
Only the account's primary user (i.e. user/email address who created the account) is able to see the Notifications tab.
-
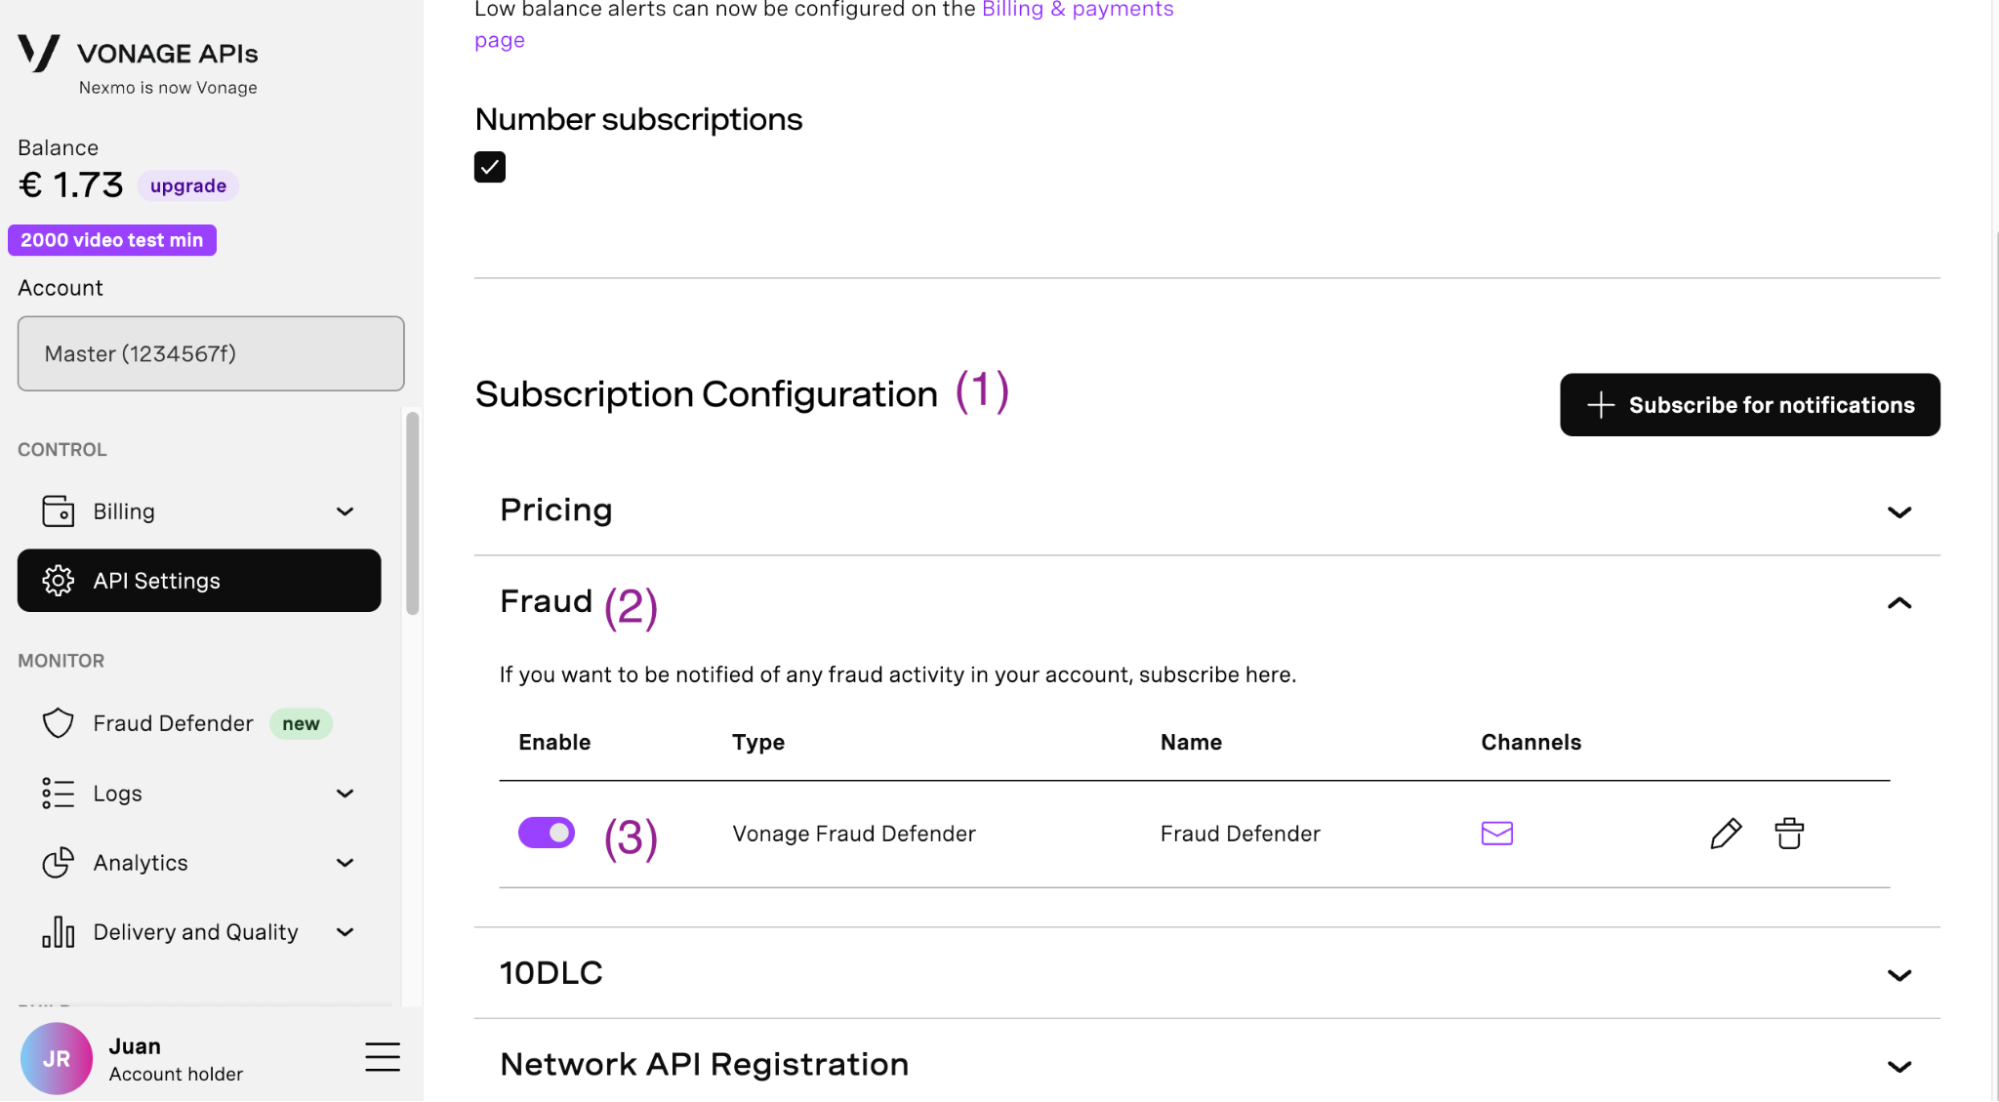
Scroll to Subscription Configuration, unfold the Fraud section, and ensure the flag is enabled.
-
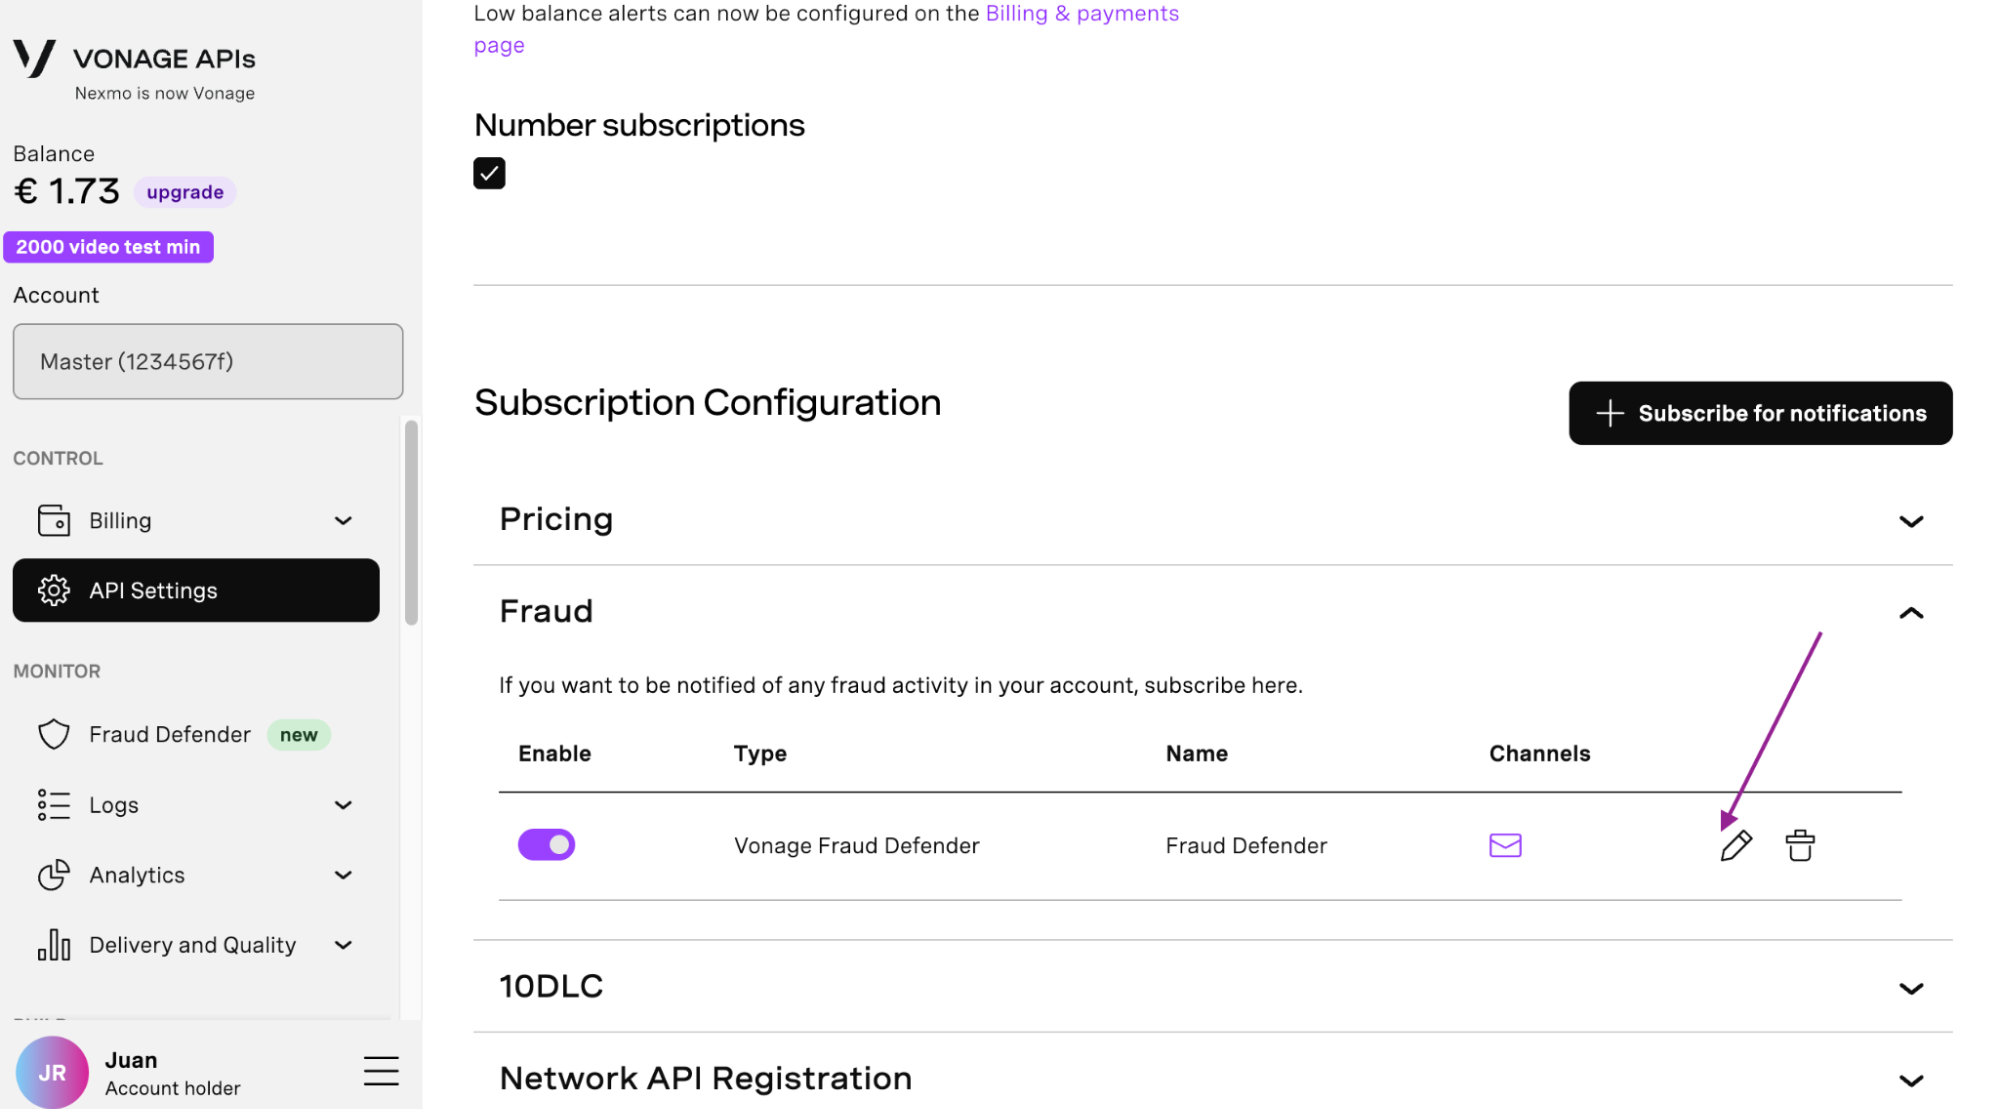
To see and manage notification recipients, click on the pencil icon.
-
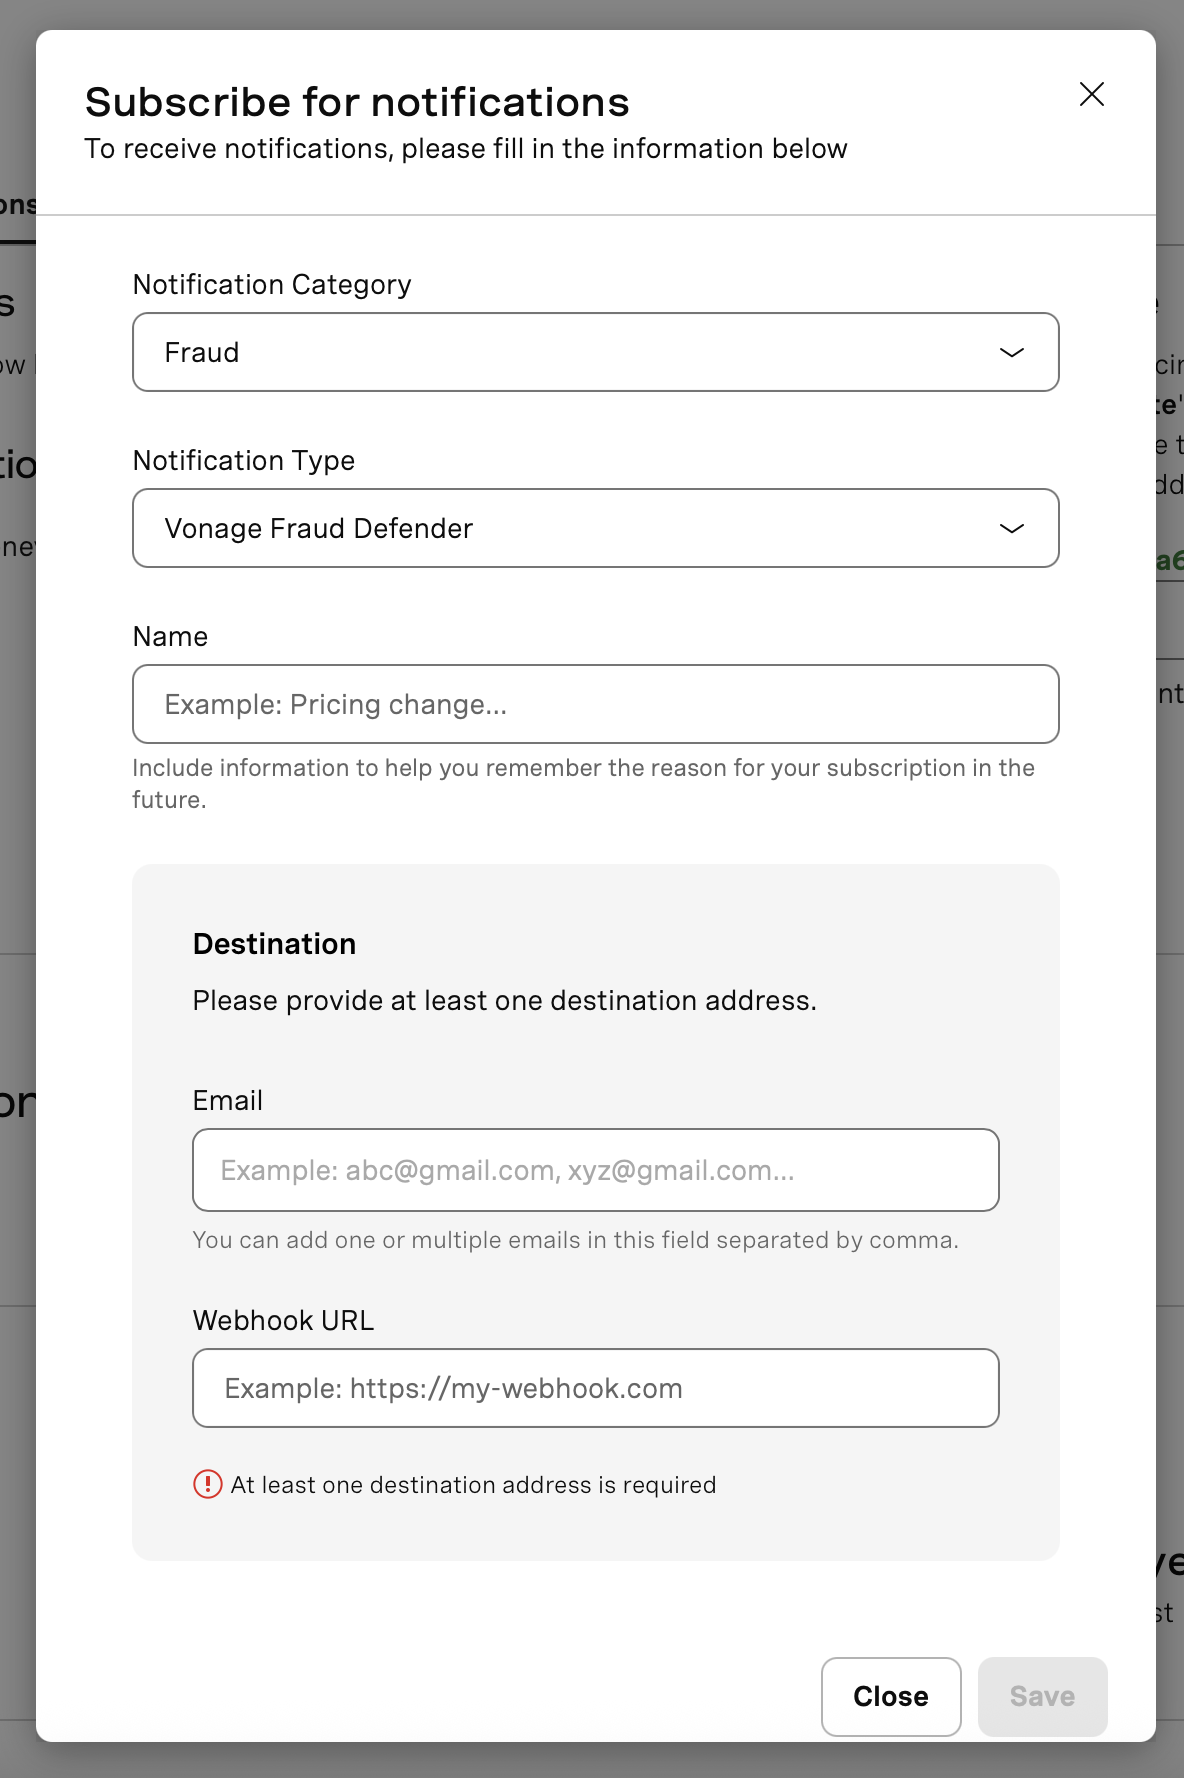
Review and manage fraud notifications recipients in the email text box or set up a Webhook URL.
2. Block All Destinations You Don't Have Business With (FD Standard)
Fraud Defender offers two complementary ways to restrict your SMS or Voice traffic to only the countries you need.
Country Blocks by Name is the recommended approach for country-level control.
Method 1 - Country Blocks by Name (Recommended - All Packages)
Country Blocks by Name allows you to block or allow SMS and Voice traffic to entire countries with a single click, using a visual toggle.
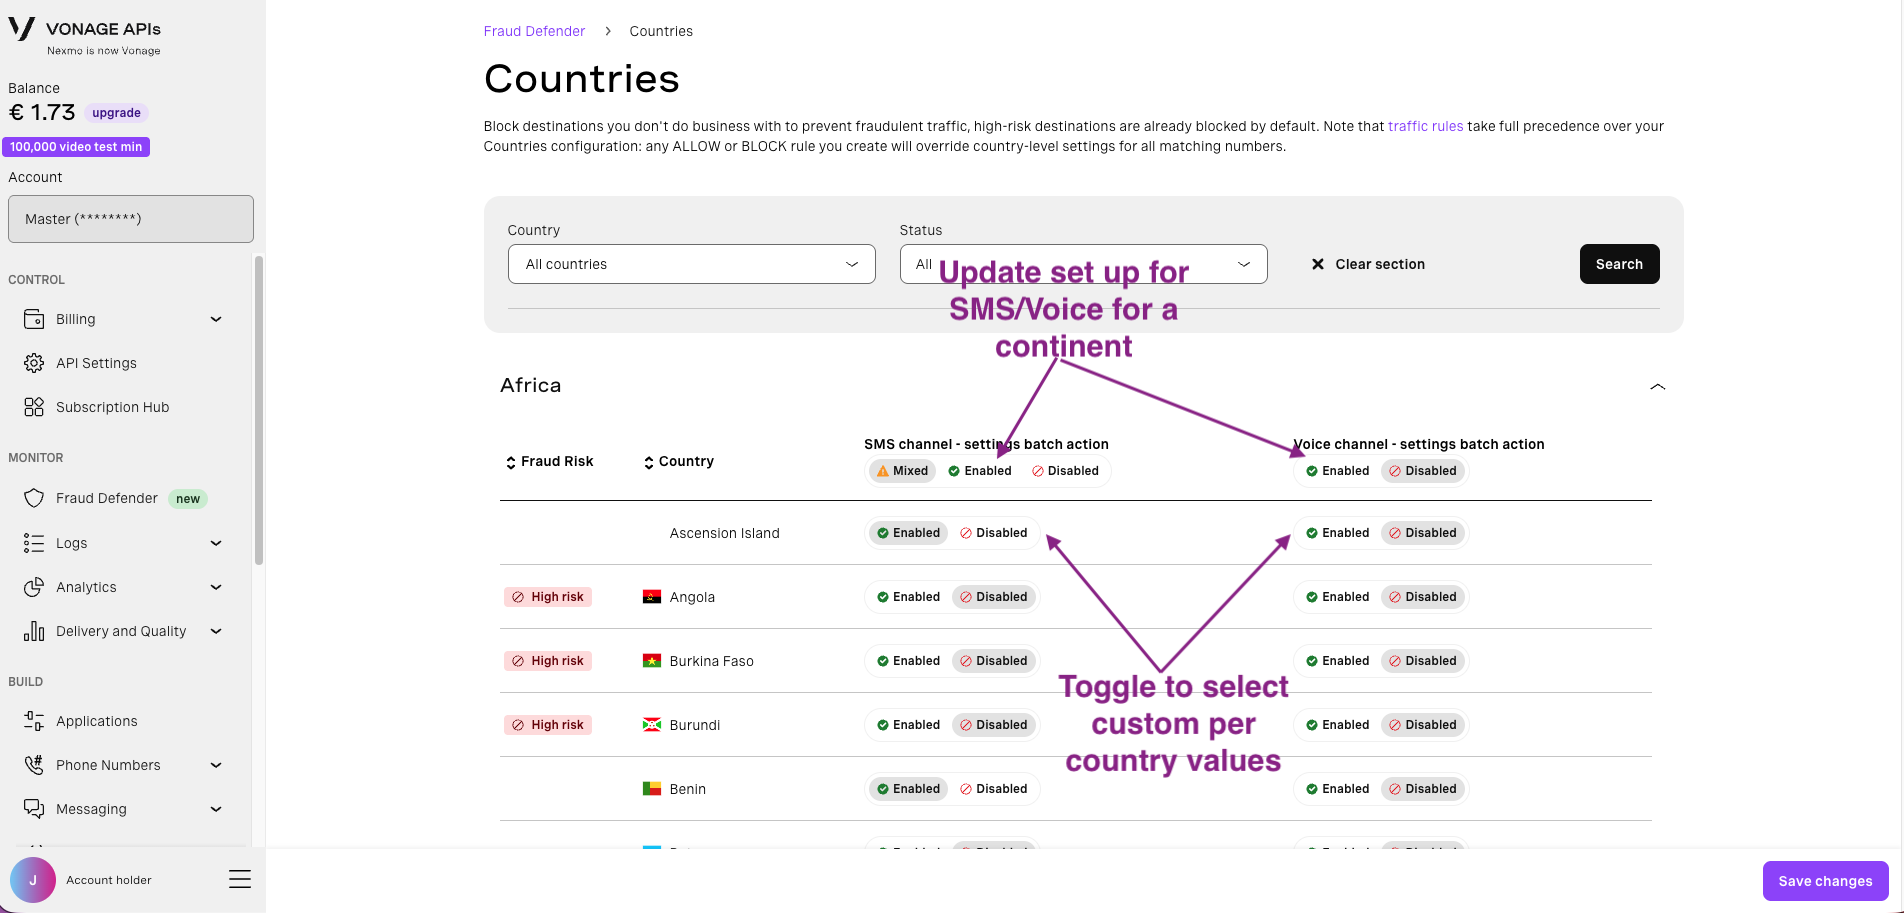
How to use it:
- Go to the Fraud Defender Dashboard.
- Scroll to the Protections section and click the Review button on the Countries tile.
- You will see a list of countries grouped by continent.
- Toggle countries ON (enabled) or OFF (disabled) for each channel (Voice or SMS) as needed.
Example: If you only want to send traffic to Spain (ES), block all countries for both Voice and SMS, then enable only Spain under Europe for the relevant channel(s).
Important notes:
- Traffic Rules take precedence over Country Management. If you have an Allow traffic rule for a prefix, traffic matching that prefix will not be blocked by the Countries feature.
- High-risk countries are blocked by default for Voice traffic. You can lift these defaults directly from the Countries tile.
Method 2 - Traffic Rules (For Granular Prefix/Number-Level Control)
Fraud Defender Traffic Rules allow you to block or allow traffic at the country code, prefix, or individual number level. They support both outbound traffic (protecting you from sending to fraudulent or unwanted destinations) and inbound traffic rules, giving you full control over which numbers are permitted to interact with your applications.
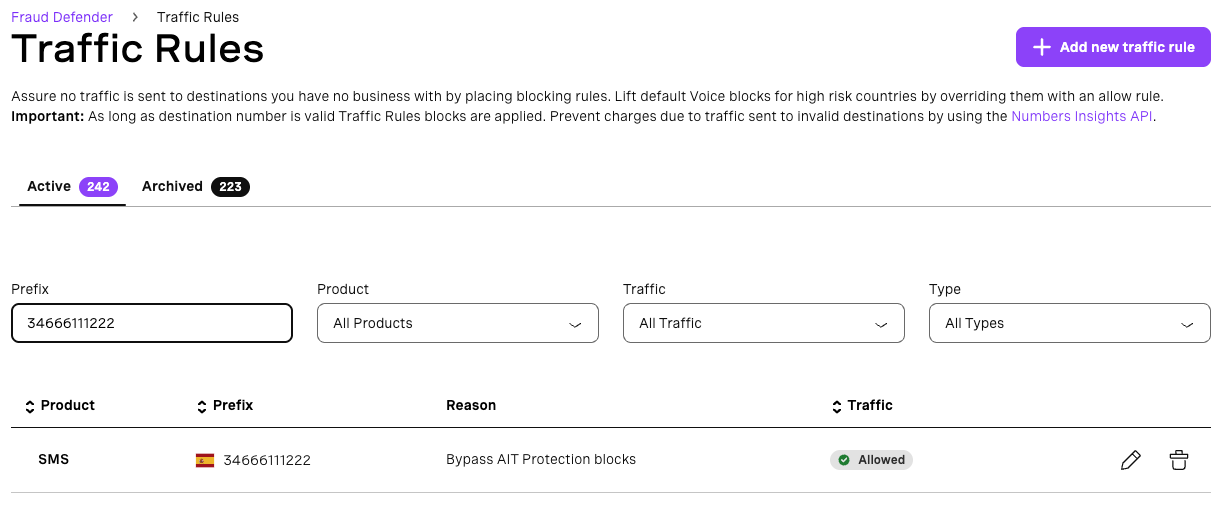
Use this approach when you need finer control, such as blocking specific number ranges within an allowed country, or managing individual sender/recipient numbers.
IMPORTANT: High-risk countries are blocked by default for Voice traffic; override the default block by creating an Allow rule.
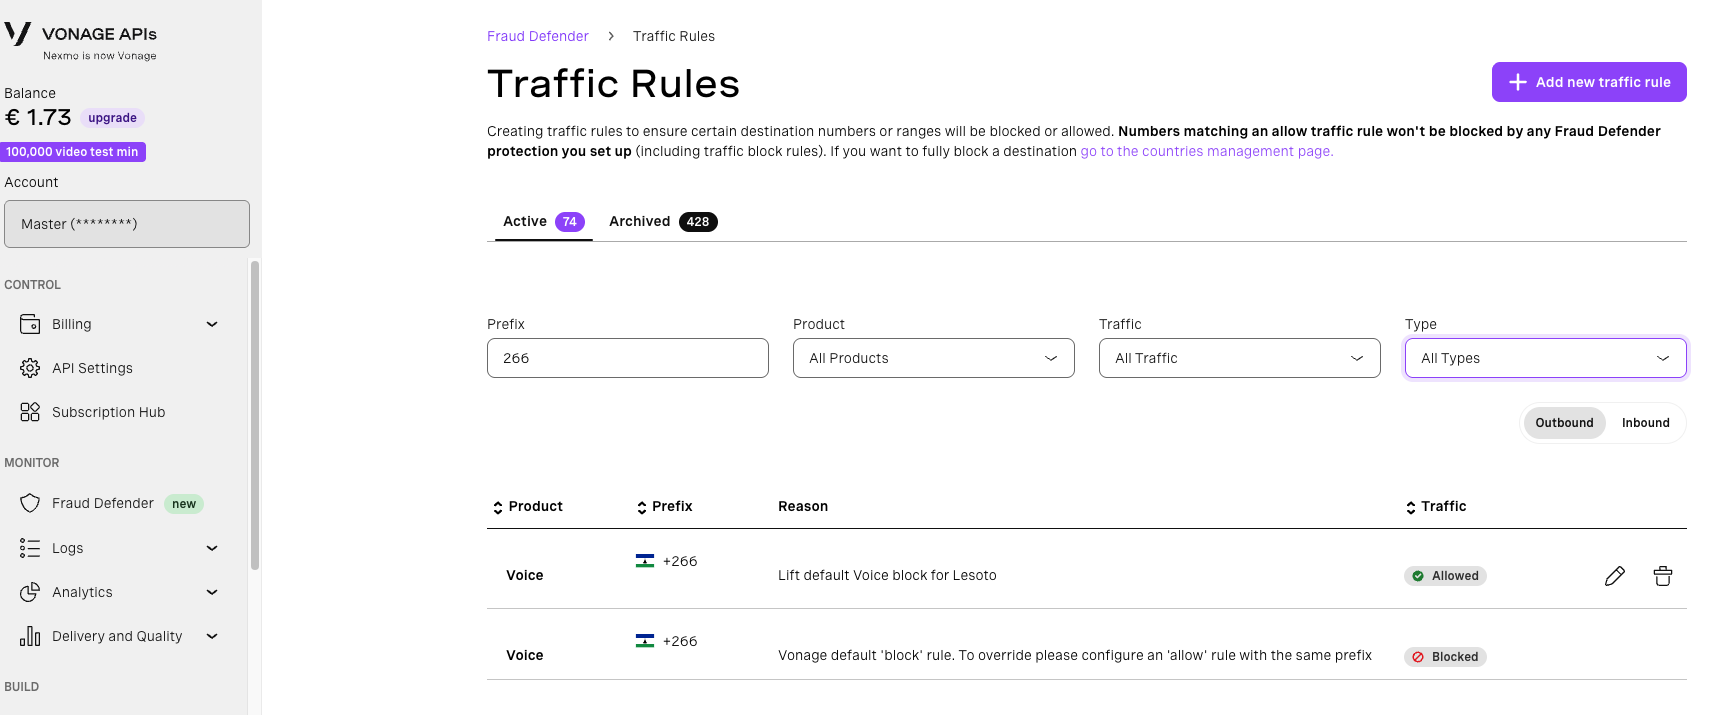
See the Traffic Rules documentation for additional details.
3. Set Up the AIT Protection to Block Fraudulent Traffic (FD Advanced)
The AIT Protection automatically blocks SMS going to potentially fraudulent destinations.
Visit the AIT Protection developer guide and follow the instructions to set up the protection.
Set Up AIT Protection Notifications
The AIT protection generates alerts ONLY when potentially fraudulent traffic is not being blocked: AIT Fraud Alerts are only generated when selecting protection levels "None" or "Standard".
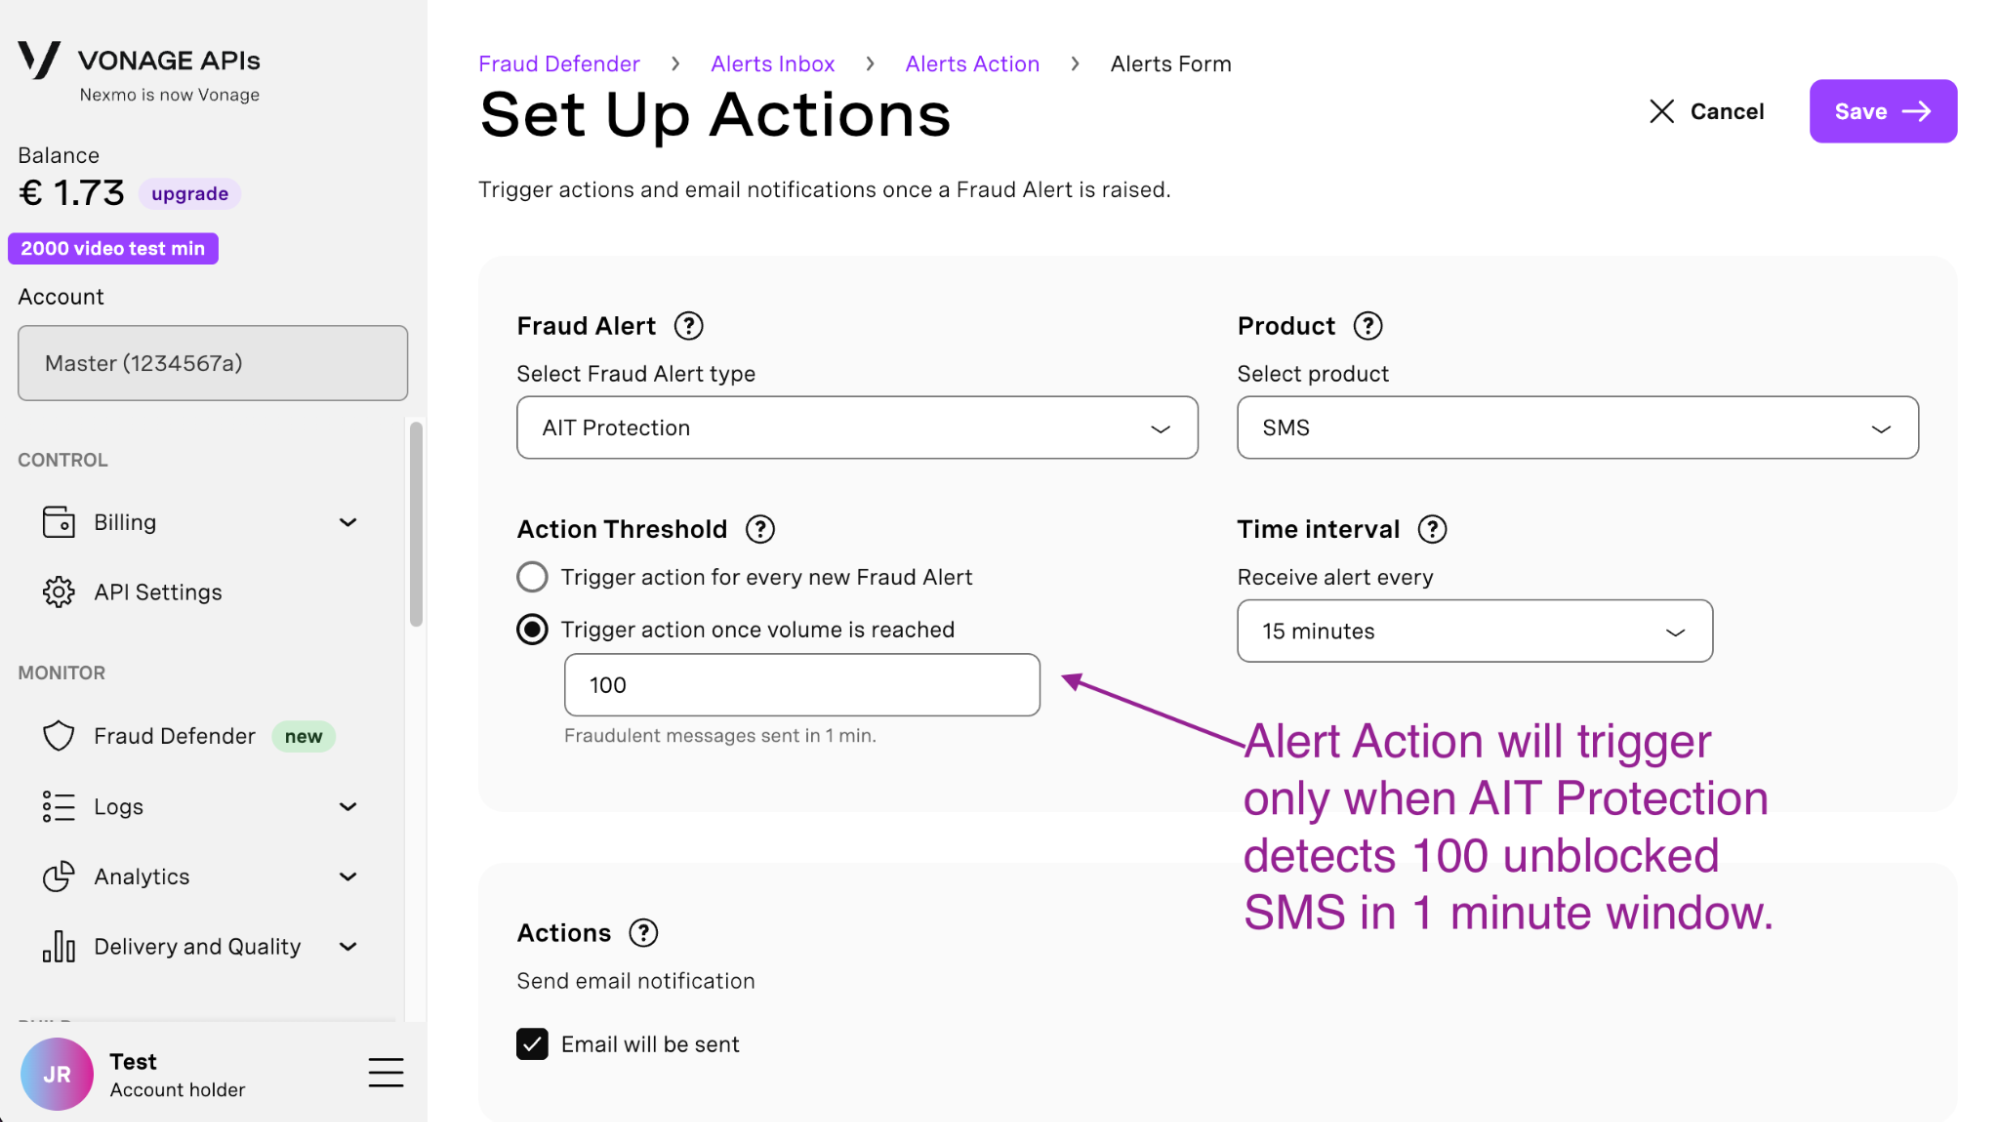
It is necessary to set up an AIT Protection Alert Action to assure you will be notified once you are under attack and to prevent too many notifications - you need to define which amount of potentially fraudulent traffic is concerning.
The AIT Protection might generate every minute a per-country Fraud Alert indicating the amount of potentially fraudulent unblocked SMS in a 15-minute window (if any). You need to define how many potentially fraudulent SMS in 15 minutes becomes worrying, so an email notification is sent to you: that will be the Action Threshold for your AIT Protection Alert Action.
4. Spot Fraudulent Activity with Volumetric Alerts (FD Standard)
Volumetric Alerts are automatically raised per country/prefix once our algorithm detects a potentially abnormal traffic increase.
Important: A minimum country traffic is required - countries with less than 1,000 SMS / Calls in the last 12 hours won't generate Volumetric Alerts.
You can proactively check for Volumetric Alerts in the Manage Alerts section.
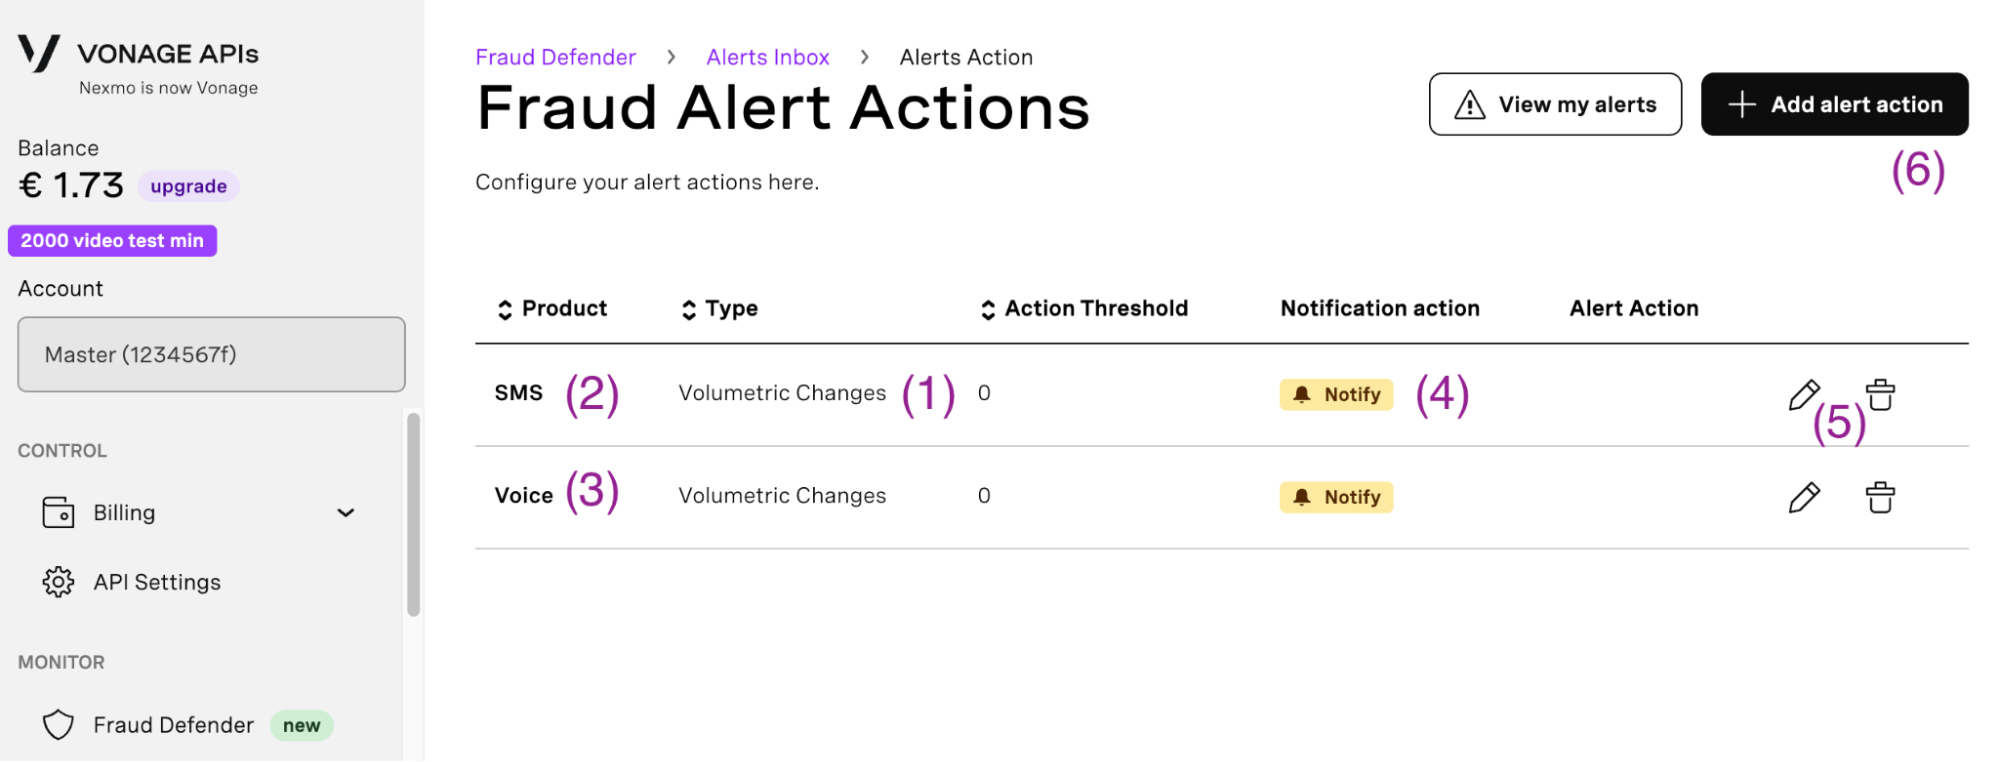
To receive an email notification once a Volumetric Alert is generated, make sure you have an Alert Action properly set up:
-
Go to the Alert Actions section and ensure you have an Alert Action with Type: Volumetric changes (1) and for both SMS (2) and Voice (3), and the notification is set to "Notify" (4).
-
You can edit the alert action by clicking on the pencil icon (5) or create it by clicking on the add button (6).
-
Click on the pencil icon to review and adjust the setup of your Alert Actions:
- Action Threshold: Fraud Alerts with a traffic volume lower than the configured value won't trigger an Alert Action (a notification won't be sent). For example, if you set a value of 2,000, every Volumetric Alert with a volume below 2,000 SMS / Calls in the last 12 hours won't trigger the action.
- Time Interval: Allows you to suppress triggering an Alert Action for consecutive alerts for the same country. Once an Alert Action triggers, it won't trigger again unless the time interval has passed. Time interval is considered on a per-country basis.
- Actions: If you choose the "Block" option, as soon as the Alert Action triggers, a country block will automatically be created in the Countries feature for the country that generated the alert (unless a country block already exists). The "Review" option allows you to create a country block with a single click from the Fraud Alerts section.
5. Set Up Alert Actions for Network Volume Alerts (FD Advanced & Premium)
Network Volume Alerts automatically detect unusually high SMS traffic spikes at the network level (more granular than country-level), compared to your historical average over the last 12 hours.
This gives you full visibility into which specific mobile network operator (MNO) is behind a spike and lets you configure automated actions.
- Network Volume Alerts are available to FD Advanced and Premium customers.
- Standard customers can view alerts in read-only mode but cannot configure alert actions.
Setting up Alert Actions for Network Volume Alerts:
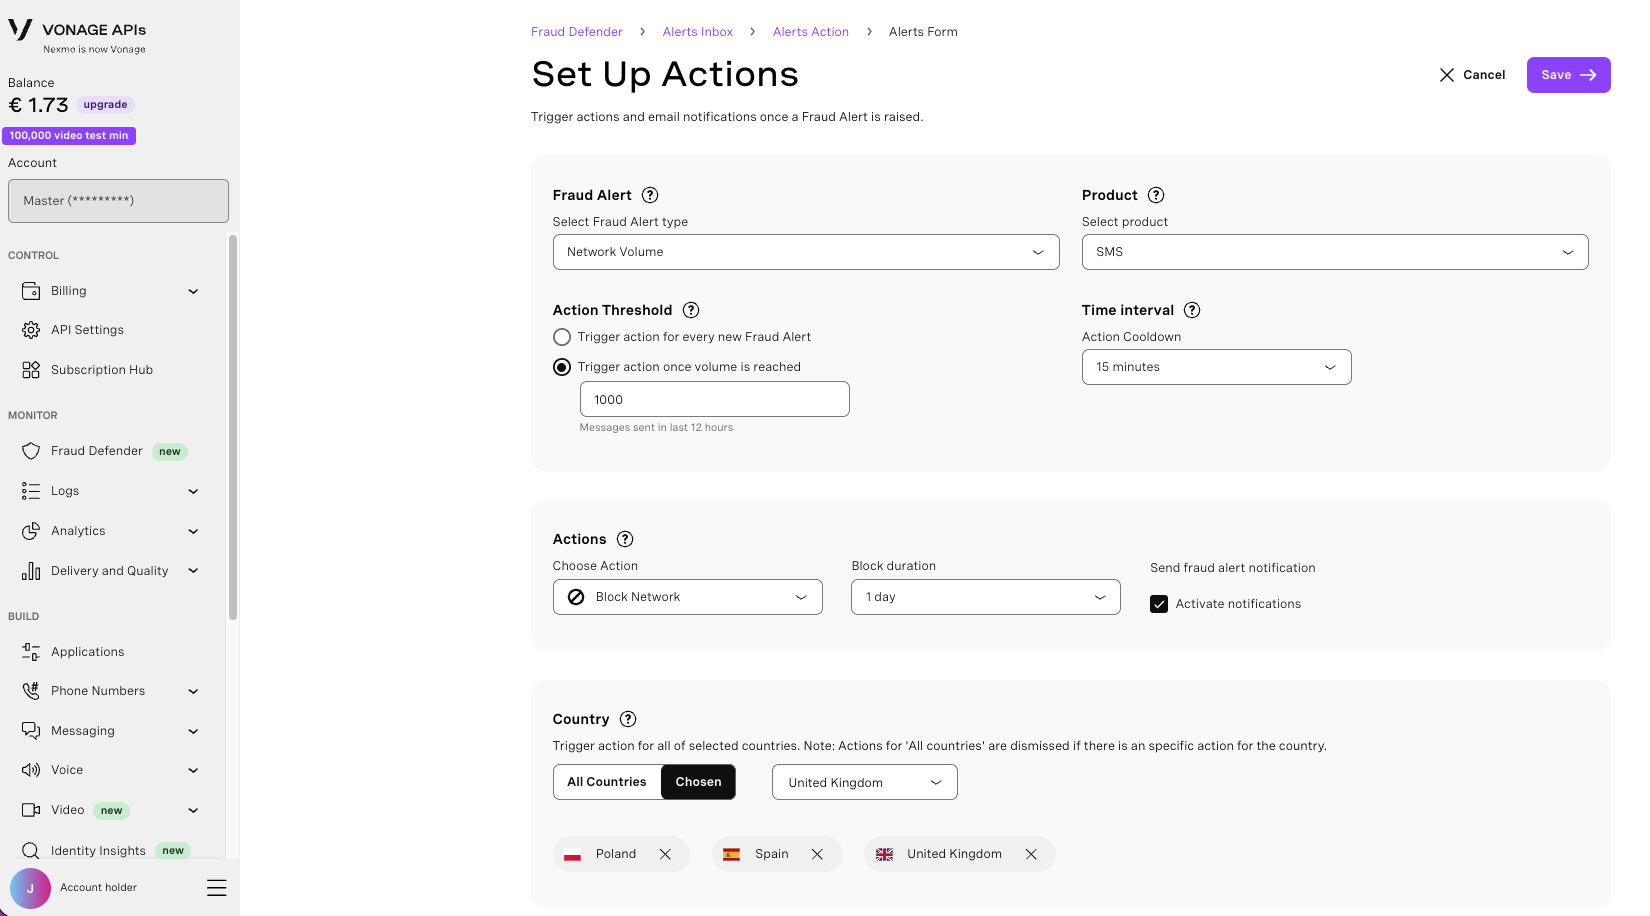
- Go to the Alert Actions section.
- Click Add Alert Action and select Type: Network Volume.
- Choose your action:
- Block Network: As soon as the alert triggers, a network block is automatically created for the network that generates the alert. You can set an optional block duration (TTL).
- Review: Allows you to manually create a network block with a single click from the alert detail view.
- Don't Block: A notification is sent without any automatic blocking.
- Configure Action Threshold and Time Interval as appropriate (same logic as Volumetric Alerts).
Default action on provisioning: A default Alert Action of "Review" with email notification is applied for all countries when the feature is first provisioned.
For further details, visit the Network Volume Alert developer guide.
6. Set Up Network Blocks (FD Advanced & Premium) (New)
Fraud Defender Network Blocks allow you to place temporary or permanent blocks on mobile country networks. If you suffer a fraudulent traffic spike on a certain network, you can place a block to deter bad actors from injecting traffic.
Network Blocks can be created manually or automatically through Network Volume Alert actions.
How to create a network block manually:
- Find the Network Blocks tile in the Fraud Defender Dashboard and click Review.
- Click the "Add Network Block" button.
- In the modal, select a country, browse the list of networks, and choose the one you want to block. You can also manually input a network identifier (MCC+MNC).
- Select the channel (Voice or SMS).
- In the "Allowed TTL" field, select how long the block will be active: Permanent, 1h, 2h, 3h, 6h, 12h, or 1 day.
- Click Save. The block will appear in the "Active Blocks" tab.
Once a block expires, it will be listed on the "Archived Blocks" tab. You can click the pencil icon to edit the block reason, or the basket icon to manually archive the block.
Limits: Maximum 50 active blocks and 50 archived blocks per API key.
Note: Network Blocks rely on a static numbering plan to determine the network a phone number belongs to. Ported or roaming numbers may not be covered.
For additional details, visit the Network Blocks developer guide.
7. Trusted Numbers: Prevent Blocks to Legitimate Traffic (FD Advanced & Premium)
All numbers you flag to us as trusted won't be blocked by the Fraud Defender protections you set up: Traffic Rules, AIT Protection, Country Blocks, Network Blocks, and SMS Burst Protection. Take a look at the developer guide for additional details.
If you are not an FD Premium customer, you can prevent blocks on numbers you trust through Traffic Rules:
- Create an Allow rule for the numbers you trust to prevent AIT Protection undesired blocks.
8. SMS Burst Protection: Set Up Traffic Limits to Mitigate AIT Attacks (FD Advanced)
The SMS Burst Protection allows you to limit the impact of AIT attacks by automatically rejecting all traffic above the limit you define.
Take a look at the SMS Burst Protection developer guide for additional details and follow the provided steps to set up the protection.
9. Custom Fraud Alerts: Receive Alerts Once Certain Traffic Amount Is Reached (FD Premium)
Define traffic limits for several time intervals; once the limit is reached an alert will be generated. You can use Custom Fraud Alerts to control your spend per country and to automatically block abnormal traffic increases. When a Custom Fraud Alert triggers a block action, a country block is automatically created in the Countries feature.
Take a look at the Custom Fraud Alerts developer guide for additional details and follow the provided steps to set up the protection.
10. Account Takeover Protection: Secure Your Account Against Credential Breaches (All Packages)
Account Takeover (ATO) fraud is a growing threat. If API credentials are leaked or stolen, attackers can make API calls from any IP address or access the Fraud Defender dashboard and dismantle configured protections.
Account Takeover Protection allows you to self-serve the management of Allowed Source IPs directly within the Fraud Defender dashboard - available on all packages (Standard, Advanced, and Premium).
What it protects:
- API Call IPs: Restrict which IP addresses are permitted to call Vonage-exposed API services. Calls from IPs not on the allowlist will be rejected. This is configurable per API key.
How to set it up:
- Go to the Account Takeover Protection page (also accessible via the "Account Takeover" tile in the Fraud Defender Protections section).
- Under API Call IPs, click "Add IP" to enter an IP address or CIDR range.
- Before activating the restriction for the first time, a confirmation modal will warn you that all other IPs will be blocked - confirm to proceed.
- Once configured, any API request from an IP not on the allowlist will be automatically blocked.
You can add, edit, or remove IP entries at any time. Removing the last entry returns the allowlist to its default permissive state (all IPs accepted).
Supported formats: Individual IPv4 addresses and CIDR ranges (e.g. 1.2.3.4 or 1.2.3.0/24). Wildcard format is not supported.
For additional details, visit the Account Takeover Protection developer guide.