Share:
Benjamin Aronov is a developer advocate at Vonage. He is a proven community builder with a background in Ruby on Rails. Benjamin enjoys the beaches of Tel Aviv which he calls home. His Tel Aviv base allows him to meet and learn from some of the world's best startup founders. Outside of tech, Benjamin loves traveling the world in search of the perfect pain au chocolat.
Unclog Your Inbound Leads with WhatsApp Using Make + Vonage MCP
This AI WhatsApp intake agent, powered by Make.com and Vonage MCP tooling, helps triage plumbing problems and estimate pricing.
Every developer eventually ends up building some kind of intake system. Sometimes it’s bug reports. Sometimes it’s sales leads. And sometimes it’s messages that all boil down to “something is leaking, and it’s getting worse”.
In this tutorial, you’ll build a WhatsApp-based intake assistant for a plumbing company, whether they’re calmly describing a slow drain or urgently reporting a situation that definitely can’t wait until Monday! The assistant is powered by Make.com, OpenAI, and Vonage’s MCP Tooling Server, and it’s designed to add intelligent automation without introducing a full CRM or a pile of custom backend code.
TL;DR: The complete Make scenario and MCP bridge code are available on GitHub
 Sending a WhatsApp message to the plumbing intake assistant describing a flooded bathtub emergency.
By the end, you’ll have a working Make scenario that:
Handles inbound WhatsApp messages from customers
Responds using an AI-powered intake assistant
Escalates high-urgency issues via SMS or phone calls before things overflow
Logs clean, structured records into a Make Data Store that acts as a lightweight CRM
The example domain here is plumbing, but the pattern applies anywhere you have inbound messages, limited context, and a strong preference for catching emergencies before they turn into incidents.
OpenAI API Account or other LLM
A verified WhatsApp Business Account (WABA)
Vonage API Account
A Vonage Virtual Number
In order to access Vonage’s APIs, we’ll need to create a Vonage Application that will give us the ability to communicate over WhatsApp, SMS, and Voice calls.
To create an application, go to the Create an Application page on the Vonage Dashboard, and define a Name for your Application.

If you intend to use an API that uses Webhooks, you will need a private key. Click “Generate public and private key”, your download should start automatically. Store it securely; this key cannot be re-downloaded if lost. It will follow the naming convention private_<your app id>.key. This key can now be used to authenticate API calls. Note: Your key will not work until your application is saved.
Choose the capabilities you need (e.g., Voice, Messages, RTC, etc.) and provide the required webhooks (e.g., event URLs, answer URLs, or inbound message URLs). These will be described in the tutorial.
To save and deploy, click "Generate new application" to finalize the setup. Your application is now ready to use with Vonage APIs.
To buy a virtual phone number, go to your API dashboard and follow the steps shown below.
 Purchase a phone number
Go to your API dashboard
Navigate to BUILD & MANAGE > Numbers > Buy Numbers.
Choose the attributes needed and then click Search
Click the Buy button next to the number you want and validate your purchase
To confirm you have purchased the virtual number, go to the left-hand navigation menu, under BUILD & MANAGE, click Numbers, then Your Numbers
You will need to enable both Voice and Messages Capabilities. For Voice, you can just toggle it on and leave the fields blank. For Messages, you will need to enable webhooks. For now, just add placeholders; we will update these with Make values later:
Set the Inbound URL to https://placeholder.com/inbound.
Set the Status URL to https://placeholder.com/status.
Then link your WhatsApp Business (WABA) by clicking the “Link external accounts” tab:
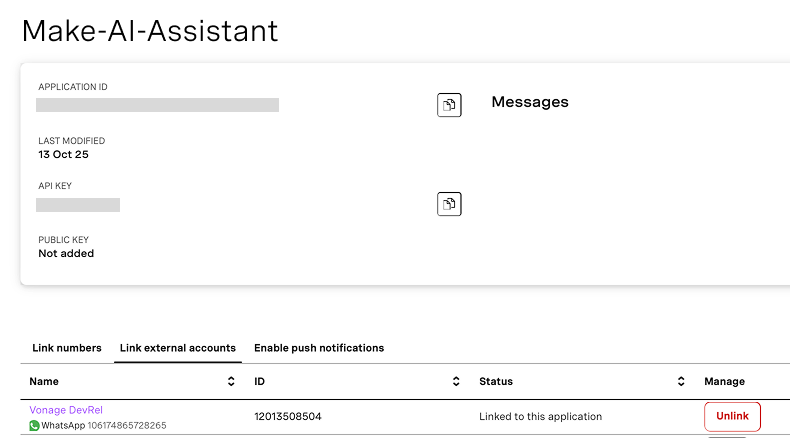 Viewing the make-AI-Assistant application in the Vonage dashboard with an active WhatsApp number linked.Make sure you have:
Application ID
Private key (downloaded as a
.keyfile)API key/secret
We’ll feed these into the MCP tooling server next.
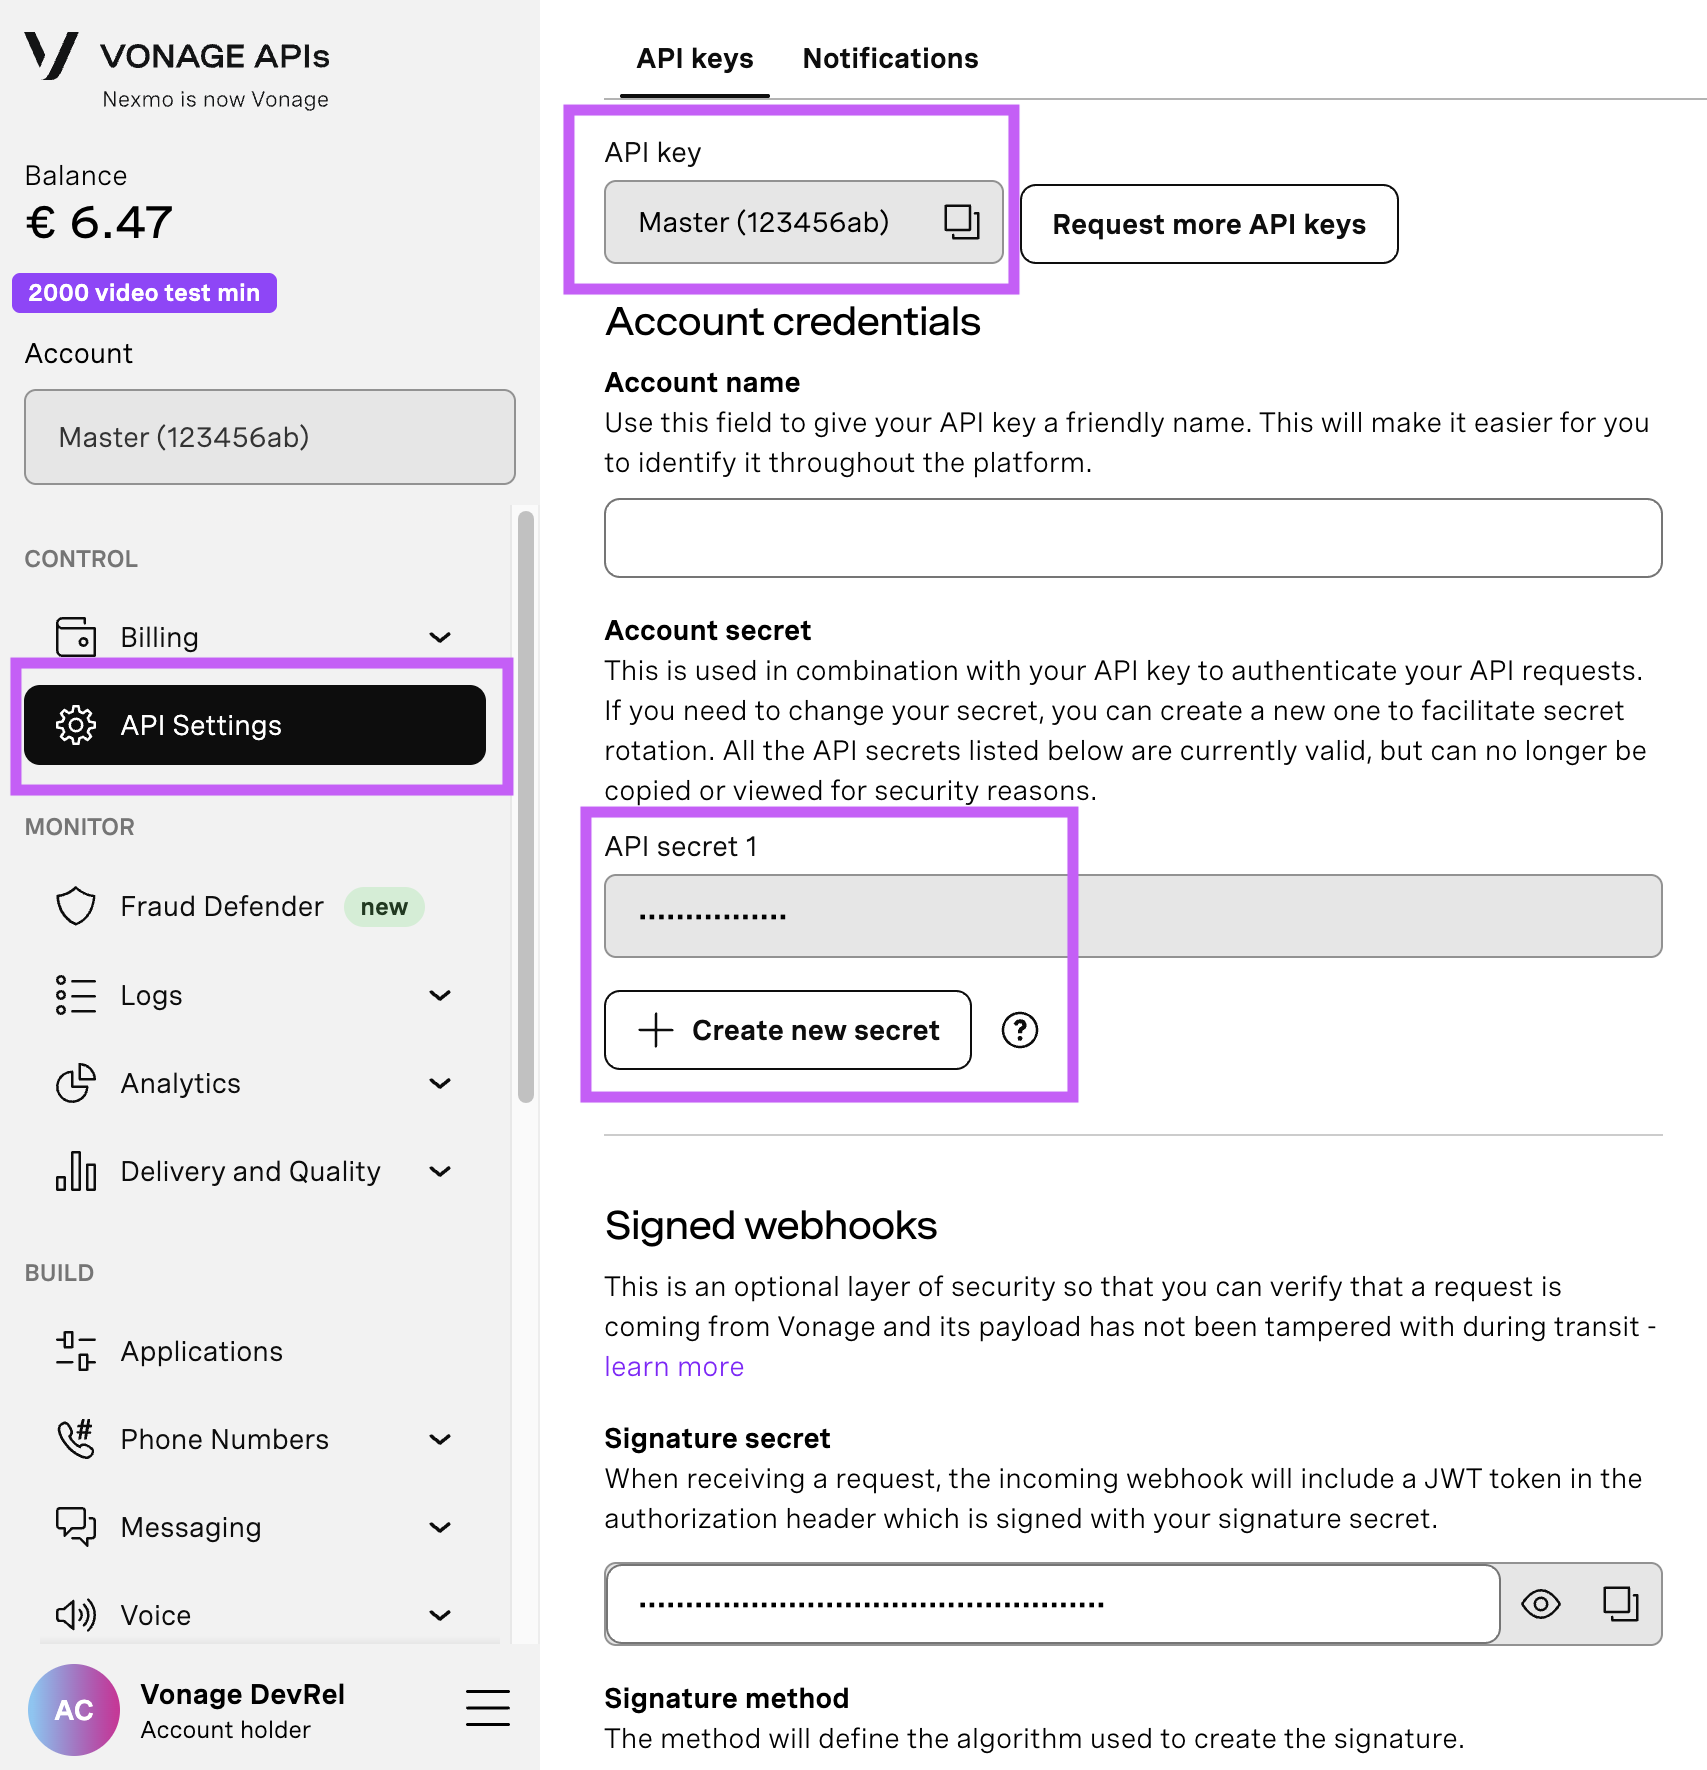
Open your API Settings Page to access your Vonage API Key and Secret, both of which are displayed as shown in the screenshot below. The API Key is located at the top of the page, and to access your API Secret, please refer to the “Account secret” subsection.
Note: In case you cannot remember your previously created API Secret, click on “+ Create new secret” and save it securely.
You may skip this section if you previously deployed a bridge from the n8n WhatsApp Receptionist article.
Render comes into the picture because Make expects a simple, public HTTP endpoint it can call to reach an MCP server. The Vonage MCP server itself runs as a local process and doesn’t ship with a public gateway, so we need a small “bridge” service to put it on the internet. Render hosts that bridge for us: it runs a tiny Node.js app that starts the Vonage MCP server in the background and exposes a single /mcp URL that Make can talk to.
Note on hosting and reliability:
In this tutorial, we use Render’s free plan for the MCP bridge, which means the service can sleep when idle. If that happens, Make’s MCP Client may temporarily show “Could not connect to your MCP server” until the instance wakes up. You can fix this by manually triggering a new deploy / restart in Render, or by upgrading the service to a paid “Starter” tier so it stays warm. If you prefer, you can also run the same Node.js bridge on other hosts such as Railway, a Virtual Private Server (VPS), or your own infrastructure. The only requirement for Make is a public HTTPS /mcp endpoint.
Deploy a new Render service using the provided blueprint:
Spin up a new service from this Blueprint.
Add a name for your new service (e.g. mcp_tooling-make_whatsapp_receptionist).
Select “main” for branch.
Select “create all as new services”, and enter your Vonage credentials from your Vonage application: VONAGE_API_KEY, VONAGE_API_SECRET, VONAGE_APPLICATION_ID, VONAGE_PRIVATE_KEY64, VONAGE_VIRTUAL_NUMBER, VONAGE_WHATSAPP_NUMBER.
NOTE: VONAGE_PRIVATE_KEY64 is not simply your private key that was downloaded. It is a base64 encoded Private Key, which you can generate with the Private Key to ENV Variable tool.
NOTE 2: The MCP_AUTH_TOKEN is a token you create, which the Make MCP client will later use to authenticate requests. It is suggested to use a safe, complex token via a strong password generator.
Once your Render MCP Bridge is live, copy its public URL (e.g., https://your-mcp-bridge.onrender.com/mcp). You will need this in the next step, when you set up the MCP Client module inside your Make workflow.
 Create a new Render deployment by copying the Blueprint and filling in your configurations.
Copy the premade Vonage Tooling MCP Integration scenario by clicking “Use this scenario”. This will open a new instance of the scenario in your editor. The scenario is all preconfigured, but each module is covered below.
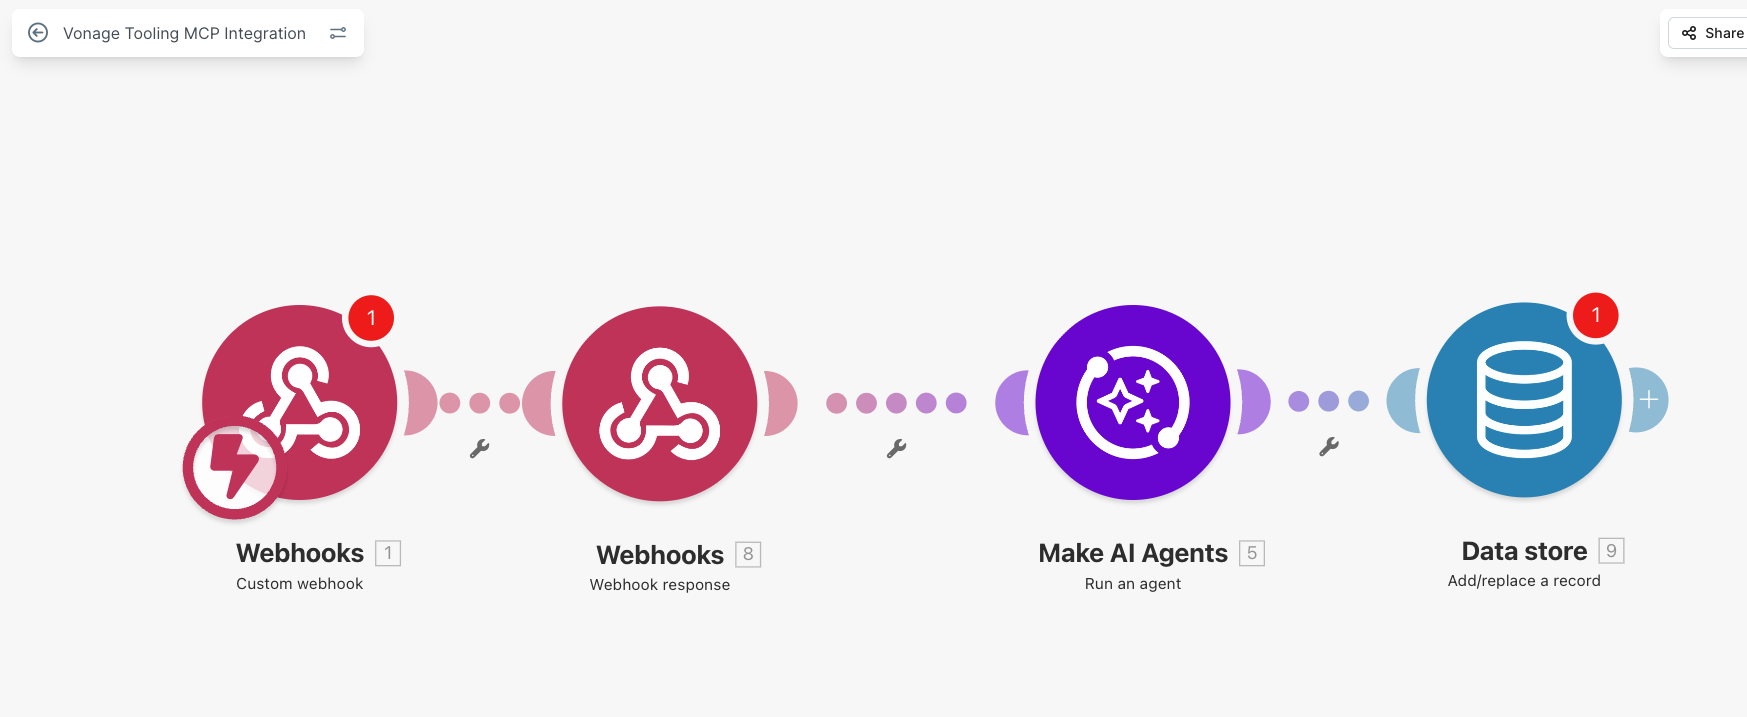 Completed Make scenario for the Vonage MCP integration, showing webhook triggers, the AI Agent module, and a Data Store for structured lead logging.
Starting from the left, in the Custom Webhook module, select the webhook named “Incoming Vonage Message”. This module is the trigger for your flow; every inbound WhatsApp message from Vonage will hit this endpoint.
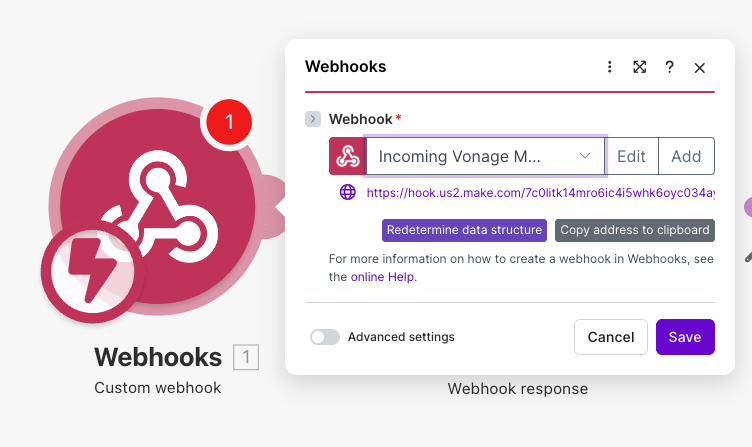 Creating a custom webhook in Make to receive inbound WhatsApp messages from Vonage as the trigger for the intake workflow.
After saving, Make generates a webhook URL. Copy it, return to your Vonage Application settings, and replace the Inbound URL in the Messages capability with this Make webhook. Save the application.
At this point, inbound WhatsApp messages will flow directly into Make.
 Configuring the Vonage Messages capability to forward inbound WhatsApp events to a Make webhook using an HTTP POST endpoint.The other Webhook module in our scenario sends a response to Vonage, so that Vonage knows the webhook received the incoming data successfully. You don’t need to do anything there.
The AI Agent module in the scenario is (almost!) already set up, but it’s worth understanding how it’s designed.
This agent is not a general-purpose chatbot. It behaves like a stateful intake assistant that processes exactly one inbound message and produces exactly one outbound response.
That constraint is intentional. The system prompt enforces three rules:
Ask only one short qualifying question at a time
Send exactly one WhatsApp message per run
Stop immediately after sending that message
This avoids common issues like message flooding or repeated questions. Conversations stay calm, predictable, and easy to follow.
The customer’s phone number is used as the Thread ID. That means each customer has a dedicated conversation thread, and the agent remembers what it has already asked. There’s no need to manage session state or build a custom state machine. Make handles orchestration, and the agent handles conversational flow.
Instead of returning text and letting Make decide what to do, the agent is given direct access to Vonage MCP tools. This is the key distinction between AI-assisted workflows, in which AI suggests actions, and AI-driven workflows, in which AI both decides and acts.
Through MCP, the agent can:
Send WhatsApp replies to interact with the customer
Send SMS summaries for medium-urgency issues
Place outbound voice calls for high-urgency cases
Low-urgency issues are intentionally logged to the Data Store but not escalated immediately. So a human can follow up later if needed.
Because this scenario is reusable, the AI Agent isn’t pre-connected to your MCP bridge.
 Configuring the AI Agent module in Make, showing the selected “Plumber Intake” agent and a request failure error message.
To connect it:
Open the AI Agent module and click on configuration.
Scroll down to the MCP section.
Add a new or replace the existing MCP connection.
Paste in your Render URL with /mcp appended.
Enter the same MCP_AUTH_TOKEN you configured in Render.
Enable the required tools:
SMS
whatsapp-send-text
outbound-voice-message
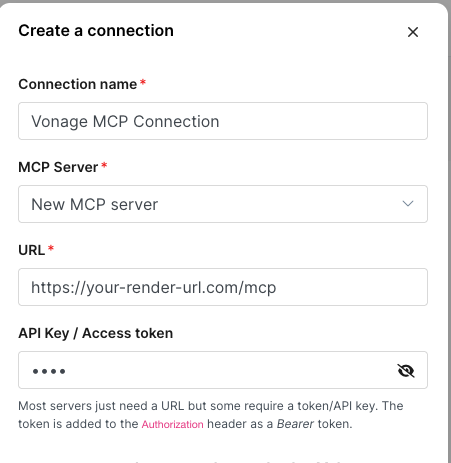 Creating a new MCP server connection in Make using a Render-hosted /mcp endpoint and API access token.Once connected, the agent can send real WhatsApp messages, SMS alerts, and voice calls through Vonage.
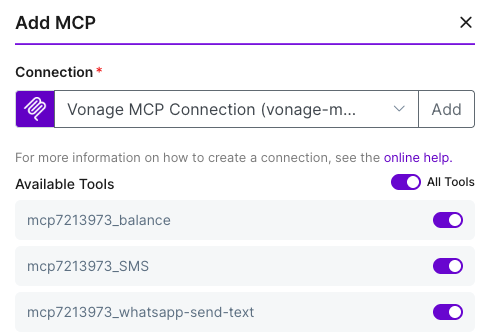 Adding a Vonage MCP connection in Make and enabling available tools, including SMS and WhatsApp send text.
In addition to sending messages, the agent returns structured fields such as urgency, issue type, price range, and a summary for the plumber.
These fields are not used to message the customer. Instead, they’re written into the Data Store. You could add more fields to the Data Store and ask the Agent to request them from the customer, for instance, their address, availability, etc.
The scenario requires a simple data store that will act as a CRM for our customer interactions. Click on the data store module and ensure the “processed_inbound_messages” data store is selected.
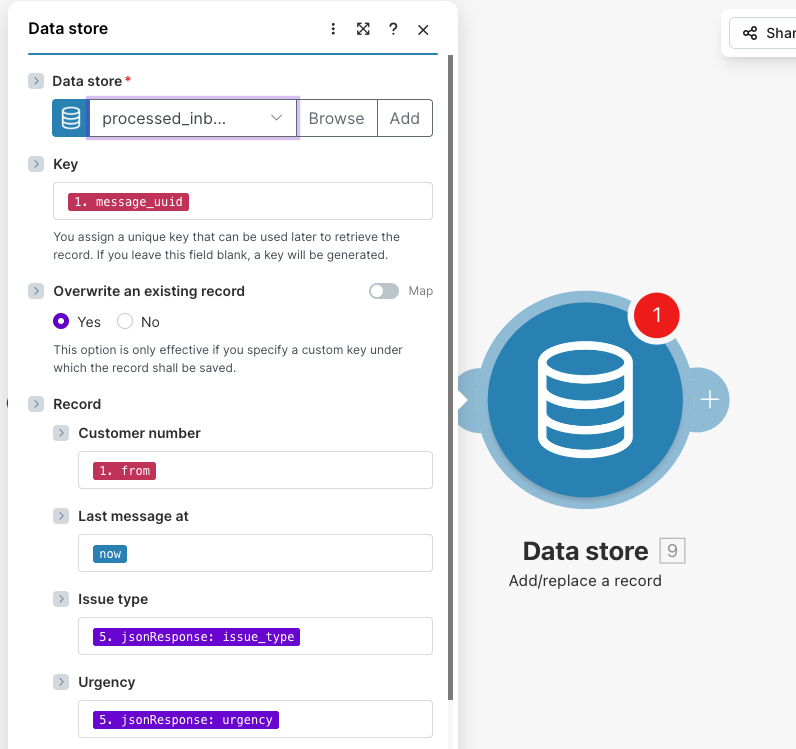 Configuring the Make Data Store to save structured intake data, including customer number, issue type, urgency, and timestamps.
The data store saves the following fields, which gives our AI Agent all the information it needs to intelligently operate.
{
  "customer_number": "16462364506",
  "last_message_at": "2026-01-30T11:25:00Z",
  "issue_type": "slow drain",
  "urgency": "low",
  "summary_for_plumber": "Bathroom sink draining slowly; no flooding; shut-off accessible.",
  "price_min": 80,
  "price_max": 150,
  "status": "pending-customer"
}
The Data Store module saves all the new data from each run of the scenario by writing a new record to “processed_inbound_messages.
For the key, we use the {{1.message_uuid}}, which is the message id from Vonage. This way, we store the full interaction triggered by an initial message. And for the “Last message at”, we can use Make’s built-in {{now}} time function.For the rest of the fields, we match up the data we return from the AI Agent module.
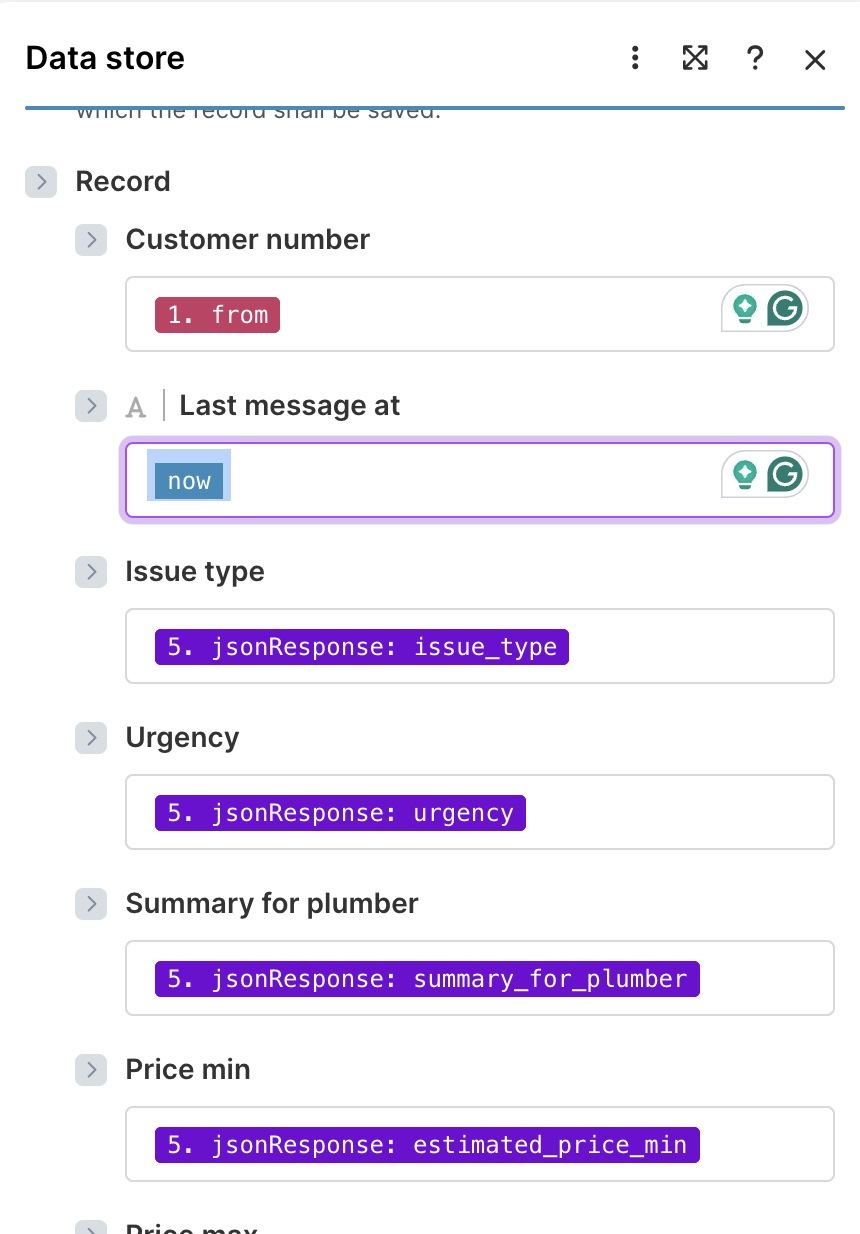 Mapping structured output from the AI Agent into the Make Data Store, including urgency, issue type, pricing estimates, and a plumber-ready summary.
Make has an unreliable auto save, so make sure to hit the save icon in the bottom toolbar. Then, from the dashboard, ensure the scenario toggle is switched ON, otherwise, the webhook will not receive messages.
Now it’s ready for use, and you can start testing by sending various levels of toilet emergencies!
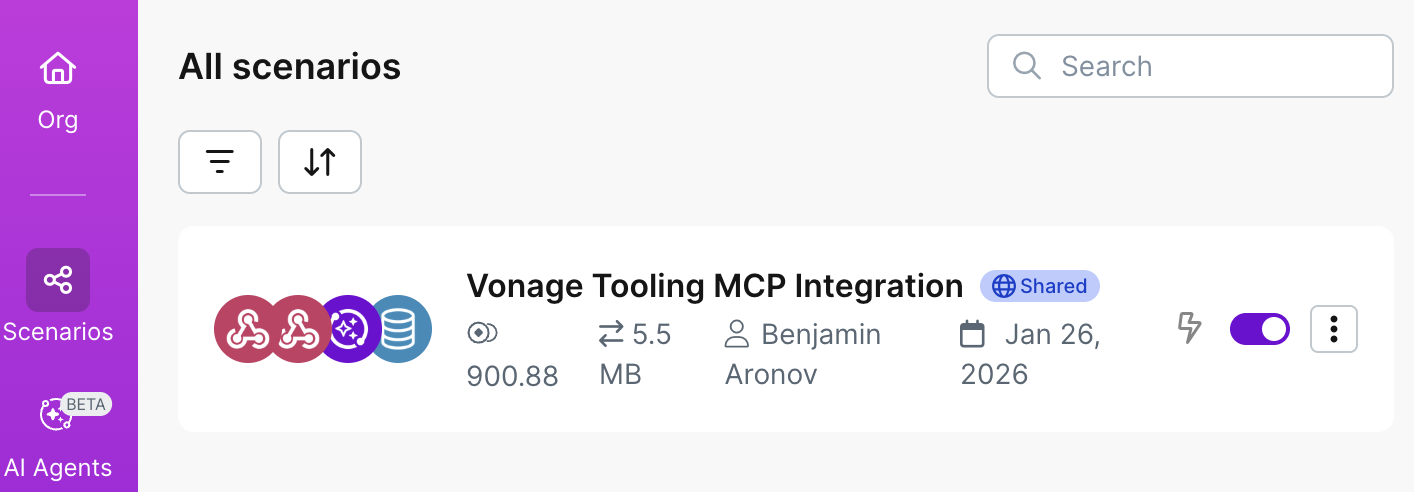 The completed Make scenario for the Vonage Tooling MCP Integration, showing the full workflow enabled and ready to receive inbound WhatsApp messages.
As I was putting together this demo, I realized that plumbing problems would be a perfect opportunity for users to send a photo of their dire situation to help better agents understand what’s going on. And it would be super easy to make this happen with the Vonage MCP Server.
So here’s an open source challenge: improve this demo and the Vonage Tooling Server by adding a WhatsApp send photo tool. You can learn how to Contribute to the Open Source Vonage MCP Tooling Server. Then come back to your Make agent, give it photo superpowers, and see how it handles photo intake. Super cool!
What we’ve built here isn’t just a chatbot; it’s a full intake flow that behaves like a smart, reliable receptionist.
With Make handling orchestration, and Vonage MCP giving your AI direct access to WhatsApp, SMS, and voice, each message becomes a predictable, structured run.
This setup is easy to extend as your needs grow:
Add human follow-up for low-urgency cases. You could connect the agent via Slack or Email to give a daily summary of all new leads.
Integrate scheduling or pricing systems so that plumbers aren’t just notified of new jobs, but already have the new jobs added to available slots in their calendar.
Support multiple languages with a simple prompt tweak.
Track outcomes with analytics and reporting. You’re already tracking all your leads; now you can understand things like conversion rates, by urgency, average response times, and resolution status.
You can start small, intake and triage, and build up from there. The result is a calm, human-feeling flow that actually gets work done.
Have a question or want to share what you're building?
Subscribe to the Developer Newsletter
Follow us on X (formerly Twitter) for updates
Watch tutorials on our YouTube channel
Connect with us on the Vonage Developer page on LinkedIn
Stay connected and keep up with the latest developer news, tips, and events.
Share:
Benjamin Aronov is a developer advocate at Vonage. He is a proven community builder with a background in Ruby on Rails. Benjamin enjoys the beaches of Tel Aviv which he calls home. His Tel Aviv base allows him to meet and learn from some of the world's best startup founders. Outside of tech, Benjamin loves traveling the world in search of the perfect pain au chocolat.