Share:
Jẹ́káyinOlúwa is a software craftsman and product manager passionate about technology and its impact on people. He works on product management, backend development, DevOps, technical writing, and community strategy. He enjoys dealing in the intersection of software, design, and human interaction. He likes reading and music.
Throttling Bulk SMS Campaigns with Python and Vonage SMS API
Bulk SMS comes in handy when marketing teams need to do promotional campaigns. Organizations can also deploy them to pass information to a large group of people.
Problems can arise when you send a bulk SMS campaign meant to generate responses to a large audience. For instance, receiving thousands of inbound responses at once could overwhelm your team. One solution to this problem is to use throttling. For example, you can design a campaign to send the messages in batches, at specific periods, or both.
This article will teach you how to implement bulk SMS throttling in Python using the Django REST framework and the Vonage Messages API. The web application we will build in this tutorial will allow you to message multiple users in batches at specified time intervals.
The Vonage Messages API allows developers to develop SMS-based applications and implement messaging features in their apps for SMS, WhatsApp, Messenger, etc. Django is a Python framework used for building web applications. Django REST framework allows developers to build RESTful APIs with Django.
A free Vonage API account
A Vonage application. You can follow this guide to create an application on your Vonage dashboard.
Python (version 3.6 or a later). You can download Python from the official website.
The Python package manager pip. You can find instructions for installing pip here.
The Python tool
virtualenvfor creating isolated virtual environments for Python projects.
You will start with setting up the project dependencies and installing the modules you need with pip. Next, you will create the Django project for the tutorial.
First, create a new directory and a virtual environment. Then, activate the newly created virtual environment:
mkdir test_project && cd test_project
python -m venv env
source env/bin/activate
The commands above installed the following packages:
Django: the Django framework package.djangorestframework: the Django REST framework for creating APIs in Django.django-cors-headers: This allows our API to make cross-origin requests to other servers.vonage: the Vonage Python server SDK.
Now, use the django-admin utility to create a Django project called vonage_project:
django-admin startproject vonage_projectNext, you need to configure the Django-cors-headers for the application. That way, other origins and frontend applications can make a request to your Django application. Go to the MIDDLEWARE in the settings.py file and add the following middleware classes:
MIDDLEWARE = [
    ...
    'corsheaders.middleware.CorsMiddleware',
    'django.middleware.common.CommonMiddleware',
    ...
]Next, create a Django app called myapp to host our bulk SMS functionality:
cd vonage
django-admin startapp myapp
In this section, you will set up the bulk SMS feature with the Vonage SMS API. You will also implement a throttling feature.
Usually, you would need to initialize the Vonage library to use the Vonage API for sending messages. However, the new Vonage Messages API is in beta, and Python is not supported yet. However, we can still use the Messages API.
First, add the following code to the views.py file:
import base64

vonageCredentials = 'API_KEY:API_SECRET'
encodedData = vonageCredentials.encode("utf-8")
b64value = b64encode(encodedData).decode("ascii")In the above code, replace the API_KEY and API_SECRET values with the values from your Vonage dashboard. The vonageCredentials variable takes your Vonage credentials: your API key and secret key in the form 'API_KEY: API_SECRET.' You then encode and decode the string with your credentials in base64 form to pass them as ASCII standard characters.
Now, create a view for sending the SMS messages in views.py like this:
from django.views.decorators.csrf import csrf_exempt
from rest_framework.decorators import parser_classes
from rest_framework.parsers import JSONParser
import json
import requests
import base64
import time
from django.http.response import JsonResponse

vonageCredentials = 'API_KEY:API_SECRET'
encodedData = vonageCredentials.encode("utf-8")
b64value = base64.b64encode(encodedData).decode("ascii")

@ csrf_exempt
@ parser_classes(\[JSONParser])
def sendMessage(self, request):
passIn the code above, you imported the csrf_exempt, parser_classes, and JSONParser class to enable you to define decorators for the view. You also imported the json, JsonResponse, and other modules you will need in your web app. Then, you created the sendMessage function, where you will put the logic for sending the message.
Next, you will add code inside the sendMessage view to accept requests and user inputs. Modify view.py as follows:
def sendMessage(self, request):
    if request.method == 'POST':
        body_unicode = request.body.decode('utf-8')
        body_data = json.loads(body_unicode)

        sender = body_data['sender']
        recipients = body_data['recipients']
        message_string = body_data['message_string']
        batch_size = body_data['batch_size']
delay_period = body_data['delay_period']In the above code, you specified the view accepts POST requests in the line: request.method == 'POST'. Then, you decoded the request body in JSON format. After that, you stripped the body of the request to the items it contains. The items are the following inputs received from the user:
sender: a variable that contains the information about the message sender.recipients: a list of the phone numbers of the SMS recipients.message_string: the text you will send in the bulk SMS campaign.batch_size: stipulates the number of recipients to send an SMS to at once.delay_period: the time frame in between sending SMS batches (measured in seconds).
Now, you will create a function to split the list of the recipients' phone numbers into batches. Add the following code outside the sendMessage function in the views.py file:
def batch(recipients, batch_size=1):
    for i in range(0, len(recipients), batch_size):
yield recipients[i:min(i + batch_size, len(recipients))]You defined a function called batch. It accepts two parameters: the recipients list and the batch_size integer that represents how many recipients you want to send a message to at once. You use a for loop and the yield keyword to create a batch of phone numbers. If this is unclear, you can read more about the range and yield keywords work.
Now, you will implement the logic to enable sending messages. Modify the sendMessage view as shown below:
@ csrf_exempt
@ parser_classes([JSONParser])
def sendMessage(request):
    if request.method == 'POST':
        body_unicode = request.body.decode('utf-8')
        body_data = json.loads(body_unicode)

        sender = body_data['sender']
        recipients = body_data['recipients']
        message_string = body_data['message_string']
        batch_size = body_data['batch_size']
        delay_period = body_data['delay_period']

        for eachBatch in batch(recipients, batch_size):
            for number in eachBatch:
                response = requests.post('https://api.nexmo.com/v0.1/messages',
                     headers={
                         "Authorization": "Basic %s" % b64value,
                         "Content-type": "application/json",
                         "Accept": "application/json"},
                     json={
                         "to": {
                             "type": "sms",
                             "number": number
                         },
                         "from": {
                             "type": "sms",
                             "number": sender
                         },
                         "message": {
                             "content": {
                                 "type": "text",
                                 "text": message_string
                             }
                         }
                     })
                print("message sent to ", number)
            time.sleep(delay_period)
        try:
            return JsonResponse("OK", status=200, safe=False)

        except Exception as e:
return JsonResponse({'the error is': str(e)}, status=403)There are two for loops inside the sendSmsMessage function. The external for statement loops through the batches of phone numbers using the batch function you defined earlier in this article. You divide the recipients' phone numbers into batches using `batch_size' from the POST request.
Then, you have an inner loop that takes each number in every batch and makes a POST request to the Vonage Messages API at the https://api.nexmo.com/v0.1/messages endpoint. The request header contains the base64 encoded credentials that you created earlier as a "b64value." It also includes a JSON payload to deliver to the Messages API. The JSON payload contains the following information:
sender: a variable that contains the information about the sender of the message.recipients: a list of the phone numbers of the SMS recipients.message_string: the text to be contained in the bulk SMS.batch_size: the number of recipients to be sent a message to at once.delay_period: the time frame in between the SMS batches to be sent.
Upon making a successful request to the Messages API endpoint, the SMS message goes to the recipient, and the code prints a message to your terminal to alert you of the sent message. Then, your code works on sending the next batch.
After you've sent a message to all the recipients in a batch, the parent for loop executes after the delay period you set with time.sleep(delay_period).
When you finish sending the SMS messages, your code returns a 200 - OK JsonResponse.
The full views.py code is as follows:
from django.views.decorators.csrf import csrf_exempt
from rest_framework.decorators import parser_classes
from rest_framework.parsers import JSONParser
import json
import requests
import base64
import time
from django.http.response import JsonResponse


# Create your views here.
vonageCredentials = 'ba779f8e:fFImpyBSezdXV1Nd'
encodedData = vonageCredentials.encode("utf-8")
b64value = base64.b64encode(encodedData).decode("ascii")
print(b64value)


@ csrf_exempt
@ parser_classes([JSONParser])
def sendMessage(request):
    if request.method == 'POST':
        body_unicode = request.body.decode('utf-8')
        body_data = json.loads(body_unicode)

        sender = body_data['sender']
        recipients = body_data['recipients']
        message_string = body_data['message_string']
        batch_size = body_data['batch_size']
        delay_period = body_data['delay_period']

        for eachBatch in batch(recipients, batch_size):
            for number in eachBatch:
                response = requests.post('https://api.nexmo.com/v0.1/messages',
                     headers={
                         "Authorization": "Basic %s" % b64value,
                         "Content-type": "application/json",
                         "Accept": "application/json"},
                     json={
                         "to": {
                             "type": "sms",
                             "number": number
                         },
                         "from": {
                             "type": "sms",
                             "number": sender
                         },
                         "message": {
                             "content": {
                                 "type": "text",
                                 "text": message_string
                             }
                         }
                     })
                print("message sent to ", number)
            time.sleep(delay_period)
        try:
            return JsonResponse("OK", status=200, safe=False)

        except Exception as e:
            return JsonResponse({'the error is': str(e)}, status=403)


def batch(recipients, batch_size=1):
    for i in range(0, len(recipients), batch_size):
        yield recipients[i:min(i + batch_size, len(recipients))]
Since you have created a view for receiving requests, you will need a corresponding URL for users to access the view to make requests. Therefore, you will add a path to the urlpatterns inside the urls.py file of the project. Navigate to the project subdirectory and add the following code:
from django.urls import path
from myapp.views import sendMessage

urlpatterns = [
   ...
    path('message/', sendMessage),
]As shown above, you imported path and the sendMessage view. Then, you added a path with the URL message/ to the list of urlpatterns.
You can test the functionality built above with the Postman tool for simulating and documenting APIs. You can sign up for a free Postman account.
To run this test, you also need to start Django's test server like this:
Python manage.py runserverLet's assume you intend to use the following details for your SMS bulk campaign.
{
    "sender": "Your Vonage number.",
    "recipients": ["First number to send to.", "Second number to send to"],
    "message_string": "Hello, World!",
    "batch_size": 3,
    "delay_period": 3600
}You can input the above details into the body of a Postman request as JSON as shown in the following image:
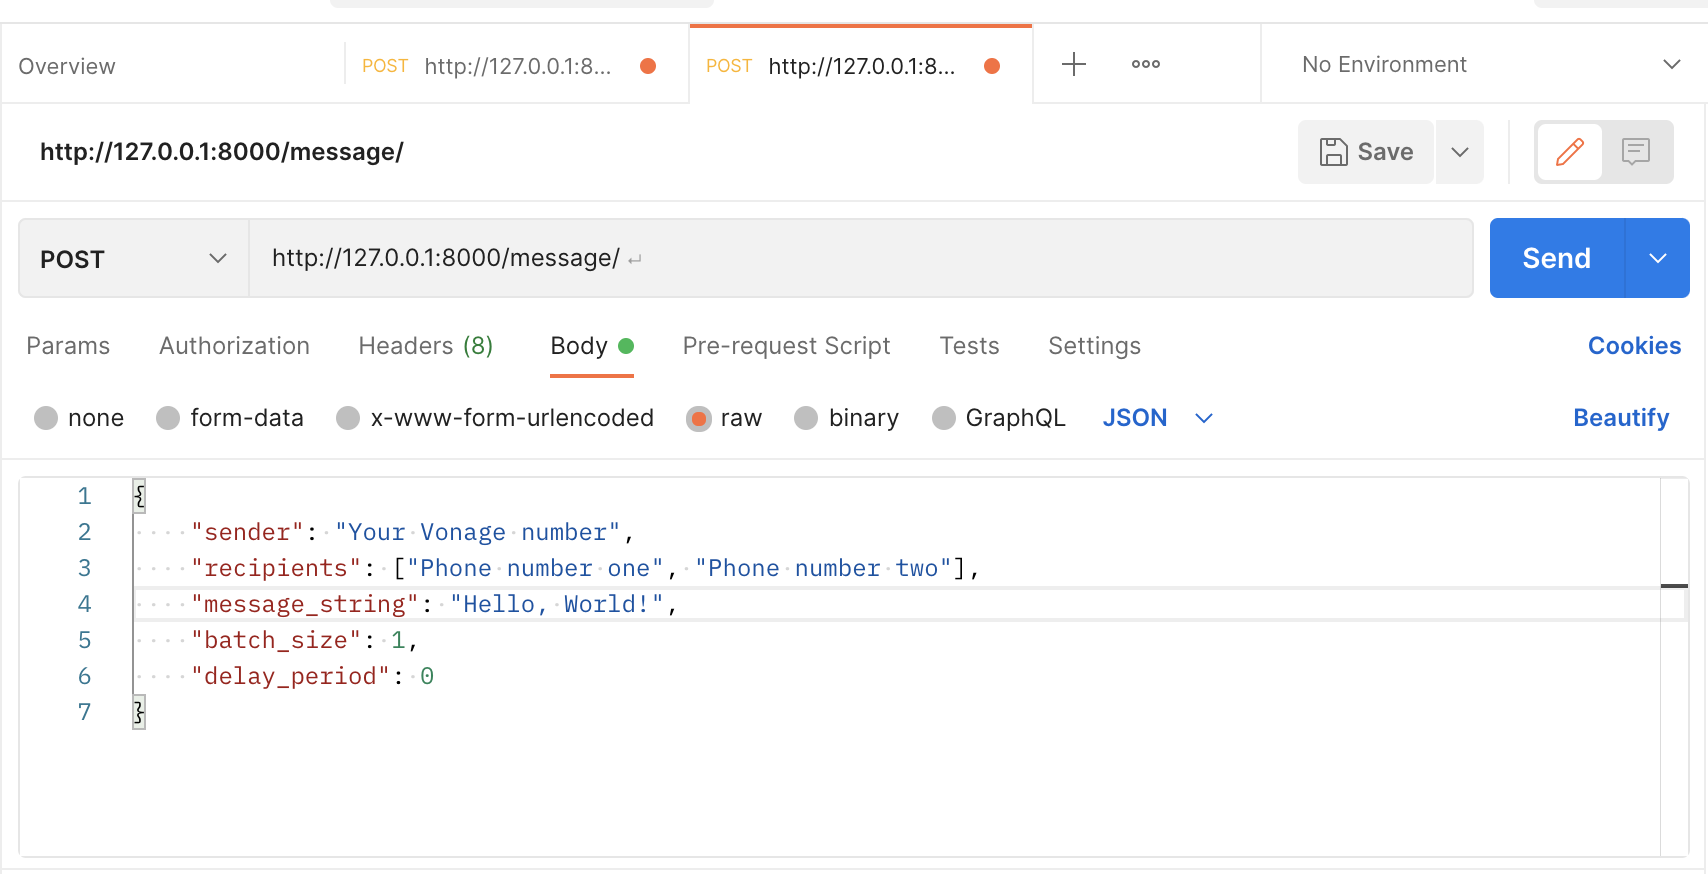
Make sure you replace the "recipients" phone numbers with real numbers and replace "sender" with your Vonage number before sending the request. Then, the messages will be delivered to your recipients.
In this article, you implemented bulk SMS throttling using Vonage in a Django REST API. You can now integrate this solution into your projects and build more solutions with Vonage. You can review our authentication guide to better understand authentication with Vonage APIs.
Share:
Jẹ́káyinOlúwa is a software craftsman and product manager passionate about technology and its impact on people. He works on product management, backend development, DevOps, technical writing, and community strategy. He enjoys dealing in the intersection of software, design, and human interaction. He likes reading and music.