
Share:
Aaron was a developer advocate at Nexmo. A seasoned software engineer and wannabe digital artist Aaron is frequently found creating things with code, or electronics; sometimes both. You can customarily tell when he's working on something new by the smell of burning components in the air.
Making a text-to-speech phone call with Django
Time to read: 5 minutes
Amongst the incessant notifications people receive every day; a ringing phone is still much harder to ignore or overlook.

It creates a sense of urgency which makes it the perfect way to deliver critical or time sensitive messages such as two-factor authentication codes or important service notifications.
In this tutorial, we will look at how you can use Nexmo's text-to-speech API to make outbound calls with Python and Django.
Your Django server will need to be reachable by the Nexmo API. If you're running it locally, then you will need to use a tool such as ngrok to expose it to the public internet.
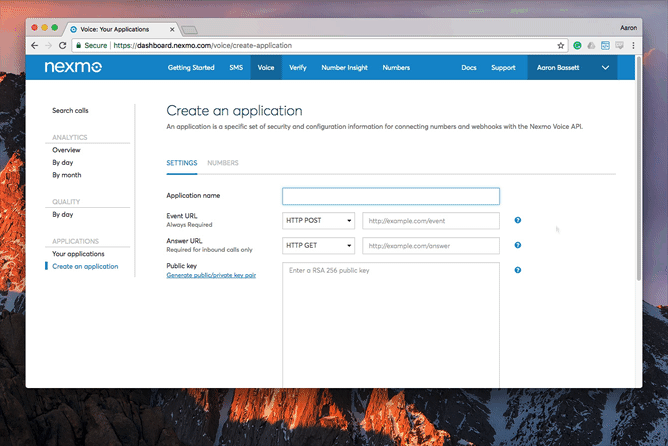
One final thing before we begin writing our Python/Django code we need to understand Nexmo applications. When we create a new Nexmo application not only do we use it to store configuration data such as the URL of our Nexmo call control object (NCCO), or where Nexmo should send event information; we can also use it to generate our public/private key pair.
Security is critical to us, and we do not want anyone to be able to impersonate you or your application by placing calls from your number. So to help secure our voice API we use your private key to create a JSON Web Token (JWT).
So before we begin let's create a new Nexmo application, attach it to a virtual number and then generate and download our private key.
Remember to keep your private key safe; I recommend using something like Vault. If you do think for any reason that someone has compromised your private key, you should stop using it immediately and generate a new public/private key pair.
The outbound voice API requires an answer_url. When someone answers our call, Nexmo will retrieve our NCCO file from this URL and execute any actions defined in it. Let's create a Django application so we can serve up our NCCO JSON file.
We're going to install our dependencies via pip. I'd always recommend keeping each Python project and its dependencies in their own virtual environment.
pip install django nexmo
django-admin startproject ttsOnce we have our Django project we need to create a new app, this will be where the bulk of our development happens.
cd tts
python manage.py startapp outboundAfter you have created your new application don't forget to add it to your tts/settings.py, you should probably edit your ALLOWED_HOSTS while you are editing your settings as well.
INSTALLED_APPS = [
    …
    'outbound'
]
ALLOWED_HOSTS = ["*"] # Never do this in production!Our first view is going to be a static JSON file. We'll make a templates directory within our new app folder and add our JSON file there.
mkdir -p outbound/templates/outbound
touch outbound/templates/outbound/hello.jsonEdit your hello.json file and add the first action for your NCCO
[
    {
        "action": "talk",
        "text": "Hello World from Nexmo"
    }
]In the code above we are defining a new list which contains a single talk action which will use text-to-speech to read out the text string to our caller whenever they answer our outbound call. We still need to render this file whenever we receive a GET request on our specified route, Django's generic TemplateView is perfect for this. As we're not extending the TemplateView, we can directly import it into our tts/urls.py
from django.conf.urls import url
from django.views.generic import TemplateView

urlpatterns = [
    url(r'^hello/', TemplateView.as_view(
        template_name='outbound/hello.json',
        content_type='application/json'
    )),
]Once you've edited your urls.py start your Django server and check it is all working by visiting http://127.0.0.1:8000/hello/
python manage.py runserverHopefully, you see the NCCO file we created above. If you don't, check the browser debug screen or your terminal for any errors.
Before we can make our outbound call, we need our Django server to be reachable by the Nexmo API. We recommend using ngrok for this if you're having problems read our blog post on connecting your local development server to the Nexmo API using a ngrok tunnel.
ngrok http 8000We're going to need multiple terminals for the next part, so you might want to use screen or tmux. Ensure you still have your Django server running in one terminal and ngrok active in another. We're going to make our first outbound call via the Python REPL, so run python in another terminal window, but don't forget to activate your virtual environment first!
import nexmo
client = nexmo.Client(application_id='<VOICE APP ID>', private_key='private.key')
to_number = [{'type': 'phone', 'number': '<YOUR NUMBER>'}]
from_number = {'type': 'phone', 'number': '<NEXMO VIRTUAL NUMBER>'}
answer_url = ['https://<NGROK URL>/hello/']
client.create_call({'to': to_number, 'from': from_number, 'answer_url': answer_url})
After running the commands above watch your ngrok terminal and you should see Nexmo requesting your NCCO! So that was a pretty simple example, let's try sending a more exciting message.

This time we're going to create our NCCO dynamically using information from the Marvel API. Before we get started on the next part, you'll need to register for a free Marvel developer account; after registering I added my Marvel credentials as environmental variables.
export MARVEL_API_KEY='<YOUR API KEY>'
export MARVEL_PRIVATE_KEY='<YOUR PRIVATE KEY>'
These commands will create the environment variables in a UNIX system. However you will need to export them every time you restart your shell. You may want to use python-dotenv to make this automatic.
Let's create a new route in our urls.py for this new NCCO endpoint.
from django.conf.urls import url
from django.views.generic import TemplateView
from outbound.views import MarvelView

urlpatterns = [
    url(r'^hello/', TemplateView.as_view(
        template_name='outbound/hello.json',
        content_type='application/json'
    )),
    url(r'^marvel/', MarvelView.as_view())
]In your views.py we will import and extend the TemplateView.
import os
from hashlib import md5
from time import time
import random
import requests
from django.utils.html import strip_tags
from django.views.generic import TemplateView


class MarvelView(TemplateView):
    template_name = 'outbound/marvel.json'
    content_type = 'application/json'

    @staticmethod
    def get_marvel_data():
        marvel_api_url = 'https://gateway.marvel.com:443/v1/public/characters'
        private_key = os.environ['MARVEL_PRIVATE_KEY']
        api_key = os.environ['MARVEL_API_KEY']

        # Create Marvel API request params
        timestamp = str(time())
        hashed_key = md5(
            str(timestamp + private_key + api_key).encode('utf-8')
        )

        # Fetch Avengers data from Marvel API
        response = requests.get(
            marvel_api_url,
            params={
                'series': '22547',  # Avengers (2016 - Present)
                'apikey': api_key,
                'ts': timestamp,
                'hash': hashed_key.hexdigest()
            },
            headers={
                'Accept': 'application/json'
            }
        )
        marvel_response_data = response.json()

        # Some characters don't have descriptions, ignore those characters
        return [{
            'name': x['name'],
            'description': x['description']
        } for x in marvel_response_data['data']['results'] if x['description']]

    @staticmethod
    def random_voice_name():
        # https://developer.nexmo.com/api/voice/ncco#voice-names
        return random.choice([
            'Salli', 'Joey', 'Nicole', 'Russell', 'Amy', 'Brian', 'Emma',
            'Gwyneth', 'Geraint', 'Raveena', 'Chipmunk', 'Eric', 'Ivy',
            'Jennifer', 'Justin', 'Kendra', 'Kimberly',
        ])

    # Add our Marvel data to the templete context
    def get_context_data(self, **kwargs):
        marvel_data = self.get_marvel_data()
        random_character = random.choice(marvel_data)

        kwargs['voice_name'] = self.random_voice_name()

        # Concat our character name & bio together to act as our voice message
        # Also remove any errant HTML tags from Marvel text
        kwargs['marvel_message'] = "{name} - {description}".format(
            name=strip_tags(random_character['name']),
            description=strip_tags(random_character['description'])
        )

        return super(MarvelView, self).get_context_data(**kwargs)

Let's go through what's happening in our new MarvelView. We need to add two pieces of data available in our context when rendering our marvel.json template, voice_name and marvel_message. The voice_name is uncomplicated; it’s the name of a random English language synthesised voice from the selection offered by the Nexmo text-to-speech API. For the marvel_message we query the Marvel API for all characters in the Avengers (2016 – present) series. After tidying up the data slightly; removing any errant HTML tags, ignoring characters with missing information. We concatenate the character's name and their description into a single string; this is our marvel_message.
If we tried to access http://127.0.0.1:8000/marvel/ now, we'd get a TemplateDoesNotExist exception. In our templates folder, we need to create a marvel.json
[
    {
        "action": "talk",
        "text": "{{ marvel_message|safe }}",
        "voiceName": "{{ voice_name }}"
    }
]Now we can test our new endpoint, and hopefully, we should see some information on a random Avengers character! Data provided by Marvel. © 2014 Marvel
[
    {
        "action": "talk",
        "text": "Taskmaster - Taskmaster first exhibited his unusual ability, called 'photographic reflexes,' which allowed him to mimic the motion of anyone he saw, when he was a young boy.",
        "voiceName": "Emma"
    }
]
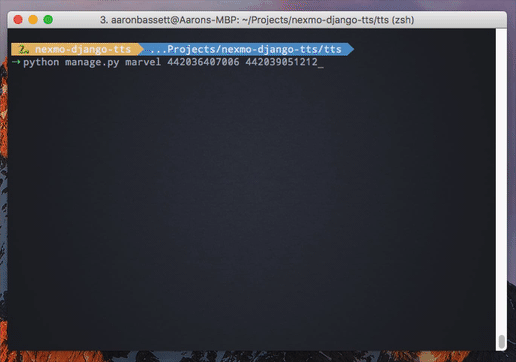
This time instead of using the Python REPL to make our call we'll wrap it in a management command so we can quickly make an outbound Marvel call to any number. Django management commands require a particular directory structure, let's create that first.
mkdir -p outbound/management/commands
touch outbound/management/__init__.py
touch outbound/management/commands/__init__.py
touch outbound/management/commands/marvel.pyNow we have the files in place we can write our marvel.py
import nexmo
from django.core.management.base import BaseCommand


class Command(BaseCommand):
    help = 'Random Avenger character as a TTS phonecall'

    def add_arguments(self, parser):
        parser.add_argument('to_number', type=str)
        parser.add_argument('from_number', type=str)

    def handle(self, *args, **options):

        client = nexmo.Client(
            application_id='<YOUR NEXMO VOICE APP ID>',
            private_key='private.key'
        )

        to_number = [{'type': 'phone', 'number': options['to_number']}]
        from_number = {'type': 'phone', 'number': options['from_number']}
        answer_url = ['https://<NGROK URL>/marvel/']

        response = client.create_call({
            'to': to_number,
            'from': from_number,
            'answer_url': answer_url
        })

        self.stdout.write(str(response))
This code is essentially the same as what we did before on the REPL, but now we've wrapped it in a Django management command. The new marvel command takes two arguments; the number we want to call, and the Nexmo virtual number from which the call should originate.

When you have an urgent alert, text-to-speech calls are perfect, but sometimes it's not enough to just know that someone has answered the call. Combine outbound text-to-speech with IVR to ensure that they've received the message.
Share:
Aaron was a developer advocate at Nexmo. A seasoned software engineer and wannabe digital artist Aaron is frequently found creating things with code, or electronics; sometimes both. You can customarily tell when he's working on something new by the smell of burning components in the air.