Streaming Calls to a Browser with Voice WebSockets
Time to read: 6 minutes
We recently announced WebSocket support within our new Voice API. The initial use cases for this are around server-to-server communication between the Vonage Voice API and speech AI platforms such as IBM Watson or Amazon Alexa. However, I'd like to show you a little demo we built for our booth at AWS ReInvent that shows another use. It demonstrates streaming the audio of a conference call to a web browser and plays it back with the Web Audio API.
Why would you want to do this? Well, firstly it's a nice way to show off the new WebSocket feature, but as I started developing this I realized it's perfect for use cases where you might want to have a large number of people in "listen only" mode for a call. Take the typical large company "all hands" conference calls. If more than 5-10 people are talking it ends up in chaos. In these large-scale calls, most of the participants are just passive listeners who (hopefully) stay muted. But this is pretty inefficient and costly. It doesn't scale particularly well either. Those regular participants aren't really involved in a conference call; their participation is more like listening to a talk radio station. So why not hook them up with a more broadcast-like technology?
The new Vonage WebSocket Voice API is a great solution for this use case. I'll walk you through how to build an app that broadcasts the audio from a call to a number of connected browsers.
I'm going to walk you through the technical details of how this works and hopefully give you an understanding of our Voice WebSocket capabilities. I'm really excited about this feature as it opens up a whole world of possibilities for integrating voice with web applications.
Here's a diagram of how this fits together:
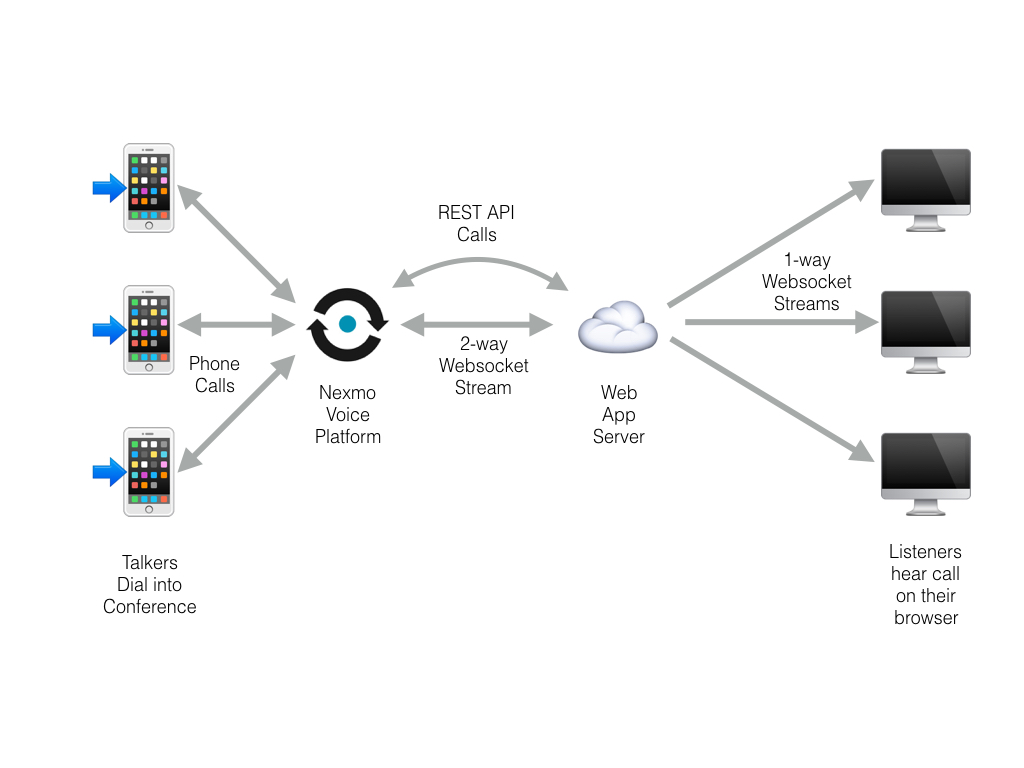 architecture
What we have are two "domains." There is a typical conference call hosted on the Vonage Voice API, which the talkers dial into. The code for this is fairly simple as all we need to do is create a new Vonage application and point the answer_url to an NCCO that creates the conference. We serve this from the web app server.
The NCCO looks like:
[
{
"action": "talk",
"text": "Connecting to Audio Socket Conf"
},
{
"action": "conversation",
"name": "audiosocket",
"eventUrl" : ["http://example.com/event"]
}
]So when users call a number linked to the application they are placed in a very basic conference. In addition, we send events to the web app server about the status of the conference call. You could, of course, add more advanced features to your call here like moderation, a PIN, etc.
Now comes the (slightly) complicated part. When interacting with the Vonage WebSocket API, your application is not a WebSocket client (e.g. a browser). Your application is a WebSocket server. So, your application server needs to make a request to the Vonage REST API to tell the voice platform to make your application a participant in the conference by making an outbound websocket connection to your web app server. To do this, we point the answer_url of the outbound call at the same NCCO we used for the phone calls.
The request to make an outgoing call to the websocket looks like this:
POST /v1/calls
Host: api.nexmo.com
Authorization: Bearer [YOUR_JWT_TOKEN]

{ "to": [{
"type": "websocket",
"uri": "ws://example.com/socket",
"content-type": "audio/l16;rate=16000",
"headers": {
"app": "audiosocket"
}
}],
"from": {
"type": "phone",
"number": "442037831800"
},
"answer_url": ["http://example.com/ncco"]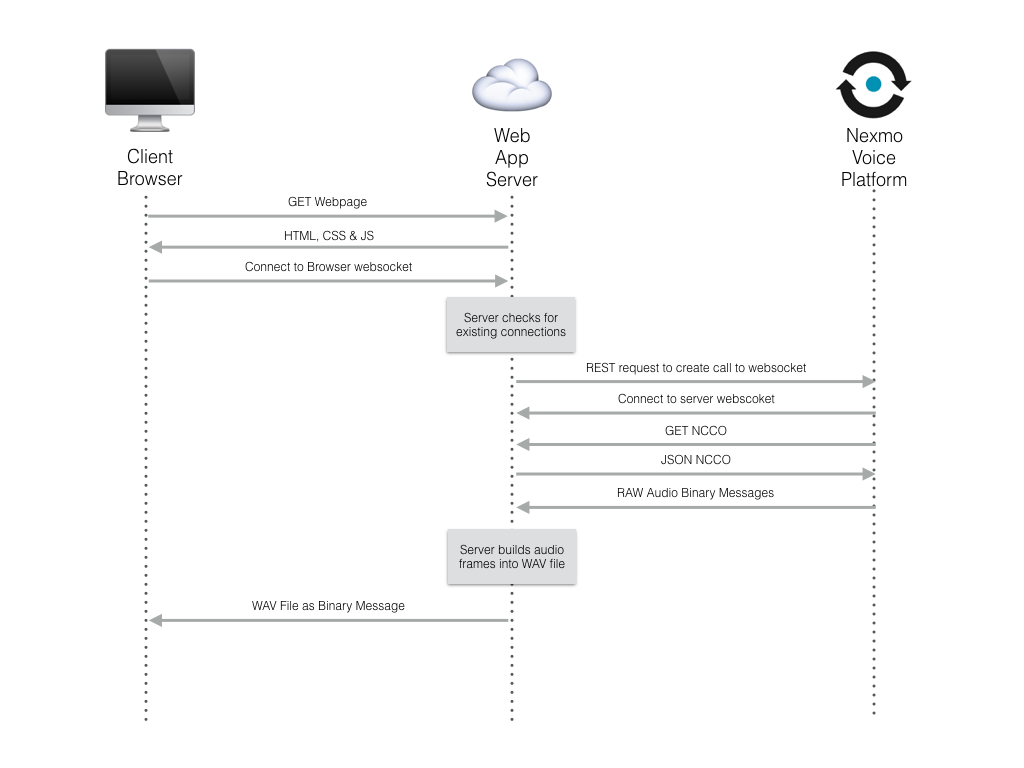
}This sequence diagram shows the flows:
 sequence diagram
To ensure that only one websocket connection is established from Vonage to the app server you need to keep track in your application of the state of this call and its call identifier (callid). I check the number of established client connections. When it's zero, I close down the websocket call again via the REST API. Only the first client connection initiates the connection from Vonage.
Once the websocket connection is established between Vonage and the app server, we need to understand what it sends. On the initial connection, the Voice API will send a single text "message" that contains some JSON data. This is mostly describing the audio format along with any additional values you are passing from your application via the NCCO when the connection was created (in this case app : audiosocket).
{
"app": "audiosocket",
"content-type": "audio/l16;rate=16000"
}After the initial text message, Vonage will then send binary messages with each one containing 20ms of RAW Audio. (Note: RAW audio isn't quite the same as a .wav file.) This means that in your code you will need to determine if the received message is text or binary and handle accordingly.
In order to play this audio in a browser using WebAudio, we need to turn the RAW audio into a .wav file. This means adding a small 44byte header to the file. However, doing this for each 20ms frame would be quite a lot of overhead and given our use case we can tolerate a small amount of latency towards the listeners. To avoid this, we can buffer up 10 of the messages from Vonage, concatenate them together, and stick the 44byte header on the top. This will leave us with a 200ms .wav file.
We can then broadcast those .wav files to the clients by iterating through a list of connected client websockets and sending each one the file as a binary message.
On the web client, we need to create some JavaScript to connect to the websocket server and then handle the received audio messages. Because the audio format that we receive from Vonage is 16bit 16Khz and most browsers' native format is 32bit 44.1Khz, we can't play back a constant stream with WebAudio. We need to ask the browser to transcode the audio to the appropriate playback rate. The WebAudio bufferSource does this very well and adds very little latency, but it can work with discrete files only and a new instance has to be created for each file. Therefore, when a new audio file arrives on the websocket, we need to pass it to a function that will create a new bufferSource and play it back on the main audioContext.
The other point to consider is timing. While moving to fewer but longer samples (200ms vs. 20ms) helps with jitter, the messages still won't arrive at exactly the right interval. Therefore, if we simply play them one after another there will be glitches. Fortunately, WebAudio has a very precise timing interface which can help. By taking the time of the first sample as T0 and then counting the number of messages received and multiplying that by 0.2, we can schedule each sample to be started at the correct time and reassemble the stream to be virtually glitch free.
Those bits of the client code are detailed below with comments:
var startTime; // Make startTime a global var

ws.onmessage = function(event) {
// On the first message set the startTime to the currentTime from the audio context
if (count ==0){
startTime = audioContext.currentTime;
}

audioContext.decodeAudioData(event.data, function(data) {
count ++; // Keep a count of how many messages have been received
var playTime = startTime + (count *0.2) //Play each at file 200ms
playSound(data, playTime); //call the function to play the sample at the appropriate time
});
};

function playSound(buffer, playTime) {
var source = audioContext.createBufferSource(); //Create a new BufferSource fr the
source.buffer = buffer; // Put the sample content into the buffer
source.start(playTime); // Set the starting time of the sample to the scheduled play time
source.connect(analyserNode); //Connect the source to the visualiser
source.connect(audioContext.destination); // Also Connect the source to the audio output
}Of course, there is still the scenario that a file will arrive too late for its scheduled start time. However, WebAudio is clever like this and actually adjusts the playback to start from the correct point, as if it had been there at the start. So, if a 200ms sample is meant to play at T 1200ms but that isn't invoked until 1300ms, WebAudio will jump 100ms into the sample to start playing. This does mean that we may get the occasional glitch in missing small starts of samples, but this is perfectly acceptable for phone call style audio. It might not work as well for high-quality music.
And there you have it: a low-latency, one-way audio stream of your conf call being played back directly in a browser.
Checkout the code on the Vonage Community GitHub Organization and find out more about the Vonage WebSocket Voice API in the docs.