Share:
Aboze Brain John is a Technology Business Analyst at Axa Mansard. He has experience in Data Science and Analytics, Product Research, and Technical Writing. Brain has been engaged in end-to-end data analytics projects ranging from data collection, exploration, transformation/wrangling, modelling, and derivation of actionable business insights and provides knowledge leadership.
SMS Spam Detection with Machine Learning in Python
This article was updated in April 2025
In this tutorial, you’re going to build an SMS spam detection web application. This application will be built with Python using the Flask framework and will include a machine learning model that you will train to detect SMS spam. We will work with the Vonage SMS API so that you’ll be able to classify SMS messages sent to the phone number you have registered in your Vonage account.
To buy a virtual phone number, go to your API dashboard and follow the steps shown below.
 Purchase a phone number
Go to your API dashboard
Navigate to BUILD & MANAGE > Numbers > Buy Numbers.
Choose the attributes needed and then click Search
Click the Buy button next to the number you want and validate your purchase
To confirm you have purchased the virtual number, go to the left-hand navigation menu, under BUILD & MANAGE, click Numbers, then Your Numbers
Python installed. The Anaconda distribution includes a number of useful libraries for data science.
A basic knowledge of Flask, HTML, and CSS.
An overview of the file directory for this project is shown below:
├── README.md
├── dataset
│   └── spam.csv
├── env
│   ├── bin
│   ├── etc
│   ├── include
│   ├── lib
│   ├── pyvenv.cfg
│   └── share
├── model
│   ├── spam_model.pkl
│   └── tfidf_model.pkl
├── notebook
│   └── project_notebook.ipynb
├── requirements.txt
├── script
└── web_app
	├── app.py
	├── static
└── templatesWe will create all the files in the above directory tree through the steps of this tutorial.
We need to create an isolated environment for various Python dependencies unique to this project.
First, create a new development folder. In your terminal, run:
Next, create a new Python virtual environment. If you are using Anaconda, you can run the following command:
Then you can activate the environment using:
If you are using a standard distribution of Python, create a new virtual environment by running the command below:
To activate the new environment on a Mac or Linux computer, run:
If you are using a Windows computer, activate the environment as follows:
Regardless of the method you used to create and activate the virtual environment, your prompt should have been modified to look like the following:
Next, you’ll install all the packages needed for this tutorial. In your new environment, install the following packages (which include libraries and dependencies):
Note: To create a reproducible data science project, stick to the versions I've included here. These were the most up-to-date versions at the time of writing this article.
Here are some details about these packages:
jupyterlab is for model building and data exploration.
flask is for creating the application server and pages.
lightgbm is the machine learning algorithm for building our model
nexmo is a Python library for interacting with your Vonage account
matplotlib, plotly, plotly-express are for data visualization
python-dotenv is a package for managing environment variables such as API keys and other configuration values.
nltk is for natural language operations
numpy is for arrays computation
pandas is for manipulating and wrangling structured data.
regex is for regular expression operations
scikit-learn is a machine learning toolkit
wordcloud is used to create word cloud images from text
After installation, start your Jupyter lab by running:
This opens the popular Jupyter lab interface in your web browser, where you are going to carry out some interactive data exploration and model building.
The Jupyter lab interface is shown here Jupyterlab.
Now that your environment is ready, you’re going to download the SMS training data and build a simple machine learning model to classify the SMS messages. The spam dataset for this project can be downloaded here. The datasets contain 5574 messages with respective labels of spam and ham (legitimate). More about the dataset can be found here. With this data, we will train a machine learning model that can correctly classify SMS as ham or spam. These procedures will be carried out in a Jupyter notebook, which from our file directory is named 'project_notebok'
Here, we will apply a variety of techniques to analyze the data and get a better understanding of it.
The necessary libraries for this project can be imported into project_notebook.ipynb as follows:
import pandas as pd
import numpy as np
import matplotlib.pyplot as plt
import plotly_express as px
import wordcloud
import nltk
import warnings
warnings.filterwarnings('ignore')The spam dataset located in the dataset directory named spam.csv can be imported as follows:
df = pd.read_csv("../dataset/spam.csv", encoding='latin-1')Note: The character encoding of this dataset character set is latin-1(ISO/IEC 8859-1).
Next, we get an overview of the dataset:
df.head()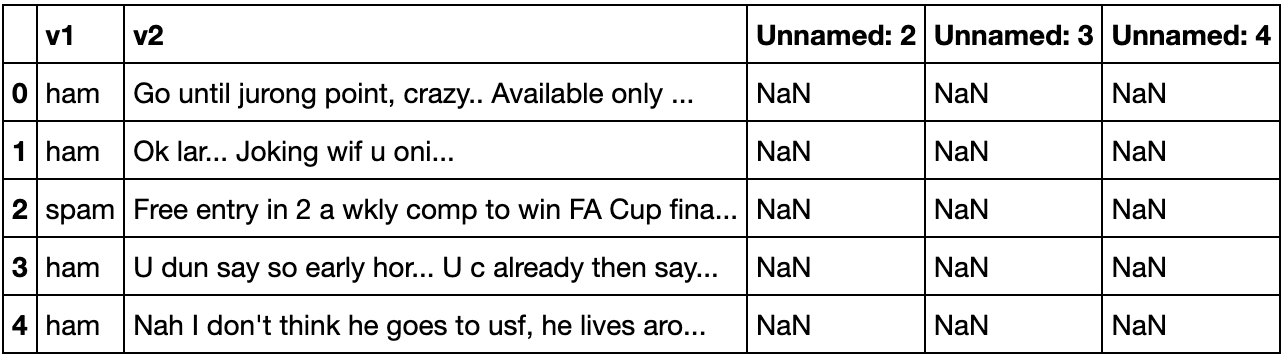 Dataset overview
The dataset contains 5 columns. Column v1 is the dataset label (“ham” or “spam”) and column v2 contains the text of the SMS message. Columns “Unnamed: 2”, “Unnamed: 3”, and “Unnamed: 4” contain "NaN" (not a number) signifying missing values. They are not needed, so they can be dropped as they are not going to be useful in building the model. The following code snippet will drop and rename the columns to improve understandability of the dataset:
df.drop(columns=['Unnamed: 2', 'Unnamed: 3', 'Unnamed: 4'], inplace=True)
df.rename(columns = {'v1':'class_label','v2':'message'},inplace=True)
df.head()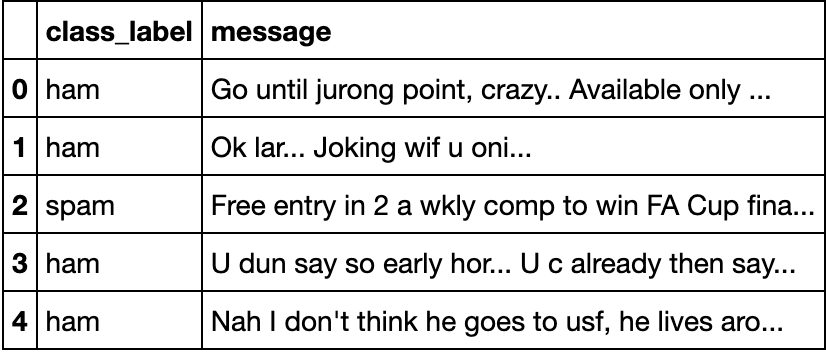 Rename columns
Let's look at the distribution of labels:
fig = px.histogram(df, x="class_label", color="class_label", color_discrete_sequence=["#871fff","#ffa78c"])
fig.show()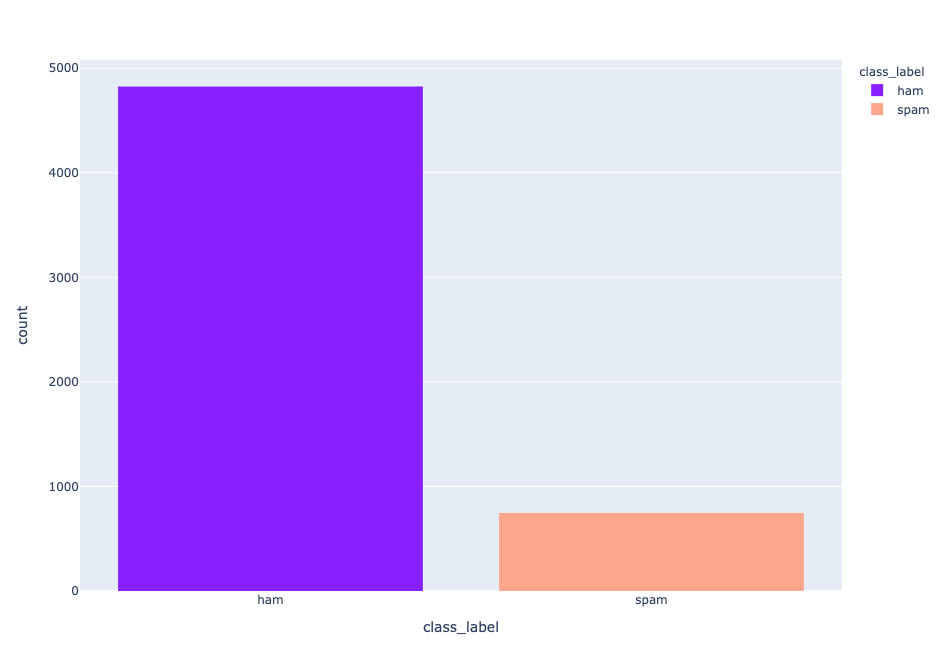 Distributions of labels
We have an imbalanced dataset, with 747 messages being spam messages and 4825 messages being ham.
fig = px.pie(df.class_label.value_counts(),labels='index', values='class_label', color="class_label", color_discrete_sequence=["#871fff","#ffa78c"] )
fig.show()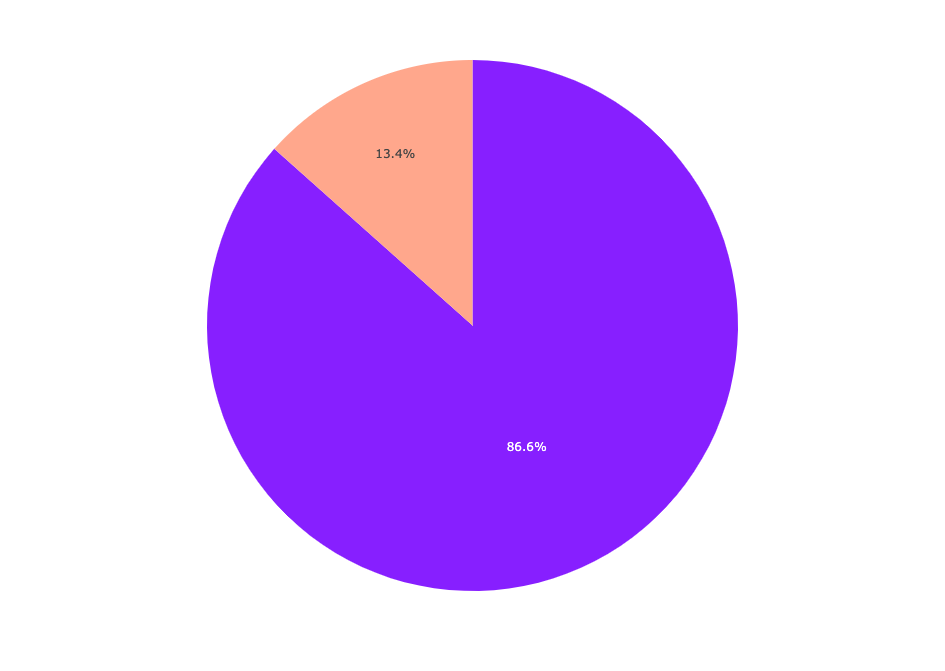 Labels pie chart
The spam makes up 13.4% of the dataset while ham composes 86.6% of the dataset.
Next, we will delve into a little feature engineering. The length of the messages might provide some insights. Let's take a look:
df['length'] = df['message'].apply(len)
df.head() Message length
fig = px.histogram(df, x="length", color="class_label", color_discrete_sequence=["#871fff","#ffa78c"] )
fig.show()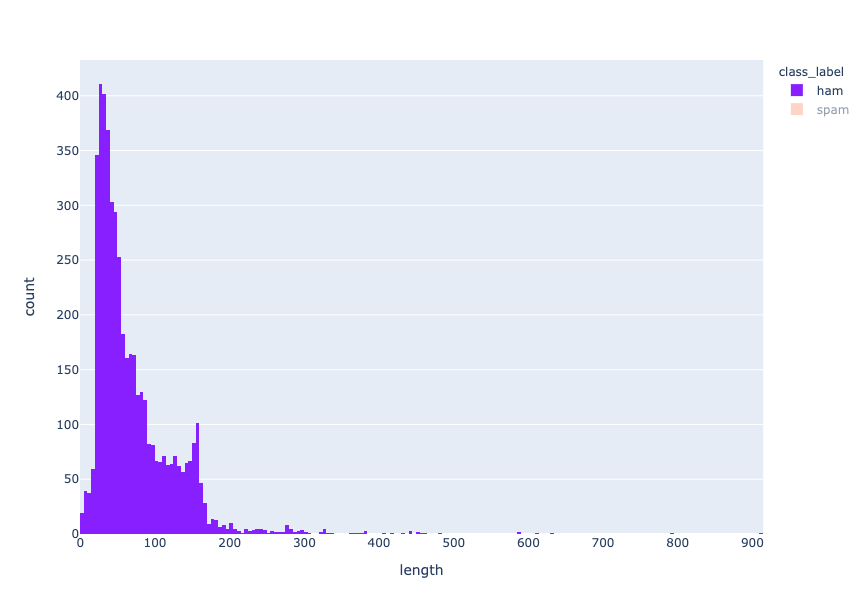 length distribution - ham
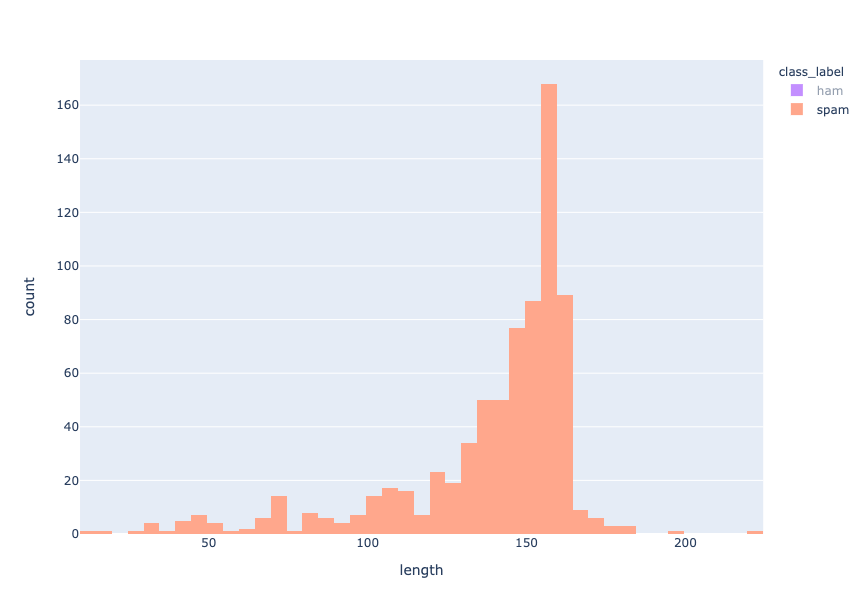 Length distribution - spam
It can be seen that ham messages are shorter than spam messages as the distribution of ham and spam message lengths are centered around 30-40 and 155-160 characters, respectively.
Having a view of the most common words used in spams and hams will help us understand the dataset better. A word cloud can give you an idea of what kind of words are dominant in each class.
To make a word cloud, first separate the classes into two pandas data frames and add a simple word cloud function, as shown below:
data_ham  = df[df['class_label'] == "ham"].copy()
data_spam = df[df['class_label'] == "spam"].copy()

def show_wordcloud(df, title):
	text = ' '.join(df['message'].astype(str).tolist())
	stopwords = set(wordcloud.STOPWORDS)
	fig_wordcloud = wordcloud.WordCloud(stopwords=stopwords, background_color="#ffa78c",
                                    	width = 3000, height = 2000).generate(text)
	plt.figure(figsize=(15,15), frameon=True)
	plt.imshow(fig_wordcloud)
	plt.axis('off')
	plt.title(title, fontsize=20)
plt.show()Below is the code that displays a word cloud for spam SMS:
show_wordcloud(data_spam, "Spam messages")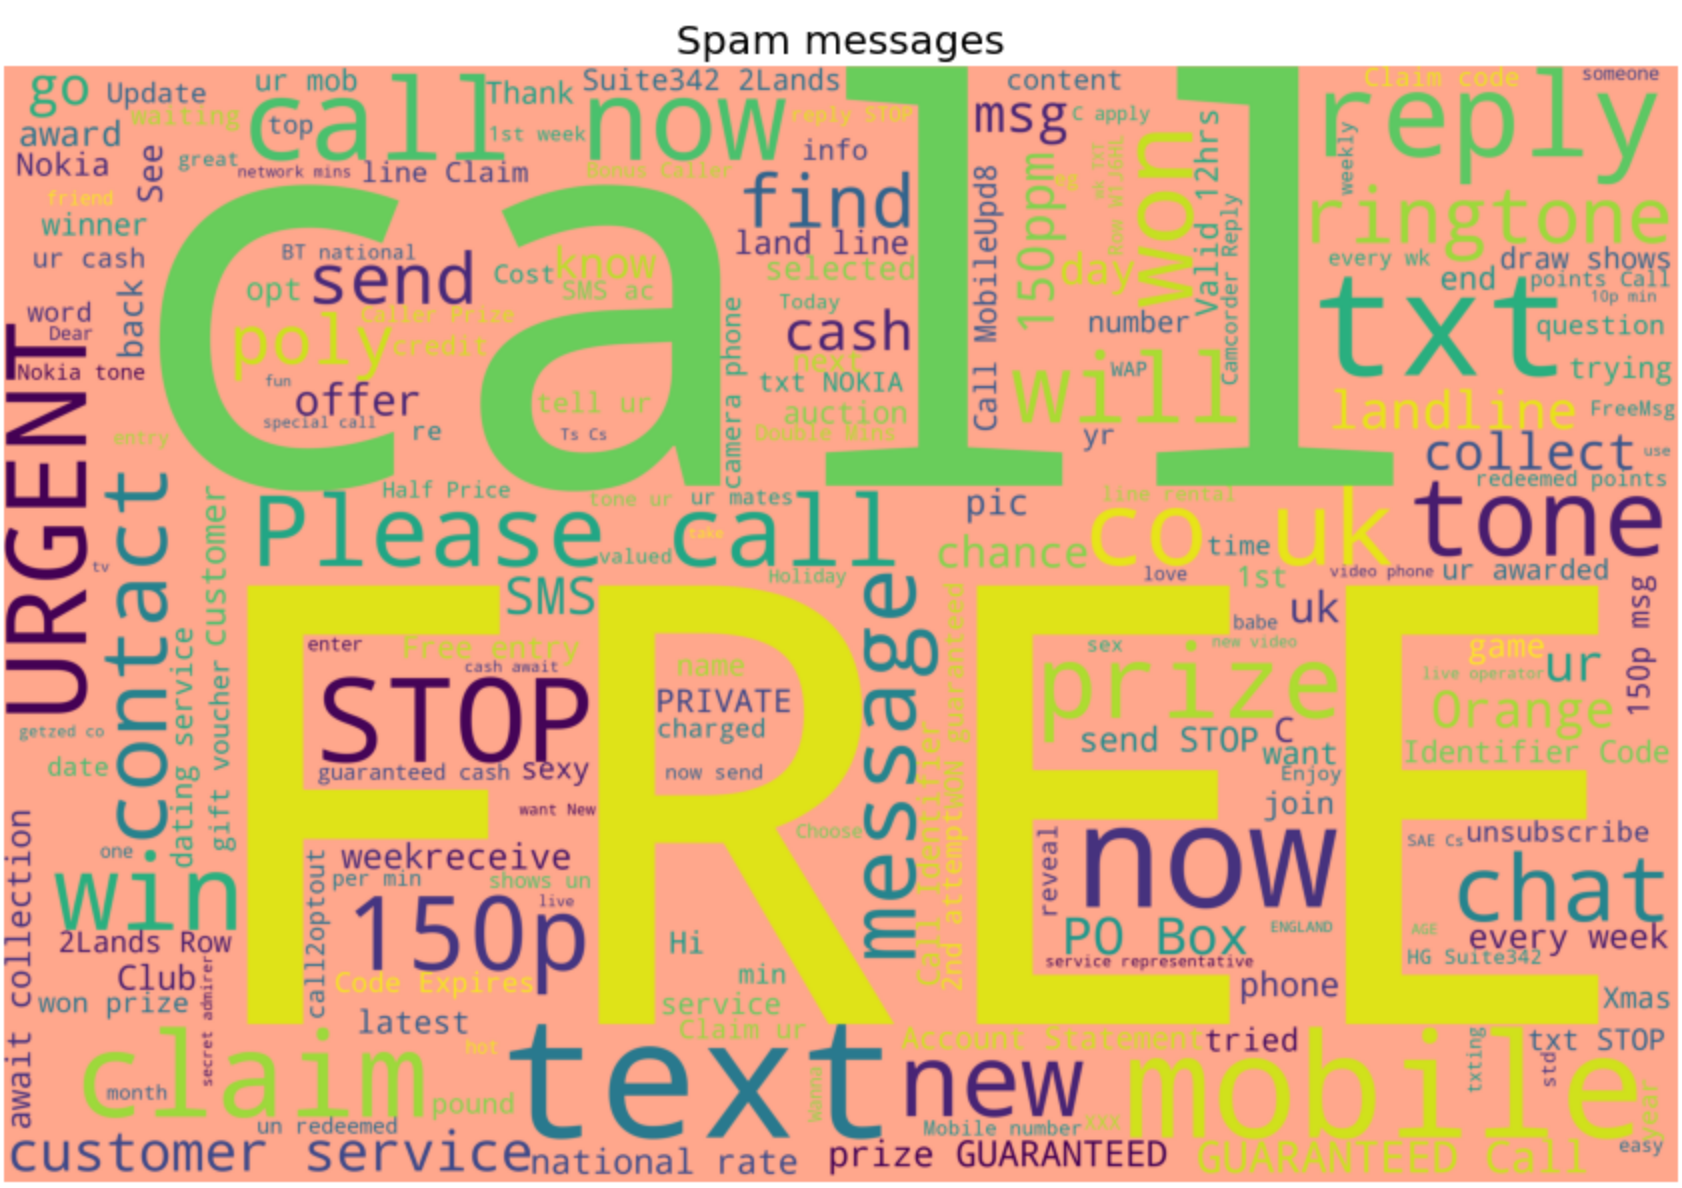 word cloud spam
You can display the word cloud for ham SMS as well:
show_wordcloud(data_ham, "ham messages")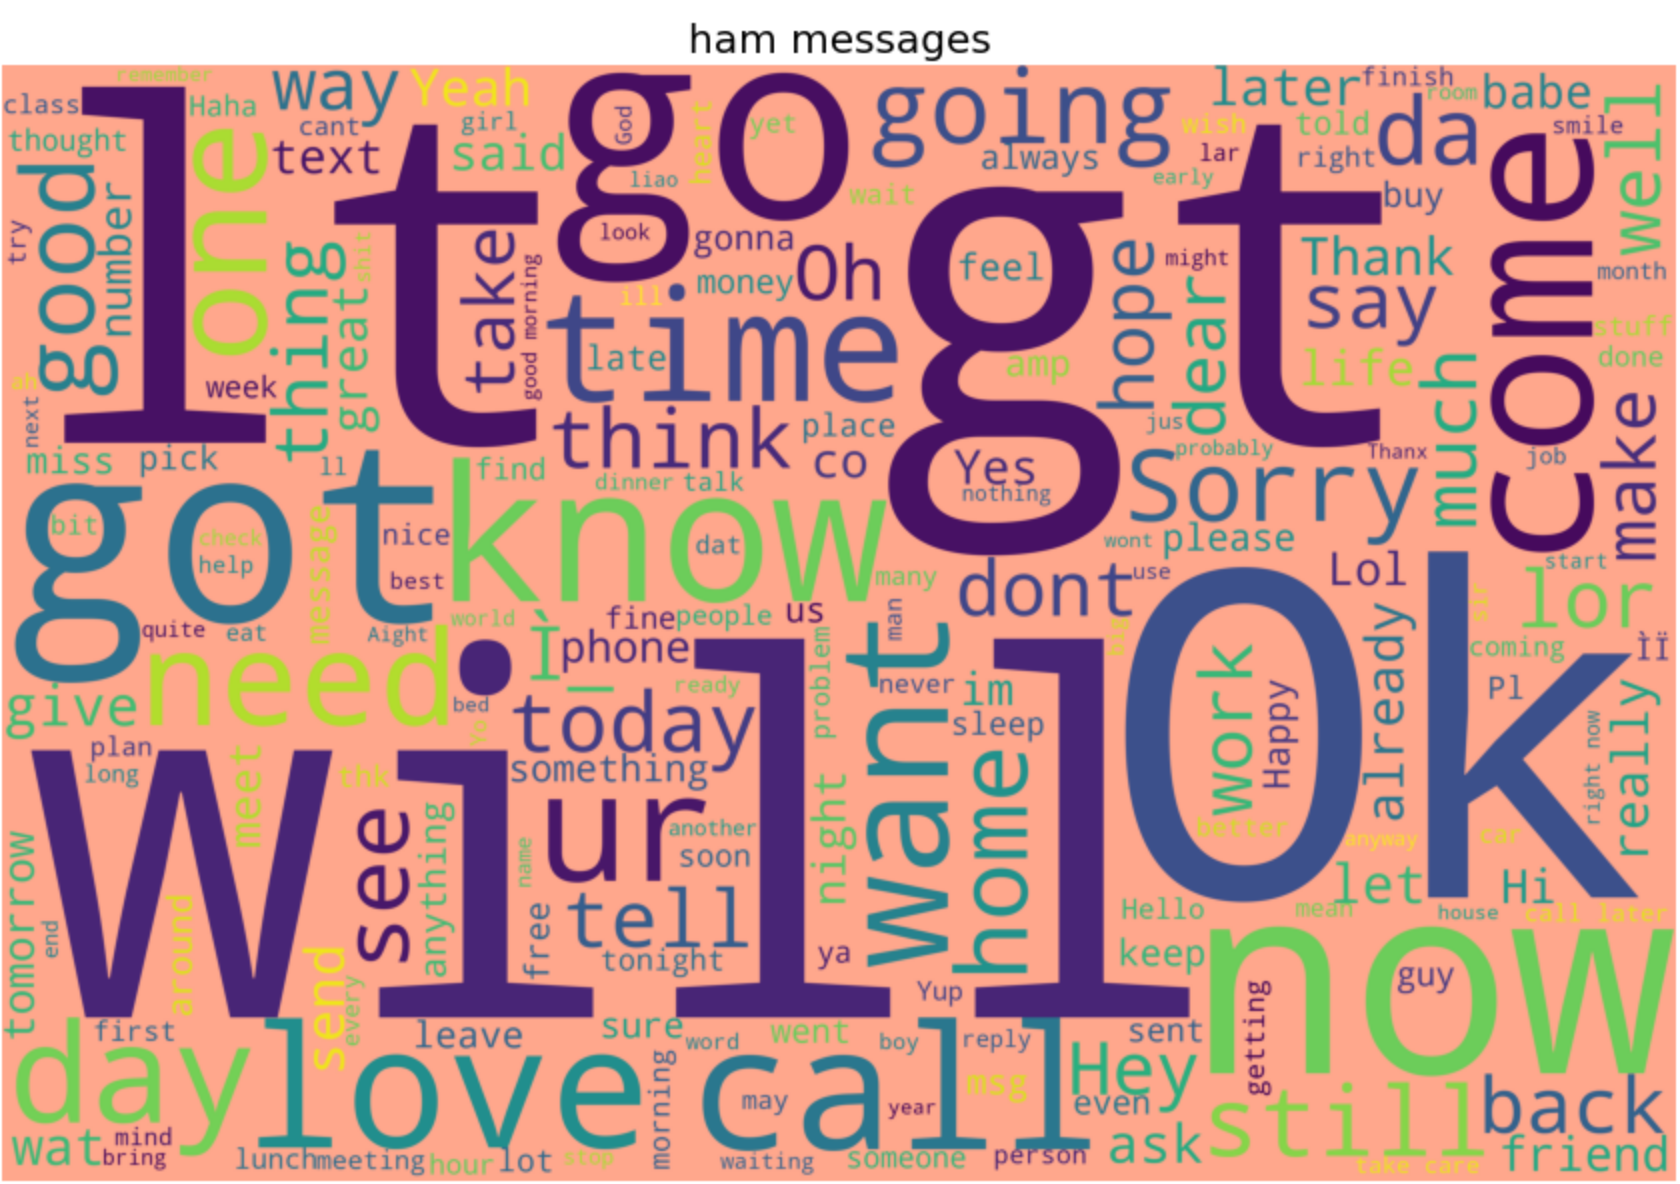 word cloud ham
The process of converting data to something a computer can understand is referred to as pre-processing. In the context of this article, this involves processes and techniques to prepare our text data for our machine learning algorithm
First, we’ll convert the label to numeric form. This is essential before model training, as deep learning models need data in numeric form.
df['class_label'] = df['class_label'].map( {'spam': 1, 'ham': 0})Next, we will process the message content with Regular Expressions (Regex) to keep email and web addresses, phone numbers, and numbers uniform, encode symbols, remove punctuation and white spaces, and finally convert all text to lowercase:
# Replace email address with 'emailaddress'
df['message'] = df['message'].str.replace(r'^.+@[^\.].*\.[a-z]{2,}$', 'emailaddress')

# Replace urls with 'webaddress'
df['message'] = df['message'].str.replace(r'^http\://[a-zA-Z0-9\-\.]+\.[a-zA-Z]{2,3}(/\S*)?$', 'webaddress')

# Replace money symbol with 'money-symbol'
df['message'] = df['message'].str.replace(r'£|\$', 'money-symbol')

# Replace 10 digit phone number with 'phone-number'
df['message'] = df['message'].str.replace(r'^\(?[\d]{3}\)?[\s-]?[\d]{3}[\s-]?[\d]{4}$', 'phone-number')

# Replace normal number with 'number'
df['message'] = df['message'].str.replace(r'\d+(\.\d+)?', 'number')

# remove punctuation
df['message'] = df['message'].str.replace(r'[^\w\d\s]', ' ')

# remove whitespace between terms with single space
df['message'] = df['message'].str.replace(r'\s+', ' ')

# remove leading and trailing whitespace
df['message'] = df['message'].str.replace(r'^\s+|\s*?$', ' ')

# change words to lower case
df['message'] = df['message'].str.lower()Going forward, we'll remove stopwords from the message content. Stop words are words that search engines have been programmed to ignore, both when indexing entries for searching and when retrieving them as the result of a search query such as “the”, “a”, “an”, “in”, "but", "because" etc.
from nltk.corpus import stopwords
stop_words = set(stopwords.words('english'))
df['message'] = df['message'].apply(lambda x: ' '.join(term for term in x.split() if term not in stop_words))Next, we will extract the base form of words by removing affixes from them. This called stemming, as it can be illustrated as cutting down the branches of a tree to its stems. There are numerous stemming algorithms, such as:
Porter’s Stemmer algorithm
Lovins Stemmer
Dawson Stemmer
Krovetz Stemmer
Xerox Stemmer
N-Gram Stemmer
Snowball Stemmer
Lancaster Stemmer
Some of these stemming algorithms are aggressive and dynamic. Some apply to languages other than English and the text data size affects various efficiencies. For this article, the Snowball Stemmer was utilized due to its computational speed.
Note: When using these stemming algorithms, be careful not to over-stem or under-stem.
ss = nltk.SnowballStemmer("english")
df['message'] = df['message'].apply(lambda x: ' '.join(ss.stem(term) for term in x.split()))Machine learning algorithms cannot work with raw text directly. The text must be converted into numbers—more specifically, vectors of numbers. Let's split the messages (text data in sentences) into words. This is a requirement in natural language processing tasks where each word needs to be captured and subjected to further analysis. First, we create a Bag of Words (BOW) model to extract features from text:
sms_df = df['message']
from nltk.tokenize import word_tokenize

# creating a bag-of-words model
all_words = []
for sms in sms_df:
	words = word_tokenize(sms)
	for w in words:
    	all_words.append(w)

all_words = nltk.FreqDist(all_words)Let's take a look at the total number of words:
print('Number of words: {}'.format(len(all_words))) Number of words 6526
Now plot the top 10 common words in the text data:
all_words.plot(10, title='Top 10 Most Common Words in Corpus');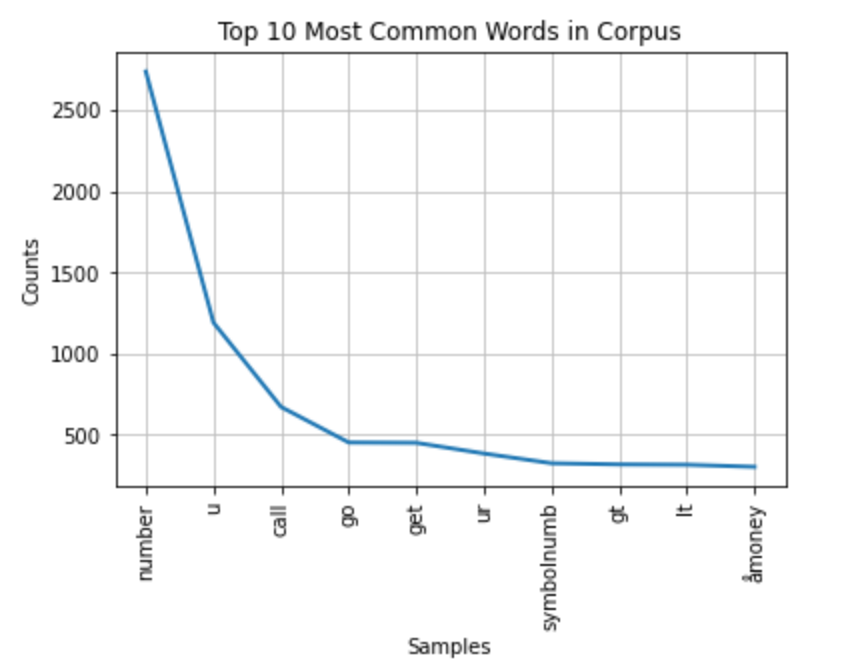 Most common words
Next, we will implement an NLP technique—term frequency-inverse document frequency—to evaluate how important words are in the text data. In short, this technique simply defines what a “relevant word” is. The tfidf_model created from this NLP technique will be saved (serialized) to the local disk for transforming the test data for our web application later:
from sklearn.feature_extraction.text import TfidfVectorizer
tfidf_model = TfidfVectorizer()
tfidf_vec=tfidf_model.fit_transform(sms_df)
import pickle
#serializing our model to a file called model.pkl
pickle.dump(tfidf_model, open("../model/tfidf_model.pkl","wb"))
tfidf_data=pd.DataFrame(tfidf_vec.toarray())
tfidf_data.head()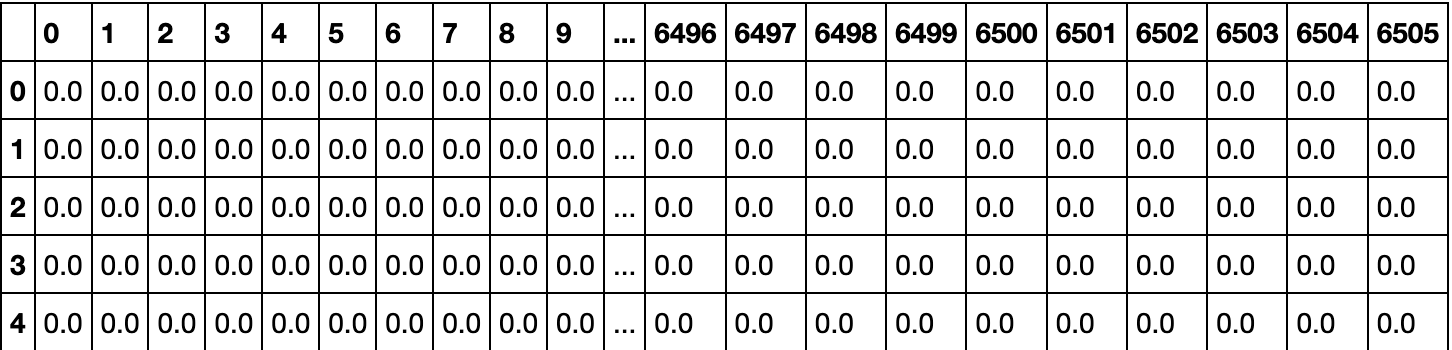 tfidf
tfidf
The shape of the resulting dataframe is 5572 by 6506. In order to train and validate the performance of our machine learning model, we need to split the data into training and test dataset respectively. The training set should be later split into a train and validation set.
### Separating Columns
df_train = tfidf_data.iloc[:4457]
df_test = tfidf_data.iloc[4457:]

target = df['class_label']
df_train['class_label'] = target

Y = df_train['class_label']
X = df_train.drop('class_label',axis=1)

# splitting training data into train and validation using sklearn
from sklearn import model_selection
X_train,X_test,y_train,y_test = model_selection.train_test_split(X,Y,test_size=.2, random_state=42)The split ratio for the validation set is 20% of the training data.
We will be utilizing a machine learning algorithm known as LightGBM. It is a gradient boosting framework that uses tree based learning algorithms. It has the following benefits:
Faster training speed and higher efficiency
Lower memory usage
Better accuracy
Support of parallel and GPU learning
Capable of handling large-scale data
The performance metric for this project is the F1 score. This metric considers both precision and recall to compute the score. The F1 score reaches its best value at 1 and worst value at 0.
import lightgbm as lgb
from sklearn.metrics import f1_score

def train_and_test(model, model_name):
	model.fit(X_train, y_train)
	pred = model.predict(X_test)
	print(f'F1 score is: {f1_score(pred, y_test)}')

for depth in [1,2,3,4,5,6,7,8,9,10]:
	lgbmodel = lgb.LGBMClassifier(max_depth=depth, n_estimators=200, num_leaves=40)
	print(f"Max Depth {depth}")
	print(" ")
	print(" ")
train_and_test(lgbmodel, "Light GBM")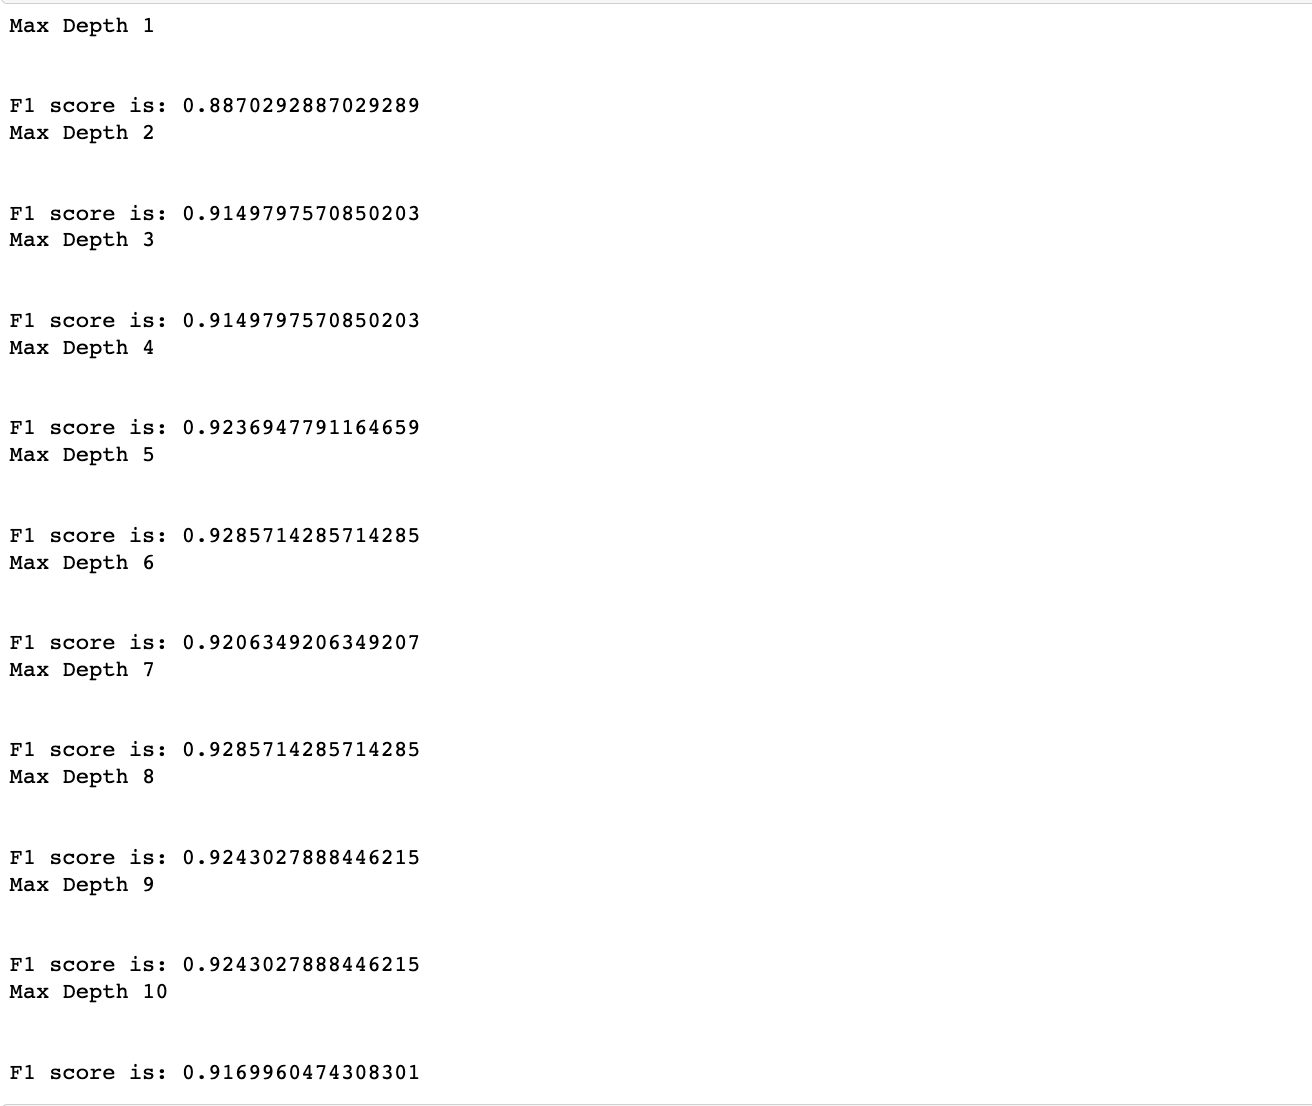 F1 score
From this iteration, it can be seen that the Max Depth of six (6) has the highest F1 score of 0.9285714285714285. We will further perform a random grid search for the best parameters for the model:
from sklearn.model_selection import RandomizedSearchCV
lgbmodel_bst = lgb.LGBMClassifier(max_depth=6, n_estimators=200, num_leaves=40)
param_grid = {
	'num_leaves': list(range(8, 92, 4)),
	'min_data_in_leaf': [10, 20, 40, 60, 100],
	'max_depth': [3, 4, 5, 6, 8, 12, 16, -1],
	'learning_rate': [0.1, 0.05, 0.01, 0.005],
	'bagging_freq': [3, 4, 5, 6, 7],
	'bagging_fraction': np.linspace(0.6, 0.95, 10),
	'reg_alpha': np.linspace(0.1, 0.95, 10),
	'reg_lambda': np.linspace(0.1, 0.95, 10),
 	"min_split_gain": [0.0, 0.1, 0.01],
	"min_child_weight": [0.001, 0.01, 0.1, 0.001],
	"min_child_samples": [20, 30, 25],
	"subsample": [1.0, 0.5, 0.8],
}
model = RandomizedSearchCV(lgbmodel_bst, param_grid, random_state=1)
search = model.fit(X_train, y_train)
search.best_params_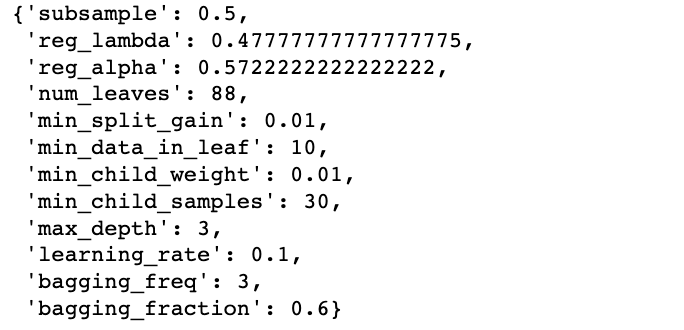 best parameters search
We'll use the best parameters to the train the model:
best_model = lgb.LGBMClassifier(subsample=0.5,
                         	reg_lambda= 0.47777777777777775,
                         	reg_alpha= 0.5722222222222222,
                         	num_leaves= 88,
                         	min_split_gain= 0.01,
                         	min_data_in_leaf= 10,
                         	min_child_weight= 0.01,
                         	min_child_samples= 30,
                         	max_depth= 3,
                         	learning_rate= 0.1,
                         	bagging_freq= 3,
                         	bagging_fraction= 0.6,
                          	random_state=1)
best_model.fit(X_train,y_train) Trained model
Let's check the performance of the model by its prediction:
prediction = best_model.predict(X_test)
print(f'F1 score is: {f1_score(prediction, y_test)}') Model prediction
As a last step, we'll do a full training on the dataset so our web app can make predictions for data it hasn't seen. We'll save the model to our local machine:
best_model.fit(tfidf_data, target)
pickle.dump(best_model, open("../model/spam_model.pkl","wb"))
Now that you have the trained model, we are going to create a Flask application that will read messages sent and received via the Vonage SMS API and classify them into spam or ham. The final result will be displayed in an SMS dashboard you’re also going to define in this section.
The web_app directory is composed of:
├── app.py
├── static
│   ├── Author.png
│   ├── style.css
│   ├── style2.css
│   └── vonage_logo.svg
└── templates
	├── inbox.html
	├── index.html
└── predict.htmlIn your code editor, open a new the file named .env (note the leading dot) and add the following credentials:
API_KEY=<Your API key>
API_SECRET=<Your API secret>
This is important for security purposes, as you should never hardcode your secrets into your application.
Next, we create a file named app.py in the web_app directory. We will import libraries to successfully build the web application. Following that, we'll load our Vonage API credentials from the .env file and initiate the Flask app. We will also import the saved models from our notebook.
import os
import warnings
import nexmo
from flask import Flask, render_template, url_for, request, session
import pickle
import pandas as pd
import nltk
from nltk.corpus import stopwords
from sklearn.feature_extraction.text import TfidfVectorizer

from dotenv import load_dotenv
load_dotenv()

API_KEY = os.getenv("API_KEY")
API_SECRET = os.getenv("API_SECRET")
client = nexmo.Client(key=API_KEY, secret=API_SECRET)

warnings.filterwarnings("ignore")

app = Flask(__name__)
# secret key is needed for session
app.secret_key = os.getenv('SECRET_KEY')After the Flask application instance, we utilize Flask sessions to aid data retention at various server logging intervals. These sessions require you to have a secret key—you can save the secret key value in the .env file and load it as we did the API credentials.
Next, we define three functions related to routes: home(), inbox(), and predict(). The respective templates for these routes are index.html, inbox.html, and predict.html, styled with two stylesheets, stlye.css and stlye2.css.
The home/index route provides the interface to send the message:
@app.route('/',  methods=['GET', 'POST'])
def home():
return render_template('index.html')The interface is shown below:
 Home interface
The supporting index.html file in the templates directory should look like this:
<!DOCTYPE html>
<html lang="en">
<head>
	<meta charset="UTF-8">
	<meta name="viewport" content="width=device-width, initial-scale=1.0">
	<title>Spam detection Project</title>
	<link rel="stylesheet" href="../static/style.css">
</head>
<body>
<nav>
	<img src="{{url_for('static', filename='vonage_logo.svg')}}">
</nav>
<section>
	<div class="side">
    	<img src="{{url_for('static', filename='Author.png')}}" width="350px" height="350px">
    	<h4>Author: Aboze Brain John Jnr</h4>
    	<h2>Project: SMS spam detection system</h2>
    	<h2>using Machine Learning, Python, Flask and</h2>
    	<h2>Vonage API</h2>
	</div>
	<div class="vl"></div>
	<div class="main">
        	<h1>Machine Learning App with Flask</h1>
        	<p>Send an SMS</p>
        	<form action="/inbox" method="POST">
            	<input id="to_number" class="form-control" name="to_number" type="tel" placeholder="Phone Number"/>
            	<br>
            	<br>
            	<textarea id="message" class="form-control" name="message" placeholder="Your text message goes here" rows="10" cols="50"></textarea>
            	<br>
            	<br>
                	<input type="submit" class="btn-info" value="Send SMS">
        	</form>
	</div>
</section>
</body>
</html>
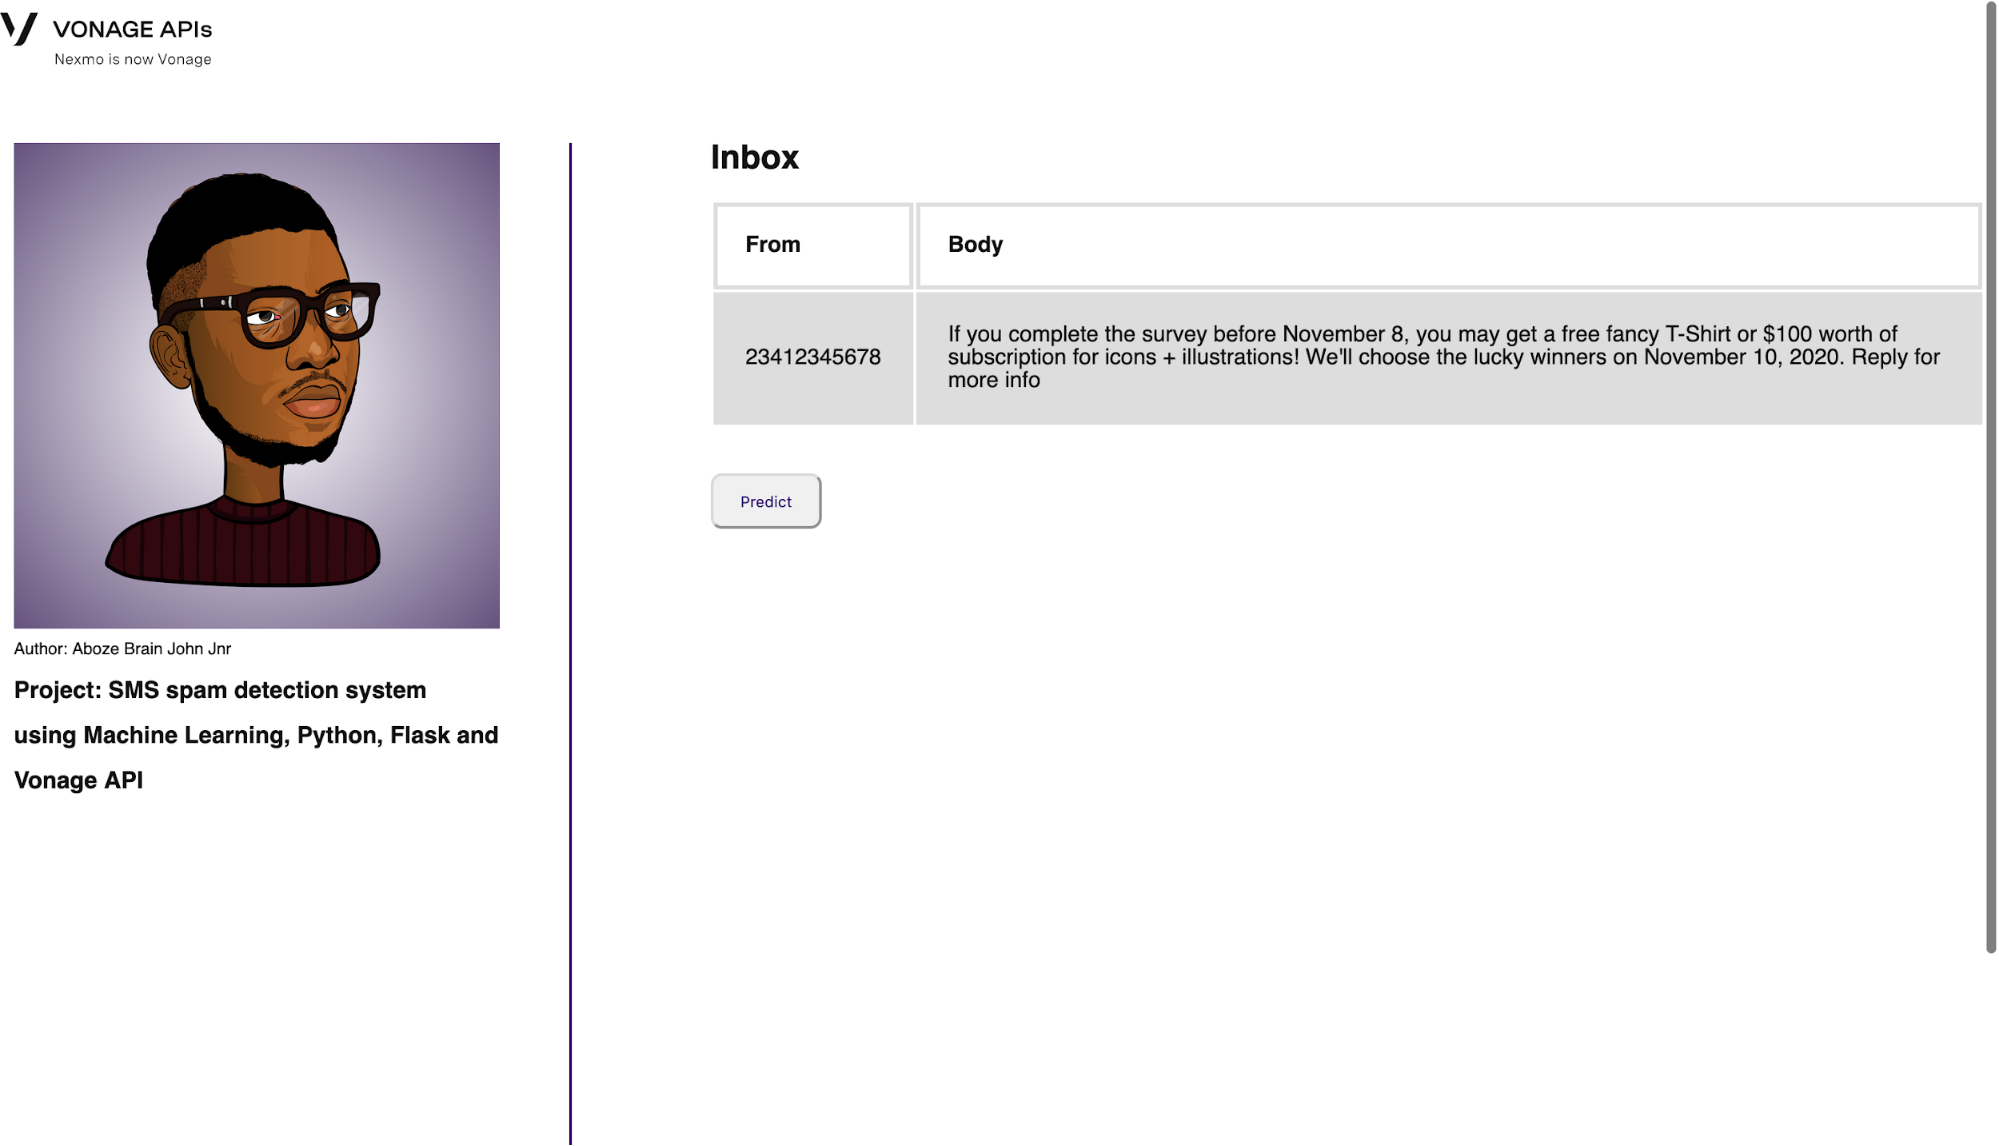
The next route is the inbox route, where the messages sent and sender phone number from the index is stored. The Vonage SMS API is utilized here to initiate the client object and send the message:
@app.route('/inbox', methods=['GET', 'POST'])
def inbox():
	""" A POST endpoint that sends an SMS. """

	# Extract the form values:
	to_number = request.form['to_number']
	message = request.form['message']
	session['to_number'] = to_number
	session['message'] = message

	# Send the SMS message:
	result = client.send_message({
    	'from': 'Vonage APIs',
    	'to': to_number,
    	'text': message,
	})
return render_template('inbox.html', number=to_number, msg=message)The interface is shown below:
 Inbox interface
The supporting inbox.html file in the templates directory looks like this:
<!DOCTYPE html>
<html lang="en">
<head>
	<meta charset="UTF-8">
	<meta name="viewport" content="width=device-width, initial-scale=1.0">
	<title>Prediction</title>
	<link rel="stylesheet" href="../static/style2.css">
</head>
<body>
	<nav>
    	<img src="{{url_for('static', filename='vonage_logo.svg')}}">
</nav>
	</nav>
	<section>
    	<div class="side">
        	<img src="{{url_for('static', filename='Author.png')}}" width="350px" height="350px">
        	<h4>Author: Aboze Brain John Jnr</h4>
        	<h2>Project: SMS spam detection system</h2>
        	<h2>using Machine Learning, Python, Flask and</h2>
        	<h2>Vonage API</h2>
    	</div>
    	<div class="vl"></div>
    	<div class="main">
        	<h1>Inbox</h1>
        	<br>
        	<table class="table" >
            	<tr>
                	<th scope="col">From</th>
                	<th scope="col">Body</th>
            	</tr>
            	<tr scope='row'>
                	<td>{{number}}</td>
                	<td>{{msg}}</td>
            	</tr>
        	</table>
    	<br>
    	<br>
    	<form action="/predict" method="POST">
        	<input type="submit" class="btn-info" value="Predict">
    	</form>
    	<!-- <input type="submit" class="btn-info" value="Predict" formaction="/predict" method="POST"> -->
    	</div>
	</section>
</body>
</html>
The last route is for our prediction. It applies all the previous preprocessing techniques used to train the machine learning model to the new data in the form of inbox messages:
@app.route('/predict', methods=['POST'])
def predict():
	model = pickle.load(open("../model/spam_model.pkl", "rb"))
	tfidf_model = pickle.load(open("../model/tfidf_model.pkl", "rb"))
	if request.method == "POST":
    	message = session.get('message')
    	message = [message]
    	dataset = {'message': message}
    	data = pd.DataFrame(dataset)
    	data["message"] = data["message"].str.replace(
        	r'^.+@[^\.].*\.[a-z]{2,}$', 'emailaddress')
    	data["message"] = data["message"].str.replace(
        	r'^http\://[a-zA-Z0-9\-\.]+\.[a-zA-Z]{2,3}(/\S*)?$', 'webaddress')
    	data["message"] = data["message"].str.replace(r'£|\$', 'money-symbol')
    	data["message"] = data["message"].str.replace(
        	r'^\(?[\d]{3}\)?[\s-]?[\d]{3}[\s-]?[\d]{4}$', 'phone-number')
    	data["message"] = data["message"].str.replace(r'\d+(\.\d+)?', 'number')
    	data["message"] = data["message"].str.replace(r'[^\w\d\s]', ' ')
    	data["message"] = data["message"].str.replace(r'\s+', ' ')
    	data["message"] = data["message"].str.replace(r'^\s+|\s*?$', ' ')
    	data["message"] = data["message"].str.lower()

    	stop_words = set(stopwords.words('english'))
    	data["message"] = data["message"].apply(lambda x: ' '.join(
        	term for term in x.split() if term not in stop_words))
    	ss = nltk.SnowballStemmer("english")
    	data["message"] = data["message"].apply(lambda x: ' '.join(ss.stem(term)
                                                               	for term in x.split()))

    	# tfidf_model = TfidfVectorizer()
    	tfidf_vec = tfidf_model.transform(data["message"])
    	tfidf_data = pd.DataFrame(tfidf_vec.toarray())
    	my_prediction = model.predict(tfidf_data)

return render_template('predict.html', prediction=my_prediction)The interface is shown below:
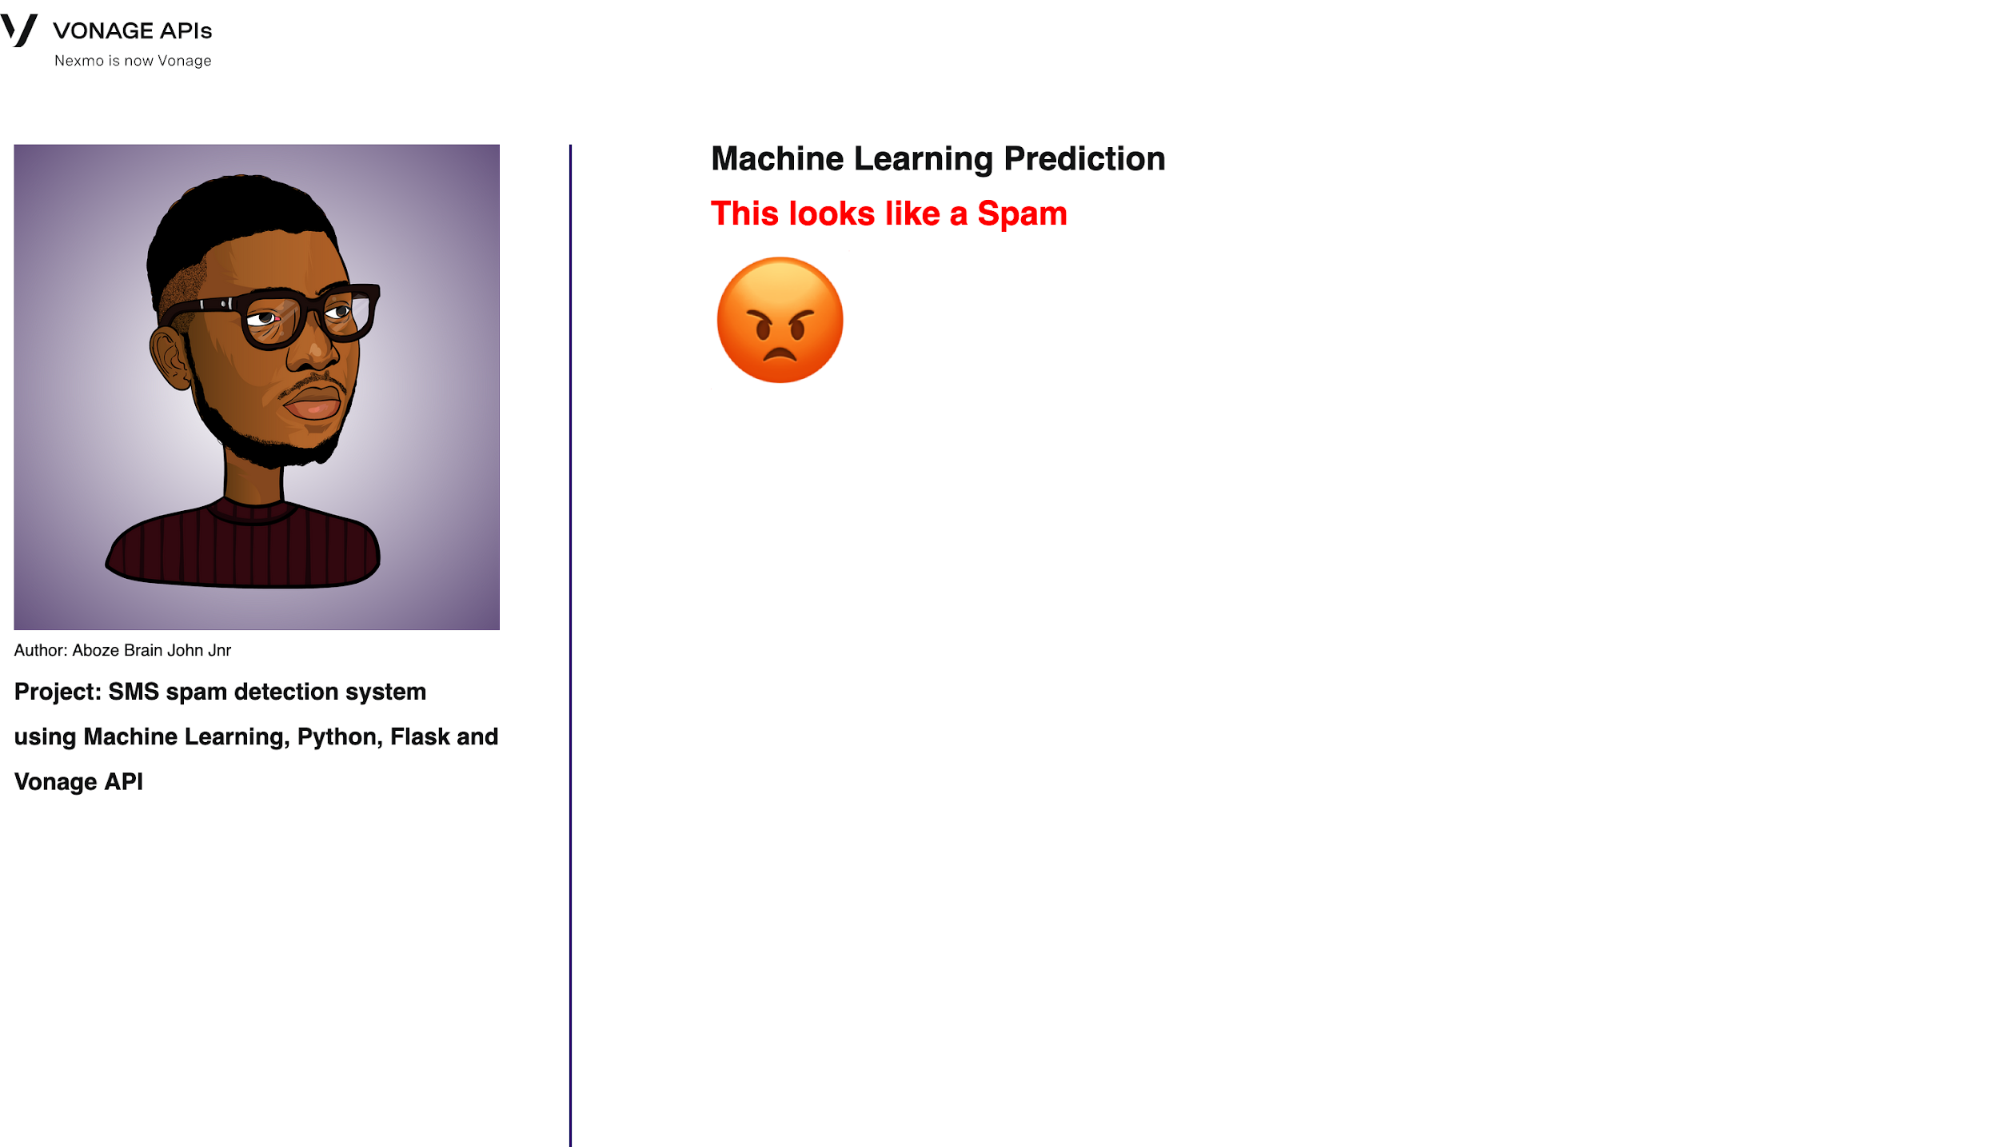 Prediction interface
The supporting predict.html file in the templates directory looks like this:
<!DOCTYPE html>
<html lang="en">
<head>
<meta charset="UTF-8">
<meta name="viewport" content="width=device-width, initial-scale=1.0">
<title>Prediction</title>
<link rel="stylesheet" href="../static/style2.css">
</head>
<body>
<nav>
<img src="{{url_for('static', filename='vonage_logo.svg')}}">
</nav>
<section>
<div class="side">
<img src="{{url_for('static', filename='Author.png')}}" width="350px" height="350px">
<h4>Author: Aboze Brain John Jnr</h4>
<h2>Project: SMS spam detection system</h2>
<h2>using Machine Learning, Python, Flask and</h2>
<h2>Vonage API</h2>
</div>
<div class="vl"></div>
<div class="main results">
<h1>Machine Learning Prediction</h1>
{% if prediction == 1%}
<h2 style="color:red; font-size: x-large;">This looks like a Spam</h2>
<span style='font-size:100px;'>😡</span>
{% elif prediction == 0%}
<h2 style="color:green; font-size: x-large;">This looks like a Ham</h2>
<span style='font-size:100px;'>😀</span>
{% endif %}
</div>
</section>
</body>
</html>
At the end of the Python file, add this code to start a local server:
if __name__ == '__main__':
app.run(debug=True)The minified css for the two supporting stylesheets used by this project is provided below.
For style.css:
*{box-sizing:border-box;padding:0;margin:0}body{color:#131415;font-family:spezia,sans-serif}nav{position:sticky;padding-top:10px}section{display:flex;flex-wrap:nowrap;padding:50px 10px}section h4{font-size:12px;font-weight:400;padding-top:5px}section h2{font-size:17px;font-weight:700;padding-top:15px}.vl{border-left:2px solid #310069;margin-left:50px;height:100vh}.main{margin-left:100px}.main h1{font-size:40px;padding-bottom:15px}.main p{font-size:24px;padding-bottom:15px}.btn-info{color:#310069;height:50px;width:100px;border-radius:8px}For style2.css:
*{box-sizing:border-box;padding:0;margin:0}body{color:#131415;font-family:spezia,sans-serif}nav{position:sticky;padding-top:10px}section{display:flex;flex-wrap:nowrap;padding:50px 10px}section h4{font-size:12px;font-weight:400;padding-top:5px}section h2{font-size:17px;font-weight:700;padding-top:15px}.vl{border-left:2px solid #310069;margin-left:50px;height:100vh}.main{margin-left:100px}td,th{border:3px solid #ddd;text-align:left;padding:20px}tr:nth-child(even){background-color:#ddd}input{width:80px;height:40px;border-radius:8px;color:#310069}button{width:80px;height:40px;border-radius:8px;color:#310069}Now you can test your application! To start your server, open your root folder in a terminal, and then run the following in the web_app directory:
If you’ve followed all the steps above, then you should see your server running as shown below:
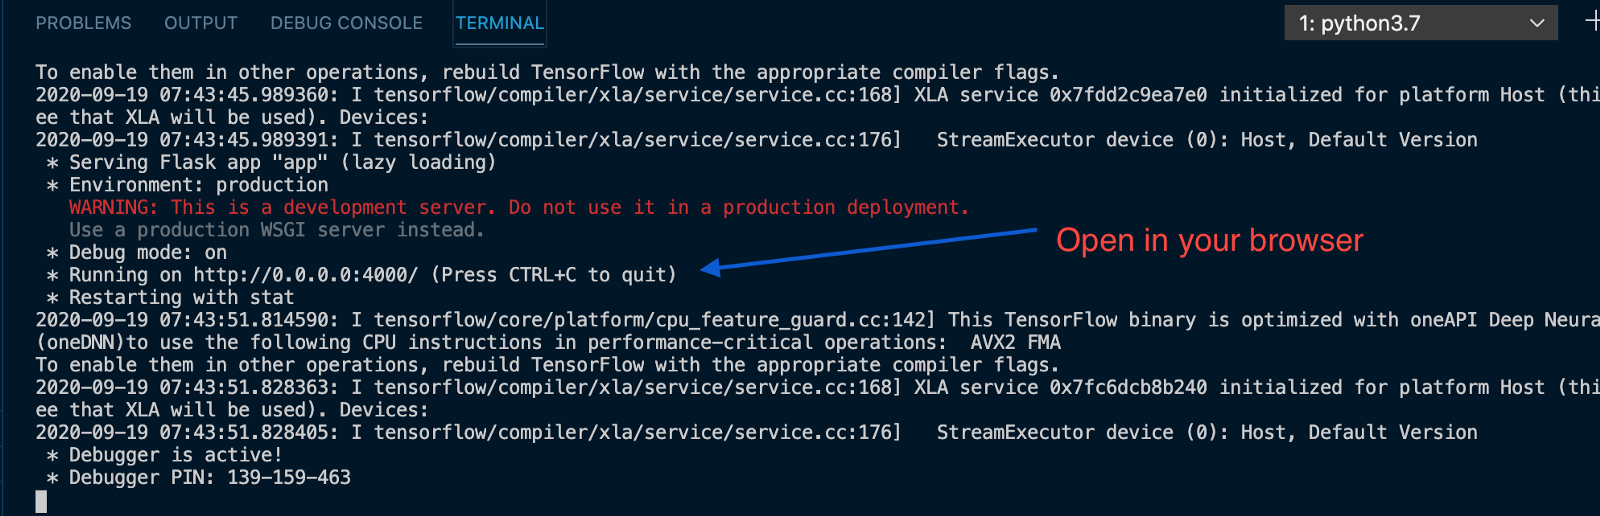 Server output
Enter http://localhost:5000/ in the address bar to connect to the application.
With that, we come to the end of this tutorial. You can try other SMS examples to see the outcome. I’m sure you can already think of all the amazing possibilities and use cases of this new knowledge. You can integrate this spam filtering into HR software, chatbots, customer service, and any other message-based application.
Have a question or want to share what you're building?
Subscribe to the Developer Newsletter
Follow us on X (formerly Twitter) for updates
Watch tutorials on our YouTube channel
Connect with us on the Vonage Developer page on LinkedIn
Stay connected and keep up with the latest developer news, tips, and events.
Share:
Aboze Brain John is a Technology Business Analyst at Axa Mansard. He has experience in Data Science and Analytics, Product Research, and Technical Writing. Brain has been engaged in end-to-end data analytics projects ranging from data collection, exploration, transformation/wrangling, modelling, and derivation of actionable business insights and provides knowledge leadership.