Share:
A trained actor with a dissertation on standup comedy, I came into PHP development via the meetup scene. You can find me speaking and writing on tech, or playing/buying odd records from my vinyl collection.
Send Greek Unicode Viber Messages with Symfony
Time to read: 12 minutes
I love the random nature of things you get to find out within Developer Advocacy. This particular find came from a conversation I had at the We Are Developers Conference in Berlin this year. It turns out that official Greek Government messages are sent out using Viber, accounting for a significant 4.55% share of the mobile messaging market. I had a lightbulb moment: Vonage supports Viber in the Messages API, so why not show an example of sending out a Unicode message using PHP to a Viber device? And that, reader, is exactly what we're going to do, entirely from scratch.
We're going to be using the Symfony Framework for this tutorial, but instead of following the installation process outlined in the Symfony Docs, I've taken a slightly different approach. Neal Brooks helped me out by creating this repository that will boot up a full framework with a single command!
Let's get to business, and boot up the app first. As we're using Docker for this, you'll need to have Docker installed for your platform first, and you'll need to have git version control installed. Another required step (which will be more relevant for Windows users than Linux or Mac environments) is to make sure that GNU Make is installed.
Clone the following repository from your command line:
Now we use make to build the application:
The command will do two things:
Download and install all dependencies for the latest version of Symfony, which sits in the
appfolder (this is your application source code now)Boot up the Docker environment using
docker compose upwhich will bring up the Symfony PHP container running PHP8.2, Postgres, Node, and Nginx as the choice of web server.
Because we're going to be super lazy, we're also going to use a command to open up our app in the browser:
 Welcome to Symfony!
We're up! Now to start developing. The first thing we're going to do is to add the Vonage PHP SDK as a dependency of the Symfony app, using Composer. We can use the makefile to do this inside the PHP container.
What we're going to do with the app is mock an incoming webhook via an exposed route, then send the message within that payload out to a number through Viber. There are a couple of steps required to make this work: firstly you'll need a Vonage account.
Next, we need to create a Vonage Application, with Messages capability. We can do this via the Vonage Dashboard :
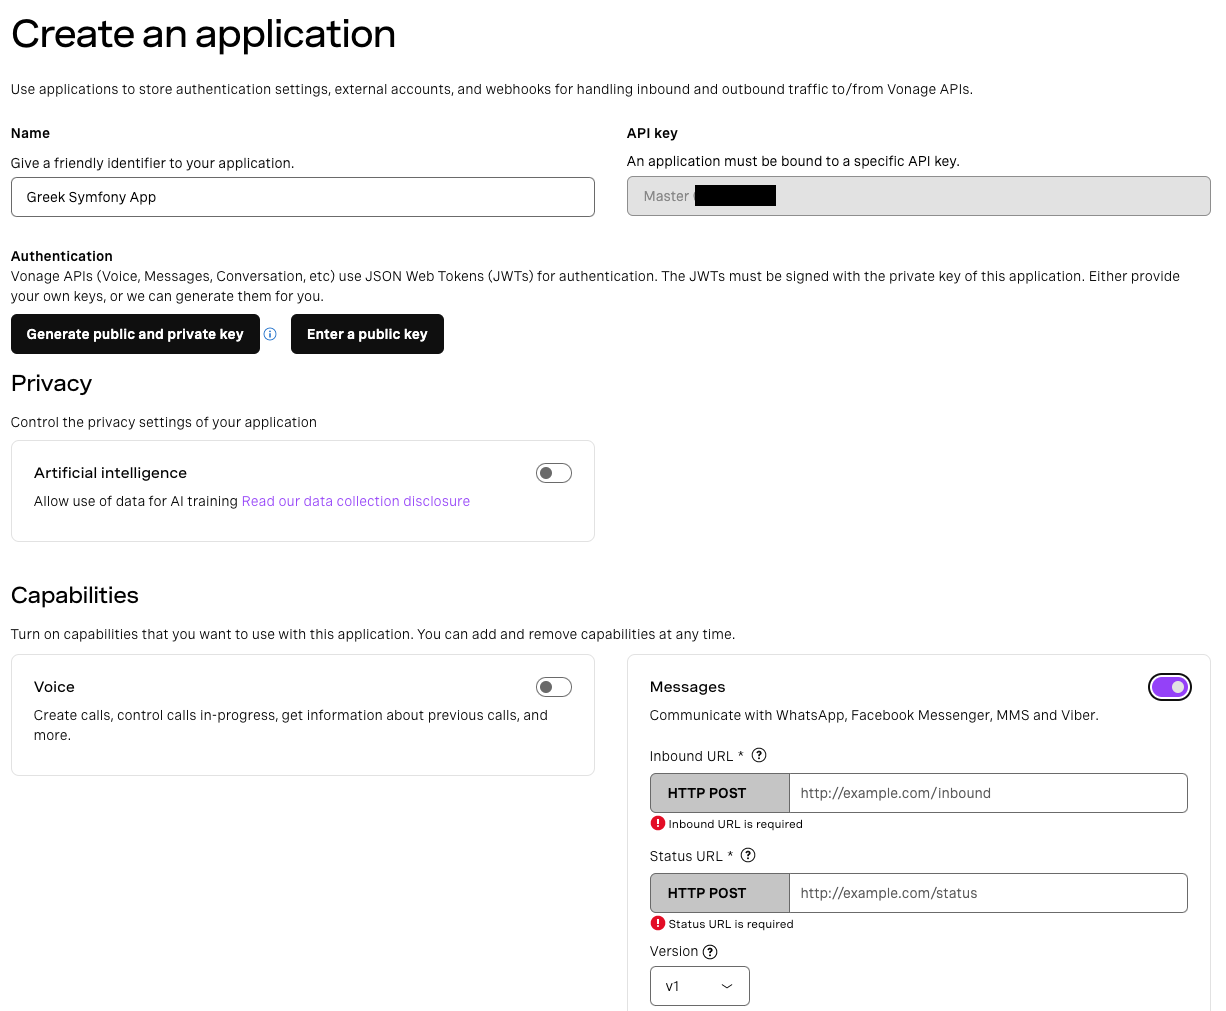 Creating an Application in the Vonage Dashboard
Don't worry about the Messages webhooks for Inbound URLs - we're not interested in getting either status callbacks or Inbound messages for the purposes of this article. When creating the app, you can put dummy URLs into the webhook config as they are required fields.
The most important parts you will need are:
Your application ID
The
private.keydownloaded from theGenerate public and private keybutton on this dashboard, and put into the Symfony root folder (i.e.app)
After you've hit 'Generate Application', we need the ability to fetch our configuration using Symfony's Config Builder. We'll configure them as parameters, as this is the simplest form of getting application global values out.
Create a new file, vonage.yaml, and place it in app/config/packages. Inside this file, we'll put our keys:
parameters:
  application_id: '99996908-65ec-XxXx-a640-f5f4a999a3b9'
private_key_path: '%kernel.project_dir%/private.key'Make sure to replace the dummy value I've given for application_id with the correct one from the Vonage Application that you generated via the Dashboard. With these parameters defined, you'll be able to access their values from anywhere in Symfony using the ParameterBag (more on that later).
While we have the Dashboard open, we'll configure the account we're going to use for using the Viber Business Messages platform. Rather than go through the process of setting up your own Viber Business Messages account, we'll use a pre-provisioned account available for use within the Messages Sandbox.
Before setting up the Sandbox, you'll need to have the Viber app installed on your phone. Download the app, and follow the complete process.
The next step is to allow-list the number associated with your Viber account for the Messages Sandbox. To do this, go to the Messages Sandbox in the Dashboard. You can navigate there using the menu via Troubleshoot & Learn > Developer Tools > Messages Sandbox. Click on the 'Add to Sandbox' link in the Viber card, and follow the instructions given there to allow-list your number for the Sandbox Viber account. Since we're using the pre-provisioned Sandbox account, Vonage branding will be present in the messages from that account.
Now that the Sandbox account is set up, next we'll create the route in Symfony that will trigger the message. We're going to do this inside the Docker container (this is providing you are one level above the app directory where all the source code is located):
You'll be given a prompt here to name your controller. Let's call it MessengerController. The console will boilerplate the rest for you, you can see this with both the code it generates:
namespace App\Controller;

use Symfony\Bundle\FrameworkBundle\Controller\AbstractController;
use Symfony\Component\HttpFoundation\Response;
use Symfony\Component\Routing\Annotation\Route;

class MessengerController extends AbstractController
{
    #[Route('/messenger', name: 'app_messenger')]
    public function index(): Response
    {
        return $this->render('messenger/index.html.twig', [
            'controller_name' => 'MessengerController',
        ]);
	}
}
You can access the new route from your browser now:
 Symfony's default controller template
Our route is going to behave more like a REST API route than a web application route. So, we need to specify it as a POST endpoint, and make it return some JSON. Let's update the code to do that:
#[Route('/messenger', name: 'app_messenger', methods: ['POST'], format: 'json')]
public function index(): Response
{
    return new JsonResponse(['message_success' => true]);
}
Three things have changed here in order to get a response:
The Route annotation has changed, to allow
POSTrequests only.The Route annotation also now specifies that only
application/jsoncan be sent to this endpointWe now return a
JsonResponseobject.
You can now try to hit the endpoint with an API testing tool such as Postman. Here, I've chosen to use Insomnia:
 Using Insomnia to test our Application
OK, we have a working request/response lifecycle. Excellent. Time to put the rest of the puzzle together.
You might have noticed that we are sending a message in the JSON payload - and, as promised, it's in Greek Unicode! So, first up the code is extracting that string out. Using Symfony's Dependency Injection, we're going to add the Request object into the controller method, which will give us access to the entire request:
use Symfony\Component\HttpFoundation\Request;

#[Route('/messenger', name: 'app_messenger', methods: ['POST'], format: 'json')]
public function index(Request $request): Response
{
    return new JsonResponse(['message_success' => true]);
}
Now, we can pull out a key in the request payload named message:
use Symfony\Component\HttpFoundation\Request;

#[Route('/messenger', name: 'app_messenger', methods: ['POST'], format: 'json')]
public function index(Request $request): Response
{
	$message = $request->getPayload()->get('message');

    return new JsonResponse(['message_success' => true]);
}
So, we have our message and request/response configured. It's time to get the Vonage PHP SDK into our controller, with the base client for it being configured with our credentials we set up in Symfony's config. We use an object called the ParameterBag to get these credentials out. To get access to this class, inject it into the controller's constructor:
public function __construct(
    protected ParameterBagInterface $parameterBag,
) {}You can now access this using $this->parameterBag. Let's pull out what we need:
use Symfony\Component\HttpFoundation\Request;

#[Route('/messenger', name: 'app_messenger', methods: ['POST'], format: 'json')]
public function index(Request $request): Response
{
	$message = $request->getPayload()->get('message');

	$privateKey = file_get_contents($this->parameterBag->get('private_key_path'));
	$applicationId = $this->parameterBag->get('application_id');

    return new JsonResponse(['message_success' => true]);
}
Now that we have the two required parameters for our Vonage credentials, we can use them to as arguments to create a Vonage\Credentials\Keypair object, and subsequently pass that object when instantiating a new Vonage Client:
use Symfony\Component\HttpFoundation\Request;

#[Route('/messenger', name: 'app_messenger', methods: ['POST'], format: 'json')]
public function index(Request $request): Response
{
	$message = $request->getPayload()->get('message');

	$privateKey = file_get_contents($this->parameterBag->get('private_key_path'));
	$applicationId = $this->parameterBag->get('application_id');

	$vonageCredentials = new Client\Credentials\Keypair($privateKey, $applicationId);

	$client = new Client(
		$vonageCredentials,
		[
			'base_api_url' => 'https://messages-sandbox.nexmo.com'
	    ]
	);

    return new JsonResponse(['message_success' => true]);
}
An important step to take note of here is that the Client is taking an additional option, base_api_url. This overrides the Base URL settings baked into the SDK, and it does this so that you can use the Messages API sandbox.
It's time to create the Viber message. You'll need to use a from number that is shown to you in the Vonage Dashboard. You can see this number if you scroll down on the Messages Sandbox page:
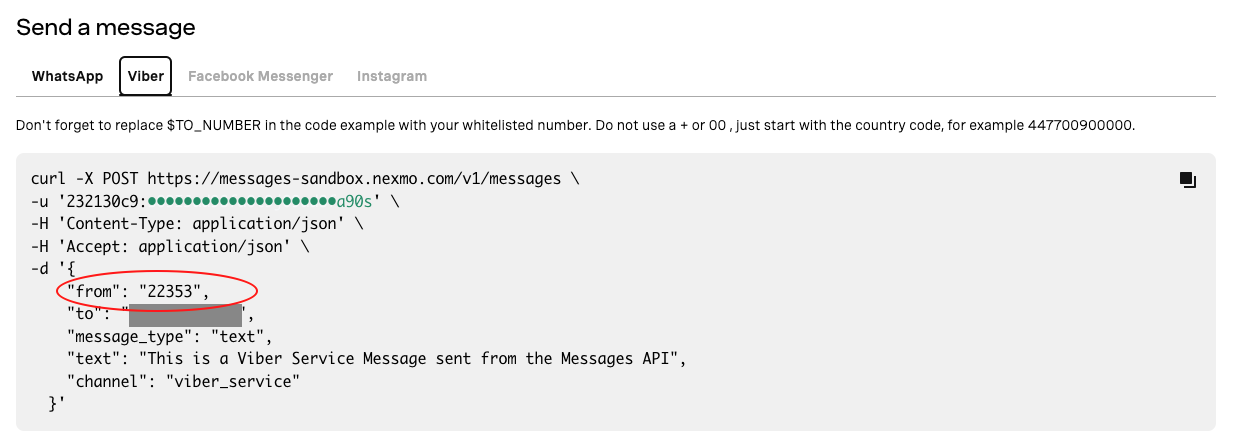 You can see the correct 'from' field here
We use this number when creating the ViberText object:
$messageText = 'Καλώς ήρθατε στο Vonage στα Ελληνικά!'
$vonageMessage = new ViberText('44999999999', '22353', $messageText);The last thing to do is send the message, but it would be preferable to make the return JSON key message_success both accurate and defensive. So, here is the final result, in full:
namespace App\Controller;

use Psr\Log\LoggerInterface;
use Symfony\Bundle\FrameworkBundle\Controller\AbstractController;
use Symfony\Component\DependencyInjection\ParameterBag\ParameterBagInterface;
use Symfony\Component\HttpFoundation\JsonResponse;
use Symfony\Component\HttpFoundation\Request;
use Symfony\Component\HttpFoundation\Response;
use Symfony\Component\Routing\Annotation\Route;
use Vonage\Client;
use Vonage\Messages\Channel\Viber\ViberText;

class MessengerController extends AbstractController
{
    public function __construct(
        protected ParameterBagInterface $parameterBag,
        protected LoggerInterface $logger
    ) {}

    #[Route('/messenger', name: 'app_messenger', methods: ['POST'], format: 'json')]
    public function index(Request $request): Response
    {
        $messageText = $request->getPayload()->get('message');
        $responseData = ['message_success' => false];

		$privateKey = file_get_contents($this->parameterBag->get('private_key_path'));
		$applicationId = $this->parameterBag->get('application_id');

		$vonageCredentials = new Client\Credentials\Keypair($privateKey, $applicationId);

		$client = new Client(
			$vonageCredentials,
			[
				'base_api_url' => 'https://messages-sandbox.nexmo.com'
		    ]
		);

        $vonageMessage = new ViberText('44999999999', '22353', $messageText);

        try {
            $client->messages()->send($vonageMessage);
            $responseData['message_success'] = true;
        } catch (\Exception $exception) {
            $this->logger->error($exception->getMessage());
        }

        return new JsonResponse($responseData);
    }
}
There are a couple of things to go through with the final code. Firstly, the defensive code requirement means that we have introduced a try-catch block. But, what do we do if it fails apart from send false to let the client know the result has failed? Well, we can log the error response. This has been done by using Symfony's Dependency Injection to add the Logger to the controller class via. the constructor. In this case, Symfony comes with the well-known Monolog configured out of the box so you can the LoggerInterface here.
Fire off the request on Insomina again and...
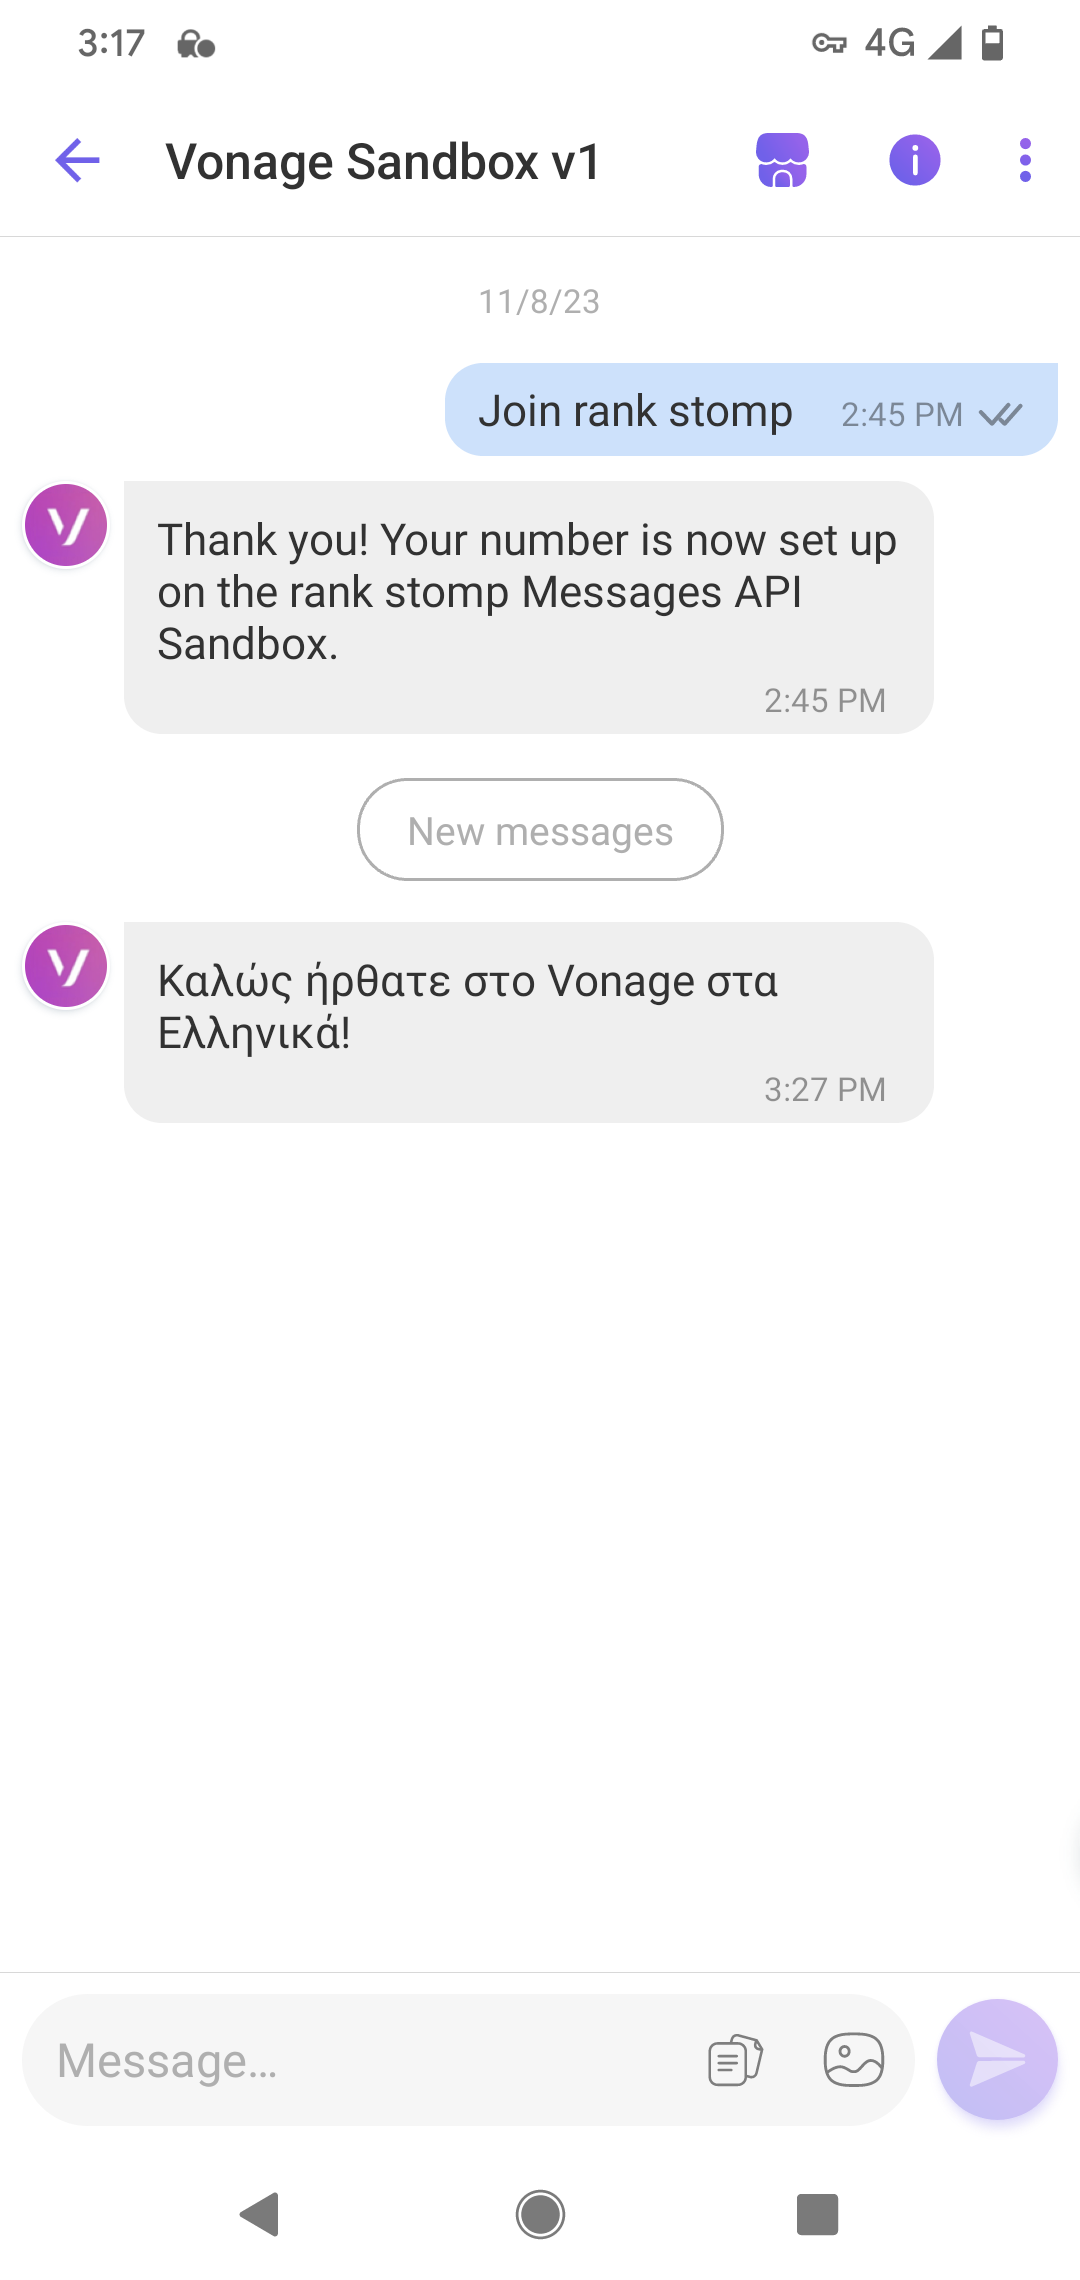 Greek Viber Messages!
Magic! We have a Greek locale message on Viber!
Using the Vonage PHP SDK is designed to make development time super-speedy, and paired with the rapid development time offered by the Symfony Framework makes for a powerful set of tools in your hands. If you're building something and need help or guidance, let us know by registering for our Community Slack.
Sending SMS from PHP with Failover: The Cupcake Bakery
Type Safety Done Right - PHP Array Hacking