
Share:
Jẹ́káyinOlúwa is a software craftsman and product manager passionate about technology and its impact on people. He works on product management, backend development, DevOps, technical writing, and community strategy. He enjoys dealing in the intersection of software, design, and human interaction. He likes reading and music.
Receive Outbound SMS Delivery Receipts With Python
Time to read: 10 minutes
You've already learned how to send an SMS with Python. You’ve also learned how to receive SMS messages in Python applications. But unless you have access to the device you've sent it to, how can you be sure that your SMS arrived?
With the Vonage Messages API, you can confirm delivery through webhooks and create delivery receipts (also known as DLRs or delivery reports). In this tutorial, you will learn how to set up SMS delivery testing in Python with help from the Vonage API.
Note: There are two APIs for SMS applications in Vonage. The SMS API can be used for SMS messaging while the Messages API allows you to use both SMS and non-SMS channels like WhatsApp, Facebook Messenger, Viber, and MMS. This tutorial uses the Messages API.
To create a Python application for SMS delivery confirmation, you will first need a Vonage API account. Once you’ve set up your Vonage account, you will also need to install the following tools:
Python will be used as the framework for your application.
Flask will be used to write your webhook for SMS delivery reports.
The Vonage CLI package will allow you to properly configure your Vonage account. It can also be used to purchase a virtual number.
Get the appropriate version of Python for your OS on the official Python downloads page.
Before installing Flask, create your project directory and navigate into it as follows:
mkdir delivery_receipt
cd delivery_receipt
Install Flask with the pip package manager. pip comes installed with Python. You will then use Flask to power your application. Use the following terminal command to install Flask inside the newly created folder.
pip install flask
Install the Vonage CLI globally in your terminal with the npm package manager:
After you have successfully installed the above packages, you can start building your Python application for SMS delivery tests.
Here are the steps for creating a Python application that receives SMS delivery reports:
Create a webhook for SMS delivery receipts
Make the webhook’s URL publicly accessible
Configure your Vonage account for delivery receipts
Send an SMS to test delivery reports in Python
The first step to receiving SMS delivery receipts is creating a webbook.
When you send messages out through your (Vonage application)[https://developer.vonage.com/en/getting-started/concepts/glossary#vonage-application], the delivery receipt is forwarded to your Python application if you have set a webhook URL in your Vonage dashboard. We’ll set up the Vonage part later on, but right now we’ll configure our Flask application to accept this POST request.
You will accept a POST request in your webhook handler to receive message status updates. Messages API webhook requests are POST requests. You will create a Flask endpoint for the request.
Create a receipt.py file in your Flask project and add the following code:
#!/usr/bin/env python3
from flask import Flask, request, jsonify
from pprint import pprint

app = Flask(__name__)

@app.route("/webhooks/message-status", methods=['POST'])
def message_status():
  if request.is_json:
    data = request.get_json()
    pprint(data)
  else:
      data = dict(request.form) or dict(request.args)
      pprint(data)

  return "200"

if __name__ == '__main__':
app.run(host="", port=3000)In the code above, you created the webhook endpoint, /webhooks/message-status, which accepts the status code of SMS via webhooks.
The endpoint also parses the incoming request and then uses the request.get_json() function to check if the request is in JSON format. JSON encoded requests have their mimetype set to application/json or application/*+json.
If the request is not in JSON format, then request.form and request.args retrieve the key/value pairs in the request body or URL query string respectively.
The endpoint then parses the request data to the data variable and prints it to the terminal using pprint. The last command runs the application’s server on port 3000.
Now, you will create a publicly-accessible URL to which Vonage APIs can send the webhook requests. This way, the Vonage API can access the webhook you created for delivery receipts.
ngrok is a lightweight and fast engine that mimics a web server. Therefore, you won't have to do DNS settings, SSL configurations, and other things that you would need in a real production scenario. ngrok is a useful tool for speedy testing in a development environment. You can check out this tutorial to see more information on how to use ngrok.
First, install ngrok from the official website.
Next, launch ngrok on your terminal:
You will get a public-facing URL similar to the following:
You can make web requests to the URL that ngrok generated for you. It is served on port 3000 of your local machine.
Note the following points:
The URL changes whenever you restart the
ngrokserver if you are on the free plan.An ngrok server session lasts for 1 hour in the free plan after which you can launch the server again and you get a new public URL.
You need to append your endpoint to the newly generated ngrok URL to form your webhook URL like this:
https://f9db-102-89-43-137.eu.ngrok.io/webhooks/message-status
The above URL is your full webhook URL.
Now that your delivery receipt webhook is ready, you’ll complete the setup in your Vonage account.
Visit the settings page on your dashboard and go to the SMS settings section to select Messages API. You can maintain the other defaults such as the version of the Messages API at 1.0.
Next, go to the applications page to create a Vonage application. Click the + Create application button. Then, enter your desired name in the Name field.
In the Capabilities section, select Messages and input your webhook Status URL. You will need to enter your URL for both Inboud and Status URL. You can check out our How to Receive SMS Messages in Python on how to set up the Inbound URL for accepting inbound SMS messages.
Your dashboard should look like this with your ngrok URLs:
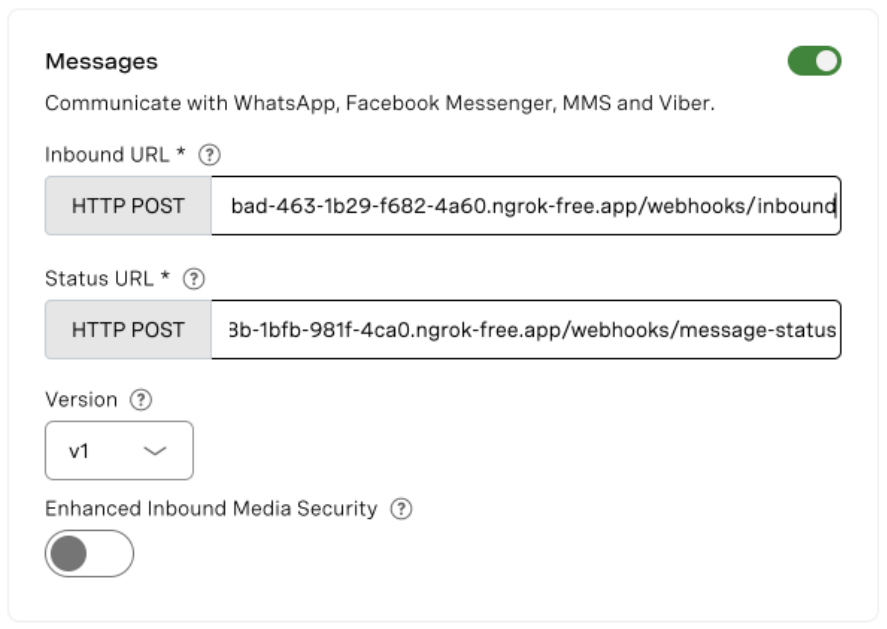 ngrok-webhooks-configured-for-messages-api.png
Click Generate New Application to complete the creation process. This automatically leads you to the application page
On the application page, you can then link your number or buy a virtual number if you are using a paid Vonage account.
At this point, your ngrok server should be running in port 3000, Ensure you have also configured your application with a virtual number in your Vonage account.
Now, you can start the Flask application in another terminal window to keep the previous terminal window running with ngrok.
Use the following command to launch the application in the specified port 3000. ngrok gets the application from the port and serves it over the internet through its public URL.
To test our code, we’ll need to send an SMS from our Vonage number through the Messages API.
First, we’ll create a new file in our project called send-sms.sh
In that file we’ll add the following code:
curl -X POST https://api.nexmo.com/v1/messages \
  -H 'Authorization: Bearer '$JWT\
  -H 'Content-Type: application/json' \
  -H 'Accept: application/json' \
  -d $'{
          "message_type": "text",
          "text": "Vonage Delivery Receipt Testing",
          "to": "'$TO_NUMBER'",
          "from": "'$FROM_NUMBER'",
          "channel": "sms"
}'Replace $TO_NUMBER with your personal number, $FROM_NUMBER with your Vonage virtual number, and $JWT with a JWT you create for the application. You can use our online JWT generator tool.
Ensure to add your country code to
YOUR_PERSONAL_NUMBERsuch as 23400000001
Then open a new tab in your terminal and run:
bash send-sms.shYou should see a response with the message_id, like this:
{"message_uuid":"6cdbd8ed-7217-4bbf-ba3f-da9cdcaeaf2b"}Then if you look in your ngrok tab you’ll see a successful POST request, like this:
POST /webhooks/message-status 200 OKAnd lastly, you’ll see in your application’s tab, you should see the status of the delivery receipt in the terminal like the following:
{'channel': 'sms',
 'destination': {'network_code': '42507'},
 'from': '972523083911',
 'message_uuid': '30af1182-e2c9-4986-bf60-0129a14bbc79',
 'sms': {'count_total': '1'},
 'status': 'submitted',
 'timestamp': '2023-06-19T10:23:16Z',
 'to': '972532208911',
'usage': {'currency': 'EUR', 'price': '0.093'}}Notice that the status is submitted. In a few seconds you should get a second response that looks like:
{'channel': 'sms',
 'destination': {'network_code': '42507'},
 'from': '972523083911',
 'message_uuid': '30af1182-e2c9-4986-bf60-0129a14bbc79',
 'status': 'delivered',
 'timestamp': '2023-06-19T10:23:23Z',
 'to': '972532208911'}
When you’re working with SMS messages, delivery receipts can be critical – especially when you’re building large-scale applications. By creating a Python application for delivery receipts, you’ll know delivery fails, and you can take corrective steps
This article shows how to get delivery receipts of SMS messages sent via Vonage's Messages API. You learned how to build a Python-based application to handle SMS delivery reports, and you learned how to test this application with ngrok. Now, you can include the delivery receipts feature in any Python applications you build.
You can go through some of our resources to learn more about the Messages API:
Did you enjoy this tutorial? Did you get stuck? Reach out on Twitter or the Vonage Community Slack. We’re excited to see what you’re building!
Share:
Jẹ́káyinOlúwa is a software craftsman and product manager passionate about technology and its impact on people. He works on product management, backend development, DevOps, technical writing, and community strategy. He enjoys dealing in the intersection of software, design, and human interaction. He likes reading and music.