Real-time Call Transcription Using IBM Watson and Python
Time to read: 5 minutes
We think our WebSocket feature is pretty awesome; it gives you a real-time stream of the audio from your phone call (and allows you to stream audio back) all within your web framework.
Having access to this real-time stream opens up a vast world of possibilities to do interesting things with the content of the call, not just the signaling. For example, you can have two-way conversations with AI bots, or perhaps you just want to feed the audio of the call to another platform for real-time sentiment analysis, or maybe you just want to watch for keywords within a call so that you can track conversations with your customers.
In the majority of these examples, the first thing you will need to do is convert the audio into text; this is known as speech recognition or transcription. Usually, services need to perform speech recognition in real-time, but to do so, they must limit their lexicon to a few predefined words or phrases. You might have encountered this when calling your bank, and the auto-attendant asks you what you want to do. Transcription can handle the full conversation but historically it was an offline batch process; you would have to record the audio of the call, and then when the call has ended pass that recording to a transcription service. After the service had transcribed the recording, they would then notify you via a callback.
With the recent developments of AI platforms we are now able to get the best of both worlds, real-time, full-text transcription. One of the platforms that is doing this especially well is IBM Watson. Watson exposes a WebSocket interface that allows you to feed it the audio stream of the call. The format of this interface looks a lot like the Nexmo WebSocket interface.
IBM provides the Watson speech-to-text service over several different channels, such as REST, HTTP with webhook callbacks, and WebSockets. Broadly, they all work in the same way: you pass in a chunk of audio and Watson responds with a transcription. There are various options you can enable, such as interim results which give you a partial transcription that then may be updated when Watson has a better idea of the speech with more context.
You also need to specify a language model to be used for the transcription. Watson has models for numerous languages including separate UK and US English. Where the source audio is coming from a phone call, you should use the Narrow Band models for the best results.
For this demo, we will connect to the WebSocket interface. This means that we can stream the audio from Vonage straight into Watson without having to do anything like silence detection to break the stream up into chunks.
Because Watson responds with the transcription data on the same WebSocket connection as you send the audio, we can’t quite directly connect Nexmo to IBM. Instead, we need to run a relay server to receive the audio from Nexmo and forward the packets onto Watson; then we can receive the transcription messages back from Watson and handle them in our application.
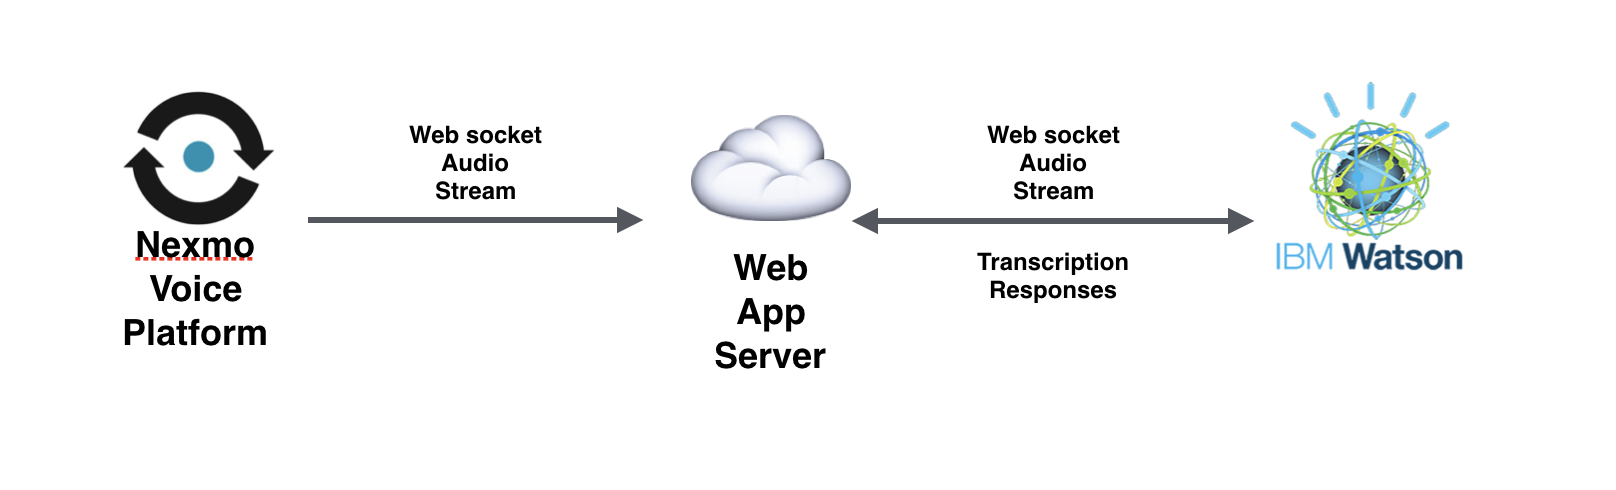 The flow of the application featured in this article
You’ll find the code on Github. Let’s walk through what is going on below.
Like all Nexmo voice applications, we need to set up an application with an answer URL that will return an NCCO. We will be serving that NCCO from our web app server. This NCCO will instruct Nexmo to play a short hello message then connect the call to our WebSocket. Here’s the NCCO:
[{
    "action": "talk",
    "text": "Please wait while we connect you to Watson"
},
{
    "action": "connect",
    "endpoint": [{
        "type": "websocket",
        "uri" : "ws://example.com/socket",
        "content-type": "audio/l16;rate=16000",
        "headers": {}
    }]
}]As you can see this is a reasonably straightforward NCCO, we greet the caller and then connect the call to our WebSocket server.
When Vonage connects the call to our WebSocket server, we then need to initiate a new connection to the Watson WebSocket interface. To connect to Watson, we need to request a token using our username and password. You can get these by signing up for a set of Watson [https://www.ibm.com/watson/developercloud/doc/common/getting-started-credentials.html]service credentials.
These credentials will look something like the object below:
{
  "url": "https://stream.watsonplatform.net/speech-to-text/api",
  "username": "aaaaaaaa-1111-bbbb-2222-cccccccccccc",
  "password": "ABC123def456"

}Using this object, we can then build a function to request a return a token:
def gettoken():
    resp = requests.get('https://stream.watsonplatform.net/authorization/api/v1/token', auth=(d['username'], d['password']), params={'url' : d['url']})
    token = None
    if resp.status_code == 200:
        token = resp.content
    else:
        print resp.status_code
        print resp.content
return tokenWe can use this function to construct the URI for the Watson WebSocket service:
uri = 'wss://stream.watsonplatform.net/speech-to-text/api/v1/recognize?watson-token={}&model={}'.format(gettoken(), language_model)
We have already specified the language_model in another variable at the beginning of the code.
With this URI we then create a new WebSocket connection to Watson and create that as an object within our incoming WebSocket connection. (self.watson_future)
When a message arrives on the WebSocket from Vonage, we will handle it with the on_message function within our WSHandler. Firstly, we call yield on our watson_future object so that we have a reference to the Watson connection, then we parse the message.
The first message that we receive from Vonage on a new connection will be a text message containing the audio format; we need to add a few additional parameters to the message to tell Watson how we want it to transcribe the stream then we write that new message to the Watson socket. That message will look something like this:
{
	"interim_results": true,
	"action": "start",
	"content-type": "audio/l16;rate=16000"
}The key parameter here is the “action”: “start”; it tells Watson that this is the start of a transcription stream. We have also enabled interim-results, this means that Watson will send you its first guess at a transcription and then potentially update that in a later message when it has a better answer. As you may receive multiple messages from Watson for a single transcription, you will need to look at the IDs to construct your text.
When the socket connection to Watson receives a message it will invoke the on_watson_message callback. This function solely prints the message to the screen at the moment, but you could extend out from this example to handle the transcription however you wanted.
Once you have successfully connected to Watson you will receive a message like the one below:
{
   "state": "listening"
}Then as you stream audio to Watson you will receive transcription messages as follows:
{
   "results": [
      {
         "alternatives": [
            {
               "confidence": 0.617,
               "transcript": "hello this is the test "
            }
         ],
         "final": true
      }
   ],
   "result_index": 0
}The key things to look for in these responses are as follows:
Confidence—this is how sure Watson is that the transcription is accurate; a value of 1 represents maximum confidence. As you can see from the test above I said “Hello This is a test”, but Watson got it slightly wrong. However, it had a confidence of only .617; the response still makes sense and the essential parts of the message are there.
Sometimes you will even get more than one transcript option with associated confidence values; it's up to you to decide which one to use. Similarly, you can use the confidence value to decide how to proceed; you might want to ask the user the question again for example.
Final—this means it’s the final pass at transcribing that phrase. Sometimes you’ll get interim results where Watson has transcribed only part of the message like below:
{
   "results": [
      {
         "alternatives": [
            {
               "transcript": "one two three four "
            }
         ],
         "final": false
      }
   ],
   "result_index": 3
}
{
   "results": [
      {
         "alternatives": [
            {
               "transcript": "one two three four five six seven eight "
            }
         ],
         "final": false
      }
   ],
   "result_index": 3
}
{
   "results": [
      {
         "alternatives": [
            {
               "confidence": 0.982,
               "transcript": "one two three four five six seven eight nine ten "
            }
         ],
         "final": true
      }
   ],
   "result_index": 3
}In this example, I counted to 10 reasonably slowly so Watson sent a transcription event part way through my count. If you look at the result_index value you can see that it’s the same, indicating that these are multiple passes of the same bit of voice. Only the last one has final set to true and contains the full string.
When the user hangs up the call Nexmo will close the WebSocket connection; we can use the on_close handler to capture this event and send a stop action to Watson before closing that connection.