
Share:
A trained actor with a dissertation on standup comedy, I came into PHP development via the meetup scene. You can find me speaking and writing on tech, or playing/buying odd records from my vinyl collection.
RCS Messaging with Laravel, Livewire, Reverb, and Echo
Time to read: 13 minutes
 Time to get our hands dirty with RCS and Laravel!TLDR; You can find the demo code here.
Laravel Livewire is a powerful way to remove frontend complexity. In this tutorial, we’ll use it to build an RCS (Rich Communication Services) messenger with Vonage Messages API.I cannot believe it has taken me this long to get my hands on Laravel Livewire, considering Version 1.0.0 was released way back in 2020. Livewire takes inspiration from the Ruby on Rails library Hotwire and does something that is genuinely dear to my heart: it takes out complex frontend code. As part of what has become known as the TALL stack, it’s certainly seeing a lot of adoption.
RCS stands for Rich Communication Services, and it’s a modern and more advanced messaging protocol from the de facto standard SMS messaging. SMS was seen to be improved on with the advent of MMS (Multimedia Messaging), but was also notably slower due to the latter still relying on the GSMA network. RCS uses data only, so whether that is you using Wi-Fi or 4/5G matters not: in our hyper-connected world of data infrastructure, this means your messaging is now significantly faster. It is also implemented in the same messaging applications on cellular devices as native SMS messaging, so RCS is ready to go on most devices made within the last 5 years.
Well, what better use case for doing something in real-time using Livewire than implementing RCS into a messaging web application? That’s what we’re going to do in this tutorial.
PHP 8.4+
Laravel Installer
Node 22+
Npm 6+
A Vonage Account
The Laravel installer is a neat wrapper around Composer that you can globally install to conveniently boot up new Laravel applications. When installing, choose the Livewire starter kit, Laravel’s built-in authentication, Volt can be skipped, and finally, the testing framework choice does not matter. You will now have a full Laravel application installed. Make sure you run the built-in migrations to scaffold out the Users table for authentication.
Caleb Porzio launched Livewire in 2020 and caused quite the stir at the time. I’ve already said that it takes out frontend complexities, but what exactly is it? You, reader, might be like me. I’m a back-end developer who will constantly scratch my head at the most basic of frontend tasks. Livewire ships PHP frontend components as if they were JavaScript components. Therefore, handling of state and behaviour is all done within the PHP code you know and love, with a well-documented API to explore. To install Livewire, use Composer:
composer install livewire/livewire
There are two entities for messaging that we will need: a Message and a Conversation. The relationship here is that Messages belong to a Conversation, and a Conversation belongs to a user. This is a significant relationship to note and to establish, as when we get to broadcasting events (i.e. incoming Messages), the frontend will need to be able to tie it to a User.
Create your migrations in the command line:
php artisan make:model Conversation --migration
php artisan make:model Message --migrationNote that because we are creating the model rather than the migration, we use singular naming rather than plural. The migration has been generated by adding --migration to the command, so now we can define how these entities look in the database.
create_conversations_table.php

<?php

use Illuminate\Database\Migrations\Migration;
use Illuminate\Database\Schema\Blueprint;
use Illuminate\Support\Facades\Schema;

return new class extends Migration
{
   /**
    * Run the migrations.
    */

   public function up(): void
   {
       Schema::create('conversations', function (Blueprint $table) {
           $table->id();
           $table->string('uuid');
           $table->foreignId('user_id')->constrained('users');
       });
   }

   /**
    * Reverse the migrations.
    */

   public function down(): void
   {
       Schema::dropIfExists('conversations');
   }
};

create_messages_migration.php

<?php

use Illuminate\Database\Migrations\Migration;
use Illuminate\Database\Schema\Blueprint;
use Illuminate\Support\Facades\Schema;

return new class extends Migration
{
   /**
    * Run the migrations.
    */

   public function up(): void
   {
       Schema::create('messages', function (Blueprint $table) {
           $table->id();
           $table->string('message');
           $table->timestamps();
           $table->foreignId('conversation_id')->constrained();
           $table->string('source');
       });
   }

   /**
    * Reverse the migrations.
    */
   public function down(): void
   {
       Schema::dropIfExists('messages');
   }
};Importantly, you can see that there is a source field, which will have only two values:
internalexternal
This is important for the frontend to be able to render a conversation-like view correctly.
We’ve also added the necessary relationships, so now we define the relationships in the models:
Models\Conversation.php

<?php

namespace App\Models;

use Illuminate\Database\Eloquent\Model;
use Illuminate\Database\Eloquent\Relations\HasMany;

class Conversation extends Model
{
   public $timestamps = false;

   public function messages(): HasMany
   {
       return $this->hasMany(Message::class);

   }

   public function user()
  {
       return $this->belongsTo(User::class);
   }
}

Models\Messages.php

<?php

namespace App\Models;

use Illuminate\Database\Eloquent\Model;
use Illuminate\Support\Facades\Log;

class Message extends Model

{
   use BroadcastsEvents;

   public $timestamps = true;
   public $table = 'messages';
   public $fillable = ['message', 'conversation_id', 'created_at', 'updated_at'];

   public function conversation()
   {
       return $this->belongsTo(Conversation::class);
   }
There are two things we need to seed:
A test user (rather than registering through the UI)
A placeholder conversation for Messages to be attached to. In reality, you’d want to create these conversations dynamically, but for the purposes of this tutorial, every message will be tied to a placeholder one.
Generate the MessagesSeeder in the command line:
php artisan make:seeder MessagesSeederNow, the seeder will handle both of the placeholders we need:
MessagesSeeder.php

<?php

namespace Database\Seeders;

use App\Models\Conversation;
use App\Models\User;
use Illuminate\Database\Seeder;
use Illuminate\Support\Facades\Hash;

class MessagesSeeder extends Seeder
{
   /**
    * Run the database seeds.
    */
   public function run(): void
   {
       $user = User::create([
           'name' => 'Admin',
           'email' => 'admin@admin.com',
           'password' => Hash::make('password'),
       ]);

       $conversation = Conversation::create([
           'uuid' => 'e2efbc00-b65e-4e47-8996-1de0043ed667',
           'user_id' => $user->id
       ]);
   }
}Running the migrations and seeders will now put everything in place in the database before we start interacting with them:
php artisan migrate
php artisan db:seed
With our data set up, it’s time to create a route and controller.
php artisan make:controller MessagesControllerFor now, the controller is only going to do one thing, which is render out a view.
<?php

namespace App\Http\Controllers;

use App\Models\Message;
use Illuminate\Http\Request;
use Illuminate\Support\Facades\Http;
use Illuminate\Support\Facades\Log;

class MessagesController extends Controller
{
   public function index()
   {
       return view('messages');
   }
}That view, messages, doesn’t exist yet, so let’s create it:
php artisan make:view messagesAnd code it up:
<!DOCTYPE html>
<html lang="en">

<head>
   <title>Livewire Messenger</title>
   <link rel="preconnect" href="https://fonts.bunny.net">
   <link href="https://fonts.bunny.net/css?family=instrument-sans:400,500,600" rel="stylesheet" />
   @vite(['resources/css/app.css', 'resources/js/app.js'])
   @fluxAppearance
</head>

<body class="bg-gray-100 min-h-screen flex flex-col" style="background-image: url('{{ asset('vonage background.png') }}'); background-size: cover; background-position: center;">
   <div class="flex items-center space-x-3 p-4 bg-black">
       <img src="{{ asset('vonage-logo.png') }}" alt="Vonage Logo" class="h-16 px-4 w-auto">
       <h2 class="text-xl font-bold text-white drop-shadow">Laravel Livewire x Reverb x Echo Messenger</h2>
   </div>
</body>
</html>Finally, tie all these together in a route:
routes/web.php

Route::get('/messages', [MessagesController::class, 'index']);
It’s time to introduce some functionality. Instead of the traditional approach of Model-View-Controller, this app will rely on functionality within a Livewire component. For PHP developers, Livewire components will look like a regular controller with its own paired view template, but the state changes will be pushed to the frontend. Create a Livewire controller in the command line:
php artisan livewire:make RcsComponentThis Livewire component will be included in the message view. This component will load all the messages for the seeded conversation, and then does two things:
The option to send a message, which will be sent to Vonage using the PHP SDK. Sending this message reloads the component by re-fetching the messages using the ORM, which Livewire will push the updated state
Will listen for changes to the seeded conversation for any changes and load them when a controller receives a webhook from Vonage
Livewire templates live in a different directory from regular Blade templates. Navigate to the new component’s template and get some styling in:
livewire/rcs-component.blade.php

<div class="flex-1 flex flex-col justify-between px-4">
   <div class="overflow-y-auto space-y-2 mb-4 px-2" style="max-height: calc(100vh - 200px);">
       @forelse ($messages as $message)
           <div class="flex {{ $message->source === 'internal' ? 'justify-end' : 'justify-start' }}">
               <div class="max-w-xs md:max-w-md px-4 py-2 rounded-lg
                   {{ $message->source === 'internal' ? 'bg-green-500 text-white rounded-br-none' : 'bg-white text-gray-800 rounded-bl-none shadow' }}">

                   <p>{{ $message->message }}</p>

                   <p class="text-xs text-gray-300 mt-1 text-right">
                       {{ $message->created_at->diffForHumans() }}
                   </p>
               </div>
           </div>
       @empty
           <p class="text-gray-100 text-center mt-4">No messages found.</p>
       @endforelse
   </div>

   <form wire:submit.prevent="sendMessage" class="flex items-center space-x-2 border-t pt-2 bg-white p-2 rounded shadow">
       <input
           type="text"
           wire:model.defer="postMessage"
           placeholder="Type a message"
           class="flex-1 border text-black rounded-full px-4 py-2 focus:outline-none focus:ring-2 focus:ring-offset-purple-500"
       >

       <button type="submit" class="bg-purple-500 text-white px-4 py-2 rounded-full hover:bg-purple-400">
           Send
       </button>
   </form>
</div>This creates a “WhatsApp” style message panel. The component takes whatever collection has been included as $messages, renders them out, and includes the syntax to call back the PHP code in the Livewire component to send a message, using the method sendMessage(). We’ve not coded that yet, so head to the Livewire component logic and code up the following:
Livewire\RcsComponent

<?php

namespace App\Livewire;

use App\Models\Conversation;
use App\Models\Message;
use Illuminate\Support\Facades\Http;
use Livewire\Component;
use Vonage\Client;
use Vonage\Messages\Channel\RCS\RcsText;

class Rcs extends Component
{
   public $messages;
   public string $postMessage = '';

   public function mount()
   {
       $this->loadMessages();
   }

   public function loadMessages(): void
   {
       $conversation = Conversation::where('uuid', env('CONVERSATION_ID'))->first();

       $this->messages = Message::where('conversation_id', $conversation->id)->orderBy('timestamp', 'desc')->get();
   }

   public function sendMessage(): void
   {
       Http::withHeaders(['Accept' => 'application/json'])
           ->post(route('messages.store'), [
           'message' => $this->postMessage,
           'source' => 'internal'
       ]);

       $this->postMessage = '';
       $this->loadMessages();
   }

   public function render()
   {
       return view('livewire.rcs-component', $this->messages);
   }

   public function refresh()

   {
       $this->loadMessages();
   }
}There’s quite a bit to unpack here, so let’s go through the logic:
The class property
$postMessageacts as state for the component. This state is the current message being handled, and if you look at the template for the component, you can see that there is syntax linking the frontend and the backend:wire:model.defer="postMessage"The class property
$messagesalso acts as state for the component, and is the complete collection of messages attached to the conversation. This property is then rendered out in the template we created earlierfor $messages as $message)There are three Livewire-specific magic methods here:
mount()is executed when the component first renders,refresh()runs when any state changes occur, andrender()runs at the end of the component lifecycle, hence the code to pull in the template.mount()calls a method that is reused inrender()which is namedloadMessages()loadMessages()uses the Eloquent ORM to do two things. Firstly, we’ve cheated a bit with retrieving aConversation, in that it uses an environment variable,CONVERSATION_ID, which is our seededConversation. All messages attached to that ID are then fetched and written to the$messagesproperty.
We’ve not added the environment variable, so head to your .env and add CONVERSATION_ID=e2efbc00-b65e-4e47-8996-1de0043ed667 to it. That ID is the same UUID that was written to the seeded dummy conversation.
It’s good practice, since we are writing a mock API essentially with how these entities work, to expose your entities via REST. You’ll notice that the sendMessage method doesn’t use the Eloquent ORM to create a new message and persist it to the database; instead, it takes the contents of $postMessage and POSTs it to the exposed internal API endpoint. This requires an endpoint that hasn’t been coded yet, so head to your routes file and add it:
routes\web.php

Route::post('/create-message', [MessagesController::class, 'store'])->name(messages.store');Now, add the store() method to the MessagesController:
MessagesController.php

public function store(Request $request): JsonResponse
{
   $validated = $request->validate([
       'message' => 'required|string',
   ]);

   $conversation = Conversation::where('uuid', env('CONVERSATION_ID'))->first();

   $message = new Message();
   $message->message = $validated['message'];
   $message->created_at = now();
   $message->updated_at = now();
   $message->conversation_id = $conversation->id;
   $message->save();

   return response()->json([
       'status' => 'success',
       'data' => $message
   ], 201);
}The input is validated, then, in this logic, the Message entity is persisted by the database and attached to the dummy Conversation seeded entity.
Livewire needs some styles and JavaScript to be added to your application templates to work. There are some convenient helper methods included that can be used in Blade. Head to the parent template page of the component, and change the code to the following:
<!DOCTYPE html>
<html lang="en">

<head>
   <title>Livewire Messenger</title>
   @livewireStyles
   <link rel="preconnect" href="https://fonts.bunny.net">
   <link href="https://fonts.bunny.net/css?family=instrument-sans:400,500,600" rel="stylesheet" />
   @vite(['resources/css/app.css', 'resources/js/app.js'])
   @fluxAppearance
</head>

<body class="bg-gray-100 min-h-screen flex flex-col" style="background-image: url('{{ asset('vonage background.png') }}'); background-size: cover; background-position: center;">
   <div class="flex items-center space-x-3 p-4 bg-black">
       <img src="{{ asset('vonage-logo.png') }}" alt="Vonage Logo" class="h-16 px-4 w-auto">
       <h2 class="text-xl font-bold text-white drop-shadow">Laravel Livewire x Reverb x Echo Messenger</h2>
   </div>
   <livewire:rcs />
   @livewireScripts
</body>
</html>The three additions here are:
@livewireStylesto bring in essential CSS classes@livewireScriptsto bring in essential JavaScript functionality<livewire:rcs />adds our Livewire component into the page.
The next thing the app needs to be able to do is to handle incoming data from Vonage in the form of a webhook. This webhook is configured in the Vonage dashboard to be fired at a URL defined by the user as a JSON payload when a user replies to the configured number in the conversation on the end user device. HTTP POST. First, add the route:
routes\web.php

Route::post('/messages/webhook', [MessagesController::class, 'webhook'])->name(messages.webhook');Now, we add the webhook() method to the MessagesController.
MessagesContoller.php

public function webhook(Request $request)
{
   $payload = $request->all();

   $newMessage = Message::create([
       'message' => $payload['text'],
       'source' => 'external',
       'conversation_id' => 1
   ]);

   return response()->json([
       'status' => 200
   ]);
}Originally, I wrote this logic to reuse the REST API, but there were security implications of taking two different domains at runtime, so I’ve cheated in this example and used Eloquent to write the webhook message to the database and return a 200 to Vonage.
We now have all of the internal parts wired together, but it probably hasn’t escaped your attention that we aren’t actually sending anything to Vonage yet. This needs to happen in your sendMessage method that is in the Livewire component. The Vonage PHP SDK requires an Application ID and a private.key, which is created in the Vonage Dashboard, and a number needs to be assigned to the application.
To create an application, go to the Create an Application page on the Vonage Dashboard, and define a Name for your Application.

If you intend to use an API that uses Webhooks, you will need a private key. Click “Generate public and private key”, your download should start automatically. Store it securely; this key cannot be re-downloaded if lost. It will follow the naming convention private_<your app id>.key. This key can now be used to authenticate API calls. Note: Your key will not work until your application is saved.
Choose the capabilities you need (e.g., Voice, Messages, RTC, etc.) and provide the required webhooks (e.g., event URLs, answer URLs, or inbound message URLs). These will be described in the tutorial.
To save and deploy, click "Generate new application" to finalize the setup. Your application is now ready to use with Vonage APIs.
RCS requires registering as an agent before you can use it. For information on how to do this, refer to this article.
Your application will need to be exposed to the internet so that Vonage can send webhooks to it. We do this using ngrok. With ngrok installed, fire it up in the command line:
ngrok http 8080You will get a public-facing URL that is pointing to your port 8080. This URL needs to be put into the Vonage Dashboard for your RCS application, like so:
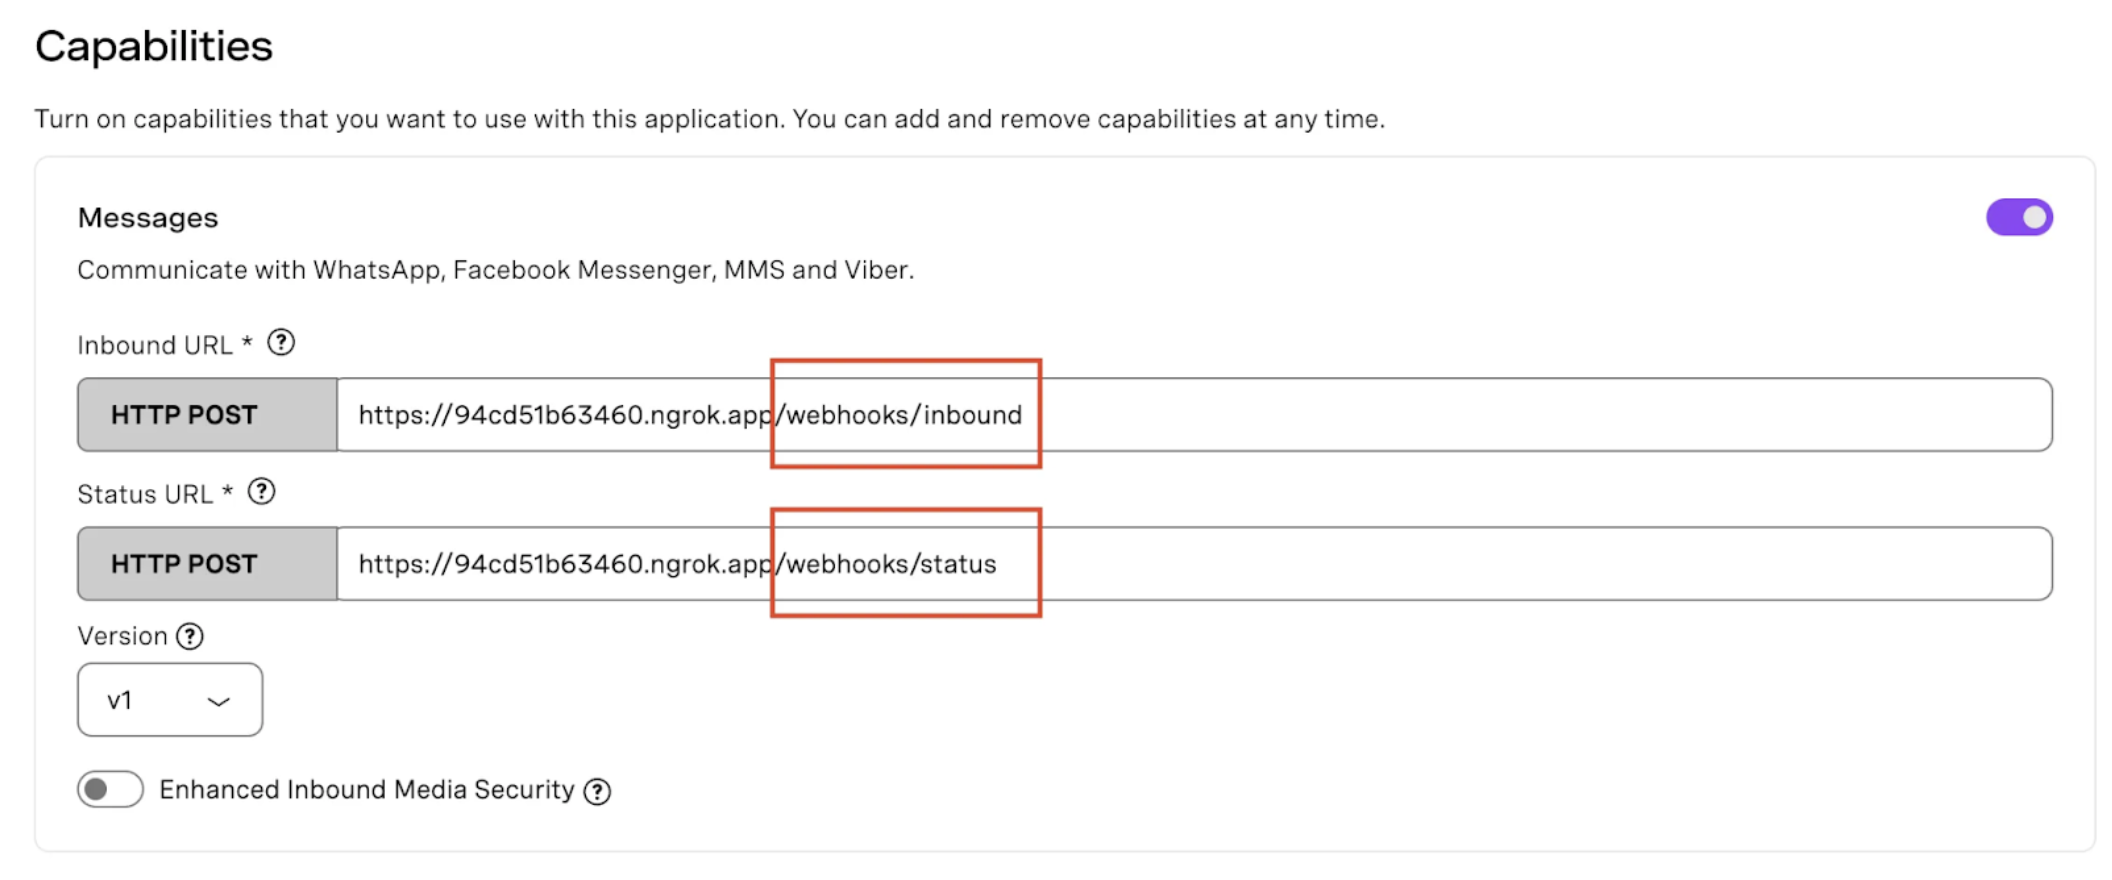 Configuring our webhooks
The sendMessage() currently doesn’t actually send a message, so it’s time to configure that. Install the Vonage PHP SDK using Composer on the command line:
composer require vonage/clientNow, using our Vonage account credentials and the private.key downloaded from the Dashboard, we set our Client object up and use it to send the RCS message. Your sendMessage() should look like this:
public function sendMessage(): void
{
   $applicationId = 'your-application-id';

   $privateKey = file_get_contents(base_path(config('path-to-your-private-key')));

   $credentials = new Client\Credentials\Keypair($privateKey, $applicationId);

   $client = new Client($credentials);

   $rcsMessage = new RcsText('your-vonage-number, 'your-configured-from-id, $this->postMessage);

   $client->messages()->send($rcsMessage);

   Http::withHeaders(['Accept' => 'application/json'])
       ->post(route('messages.store'), [
       'message' => $this->postMessage,
       'source' => 'internal'
   ]);

   $this->postMessage = '';
   $this->loadMessages();
}The Client is created with a Keypair, that configures it to automatically handle JWT auth for any Vonage calls. It is then calling the Messages API with the chained messages() method and uses send(). This method, as part of the Messages API integration, will take any valid object that conforms to the Message Interfaces internally. The object to send an RCS message is RcsText.
There are a couple of environment variables to plug in here - we’ve already looked at your credentials, but RCS also requires the to and from numbers. The to number is your target device, and the from is the key that is configured with your RCS agent.
It’s time for the magic. The limitation here is that with Livewire, the component will update when you send a message (as it uses Livewire’s refresh(), which will then call loadMessages() BUT, how does the Livewire component know about an incoming webhook, which should then update the state?
The answer here comes in the form of the super-shiny Model Broadcasting functionality. Translated into English, Laravel gives you the ability to tap into the existing Event system whenever a model is changed. This means every time a Message is created (i.e. when a webhook comes in and is written to the database), we can use a WebSocket server to listen and tell Livewire to refresh().
There are two libraries we need to install to do this: Laravel Reverb (the broadcasting websocket server) and Laravel Echo (client-side library for listening to events). Reverb is installed using the Laravel Console:
php artisan install:broadcastingEcho is installed using npm:
npm install --save-dev laravel-echo pusher-jspusher-js is the protocol that Echo uses under the hood, hence why it is included in the command.
The root of your application’s JavaScript needs to have a configured Echo class ready to listen to what Reverb broadcasts. Head to resources\js and create a new file called echo.js. Populate it as follows:
import Echo from 'laravel-echo';
import Pusher from 'pusher-js';

window.Pusher = Pusher;

let echo = new Echo({
   broadcaster: 'reverb',
   key: import.meta.env.VITE_REVERB_APP_KEY,
   wsHost: import.meta.env.VITE_REVERB_HOST,
   wsPort: import.meta.env.VITE_REVERB_PORT ?? 80,
   wssPort: import.meta.env.VITE_REVERB_PORT ?? 443,
   forceTLS: (import.meta.env.VITE_REVERB_SCHEME ?? 'https') === 'https',
   enabledTransports: ['ws', 'wss'],
});

echo.privateApp.Models.Conversation.1)
   .listen('.MessageCreated', (e) => {
       console.log(e);
   });

window.Echo = echo;A channel to listen to is identified here: App.Models.Conversation.1 is hard-coded in. Since we only have our one seeded Conversation object, in this case, it will always be this. The naming convention of the channel has come from our channel.php routing file, which hasn’t been written yet, which will happen shortly, but it’s interesting to note that .MessageCreated is a naming convention from Laravel’s built-in Model Broadcasting.
echo.private is used because Model Broadcasting events can only be emitted from private channels. One thing to really pay attention to (and I didn’t originally, which was a fantastic 2 hours of debugging nothing) is that they can only be private channels because Model Broadcasting is tied to Laravel’s Auth Mechanism. So, for this to work, you’ll need to be logged in as the seeded user we created.
The echo.js needs to be included at the point of the app’s bootstrap, so include it in the resources\js\app.js file:
/**
* Echo exposes an expressive API for subscribing to channels and listening
* for events that are broadcast by Laravel. Echo and event broadcasting
* allow your team to quickly build robust real-time web applications.
*/

import './echo';
We have something listening to the events, but we haven’t coded the broadcasting of them yet. There are three parts to this:
Setting up the broadcasting channel route
Adding the broadcast to the model
Configuring Livewire to react to events bubbled up
When installing Reverb, the new routes file for channels is created as routes\channels.php. This is where we tell Reverb to broadcast.
channels.php

Broadcast::channel('App.Models.Conversation.{id}', function ($user, $id) {
   return $user->conversations->firstOrFail('id', $id)->exists;
});The channel method expects a boolean to identify whether the conversation ID is available to the user as an auth gate.
There are two things you’ll need to add to the model - the model in this case being the Message entity. Reverb has a trait called BroadcastEvents that opens up the interface for WebSocket use. You’ll need to include this in the code, which opens up the broadcastOn method to overload.
The end model code looks like this:
<?php

namespace App\Models;
use Illuminate\Database\Eloquent\BroadcastsEvents;
use Illuminate\Database\Eloquent\Model;
use Illuminate\Support\Facades\Log;

class Message extends Model
{
   use BroadcastsEvents;

   public $timestamps = true;
   public $table = 'messages';
   public $fillable = ['message', 'conversation_id', 'created_at', 'updated_at'];

   public function conversation()
   {
       return $this->belongsTo(Conversation::class);
   }

   public function broadcastOn(string $event)
   {
       return [$this->conversation];
   }
}Before we get onto the logic behind broadcastOn(), you’ll notice that several fields have been included in $fillable. This property specifies which fields on the model can be autopopulated with hydration, so those fields have been included in the array due to the Webhook hydration.
Due to Model Broadcasting, the built-in channel address of this model would be App.Model.Conversation, so returning a value of $this->conversation results in our required broadcast string identifier of App.Model.Conversation.{id}. BroadcastEvents emits the CRUD actions on this model, but we’ve instructed it to broadcast on the Conversation ID for listening.
OK, I’ll admit it: we’ve gone through an extraordinary amount of logic to just not do JavaScript. But, look, I’m OK with that because I’m the world’s okayish developer. Plus, you know, I love the innovation that frameworks like Laravel continue to push.
There are now two servers you need to run: Vite needs to run to compile frontend assets, and Reverb needs to run to broadcast the events that Echo listens to. In your terminal, fire these up:
php artisan reverb:start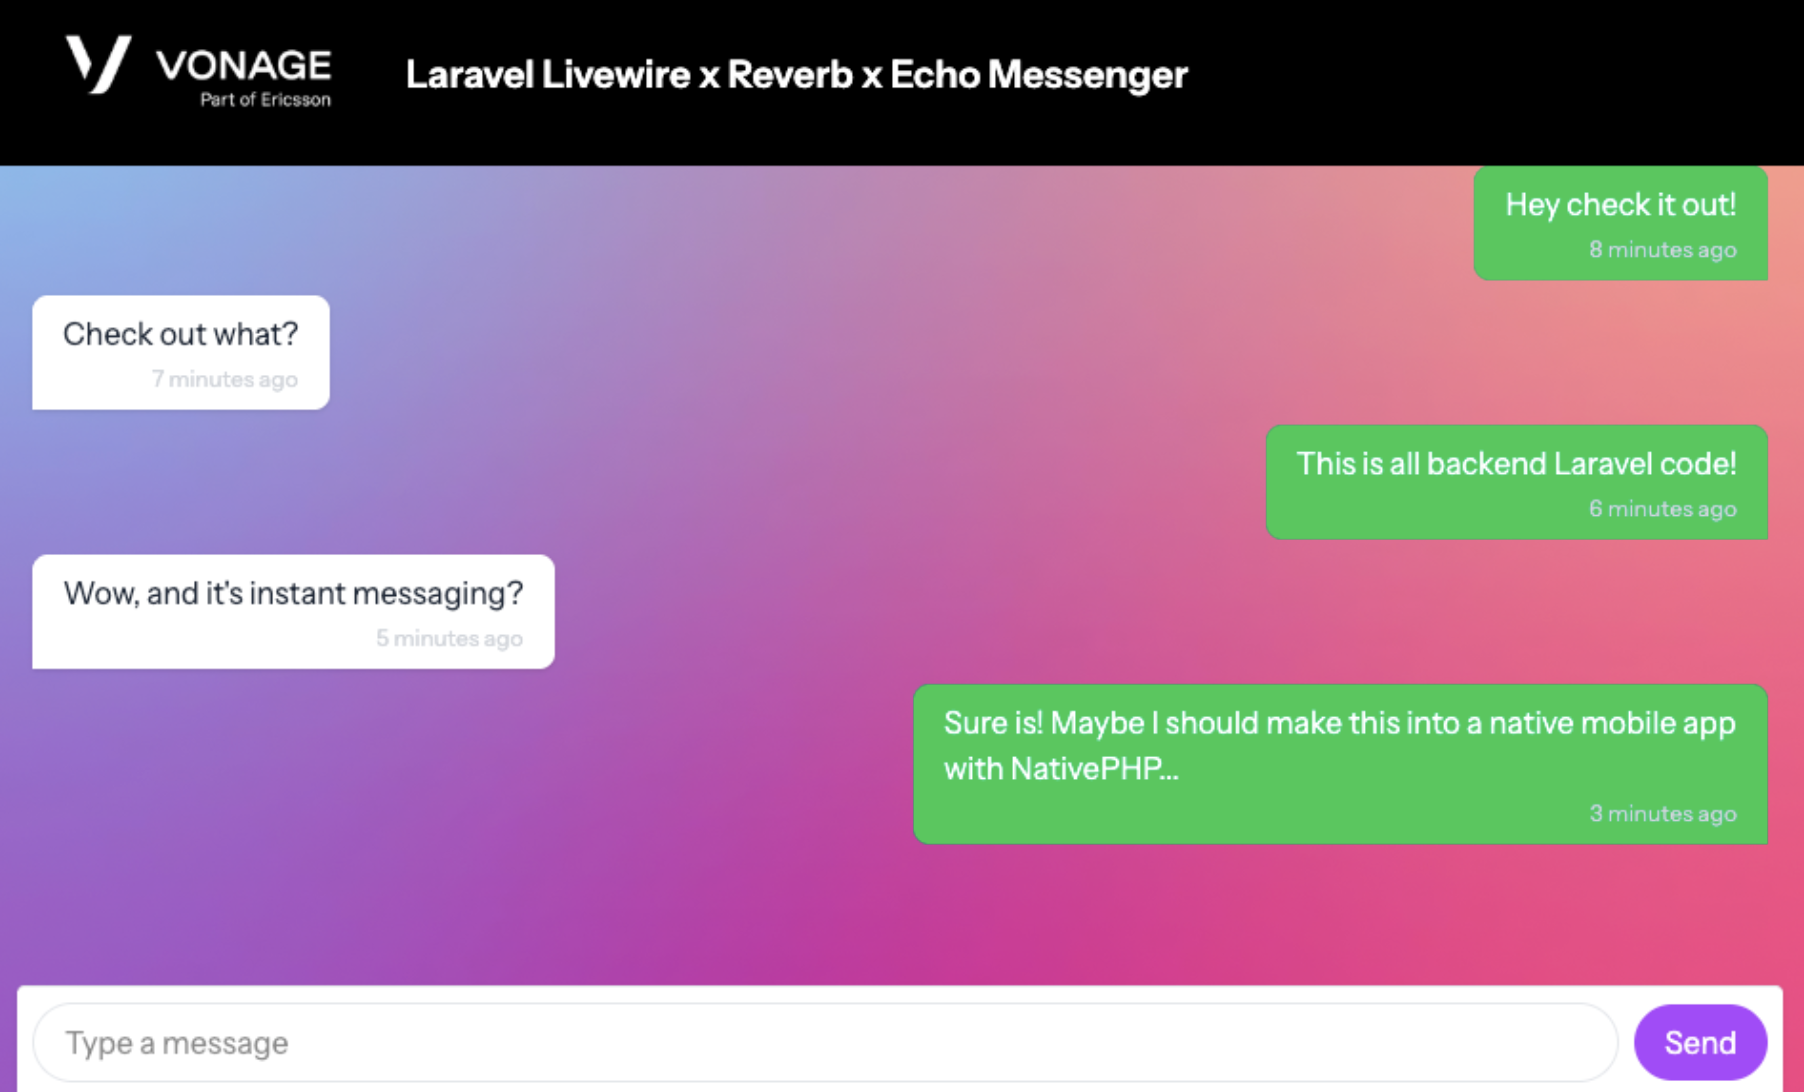
npm run devPhew! That’s a lot of wiring. But, worth it, right? With everything booted, log in and start sending some messages!
 I absolutely did not use ChatGPT to sort out my styling
Have a question or want to share what you're building?
Subscribe to the Developer Newsletter
Follow us on X (formerly Twitter) for updates
Watch tutorials on our YouTube channel
Connect with us on the Vonage Developer page on LinkedIn
Stay connected and keep up with the latest developer news, tips, and events.