Share:
A trained actor with a dissertation on standup comedy, I came into PHP development via the meetup scene. You can find me speaking and writing on tech, or playing/buying odd records from my vinyl collection.
Rapid API Development With Laravel and API Platform
It’s this author’s personal opinion that more people outside of the PHP space should know about API Platform. It is an astonishing piece of kit that can structure your entire web application API within 10 minutes to get started, and comes with a dizzying array of features that will transform and handle authentication within your application by changing config switches.
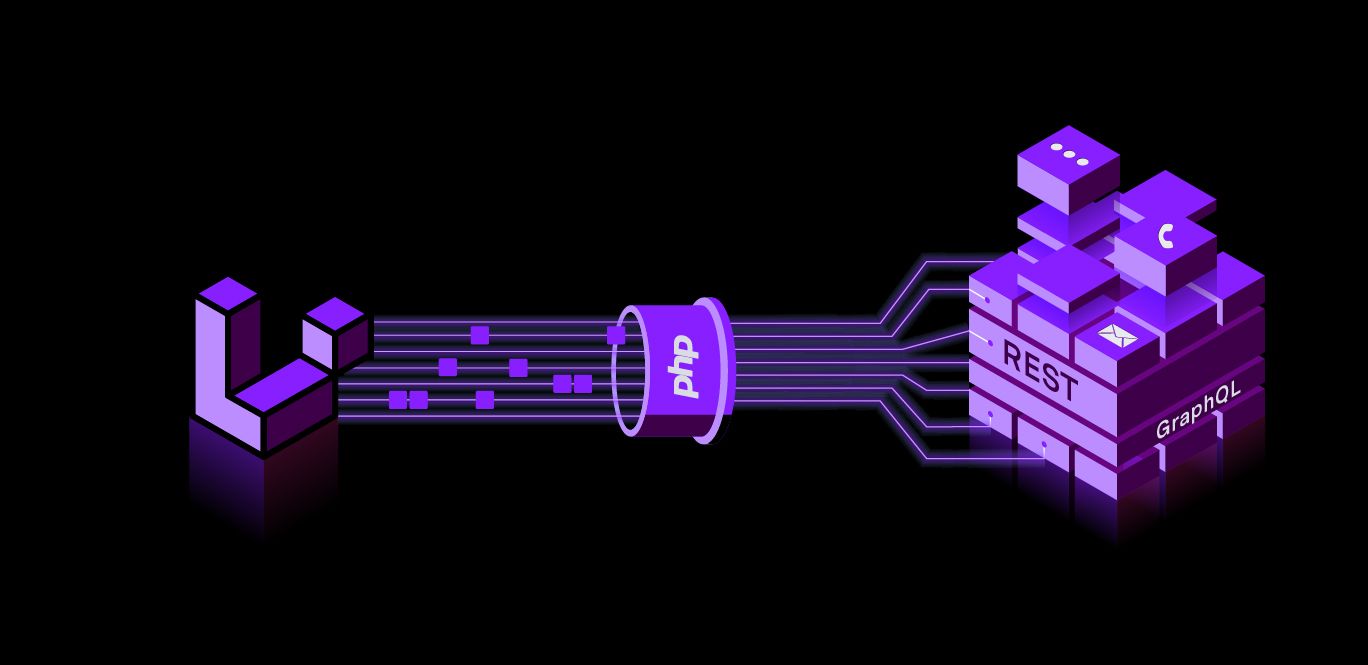
In this article, we’re going to take an existing Laravel application that uses Vonage’s Messages API and open it up as a web API under various standards.
Ok, so here is the slightly confusing bit: API Platform is a PHP framework, but that framework then sits on top of either Symfony or Laravel (which will also include other frameworks and platforms that are built on top of these things, such as Drupal or WinterCMS). Think of it as a set of configurations and attributes you can add to your database modelling and config folder. It also comes with a full web dashboard built in, for testing with API tools such as Postman and OpenAPI standards.
AKA. “Here’s one I made earlier!” We’re going to use an application that has only one database entity: the humble ToDo, which I coded in a previous article. It also uses the Vonage Messages API to send the text contents of the ToDo to a configured device when one of the ToDo items is ticked off (acting like a notification). Because it’s a fully functioning application, we’re going to start by booting up this app before adding API Platform to it.
TLDR; you can find the source code here.
git
PHP 8.3+
Node 23+ & npm
A Vonage account
Fetch the repository to your machine: https://github.com/Vonage-Community/blog-messages_native_php
Install dependencies:
composer installRun migrations in the command line:
php artisan migrateRun npm in the command line:
npm iIn the command line, get Vite running with
npm run devIn the command line, run the database seeder to get some data into our app:
php artisan db:seedCopy the example
.envto make it a live.envin the command line:cp .env.example .envAdd your Vonage credentials to the
.envfile.
This application uses the Vonage Messages API to send out an SMS when the ToDo is completed, so you’ll need to create a Vonage account and then create a Vonage application. When creating the application, select the Messages functionality, populate the webhooks fields with dummy data, and note the application_id upon creation. Move the private.key that is automatically downloaded into the root of your project’s files.
To create an application, go to the Create an Application page on the Vonage Dashboard, and define a Name for your Application.

If you intend to use an API that uses Webhooks, you will need a private key. Click “Generate public and private key”, your download should start automatically. Store it securely; this key cannot be re-downloaded if lost. It will follow the naming convention private_<your app id>.key. This key can now be used to authenticate API calls. Note: Your key will not work until your application is saved.
Choose the capabilities you need (e.g., Voice, Messages, RTC, etc.) and provide the required webhooks (e.g., event URLs, answer URLs, or inbound message URLs). These will be described in the tutorial.
To save and deploy, click "Generate new application" to finalize the setup. Your application is now ready to use with Vonage APIs.
In the .env file, you’ll need to add your configuration:
VONAGE_APPLICATION_ID="<YOUR_APPLICATION_ID_HERE>"
VONAGE_PRIVATE_KEY_PATH="./private.key"
VONAGE_TO="<YOUR-NUMBER-HERE>"
Note that VONAGE_PRIVATE_KEY_PATH should always have the value given above, as the app will resolve to reading in your private key at the root level.
VONAGE_TO is the number you want the SMS notification to go to.
You’ll need to be serving your app. I recommend using Laravel Herd. You can find the installation instructions here. Alternatively, you can run the built-in PHP server from the command line: php artisan serve
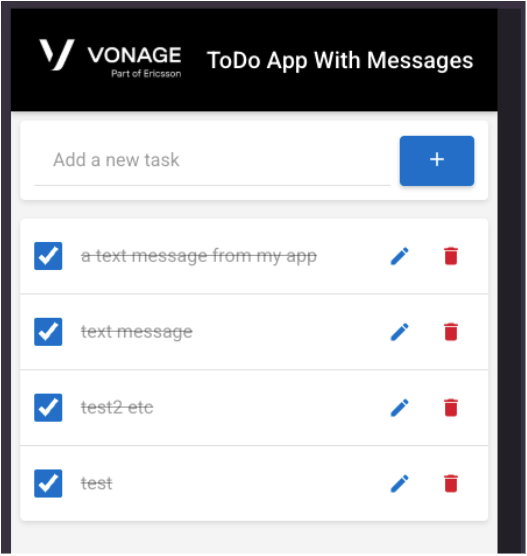 App up and running!
The application is written as a classic Model-View-Controller app with a sprinkling of frontend magic courtesy of Laravel Livewire. However, consider two scenarios:
We want to plug external tools into our application, so we’ll need to expose an API.
Mass scaling means we need to decouple the front and back ends, meaning we have a separate JavaScript framework, such as Svelte or Vue, that consumes and sends data to the exposed API.
Time to install API Platform. Open up your terminal and add the following:
composer require api-platform/laravelStill in the terminal, finish off the installation with the console.
php artisan api-platform:installThat’s it for installation. Don’t believe me? Head to your project’s URL and add /api:
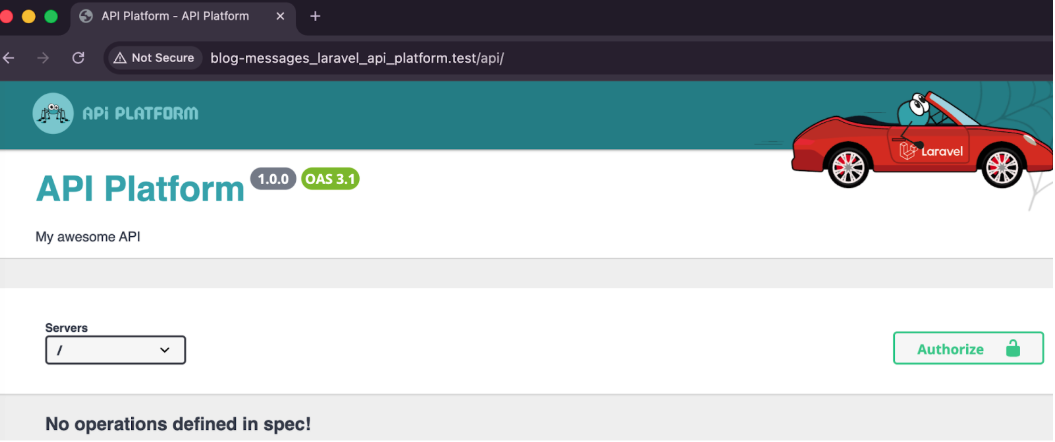 We've certainly done -something-We have one Eloquent ORM model,
 Todo. It looks like this in the app:
<?php

namespace App\Models;

use Illuminate\Database\Eloquent\Model;

class Todo extends Model
{
   /**
    * The attributes that are mass assignable.
    *
    * @var array<int, string>
    */

   protected $fillable = [
       'title',
       'completed',
   ];

   /**
    * The attributes that should be cast.
    *
    * @var array<string, string>
    */

   protected $casts = [
       'completed' => 'boolean',
   ];
}Are you ready? The next step will change everything, and I’ll explain what’s happening after. Add this attribute:
<?php

namespace App\Models;

use ApiPlatform\Metadata\ApiResource;
use Illuminate\Database\Eloquent\Factories\HasFactory;
use Illuminate\Database\Eloquent\Model;

#[ApiResource]
class Todo extends Model
{
   use HasFactory;

   /**
    * The attributes that are mass assignable.
    *
    * @var array<int, string>
    */

   protected $fillable = [
       'title',
       'completed',
   ];

   /**
    * The attributes that should be cast.
    *
    * @var array<string, string>
    */
   protected $casts = [
       'completed' => 'boolean',
   ];
}OK, I’ve added #[ApiResource]. So, what does that do? Refresh the /api/ dashboard:
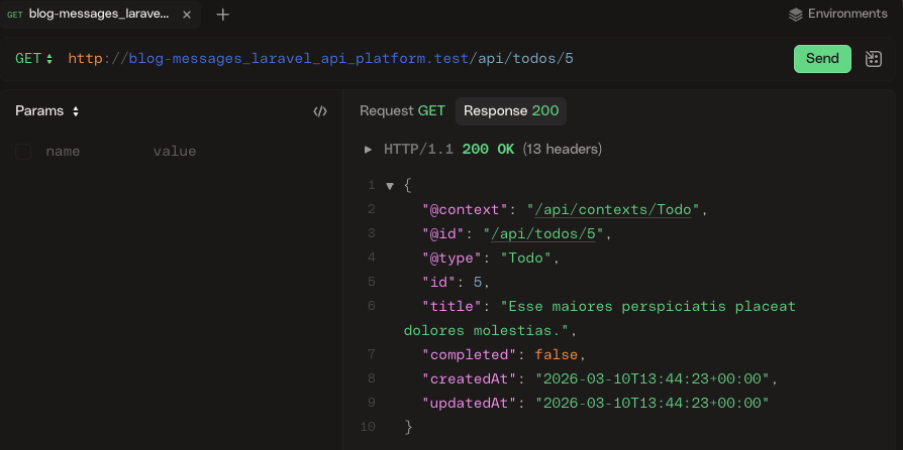
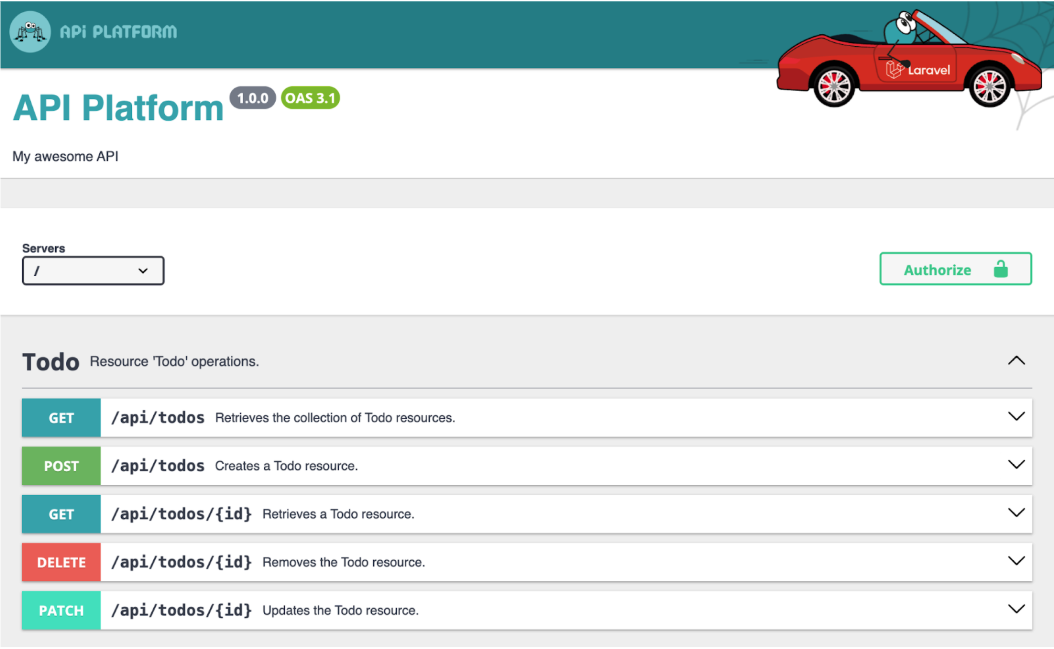 An OpenAPI document renders our new magic APIEr, OK? So, what, we just have a full REST set of routes now? Guess I should check that out. In the database, we have 10 fixtures, so let’s see what happens if I use HTTPie to fire off the GET{id} endpoint to get entry 5 (also: never expose your primary keys in your database in the real world!)
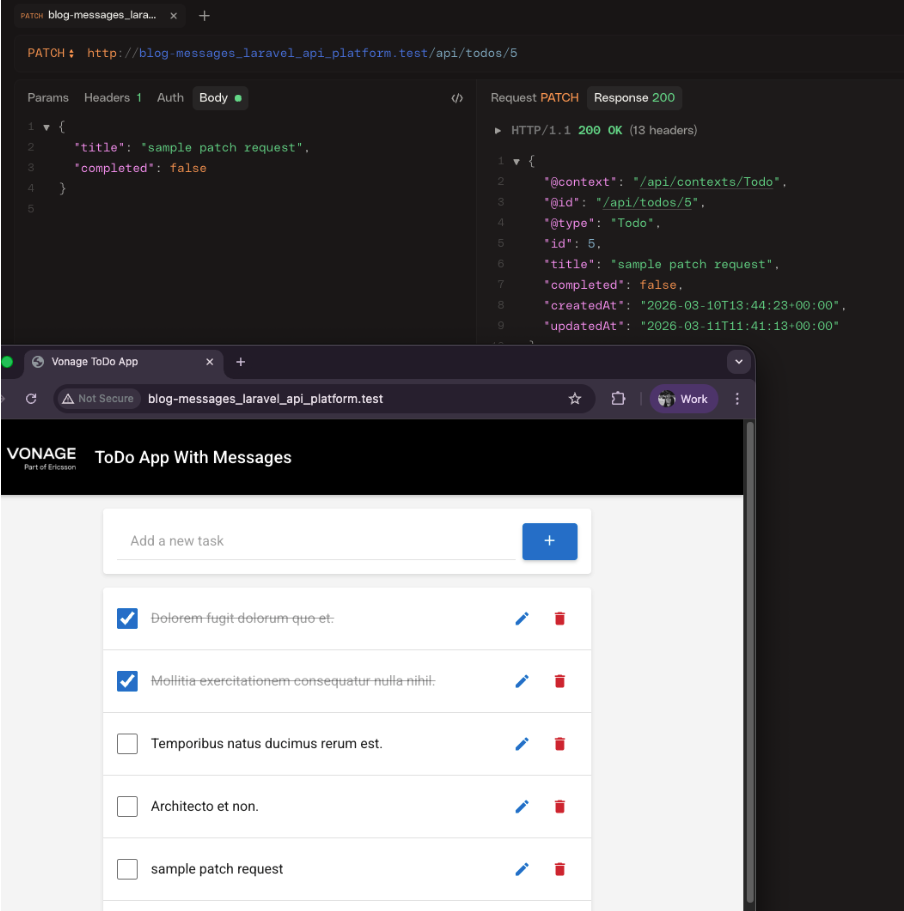
 Absolute cinema!Huh? You’ve just… made an API for me? How about I send a
 PATCH request to edit the title?
 Suddenly, a wild REST API appearsOK. We’ve added two lines of code, and we have an API. That’s pretty wild.
The more eagle-eyed of you may have spotted that API Platform has defaulted to a data structure pattern, the giveaway being fields named @context and @id. But why do the fields look like this?
The answer is that API Platform defaults to the JSON-LD (JSON For Linking Data) format. We may be seeing only one entity here, but if we had a one-to-many entity relationship, API Platform would automatically handle the returned results for you. Let’s add, as an example, a new entity named SubTask. In Eloquent, the relationship would look like this:
   public function subtasks(): HasMany
   {
       return $this->hasMany(Subtask::class);
}Calling the same endpoint would render a response like the one below. Bear in mind, I have added the Groups Serialization code that determines what fields to render. You can read about API Platform Serialization here, or, for Laravel specifically, use the $visible array configuration to expose which parts of the model you want to render.
{
    "@context": "/api/contexts/Todo",
    "@id": "/api/todos/5",
    "@type": "Todo",
    "id": 5,
    "title": "sample patch request",
    "completed": false,
    "createdAt": "2026-03-10T13:44:23+00:00",
    "updatedAt": "2026-03-11T11:41:13+00:00",
    "subTasks": [
        {
            "@id": "/api/sub_tasks/1",
            "@type": "SubTask",
            "id": 1,
            "title": "Write request body",
            "completed": true
        },
        {
            "@id": "/api/sub_tasks/2",
            "@type": "SubTask",
            "id": 2,
            "title": "Send PATCH request",
            "completed": false
        },
        {
            "@id": "/api/sub_tasks/3",
            "@type": "SubTask",
            "id": 3,
            "title": "Verify API response",
            "completed": false
        }
    ]
}How cool is that, having API Platform take care of your API data for you? Looks like it’s time to ditch all those transformation layers and DTOs!
But, hold on: what if my standard of choice for REST development isn’t JSON-LD? That’s when we head to the config, which you can find in configuration/api-platform.php.
<?php

/*
* This file is part of the API Platform project.
*
* (c) Kévin Dunglas <dunglas@gmail.com>
*
* For the full copyright and license information, please view the LICENSE
* file that was distributed with this source code.
*/

declare(strict_types=1);

use ApiPlatform\Metadata\UrlGeneratorInterface;
use Illuminate\Auth\Access\AuthorizationException;
use Illuminate\Auth\AuthenticationException;
use Symfony\Component\Serializer\NameConverter\SnakeCaseToCamelCaseNameConverter;

return [
   'title' => 'API Platform',
   'description' => 'My awesome API',
   'version' => '1.0.0',
   'show_webby' => true,
   'routes' => [
       'domain' => null,
       // Global middleware applied to every API Platform routes
       // 'middleware' => [],
   ],
   'resources' => [
       app_path('Models'),
   ],
   'formats' => [
       'jsonld' => ['application/ld+json'],
       // 'jsonapi' => ['application/vnd.api+json'],
       // 'csv' => ['text/csv'],
],(I left the Copyright in there just to give Kevin Duglas a shoutout).
Aha! You see, there is a formats key in the config array? Let’s change that:
   'formats' => [
       'jsonld' => ['application/ld+json'],
       'jsonhal' => ['application/hal+json'],
],If you send the request again, nothing changes. It’s still in JSON-LD. Why?
This is part of API Platform’s Content Negotiation implementation. LD-JSON is still the first key listed, making it the default. But, change your request headers to accept: application/hal+json and fire off the request:
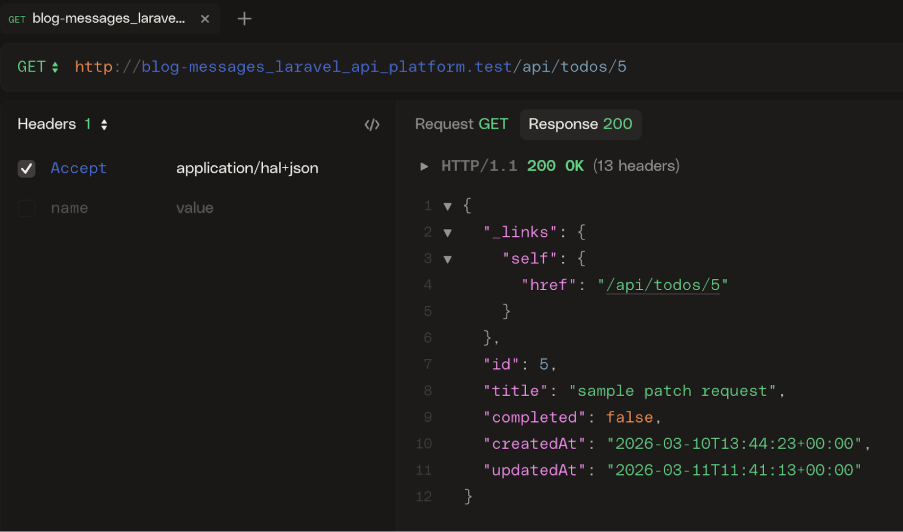 Suddenly, a wild HAL appearsSo now the power is in your API consumers’ hands, as they can request the format they want.
It also gives you, the author of your API, the kind of mind-blowing power to create a new endpoint on their app, e.g. /api/v2, and simply change it. Let’s go mad here: what about if we just want to change our API into a GraphQL one? Yeah. You can do that in only 3 steps!
Install the API Platform GraphQL with Composer in the browser
composer require api-platform/graphqlEnable GraphQL in your
configuration/api-platform.phpfile
   'graphql' => [
       'enabled' => true,
       'nesting_separator' => '__',
       'introspection' => ['enabled' => true],
       'max_query_complexity' => 500,
       'max_query_depth' => 200,
       // 'middleware' => null,
],Head to
/api/graphqland what happens?
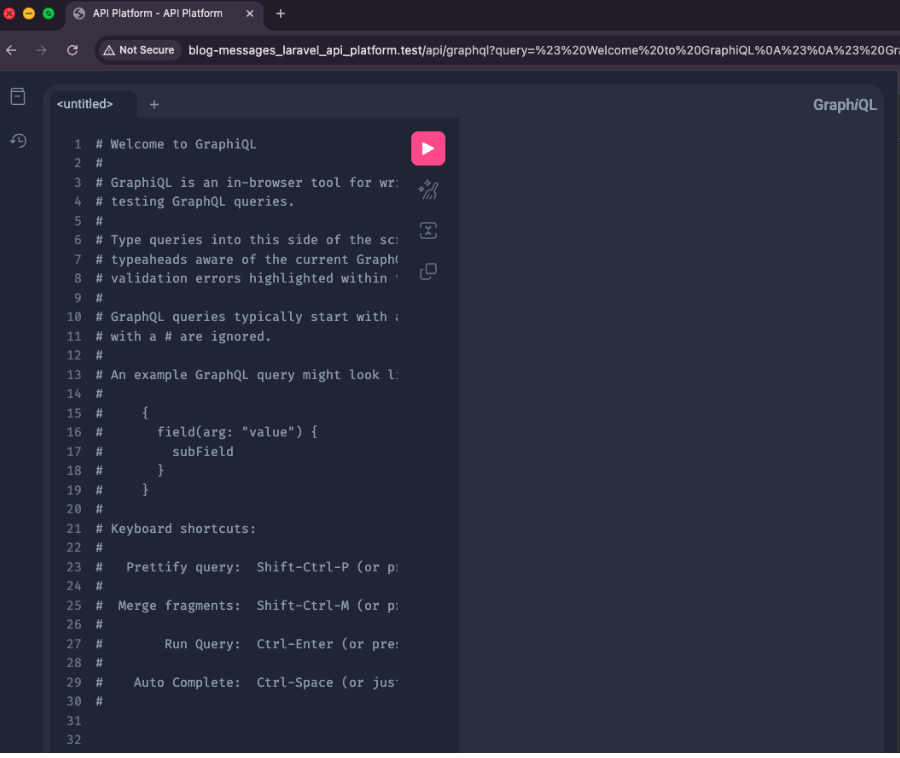 A Built-in GraphQL sandbox, just for youYes. That’s right. You have a GraphQL playground because your API is now GraphQL. If you don’t believe me:
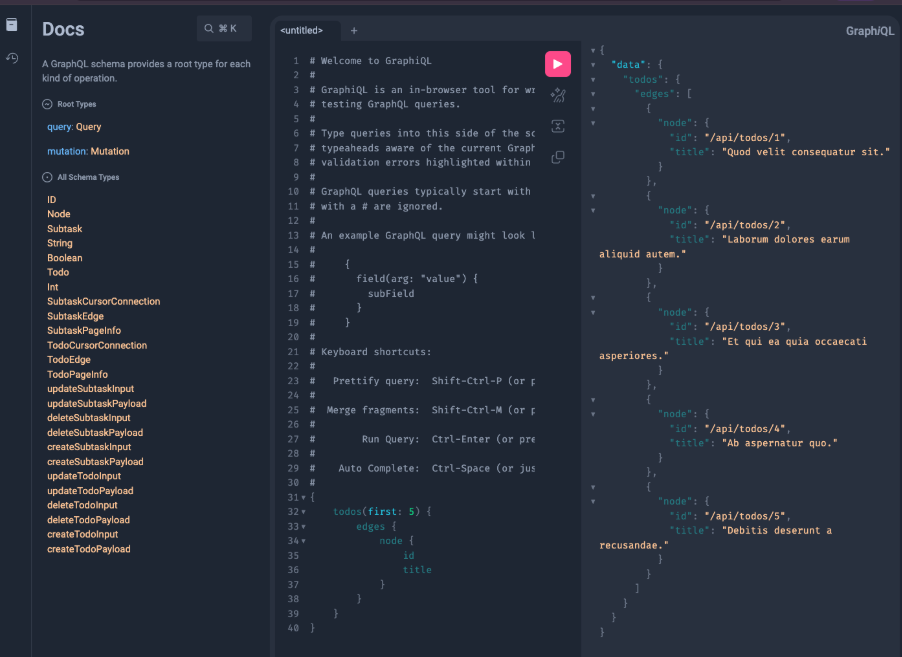 From REST to GraphQL in mere minutesYou now have a GraphQL API and a REST API.
Pagination is one of those things that I’ve always found to be a very manual pain to implement. API Platform has an approach to this that borders on the ridiculous when it comes to simplifying the process of integrating pagination. Consider our ToDo model again:
<?php

namespace App\Models;

use ApiPlatform\Metadata\ApiProperty;
use ApiPlatform\Metadata\ApiResource;
use Illuminate\Database\Eloquent\Factories\HasFactory;
use Illuminate\Database\Eloquent\Model;
use Illuminate\Database\Eloquent\Relations\HasMany;
use Symfony\Component\Serializer\Attribute\Groups;

#[ApiResource(normalizationContext: ['groups' => ['read']])]
#[ApiProperty(property: 'title', serialize: [new Groups(['read'])])]
#[ApiProperty(property: 'completed', serialize: [new Groups(['read'])])]
class Todo extends Model
{
   use HasFactory;

   /**
    * Get the subtasks for the todo.
    */
   #[ApiProperty(readableLink: true)]
   #[Groups(['read'])]
   public function subtasks(): HasMany
   {
       return $this->hasMany(Subtask::class);
   }

   /**
    * The attributes that are mass assignable.
    *
    * @var array<int, string>
    */

   protected $fillable = [
       'title',
       'completed',
   ];

   /**
    * The attributes that should be cast.
    *
    * @var array<string, string>
    */
   protected $casts = [
       'completed' => 'boolean',
   ];
}I’ve added new attributes that are for formatting the Subtask relationship. To add pagination, I’m going to set a default for the number of entities returned per page, then test the page URL query string. Add the following attribute to the class:
#[ApiProperty(property: 'title', serialize: [new Groups(['read'])])]
#[ApiProperty(property: 'completed', serialize: [new Groups(['read'])])]
#[ApiResource(
   normalizationContext: ['groups' => ['read']],
   paginationItemsPerPage: 5,
)]
#[ApiProperty(property: 'title', serialize: [new Groups(['read'])])]
#[ApiProperty(property: 'completed', serialize: [new Groups(['read'])])]
class Todo extends ModelAnd that’s it. Done. As we have 10 Todos, that means we should have two pages—5 entities returned per page. So, you can test out adding page 2:
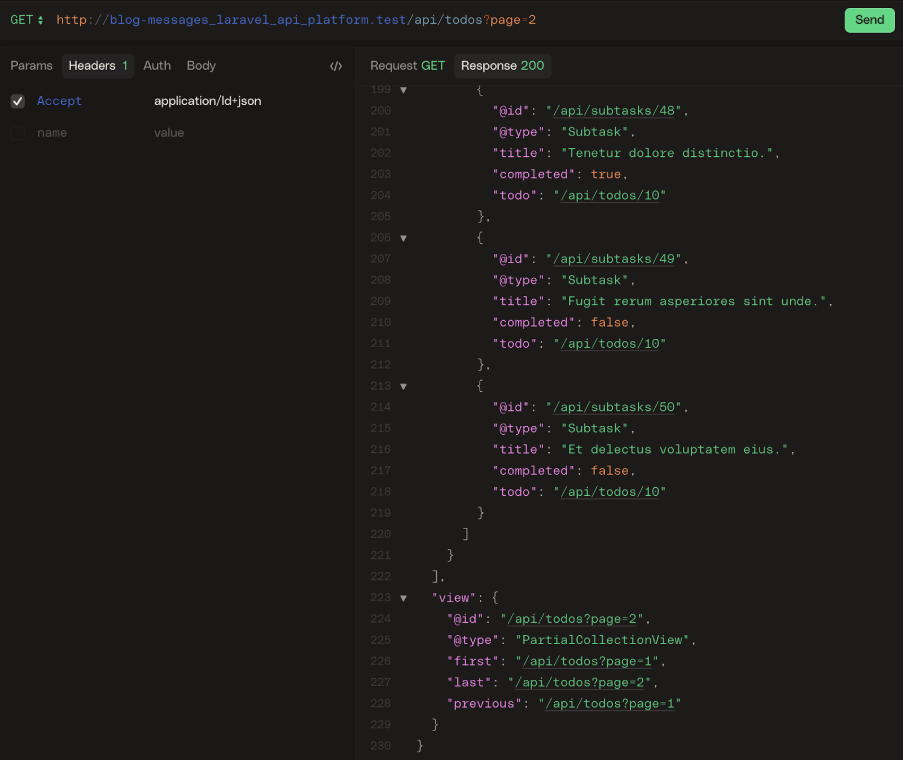 Magical pagination out of the boxIt’s also added pagination links, magic.
One of the points I made when speaking about the power of API Platform at API Platform Conference 2025 was that PHP developers who use this framework day in, day out are probably unaware of just how rare this kind of power is. I haven’t come across anything else that can put these sorts of features into developers’ hands and make it this simple. If you’re not from the PHP world, give it a try—it made API development fun again for me.
Have a question or want to share what you're building?
Subscribe to the Developer Newsletter
Follow us on X (formerly Twitter) for updates
Watch tutorials on our YouTube channel
Connect with us on the Vonage Developer page on LinkedIn
Stay connected and keep up with the latest developer news, tips, and events.