
Share:
Phil is Head of Developer Relations at Hookdeck, an asynchronous messaging platform, and a proud Vonage alumni.
Making Phone Calls from a Web Browser With Vue.js and Vonage
Time to read: 19 minutes
Note: Some of the tools or methods described in this article may no longer be supported or current. For updated content or support, check our latest posts or our Documentation
In this blog post we'll walk through how you can make a phone call from a web brower to a phone with Vonage In-App Voice using the Vonage Client SDK for JavaScript and Vue.JS. In-App Voice and In-App Messaging is in Developer Preview so we'd love your feedback on both the development experience that you have and on the functionality that's provided. You can get in touch via the Vonage Developer Community Slack.
In order to make a phone call from a web browser we're going to need a number of components in our app. A Vue.JS application that runs in the browser and that uses the Vonage Client SDK for JavaScript, an application server used to authenticate the application user with Vonage by generating a User JWT, and a phone to receive the phone call.
The sequence diagram below shows how things will work once we've built our app. In this blog post, we'll first create the Vue.JS application with a UI that allows a phone number to be entered. We'll then create an application server that can generate the required User JWT. Once the app server is up and running we'll update the Vue.JS app to retrieve the JWT and use that with the Vonage Client SDK for JavaScript to login to the Vonage platform and initiate the phone call. We then need to update the app server to handle a GET request that Vonage will make in order to retrieve instructions for how to proceed with the phone call. Those instructions will tell Vonage to connect the call from the Vue.JS application in the web browser to a phone.
/* https://bramp.github.io/js-sequence-diagrams/ Participant Vue.JS App as V Participant App Server as A Participant Nexmo as N Participant Phone as P V->A: Get User JWT Note right of V: In a production app<br/>this request should<br/>be authenticaterd A-->V: User JWT V -> V: Create Nexmo<br/>Conversation Client V -> N: Login N --> V: Logged In V -> N: Call Phone N -> A: GET answer_url A --> N: NCCO connect N -> P: Call */
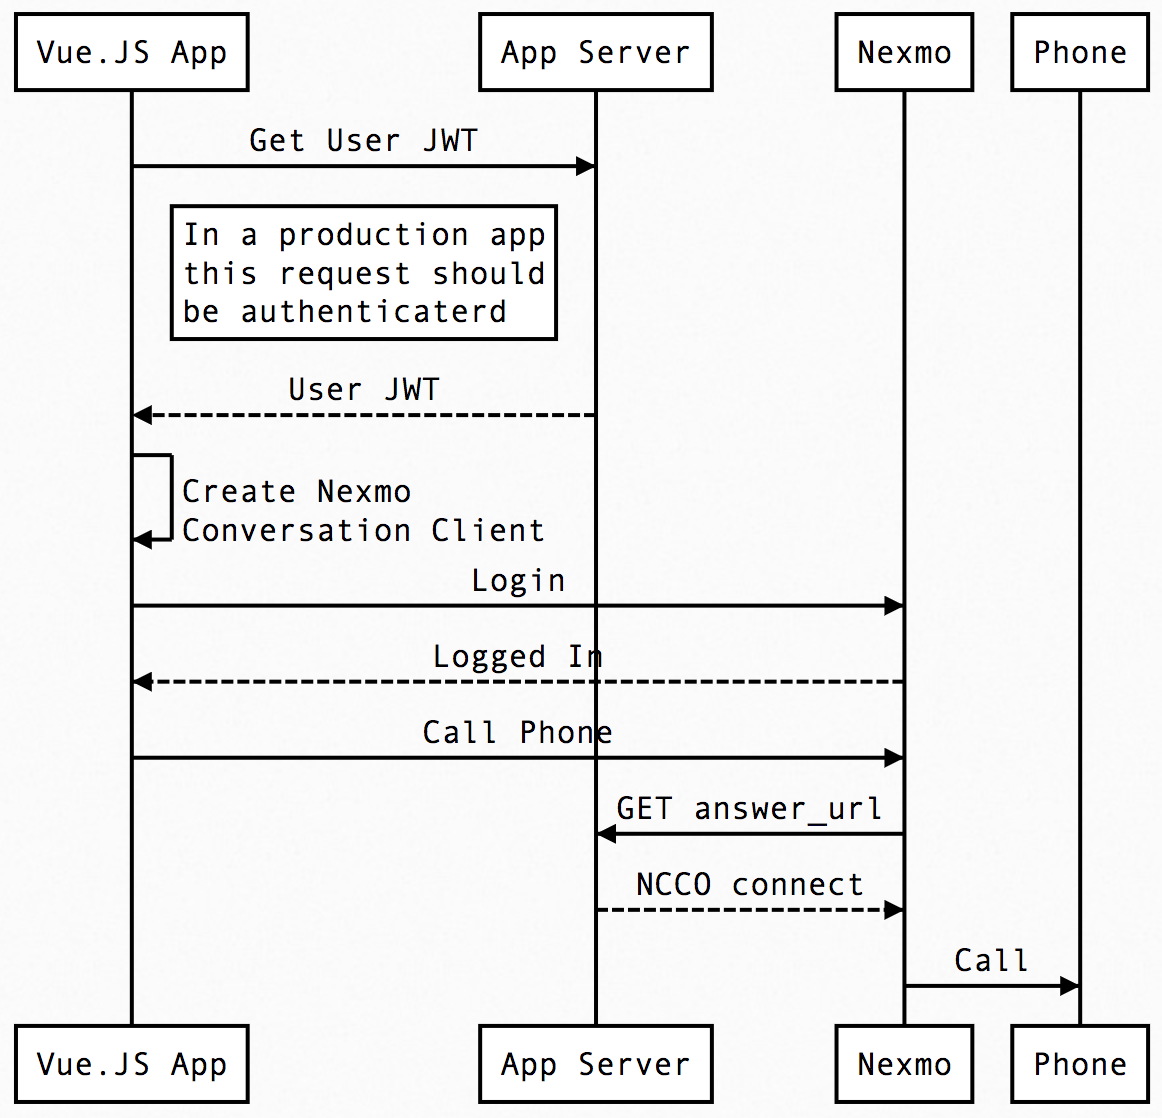 Call from Web Browser Sequence Diagram
So, there are a few steps involved but the result is worthwhile.
If you'd rather dive straight into the code you can find the Call from Browser code on GitHub.
Yarn for package management
The Vue CLI for scaffolding out our app and running a dev server
A Nexmo account to enable us to use the SDK and make phone calls
The Nexmo CLI to quickly create and setup a Nexmo application from the command line. Please use the beta version of the CLI e.g.
npm install -g nexmo@betaA local tunnel solution such as Ngrok so that the Nexmo platform can reach a locally running web server). For this blog post we're going to use Ngrok.
With those in place, let's get started.
Run the following vue command in the terminal and pick the default of (babel, eslint) when prompted.
$ vue create call-from-browser

# navigate into the newly created Vue project folder
cd call-from-browserThis will result with you having the following directory structure and files:
call-from-browser
├── README.md
├── babel.config.js
├── package.json
├── public
│   ├── favicon.ico
│   └── index.html
├── src
│   ├── App.vue
│   ├── assets
│   │   └── logo.png
│   ├── components
│   │   └── HelloWorld.vue
│   └── main.js
└── yarn.lockWe're going to build a CallFromBrowser component so let's rename the default HelloWorld one that was created.
With that we're ready to start building the UI.
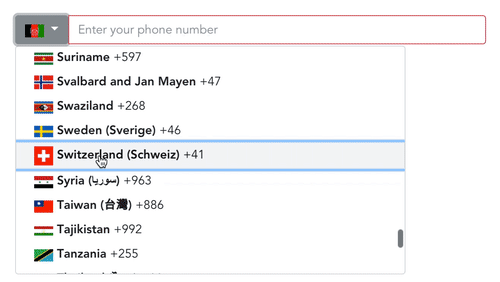
Vue.JS has a strong and growing ecosystem so it makes sense to utilize existing components if there are any. Luckily, there are a few options and we'll go with the vue-tel-input component by Steven Dao.
 vue-tel-input example animation
Install the component:
Now that we have the component to help us validate phone numbers we can add it to the CallFromBrowser component. Open src/components/CallFromBrowser.vue in a code editor.
Update the <template> element as follows:
<template>
  <main class="call-from-browser">
    <vue-tel-input @oninput="onInput">
    </vue-tel-input>
    <button class="call-control" v-bind:class="{'call-in-progress': callInProgress}" v-on:click="controlCallClick"></button>

    <p>{{infoMessage}}</p>
  </main>
</template>The template utilises the <vue-tel-input> component and sets an @onInput handler. We have a <button> that will have a call-in-progress class set based on a callInProgress property value and a click handler that will call a controlCallClick method. The template also has a <p>{{infoMessage}}</p> that enables us to provide some user feedback via a data.infoMessage property that we're just about to define.
Let's next update the contents of the <script> tag within the same file.
<script>
import 'vue-tel-input/dist/vue-tel-input.css'
import VueTelInput from 'vue-tel-input'

export default {
  name: 'CallFromBrowser',
  components: {
      'vue-tel-input': VueTelInput
  },

...
</code></pre>
<p>This imports the CSS and the component definition for the telephone input component sets the name of the component to <code>CallFromBrowser</code> and registers the <code>vue-tel-input</code> component dependency so it can be used within the template.</p>
<p>Next let's set up some properties for data binding such as the <code>callInProgress</code> property relied upon by the <code>template</code> and add any methods that are expected to be in place, as show, in the template:</p>
<pre><code class="language-javascript">export default {
  name: 'CallFromBrowser',
  components: {
      'vue-tel-input': VueTelInput
  },

  data() {
    return {
      phone: {
        number: '',
        isValid: false,
        country: {}
      },
      infoMessage: "",
      callInProgress: false
    }
  },

  methods: {

    onInput({ number, isValid, country }) {
      this.phone.number = number;
      this.phone.isValid = isValid;
      this.phone.country = country;

      if(!isValid) {
        this.infoMessage = "Please enter a valid phone number"
      }
      else {
        this.infoMessage = `Thanks for entering a valid ${this.phone.country.name} phone number`
      }
    },

    controlCallClick() {
    }

  }
}
</script>The data function returns a phone object that we populate in the onInput handler. In that handler, we set the phone number that the user has entered into the vue-tel-input component and properties representing the validity of the phone number and the country that the number is for.
We also provide the user with some feedback on the phone number validity by setting the infoMessage property. Vue data-binding means that the value we set here is reflected in the UI.
A stub controlCallClick method is also added to handle the <button> being clicked.
A final step in setting up the CallFromBrowser component is to add some styling. Replace the existing <style> element and contents with the following:
<style scoped="">
.vue-tel-input {
  width: 200px;
  margin: auto;
}

.call-control {
  font-size: 11em;
}

.call-control:before {
  content: '☎️';
}

.call-control.call-in-progress:before {
  content: '?'
}
</style>The style sets the default content of the <button> to be the red telephone emoji (☎️). If the call-in-progress class is present, dynamically set if the callInProgress property returns true then the content will instead be an old-style phone handset emoji (?).
The final step in getting the basic UI in place is to update App.vue by replacing the template and script tags. Leave the style tag as-is.
<template>
  <div id="app">
    <callfrombrowser>
  </callfrombrowser></div>
</template>

<script>
import CallFromBrowser from './components/CallFromBrowser.vue'

export default {
  name: 'app',
  components: {
    CallFromBrowser
  }
}
</script>Replace <template> contents, import the CallFromBrowser.vue component definition and registering the imported component.
We can now run the app:
With this running, navigating in a browser to http://localhost:8080 and trying out entering phone numbers into the vue-input-tel component. We'll see the phone number validated at the bottom of the app UI.
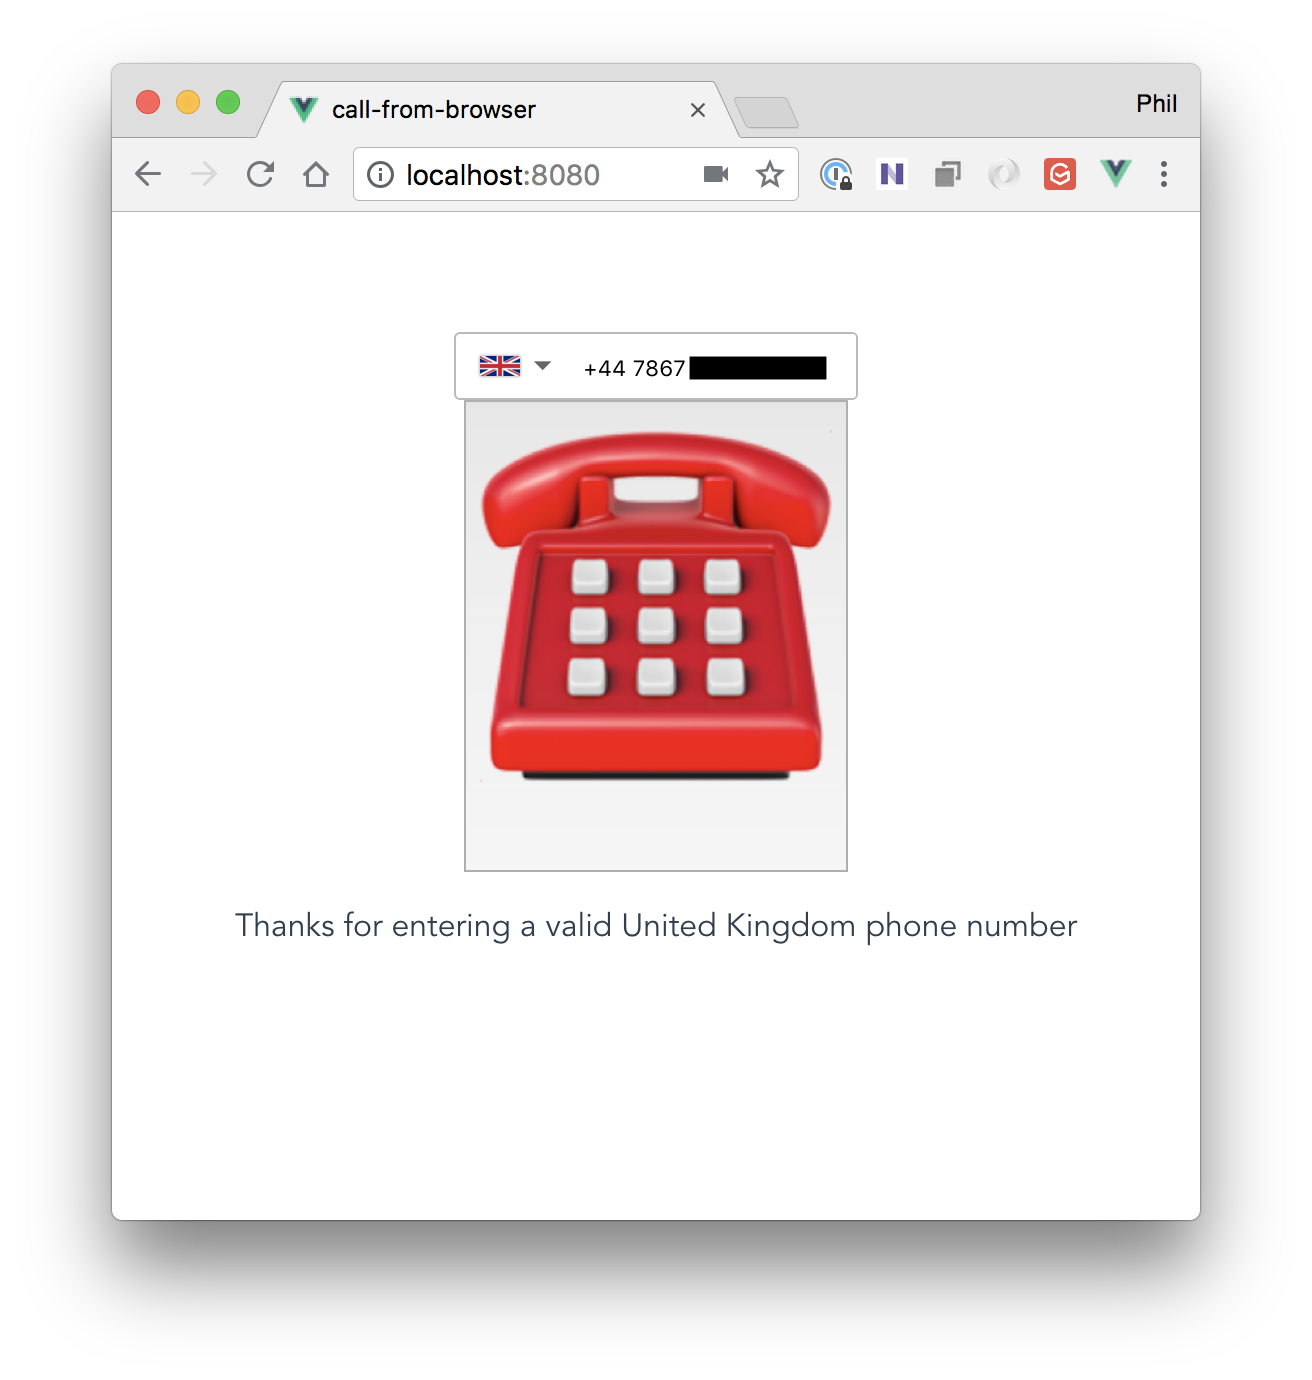 Call from Browser simple user interface
The Nexmo Stitch JavaScript SDK connects to the Vonage platform to enable In-App Voice functionality within the web browser. In order to connect to the Nexmo platform, we need to login with a valid user authentication JWT (JSON Web Token) for the application user that defines that user's permissions. To create a User JWT we're going to need to create a few things:
a simple server that generates the User JWT that can be retrieved by the
CallFromBrowserVue.JS componentan Application within the Vonage platform - we can do this using the Nexmo CLI
a User within the Application for the current web app users
Let's start by creating a simple server. Create a server directory, install a few dependencies and create an index.js and .env files for the functionality we need.
For the server, we're going to use Express.js with the CORS and body-parser middleware. dotenv is used to load in the .env file which itself will contain configuration that we wouldn't want in source control. We've also installed the Nexmo Node.JS library to help with User JWT generation.
Before we look at the server code let's also create the Application and the User for that application. We can do this using the Nexmo CLI:
Running this command will output an application ID. It will also add the Application details to a .nexmo-app file. Take the application ID and add it to the .env file along with a variable for the private.key location:
NEXMO_PRIVATE_KEY=private.key
NEXMO_APP_ID=YOUR_APPLICATION_IDThe last piece of Application setup is to create a user within the application. It's possible to do this using Nexmo libraries but in this case, we'll set up a user using the Nexmo CLI:
This command will create the user for the application ID identified within the .nexmo-app file. Add an environment variable for the user name to the .env file.
NEXMO_PRIVATE_KEY=private.key
NEXMO_APP_ID=YOUR_APPLICATION_ID
NEXMO_APP_USER_NAME=demoNow open up index.js to add the basic server code:
// Load .env config
require('dotenv').config({
    path: __dirname + '/.env'
});

const Nexmo = require('nexmo')
const express = require('express')
const bodyParser = require('body-parser')
const cors = require('cors')

const app = express()
app.use(bodyParser.json())
app.use(cors())

// endpoint that doesn't authenticate the user
// it will simply return a JWT with every request
app.get('/no-auth', (req, res) => {
    res.json({userJwt: null})
})

app.listen(3000, () => console.log('Example app listening on port 3000!'))In the above code, we load in Express and set it up to parse inbound requests as JSON (we'll use this later). We also set Express up to support Cross-Origin Resource Sharing (CORS). This is required because the Vue.JS app is running on localhost:8080 and the JavaScript code running in the browser needs to make a call to this server running on localhost:3000, a different port.
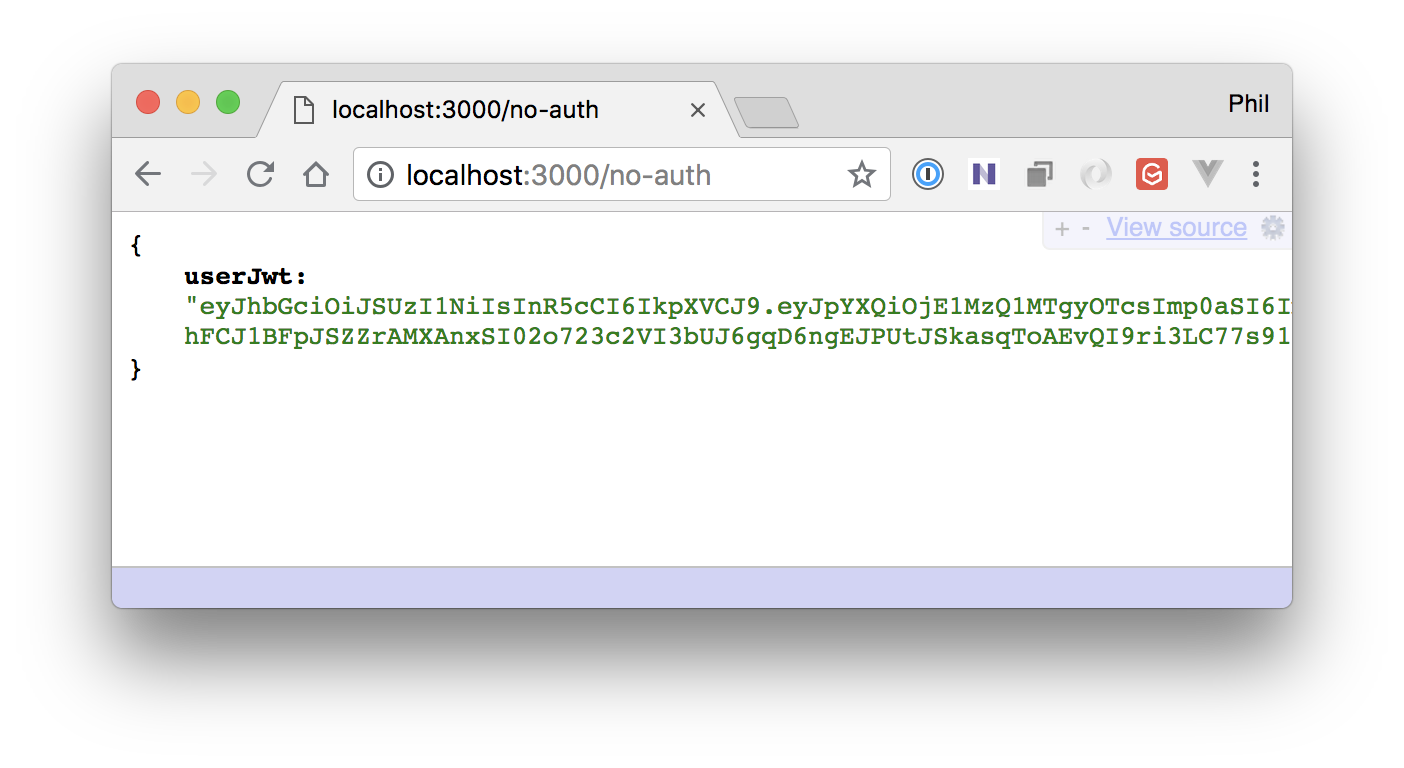
You can now run node index.js and then access http://localhost:3000/no-auth to ensure the endpoint returns the expected JSON.
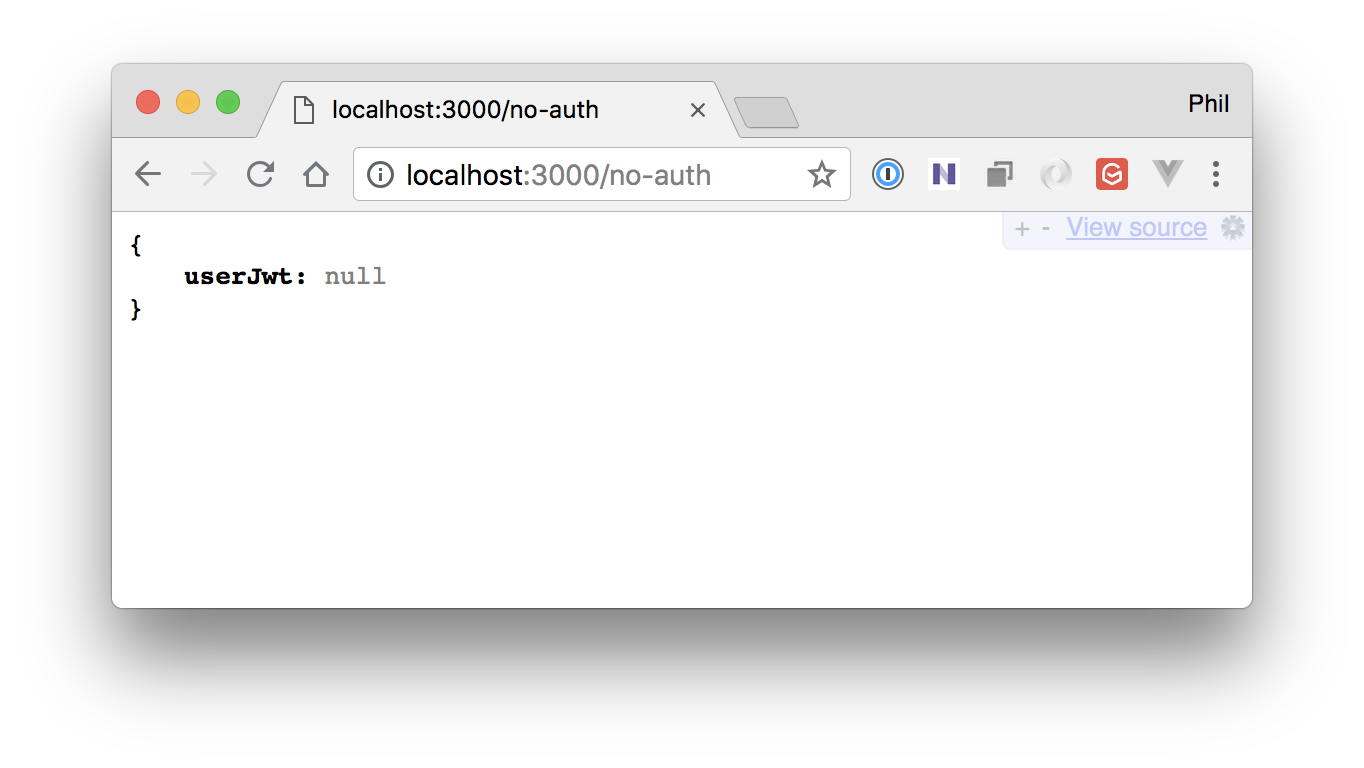 User JWT with null value
Now, let's add the code to generate the User JWT to be used with the Vonage Client SDK for JavaScript.
const userAcl = {
    "paths": {
        "/v1/users/**": {},
        "/v1/conversations/**": {},
        "/v1/sessions/**": {},
        "/v1/knocking/**": {}
      }
}

// endpoint that doesn't authenticate the user
// it will simply return a JWT with every request
app.get('/no-auth', (req, res) => {
    const jwt = Nexmo.generateJwt(process.env.NEXMO_PRIVATE_KEY, {
        application_id: process.env.NEXMO_APP_ID,
        sub: process.env.NEXMO_APP_USER_NAME,
        exp: new Date().getTime() + 86400,
        acl: userAcl
    })

    res.json({userJwt: jwt})
})The userAcl variables provide a set of claims or access rules that are used when creating the JWT along with the application ID, a sub for the name of the user and an exp as an expiry time for the JWT. See the JWT and ACL overview in Nexmo Developer for more information.
Restarting the node index.js processing and accessing http://localhost:3000/no-auth will show a real JWT having been generated.
 User JWT with real JWT value
Note: It can sometimes be handy to take a look at JWT Debugger to check the contents of your JWT.
With the JWT generation in place, we can move back to the client to retrieve the User JWT that we create on the server.
Since it'd be bad practice to 100% hard code the server URL we'll make this settable via a Vue.JS property with a default that's handy for our development setup.
...

      callInProgress: false
    }
  },

  props: {
    jwtUrl: {
      type: String,
      default: process.env.VUE_APP_JWT_URL || "http://localhost:3000/no-auth"
    }
},The jwtUrl value can then be overwritten by setting a jwt-url property on the <CallFromBrowser> element and the default can be changed when the component is built by having a VUE_APP_JWT_URL value set in a .env file in our top-level directory. For more info see Vue.JS props and Vue CLI 3 Environment Variables and Modes.
With the server URL set, we can now fetch the User JWT. Vue.JS has various life cycle hooks. We'll retrieve the JWT within the created hook. To do this define a created function within the CallFromBrowser definition.
props: {
    jwtUrl: {
      type: String,
      default: process.env.VUE_APP_JWT_URL || "http://localhost:3000/no-auth"
    }
  },

  created() {
    fetch(this.$props.jwtUrl)
      .then(response => {
        return response.json();
      })
      .then(json => {
          console.log(json)
      })
      .catch(error => {
        console.error(error)
      })
},Ensure your Vue.JS development server is still running (run yarn serve from within the call-from-browser directory if not) navigate to http://localhost:8080 and open up your developer tools to check the console and make sure the User JWT us logged.
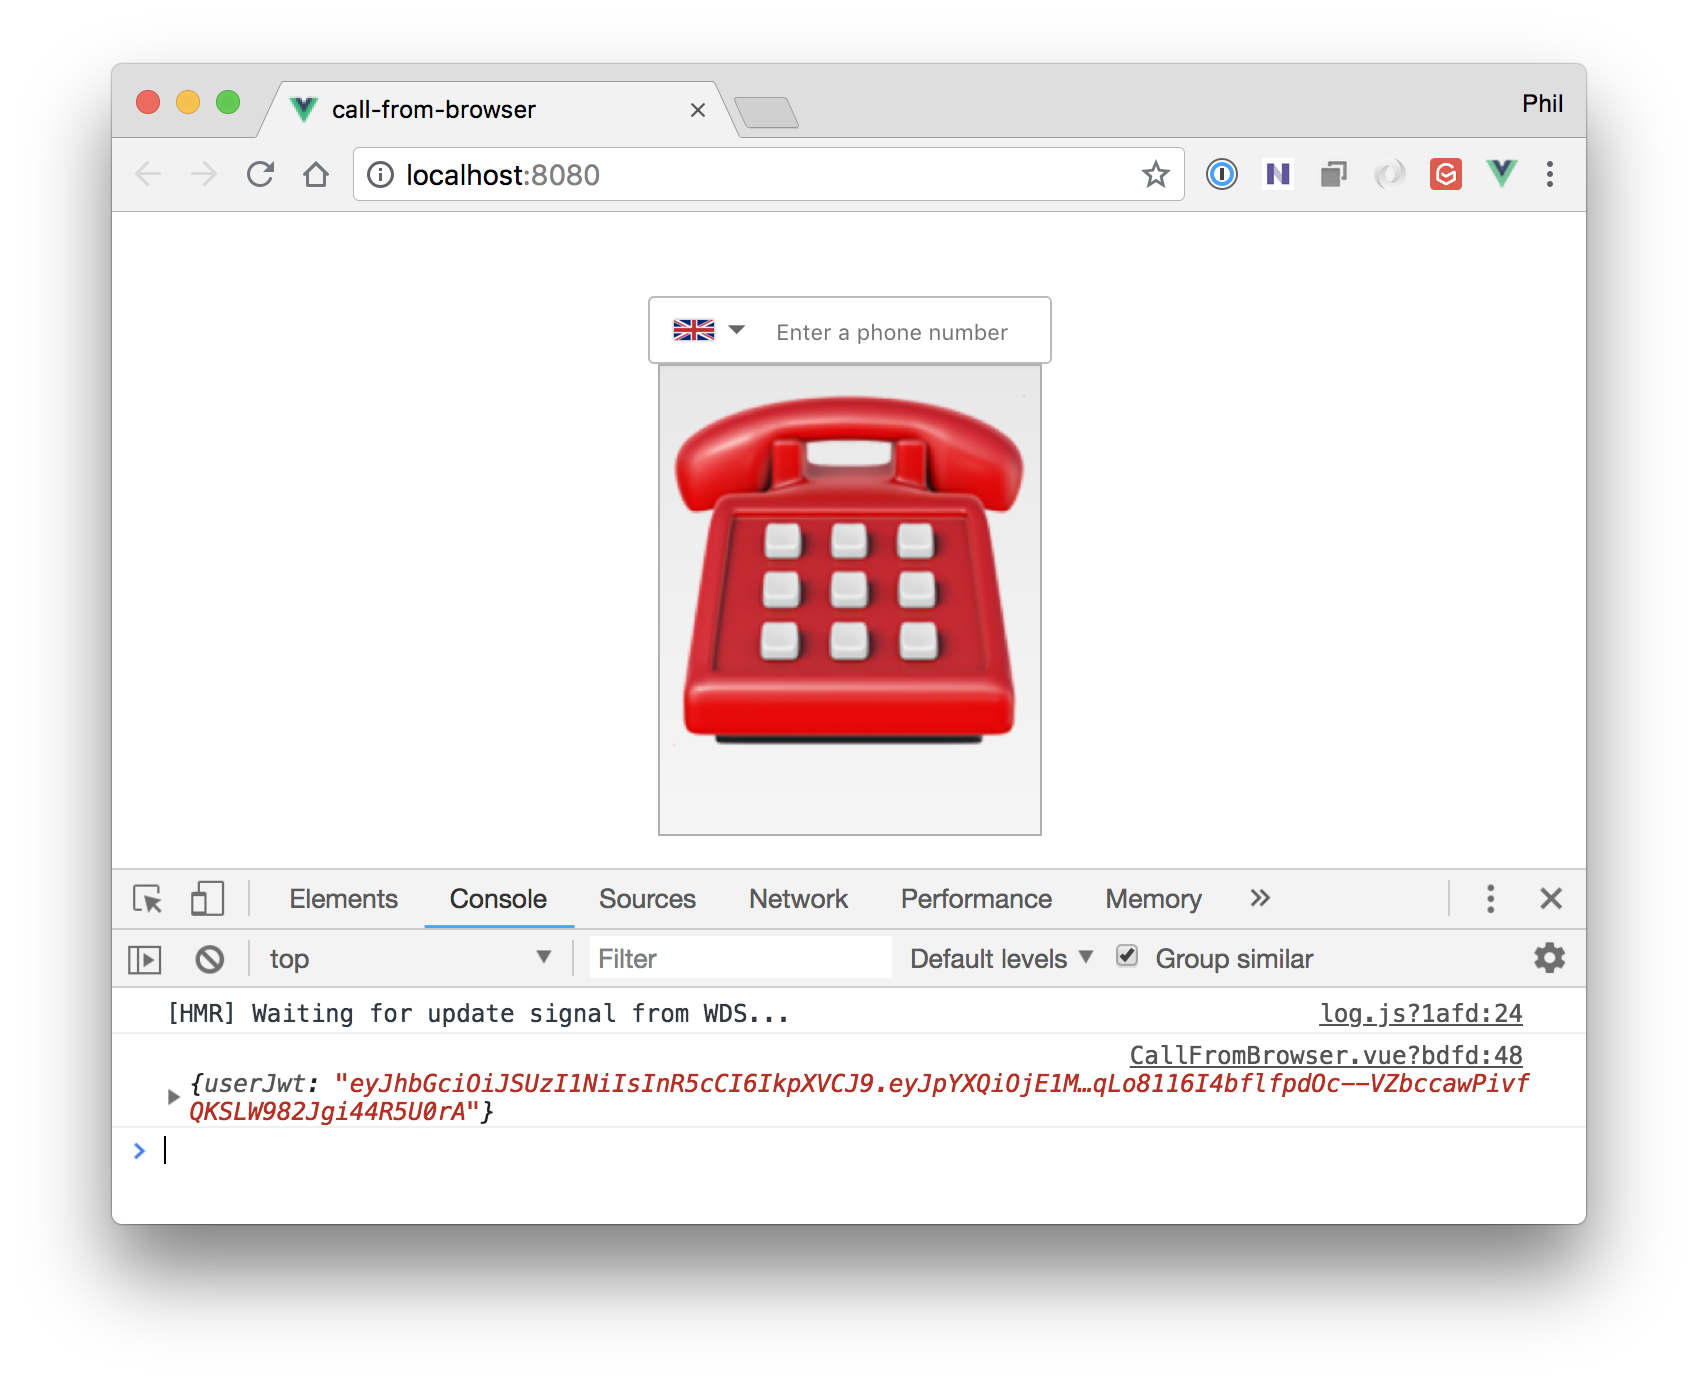 JWT now present in browser and output via console.log
With the User JWT in the client we can move to include the Vonage Client SDK for JavaScript:
Next, include the SDK within the CallFromBrowser.vue component and import the ConversationClient object definition:
<script>
import 'vue-tel-input/dist/vue-tel-input.css'
import VueTelInput from 'vue-tel-input'

import ConversationClient from 'nexmo-stitch'Once we have the required definition included we need to create a new instance of the ConversationClient and login. We'll do this after retrieving the User JWT:
created() {
    fetch(this.$props.jwtUrl)
      .then(response => {
        return response.json();
      })
      .then(json => {
        this.conversationClient = new ConversationClient({debug: true})

        return this.conversationClient.login(json.userJwt)
      })
      .then(app => {
        this.app = app

        // When the active member (the user) makes a call
        // keep a reference to the Call object so we can
        // hang up later
        this.app.on("member:call", (member, call) => {
            this.call = call
        });

        // Keep track of call status so we know how to
        // interact with the call e.g. hangup
        this.app.on("call:status:changed", (call) => {
          this.callInProgress =
            [
              "machine",
              "timeout",
              "unanswered",
              "rejected",
              "busy",
              "failed",
              "completed"
            ].indexOf(call.status) === -1;
        })
    })
    .catch(error => {
        console.error(error)
    })
},After the login Promise resolves we receive a reference to a representation of the Application via the app variable. We keep a reference of that app for future use (this.app) and also bind to two events on the app.
We bind to member:call which is triggered when the active user makes a call. In the event handler we store a reference to the current call with this.call.
We also bind to call:status:changed to keep track of the call status. Within the event handler we updated the callInProgress property based on the call status. If the call is in any of the final states then the call is not in progress. Otherwise, the call status is in progress. These states will be reflected in the <button> in the template.
The final thing we need to do in the client - before we make one last update to the server and complete the app - is handling the user click on the <button>.
    ...
    },

    controlCallClick() {
      if(this.callInProgress) {
        this.call.hangUp()
      }
      else if(this.phone.isValid) {
        this.app.callPhone(this.phone.number)
      }
}Above we've updated controlCallClick with the logic to check if there is no call in progress and the user has entered a valid phone number this should trigger the call. If there is an active call this should hang up the call. In both cases we call the appropriate function on the this.call reference that was set in the member:call event handler.
With all the client-side functionality in place, you can enter a valid phone number, click the call button and you'll then see an error in the console that comes from the Vonage platform
conversation:error:not-found
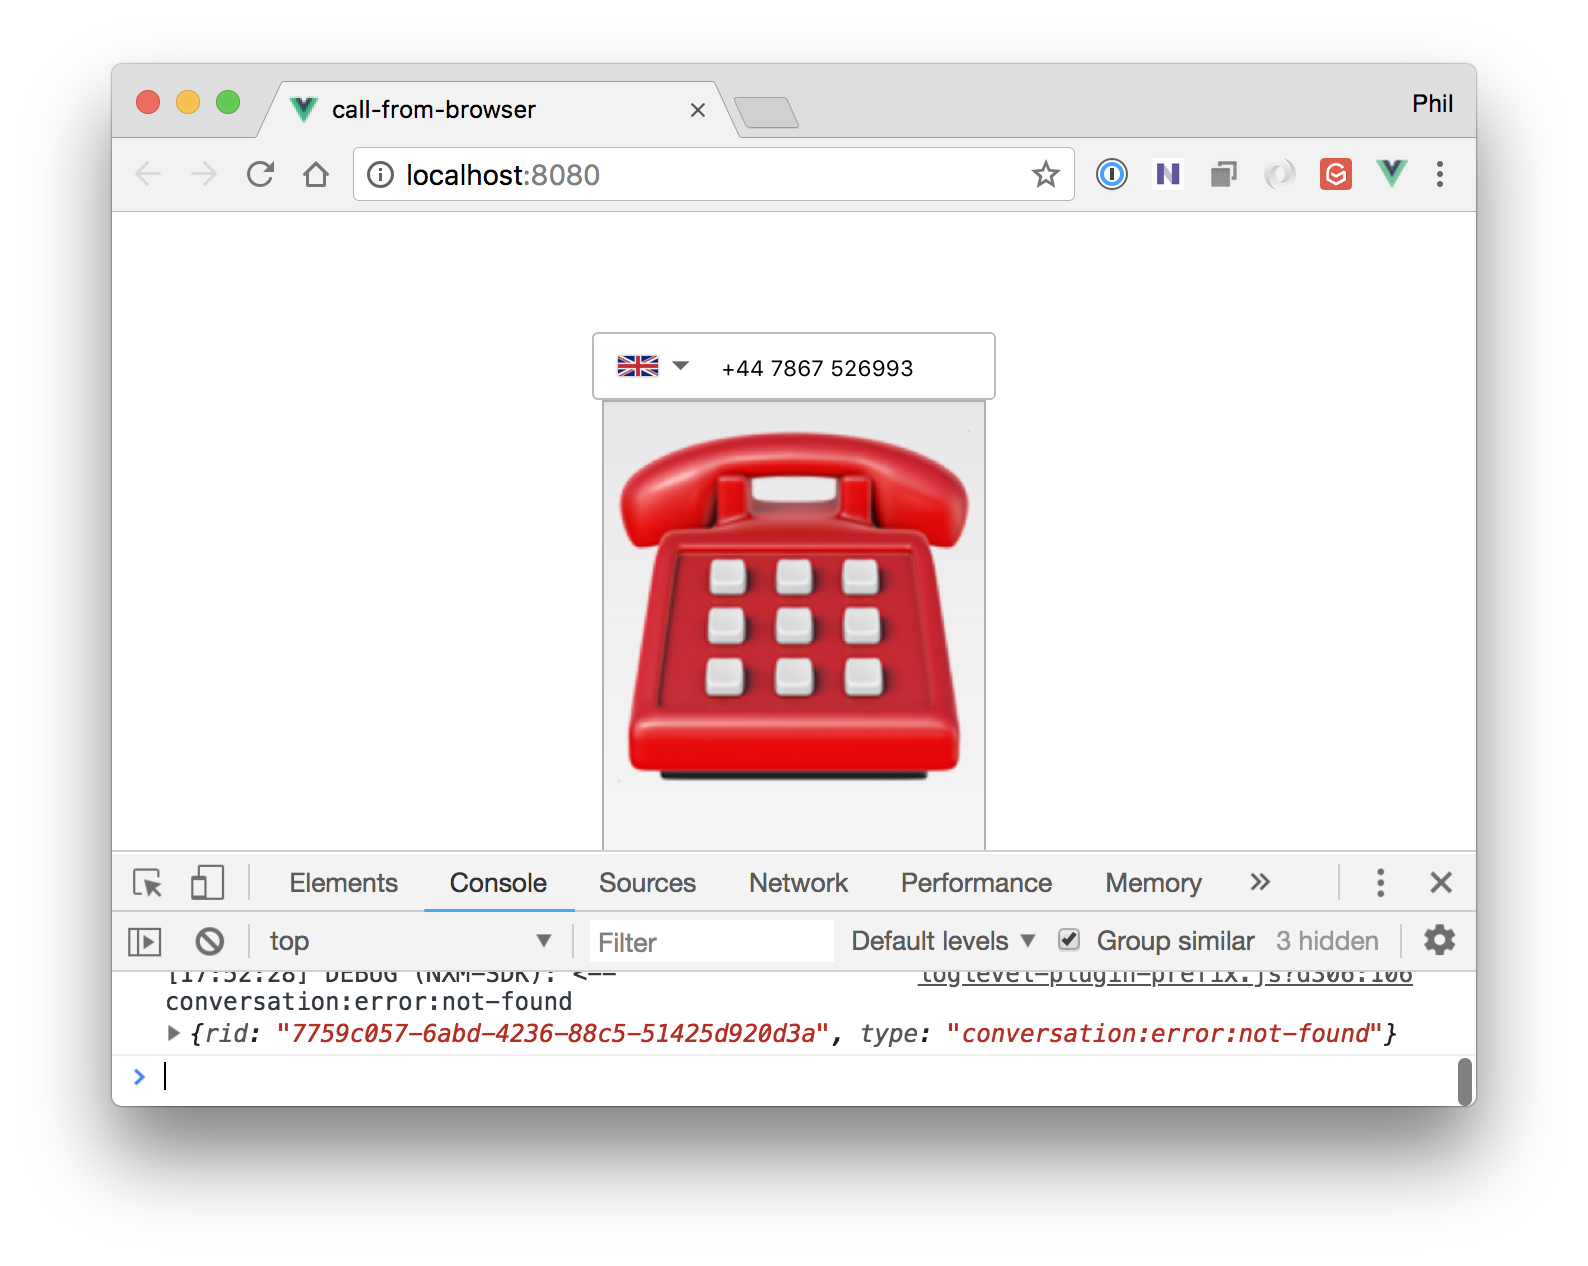 conversation-not-found message in browser console
When a call is initiated or received by the Nexmo platform it makes an HTTP request to an answer_url for the relevant associated Nexmo application. The server that receives that HTTP request must return a Nexmo Conversation Control Object (NCCO); a set of instructions informing Nexmo how to proceed with the call.
Back in server/index.js add an /answer endpoint to handle the GET request from the Vonage platform:
app.get('/answer', (req, res) => {
    const ncco = [{
        "action": "connect",
        "from": process.env.NEXMO_FROM_NUMBER,
        "endpoint": [{
            "type": "phone",
            "number": req.query.to
        }]
    }]

    res.json(ncco)
})Nexmo expects a JSON structure, the NCCO, to be returned instructing it how to proceed with the call. The above ncco JSON structure that we return informs Nexmo to connect the call to a phone endpoint with the number identified by the value in req.query.to - the to query parameter in the inbound GET request. This number is the number we passed to this.app.callPhone in our Vue.JS app.
_Notes:
Please remember that we have no application-level authentication in our web app so you'll need to add this yourself e.g. within the answer URL endpoint you can check the
req.query.toandreq.query.fromto ensure that the user (identified byfrom) is allowed to make the requested call.If you have a Nexmo virtual phone number you should add a
NEXMO_FROM_NUMBERentry to the.envfile so that recipient of phone calls see a number on their inbound call. Otherwise, it may come up as a "Private Number" or "Unknown"._
Restart the Node process for the server so it's running with the updated code.
Finally, we need to make it possible for the Nexmo platform to reach the answer URL. To do this use Ngrok to create a local tunnel to localhost:3000.
$ ngrok http 3000
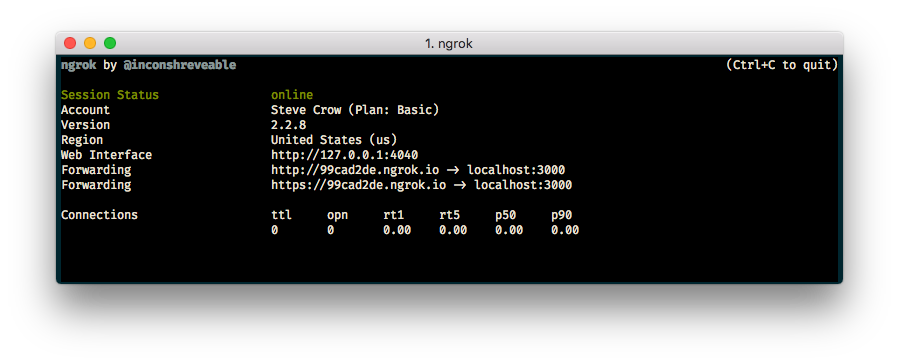 Ngrok output in a terminalAnd update the
 answer_url for your Nexmo Application to utilise the Ngrok tunnel URLs using the Nexmo CLI.
$ nexmo app:update NEXMO_APP_ID "call-from-browser" https://4ca73ac6.ngrok.io/answer https://4ca73ac6.ngrok.io/event
Note: you can find the
NEXMO_APP_IDinserver/.envorserver/.nexmo-app
Head back into the Vue.JS app in the browser, enter a phone number and click the button to make an outbound call from your web browser.
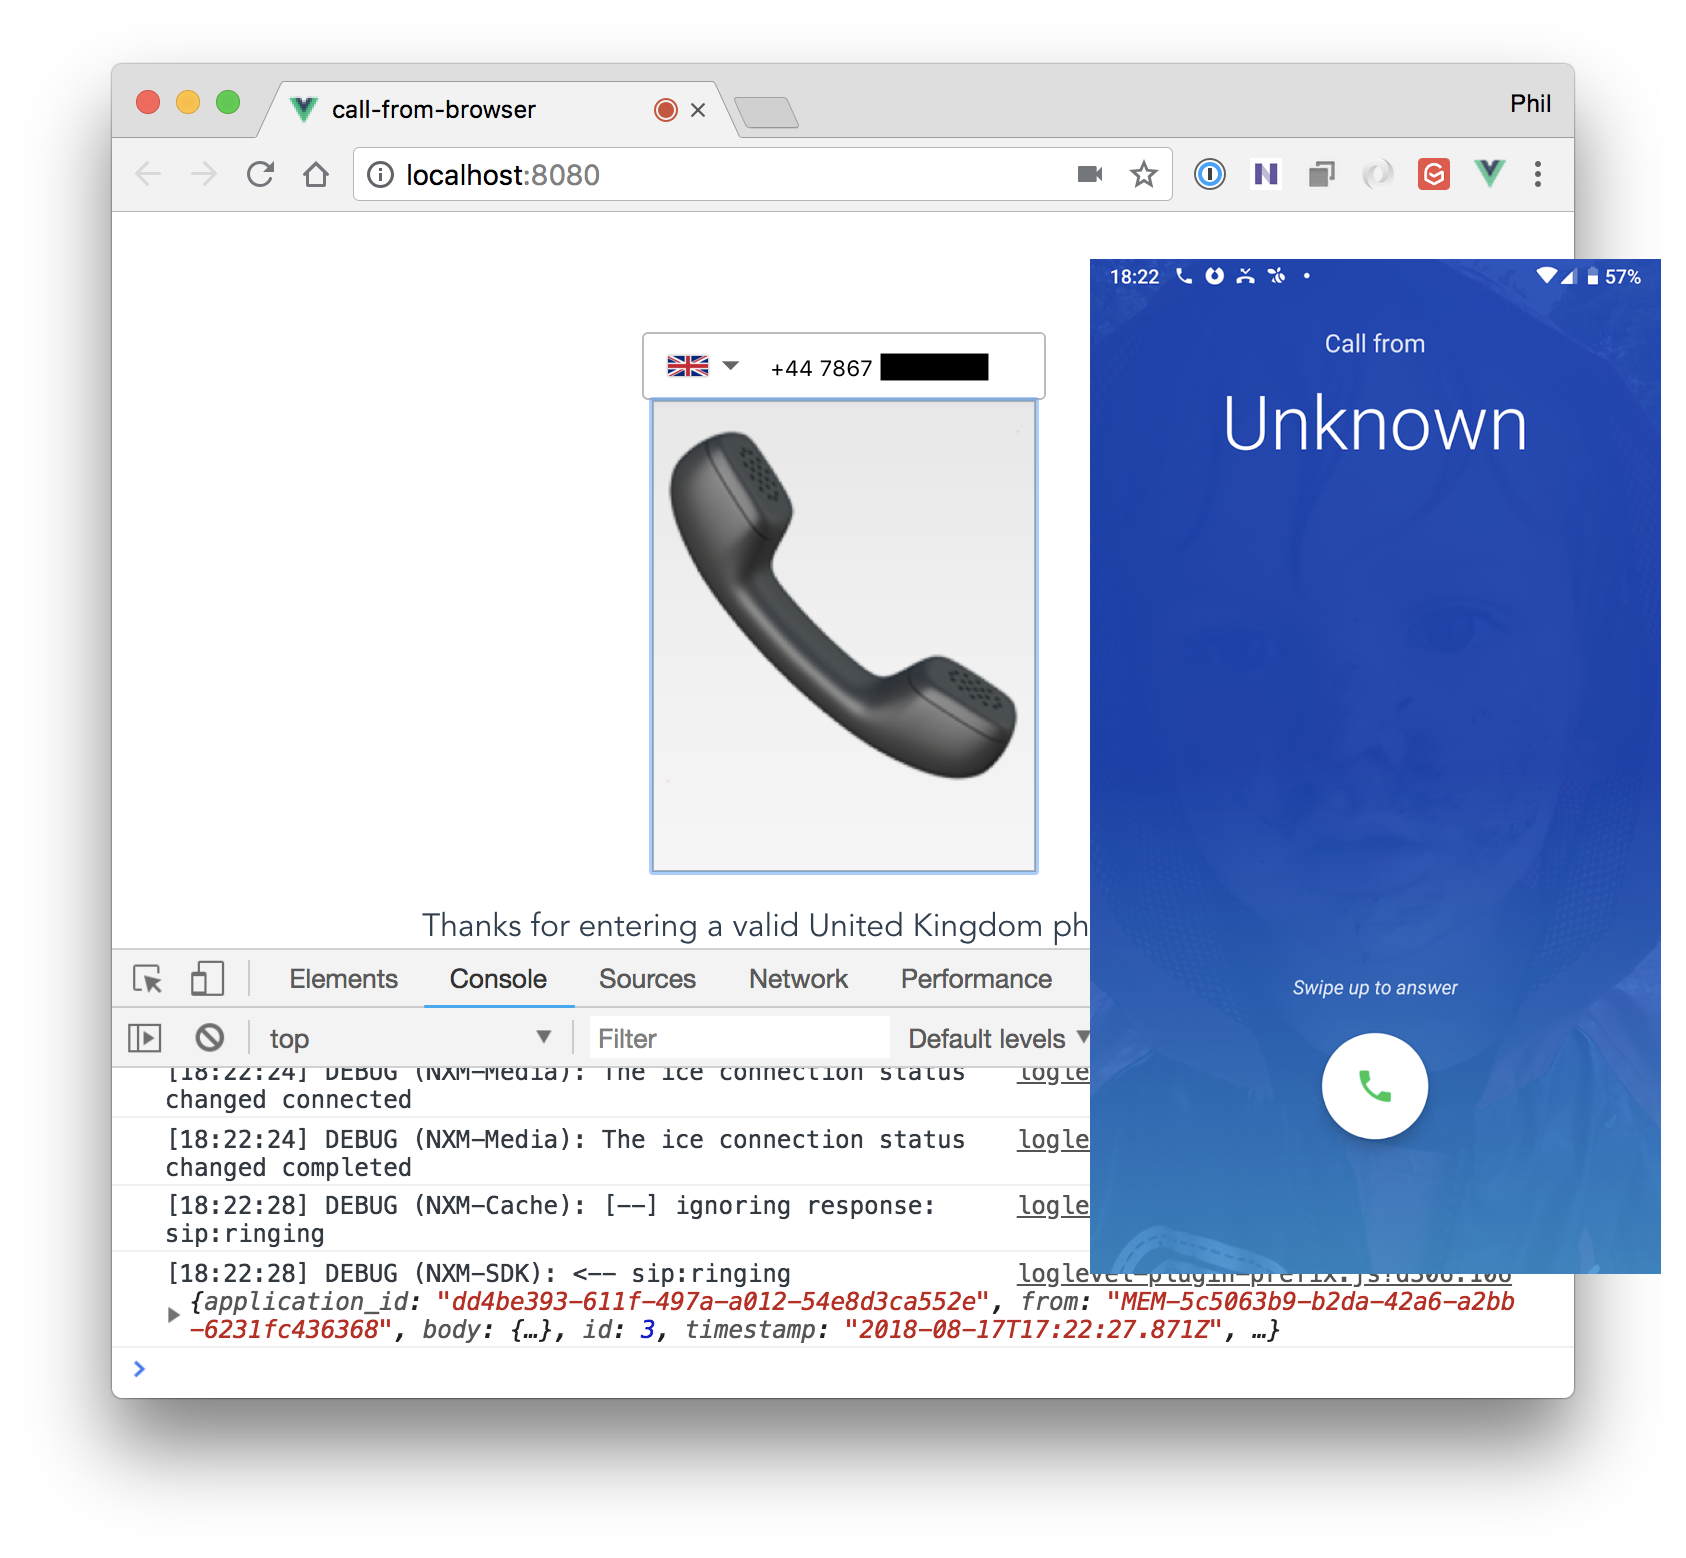 Full Vue.JS Call from Browser application working alongside screenshot of phone ringing
The purpose of this blog post is was to show how to to build an app that enables a user to call any phone on the planet directly from a web browser using Vue.JS and In-App Voice using the Vonage Client SDK for JavaScript. It provides the basics and has hopefully provided inspiration for what use cases this can enable. Oh, and you could also update the app to support inbound phone calls.
As mentioned at the start of this post, In-App Voice is in Developer Preview so please let us know if you've any thoughts on the experience you've had whilst building this app or if you have any other feedback by joining the Vonage Community Slack.
If you found this blog post interesting then the following resources are also worth checking out: