Share:
Beejay is your average tehnomancer. Currently a member of Vonage’s Customer Solutions Engineers team, you can find him doing a bunch of API integrations, helping clients with their code and doing odd tech stuff here and there. Aside from tinkering with anything tech, he enjoys playing music, climbing mountains, dragon-boating, and being the goofy dad to his kids.
Integrate ChatGPT with Meta (Facebook) Messenger via Messages API
Time to read: 6 minutes
This article was written in collaboration with Benjamin Aronov and updated in July 2025
Conversational AI has become pivotal in enhancing user experiences across various platforms. One of the most popular channels for engaging with users is Meta Messenger, previously known as Facebook Messenger. With billions of active users, developers have the opportunity to build smart chatbots that can help with customer support, answer questions, and make the experience more personal.
In this post, you’ll learn to connect ChatGPT to Meta Messenger using the Vonage Messages API so you can build your own smart, responsive chatbot.
>> tl;dr Find the fully working code in this GitHub repo.
Vonage API Account
JavaScript Node version 20 or higher
ngrok for tunneling
Before creating your Vonage app, open a tunnel with ngrok in your terminal, which you will use to set up the Vonage application’s webhooks:
ngrok http 3000For more help, see Testing with ngrok.
You now have your ngrok URL that looks something like:
Forwarding https://ed95-77-137-44-66.ngrok-free.app
-> http://localhost:3000Now you are ready to create a Vonage application!
To create an application, go to the Create an Application page on the Vonage Dashboard, and define a Name for your Application.

If you intend to use an API that uses Webhooks, you will need a private key. Click “Generate public and private key”, your download should start automatically. Store it securely; this key cannot be re-downloaded if lost. It will follow the naming convention private_<your app id>.key. This key can now be used to authenticate API calls. Note: Your key will not work until your application is saved.
Choose the capabilities you need (e.g., Voice, Messages, RTC, etc.) and provide the required webhooks (e.g., event URLs, answer URLs, or inbound message URLs). These will be described in the tutorial.
To save and deploy, click "Generate new application" to finalize the setup. Your application is now ready to use with Vonage APIs.
Enable the Messages capabilities and add your ngrok URL for the webhooks:
For Inbound:
https://YOUR_NGROK_URL/inboundFor Status:
https://YOUR_NGROK_URL/status
Click on "Generate public and private key". This will automatically download a file called "private.key". Later, we will move this file into our project. Finally, click “generate new application”.
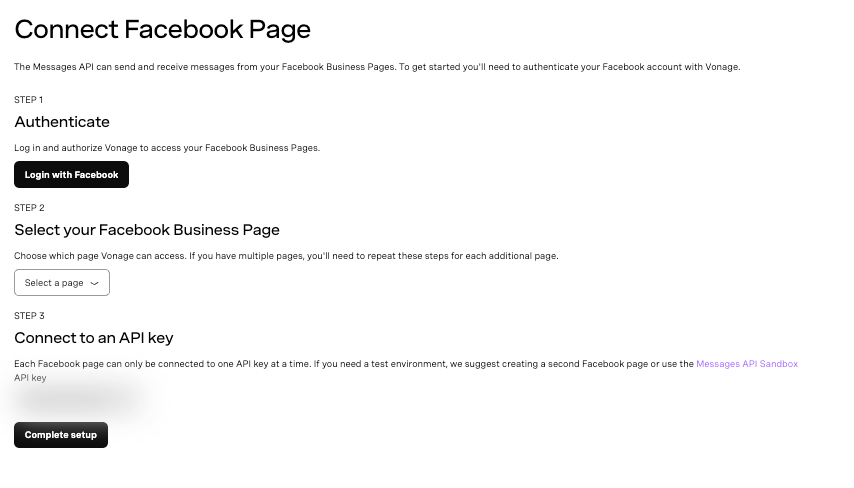 Step-by-step interface for connecting a Facebook Business Page to the Vonage Messages API
In the Vonage Developer Dashboard, click External Accounts
Click on Connect Facebook Pages
Log in to Your Facebook Account
Select the Facebook page you want to connect
If the page doesn’t appear, ensure the Vonage API Platform is enabled under Business Integrations
Click on "Complete Setup"
Return to your Vonage Application and click on the Link Social Channels tab
Click "Link" next to the Facebook page you want to associate with
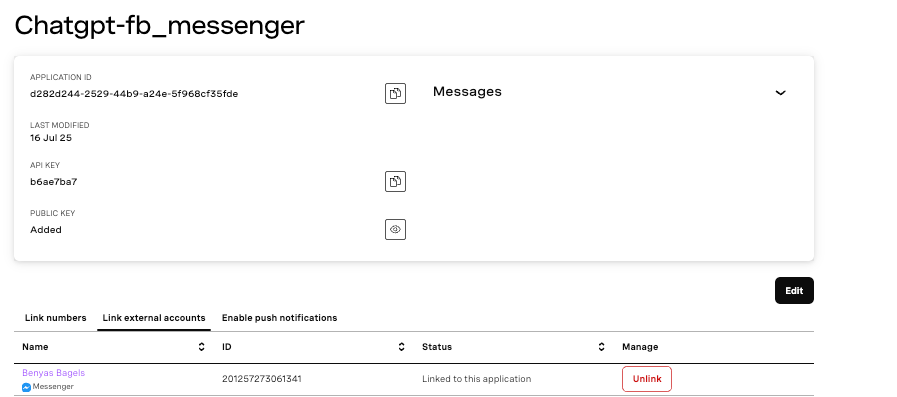 Vonage dashboard showing Facebook Messenger application details and linked page
Open a new terminal tab, separate from your ngrok tab, and create a new directory:
mkdir chatgpt-fb_messenger
cd chatgpt-fb_messengerMove your private.key file from before into your new project. Then, initialize your project:
npm init -y && npm pkg set type=modulegrea
Our project uses a few packages. The OpenAI library gives us our generative AI capabilities. The Vonage Node SDK allows us to access the Messages API and connect with Facebook.
Install your Node dependencies:
npm install express openai @vonage/server-sdk dotenvCreate the file app.js:
touch app.jsAdd the following boilerplate to app.js:
import express from 'express'

const PORT = 3000
const app = express()
app.use(express.json())
app.use(express.urlencoded({ extended: false }))

app.get('/', (req, res) => res.sendStatus(200))
app.post('/status', async (req, res) => res.sendStatus(200))
app.post('/inbound', async (req, res) => res.sendStatus(200))

app.listen(PORT, () => {
  console.log(`Server started on port ${PORT}`)
})
Run your app in separate terminal from your ngrok:
node app.jsYou can test that everything is working by sending a message to your Facebook Page. You will see in your ngrok tab that the /inbound endpoint is hit and should receive a 200 status. But that isn’t very fun! Let’s handle our inbound message in a better way!
Let’s add logic to receive and log incoming messages. Replace the line for handling POST requests to the /inbound endpoint:
app.post('/inbound', async (req, res) => {
  res.sendStatus(200);
  const messenger_to = req.body.to;
  const messenger_from = req.body.from;
  const received_text = req.body.text;
  console.log("Received message:", received_text, "from:", messenger_from);
});
Now, restart your Node server and test by sending a message to your Facebook Page. This time, in your Node tab, you’ll see your message displayed along with your Facebook ID:
➜  chatgpt-fb_messenger node app.js
Server started on port 3000
Received message: Hello Facebook! This is Vonage! from: 24826607800271195Receiving messages is fun, but let’s now have ChatGPT respond to our users’ messages!
Kill your node server and create an .env file in your project’s root:
touch .envNow populate your .env file with your Vonage and OpenAI credentials:
API_KEY=your_vonage_api_key
APPLICATION_ID=your_vonage_app_id
PRIVATE_KEY_PATH=./private.key
OPENAI_API_KEY=your_openai_key
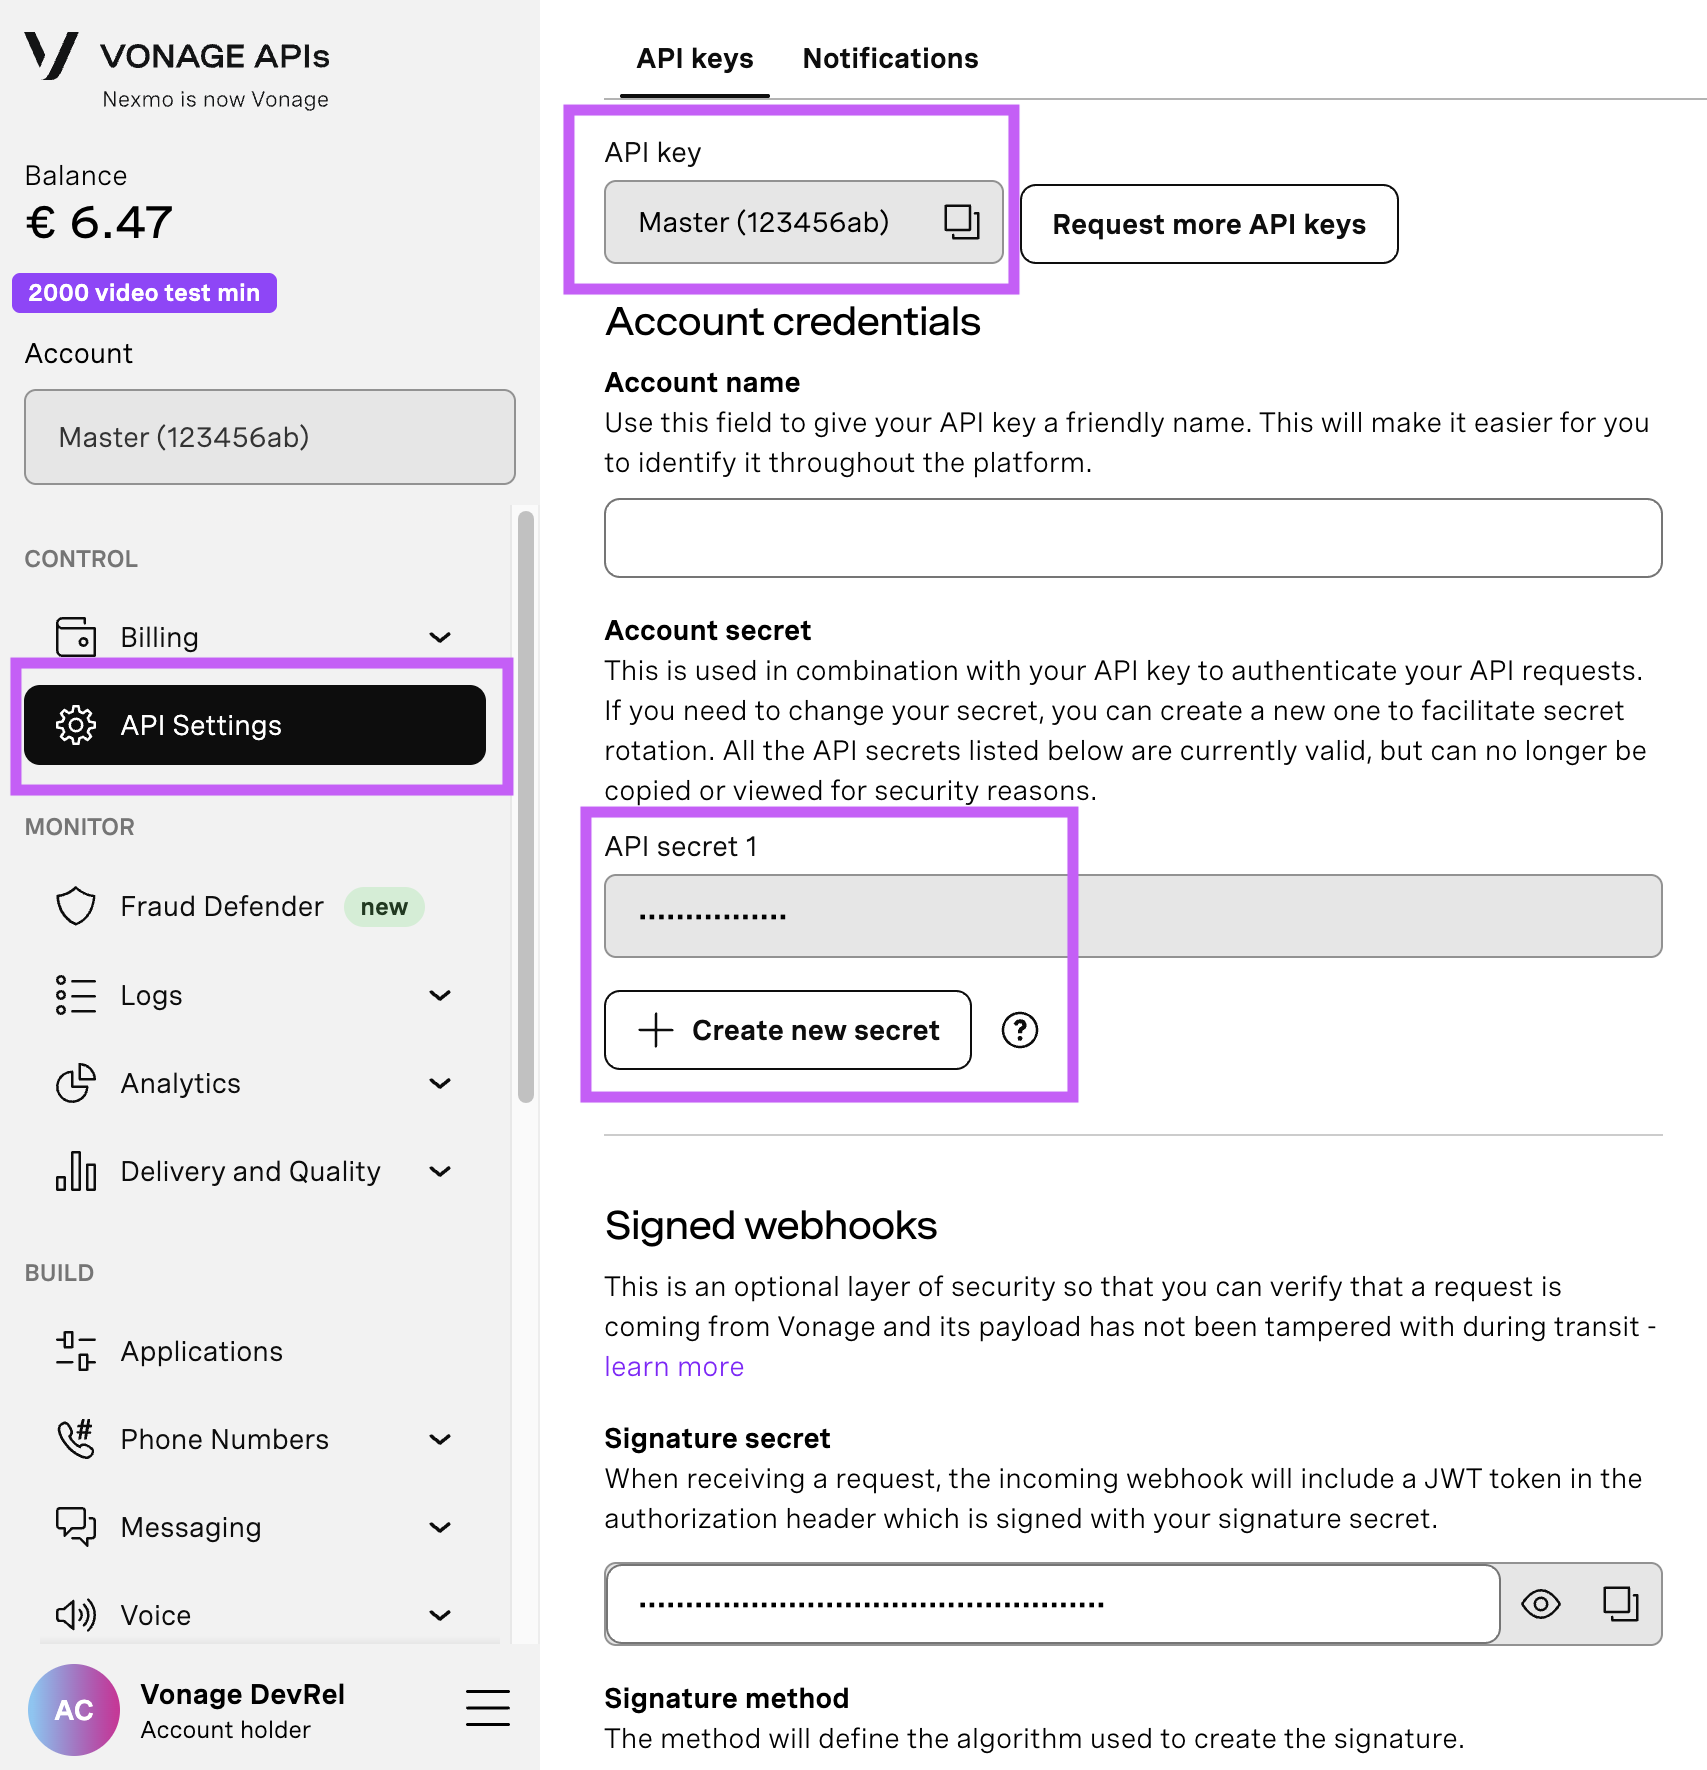
Open your API Settings Page to access your Vonage API Key and Secret, both of which are displayed as shown in the screenshot below. The API Key is located at the top of the page, and to access your API Secret, please refer to the “Account secret” subsection.
Note: In case you cannot remember your previously created API Secret, click on “+ Create new secret” and save it securely.
Add the following initialization code to the top of app.js, just below your import express statement:
import fs from 'fs'
import { Vonage } from '@vonage/server-sdk'
import OpenAI from 'openai'
import dotenv from 'dotenv'

dotenv.config()

const vonage = new Vonage({
  apiKey: process.env.API_KEY,
  applicationId: process.env.APPLICATION_ID,
  privateKey: fs.readFileSync(process.env.PRIVATE_KEY_PATH)
})

const openai = new OpenAI({ apiKey: process.env.OPENAI_API_KEY })
Now that we have initialized Vonage and ChatGPT instances, it's getting more exciting. We can now send our messages to ChatGPT.
Let's update our /inbound endpoint and add the queryChatGPT function. Add this new function just before the endpoint:
async function queryChatGPT(user_message) {
  const chatCompletion = await openai.chat.completions.create({
    model: 'gpt-4o',
    messages: [
      { role: 'system', content: 'You are a helpful assistant. Keep responses under 640 characters.' },
      { role: 'user', content: user_message }
    ]
  })
  return chatCompletion.choices[0].message.content
}
And now update the endpoint to return the answer from ChatGPT:
app.post('/inbound', async (req, res) => {
    res.sendStatus(200);
    const messenger_to = req.body.to;
    const messenger_from = req.body.from;
    const received_text = req.body.text;
    const answer = await queryChatGPT(received_text);
    console.log('Received message:', received_text);
    console.log('ChatGPT response:', answer);
  });
This small bit of code sends the message we receive to ChatGPT.
In this step, we use our ChatGPT openai instance and the openai.chat.completions.create method to send the message to the API. We pass along two pieces of additional information: the messages array, which acts as context for the conversation, and the model, which tells OpenAI which AI model to use.
For those of you eagle-eyed people, you can see that we sent a black option object named chatCompletion. Inside chatCompletion, we can retrieve the AI response to our text, inside the choices method.
Let's test our code again. Restart your app by running:
node app.jsYou can now send a message to the page. And now you’ll see ChatGPT’s response in the terminal! Something like this:
Received message:  what is the smelliest cheese? from:  2345801948423549411

Chat GPT Response: One of the smelliest cheeses is Époisses de Bourgogne, a French cheese known for its pungent aroma.That's so cool~~
Now that we've got ChatGPT responding in the terminal, it's time to send that response back to the user directly in Messenger.
To do that, we’ll use the MessengerText class provided by Vonage, which makes it simple to send a plain-text message back through the Messenger channel.
At the top of your app.js file, import MessengerText alongside your other imports:
import { MessengerText } from '@vonage/messages'Now let’s update our /inbound webhook handler to extract the user's message, send it to ChatGPT, and send the AI’s response back to Messenger:
app.post('/inbound', async (req, res) => {
  res.sendStatus(200)
  const messenger_to = req.body.to
  const messenger_from = req.body.from
  const received_text = req.body.text

  try {
    const reply = await queryChatGPT(received_text)
    await vonage.messages.send(new MessengerText({
      to: messenger_from,
      from: messenger_to,
      text: reply
    }))
  } catch (error) {
    console.error("Error sending message:", error)
  }
})Let’s break that down:
from: should bereq.body.to— that’s you, the recipient of the original message.to: should bereq.body.from— that’s the user who messaged your Page.text: is the message we’ll get from ChatGPT.
If you run this and test it out, you should get a response right in Messenger! But there’s one catch...
Facebook Messenger limits message length to 640 characters. If ChatGPT rambles past that, your message could fail silently.
Sure, you could manually chunk messages or tweak your code, but there's a better way: just tell GPT to keep it short. Let’s do that next.
Let’s make two improvements:
Give ChatGPT a system instruction to keep responses under 640 characters.
Start tracking conversation history so replies can build on previous messages.
To do that, we’ll create a shared array to hold the ongoing conversation:
const conversationContext = [
  { role: 'system', content: 'You are a helpful assistant. Keep responses under 640 characters.' }
]
Now let’s update our queryChatGPT function to:
Push each new user message to the conversation.
Call the OpenAI API using the full conversation history.
Truncate responses if they’re too long.
Add ChatGPT’s reply to the conversation history too.
async function queryChatGPT(user_message) {
  conversationContext.push({ role: 'user', content: user_message });

  const chatCompletion = await openai.chat.completions.create({
    model: 'gpt-4o',
    messages: conversationContext
  });

  let reply = chatCompletion.choices[0].message.content;

  // Enforce Messenger's 640-character limit
  if (reply.length > 640) {
    reply = reply.substring(0, 637) + '...';
  }

  conversationContext.push({ role: 'assistant', content: reply });
  return reply;
}
Now, every time a user sends a message, we save the full back-and-forth. That way, when someone asks: what’s the smelliest cheese?
And then follows up with: what wine goes with that?
ChatGPT understands the context, just like a real conversation.
 A Facebook Messenger conversation where a user asks about the smelliest cheese and receives wine pairing advice for Limburger
That’s it! You now have a working Messenger chatbot powered by ChatGPT. From here, you can add support for other channels like WhatsApp or SMS using the Messages API, or connect to the Voice API for audio agents. You can even try saving conversation history in a database or another 3rd party service.
As always, we’d love to see what you build. Join us on the Vonage Developer Community Slack or tag VonageDev on X.
Share:
Beejay is your average tehnomancer. Currently a member of Vonage’s Customer Solutions Engineers team, you can find him doing a bunch of API integrations, helping clients with their code and doing odd tech stuff here and there. Aside from tinkering with anything tech, he enjoys playing music, climbing mountains, dragon-boating, and being the goofy dad to his kids.