Share:
With over 5 years of experience in Conversation Design, Luisa deployed hundreds of conversational AI projects for Vonage AI. Now a Product Education Manager for the AI Studio, she's trying to turn everyone into AI enthusiasts by educating them on the capabilities and benefits of the product.
How to Switch Bot <> Human via Text Channel on the AI Studio
Time to read: 5 minutes
Vonage AI Studio provides businesses with a Low-Code/No-Code conversational AI platform for managing complex customer interactions.
Regardless of the conversation flow you are creating, you might want to add the ability for human representatives to intervene and take over if need be. As a former Conversation Designer, we strongly urge every business to add this escalation option to their conversation flows. Permitting an elegant fallback option to support cases where the agent might not be able to handle the user’s query or the end user requests to talk to a human is crucial in keeping a healthy Net Promoter Score and overall customer satisfaction.
In the voice channel, the conversation can be transferred via the “Route Call” note. In the text channels such as WhatsApp and HTTP, we can engage a human rep using the “Live Agent” node. In this blog post, you'll learn how to hand over the conversation to a human representative using slack.
The live agent node allows your end users to interact with live agents without ever having to leave the conversation; the live agent will also have insight into what the conversation consisted of before the live agent routing was triggered. You can follow up on the entire conversation in the AI Studio Reports to optimize your agent's performance.
 Live Agent Routing
Please note that this demo can only support a single session at a time.
First thing we need to do, is to create our virtual agent in the studio. We will create an agent for the fictional Electronics company 'Awesome Internet Support' in the WhatsApp channel. The virtual agent will help the end-user with his case. When the VA realizes that professional support is needed, it will route the conversation to the support team. They will communicate with the customer over slack while the customer himself will stay in the same WhatsApp conversation.
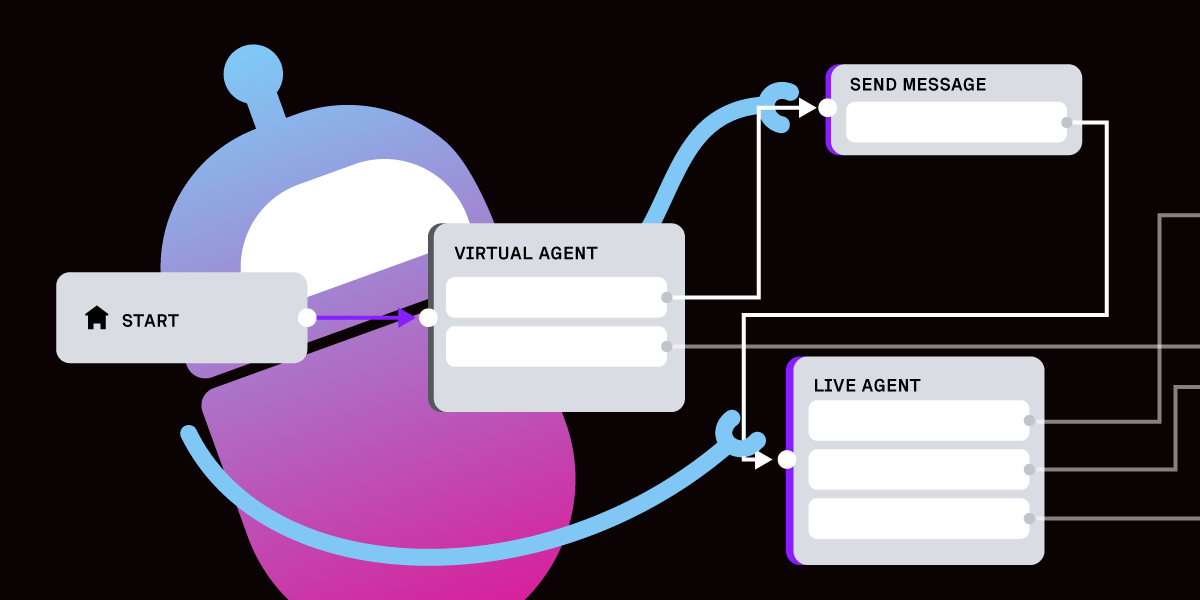
After creating the Virtual Agent flow and using it to greet the customer and kick off the conversation, we added the exit point for Live Agent routing. This way, we’re calling the Live Agent node.
 The Virtual Agent Flow so far
This is where the Live Agent node comes in. We use this node to communicate with the live agent. There are two required webhook URLs you need to fill in. The other endpoints will stay as they are. We’ll ignore the status delivery endpoint in this blog.
 Live Agent
What are these endpoints?
As mentioned, the live-agent node is a generic node that allows you to connect to any 3rd party, because of that, you will have to build the connector between AI studio and your 3rd party (in our case, slack). Hence, we built a connector that is able to route the start conversation request, and the inbound message requests (from your customer to the live representative), and is also able to send the outbound message requests (from your live representative to your customer) and end the conversation.
 Endpoint flow
How did we do it?
First, let’s create the connector. For this demo, we used Nest.JS framework to easily build the API of the connector. We built two endpoints for handling studio requests -
 Code for Start and Message Endpoint
Both of them are Post endpoints, and we extract the information we need from each one of them. The start endpoint body contains information such as the session id, the whole conversation transcription so far, all the system parameters, and also other parameters that you chose from the live agent drawer.
In the message endpoint, we’ll also get the session id, and the message (in our case we expect only text so we immediately took the text field, but it could also be a link to any media file).
In the next step, we will transfer the data from our connector to slack.
In order to do that, we follow slack's API documentation here. For our basic demo, we created a new application in slack and we used the Incoming Webhooks features to send messages to our slack application:
 Slack Permissions
We route the webhook to a slack channel we created ( vgai-live-agent-test ) - and we call this webhook from our connector, we did it as a result of the start conversation request and also for the inbound message requests. It should look something like that:
 Route the WebHook to a Channel
The text is the message you want to send.
In order to allow the live representative to manage the conversation with the customer and to communicate with him using slack we added a new feature to the slack app, and we created slash commands. One for sending messages, and the second for closing the conversation of the customer with the live representative.
 Create a New Command
We added two more endpoints to the connector:
 An Additional 2 EndPoints
The slack/message endpoint is connected to the /vgai-message command.
The slack/end endpoint is connected to the /vgai-complete command.
In this demo, we send text messages back to the user, so it should look like this:
 Send Text Messages back to the User
Now after we did the integration to start the conversation and send messages from the customer to the live representative:
 Integration 1
And we also managed to do send messages back to the customer and close the conversation:
 Integration 2
We can now test it end-to-end
The customer complains about the wifi and the VA decides that professional IT support is needed:
 Customer Scenario
At this point, the Live Agent Node, triggers the start conversation endpoint of the connector. The connector triggers a webhooks to the slack application, the live representative is able to see the conversation with the VA, and any additional information we want to choose:
 Transcription
Now the live representative will be able to communicate with the customer using the slash command /vgai-message
 Live Representative Communicating
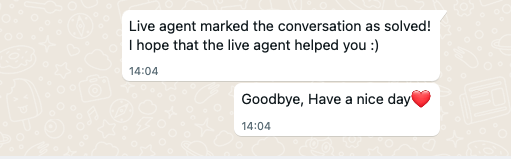
And the customer will receive the message on his WhatsApp channel:
 WhatsApp Message that the customer will receive
And both will be able to communicate with each other, using their own channels:
 Communicating with their own channels
 Communicating with their own channels part 2
Now, in the moment the live representative will run the /vgai-complete command, it will close the connection the VA will be able to take over again:
 Live Representative running the command
The VA that take control of the conversation:
 VA taking control of the conversation
The entire conversation can be recorded and viewed for optimization purposes in the Call Reports Tab on the AI Studio.
 Everything can be recorded in AI Studio
Additional settings in the live agent node:
 Additional settings in the live agent node
Choose if we want to display the conversation with the Live Agent
Choose what parameters we want to transfer the connector on the start conversation endpoint
Set up how long we’ll wait to the live agent response
Best Practice - Make sure you notify your end user they are being routed to a live agent before handing over the conversation. You can do so using the Send Message node.
If you want to send media to the live agent you can do this only on the WhatsApp channel. Please refer to the list of support media types below:
Images - jpg, jpeg, and png.
Audio - aac, m4a, amr, mp3 and opus
Video - mp4 and 3gpp. (Note, only H.264 video codec and AAC audio codec is supported.)
File - zip, csv, and pdf.
To learn more about supported media types, please visit this page.
As excited as we are? Head over to AI Studio to add this node to your flow.
If you have questions or feedback, join us on the Vonage Developer Slack or add your feedback via the AI Studio. Thanks for reading and happy exploring!
Share:
With over 5 years of experience in Conversation Design, Luisa deployed hundreds of conversational AI projects for Vonage AI. Now a Product Education Manager for the AI Studio, she's trying to turn everyone into AI enthusiasts by educating them on the capabilities and benefits of the product.