How to Send and Receive SMS Messages with Node.js and Google Cloud Run
Time to read: 9 minutes
Back in 2019, I organised a series of events featuring a “Cloud Run Club” at Finsbury Square Garden and Victoria in London, followed by a Google Cloud Run workshop. Today, there will be no running, but you'll learn how to build and deploy an SMS application using Node.js, Express, and the Vonage Messages API on Google Cloud Run.
Unfortunately, while running, I can't scale to zero, but Google Cloud Run lets you deploy containerized applications that scale automatically. You only pay for what you use. It's great for building webhooks and APIs since you don't need to manage servers. Your app scales to zero when there's no traffic.
Node.js v18 or later installed
Google Cloud CLI installed and configured
A Google Cloud account with billing enabled
A basic understanding of JavaScript and Node.js.
You can find the complete code on GitHub. The project tree looks as follows.
blog-messages_api-cloud_run-sms/

├── index.js, contains our JavaScript

├── package.json, for our dependencies

├── .env.example, you can copy and create a .env from it to add your environment variables

├── .gitignore, for any files or folders not to be committed

└── private.key
I'll show you how to create a new Vonage application from the dashboard in the steps below. Alternatively, you can use the CLI to create an application.
To create an application, go to the Create an Application page on the Vonage Dashboard, and define a Name for your Application.

If you intend to use an API that uses Webhooks, you will need a private key. Click “Generate public and private key”, your download should start automatically. Store it securely; this key cannot be re-downloaded if lost. It will follow the naming convention private_<your app id>.key. This key can now be used to authenticate API calls. Note: Your key will not work until your application is saved.
Choose the capabilities you need (e.g., Voice, Messages, RTC, etc.) and provide the required webhooks (e.g., event URLs, answer URLs, or inbound message URLs). These will be described in the tutorial.
To save and deploy, click "Generate new application" to finalize the setup. Your application is now ready to use with Vonage APIs.
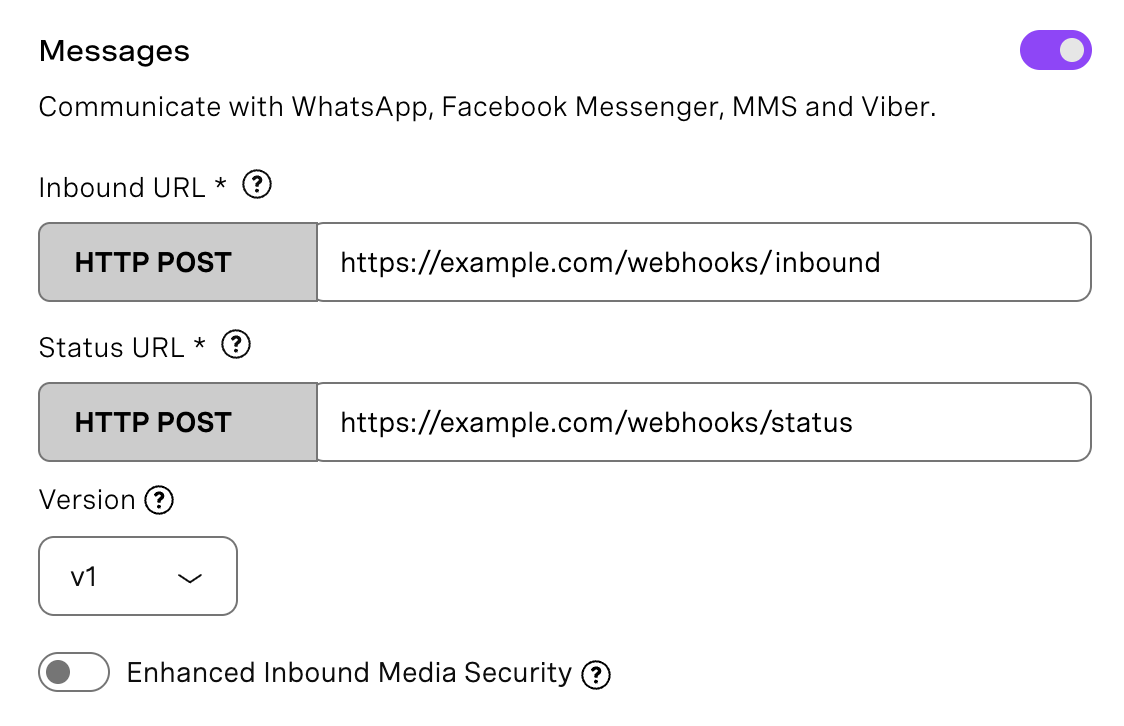
Toggle the Messages option under capabilities. We will use the Messages API v1.
Set placeholder URLs for now. We'll update these after deployment:
Inbound URL: https://example.com/webhooks/inbound
Status URL: https://example.com/webhooks/status
Save your application and note down your Application ID.
 Messages Capability
To buy a virtual phone number, go to your API dashboard and follow the steps shown below.
 Purchase a phone number
Go to your API dashboard
Navigate to BUILD & MANAGE > Numbers > Buy Numbers.
Choose the attributes needed and then click Search
Click the Buy button next to the number you want and validate your purchase
To confirm you have purchased the virtual number, go to the left-hand navigation menu, under BUILD & MANAGE, click Numbers, then Your Numbers
Once we've selected our number, it’s time to link it to our Vonage application. Go to Your Numbers and click the pencil icon next to your number. Select your application under "Messages". At [00:01:19], you can see how to purchase and link a virtual number.
Go to Settings and scroll down to "SMS Settings". Make sure "Messages API" is selected as the default API for SMS, then click "Save changes".
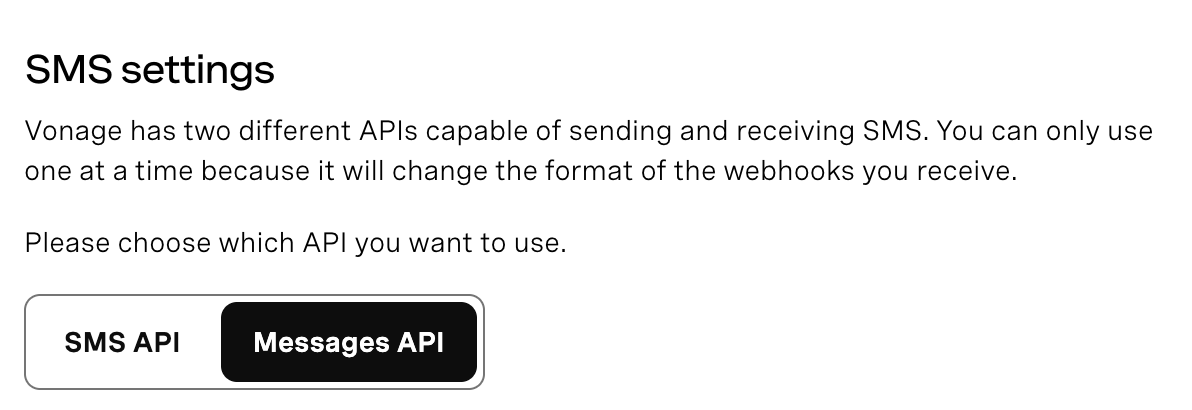 SMS SettingsVonage has two APIs for sending SMS: the SMS API and the Messages API. This tutorial uses the Messages API. If you don't switch this setting, your webhooks will receive a different payload format, and the code won't work correctly.
Create a directory for your application and change into it. Run npm init -y to initialize your project.
mkdir blog-messages_api-cloud_run-sms

cd blog-messages_api-cloud_run-sms

npm init -y
We are going to use the following dependencies in our project: express, @vonage/server-sdk, @vonage/jwt. You can install them by running the following command from your terminal or command prompt.
npm install express @vonage/server-sdk @vonage/jwt
Create the index.js file and initialize your server with the required packages. Configure a Vonage client using environment variables that are read from the .env file to be created from the .env.example file.
const express = require('express');

const path = require('path');

const { Vonage } = require('@vonage/server-sdk');

const { verifySignature } = require('@vonage/jwt');

const app = express();

app.use(express.json());

app.use(express.urlencoded({ extended: true }));

// Initialize Vonage client

const vonage = new Vonage({

  applicationId: process.env.VONAGE_APPLICATION_ID,

  privateKey: path.join(__dirname, 'private.key')

});

const FROM_NUMBER = process.env.VONAGE_NUMBER;We use path.join(__dirname, 'private.key') to get the absolute path to the key file, so that it works both locally and when deployed to Cloud Run.
Add the form content and styling that the user must complete to send SMS messages. The user has to enter their phone number and a message, then click the submit button to send the SMS.
app.get('/', (req, res) => {

  res.send(`

    <!DOCTYPE html>

    <html>

    <head>

      <title>Vonage SMS on Cloud Run</title>

      <style>

        body { font-family: Arial, sans-serif; max-width: 600px; margin: 50px auto; padding: 20px; }

        h1 { color: #7b00ff; }

        form { display: flex; flex-direction: column; gap: 15px; }

        input, textarea { padding: 10px; font-size: 16px; }

        button { padding: 12px; background: #7b00ff; color: white; border: none; cursor: pointer; }

      </style>

    </head>

    <body>

      <h1> Send SMS with Vonage </h1>

      <form action="/send" method="POST">

        <label>Phone Number (e.g. 444155551234)</label>

        <input type="tel" name="to" required>

        <label>Message</label>

        <textarea name="text" rows="4" required></textarea>

        <button type="submit">Send SMS</button>

      </form>

    </body>

    </html>

  `);

});
Add the endpoint that sends the SMS using the Vonage Messages API. The vonage.messages.send() method accepts an object with channel set to 'sms' and message_type set to 'text'. The response includes a message_uuid you can use to track the message.
app.post('/send', async (req, res) => {

  const { to, text } = req.body;

 try {

    const response = await vonage.messages.send({

      message_type: 'text',

      to: to,

      from: FROM_NUMBER,

      channel: 'sms',

      text: text

    });

    console.log('SMS sent:', response.message_uuid);

    res.sendSMS sent! Message ID: ${response.message_uuid});

  } catch (error) {

    console.error('Error sending SMS:', error);

    res.status(500).sendFailed to send SMS: ${error.message});

  }

});
When someone sends an SMS to your Vonage virtual number you previously purchased, the SMS message arrives at Vonage, Vonage sends a POST request to your Google Cloud Run /webhooks/inbound endpoint, and finally, your app processes the message and responds with 200 OK, if everything works well. Add the webhook endpoints that use this verification, as shown below. The status webhook (/webhooks/status) receives delivery receipts. You'll know whether your message was delivered or failed.
app.post('/webhooks/inbound', (req, res) => {

  verifyJWT(req);

  console.log('Inbound SMS received:');

  console.log('From:', req.body.from);

  console.log('Text:', req.body.text);


  res.status(200).send('OK');

});

app.post('/webhooks/status', (req, res) => {

  verifyJWT(req);

  console.log('Status update:', req.body.status);

  res.status(200).send('OK');

});Add a JWT verification function to verify if the incoming request (e.g., message or call) came from Vonage.
The VONAGE_API_SIGNATURE_SECRET variable is the secret used to sign the request corresponding to the signature secret associated with the API key included in the JWT claims. You can identify your signature secret on the Dashboard settings.
You can learn more about verifying the request.
const verifyJWT = (req) => {
  // Verify if the incoming request came from Vonage
  const jwtToken = req.headers.authorization.split(" ")[1];
  if(!verifySignature(jwtToken, process.env.VONAGE_API_SIGNATURE_SECRET)) {
    console.error("Signature does not match");
    throw new Error("Not a Vonage API request");
  }

  console.log("JWT verified");
}Make sure to install the @vonage/jwt dependency.
npm install @vonage/jwt
Cloud Run sets the PORT environment variable automatically, so we use that if available. Add the code to start the server:
const PORT = process.env.PORT || 8080;

app.listen(PORT, () => {

  console.logServer running on port ${PORT});

});
You can run the app locally to check that it starts without errors, but you won't be able to send SMS messages yet. The Vonage Messages API needs to reach your webhook URLs to verify requests and send status updates. That's why we're deploying to Cloud Run first.
If you want to verify the app runs, run the JavaScript file.
node index.jsOpen http://localhost:3000 to see the form. The app should start without errors, but sending messages will fail until we deploy and configure the webhooks.
Now that the app works locally, let's deploy it to Google Cloud Run, so it's accessible on the internet and can receive webhooks from Vonage.
If you don't have a Google Cloud account yet, create one as required in the prerequisites.
Download and install the Google Cloud CLI for your operating system. In the next subsection, I’ll show how to do it on macOS, but you can refer to the link above for other OSes. I wanted to show the steps I’ve done myself because I ran into some errors, and share some tips that might help.
# Download the archive (Apple Silicon)

curl -O https://dl.google.com/dl/cloudsdk/channels/rapid/downloads/google-cloud-cli-darwin-arm.tar.gz

# Extract it

tar -xzf google-cloud-cli-darwin-arm.tar.gz

# Run the install script

./google-cloud-sdk/install.shIn case there’s a Python version error: the gcloud CLI requires Python 3.10 or higher. If you see a TypeError about unsupported operand type(s) for |, your Python is too old. Install a newer version with Homebrew as shown below (or any other way you prefer) and point gcloud to it:
brew install python@3.12

export CLOUDSDK_PYTHON=$(brew --prefix python@3.12)/bin/python3.12

./google-cloud-sdk/install.shThe install script will ask if you want to add gcloud to your PATH. Choose yes. Then restart your command prompt/ terminal or run:
source ~/.zshrcNow initialize gcloud:
gcloud initThis will open a browser window to log in to your Google account and select or create a new Google Cloud project.
If you don't have a project yet, create one. The Project IDs must be globally unique, so you can add some random characters.
gcloud projects create vonage-sms-yourname --name="Vonage Messages API Demo"

gcloud config set project vonage-sms-yournameYou can also create a project from the Google Cloud Console.
Cloud Run requires billing to be enabled. Go to the Billing page and link a billing account to your project.
Enable the Cloud Build and Cloud Run APIs:
gcloud services enable cloudbuild.googleapis.com run.googleapis.com
For production applications, consider using Google Secret Manager to store sensitive values. For this tutorial, we'll pass environment variables directly.
Make sure your “private.key” file is in the project directory. It gets bundled with your source code during deployment.
Deploy:
gcloud run deploy vonage-sms \

  --source . \

  --region us-central1 \

  --allow-unauthenticated \

  --set-env-vars "VONAGE_APPLICATION_ID=your_app_id" \

  --set-env-vars "VONAGE_NUMBER=444155551234" \

--set-env-vars "VONAGE_API_SIGNATURE_SECRET=your_signature_secret"First deploy: you'll see a prompt about creating an Artifact Registry repository named cloud-run-source-deploy to store your container images. Type y to continue.
The first deployment takes a couple of minutes. When it's done, you'll see a URL like https://vonage-sms-abc123-uc.a.run.app.
Now that you have your Cloud Run URL, go back to your Vonage Application and update the webhook URLs:
Inbound URL: https://your-cloud-run-url/webhooks/inbound
Status URL: https://your-cloud-run-url/webhooks/status
Don't forget to click Save changes at the bottom right of the page.
It’s time to test everything we’ve been setting up and see things running!
Open your Cloud Run URL in a browser (the URL you got after deployment, like https://vonage-sms-abc123-uc.a.run.app). You should see the SMS form we built. Enter your phone number and a message, then press send. If everything is configured correctly, you'll receive the SMS on your phone within a few seconds. You can check country-specific features and restrictions.
Now test the other direction. Send an SMS from your phone to the Vonage number you purchased and linked to the application you created. This triggers the inbound webhook we set up. You can check the logs in two places:
gcloud run logs read vonage-sms --region us-central1
Go to your Vonage Application, click on your application, and check the logs section to see message activity and any webhook errors. You should see your inbound message logged with the sender's number and text.
You've built and deployed an SMS application on Google Cloud Run using the Vonage Messages API. The app can send messages through a web form and receive incoming messages through webhooks.
Have a question or want to share what you're building?
Subscribe to the Developer Newsletter
Follow us on X (formerly Twitter) for updates
Watch tutorials on our YouTube channel
Connect with us on the Vonage Developer page on LinkedIn
Stay connected and keep up with the latest developer news, tips, and events.