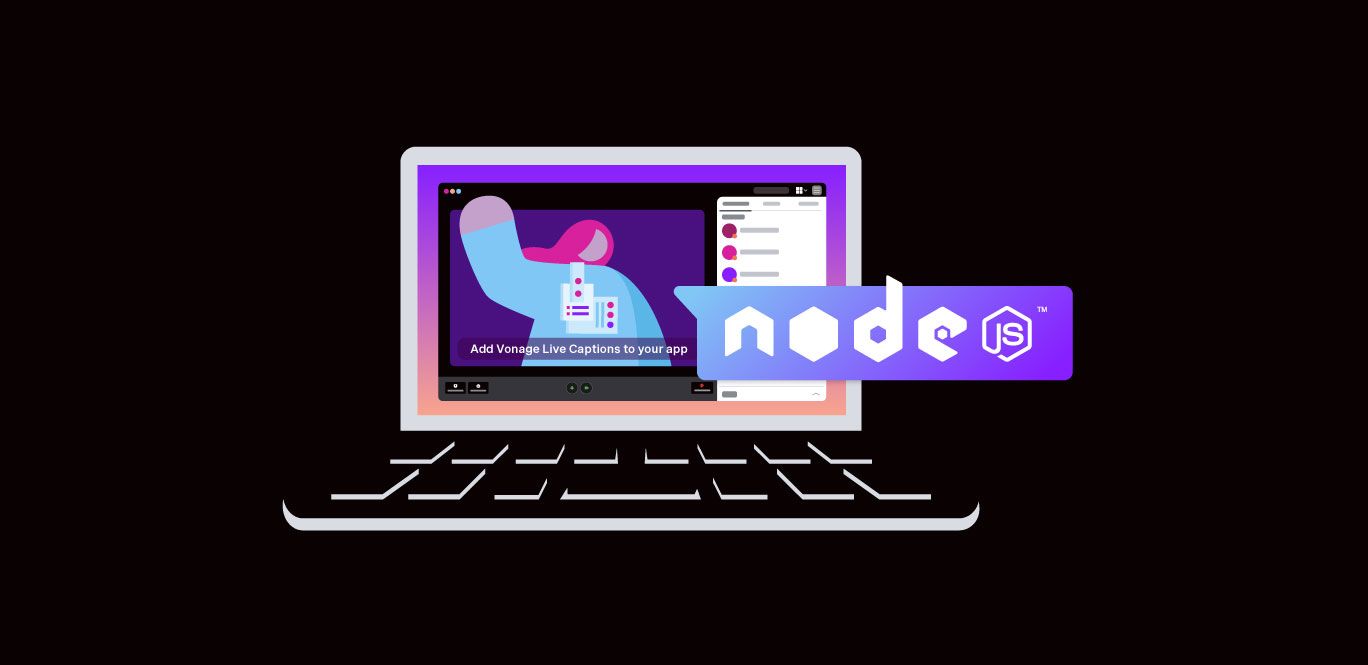
Getting Started With the Vonage Live Captions API in Node.js
Time to read: 3 minutes
Imagine this. You have used Vonage Video to add a live-streaming platform for your local community college to allow remote students to attend classes. Congratulations! Your next ticket is to add a live captions feature. Whether for accessibility, improved student focus, or other reasons, captions are essential. In this getting-started guide, you’ll walk through adding the Live Captions API to your application and support a variety of languages. There’s even a sample in this GitHub repository you can deploy with one click and try out.
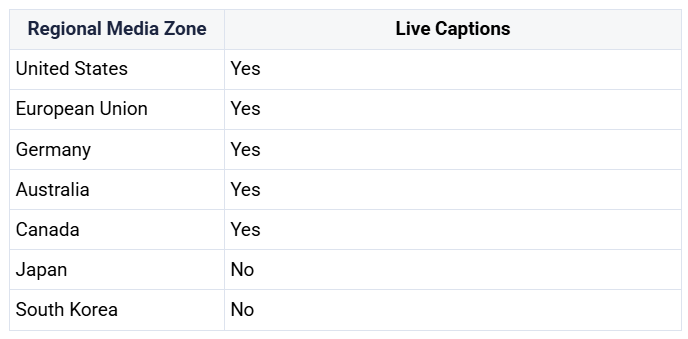
We support live captions in most of our regional media zones, which is separate from our language support. All supported regional media zones support all of our languages.
Before you can have captions, you’ll need participants speaking in a video call. To be able to participate in a video call, a person will need a token to be able to join. This token is generated on a server using your application’s ID and the session ID. You can think of the session ID as the unique identifier of the room in which your video call is happening.
This walkthrough assumes that you already have a server up and running. If not, you can find a sample server application written in Node.js that you can deploy. If you would like to spin up a test server, you can use Vonage's serverless platform to deploy this Vonage Video Learning Server Node.js project.
To start and stop live captions in a video call, the requests must come from a server. If you are using the Node.js SDK, the code for the endpoints may look like this:
/**
 * POST /captions/start
 */
router.post('/captions/start', async (req, res) => {
  const sessionId = req.body.sessionId;
  const captionsOptions = {
    languageCode: 'en-US',
    partialCaptions: 'true',
  };
  try {
    const captionsResponse = await vonage.video.enableCaptions(sessionId, req.body.token, captionsOptions);
    const captionsId = captionsResponse.captionsId;
    res.send({ id: captionsId });
  } catch (error) {
    console.error("Error starting captions: ",error);
    res.status(500).send(`Error starting captions: ${error}`);
  }
});

/**
 * POST /captions/:captionsId/stop
 */
router.post('/captions/:captionsId/stop', async (req, res) => {
  const captionsId = req.params.captionsId;
  try {
    await vonage.video.disableCaptions(captionsId);
    res.sendStatus(202)
  } catch (error) {
    console.error("Error stopping captions: ",error);
    res.status(500).send(`Error stopping captions: ${error}`);
  }
});
Note: If you are looking at the Video Node.js Learning Server sample application, you can find this code in the routes/index.js file.
To change the language, set the languageCode to a supported language.
Supported Languages
For the most up-to-date list, please see the documentation."af-ZA"- Afrikaans"ar-AE"- Arabic, Gulf"ar-SA"- Arabic, Modern Standard"eu-ES"- Basque"ca-ES"- Catalan"zh-HK"- Chinese, Simplified"zh-CN"- Chinese, Cantonese"zh-TW"- Chinese, Traditional"hr-HR"- Croatian"cs-CZ"- Czech"da-DK"- Danish"nl-NL"- Dutch"en-AU"- English, Australian"en-GB"- English, British"en-IN"- English, Indian"en-IE"- English, Irish"en-NZ"- English, New Zealand"en-AB"- English, Scottish"en-ZA"- English, South African"en-US"- English, US"en-WL"- English, Welsh"fa-IR"- Farsi"fi-FI"- Finnish"fr-FR"- French"fr-CA"- French, Canadian"gl-ES"- Galician"de-DE"- German"de-CH"- German, Swiss"el-GR"- Greek"he-IL"- Hebrew"hi-IN"- Hindi, Indian"id-ID"- Indonesian"it-IT"- Italian"ja-JP"- Japanese"ko-KR"- Korean"lv-LV"- Latvian"ms-MY"- Malay"no-NO"- Norwegian Bokmål"pl-PL"- Polish"pt-PT"- Portuguese"pt-BR"- Portuguese, Brazilian"ro-RO"- Romanian"ru-RU"- Russian"sr-RS"- Serbian"sk-SK"- Slovak"so-SO"- Somali"es-ES"- Spanish"es-US"- Spanish, US"sv-SE"- Swedish"tl-PH"- Tagalog/Filipino"th-TH"- Thai"uk-UA"- Ukrainian"vi-VN"- Vietnamese"zu-ZA"- Zulu
If you are using another Server Language, the REST API can be used to start and stop captioning.
Now that the server is ready, let’s set up the frontend application to make the calls to start, stop, and listen for the captions.
You can find the following code used in the context of the Basic Captions sample application in the js/app.js file.
To start captioning in your session, you’ll need to make a POST request to your server, passing the sessionId and token. Here’s the code used in the demo application to make this happen:
async function startCaptions() {
  console.log('start captions');
  try {
    captions = await postData(SAMPLE_SERVER_BASE_URL +'/captions/start',{sessionId, token});
    captionsStartBtn.style.display = 'none';
    captionsStopBtn.style.display = 'inline';
  }
  catch(error){
    handleError(error);
  }
}Another POST request is made to stop the captions in your session using the id property in the captions object that you get back from the request to start the captions:
async function stopCaptions() {
  console.log('stop captions');
  try {
    const response = await fetch(
      ${SAMPLE_SERVER_BASE_URL}/captions/${captions.id}/stop,
      {
        method: 'POST',
        headers: {
          'Content-Type': 'application/json',
        },
      }
    );
    if (!response.ok) {
      throw new Error('error getting data!');
    }
    captionsStopBtn.style.display = 'none';
    captionsStartBtn.style.display = 'inline';
  } catch (error) {
    captionsStartBtn.style.display = 'none';
    captionsStopBtn.style.display = 'inline';
    handleError(error);
  }
}The next change to make is to add publishCaptions: true when you initialize a Publisher.
const publisherOptions = {
  insertMode: 'append',
  width: '100%',
  height: '100%',
  publishCaptions: true,
};Now, anyone publishing to the video call is also having captions created. That means anyone subscribing can then receive those captions to display them. The Subscriber object has a captionReceived event that you can listen for:
subscriber.on('captionReceived', function(event){
  console.log('captionReceived event: ', event);
  if (!captions) {
    // Client didn't initiate the captions. Remove controls.
    captionsStartBtn.style.display = 'none';
    captionsStopBtn.style.display = 'none';
  }
  captionsBox.style.display = 'flex';
  captionsText.textContent = event.caption;
  // remove the captions after 5 seconds
  const removalTimerDuration = 5 * 1000;
  clearTimeout(captionsRemovalTimer);
  captionsRemovalTimer = setTimeout(() => {
    captionsBox.style.display = 'none';
    captionsText.textContent = '';
  }, removalTimerDuration);
});
That’s it! You have now aided in helping students retain information better and achieve success. Got any questions or comments? Join our thriving Developer Community on Slack, follow us on X (formerly Twitter), or subscribe to our Developer Newsletter. Stay connected, share your progress, and keep up with the latest developer news, tips, and events!