Share:
Aaron was a developer advocate at Nexmo. A seasoned software engineer and wannabe digital artist Aaron is frequently found creating things with code, or electronics; sometimes both. You can customarily tell when he's working on something new by the smell of burning components in the air.
Super Fast Voice Broadcast with Asynchronous Python and Sanic
Time to read: 11 minutes
SMS has become the de facto method for sending notifications when push isn't available. So much so that I rarely receive an SMS from an actual "person" anymore. My colleagues use Slack, friends use Facebook Messenger, security-conscious friends use Telegram, and paranoid friends use Signal. Even my mum, who only got her first smartphone in the last year, now sends me cute pictures of my niece via WhatsApp instead of email.
As I moved away from seeing SMS as a way of communicating with friends and family, and more of a service notification channel I found myself no longer reacting in the same way to the new SMS sound. It doesn't convey the same urgency as it did before; I know now that it is more likely to be a coupon for my local pizzeria than anything that requires my immediate attention.
And often this is fine. Not every notification is time sensitive or requires urgent action. But what about those messages that do? The critical alerts? Notifications that need to be acted upon right now, such as service outages or extreme weather warnings. For these, we need something that is harder to ignore: a ringing phone.
Isn't it funny? You hear a phone ring, and it could be anybody. But a ringing phone has to be answered, doesn't it? - The Caller, Phone Booth (2002)
There are a few things you will need before we get started.
Python 3.5 or better, we're going to be using some of the newer async features of Python, so we'll need a pretty modern version. I'd also recommend virtualenv as we're going to need to install a few dependencies.
MongoDB installed locally
ngrok or a similar way of exposing your application to the internet
We're going to be using MongoDB to store the numbers of the people we need to call. Our documents are going to be especially simple:
{
    "_id" : ObjectId("599d3f2c736544a32f48d3c4"),
    "number" : "<NUMBER TO CALL>"
}So before we start let's open our shell and add a few documents to our collection. Start the MongoDB shell by running mongodb.
use contactsDatabase
db.contactsCollection.insert([{"number": "<NUMBER TO CALL>"}, {"number": "<NUMBER TO CALL>"}])The .insert() method accepts a list of documents, so add a few different numbers you would like to call as part of this example. These can also be Nexmo Virtual Numbers if you need some extras for testing.
All the code for this example is in the Nexmo Community Github. We should clone this now and install our requirements. From now on make sure you are running all of these commands within your virtual environment. As we go on you will need multiple terminal windows, so remember to activate the environment in each one.

git clone
cd python-sanic-voice-broadcast/
pip install -r requirements.txtNow that we have all our code locally, and we've installed all our dependencies with pip, we have one final piece of setup to complete. To use the Nexmo Voice API, we will need our application ID, the private key for the application, and the Nexmo virtual number to use as the caller's number.
Copy the private key that Nexmo generated when you created your voice application and place it in your python-sanic-voice-broadcast/ directory. You will need to rename it to broadcast.key as well.
Next, let's save our application ID and virtual number as environmental variables so that we can access them in our code. You'll need to export these variables every time you open a new Terminal, or if you're using virtualenvwrapper you can use postactivate to set them for you automatically when you activate your virtual environment.
export BROADCAST_APPLICATION_ID="<YOUR APPLICATION ID>"
export BROADCAST_NUMBER_FROM="<YOUR NEXMO VIRTUAL NUMBER>"
We need to instruct the Nexmo API what actions it should take whenever the user answers our call. Just like in my previous text-to-speech blog post we're going to use the talk action and a synthesised voice to read our notification to the user.
The Nexmo API will make a GET request to the Answer URL you provided when creating your application. This URL will need to be reachable by Nexmo, so if you're going to be running your server locally, you will need to use a tool like ngrok to expose your local server to the public internet.
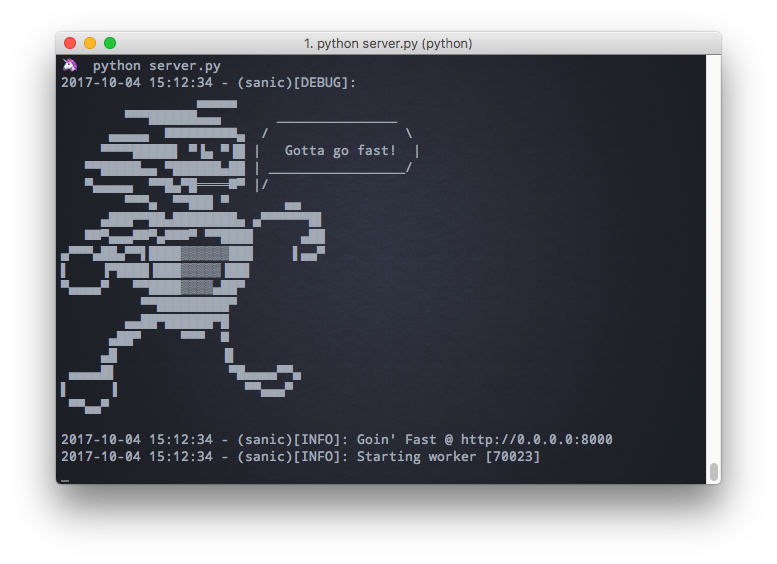 Sanic running in a Terminal
You can find the code for the server in the server.py file, but let's concentrate on the answer route for now.
@app.route("/")
async def answer(request):
    return json([{
        'action': 'talk',
        'text': 'This is a message from the Nexmo broadcast system'
}])Our NCCO is incredibly simple. We have a single action that will read the text 'This is a message from the Nexmo broadcast system' whenever a user answers our outbound call. We're using the Sanic json method to ensure that we send the correct HTTP headers with our JSON response.
Let's try it now. In your terminal run python server.py and visit http://127.0.0.1:8000 in your browser.
This server is only reachable locally, but we need it to be available to the Nexmo API. If you're using ngrok to create a tunnel to your localhost, then this would be a good time to open another Terminal and start ngrok:
ngrok http 8000Remember to update your voice application answer and event URLs to match your ngrok address. You can find the event's route in the server.py file.
In this example, we're going to use the Python Nexmo client. But the code is pretty much the same for JavaScript, Java, PHP, Ruby or ASP.NET.
import os
import nexmo
from pymongo import MongoClient


if __name__ == '__main__':
    # Connect to our mongo database
    db_client = MongoClient('mongodb://localhost:27017/')
    collection = db_client.contactsDatabase.contactsCollection

    # Create our Nexmo client
    nexmo_client = nexmo.Client(
        application_id=os.environ['BROADCAST_APPLICATION_ID'],
        private_key='broadcast.key'
    )

    # Grab a single contact from our database
    contact = collection.find_one()

    # Create an outbound call to the selected user
    response = nexmo_client.create_call({
        'to': [{'type': 'phone', 'number': contact['number']}],
        'from': {'type': 'phone', 'number': os.environ['BROADCAST_NUMBER_FROM']},
        'answer_url': ['https://nexmo-broadcast.ngrok.io']
    })

print(response)The process is simple; we connect to our data store, grab a telephone number to call, create a new outbound call using the Nexmo API and the Python client library.
Using the Python client is the most straightforward way of making an outbound call. But it is also synchronous. Under the hood our Python client uses the pretty incredible requests library. But unfortunately, requests is not an asynchronous library, although that is coming!

If you have a small number of notifications to send this is probably good enough. The Nexmo API is fast, but you still have to connect to it online. There is going to be some latency. From my office in Glasgow, Scotland it takes approximately 1 second for the request and response from the Nexmo API. So sending a few notifications this way would probably be fine, but if I wanted to send thousands of notifications, or even hundreds of thousands of notifications synchronously is probably not the best way.
All the code for this next section is in the broadcast.py file. It's a bit more complex than above as we're going to be recreating a tiny part of the Nexmo Python client; in a way that supports asynchronous calls.
Let's have a look at our event loop first.
def run_event_loop():
    loop = asyncio.get_event_loop()
    future = asyncio.Future()

    asyncio.ensure_future(broadcast(future, loop))
    loop.run_until_complete(future)

    logger.debug(future.result())
loop.close()Here we have a future and a coroutine, this Future will run until our broadcast method signals it is complete by calling future.set_result. It is this broadcast coroutine that will gather all the calls we need to make. Let's look at it next.
async def broadcast(future, loop):
    # Connect to MongoDB
    client = motor.motor_asyncio.AsyncIOMotorClient('mongodb://localhost:27017')
    contacts_collection = client.contactsDatabase.contactsCollection
    cursor = contacts_collection.find()

    # Use the aiohttp client which is async
    async with aiohttp.ClientSession(loop=loop) as session:

        # Use a list comprehension to call create_call with each number
        tasks = [
            create_call(session=session, number=document['number'])
            for document in await cursor.to_list(length=100)
        ]
        await asyncio.gather(*tasks)

    # Signal that our future is now complete
future.set_result(f'attempted to ring {len(tasks)} people')The first thing to notice is this is a coroutine, and we're using the async def syntax, which means we will need a Python version >= 3.5
 Python Motor Mascot
Our MongoDB client code has changed somewhat as well. We're now using motor rather than the pymongo library. We have made this switch as pymongo is not asynchronous. To prevent our Mongo calls from being blocking we have to use motor instead.
The most important part of this coroutine is the introduction of aiohttp. This module allows us to make asynchronous HTTP requests. We're going to create an asynchronous client session and pass this into our create_call coroutine.
You might have noticed in the first blocking example that the Nexmo Python client has a method create_call, we're going to use the same name for our coroutine that we called above for each of the numbers in our MongoDB.
At the start of our coroutine, we are creating a new BroadcastClient.
# Wrap our JWT generation in a new class
client = await BroadcastClient.create(number_to=number)
headers = client.get_headers()
payload = client.get_payload()The Nexmo Voice API uses JSON Web Tokens (JWT) for authentication. This BroadcastClient will generate our token and provide us with methods for creating the correct headers and payload that we must send with our API request. Let's look at this first before we return to our create_call method.
If you look at the BroadcastClient, you'll notice that it does not have an __init__ method, this is on purpose. We need the creation of our client to be non-blocking, but we also need to read the contents of our private key from disk. Ordinarily, we would perform this set up in the __init__ method, but Python's magic methods are not designed to work with async/await. Instead, we are going to use the factory pattern.
The BroadcastClient has a create method, which is async and returns a BroadcastClient object, which has the correct class attributes set, including the contents of our private key file. You can see how we use it to instantiate our client in the previous code example.
client = await BroadcastClient.create(number_to=number)Once we have our client instantiated we can generate the headers for our request, which will include our token.
def get_headers(self):
    iat = int(time.time())
    payload = {
        'iat': iat,
        'application_id': self.APPLICATION_ID,
        'exp': iat + 60,
        'jti': str(uuid.uuid4())
    }

    token = jwt.encode(payload, self.PRIVATE_KEY, algorithm='RS256')

    headers = {
        'User-Agent': self.USER_AGENT,
        'Authorization': 'Bearer ' + token.decode('utf-8')
    }

return headersIf you have worked with JWT before this code will be familiar. If you haven't, I recommend reading the full specification to understand how it works.
The private key used to encode the token must be a match for the public key configured for your voice application. The other thing to note is the User-Agent attribute; it is used to identify your application and should be unique.
You'll notice how similar this is to the dictionary passed into the Nexmo client in our very first synchronous example:
# Nexmo Python client (synchronous)
response = nexmo_client.create_call({
    'to': [{'type': 'phone', 'number': contact['number']}],
    'from': {'type': 'phone', 'number': os.environ['BROADCAST_NUMBER_FROM']},
    'answer_url': ['https://nexmo-broadcast.ngrok.io']
})

# Get payload method for our asynchronous example
def get_payload(self):
    return {
        'to': [{'type': 'phone', 'number': self.NUMBER_TO}],
        'from': {'type': 'phone', 'number': self.NUMBER_FROM},
        'answer_url': [self.ANSWER_URL]
}The Nexmo client libraries are all very thin wrappers over a REST API. As you can see even when writing our code without using the Python client, it looks very similar.
Okay, let's get back to our create_call method and see how we use our BroadcastClient to send our urgent notifications.
async def create_call(session, number):
    logger.info(f'calling {number}')

    # Wrap our JWT generation in a new class
    client = await BroadcastClient.create(number_to=number)
    headers = client.get_headers()
    payload = client.get_payload()

    # POST to the Nexmo API
    async with session.post('https://api.nexmo.com/v1/calls', headers=headers, json=payload) as response:
        status = response.status
        nexmo_response = await response.text()

        # 429 == rate limited, need to back off
        if status == 429:
            raise NexmoRateError

        logger.info(f'call requested to {number} ({status})')

    # The Nexmo JSON response will contain 'started' as the status
    # if everything has gone to plan
return 'started' in nexmo_responseOnce we have instantiated our client, we use the aiohttp session to POST to the calls endpoint of the Nexmo API. Our headers will now include our JWT token, and the payload is a JSON representation of the dictionary returned by get_payload.
After we make the POST request to the Nexmo API, we must check for a 429 HTTP status. If we've exceeded our rate limiting this is the code Nexmo will return. So if we receive a 429, we should backoff. At present, the API rate limit for POST requests to the Voice API is two requests per second. We'll look at the backoff decorators in a moment.
Finally, our create_call coroutine will return either True or False depending on whether or not the JSON string contains the status "started". While this check seems a bit rudimentary, we will see how it is important in the next section.
We have the following decorators on our create_call method.
@backoff.on_exception(backoff.expo, NexmoRateError, on_backoff=backoff_exception_handler)
@backoff.on_predicate(backoff.fibo, on_backoff=backoff_predicate_handler, max_tries=5)Here we're using the backoff library to re-run our API call if it fails, but it will also wait before retrying so that we do not hammer the API endpoint.
We have two decorators each waiting for a different sort of error from the API. The on_exception decorator is triggered when the coroutine raises a NexmoRateError; this exception occurs anytime we have an HTTP status of 429. We have not set a max number of retries for this decorator, but we've instructed it to use an exponential duration for our backoff, with jitter.
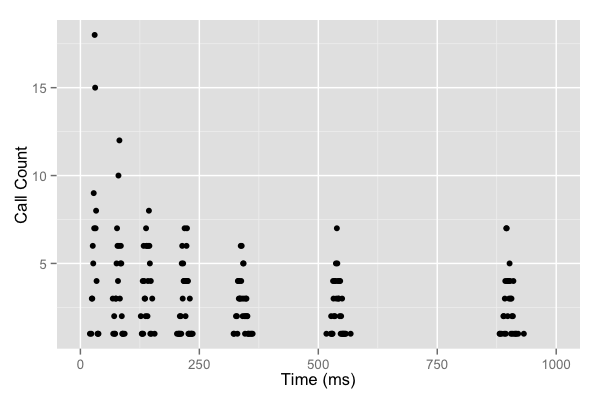 Graph showing clustering with no jitter
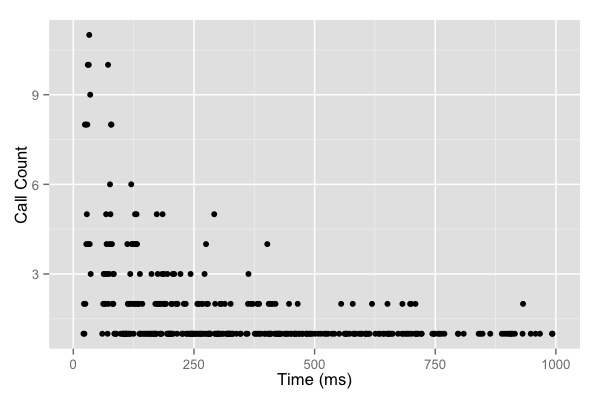 Graph with no clustering as jitter is applied
Graphs from "Exponential Backoff And Jitter" by AWS Architecture blog
As we can see in the second graph, there are far fewer clusters of calls when we add jitter to our algorithm. The AWS architecture blog explains this especially well in their post Exponential Backoff And Jitter.
Our second decorator on_predicate is triggered whenever the coroutine returns a Falsey value. Our generator for the wait time in this example is fibo, which will yield the numbers in the Fibonacci sequence, again with some jitter to prevent clustering.
def fibo(max_value=None):
    a = 1
    b = 1
    while True:
        if max_value is None or a < max_value:
            yield a
            a, b = b, a + b
        else:
            yield max_value
If the exponential or Fibonacci generators do not suit your use case, it's straightforward to write your own. As per xkcd 221 here is a generator that always yields a random wait duration.
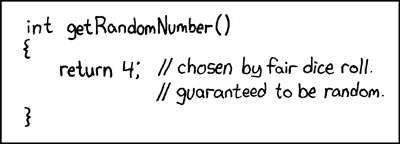 XKCD 221 - Random number generator
def xkcd():
    while True:
yield 4 # chosen by fair dice roll, guaranteed to be randomOur create_call coroutine will return a Falsey value any time the JSON response from the Nexmo API does not contain started. There are many different reasons why this might be: our private key might be incorrect, we have invalid values in our payload, we don't have enough credit on our Nexmo account, and so on. These are not issues that will be resolved just by calling the API again. So in this example, we give it a few tries to allow for a minor blip in connectivity or similar, and then we simply give up.
 Screencast showing multiple async tasks making outbound voice calls
Before you try running either script remember you will need to have Sanic and ngrok running so Nexmo can fetch your NCCO file!
You will also need to complete the setup section at the start of this article. Ensure that you have MongoDB running with several documents in your contactsCollection, you have set the required environmental variables, you have saved your private key in your project root as broadcast.key, and you have installed all requirements in your virtual environment using pip.
Once you have completed everything above you can run the synchronous task with:
python blocking_broadcast.pyAnd to try the asynchronous version run:
python broadcast.pyNote the output of the asynchronous script; the order of the calling number and call requested to number are likely different as it is asynchronous.
Share:
Aaron was a developer advocate at Nexmo. A seasoned software engineer and wannabe digital artist Aaron is frequently found creating things with code, or electronics; sometimes both. You can customarily tell when he's working on something new by the smell of burning components in the air.