Share:
Michael is a polyglot software engineer, committed to reducing complexity in systems and making them more predictable. Working with a variety of languages and tools, he shares his technical expertise to audiences all around the world at user groups and conferences. Day to day, Michael is a former developer advocate at Vonage, where he spent his time learning, teaching and writing about all kinds of technology.
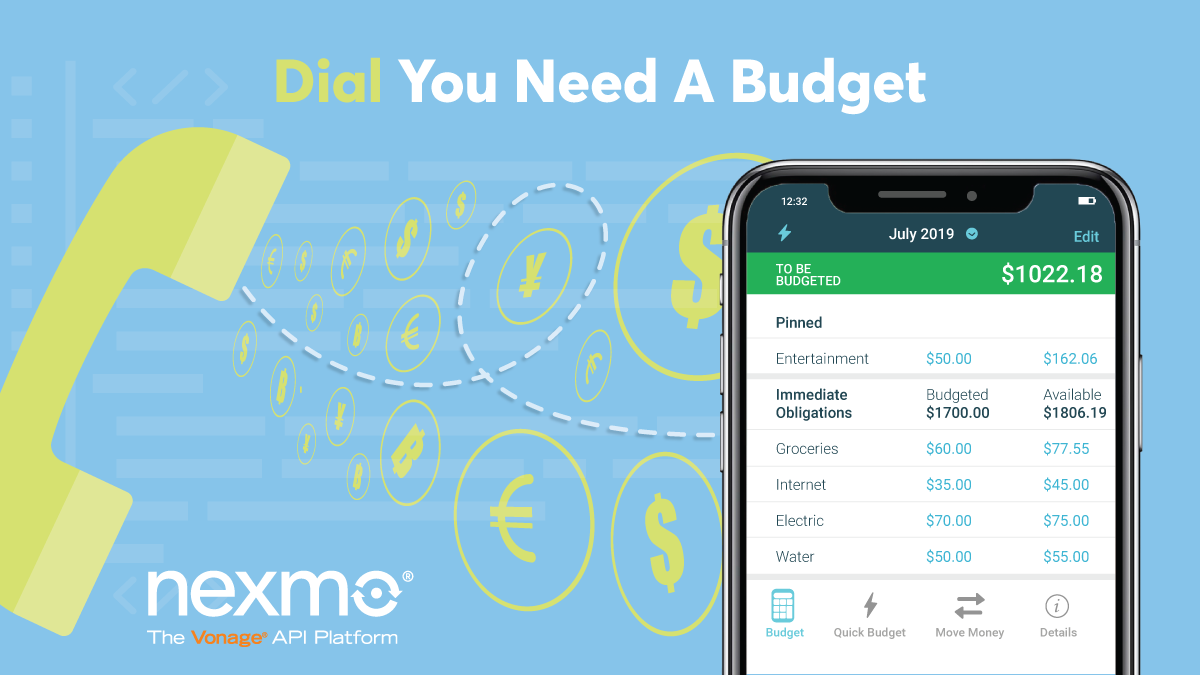
Keep Track of Your Budget with Dial YNAB
Time to read: 16 minutes
Between paying the mortgage, saving an emergency fund, and buying far too many board games I used to have a tough time tracking where all of my money was going each month. Thankfully, I discovered You Need A Budget (YNAB) a few years ago, which allows me to put money into different categories each month and keep track of how much is in each category.
Their mobile application and website are pretty good, but when I saw that YNAB had recently launched an API it made me think about other ways to access the data in my budget. It didn't take long for inspiration to strike.
You've been able to call your bank to check the balance on your account for years, but that's not useful for me. The total balance doesn't reflect money that has already been allocated for a future purchase. Instead, I wanted to call a number and find out how much I had left in my board games category, and so, dial-ynab was born.
In this post we're going to build a node.js application that uses the Nexmo platform to do the following:
Receive a voice call.
Feed the audio data into Google's speech-to-text API
Query the YNAB API to find out the current balance of the requested category.
Utilize Nexmo's text-to-speech functionality to say the balance back into the call.
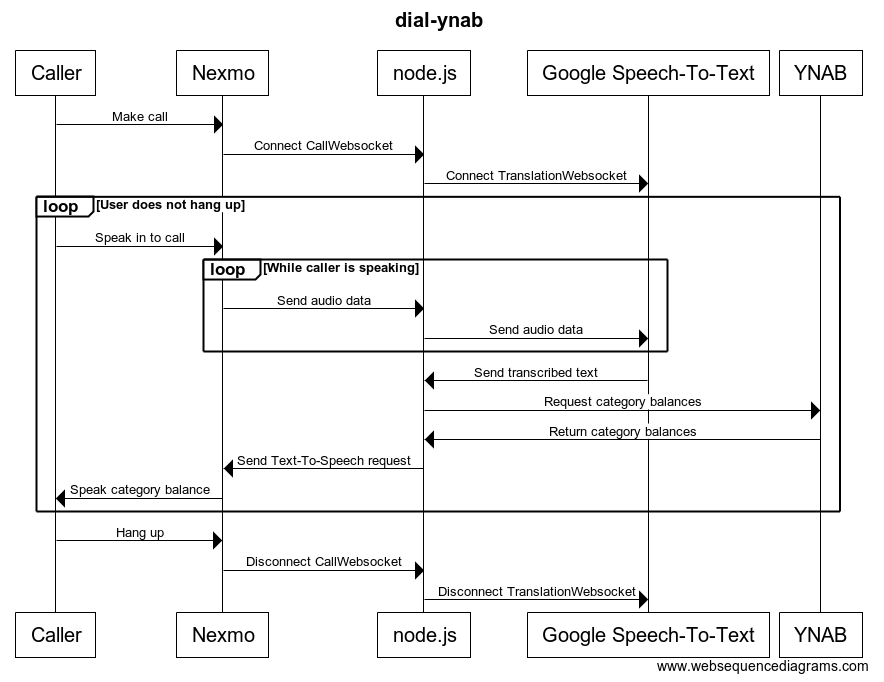 Dial YNAB Sequence Diagram
To achieve this, we're going to need to accomplish the following steps:
Bootstrap a Node.js project with
expressandexpress-wsConfigure a Nexmo application
Obtain authentication credentials for Google Cloud and YNAB
Handle an inbound call using Nexmo
Connect the call to our application using a websocket
Pass the audio data from Nexmo to Google for transcription
Handle the transcribed data returned from Google
Fetch our current account balances from YNAB
Say the balance back in to the call using Nexmo's Text-To-Speech functionality
There's a lot there, so we should get started!
To work through this tutorial you'll need the following:
node.js (I'm running version 10.0.0) and npm installed
ngrok to expose your local application to the internet so that Nexmo can reach it
nexmo-cli available (this is optional, as you can perform the same tasks via the Nexmo dashboard)
Google and YNAB credentials (we'll cover those later)
Once you've got everything to hand, start an ngrok tunnel by running ngrok http 3000 and make a note of the URL (in my case, it's http://e7dddad9.ngrok.io). Any time you see an ngrok URL in this post, swap it for your own.
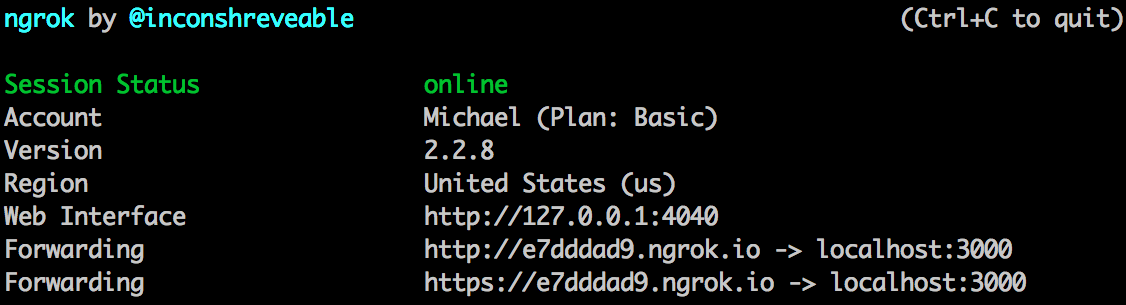 dial ynab ngrok
Let's start by creating a folder named dial-ynab and changing directory in to it. To start our project we need to run npm init and install a few dependencies:
We don't need all of these dependencies to start with, but it's easier to install them all up front so we don't need to worry about them later.
Before we can handle an inbound call we need to create a Nexmo application and link a number to it. We'll be using the Nexmo CLI tool to achieve this, but you can also create an application and link a number to it in the dashboard if you prefer.
Once you've done this, any time a call is placed to the number you purchased Nexmo will make a GET request to http://e7dddad9.ngrok.io/webhook/answer to find out how to handle the call. Let's implement that endpoint now using Express.
There's a lot of code required to bootstrap our Express instance. Create a file named index.js with the following contents, which will register dotenv for configuration values and create an express instance without any defined routes:
require('dotenv').config();

const express = require('express');
const bodyParser = require('body-parser');
const app = express();
const expressWs = require('express-ws')(app);

app.use(bodyParser.urlencoded({ extended: false }));
app.use(bodyParser.json());

// Routes go here

app.listen(process.env.PORT, function () {
    console.log(`dial-ynab listening on port ${process.env.PORT}!`);
});We've also referenced a variable named process.env.PORT but haven't defined it yet. Create a file named .env with the following contents to do so:
The final part of the puzzle is to define our /webhooks/answer URL. This is done by defining an app.get() method just before we call app.listen(). When Nexmo makes a request to our application, they expect us to return an NCCO. In this case, we return a talk action which will speak a response to the caller using Text-To-Speech:
app.get('/webhooks/answer', function (req, res) {
    return res.json([
        {
            "action": "talk",
            "text": "This is a text to speech demo from Nexmo. Thanks for calling"
        }
    ]);
});That's all you need to handle an inbound call with Nexmo. Give it a go by running node index.js, then call the number you purchased earlier. You should hear This is a text to speech demo from Nexmo. Thanks for calling before the call is ended.
Congratulations! You've done the hard part—the rest of this post is just wiring up a few different external services
Before we can continue with the rest of the post, we need authentication credentials for Google Cloud Speech and You Need A Budget.
For Google Cloud Speech you need to create a service account key and download the credentials as JSON. Create a new service account, call it dial-ynab and give it the Project->Owner role. You'll want to create a specific IAM role to deploy to production, but for now this is the easiest way to get started. Download the credentials file, rename it to google-creds.json and put it in your project folder alongside index.js.
YNAB API credentials are a little easier to find. You can generate a personal access token in your account settings. You'll also need your budget ID, which you can find by visiting the web interface and copying the ID in the URL (it'll look similar to 58f1ca9a-abcd-123a-96ef-21aac7e2865c)
At this point you should have:
Nexmo application ID
Google application credentials
YNAB budget ID and access token
Let's add those to our .env file so that we can use them in our application:
NEXMO_PRIVATE_KEY and GOOGLE_APPLICATION_CREDENTIALS are paths to files that exist in our project folder alongside index.js that contain our credentials.
Now that we can handle an inbound call and have our Google credentials, it's time to feed the audio from the phone call in to Google's transcription service. This is done using two websockets: one from Nexmo to our application and another from our application to Google.
Let's start by changing our /webhooks/answer endpoint to use a connect action. This tells Nexmo to connect to the /transcription endpoint in our application using a websocket. We also tell it to pass the call UUID to the websocket using the headers option as we'll need this a little later on.
Replace your existing /webhooks/answer endpoint with the following:
app.get('/webhooks/answer', function (req, res) {
    return res.json([
            {
                "action": "talk",
                "text": "Please say the name of the category you would like the balance for"
            },
            {
                "action": "connect",
                "endpoint": [
                {
                    "type": "websocket",
                    "content-type": "audio/l16;rate=8000",
                    "uri": `ws://${req.get('host')}/transcription`,
                    "headers": {
                        "user": req.query.uuid
                    }
                }
                ]
            }
    ]);
});As well as telling Nexmo to connect to /transcription, we need to create an endpoint that listens for a websocket connection. This is where the express-ws package comes in. It adds an app.ws() method as a wrapper around a websocket server. Add the following below your app.get() method:
app.ws('/transcription', function(ws, req) {
    let UUID;

    ws.on('message', function(msg) {
    });

    ws.on('close', function(){
    });
});The first message received from Nexmo will be a JSON message containing any headers that we asked for in the NCCO (in this case, the call UUID) and all subsequent messages will be buffers of audio data. We can use this knowledge to implement ws.on('message'); if the message is a buffer we forward it on to Google, otherwise we store the UUID for later.
let UUID;

ws.on('message', function(msg) {
    if (!Buffer.isBuffer(msg)) {
        let data = JSON.parse(msg);
        UUID = data.user;
        return;
    }
});
Before we can send the audio data to Google, we need to configure an instance of their cloud speech client. Add the following at the beginning of the file just after require('dotenv').config();
const Speech = require('@google-cloud/speech');
const speech = new Speech.SpeechClient();
const googleConfig = {
    config: {
        encoding: 'LINEAR16',
        sampleRateHertz: 8000,
        languageCode: 'en-GB'
    },
    interimResults: false
};This creates a new instance of the cloud speech client for us to use. The configuration options provided work well with Nexmo, but you may want to change languageCode if you're speaking anything other than en-GB. You can find a full list of supported languages on the Google Cloud Speech docs.
To use the speech-to-text functionality in the SpeechClient, we use the speech.streamingRecognize() method. Update app.ws('/transcription') and create a new instance of speech.streamingRecognize whenever a new websocket connection is received:
app.ws('/transcription', function(ws, req) {
    let UUID;

    const speechStream = speech.streamingRecognize(googleConfig)
        .on('error', console.log)
        .on('data', async (data) => {
            if (!data.results) { return; }
            const translation = data.results[0].alternatives[0];
            console.log(translation.transcript);
        });

    ws.on('message', function(msg) {
You may notice that in the .on('data') method we log out the results of data.results[0].alternatives[0].transcript. This is the transcribed text returned from Google. We know that the first item returned is always the final translation as we set interimResults: false in our configuration.
As we've created a new speech.streamingRecognize() instance, we must also clean up the instance when our call disconnects. We do this by destroying our speechStream instance in the ws.on('close') method:
ws.on('close', function(){
    speechStream.destroy();
});The final thing to do is update ws.on('message') to forward the data in to speechStream if it is a buffer.
ws.on('message', function(msg) {
    if (!Buffer.isBuffer(msg)) {
        let data = JSON.parse(msg);
        UUID = data.user;
        return;
    }

    speechStream.write(msg);
});If you run your application (node index.js) and call your Nexmo number you should be able to speak in to the call and see the text transcribed in the console in realtime.
Now that we've got transcription working, the next thing to do is fetch our YNAB budget data. At the top of your file (after you've created your googleConfig object) add the following to create a ynab API client:
const ynabClient = require("ynab");
const ynab = new ynabClient.API(process.env.YNAB_ACCESS_TOKEN);We can connect to the YNAB API using this client and list our all of our category groups and categories. As we're not interested in the master groups, just the categories themselves, we can build a list of category names and balances using the following function. Add this to the bottom of your file:
async function fetchYnabBalanceData() {
    let r = await ynab.categories.getCategories(process.env.YNAB_BUDGET_ID);
    return r.data.category_groups.reduce((acc, v) => acc.concat(
        v.categories.map((c) => { return {"name":c.name, "balance":c.balance/1000}; })
    ), []);
}
This fetches all of the categories from YNAB and returns a list in the following format:
[
  { name: 'Dining Out', balance: 38.11 },
  { name: 'Gaming', balance: 12.74 },
  { name: 'Music', balance: 43.85 },
  { name: 'Fun Money', balance: -13.44 }
]We'll use this fetchYnabBalanceData() method in our .on('data') function when we receive a transcription to match what was said to a category name. Unfortunately, it's highly unlikely that what Google returns will match your category name exactly. We need to be a little creative to work out which category the caller wanted. To do this, we can use the fast-levenshtein package we installed earlier.
To work out which category our caller wanted, we can take the input (needle) and search through every category name (haystack), using fast-levenshtein to calculate the lowest number of letter changes required for a category name to match our input. This is a crude approximation, but it works well enough for our needs. Add the following to the bottom of your file below function fetchYnabBalanceData():
function findClosestName(needle, haystack) {
    needle = needle.toLowerCase();

    let shortestDistance = {"value": [], "distance": Number.MAX_SAFE_INTEGER};

    for (let k of haystack) {
        let name = k.name.toLowerCase();
        if (needle == name) {
            return k;
        }

        let distance = levenshtein.get(needle, name);
        if (distance < shortestDistance.distance) {
            shortestDistance.value = k;
            shortestDistance.distance = distance;
        }
    }

    return shortestDistance.value;
}
You'll also need to require the fast-levenshtein package at the top of your file. Add it just after require('dotenv').config():
const levenshtein = require('fast-levenshtein');We now have everything we need to update our .on('data') function to log a category and balance to the console:
const speechStream = speech.streamingRecognize(googleConfig)
    .on('error', console.log)
    .on('data', async (data) => {
        if (!data.results) { return; }
        const translation = data.results[0].alternatives[0];
        console.log(translation.transcript);

        const categories = await fetchYnabBalanceData();
        const category = findClosestName(translation.transcript, categories);
        console.log(category);
    });
This is good time run your application again (node index.js) and give your Nexmo number a call to test your code. Try saying "Eating Out" and watch as it returns your "Dining Out" category.
There's just one final thing left to do to finish off our dial-ynab project: make it read the category balance back in to the call using Text-To-Speech.
To do this, we'll need to use the nexmo package. You don't need an apiKey or apiSecret to use the voice API, so feel free to ignore those values. To access the voice API we need to provide an applicationId and privateKey which we just happened to add to our .env file earlier.
Add the following code just below require('fast-levenshtein') at the top of your file:
const Nexmo = require('nexmo');
const nexmo = new Nexmo({
    apiKey: 'unused',
    apiSecret: 'unused',
    applicationId: process.env.NEXMO_APPLICATION_ID,
    privateKey: process.env.NEXMO_PRIVATE_KEY,
});Next, update your .on('data') method to call the Nexmo API by adding the following code below console.log(category);:
const balanceText = `${category.name} has ${category.balance} available.`;
nexmo.calls.talk.start(UUID, { text: balanceText }, (err, res) => {
    if(err) { console.error(err); }
});
If you call your Nexmo number again now you'll hear the category balance read out to you. However, the category balance doesn't sound quite right as it's being read out as a decimal number. We can hint to the Text-To-Speech engine that this is a currency value using SSML. Update your balanceText definition to the following:
const balanceText = `<speak>${category.name} has <say-as interpret-as="vxml:currency">GBP${category.balance}</say-as> available</speak>`;Give your Nexmo number a call one last time and you'll hear that the number has been interpreted as currency thanks to interpret-as="vxml:currency".
In just under 125 lines of code we've built an application that allows you to call your YNAB budget and make sure that you've got enough left in your dining out category before you head out after getting a craving for your favourite takeout food.
We've wired up Nexmo, Google, and YNAB using their APIs and websockets to provide realtime call transcription and audio feedback on an active voice call. I don't know about you, but I think that's pretty awesome!
If you'd like to learn more about the Nexmo voice API, the Voice API overview is a good place to start. You may be particularly interested in the NCCO reference or the websockets concept guide.
To talk about this post, the Nexmo Voice API, or communication in general, feel free to join the Nexmo Community Slack, where the @NexmoDev team are ready and waiting to help.
You're still reading? Excellent! My favourite part of this whole post is that the only YNAB specific part is the fetchYnabBalanceData method. It'd be trivial to make this work with Monzo's pots feature instead of YNAB. In fact, let's do it now!
First, get your Monzo access token from the Monzo Playground and add it to .env:
We're going to use the request-promise library to access the Monzo API, so let's install it now
Add the following to the bottom of your file to define the fetchMonzoBalanceData function. The Monzo API returns data that contains name and balance keys, so all we have to do is reformat the balance to be decimal currency:
const request = require("request-promise");
async function fetchMonzoBalanceData() {
    const data = JSON.parse(await request({"uri": "https://api.monzo.com/pots", "headers": {"Authorization": `Bearer ${process.env.MONZO_ACCESS_TOKEN}`}}));
    return data.pots.map((v) => { v.balance = v.balance/100; return v; });
}
Finally, change the call to fetchYnabBalanceData so that it calls fetchMonzoBalanceData instead. Now give your Nexmo number a call and say the name of one of your Monzo pots. Congratulations! You're now working with the Monzo API instead of YNAB with just 6 lines of additional code.
Share:
Michael is a polyglot software engineer, committed to reducing complexity in systems and making them more predictable. Working with a variety of languages and tools, he shares his technical expertise to audiences all around the world at user groups and conferences. Day to day, Michael is a former developer advocate at Vonage, where he spent his time learning, teaching and writing about all kinds of technology.