Share:
Enrico is a former Vonage team member. He worked as a Solutions Engineer, helping the sales team with his technical expertise. He is passionate about the cloud, startups, and new technologies. He is the Co-Founder of a WebRTC Startup in Italy. Out of work, he likes to travel and taste as many weird foods as possible.
Create a Multiparty Video App With the New Vonage Video Express
Time to read: 5 minutes
This article was written in collaboration with Javier Molina Sanz
This blog post will help you develop a Multiparty Video Application based on ReactJS and the new Vonage Video Express. The Video Express provides by default the following features:
Room and Participant Manager: simplified publishing, subscribing, and stream management logic
Layout Management: out of the box responsive UI and Layout Manager with customizable components
Video Quality Optimization (framerate and resolution) based on the number of participants, rendering sizes, CPU, and network conditions
Network optimization: Automatically remove video or audio for participants who are non-visible or non-speaking, optimizing bandwidth resources.
Ease of use: It provides a more natural interaction by replacing publishing, subscribing, and streams with Room and Participants.
Want to skip to the end? You can find all the source code for this tutorial on GitHub.
The app is divided into two main sections, server and client-side: Server-Side: a simple NodeJS server that is in charge of credentials generation and archive management Client-Side: a React SPA (single page application) using React Hooks.
The client-side is where the real action happens. Using Video Express, we were able to implement a responsive and scalable multiparty video conferencing app that takes care of time-consuming optimizations.
The React application leverages the @vonage/video-express module via NPM. Remember that you can also use the Video Express via an HTML script tag—check out out the Video Express Documentation for all the details.
The app is based on React Hooks that came with React 16.8. Next, let's have a closer look at the main hooks of this application.
The UseRoom hook is the one that handles the lifecycle of our video room. Thanks to the Video Express, we don’t have to manage the Session, Publisher, and Subscriber lifecycle. Instead, we only have to instantiate a Room object, then use the room.join() method, which in turn will handle everything for us behind the scenes.
First, we need to create a function in charge of initializing our Room object and joining the call. We need to provide our authentication (apiKey, sessionId, and token) and other optional parameters used as publisher settings such as the userName, the container where our Room will be visible, and some optional publisher settings.
Since we’re going to use the default Layout manager that the Video Express provides, we’re passing some layout parameters: set a grid view for the initial layout define a custom HTML element for the screensharing view You can find the complete list of parameters here.
const createCall = useCallback(
    (
      { apikey, sessionId, token },
      roomContainer,
      userName,
      publisherOptions
    ) => {
      if (!apikey || !sessionId || !token) {
        throw new Error('Check your credentials');
      }

      roomRef.current = new MP.Room({
        apiKey: apikey,
        sessionId: sessionId,
        token: token,
        roomContainer: 'roomContainer',
        participantName: userName,
        managedLayoutOptions: {
          layoutMode: 'grid',
          screenPublisherContainer: 'screenSharingContainer'
        }
      })
       startRoomListeners();

       roomRef.current
        .join({ publisherProperties: finalPublisherOptions })
        .then(() => {
          setConnected(true);
          setCamera(roomRef.current.camera);
          setScreen(roomRef.current.screen);
          addLocalParticipant({ room: roomRef.current });
        })
        .catch(e => console.log(e));
    },
    [ ]
  );
Once the Room object has been initialized, we call the startRoomListeners function to start the event listeners on the Room object. Then we call the room.join() method with some optional publisherSettings to join the session. We need the event listeners to notify us about events such as a new participant joins, a new screen sharing stream created, a user is reconnecting to the call, etc.
const startRoomListeners = () => {
    if (roomRef.current) {
      roomRef.current.on('connected', () => {
        console.log('Room: connected');
      });
      roomRef.current.on('disconnected', () => {
        setNetworkStatus('disconnected');
        console.log('Room: disconnected');
      });
      roomRef.current.camera.on('created', () => {
        setCameraPublishing(true);
        console.log('camera publishing now');
      });
      roomRef.current.on('reconnected', () => {
        setNetworkStatus('reconnected');
        console.log('Room: reconnected');
      });
      roomRef.current.on('reconnecting', () => {
        setNetworkStatus('reconnecting');
        console.log('Room: reconnecting');
      });
      roomRef.current.on('participantJoined', participant => {
        console.log(participant);
        addParticipants({ participant: participant });
        console.log('Room: participant joined: ', participant);
      });
      roomRef.current.on('participantLeft', (participant, reason) => {
        removeParticipants({ participant: participant });
        console.log('Room: participant left', participant, reason);
      });
    }
  };
Notice that we also keep track of the session’s participants to be able to show a list of participants. We will create a state variable that gets updated once a participant joins or leaves the room.
Another helpful feature implemented is the network status component. This feature will be useful upon user disconnection/reconnection to update the UI, informing the user about their network problems.
Nowadays, it is very common to have multiple audio/video devices available. Some users will prefer to use earphones, and others will prefer to plug an external webcam into their computer. In a video application, it is essential to let the user choose from different devices. The useDevices hook explains how to get a list of devices available.
  useEffect(() => {
    navigator.mediaDevices.addEventListener('devicechange', getDevices);
    getDevices();

    return () => {
      navigator.mediaDevices.removeEventListener('devicechange', getDevices);
    };
  }, [getDevices]);
We’ve set up an event listener to detect a change on media devices; we will trigger our getDevices() function when that happens.
const getDevices = useCallback(async () => {
    if (!navigator.mediaDevices || !navigator.mediaDevices.enumerateDevices) {
      console.log('enumerateDevices() not supported.');
      return;
    }
    try {
      const devices = await MP.getDevices();
      const audioInputDevices = devices.filter(
        (d) => d.kind.toLowerCase() === 'audioinput'
      );
      const audioOutputDevices = devices.filter(
        (d) => d.kind.toLowerCase() === 'audiooutput'
      );
      const videoInputDevices = devices.filter(
        (d) => d.kind.toLowerCase() === 'videoinput'
      );
      setDeviceInfo({
        audioInputDevices,
        videoInputDevices,
        audioOutputDevices
      });
      // });
    } catch (err) {
      console.log('[loadDevices] - ', err);
    }
  }, []);
Our getDevices() function will call the MP.geDevices() method that returns a list of devices available once the user has granted device access. We will then filter through devices and populate our state with the different devices available.
const [deviceInfo, setDeviceInfo] = useState({
    audioInputDevices: [],
    videoInputDevices: [],
    audioOutputDevices: []
  });
The Video Express helps you also implementing the pre-call user experience. Indeed, the Video Express implements a PreviewPublisher class. The idea of the PreviewPublisher class is to allow the developers to preview media easily and ensure that your devices (audio/video) work fine without the need to create a Room object.
We will create a preview to allow the user to choose the right device (if they have multiple), ensure that the microphone picks up the audio, and the camera works fine. Check out the full implementation on GitHub.
We will first get the available devices from our UseDevices hook.
const { deviceInfo, getDevices } = useDevices();Once we initialize the preview publisher with the target element, we call the previewMedia method to visualize the media. We’ll also set up some event listeners to handle device access and audioLevel events. As you can see, we will not call the getDevices() function until the user has granted permission to devices (upon the accessAllowed event)
const createPreview = useCallback(
    async (targetEl, publisherOptions) => {
      try {
        const publisherProperties = Object.assign({}, publisherOptions);
        console.log('[createPreview]', publisherProperties);
        previewPublisher.current = new MP.PreviewPublisher(targetEl);
        previewPublisher.current.on('audioLevelUpdated', (audioLevel) => {
          calculateAudioLevel(audioLevel);
        });
        previewPublisher.current.on('accessAllowed', (audioLevel) => {
          console.log('[createPreview] - accessAllowed');
          setAccessAllowed(DEVICE_ACCESS_STATUS.ACCEPTED);
          getDevices();
        });
        previewPublisher.current.on('accessDenied', (audioLevel) => {
          console.log('[createPreview] - accessDenied');
          setAccessAllowed(DEVICE_ACCESS_STATUS.REJECTED);
        });
        await previewPublisher.current.previewMedia({
          targetElement: targetEl,
          publisherProperties
        });

        setPreviewMediaCreated(true);
        console.log(
          '[Preview Created] - ',
          previewPublisher.current.getVideoDevice()
        );
      } catch (err) {
        console.log('[createPreview]', err);
      }
    },
    [calculateAudioLevel, getDevices]
  );
We’re subscribing to some events from the SDK to know whether the user has allowed device access and to subscribe to audio Level events to update the UI and reassure the user that the microphone picks up audio. We will also display an alert to the user if the access to audio/video devices has been denied (see implementation).
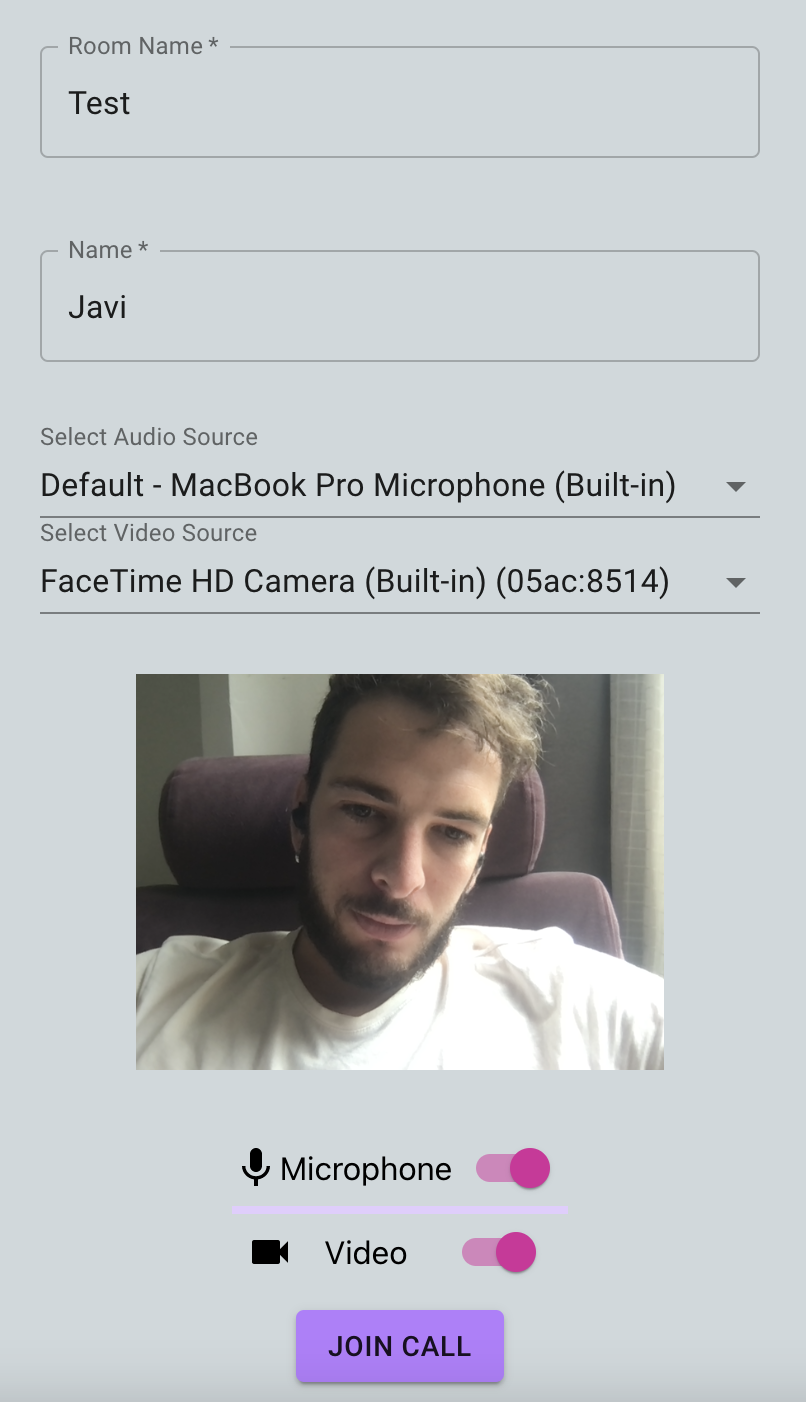
One of the most important components of our application is the WaitingRoom component because it’s where we will use the useDevices and usePreviewPublisher hooks. The waiting room is a pre-call page where the user can choose the right audio and video device, check if the microphone and camera work, and choose a name.
This is what our waiting room looks like:
 Screenshot of waiting room on mobile device
We have a few state variables that will hold the user’s choice; this is done to allow the user to join the room with the audio or video turned off, set a name, or change the audio devices:
const roomToJoin = location?.state?.room || '';
const [roomName, setRoomName] = useState(roomToJoin);
const [userName, setUserName] = useState('');
const [isRoomNameInvalid, setIsRoomNameInvalid] = useState(false);
const [isUserNameInvalid, setIsUserNameInvalid] = useState(false);
const [localAudio, setLocalAudio] = useState(
    user.defaultSettings.publishAudio
  );
const [localVideo, setLocalVideo] = useState(
    user.defaultSettings.publishVideo
);
const [localVideoSource, setLocalVideoSource] = useState(undefined); const [localAudioSource, setLocalAudioSource] = useState(undefined);
let [audioDevice, setAudioDevice] = useState('');
let [videoDevice, setVideoDevice] = useState('');We have created a UserContext which handles user choices such as audio and video sources. We will use our usePreviewPublisher hook to create and destroy a publisher preview on our waiting room and have a list of devices available along with other useful state variables.
const {
    createPreview,
    destroyPreview,
    previewPublisher,
    logLevel,
    previewMediaCreated,
    deviceInfo,
    accessAllowed
} = usePreviewPublisher();The logic starts once our component is mounted and we’ve got the container for our waiting room. We will create a publisher preview.
useEffect(() => {
    if (waitingRoomVideoContainer.current) {
      createPreview(waitingRoomVideoContainer.current);
    }

    return () => {
      destroyPreview();
    };
  }, [createPreview, destroyPreview]);
We have a useEffect hook that runs once the preview has been created and initializes the list of devices with the current device in use. Note the call to getAudioDevice() and getVideoDevice() as the former is a promise, and the latter is a synchronous method.
useEffect(() => {
    if (previewPublisher && previewMediaCreated && deviceInfo) {
      console.log('useEffect - preview', deviceInfo);
      previewPublisher.getAudioDevice().then(currentAudioDevice => {
        setAudioDevice(currentAudioDevice.deviceId);
      });
      const currentVideoDevice = previewPublisher.getVideoDevice();
      console.log('currentVideoDevice', currentVideoDevice);
      setVideoDevice(currentVideoDevice.deviceId);
    }
  }, [
    deviceInfo,
    previewPublisher,
    setAudioDevice,
    setVideoDevice,
    previewMediaCreated
  ]);
The logic to change devices is almost the same for audio and video. We will explain it for audio, but remember that you can check the implementation of the WaitingRoom component.
useEffect(() => {
    if (previewPublisher) {
      if (localVideo && !previewPublisher.isVideoEnabled()) {
        previewPublisher.enableVideo();
      } else if (!localVideo && previewPublisher.isVideoEnabled()) {
        previewPublisher.disableVideo();
      }
    }
  }, [localVideo, previewPublisher]);
We have an event listener that fires when the user changes the video device in use:
const handleVideoSource = React.useCallback(
    e => {
      const videoDeviceId = e.target.value;
      setVideoDevice(e.target.value);
      previewPublisher.setVideoDevice(videoDeviceId);
      setLocalVideoSource(videoDeviceId);
    },
    [previewPublisher, setVideoDevice, setLocalVideoSource]
  );
This post shows how to integrate the brand new Video Express with a React Application. The application implements the main features related to a video application, such as waiting room, device selection, network status detection, screen sharing, chat, and more.
Feel free to clone the Github Repo and start using it in your application.
Share:
Enrico is a former Vonage team member. He worked as a Solutions Engineer, helping the sales team with his technical expertise. He is passionate about the cloud, startups, and new technologies. He is the Co-Founder of a WebRTC Startup in Italy. Out of work, he likes to travel and taste as many weird foods as possible.