
Send Visual Weather Forecasts With Vonage RCS and Google AI
Time to read: 5 minutes
In this tutorial, you'll build a Node.js app that fetches the weather in a given city, generates a descriptive image using Google’s Imagen model, creates a short text summary with Gemini, and sends everything as a rich card via RCS using the Vonage Messages API.
 Weather forecast RCS message on phone
Note: The code is available on the Vonage Community GitHub repository.
Prerequisites
Make sure node.js is installed on your machine.
A registered RCS Business Messaging (RBM) agent.
A phone with RCS capabilities.
API tunneling service. This tutorial uses ngrok. Learn more about how to use ngrok for testing.
API Keys
Weather API key.
Gemini API key.
To use RCS via the Vonage Messages API, you’ll need an RCS Agent linked to your account. Contact Vonage Support or your account manager to enable Developer Mode and add allowlisted phone numbers. Once linked, your RCS agent will appear under “External Accounts” in the Vonage Dashboard.
To create an application, go to the Create an Application page on the Vonage Dashboard, and define a Name for your Application.

If you intend to use an API that uses Webhooks, you will need a private key. Click “Generate public and private key”, your download should start automatically. Store it securely; this key cannot be re-downloaded if lost. It will follow the naming convention private_<your app id>.key. This key can now be used to authenticate API calls. Note: Your key will not work until your application is saved.
Choose the capabilities you need (e.g., Voice, Messages, RTC, etc.) and provide the required webhooks (e.g., event URLs, answer URLs, or inbound message URLs). These will be described in the tutorial.
To save and deploy, click "Generate new application" to finalize the setup. Your application is now ready to use with Vonage APIs.
Start an ngrok Tunneling Instance
Run the following command to start ngrok:
ngrok http 3000Copy the HTTPS URL (e.g., https://94cd51b63460.ngrok.app) to configure your webhooks.
In the Vonage API Dashboard, set your ngrok public URL as the endpoint for inbound messages and events:
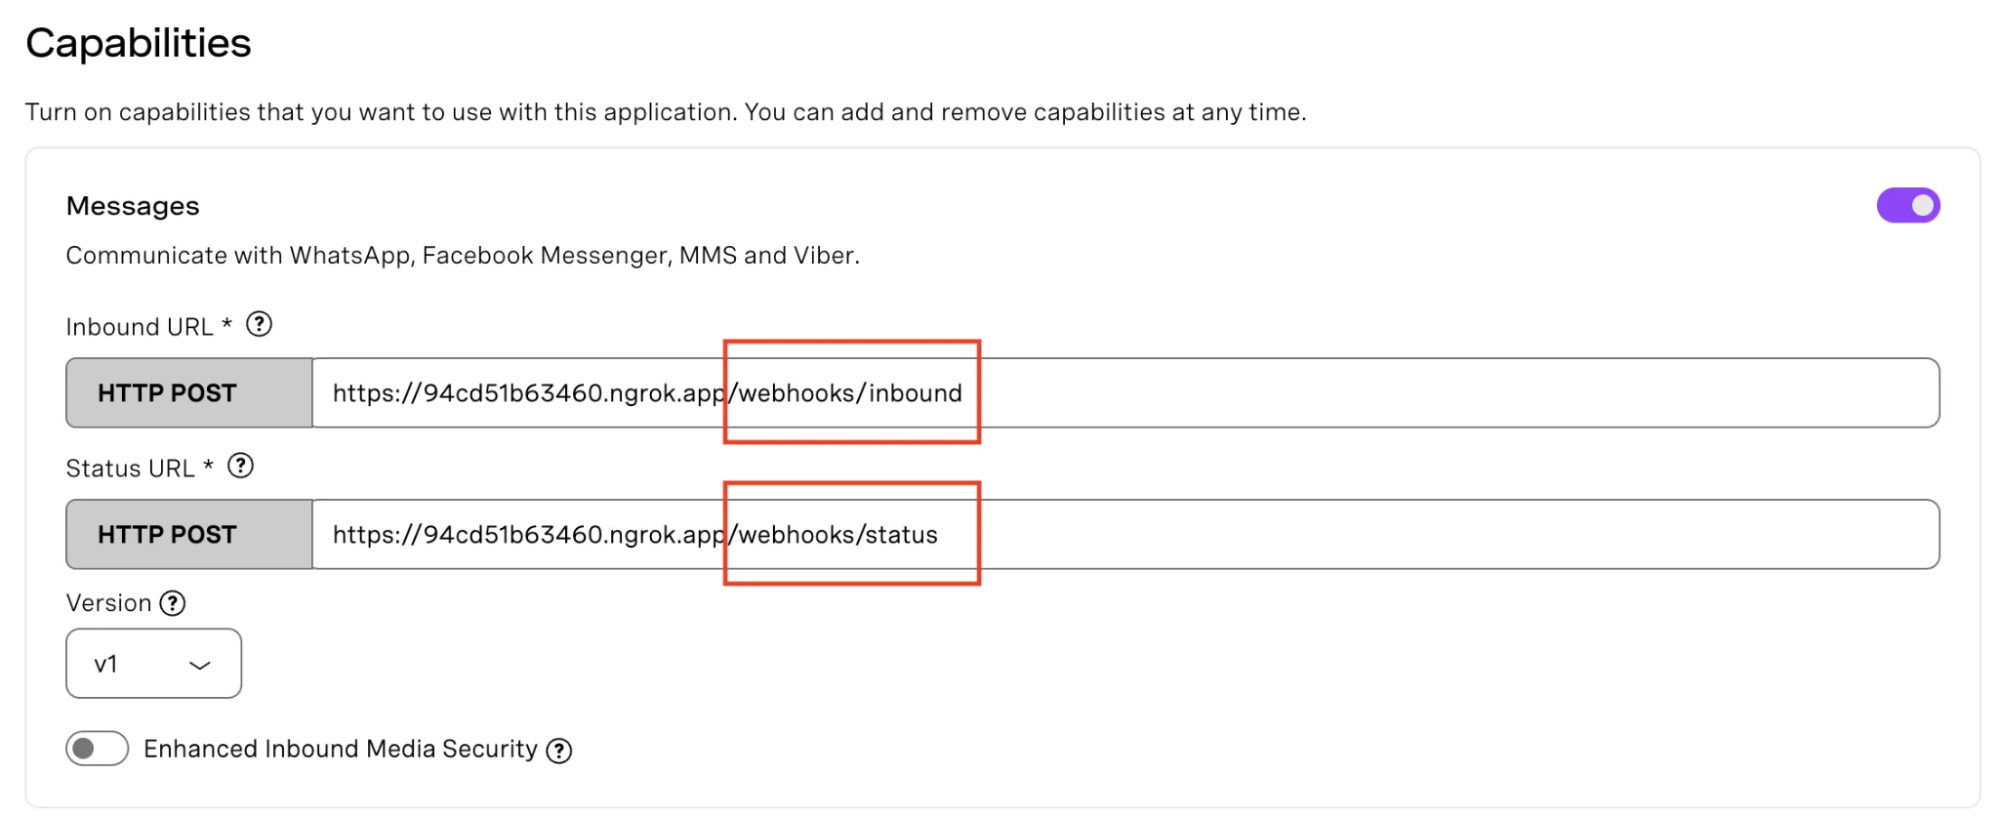 ngrok URL added to Vonage Messages API webhooks
Clone the repository and install dependencies. You can find all the dependencies in the package.json file.
npm install
You can see there's a .env.example file in the node project, make a copy of it and create a .env file that contains the below environment variables.
VONAGE_APPLICATION_ID= This is your your Vonage Application ID, as you can see in the image provided below.

VONAGE_PRIVATE_KEY=./private.key, it's the private key you downloaded earlier when creating the application.

RCS_SENDER_ID=YOUR_RCS_SENDER_ID. You will need an RCS Agent linked to your Vonage account to send and receive RCS messages via the Vonage Messages API. To get the agent set up, contact Vonage Support or your account manager to get the ball rolling. Once the agent is added to your account, you should see it listed under “External Accounts” in your dashboard.

PHONE_NUMBER=YOUR_PHONE_NUMBER_E164

PORT=3000

VONAGE_API_SIGNATURE_SECRET=YOUR_SIGNATURE_SECRET. It is the secret used to sign the request that corresponds to the signature secret associated with the api_key included in the JWT claims. You can identify your signature secret on the Dashboard settings

GEMINI_API_KEY=YOUR_GEMINI_API_KEY

WEATHER_API_KEY=YOUR_WEATHER_API_KEY

PUBLIC_URL=https://YOUR_NGROK_URL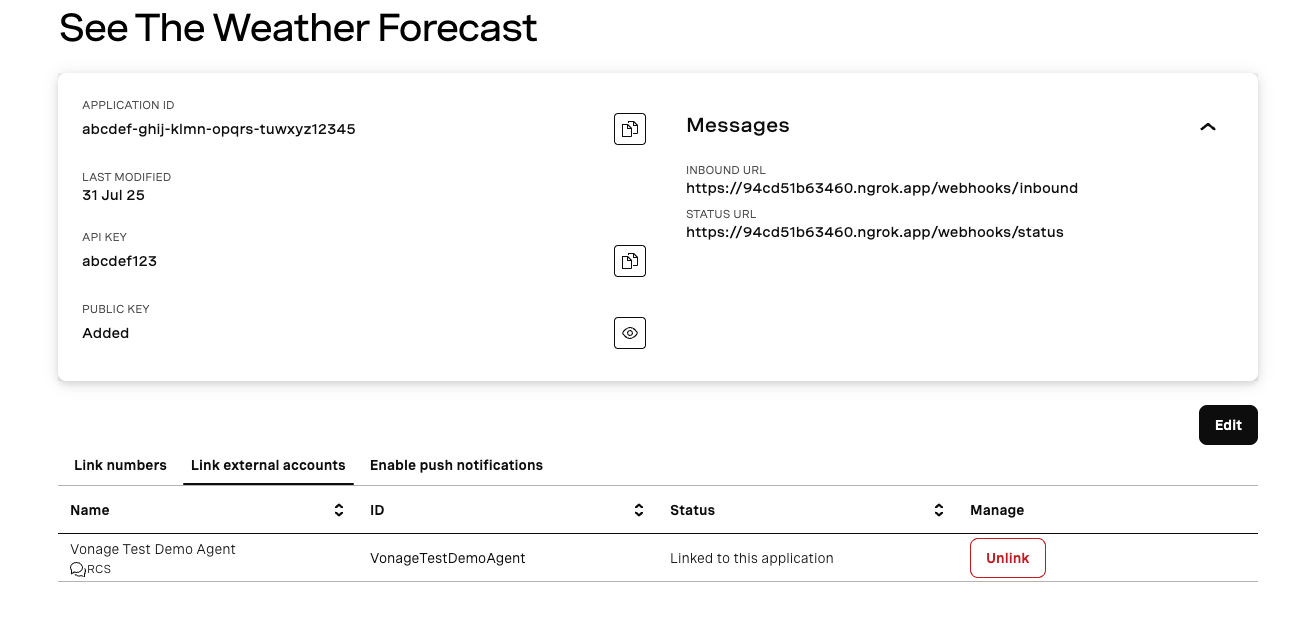 Vonage application dashboard with webhook and RCS agent settings
The server.js file contains the core logic of the application. We start by importing the required packages. Create a new folder called public/images for storing images. Every time a new image is generated, it is added to this folder. Before proceeding, the app verifies that all necessary environment variables are set.
Set up the Vonage SDK and initialize the client.
const privateKey = fs.readFileSync(process.env.VONAGE_PRIVATE_KEY).toString();

const auth = new Auth({

  apiKey: process.env.VONAGE_API_KEY,

  apiSecret: process.env.VONAGE_API_SECRET,

  applicationId: process.env.VONAGE_APPLICATION_ID,

  privateKey,

});

const vonage = new Vonage(auth);The asynchronous function generateWeatherImage takes a city as an argument, which you'll provide when accessing the URL by passing this city. It calls the weather API to get the current weather in the city you’ve entered, Google’s Imagen model generates a weather image, the image is saved locally, and it returns a weather summary in addition to an image URL.
We'll send an RCS Custom Message containing the city. The sendWeatherImageRCS function builds and sends a rich card via RCS.
You'll also find a JWT Verification function within the server.js file.
Add a JWT verification function to verify if the incoming request (e.g., message or call) came from Vonage.
The VONAGE_API_SIGNATURE_SECRET variable is the secret used to sign the request corresponding to the signature secret associated with the API key included in the JWT claims. You can identify your signature secret on the Dashboard settings.
You can learn more about verifying the request.
const verifyJWT = (req) => {
  // Verify if the incoming request came from Vonage
  const jwtToken = req.headers.authorization.split(" ")[1];
  if(!verifySignature(jwtToken, process.env.VONAGE_API_SIGNATURE_SECRET)) {
    console.error("Signature does not match");
    throw new Error("Not a Vonage API request");
  }

  console.log("JWT verified");
}Make sure to install the @vonage/jwt dependency.
npm install @vonage/jwt
Start your server by running ‘node’ followed by the name of the JavaScript file in a separate tab from ngrok.
node server.jsOpen your browser and visit http://localhost:3000/send-weather-image?city=? followed by the name of the city you'd like to check the weather for. You’ll receive an RCS card with a weather image and text information generated by Gemini.
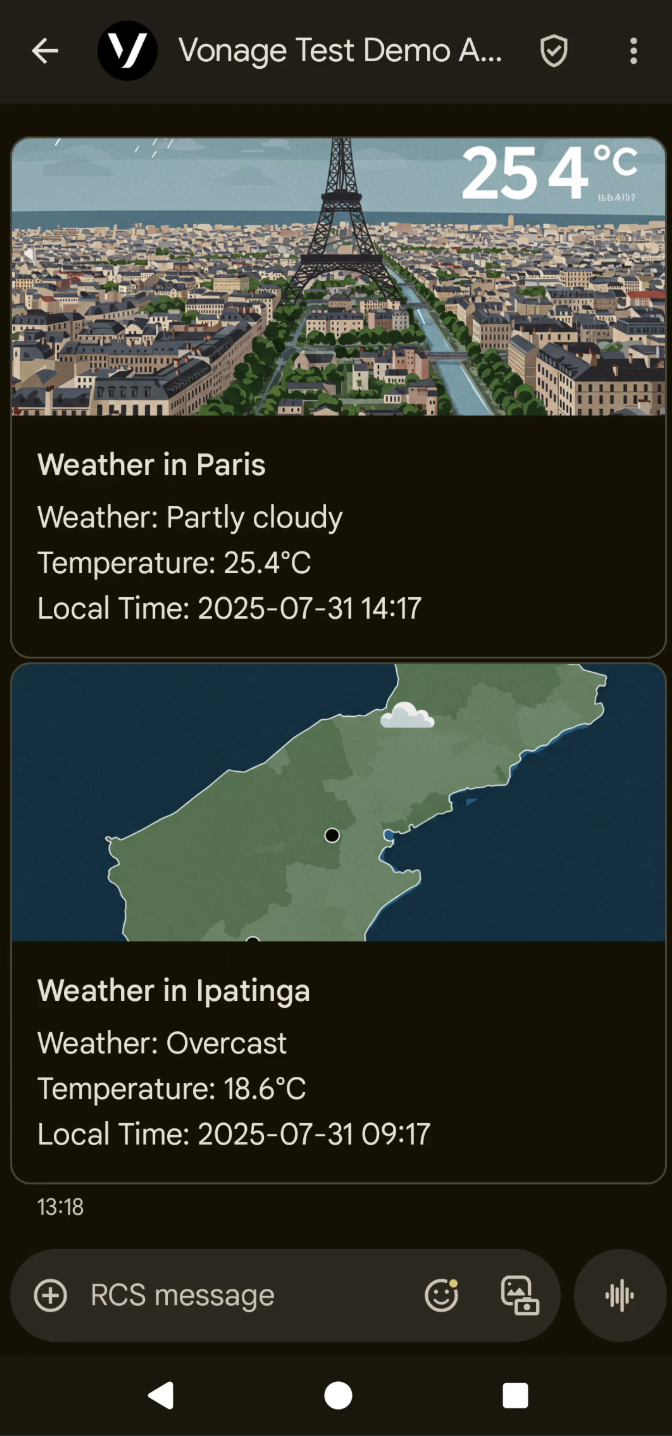
Let's test it with Paris, which I also set as default city.
http://localhost:3000/send-weather-image?city=Paris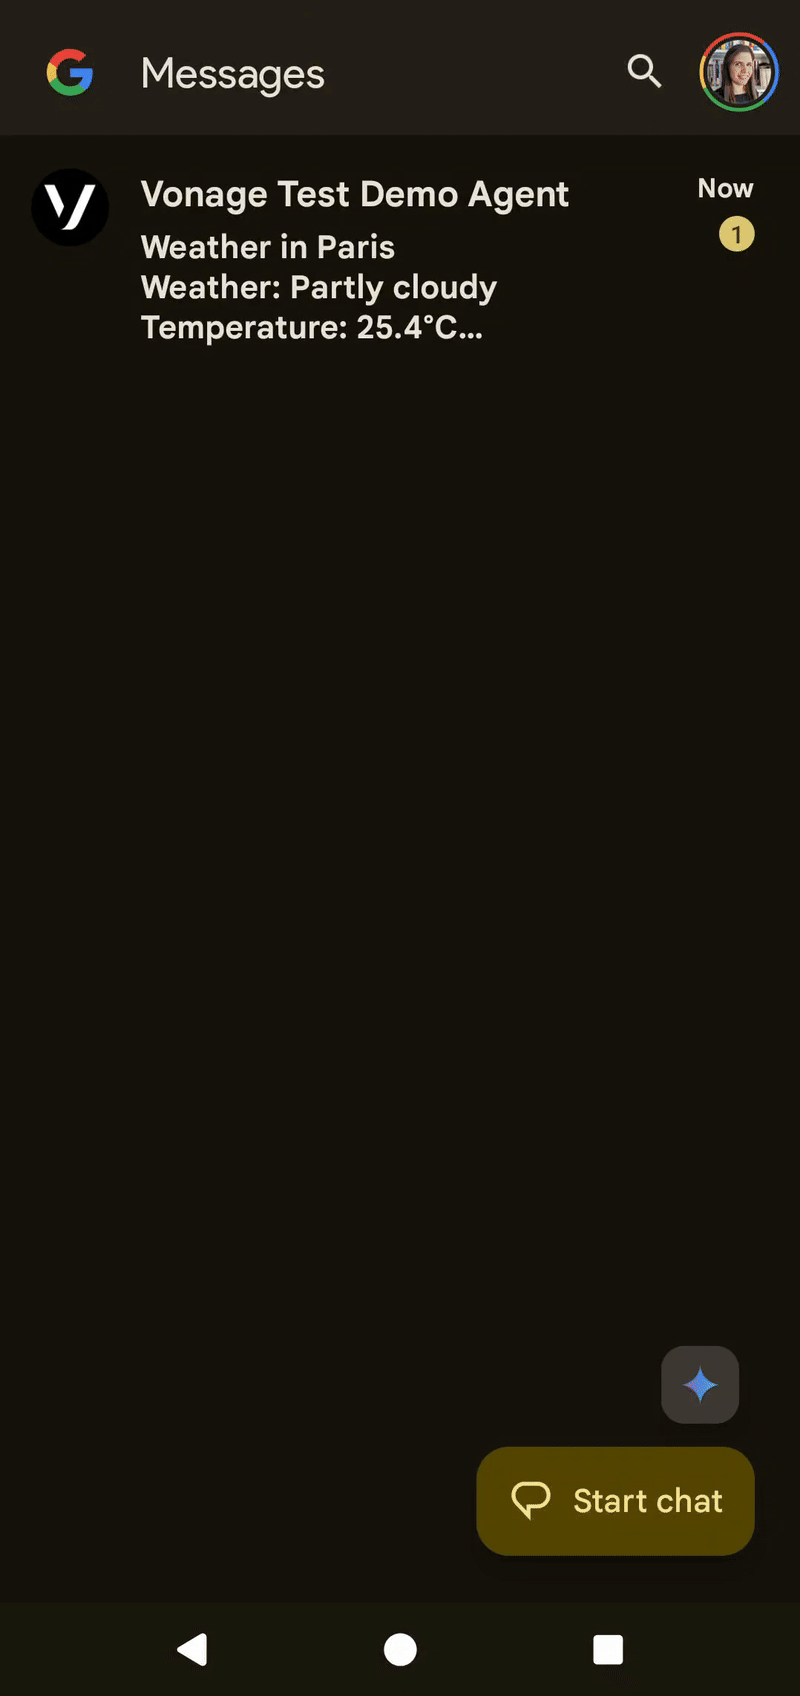 RCS weather message interaction with Paris forecastLet’s try another example, such as the city of Ipatinga.
http://localhost:3000/send-weather-image?city=Ipatinga
To send a visual weather forecast via RCS, we access a URL that triggers the weather information research and displays text and images about the searched city. You could try a code generation tool such as Gemini Code Assist or Google AI Studio to create a UI that allows the user to click a button and send an RCS Rich Text message to their phone.
If you’re into experimenting with developer tools and coding environments, check out Alexandra Williams, Developer Advocate at Vonage, demonstrating how to add Vonage API documentation into Cursor.
You’ve reached the end of the tutorial! Now that you’ve seen how to use RCS with the Messages API, why don’t you go ahead and check out how to verify your users in the Verify API too?
Have a question or want to share what you're building?
Subscribe to the Developer Newsletter
Follow us on X (formerly Twitter) for updates
Watch tutorials on our YouTube channel
Connect with us on the Vonage Developer page on LinkedIn
Stay connected and keep up with the latest developer news, tips, and events.