
Share:
Renato is a backend software developer and a father of two amazing kids who won’t let him sleep so that he can enjoy spending nights connecting APIs around.
Building a Python Error Alerting Tool
No matter how much we care about quality and testing, software is almost guaranteed to go wrong at some point. As a result, monitoring logs to keep track of application health are essential.
There certainly are multiple services and open source projects taking care of monitoring application logs. In my experience, though, they’re usually either expensive, time-consuming to integrate or bloated with features I will hardly use. When I’m deploying small projects that do not require fancy monitoring, sometimes I wish I could have a native Python solution to get simple alerts when something goes wrong in my code.
The purpose of this tutorial is precisely to fulfill this need. We will build a simple and flexible Python error alerting tool that can be plugged into any project. A logging HTTP handler object will asynchronously send alerts through the Vonage SMS API into our phones when new errors or warnings, for example, come in.
We will use Python 3.9.1 (the latest stable version) in the tutorial, but the code should also work on Python 3.6+. Python is available on Linux, macOS and Windows. To download and install, follow the instructions at the official website.
You will also need a Vonage account to receive error alerts through SMS. Create an account if you’re not registered yet. Vonage provides new subscribers with € 2.00 in credits to test the APIs for free.
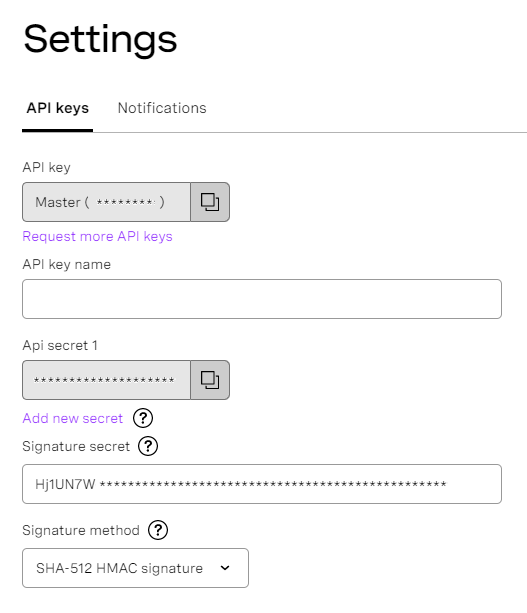
The Vonage API key and secret will also be necessary; make sure to grab them in the Dashboard settings:
PyPI http-logging library will be used for log caching and asynchronous communication with the Vonage API. It prevents our main Python application from being disrupted by the alerting mechanism.
Create a directory for the project:
Creating a virtual environment is often good practice, so let’s get this done first:
On a Windows computer, replace the source command in the last line above with:
Make sure the environment is working as expected:
Now let’s create our Python dependencies file:
Open it with your preferred text editor and add the following lines:
http-logging
vonageClose the file and install dependencies with the pip install command:
Our custom logging logic will require some information that will be supplied through environment variables.
The Vonage API Key is required for authentication with the SMS service. A phone number will also be necessary to send SMS messages.
The export command should work on Linux and macOS. On Windows, use set instead. If you are using a PowerShell console, then this command should do the work:
$Env: VONAGE_API_KEY = "abc123"
$Env: VONAGE_API_SECRET = "xyz123"
$Env: export ALERT_PHONE_NUMBER = "+1234567890"
As mentioned before, we will rely on the http-logging library to connect our logs to the Vonage APIs.
A native logging HTTP handler from the Python standard library would also do the job. However, we are not going to use it because it generates blocking HTTP requests, which can negatively affect the execution of our main Python application.
The http-logging library runs silently in a background thread and is also capable of caching logs in a local SQLite database to reduce the number of network requests. For those reasons, it will be a lot less intrusive than a native HTTP handler.
The library is based on the Python Logstash Async, but generalized to work with any backend apart from Logstash (in our tutorial, we will use Vonage). Read more about it in the project documentation wiki.
The first thing we need is to create a custom HTTP Transport class. This is the one carrying instructions for how to send logs to the Vonage API.
Before we dive into it, let’s create a new Python file to contain our custom logging code:
Now open this file—it’s time for some Python fun!
Our own HTTP Transport class will inherit from the [http_logging.AsyncHttpTransport](https://github.com/hacktlib/py-async-http-logging/wiki/3.-HTTP-Transport-Class) one. First, import the necessary libraries at the top of the file and then declare a new class like demonstrated below:
import logging
import os

from vonage import Sms

from http_logging import HttpHost, SupportClass
from http_logging.handler import AsyncHttpHandler
from http_logging.transport import AsyncHttpTransport

class VonageHttpTransport(http_logging.transport.AsyncHttpTransport):
passRight now, this class will behave exactly like the original. Let’s add some custom functionality to it. The AsyncHttpTransport implements a send method, which is responsible for sending logs to a remote host. Initially, it uses the requests library for that. In our case, we have the Vonage SDK, which makes our lives a lot easier and removes HTTP protocol boredom.
Ok, enough talking. Let’s start coding with the Vonage SDK by declaring a new send method:
class VonageHttpTransport(AsyncHttpTransport):

    def send(self, events: dict, **kwargs) -> None:
        batches = self._HttpTransport__batches(events)

        sms_logs = ', '.join([
            f"{log['level']['name']}: {log['message']}"
            for batch in batches
            for log in batch
        ])

        sms_message = f'[Python Logger {self.logger_name}] {sms_logs}'

        sms_client = Sms(
            key=self.vonage_api_key,
            secret=self.vonage_api_secret,
        )

        response = sms_client.send_message({
            'from': f'Python Logger {self.logger_name}',
            'to': self.alert_phone_number,
            'text': sms_message,
        })

        if not response['messages'][0]['status'] == 0:
            raise ConnectionError(response["messages"][0].get("error-text"))
The send method takes an events argument; a list that is converted in a batch of logs using the HttpTransport.__batches method. Batches are then processed to extract basic data points into a log string.
Each log string contains only the log level name (e.g. “Warning” or “Error) and a log message. SMS stands for Short Message Service, so we want to keep our alert message short. Our primary goal is to alert, not support, the full debugging through SMS. Minimal information is sent to provide context and help the developer start the debugging process.
The logs are then concatenated using the string.join method and prefixed with the logger name for providing information regarding the application context (this should be helpful in case multiple projects are using this alerting tool).
Lastly, we instantiate a vonage.Sms client from the Vonage SDK and use it to send the SMS message to our phone. The response status is checked and, if not “OK”, we raise a ConnectionError. This error raised makes sure the log alerting mechanism is retried later and will not disrupt our main Python application, since the VonageHttpTransport class will be running in a background thread.
Notice that we are using some class attributes in the new send method: logger_name, vonage_api_key, vonage_api_secret, alert_phone_number. Let’s override the __init__ method to make sure those are properly set on class instantiation:
class VonageHttpTransport(AsyncHttpTransport):

    def __init__(
        self,
        logger_name: str,
        vonage_api_key: str,
        vonage_api_secret: str,
        alert_phone_number: str,
        *args,
        **kwargs,
    ) -> None:
        self.logger_name = logger_name
        self.vonage_api_key = vonage_api_key
        self.vonage_api_secret = vonage_api_secret
        self.alert_phone_number = alert_phone_number
        super().__init__(*args, **kwargs)
Our new HTTP Transport class is now ready. But before we move into some real logging action, we first need to create the logic that will instantiate an actual Logger object using the new VonageHttpTransport class.
The VonageHttpTransport class looks good, but it can’t go to battle on its own. We aren’t actually capable of using it to log anything in our applications, so let’s move one step further and make it combat-ready.
The missing piece in our puzzle is an actual HTTP Handler class. This should be an http_logging.AsyncHttpHandler, but, surely, instantiated with the custom VonageHttpTransport.
Let’s create a getLogger function inside logging_vonage.py, to mimic the Python’s native logging.getLogger behavior:
def getLogger(name: str) -> logging.Logger:
    pass
As the native Python’s getLogger function, ours takes a name string as an argument and returns an instance of the logging.Logger class. Next, we will build the functionality for this function step by step.
We start by instantiating an HttpHost. This isn’t really needed by the VonageHttpTransport, since we’re delegating HTTP requests to the Vonage SDK, but is a required part of the http-logging library API signature:
def getLogger(name: str) -> logging.Logger:
    host = HttpHost(name='vonage.com')
Next we need a SupportClass holding our HTTP Transport object:
support_class = SupportClass(
        http_host=host,
        _transport=VonageHttpTransport(
            http_host=host,
            logger_name=name,
            vonage_api_key=os.environ.get('VONAGE_API_KEY'),
            vonage_api_secret=os.environ.get('VONAGE_API_SECRET'),
            alert_phone_number=os.environ.get('ALERT_PHONE_NUMBER'),
        ),
)This SupportClass object is then used to instantiate our AsyncHttpHandler:
vonage_handler = AsyncHttpHandler(
        http_host=host,
        support_class=support_class,
)Finally, we instantiate a logging.Logger object, add the vonage_handler as its handler and return it:
logger = logging.getLogger(name)
    logger.addHandler(vonage_handler)

return loggerIn the end, our getLogger function should look like the following:
def getLogger(name: str) -> logging.Logger:
    host = HttpHost(name='vonage.com')

    support_class = SupportClass(
        http_host=host,
        _transport=VonageHttpTransport(
            http_host=host,
            logger_name=name,
            vonage_api_key=os.environ.get('VONAGE_API_KEY'),
            vonage_api_secret=os.environ.get('VONAGE_API_SECRET'),
            alert_phone_number=os.environ.get('ALERT_PHONE_NUMBER'),
        ),
    )

    vonage_handler = AsyncHttpHandler(
        http_host=host,
        support_class=support_class,
    )

    logger = logging.getLogger(name)
    logger.addHandler(vonage_handler)

    return logger
Notice that the API key and secret and phone number are being retrieved from the environment variables we set at the beginning of this tutorial. This provides flexibility in case we want to use this code in multiple projects, and also avoids hardcoding API secrets, which usually is not a good idea. ;)
The Python’s logging machinery is very powerful, and the logging.Logger object is flexible enough to extend it with multiple handlers.
As explained above, the VonageHttpTransport class will send minimal information about logs due to the inherent text length limitations of the SMS system. Nonetheless, in the event of an error that requires further debugging, we certainly will want to grab the entire stack trace, information about which line of code failed, exact timestamps, etc.
We can meet that detailed log demand by using the Logger.addHandler and adding one or more additional handlers to the Vonage Logger object.
For example, to send logs not only to our phone but also to the console, we may use the logging.StreamHandler, like demonstrated below:
import logging
import logging_vonage

logger = logging_vonage.getLogger('')
logger.addHandler(logging.StreamHandler())Anything logged with the above logger object will be printed to the console and sent to our phone through the Vonage SMS API.
A logging.FileHandler may be used to store logs in the local filesystem if that makes sense in an implementation. You could also use the same http_logging.AsyncHttpHandler again, but in this case, sending logs to a different backend host apart from the Vonage API. Testing With a Sample Application All right, time to see some real-world action with bells and whistles. Kidding, we’re just about to make our phones beep with the Vonage SMS API. :D
Create a new file in the project directory called sample_app:
Open it and add the following content:
import logging
import logging_vonage


logger = logging_vonage.getLogger('sampleapp')

logger.addHandler(logging.StreamHandler())

logger.debug('Debugging...')
logger.warning('You\'ve been warned!')
logger.error('This is a test error')

try:
    1/0
except ArithmeticError as exc:
logger.exception(exc)Notice we’re instantiating a logger object from the logging_vonage module we built earlier. The logging.StreamHandler() is also being used so that full traces are logged to our console, not only sent to our phone.
In the console, run this script with:
The following output should be printed to the console:
You've been warned!
This is a test error
division by zero
Traceback (most recent call last):
  File "/home/vonage-alerts/sample_app.py", line 14
    1/0
ZeroDivisionError: division by zeroHopefully, if you have everything set up correctly (a Vonage account and API key/secret), you should receive an SMS message shortly with the following text:
[Python Logger sampleapp] WARNING: You've been warned!, ERROR: This is a test error, ERROR: division by zero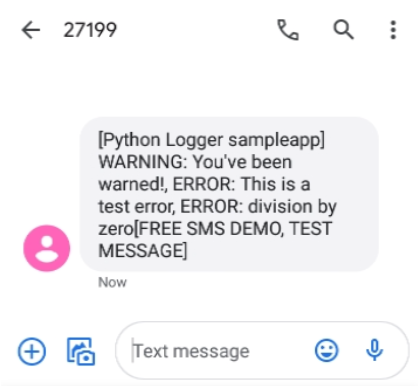
Notice that the debug message 'Debugging...' was not printed to the console nor concatenated into the SMS message. That is because the default log level in the Python logging library is WARNING. The DEBUG level is considered lower than WARNING and, thus, discarded.
If you want the DEBUG message to be captured, set the level accordingly as shown below:
Run the sample_app.py script again and you should see the debug message printed to the console and also concatenated into the SMS message.
Observe that, despite our logger reliance on a custom Handler (http_logging.AsyncHttpHandler) and a custom Transport (logging_vonage.VonageHttpTransport) class, it behaves just like any other Python Logger object. This makes it fully compatible as a drop-in replacement for any Python project you currently have, in case you’d like to integrate the SMS-alerting mechanism we’ve just developed throughout your stack and in any future project.
There it goes! We now have a simple and non-intrusive Python alerting tool to keep on top of what is going on with the applications we have deployed. It extends the basic Python logging native features to use the same API we’re used to, and runs anywhere our Python apps are executed. Financially, it has no fixed costs and is relatively cheap to maintain (SMS message fees only).
The http-logging library keeps a local cache of logs, so in case the Vonage API or the cell phone carrier experience any downtime or network instability, our logger can retry sending the SMS alerts some time later.