Share:
)
Kitt is a Technical Solutions Engineer for Vonage. He enjoys developing NodeJS integrations into various Cloud Platform Services. In his spare time, he enjoys riding his UTV through the Organ Mountains and Kayaking through out the USA.
Build Real-Time AI Voice Agents with Pipecat, AgentCore, and Vonage
Time to read: 11 minutes
Developers can now deploy AI agents directly into live phone calls. Instead of static IVR menus or scripted bots, you can build AI agents that listen, respond naturally, and take real-world actions—all over a standard Vonage phone call.
In this tutorial, you'll deploy an AI agent for voice calls using the Vonage Audio Serializer for Pipecat and AWS Nova Sonic.
By the end of this tutorial, you'll have:
A working AI voice agent that answers real phone calls using your Vonage number
A Pipecat pipeline powered by Amazon Nova Sonic for real-time speech-to-speech conversation
An AI Agent Runtime deployed and running inside AWS Bedrock AgentCore
A fully containerized app with your Vonage server acting as the authenticated bridge between Vonage Voice calls and your AgentCore-hosted agent
Skip ahead and find the working code for this sample on GitHub.
This tutorial uses the Vonage Audio Serializer for Pipecat, the Pipecat plugin (VonageFrameSerializer) that connects to the Vonage Voice WebSocket and converts PCM audio frames between Vonage's WebSocket format and Pipecat's internal pipeline format. It is designed for audio-only AI use cases across both the Vonage Voice API and the Video API (no video processing required).
This path connects Vonage Voice and Video sessions to Pipecat pipelines over WebSocket. If you need full video frame processing or video avatars, see the Vonage Video Transport for Pipecat instead.
This is Part 2 of a two-part series on building AI voice agents with Vonage and Pipecat:
Part 1 covers the Vonage Video Transport for Pipecat, the WebRTC path for AI agents that join Vonage Video sessions.
Part 2 (this post) covers the Vonage Audio Serializer for Pipecat, the WebSocket path for voice and telephony use cases.
Part 1: Video Session | Part 2: Voice Call (this post) | |
Vonage Product | Vonage Video Transport for Pipecat | Vonage Audio Serializer for Pipecat |
Protocol | WebRTC | WebSocket (PCM) |
Use Case | AI agent joins a video session | AI agent answers a phone call |
Transport Class |
|
|
Status | GA | GA |
Before you begin, make sure you have the following:
An AWS account with Amazon Bedrock access and Nova Sonic (amazon.nova-2-sonic-v1:0) enabled in us-east-1
Python 3.12 or later — the aws_sdk_bedrock_runtime package (required for Nova Sonic) is only distributed for Python 3.12+
Docker Desktop — the app runs in Docker for an isolated, reproducible runtime
ngrok with a reserved domain for a stable Vonage webhook URL
AWS CLI configured (aws configure --profile vonage-dev)
bedrock-agentcore-starter-toolkit CLI (pip install bedrock-agentcore-starter-toolkit) for runtime deployment
A Vonage API account with Voice API enabled and a phone number linked to a Voice application
Layer | What it does | Why it matters |
Vonage Voice API (Call Control) | Handles incoming calls via a Call Control Object (NCCO), returns the WebSocket URI to Vonage | Standard telephony entry point, no SIP or media gateway needed |
Vonage Voice API (Audio WebSocket) | Streams PCM audio from the live call to your server over WebSocket | Raw 16kHz PCM audio delivered directly to your server in real time |
Connects to the Vonage Audio WebSocket and converts Vonage PCM frames to/from Pipecat's internal format | Bridges phone call audio ( via WebSocket PCM) into a Pipecat pipeline | |
Speech-to-speech (S2S) AI — voice in, voice out | Improves latency over the traditional STT → LLM → TTS chained approach by processing audio end-to-end in a single model | |
Runs Nova Sonic model inference | The model layer - Bedrock answers | |
Production runtime for deploying and scaling your agent — adds tool use, RAG, and external API access on top of Nova Sonic's model inference | AgentCore runs your deployable agent logic. Built on the same underlying framework as Bedrock Agents, but with full developer control. Without AgentCore: a smart assistant limited to model intelligence. With AgentCore: an agent that can query your knowledge base, call an external API, look up a CRM record–all over a live phone call |
Note: AgentCore is the underlying framework on which Bedrock Agents is itself built. Using AgentCore directly gives you full developer control over agent logic, frameworks, and models, without the higher-level abstractions of Bedrock Agents.
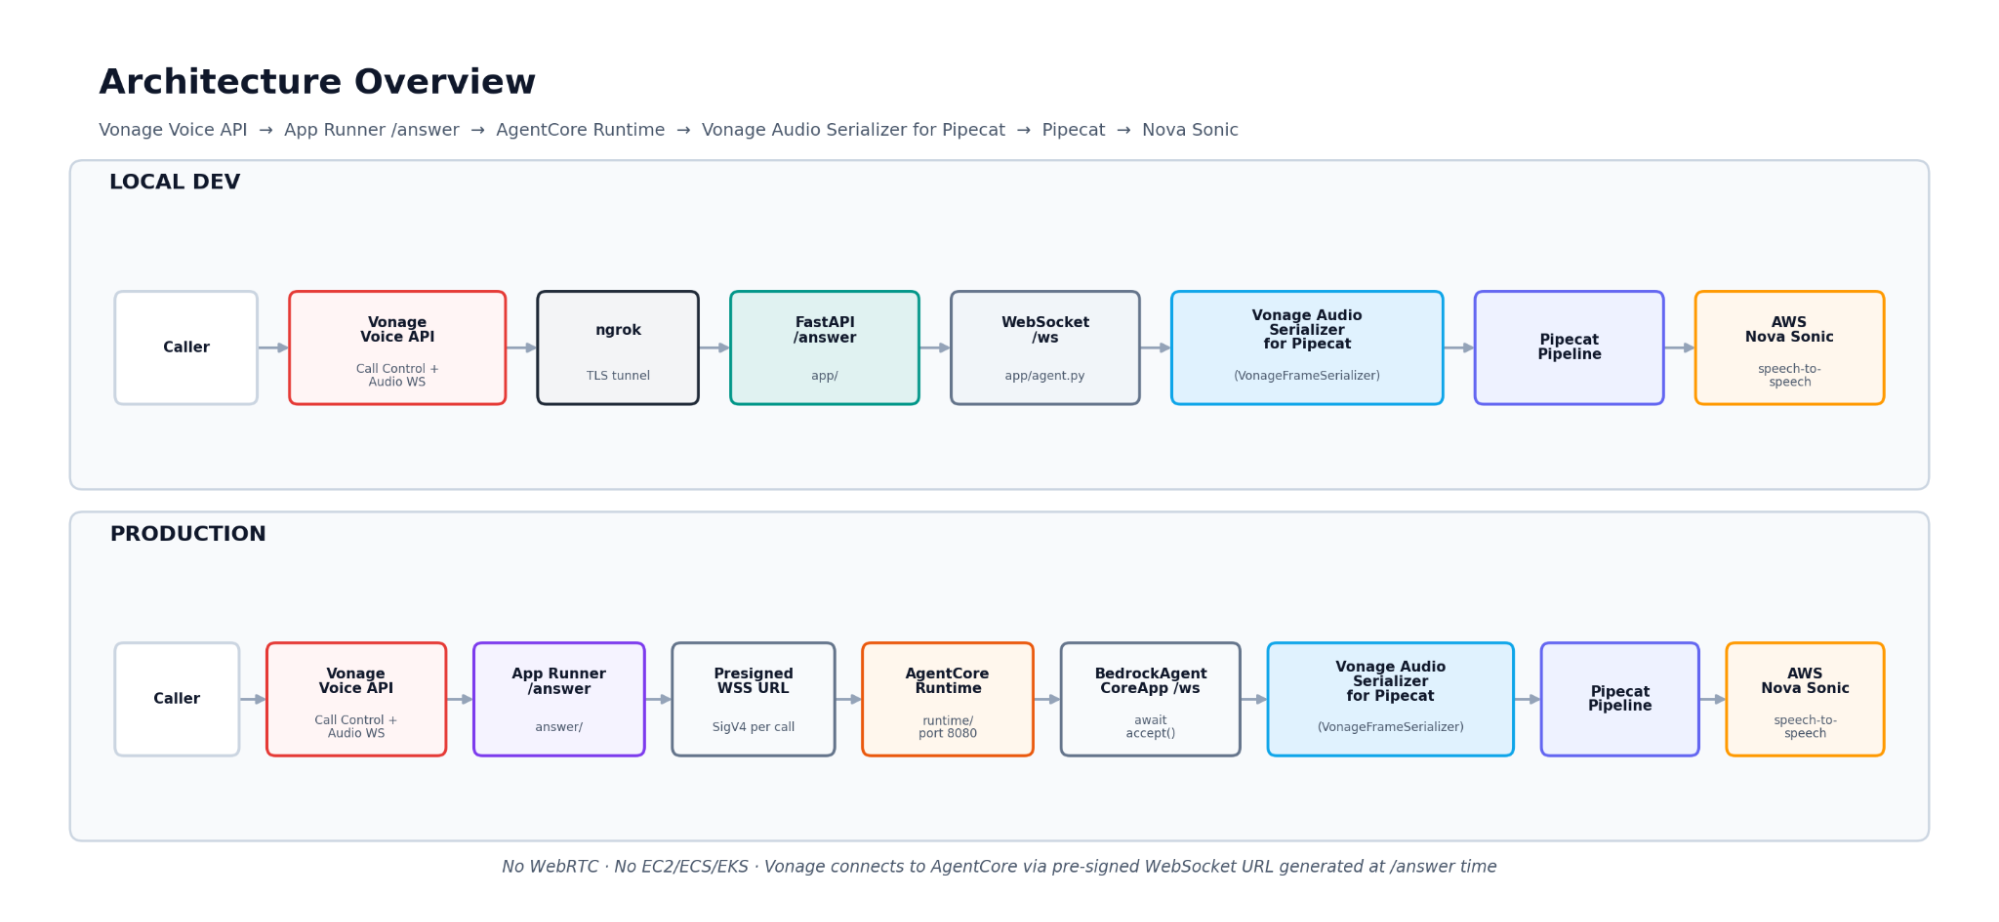 Vonage Voice API -> App Runner /answer -> AgentCore Runtime -> Vonage Audio Serializer for Pipecat -> Pipecat Pipeline -> AWS Nova Sonic
Vonage Voice Call
  ↓ GET /answer
ngrok → FastAPI /answer (app/main.py, port 8000)
  ↓ returns NCCO with wss://your-reserved-domain.ngrok.app/ws
Vonage connects to FastAPI /ws
  ↓
VonageFrameSerializer + FastAPIWebsocketTransport
  ↓
Pipecat Pipeline → Amazon Nova Sonic
Vonage Voice Call
  ↓ GET /answer
App Runner (answer/server.py — public HTTPS endpoint)
  ↓ AgentCoreRuntimeClient.generate_presigned_url()
  ↓ returns NCCO with wss://bedrock-agentcore.us-east-1.amazonaws.com/runtimes/{arn}/ws
Vonage connects directly to AgentCore Runtime /ws
  ↓
AgentCore Runtime (runtime/agent.py, port 8080)
  ↓ BedrockAgentCoreApp @app.websocket /ws
  ↓ await websocket.accept()
VonageFrameSerializer + FastAPIWebsocketTransport
  ↓
Pipecat Pipeline → Amazon Nova Sonic
git clone https://github.com/Vonage-Community/vonage-pipecat-serializer-voice-aws-agentcore.git
cd vonage-pipecat-serializer-voice-aws-agentcoreThe repository has two deployment targets:
├── app/                        ← Local dev: full FastAPI app (port 8000)
├── runtime/                    ← Production: AgentCore Runtime container (port 8080)
└── answer/                     ← Production: App Runner /answer handler
Always use IAM roles or temporary credentials in production. Never hardcode AWS secrets in your code or commit them to version control.
To get started, duplicate the provided .env.example file as .env:
cp .env.example .envOpen the .env file and fill in your credentials:
# Vonage Voice API
VONAGE_APPLICATION_ID=your-vonage-application-id
VONAGE_PRIVATE_KEY=private.key
VONAGE_NUMBER=+14155551234
VONAGE_CALL_ID=your-vonage-call-id          # local/tests only

# AWS
AWS_PROFILE=vonage-dev
AWS_REGION=us-east-1
BEDROCK_MODEL_ID=amazon.nova-2-sonic-v1:0
BEDROCK_CONNECT_TIMEOUT_SECONDS=10
BEDROCK_READ_TIMEOUT_SECONDS=60
BEDROCK_MAX_ATTEMPTS=4
BEDROCK_VALIDATE_MODEL_ID=true

# AgentCore
AGENTCORE_AGENT_ARN=arn:aws:bedrock-agentcore:us-east-1:123456789012:runtime/your-runtime-id   # local bootstrap (optional)
AGENTCORE_RUNTIME_ARN=arn:aws:bedrock-agentcore:us-east-1:123456789012:runtime/your-runtime-id  # production /answer webhook

# Nova Sonic session guard
NOVA_SESSION_WARN_SECONDS=410
NOVA_SESSION_LIMIT_SECONDS=470
NOVA_SESSION_STOP_ON_LIMIT=false

# Agent behavior (local dev via .env; production via runtime/agent.py defaults)
BEDROCK_SYSTEM_INSTRUCTION=You are a helpful voice assistant. Respond warmly and briefly.
BEDROCK_INITIAL_USER_MESSAGE=Hello! How can I help you today?
AGENTCORE_BOOTSTRAP_PROMPT=Provide one short greeting plus one helpful follow-up question for a live voice assistant session.

# App
PORT=8000Configure your AWS profile:
aws configure --profile vonage-dev
export AWS_PROFILE=vonage-dev
aws sts get-caller-identity --profile vonage-devNote: The production app webhook flow does not require VONAGE_CALL_ID at runtime. Vonage calls /answer, receives the NCCO, then connects media to /ws automatically.
app/agent.py (local dev) and runtime/agent.py (production) implement the voice pipeline—one instance per inbound Vonage WebSocket connection. The Vonage Audio Serializer for Pipecat handles all PCM audio frame conversion between Vonage's WebSocket format and Pipecat's internal pipeline format.
from pipecat.audio.vad.silero import SileroVADAnalyzer
from pipecat.pipeline.pipeline import Pipeline
from pipecat.pipeline.runner import PipelineRunner
from pipecat.pipeline.task import PipelineParams, PipelineTask
from pipecat.serializers.vonage import VonageFrameSerializer
from pipecat.services.aws.nova_sonic.llm import AWSNovaSonicLLMService, Params
from pipecat.transports.websocket.fastapi import (
    FastAPIWebsocketParams,
    FastAPIWebsocketTransport,
)

# Vonage telephony-grade audio framing: 640 bytes = 20ms @ 16kHz PCM16 mono
# 16kHz is the standard sample rate used in this tutorial. The Vonage Voice WebSocket
# also supports 8kHz and up to 24kHz, but 16kHz is the recommended default for Nova Sonic.

serializer = VonageFrameSerializer(
    params=VonageFrameSerializer.InputParams(
        vonage_sample_rate=16000,
    )
)

transport = FastAPIWebsocketTransport(
    websocket=websocket,
    params=FastAPIWebsocketParams(
        audio_in_enabled=True,
        audio_out_enabled=True,
        add_wav_header=False,
        fixed_audio_packet_size=640,  # 20ms PCM frame at 16kHz
        serializer=serializer,
        vad_analyzer=SileroVADAnalyzer(),
    ),
)

# AWS Nova Sonic — speech-to-speech AI
nova_sonic = AWSNovaSonicLLMService(
    access_key_id=frozen_credentials.access_key,
    secret_access_key=frozen_credentials.secret_key,
    session_token=frozen_credentials.token,
    region=aws_region,
    model=bedrock_model_id,
    params=Params(
        input_sample_rate=16000,
        input_channel_count=1,
        output_sample_rate=16000,
        output_channel_count=1,
    ),
    system_instruction=system_instruction,
)

# 3-stage speech-to-speech pipeline
pipeline = Pipeline([
    transport.input(),   # Audio in from Vonage phone call
    nova_sonic,          # Speech-to-speech AI processing
    transport.output(),  # Audio out back to caller
])Note that 16kHz is the standard sample rate used in this tutorial. The Vonage Voice WebSocket also supports 8kHz and up to 24kHz, but 16kHz is the recommended default for Nova Sonic.
AgentCore is AWS Bedrock's managed runtime for deploying and scaling AI agents in production, without having to manage servers or container infrastructure yourself. It is generally available (GA).
In this project, AgentCore is the runtime host—the entire Pipecat agent runs inside AgentCore Runtime.
Short version: Bedrock answers. AgentCore runs your agent.
Service | Role |
Amazon Bedrock (Nova Sonic) | Runs model inference for live speech-to-speech conversation |
Amazon Bedrock AgentCore | Production runtime that hosts your deployable agent — handles infrastructure, scaling, and WebSocket routing |
When a Vonage call comes in, App Runner handles the /answer webhook, generates a fresh pre-signed AgentCore WebSocket URL, and returns it in the NCCO. Vonage connects directly to AgentCore Runtime using that URL. AgentCore routes the connection to your agent's /ws handler, where VonageFrameSerializer and the Pipecat pipeline take over.
The runtime/agent.py file is your production agent—it runs inside AgentCore, not as a caller of it.
app/agent.py (local dev)
|
| |
|---|---|---|
App wrapper |
|
|
Port | 8000 | 8080 (AgentCore requirement) |
| Present in | Removed; App Runner handles it |
AWS credentials |
| IMDS automatic, no static keys |
AgentCore bootstrap | Optional local call | Removed; agent IS in AgentCore |
# runtime/agent.py — runs inside AgentCore Runtime
from bedrock_agentcore.runtime import BedrockAgentCoreApp
from starlette.websockets import WebSocket

app = BedrockAgentCoreApp()

@app.websocket
async def ws_handler(websocket: WebSocket, context) -> None:
    await websocket.accept()  # mandatory — BedrockAgentCoreApp does not auto-accept
    # VonageFrameSerializer + FastAPIWebsocketTransport + Nova Sonic pipeline run here
await websocket.accept()must be called explicitly.BedrockAgentCoreAppdoes not auto-accept WebSocket connections. Omitting it causes AgentCore to close the connection with error 1008 "write buffer limit exceeded".
You can customize the greeting and persona in runtime/agent.py by editing the BEDROCK_SYSTEM_INSTRUCTION and BEDROCK_INITIAL_USER_MESSAGE defaults. Queue LLMRunFrame() on connect to prevent Nova Sonic 532 timeout.
pip install bedrock-agentcore-starter-toolkit

cd runtime/

agentcore configure \
  -e agent.py \
  -r us-east-1 \
  -n your_agent_name \
  --non-interactive \
  --deployment-type direct_code_deploy \
  --runtime PYTHON_3_12 \
  -rf requirements.txt

AWS_PROFILE=vonage-dev agentcore deploy -a your_agent_name
# → Copy Runtime ARN from output — you'll need it for App Runner configuration

AWS_PROFILE=vonage-dev agentcore deploy -a your_agent_name --auto-update-on-conflict # redeploy after changesYour agent is now running in AgentCore. Vonage connects directly to AgentCore's /ws endpoint via the pre-signed URL; no EC2, ECS, or EKS needed.
/answer Handler
App Runner handles the Vonage Answer URL webhook. The App Runner is a small docker container that is pushed to the AWS Elastic Container Registry and deployed using the AWS apprunner command. It generates a fresh pre-signed AgentCore WebSocket URL for each call and returns it in the NCCO:
# answer/answer.py
from bedrock_agentcore.runtime import AgentCoreRuntimeClient
import uuid

client = AgentCoreRuntimeClient(region="us-east-1")

def get_presigned_url(runtime_arn: str) -> str:
    return client.generate_presigned_url(
        runtime_arn,
        session_id=str(uuid.uuid4()),  # unique session per call
)Do NOT use raw boto3
generate_presigned_url('invoke_agent_runtime', ...). That produces an HTTPS POST URL which returns HTTP 405 for WebSocket upgrade. UseAgentCoreRuntimeClientfrombedrock_agentcore.runtime.
# Build and push to ECR
docker build --platform linux/amd64 -t vonage-agentcore-answer ./answer
docker push {account}.dkr.ecr.us-east-1.amazonaws.com/vonage-agentcore-answer:latest

# App Runner environment variables:
# AGENTCORE_RUNTIME_ARN = <runtime-arn-from-agentcore-deploy>
# VONAGE_NUMBER = <your-vonage-number>
# AWS_DEFAULT_REGION = us-east-1Set your Vonage Voice application's Answer URL to your App Runner endpoint:
https://{service-id}.us-east-1.awsapprunner.com/answerWhere does {service-id} come from? AWS auto-generates this unique ID when you create the App Runner service. You can find your full service URL in the App Runner console or by running:
aws apprunner describe-service \ --service-arn <your-service-arn> \ --query 'Service.ServiceUrl'The URL is also returned in the output of aws apprunner create-service when you first deploy.
See the root README.md for complete App Runner deployment steps (Docker → ECR → aws apprunner create-service).
Call your Vonage number. When Vonage sends a GET /answer request, App Runner generates a fresh pre-signed AgentCore WebSocket URL and returns it in the NCCO:
[
  {
    "action": "connect",
    "from": "VONAGE_NUMBER",
    "endpoint": [
      {
        "type": "websocket",
        "uri": "wss://bedrock-agentcore.us-east-1.amazonaws.com/runtimes/{arn}/ws?X-Amz-Algorithm=...",
        "content-type": "audio/l16;rate=16000"
      }
    ]
  }
]
App Runner generates a fresh SigV4 pre-signed URL at answer time, and Vonage connects immediately using that URL. The pre-signed URL expires after 300 seconds, but the WebSocket connection persists for the full duration of the call once established. App Runner handles the AWS authentication; Vonage just uses the URL.
For local development, the NCCO points to your local server via ngrok instead:
[
  {
    "action": "connect",
    "from": "VONAGE_NUMBER",
    "endpoint": [
      {
        "type": "websocket",
        "uri": "wss://your-reserved-domain.ngrok.app/ws",
        "content-type": "audio/l16;rate=16000"
      }
    ]
  }
]
Caller dials your Vonage number
Vonage sends
GET /answerto App RunnerApp Runner calls
AgentCoreRuntimeClient.generate_presigned_url(), generates fresh pre-signed AgentCore WSS URLApp Runner returns NCCO with a pre-signed URL
Vonage connects directly to AgentCore Runtime
/wsusing a pre-signed URLruntime/agent.pycallsawait websocket.accept(),VonageFrameSerializerinitializesPipecat pipeline starts, Nova Sonic processes speech-to-speech in real time
Audio response streams back to the caller
For local development, expose your server with ngrok:
ngrok http --domain=your-reserved-domain.ngrok.app 8000Set your Vonage Answer URL to https://your-reserved-domain.ngrok.app/answer in the Vonage Dashboard.
For production, set your Vonage Answer URL to your App Runner domain (see this page for setting the Voice Application Answer URL in the Vonage Dashboard):
https://{service-id}.us-east-1.awsapprunner.com/answerTo hang up programmatically (local dev):
curl -X POST http://localhost:8000/hangup
This app uses two managed AWS services for production; no EC2, ECS, EKS, ALB, or nginx required.
Vonage Voice Call
  ↓ GET /answer
App Runner (answer/ — public HTTPS endpoint, auto-generated URL)
  ↓ AgentCoreRuntimeClient.generate_presigned_url()
  ↓ returns NCCO with pre-signed AgentCore WSS URL
Vonage connects directly to AgentCore Runtime /ws
  ↓
AgentCore Runtime (runtime/ — port 8080)
  ↓ VonageFrameSerializer + Pipecat Pipeline
  ↓
Nova Sonic (speech-to-speech)
Local Dev | Production | |
|
| App Runner ( |
Agent host | Your local Docker container | AgentCore Runtime ( |
WebSocket URI in NCCO |
| Pre-signed AgentCore WSS URL |
AWS credentials |
| IAM Role attached to App Runner instance |
Infrastructure to manage | None | None; both are fully managed |
What never changes: VonageFrameSerializer, the Pipecat pipeline, and Nova Sonic, which are identical in both environments.
cd runtime/
agentcore configure -e agent.py -r us-east-1 -n your_agent_name \
  --non-interactive --deployment-type direct_code_deploy --runtime PYTHON_3_12 -rf requirements.txt
AWS_PROFILE=vonage-dev agentcore deploy -a your_agent_name
# → Copy Runtime ARN from output
TMPDIR=$(mktemp -d)
ECR="{account}.dkr.ecr.us-east-1.amazonaws.com/vonage-agentcore-answer"

docker build --platform linux/amd64 -t vonage-agentcore-answer ./answer
docker tag vonage-agentcore-answer:latest $ECR:latest

ECR_PASS=$(aws ecr get-login-password --region us-east-1)
echo "$ECR_PASS" | DOCKER_CONFIG="$TMPDIR" docker login \
  --username AWS --password-stdin {account}.dkr.ecr.us-east-1.amazonaws.com
DOCKER_CONFIG="$TMPDIR" docker push $ECR:latestCreate App Runner service on first deploy: see README.md for full aws apprunner create-service JSON. Redeploy after answer/ changes:
aws apprunner start-deployment \
  --service-arn "arn:aws:apprunner:us-east-1:{account-id}:service/vonage-agentcore-answer/{service-id}" \
  --region us-east-1
aws apprunner update-service --service-arn <arn> \
  --source-configuration '{
    "ImageRepository": {
      "ImageConfiguration": {
        "RuntimeEnvironmentVariables": {
          "AGENTCORE_RUNTIME_ARN": "<runtime-arn-from-step-1>",
          "VONAGE_NUMBER": "<your-vonage-number>",
          "AWS_DEFAULT_REGION": "us-east-1"
        }
      }
    }
  }'
In the Vonage Dashboard, update your Voice application's Answer URL to your App Runner endpoint:
https://{your-app-runner-url}.us-east-1.awsapprunner.com/answerVerify it returns a valid NCCO:
curl "https://{service-id}.{region}.awsapprunner.com/answer"
Role | Principal | Permissions |
Instance role |
|
|
ECR access role |
|
|
The AWS reference implementation for this pattern can use a Lambda Function URL for the /answer handler. If your AWS account permits lambda:InvokeFunctionUrl, Lambda is a simpler alternative—the pre-signed URL generation logic is identical. App Runner is used here because it works across all AWS account configurations, including those with org-level SCPs that restrict Lambda public invocations.
Total AWS resources: 1 AgentCore Runtime + 1 App Runner service + 1 ECR repository.
Runtime: use Python 3.12 for AgentCore Runtime; Nova Sonic silently fails on 3.11
WebSocket:
await websocket.accept()as first line inruntime/agent.py @app.websockethandlerInitial greeting: set
BEDROCK_INITIAL_USER_MESSAGEto prevent Nova Sonic 532 timeoutPresigned URL: use
AgentCoreRuntimeClient.generate_presigned_url(), not raw boto3invoke_agent_runtimepresignIAM: use IAM roles, never static AWS keys in production
Secrets: store
VONAGE_NUMBERandAGENTCORE_RUNTIME_ARNin App Runner environment variablesVonage Answer URL: must point to App Runner
/answerbefore go-liveVerify:
curlthe/answerendpoint and confirm NCCO containswss://bedrock-agentcore...URI before testing a real callSession behavior: tune
NOVA_SESSION_WARN_SECONDSandNOVA_SESSION_LIMIT_SECONDSfor long-lived calls
You have deployed a real-time AI agent for voice calls using the Vonage Audio Serializer for Pipecat and AWS Nova Sonic, running entirely within AWS Bedrock AgentCore Runtime with a public App Runner webhook endpoint.
Together with Part 1 (Vonage Video Transport for Pipecat), you now have two complementary paths for deploying AI agents on Vonage.
Have a question or want to share what you're building?
Subscribe to the Developer Newsletter
Follow us on X (formerly Twitter) for updates
Prefer video? Watch tutorials on our YouTube channel
Connect with us on the Vonage Developer page on LinkedIn
Help us improve our developer experience by filling out our Voice of the Developer Feedback
Stay connected and keep up with the latest developer news, tips, and events.