
Share:
Kitt is a Technical Solutions Engineer for Vonage. He enjoys developing NodeJS integrations into various Cloud Platform Services. In his spare time, he enjoys riding his UTV through the Organ Mountains and Kayaking through out the USA.
AI Video Agents With Vonage, Pipecat and AgentCore
Developers can now add conversational AI participants directly into live video sessions. Instead of passive video calls, you can build AI agents that listen, respond, and interact naturally during live conversations.
In this tutorial, you'll deploy an AI agent for video sessions using the Vonage Video Transport for Pipecat and AWS Nova Sonic. The repository supports two paths: local development using Docker for fast iteration, and production deployment with the agent running fully inside AWS Bedrock AgentCore Runtime. This tutorial walks through both — start locally to validate your pipeline, then deploy to production with agentcore deploy and AWS App Runner.
The Vonage Video Transport for Pipecat enables you to build AI-powered applications that seamlessly participate in Vonage Video API sessions. This transport allows you to receive audio and video from session participants and send processed audio and video back to the session in real-time.
Pipecat is an open-source framework for building voice and multimodal conversational AI applications. The Vonage Video Connector transport bridges Pipecat's media processing pipeline with Vonage Video API sessions, enabling a wide range of use cases. AWS Nova Sonic is optimized for low-latency conversational voice interactions, making it well-suited for live video sessions. AWS Bedrock AgentCore Runtime is a secure, serverless infrastructure designed to deploy and scale low-latency, real-time voice and AI agents at scale without the complexity of managing underlying servers.
You'll use:
Vonage Video Connector WebRTC transport for Pipecat for AI pipeline orchestration
AWS Nova Sonic for voice AI
AWS Bedrock AgentCore lets developers deploy and scale AI agents.
Skip ahead and find the working code for this sample on GitHub.
By the end of this tutorial, you'll have:
An AI agent deployed inside AWS Bedrock AgentCore Runtime — a fully managed serverless container that runs your Pipecat pipeline
A public App Runner endpoint that handles the agent trigger webhook and passes the session context to AgentCore
Real-time spoken AI responses using AWS Nova Sonic (speech-to-speech, no STT/TTS chain)
A production architecture that requires no EC2, no ECS, no ALB — just agentcore deploy and an App Runner service
A validated test path using Vonage Playground before integrating the Vonage Video React Reference App
Before you begin, make sure you have the following:
A Vonage API account with Video API enabled
An AWS account with Amazon Bedrock access to Nova Sonic (
amazon.nova-2-sonic-v1:0)Python 3.13 required by vonage-video-connector>=1.0.0
uv package manager (
brew install uvon macOS)Docker Desktop - required because the Vonage Video Connector SDK currently runs on Linux only
ngrok for local development
AWS CLI configured (
aws configure --profile profile-name)
This project uses two complementary AWS services:
Service | Role |
|---|---|
Amazon Bedrock (Nova Sonic) | Runs model inference for live speech-to-speech conversation |
Amazon Bedrock AgentCore | Managed runtime that hosts deployable agent logic — invoked at session start to prime the agent with context, persona, or tool access |
How they work together in this repository:
Bedrock + Agent Core (final product) - together for a production-ready agent with management tools
Bedrock alone - a lighter option for quick experiments and simple conversational agents
Extended - add real-world capabilities such as RAG, API calls, and CRM lookups alongside low-latency voice
Short version: Bedrock answers; AgentCore runs deployable agent app logic.
The integration follows a WebRTC-based flow: the AI agent joins the Vonage Video session as a participant using the Vonage Video Connector SDK. Pipecat then orchestrates the AI pipeline, routing audio through AWS Nova Sonic for speech-to-speech processing. If configured, AgentCore primes the agent at session start with custom context or tool access.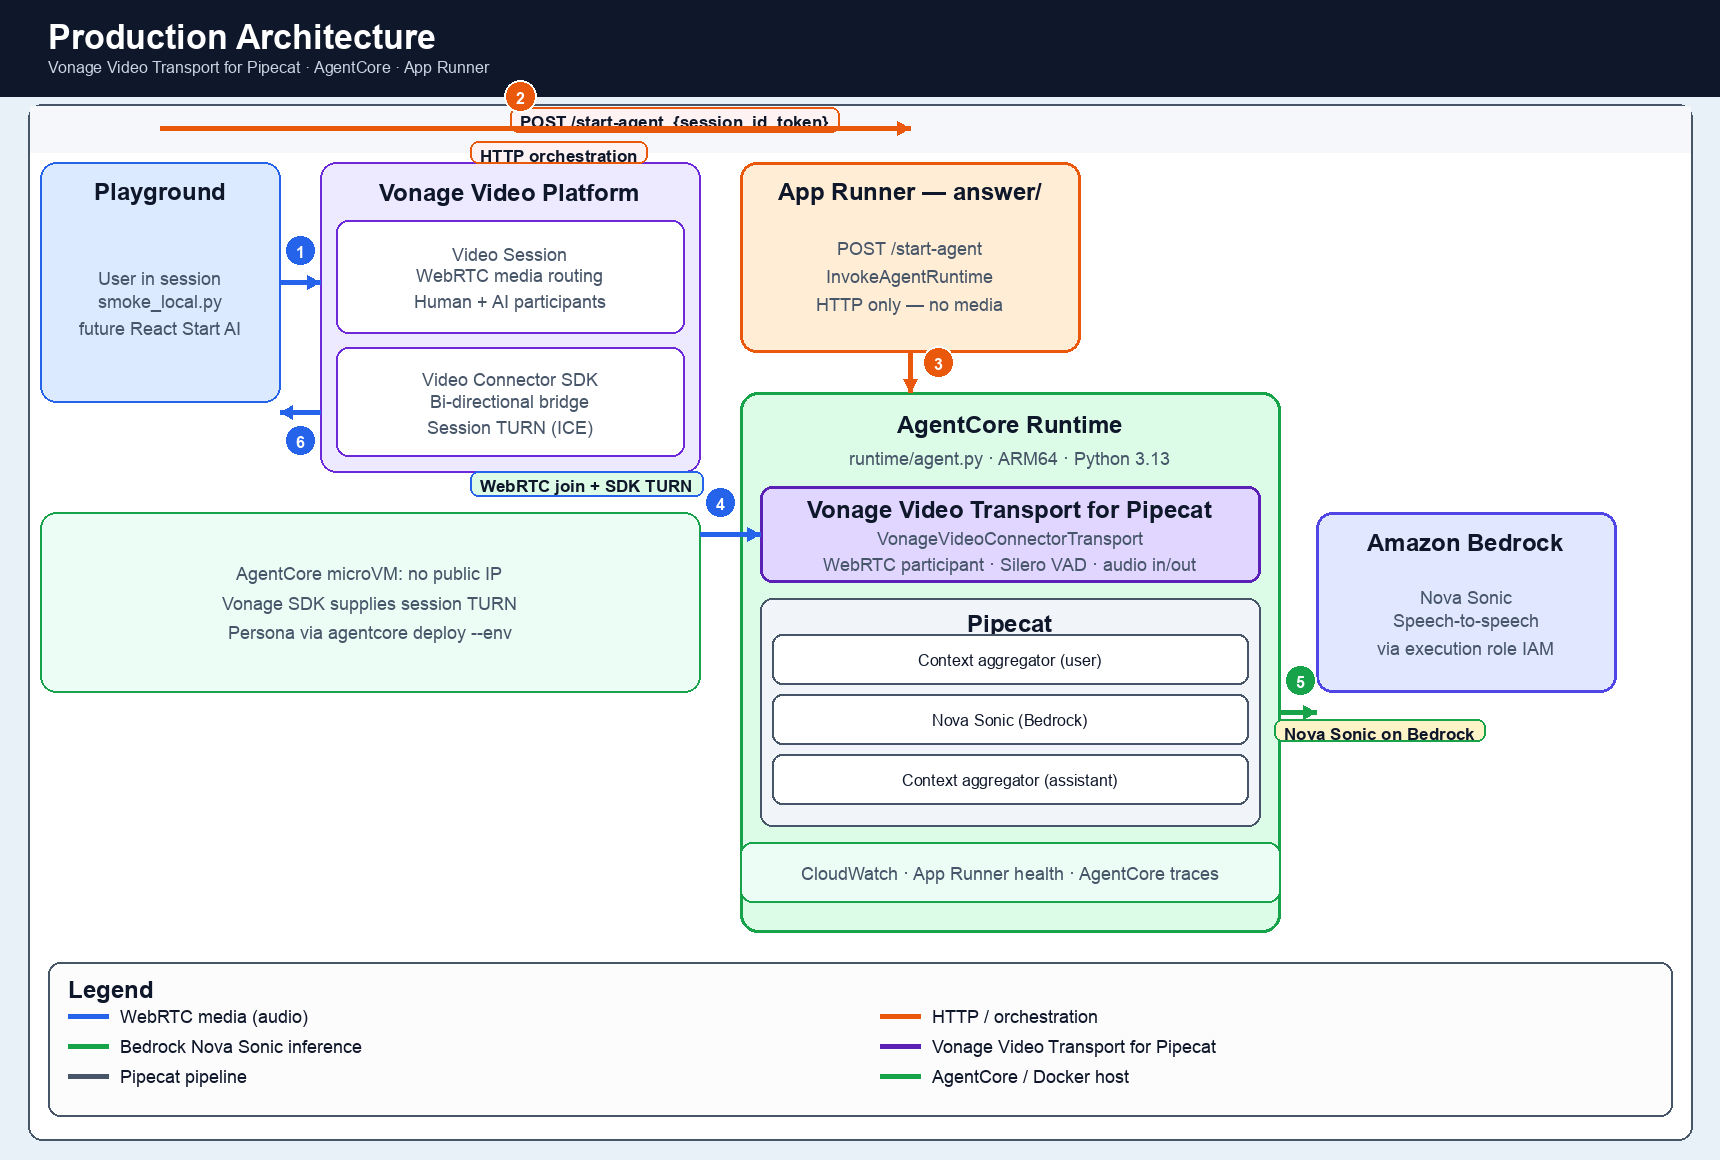 Architecture overview: Vonage Video session → Pipecat pipeline → AWS Nova Sonic → AgentCore.
Browser (Vonage Playground) connects to WebRTC Vonage Video Session.
POST /join {vonage_session_id, vonage_token}is sent to FastAPI (app/main.py, port 8000).FastAPI initiates
VonageVideoConnectorTransport(WebRTC), joining the session as a native participant.The Pipecat Pipeline processes the media.
AWS Nova Sonic handles AI processing.
Audio streams back to the Video session participants.
Browser (Vonage Video React Reference App) sends
POST /answer {vonage_session_id, vonage_token}.App Runner (
answer/server.py— public HTTPS endpoint) invokesAgentCoreRuntimeClient.generate_presigned_url().This passes
vonage_session_id+vonage_tokento AgentCore invoke context.AgentCore Runtime (
runtime/agent.py, port 8080, ARM64, Python 3.13) initializes theBedrockAgentCoreApp.@app.websocket /wsawaitswebsocket.accept().VonageVideoConnectorTransportjoins the Vonage Video session as a native participant.The Pipecat Pipeline routes audio to AWS Nova Sonic.
Audio streams back to the Video session participants.
Component | Role | What it does in app |
|---|---|---|
Browser session management and media routing | Manages the multi-participant video session and handles media routing between participants. | |
Server-side WebRTC session participant | Allows the AI agent to join the session as a native WebRTC participant, sending and receiving audio like a human participant. | |
Real-time media and model orchestration | Orchestrates the flow of audio between the Video session and AWS Nova Sonic. | |
Low-latency speech-to-speech intelligence | Listens to participant audio and generates spoken AI responses in real-time. | |
Managed runtime for deployable agent logic | An optional managed layer used at session start to prime the agent with context, persona, or tool access instructions. |
Before setting up your environment, you need a Vonage Video application and a session ID.
Log into the Vonage Dashboard
Go to Applications → Create a new application
Enable Video capability
Click Generate public and private key — this downloads
private.keySave the application — copy the Application ID
In the Vonage Dashboard, go to Video → Tools → Playground
Select your application
Click Create Session — copy the Session ID
Use routed media mode when using the Video Connector. Use a publisher token role for the AI session participant.
You now have:
VONAGE_APPLICATION_ID— your Vonage application IDVONAGE_SESSION_ID— your Vonage video session IDprivate.key— downloaded to your machine
git clone https://github.com/Vonage-Community/vonage-pipecat-aws-agentcore.git
cd vonage-pipecat-aws-agentcoreThe repository layout:
vonage-pipecat-aws-agentcore/
├── app/                  # LOCAL DEV — FastAPI app (main.py, agent.py), port 8000
├── runtime/              # PRODUCTION — BedrockAgentCoreApp (agent.py), agentcore deploy, Python 3.13 ARM64
├── answer/               # PRODUCTION — /answer handler (App Runner)
├── tests/                # C1–C6 validation stages
├── docker-compose.yml
├── .env.example
└── README.md
Always use IAM roles or temporary credentials in production. Never hardcode AWS secrets in your code or commit them to version control.
cp .env.example .envOpen .env and fill in your credentials:
# Vonage Video API
VONAGE_APPLICATION_ID=your-vonage-application-id
VONAGE_PRIVATE_KEY=private.key
VONAGE_SESSION_ID=your-vonage-session-id

# AWS
AWS_PROFILE=your-aws-profile
AWS_DEFAULT_REGION=us-east-1
BEDROCK_MODEL_ID=amazon.nova-2-sonic-v1:0The full
.env.examplein the repo contains additional configuration for timeouts, session limits, and production settings. The three variables above are all you need to run the local demo.
aws configure --profile vonage-dev
export AWS_PROFILE=vonage-dev
aws sts get-caller-identity --profile vonage-dev
To create a Vonage Video session, log into the Vonage Dashboard, navigate to Video → Tools → Playground, and create a routed session. Copy the session ID into your .env file.
Use routed media mode when using the Video Connector. Use a publisher token role for the AI session participant.
The Vonage Video Connector SDK requires Linux. On macOS or Windows, Docker handles this automatically.
Start the full application from the repo root:
docker compose --profile app up --build
Verify it is running:
curl http://localhost:8000/
# {"status": "ok"}

curl http://localhost:8000/status
# {"running": true, "connected": false, "last_error": null}The app auto-joins VONAGE_SESSION_ID on startup. Open Vonage Playground, join the same session, and speak. The agent responds with live spoken replies using AWS Nova Sonic.
Session management:
# Force the agent to leave the session
curl -X POST http://localhost:8000/leave

# Rejoin with a new or existing session
curl -X POST http://localhost:8000/join \
  -H "Content-Type: application/json" \
-d '{"session_id": "your-session-id"}'AWS Nova Sonic has an ~8-minute connection window per session. The app emits a
session_renewal_recommendedevent before the limit is reached. Use/leavethen/jointo refresh the session without restarting the container.
Once the agent is working locally, proceed to Steps 5–7 to deploy to production.
The core of the application is the VonagePipecatAgent class in agent.py. The Vonage Video Connector Pipecat Integration acts as the transport layer, receiving audio frames from the Video session and sending AI responses back.
from pipecat.transports.vonage.video_connector import (
    VonageVideoConnectorTransport,
    VonageVideoConnectorTransportParams,
)
from pipecat.services.aws.nova_sonic.llm import AWSNovaSonicLLMService, Params
from pipecat.processors.aggregators.llm_response_universal import LLMContextAggregatorPair

# Vonage Video Connector transport — joins session as WebRTC participant
transport = VonageVideoConnectorTransport(
    application_id=application_id,
    session_id=session_id,
    token=token,
    params=VonageVideoConnectorTransportParams(
        audio_in_enabled=True,
        audio_out_enabled=True,
        video_in_enabled=False,
        video_out_enabled=False,
        publisher_name="Vonage AI Assistant",
        audio_in_sample_rate=16000,
        audio_in_channels=1,
        # Nova Sonic returns 24kHz audio — output sample rate must match
        audio_out_sample_rate=24000,
        audio_out_channels=1,
        vad_analyzer=SileroVADAnalyzer(),
        audio_in_auto_subscribe=True,
        video_in_auto_subscribe=False,
    ),
)

# AWS Nova Sonic — speech-to-speech AI
nova_sonic = AWSNovaSonicLLMService(
    access_key_id=frozen_credentials.access_key,
    secret_access_key=frozen_credentials.secret_key,
    session_token=frozen_credentials.token,
    region=aws_region,
    model=bedrock_model_id,
    params=Params(
        input_sample_rate=16000,
        input_channel_count=1,
        # Must match audio_out_sample_rate above
        output_sample_rate=24000,
        output_channel_count=1,
    ),
    system_instruction="You are a helpful voice assistant for a Vonage video session. Keep responses brief and conversational.",
)

# LLMContextAggregatorPair maintains conversational memory across user and assistant turns
context_aggregator = LLMContextAggregatorPair(context)

# 5-stage pipeline with context aggregators for conversation memory
pipeline = Pipeline([
    transport.input(),              # Audio in from Vonage Video session
    context_aggregator.user(),      # Accumulate user speech turns
    nova_sonic,                     # Speech-to-speech AI processing
    context_aggregator.assistant(), # Accumulate assistant responses
    transport.output(),             # Audio out back to Vonage Video session
])
AgentCore is AWS Bedrock's managed runtime for deploying and scaling AI agents in production without having to manage servers or container infrastructure yourself. It is Generally Available (GA).
In this project, AgentCore is the runtime host, and so the entire Pipecat agent runs inside AgentCore Runtime. The agent joins the Vonage Video session as a native WebRTC participant from inside AgentCore.
When a user triggers the agent, App Runner generates a fresh pre-signed AgentCore WebSocket URL and passes vonage_session_id and vonage_token to AgentCore via the invoke context. AgentCore routes the connection to your agent's /ws handler, where VonageVideoConnectorTransport joins the Video session as a native WebRTC participant.
# runtime/agent.py — runs inside AgentCore Runtime
from bedrock_agentcore.runtime import BedrockAgentCoreApp
from pipecat.transports.vonage.video_connector import (
    VonageVideoConnectorTransport,
    VonageVideoConnectorTransportParams,
)
from pipecat.audio.vad.silero import SileroVADAnalyzer

app = BedrockAgentCoreApp()

@app.websocket("/ws")
async def ws_handler(websocket: WebSocket, context: dict) -> None:
    await websocket.accept()  # mandatory — BedrockAgentCoreApp does not auto-accept

    # Session context from AgentCore invoke payload — dynamic per call
    session_id = context.get("vonage_session_id")
    token = context.get("vonage_token")

    transport = VonageVideoConnectorTransport(
        application_id=application_id,
        session_id=session_id,
        token=token,
        params=VonageVideoConnectorTransportParams(
            audio_in_enabled=True,
            audio_out_enabled=True,
            video_in_enabled=False,
            video_out_enabled=False,
            vad_analyzer=SileroVADAnalyzer(),
            audio_in_auto_subscribe=True,
        ),
    )
await websocket.accept()must be called explicitly.BedrockAgentCoreAppdoes not automatically accept WebSocket connections; omitting it causes AgentCore to close the connection with error 1008: "write buffer limit exceeded".
Deploy your agent to AgentCore:
cd runtime/

agentcore configure \
  -e agent.py \
  -r us-east-1 \
  -n your_agent_name \
  --non-interactive \
  --deployment-type direct_code_deploy \
  --runtime PYTHON_3_13 \
  -rf requirements.txt

AWS_PROFILE=vonage-dev agentcore deploy -a your_agent_name
# → Copy Runtime ARN from output — you'll need it for Step 6This app requires Python 3.13 .
vonage-video-connector>=1.0.0requires>=3.13,<3.14. Use--runtime PYTHON_3_13inagentcore configure.
Your agent is now running in AgentCore. Vonage connects directly to AgentCore's built-in /ws endpoint—no EC2, ECS, or EKS needed.
/answer Handler
App Runner handles the agent trigger webhook. It generates a fresh pre-signed AgentCore WebSocket URL for each session and passes the session context to AgentCore:
# answer/answer.py
from bedrock_agentcore.runtime import AgentCoreRuntimeClient

client = AgentCoreRuntimeClient(region=region)

presigned_url = client.generate_presigned_url(
    runtime_arn,
    session_id=session_id
)
# Returns presigned_url in JSON response
# vonage_session_id and vonage_token passed to AgentCore invoke contextBuild and push to ECR:
TMPDIR=$(mktemp -d)
ECR="{account}.dkr.ecr.us-east-1.amazonaws.com/vonage-agentcore-video-answer"

docker build --platform linux/amd64 -t vonage-agentcore-video-answer ./answer
docker tag vonage-agentcore-video-answer:latest $ECR:latest

ECR_PASS=$(aws ecr get-login-password --region us-east-1)
echo "$ECR_PASS" | DOCKER_CONFIG="$TMPDIR" docker login \
  --username AWS --password-stdin {account}.dkr.ecr.us-east-1.amazonaws.com
DOCKER_CONFIG="$TMPDIR" docker push $ECR:latestCreate the App Runner service:
See README.md for the full aws apprunner create-service command.
Update App Runner environment variables:
aws apprunner update-service --service-arn <arn> \
  --source-configuration '{
    "ImageRepository": {
      "ImageConfiguration": {
        "RuntimeEnvironmentVariables": {
          "AGENTCORE_RUNTIME_ARN": "<runtime-arn-from-step-5>",
          "VONAGE_APPLICATION_ID": "<your-vonage-application-id>",
          "AWS_DEFAULT_REGION": "us-east-1"
        }
      }
    }
}'App Runner IAM setup:
Role | Principal | Permissions |
|---|---|---|
Instance role | tasks.apprunner.amazonaws.com | AmazonBedrockFullAccess + BedrockAgentCoreFullAccess |
ECR access role | build.apprunner.amazonaws.com | AWSAppRunnerServicePolicyForECRAccess |
Your App Runner endpoint is now live:
https://{service-id}.us-east-1.awsapprunner.com/answer
With your agent running in AgentCore and App Runner deployed, validate the full production stack using Vonage Playground—no custom client app needed.
Log into your Vonage Dashboard → Video → Tools → Playground. Create a routed session and copy the session ID.
In Vonage Playground, generate a publisher token for the agent session.
curl -X POST https://{service-id}.us-east-1.awsapprunner.com/answer \
  -H "Content-Type: application/json" \
  -d '{
    "vonage_session_id": "<your-session-id>",
    "vonage_token": "<publisher-token>"
  }'
# Expected response:
# {"status": "started", "vonage_session_id": "..."}
Go to Vonage Playground
Enter your API Key and Session ID
Generate a subscriber token for yourself
Click Connect—you are now in the same session as the agent
Speak—the agent responds in real time via Nova Sonic
You should now see the agent appear as a second participant in the session. When you speak, Nova Sonic processes your audio, and the agent responds. The agent's audio streams back to all participants in the session.
Tail the logs while testing:
AWS_PROFILE=vonage-dev aws logs tail \
/aws/bedrock-agentcore/runtimes/{runtime-id}-DEFAULT \
  --log-stream-name-prefix "$(date +%Y/%m/%d)/[runtime-logs]" \
  --follow \
  --region us-east-1
Runtime: Use Python 3.13 for AgentCore Runtime — vonage-video-connector requires >=3.13,<3.14
ARM64: Build AgentCore container with --platform linux/arm64
WebSocket: await websocket.accept() as first line in runtime/agent.py @app.websocket handler
Session context: Pass vonage_session_id and vonage_token dynamically via AgentCore invoke context — never static env vars
IAM: Use IAM roles — never static AWS keys in production
TURN: VonageVideoConnectorTransport handles TURN natively — no external TURN server needed
Validate first: Test with Vonage Playground before integrating the React Reference App
Secrets: Store VONAGE_APPLICATION_ID and AGENTCORE_RUNTIME_ARN in App Runner environment variables
Session behavior: Tune NOVA_SESSION_WARN_SECONDS and NOVA_SESSION_LIMIT_SECONDS for long-lived video sessions
Verify: curl the /answer endpoint and confirm the response before testing a real session
You have deployed a real-time AI video agent using the Vonage Video Transport for Pipecat and AWS Nova Sonic, running fully inside AWS Bedrock AgentCore Runtime with a public App Runner webhook endpoint.
The Vonage Video Transport for Pipecat (VonageVideoConnectorTransport) joins the Vonage Video session as a native WebRTC participant. Nova Sonic handles speech-to-speech processing in real time. AgentCore provides a managed runtime for deploying and scaling without the need for managing EC2, ECS, or EKS infrastructure.
In Part 2, we'll switch from video to telephony using the Vonage Audio Serializer for Pipecat and the Vonage Voice API, a WebSocket-based path for AI agents that answer live phone calls–also deployed fully inside AgentCore Runtime.
Have a question or want to share what you're building?
Subscribe to the Developer Newsletter
Follow us on X (formerly Twitter) for updates
Watch tutorials on our YouTube channel
Connect with us on the Vonage Developer page on LinkedIn
Stay connected and keep up with the latest developer news, tips, and events.