Share:
)
Liz Acosta is a Developer Advocate at Vonage. While her career path from film student to marketer to engineer to Developer Advocate might seem unconventional, it’s pretty typical for Developer Relations! Liz loves pizza, plants, pugs, and Python.
Build a Python Video Conferencing Web App With Flask and Vonage
Time to read: 12 minutes
In this tutorial, you’ll build a working browser-based video conferencing app using Flask and the Vonage Video API.
After the global pandemic in 2020 reshaped how we interact, video conferencing quickly became one of the primary ways people communicate worldwide. Whether meeting coworkers in another country or catching up with friends in another city, browser-based video conferencing is now part of everyday life.
As the technology has matured, user expectations have grown. What was once complex is now streamlined and sophisticated, and modern video conferencing solutions are expected to deliver high-quality, reliable, real-time experiences.
In this tutorial, you’ll learn how to build a minimal video conferencing app using Python, JavaScript, and the Vonage Video API. This hands-on guide walks through creating a simple WebRTC video app and introduces the core concepts behind Python video conferencing.
Before we jump into building the app, we’ll cover some of the terms and technologies used in the sample app. If you’re already familiar with these concepts, you can skip ahead to the tutorial on building a video conferencing web app with Vonage and Python, or you can clone the sample app from GitHub and follow the README to get it up and running quickly.
In order to complete this tutorial, we will rely on technical concepts and tools outside of Vonage that may be helpful in other areas of software development.
For this tutorial, we'll create a web application using Flask, a lightweight yet powerful web framework for Python. As a framework, it enables developers to quickly spin up a software application using web technologies to run in a web browser. We've chosen it for this tutorial because of its ease of use and minimalist approach. Unlike other Python web development frameworks, it gives us just the essentials we need to create a simple video conferencing solution.
In this tutorial, we will create a web application and run it locally on your machine. Because it runs locally, it isn’t accessible from the public internet, and if your web app cannot be accessed, then you cannot add participants to your video conference. That’s where tunneling comes in. Tunneling exposes local servers to the public internet through temporary or static public URLs. ngrok is a software platform that provides this service.
Users expect high-quality video calls to just work without interruptions. But behind the scenes, delivering that kind of experience isn’t that simple.
Real-time video is inherently unpredictable. Participants join from different devices, on different networks, and in different parts of the world. On top of that, conditions can change mid-call: a mobile device might switch from Wi-Fi to cellular, a corporate firewall could block certain UDP paths, or a low-end laptop might struggle under CPU load.
The Vonage Video API platform makes it possible to embed real-time, high-quality interactive video, messaging, screen-sharing, and more into web and mobile apps. In order to achieve this, the Video API uses WebRTC for audio-video communications. When it comes to working with the Video API, these are the key terms and concepts to understand:
Session: A session is a logical group of connections and streams. Connections within the same session can exchange messages. Think of a session as the “virtual room” where participants can interact with each other.
Connection: An endpoint that participates in a session and is capable of sending and receiving messages. A connection is either connected and can receive messages, or it’s disconnected and cannot receive messages.
Stream: A media stream flows between two connections. This refers to the actual bytes containing media that are being exchanged. Media can consist of audio only, or audio and video. You can also create screenshare and custom streams.
Token: The Video API platform uses tokens for authorization so you don’t have to worry about creating users on the platform. In this tutorial, we use tokens to create video session participants on the fly.
Publisher: This refers to the client publishing a media stream.
Subscriber: This refers to the clients receiving media streams.
Signaling: This refers to sending text and data between clients connected to a session as messages. These messages allow developers to build basic text chat, send instructions from one client to another, and create other valuable experiences.
For a deeper dive into these key terms and concepts, check out the Video API glossary or refer to the Video API documentation or check out the video below.
Now that you understand the core concepts, let’s apply them by building a working video conferencing app.
In this tutorial, we focus on the basic building blocks of a video conferencing app, including creating a video session, adding connections, and using signaling for real-time chat. We are going to use Python and Flask for the backend and JavaScript to create and coordinate the video session.
In order to complete this tutorial, you will need the following:
Python 3.8+
A friend to participate in a video conference with you
Before we begin building, let’s get everything in order.
You now need to create a Video API application. In this particular context, an application is a container for the configuration and security information you need for the Video API. When creating your application, toggle the option for Video in the Capabilities section.
To create an application, go to the Create an Application page on the Vonage Dashboard, and define a Name for your Application.
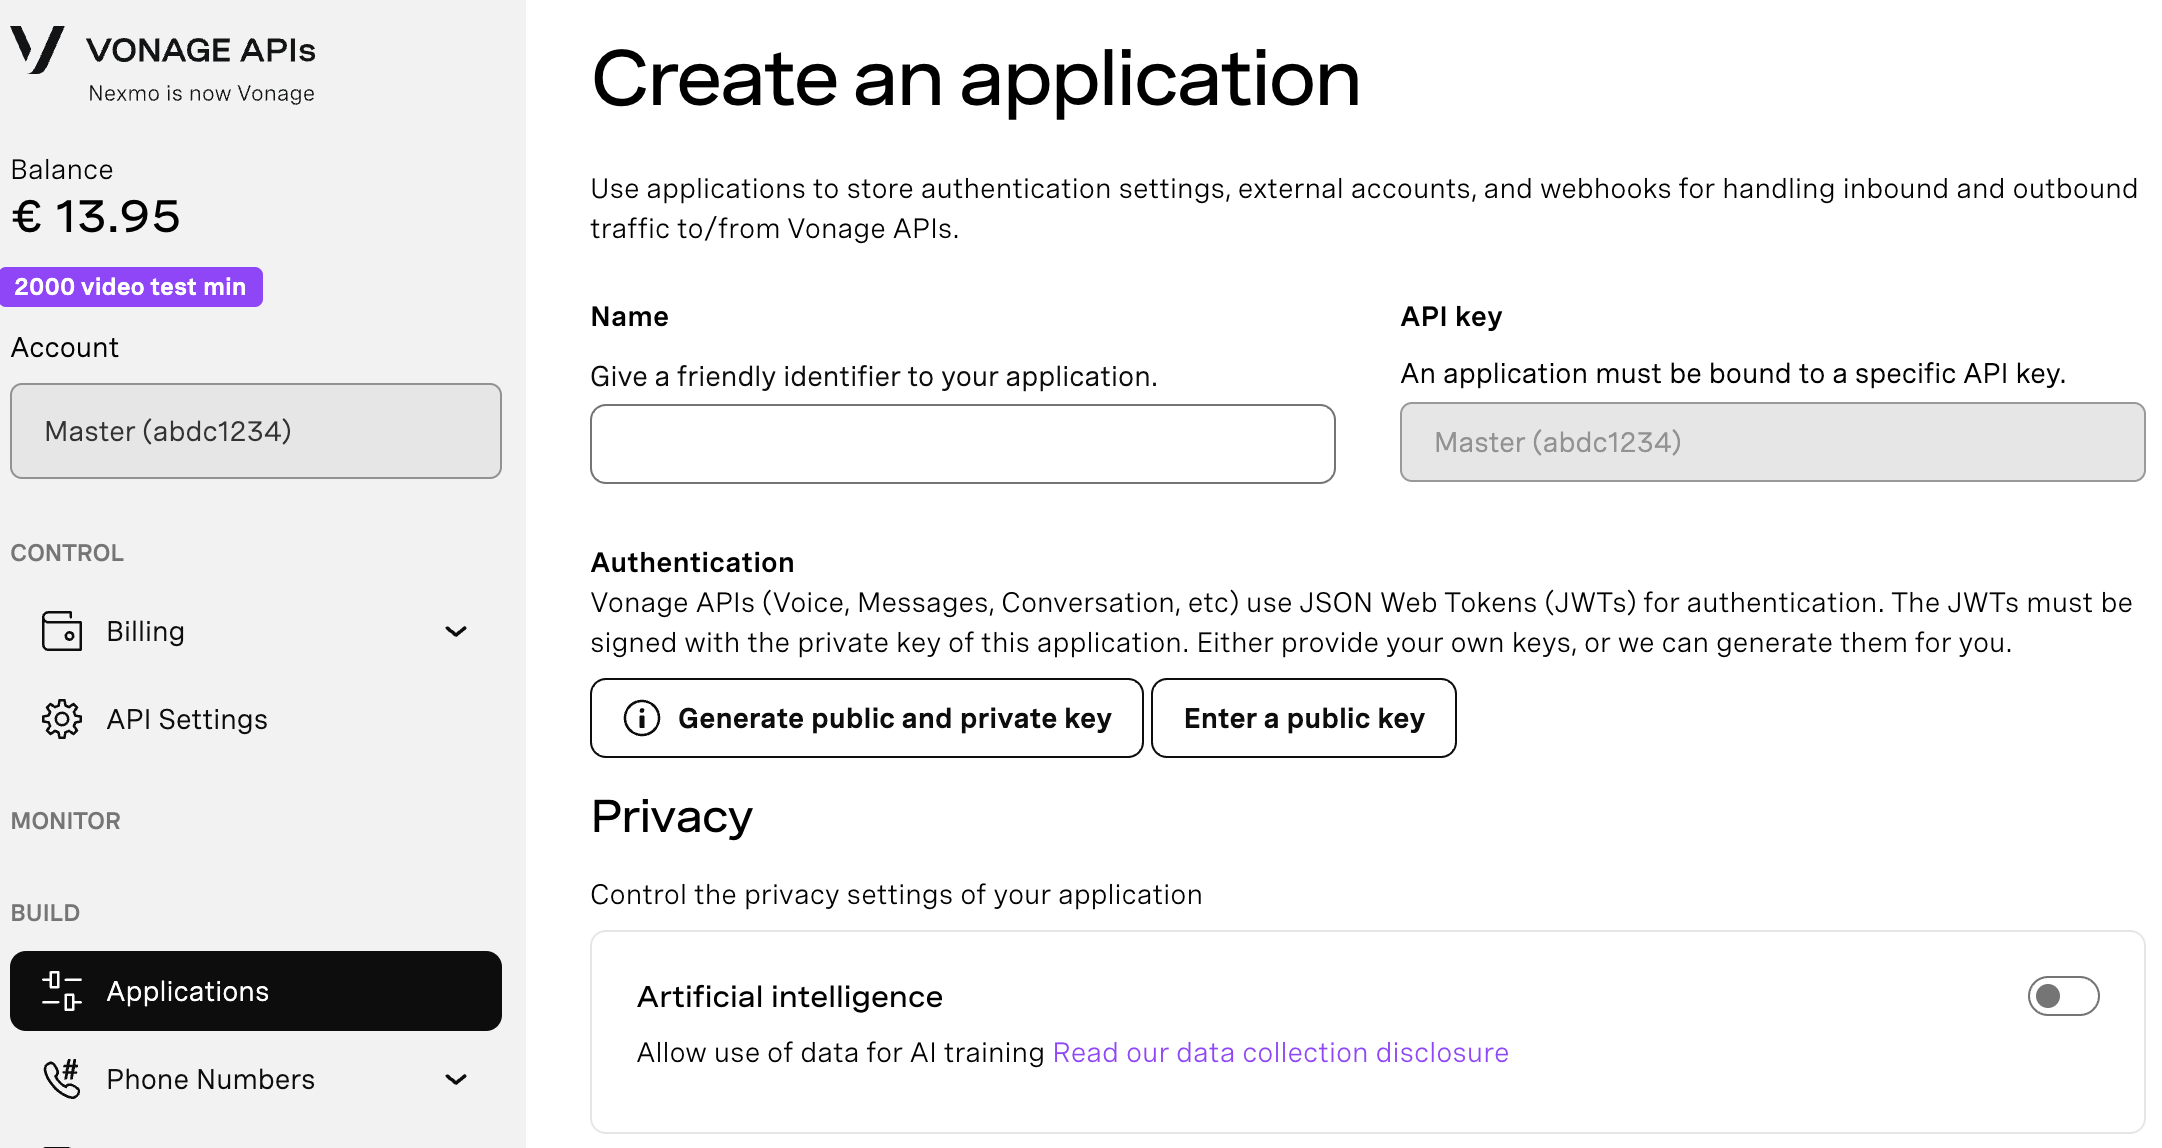
If you intend to use an API that uses Webhooks, you will need a private key. Click “Generate public and private key”, your download should start automatically. Store it securely; this key cannot be re-downloaded if lost. It will follow the naming convention private_<your app id>.key. This key can now be used to authenticate API calls. Note: Your key will not work until your application is saved.
Choose the capabilities you need (e.g., Voice, Messages, RTC, etc.) and provide the required webhooks (e.g., event URLs, answer URLs, or inbound message URLs). These will be described in the tutorial.
To save and deploy, click "Generate new application" to finalize the setup. Your application is now ready to use with Vonage APIs.
The Video API must be able to access your webhook so that it can make requests to it. So the endpoint URL must be exposed to the public internet. This is what ngrok is for.
In a separate terminal window, run:
ngrok http 5000This command will generate the public URLs your local server will tunnel to on port 5000. Take note of the public URL – it should look something like this:
Forwarding https://0a6ec0a950eb.ngrok-free.app -> http://localhost:5000 Please note that unless you are using one of ngrok’s paid plans, the generated public URLs are not persistent. In other words, every time you run the ngrok command, the resulting URLs will change. To prevent this, leave ngrok running for the duration of this tutorial.
Now that you’ve got everything set up, it’s time to start building.
Here is an overview of the steps we will be taking to complete this tutorial:
1. Create and activate a Python virtual environment
2. Install dependencies
3. Establish a Vonage client and define the routes for our web app in the backend
4. Create a session, add connections to it, and define how to handle chat signals in the frontend
5. Run the code and try it out
The code for this tutorial can be found on GitHub in the Vonage Community along with a README to get it up and running.
Create a project directory and change directories into it:
mkdir sample-video-conference && cd sample-video-conference
Python virtual environments allow you to install packages in a location isolated from the rest of your system. This helps prevent system-wide clutter and conflicts with different Python versions and packages. Learn more about virtual environments in this blog post.
In your project directory, run the following commands to create a virtual environment and activate it:
virtualenv venv && source venv/bin/activate
In order to install the dependencies we need for this tutorial, run the following:
pip install Flask python-dotenv vonage
Environment variables (often called "env vars") are variables you store outside your program that can affect how it runs. For example, you can set environment variables that contain the key and secret for an API. Your program might then use those variables when it connects to the API. Learn more about environment variables in
In order to instantiate a Vonage client, you will need the ID of the Vonage application you created and your Vonage private key.
You can find the application ID in the developer dashboard in the settings for the Video application you created for this tutorial.
This is also where you generate and download your private key. In the developer dashboard Applications menu, click on the application you created for this tutorial and then click Edit. Once the edit window opens, click on the button that says, “Generate public and private key.” This will trigger the download of your private key as a file with the extension .key. Once the file has downloaded, move it to the root of your project directory.
Keep this file private and do not share it anywhere it could be compromised. If you plan on pushing this code somewhere public, make sure to add your private key file to your .gitignore file.
In the root directory, create a file called .env and add the following variables:
VONAGE_APPLICATION_ID=your-application-id
VONAGE_PRIVATE_KEY_PATH=path-to-your-private-key-file
The backend of this application is responsible for instantiating a Vonage client, defining the web app routes, initiating a video session, and generating tokens for video conference participants.
Create a file called appy.py and add the code from GitHub.
While you wouldn’t want to deploy this code to production, it enables a quick hands-on experience of the Video API in action. The way it does that is by spinning up a minimal web app with two routes:
The
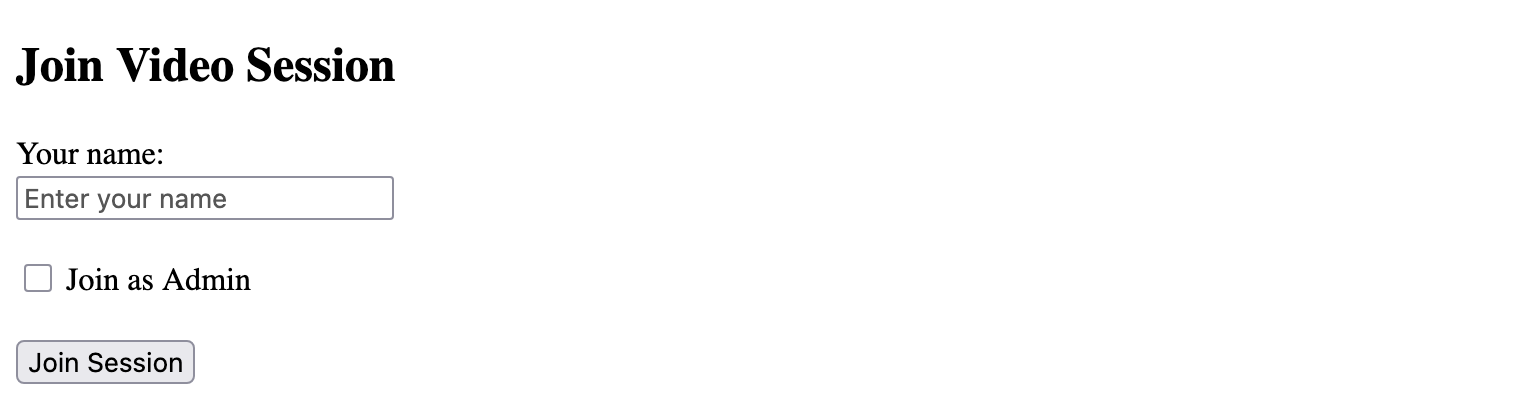
/route directs you to a webpage inviting you to join a video session. In order to publish a video stream, you need to select the “Join as Admin” option; to subscribe to the stream, leave this option unchecked.After clicking the “Join Session” button, the
/api/generate-sessionroute generates a token for each participant, and based on whether the participant is anadminor not, either publishes or subscribes to a stream.
The following code is where the video session is initiated using the Vonage client:
session_options = SessionOptions(media_mode=MediaMode.ROUTED)
video_session = vonage_client.video.create_session(options=session_options)
session_id = video_session.session_idEach session is identified with a specific ID. This ID is used to create connections and streams between participants. Sessions have different options available, and for this particular session, we are using the routed media mode. For this particular session, we are using the routed media mode, which is better for more participants and also enables archiving. To learn more about sessions and session options, refer to the documentation.
This code is where the token is created for each participant:
token_options = TokenOptions(session_id=session_id)
token = vonage_client.video.generate_client_token(token_options).decode("utf-8")In order to authenticate a user connecting to a session, the code must pass a token along with the application ID. You generate a token for each user trying to connect to a session. When generating a token, you must include a session ID. For more information about tokens and token options, check out the documentation.
The session_id, token, and application_id are passed along with other data to the frontend in the following code to create the embedded video in the frontend:
    return jsonify(
        {
            "session_id": session_id,
            "token": token,
            "is_admin": admin,
            "name": name,
            "application_id": application_id,
            "success": True,
        }
    )
The Video API makes it easy to embed high-quality interactive video, voice, messaging, and screen sharing into web and mobile apps.
The JavaScript
In the root directory, create another directory called static. In the static directory, create a file called app.js and add the code from this file in GitHub.
Let’s walk through how a session is created and handled with Vonage:
1. Using the application_id and session_id a session object is created with:
session = OT.initSession(applicationId, sessionId);2. Then a client is connected to the session; if the client is an admin, then the media stream is published:
    session.connect(token, (error) => {
        if (error) {
            console.error('Error connecting:', error);
            return;
        }
        if (isAdmin === "true") {
            const publisher = OT.initPublisher('publisher', { name: name });
            session.publish(publisher);
        }
});3. When the media stream is published, the session object dispatches a streamCreated event and subscribes new connections to it:
session.on('streamCreated', (event) => {
    session.subscribe(event.stream, 'subscriber');
});4. Meanwhile, the following code creates and listens for signal events to implement a chat between clients:
session.on('signal', (event) => {
    const messages = document.getElementById('messages');
    messages.innerHTML += `<p>${event.data}</p>`;
});The HTML
For the routes we created in the backend in app.py, we need a template to render on the frontend. This is what the index.html file is for. Since this code doesn’t use anything specific to the Video API, we won’t discuss it here. You can copy the templates directory and its contents from the repo on GitHub.
Get your app up and running with the following command in your root directory:
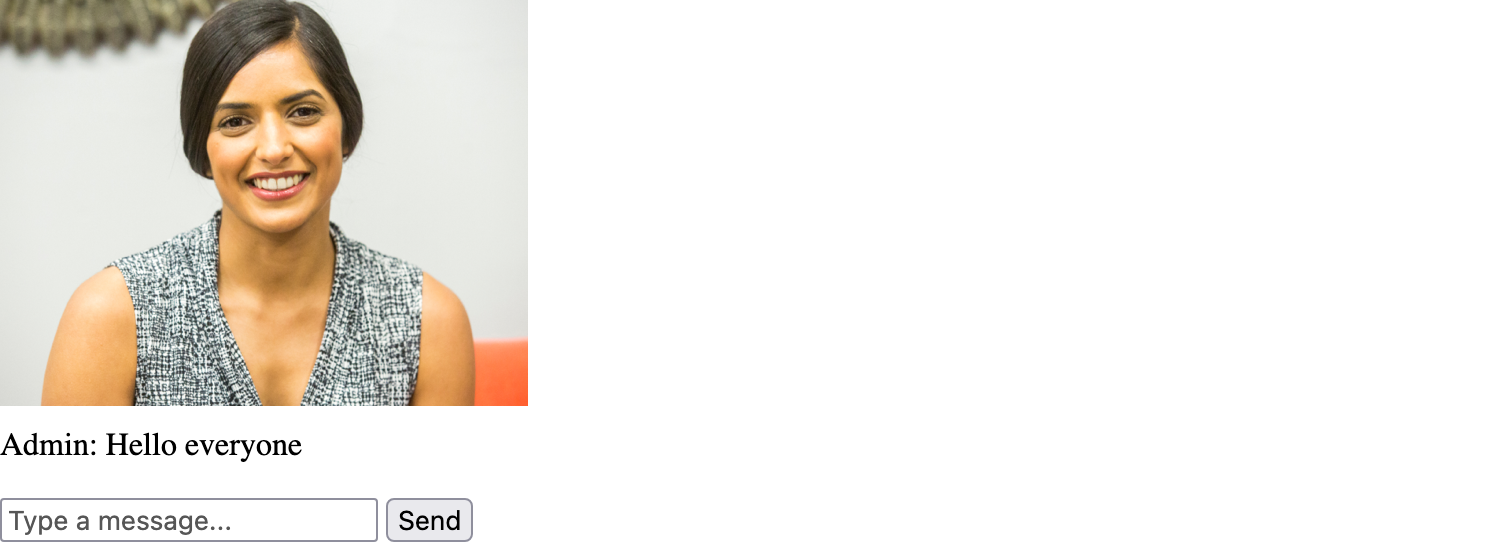
python app.pyIn your browser, navigate to the public URL generated by ngrok. You should see a webpage inviting you to "Join Video Session" with a text field for your name. If you want to publish a video stream, make sure to tick the box for Join as Admin and then click Join Session.
 You should be redirected to a page that displays your device’s video feed. Note: You may have to give permission for your camera and microphone first.
With this video feed established, send the same ngrok URL to a friend and have them join without selecting the option to Join as Admin. This will add them to the session as a subscriber so they will only be able to see the video from the Admin’s camera.
The chat feature works for all participants. When you enter text in the field and click Send, the text will be visible for all participants.
In this tutorial, you learned how to build a minimal browser-based video conferencing application using Python, JavaScript, and the Vonage Video API. Along the way, we covered key supporting concepts like Flask for quickly scaffolding a backend and ngrok for exposing your local environment to the internet. You also explored the core building blocks of the Video API – sessions, tokens, connections, and streams – and saw how they work together to enable real-time communication. By combining a simple Flask backend with a JavaScript-powered frontend, you created a working app that supports live video and basic chat functionality. From here, you can extend this foundation with more advanced features like moderation controls, recording, screen sharing, or enhanced UI/UX to suit your use case. The Vonage Video API Playground makes it easy to try out different features right in your browser.
Best Practices to Get Started With Vonage Video: Best practices we recommend for consideration, before you start building your feature-rich video application powered by Vonage Video API.
Video Archiving with the Vonage Video API and React: Learn four video archiving modes with the Vonage Video API, including Experience Composer.
Improve the User Video Experience With Real-Time Quality Monitoring: MOS is an outstanding video quality metric for video calls. Learn how Vonage Video uses it to enhance user experience.
Getting Started with the Vonage Video API: Creating a new application with the Vonage Video API takes only a few minutes. We will walk through creating an application from scratch using our Node SDK and the Video Web SDK.
Have a question or want to share what you're building?
Subscribe to the Developer Newsletter
Follow us on X (formerly Twitter) for updates
Prefer video? Watch tutorials on our YouTube channel
Connect with us on the Vonage Developer page on LinkedIn
Help us improve our developer experience by filling out our Voice of the Developer Feedback
Stay connected and keep up with the latest developer news, tips, and events.