
Share:
Benjamin Aronov is a developer advocate at Vonage. He is a proven community builder with a background in Ruby on Rails. Benjamin enjoys the beaches of Tel Aviv which he calls home. His Tel Aviv base allows him to meet and learn from some of the world's best startup founders. Outside of tech, Benjamin loves traveling the world in search of the perfect pain au chocolat.
Build a Reports Dashboard in Claude Desktop with MCP Apps and Vonage
Time to read: 11 minutes
In this tutorial, you’ll build a real-time reporting dashboard inside Claude Desktop.
“SMS is down.”
That’s all the information you get from your team. No details. No logs.
Is it a regional issue? A carrier problem? A bug in your app? Answering those questions usually means jumping between dashboards, exporting reports, and manually evaluating the data. Or maybe you’re clever and quickly write some scripts to check against the API. Either way, it’s not fast. And it’s definitely not what you want to be doing under pressure.
What if you could investigate all of that directly inside the chat you use every day?
That's what Model Context Protocol (MCP) Apps make possible. Think of them as the GUI moment for AI tooling. In the same way graphical interfaces made computing accessible beyond specialists, MCP Apps bring real interactivity to the MCP tools you connect to your AI Agents.
In this post, you’ll learn how to build a reporting dashboard that runs inside Claude Desktop using the MCP Apps framework. It connects to Vonage’s Reporting API and turns raw records into an interactive UI that lets you understand what’s happening in real time.
>> TL;DR: Skip ahead and find the quickstart and app code on GitHub.
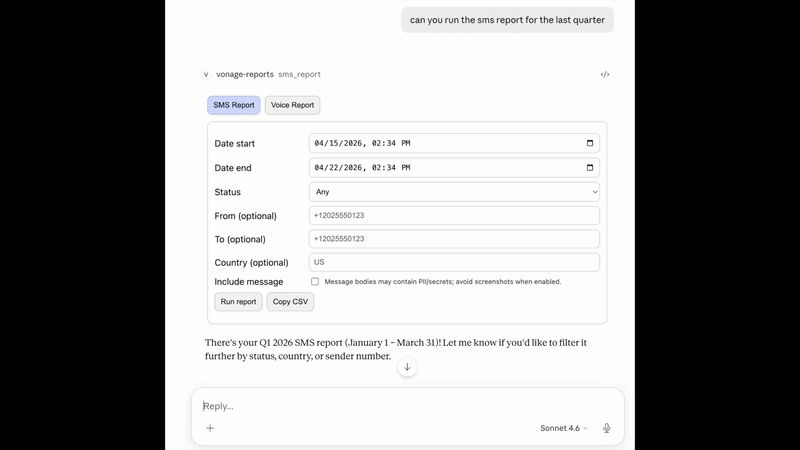 Claude Desktop showing the MCP App SMS report dashboard with filters for date range, status, and phone numbers.
Before you get started, make sure you have:
A Vonage API account
only needed if you build from source; pre-built release doesn't require it
If you're familiar with the Model Context Protocol, you know about MCP Servers. They extend an AI Agent’s capabilities by providing tools and resources. The MCP Tooling Server, for example, exposes endpoints like send_sms or get_records_report that Claude can call on your behalf.
MCP Apps are different. They're MCP Servers that also bundle an interactive UI directly inside an AI Agent. That means you have access to buttons, filters, forms, and complex UI elements.
MCP Apps are really useful when a plain text response isn’t enough. If you’re exploring large datasets, configuring systems with multiple inputs, monitoring live activity, or stepping through multi-stage workflows, an interactive UI makes those tasks faster and easier to reason about. Instead of a back-and-forth conversation, users can see everything at once and interact with it directly.
 Example of an MCP App rendering an interactive dashboard UI directly inside a chat interface.
Here's what happens when you run a report:
You interact with the dashboard inside Claude
The dashboard calls a tool on the MCP App server
The server calls the upstream Vonage MCP server
The Vonage MCP server hits the Vonage Reports API
Data flows back through the chain
The server normalizes and masks it, then returns it to the UI
The dashboard renders the results inline
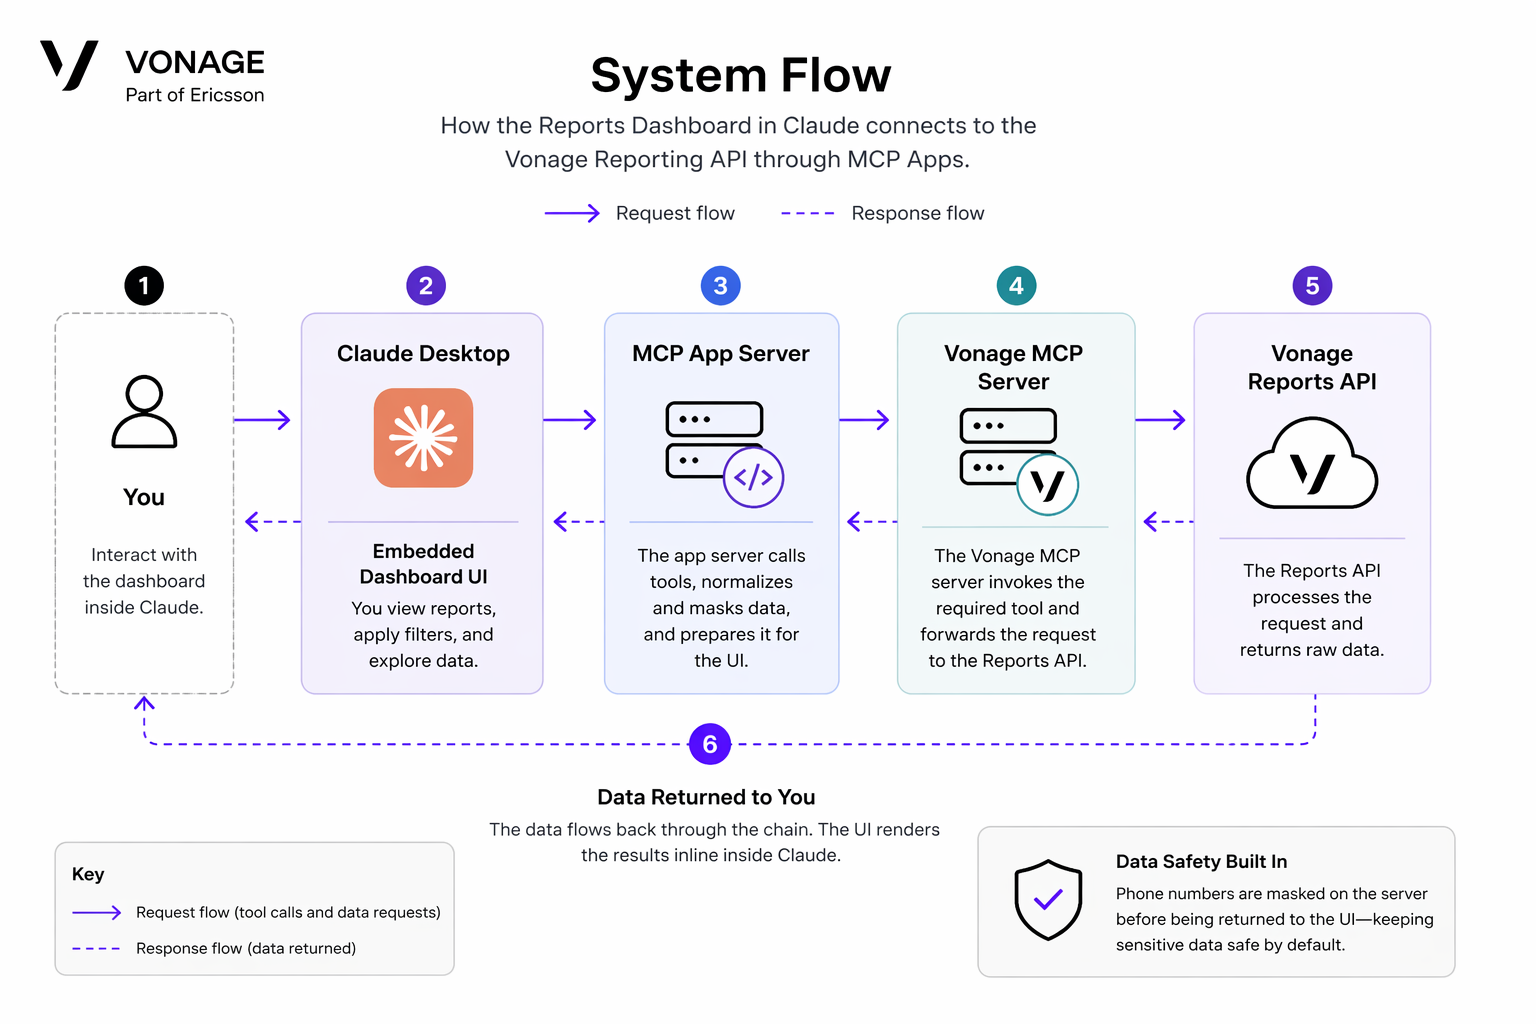 System flow diagram showing how an MCP App in Claude Desktop connects to the Vonage Reports API and returns data to an embedded UI.
Your server acts as the bridge between raw API data and an interactive interface. It normalizes the Vonage API response, masks sensitive phone numbers before displaying them, and structures the data for the UI to consume.
The Server (src/server.ts)
The server registers two tools (
sms_reportandvoice_report) and acts as a proxy between the UI and Vonage. Rather than calling the Vonage Reports API directly, it wraps the existing Tooling MCP server as a subprocess, callsget-records-reporton your behalf, and normalizes the response for display. This keeps the implementation lean: authentication, request signing, and error handling all stay with the Vonage MCP server. Our server just shapes the data and passes it to the UI.The UI (src/ui/mcp-app.ts)
This generates our interactive HTML dashboard. It creates date pickers, status filters, paginated tables, and expandable row details by bundling into a single self-contained file via Vite's
vite-plugin-singlefile. It renders inside Claude because each tool registration includes a pointer to it:"_meta": { "ui": { "resourceUri": "ui://vonage-reports/mcp-app.html" } }CopyWhen Claude Desktop sees that metadata, it renders the interface inline instead of returning plain text. From there, the UI manages everything client-side: calling
app.callServerTool()to fetch data, tracking pagination and active filters, and handling click-to-filter on KPI cards and row expansion for message and call details.Data Safety
Phone numbers are masked on the server side before data ever reaches the UI. The last four digits are preserved, everything else is replaced. This means exports, screenshots, and clipboard copies won't leak full numbers, even accidentally.
Head to the GitHub releases page and download vonage-reports-mcp-app-v0.1.0.tar.gz. Extract it to a folder on your machine (e.g., ~/vonage-reports-app/).
tar -xzf vonage-reports-mcp-app-v0.1.0.tar.gz -C ~/vonage-reports-app/
Open your claude_desktop_config.json
It lives at
~/Library/Application Support/Claude/on macOS, or%APPDATA%\Claude\on WindowsAdd this entry to the
mcpServersobject:
{
  "vonage-reports": {
    "command": "node",
    "args": ["/path/to/vonage-reports-app/dist/server.js"],
    "env": {
      "VONAGE_API_KEY": "your_api_key",
"VONAGE_API_SECRET": "your_api_secret",
       "VONAGE_APPLICATION_ID": "your_app_id",
       "VONAGE_PRIVATE_KEY64": "your_private_key_base64",
       "VONAGE_VIRTUAL_NUMBER": "your_virtual_number"
    }
  }
}
Replace the paths and credentials with your actual values.
You can find your API credentials in your Vonage API Settings.
Close Claude completely and reopen it. The MCP App will initialize on startup.
In Claude, look for the Vonage Reports Dashboard in the MCP Apps section. You should see two tabs: SMS Report and Voice Report. You're ready to go!
To trigger the UI, you’ll need to call the tool through a prompt like, “run the sms report”. Then you have access to the form and dashboard.
 Claude Desktop displaying the MCP App SMS report dashboard with filters applied and results summarized in KPI cards.
Set your date range
Use the date/time pickers to select a range (e.g., last 7 days).
Filter by status (optional)
Click the "Status" dropdown and pick a value like delivered, failed, or rejected.
Filter by sender or recipient (optional)
Enter phone numbers in E.164 format (e.g., +12025550123).
Include message content (optional)
Check this box if you want to see the actual SMS bodies in the results. (⚠ Warning: message bodies may contain private information)
Click "Run report"
The dashboard fetches your records and displays them.
KPI Cards
At the top, colored status cards show the breakdown of your messages:
Green = Delivered
Red = Failed or Rejected
Yellow = Submitted, Accepted, or Buffered
Grey = Expired, Deleted, or Unknown
Click any card to filter the table to just those rows. Click again to clear the filter.
Paginated Table
The results table shows 10 records per page with columns like date, from, to, status, network, country, and price. Long values (like internal reference IDs) are truncated with a tooltip on hover.
Expandable Messages
If you enabled "Include message content," rows with actual message bodies will show a ▶ msg button. Click it to expand and see the full message text.
Copy CSV
Click the "Copy CSV" button to export the current results to your clipboard. Paste into a spreadsheet or text editor.
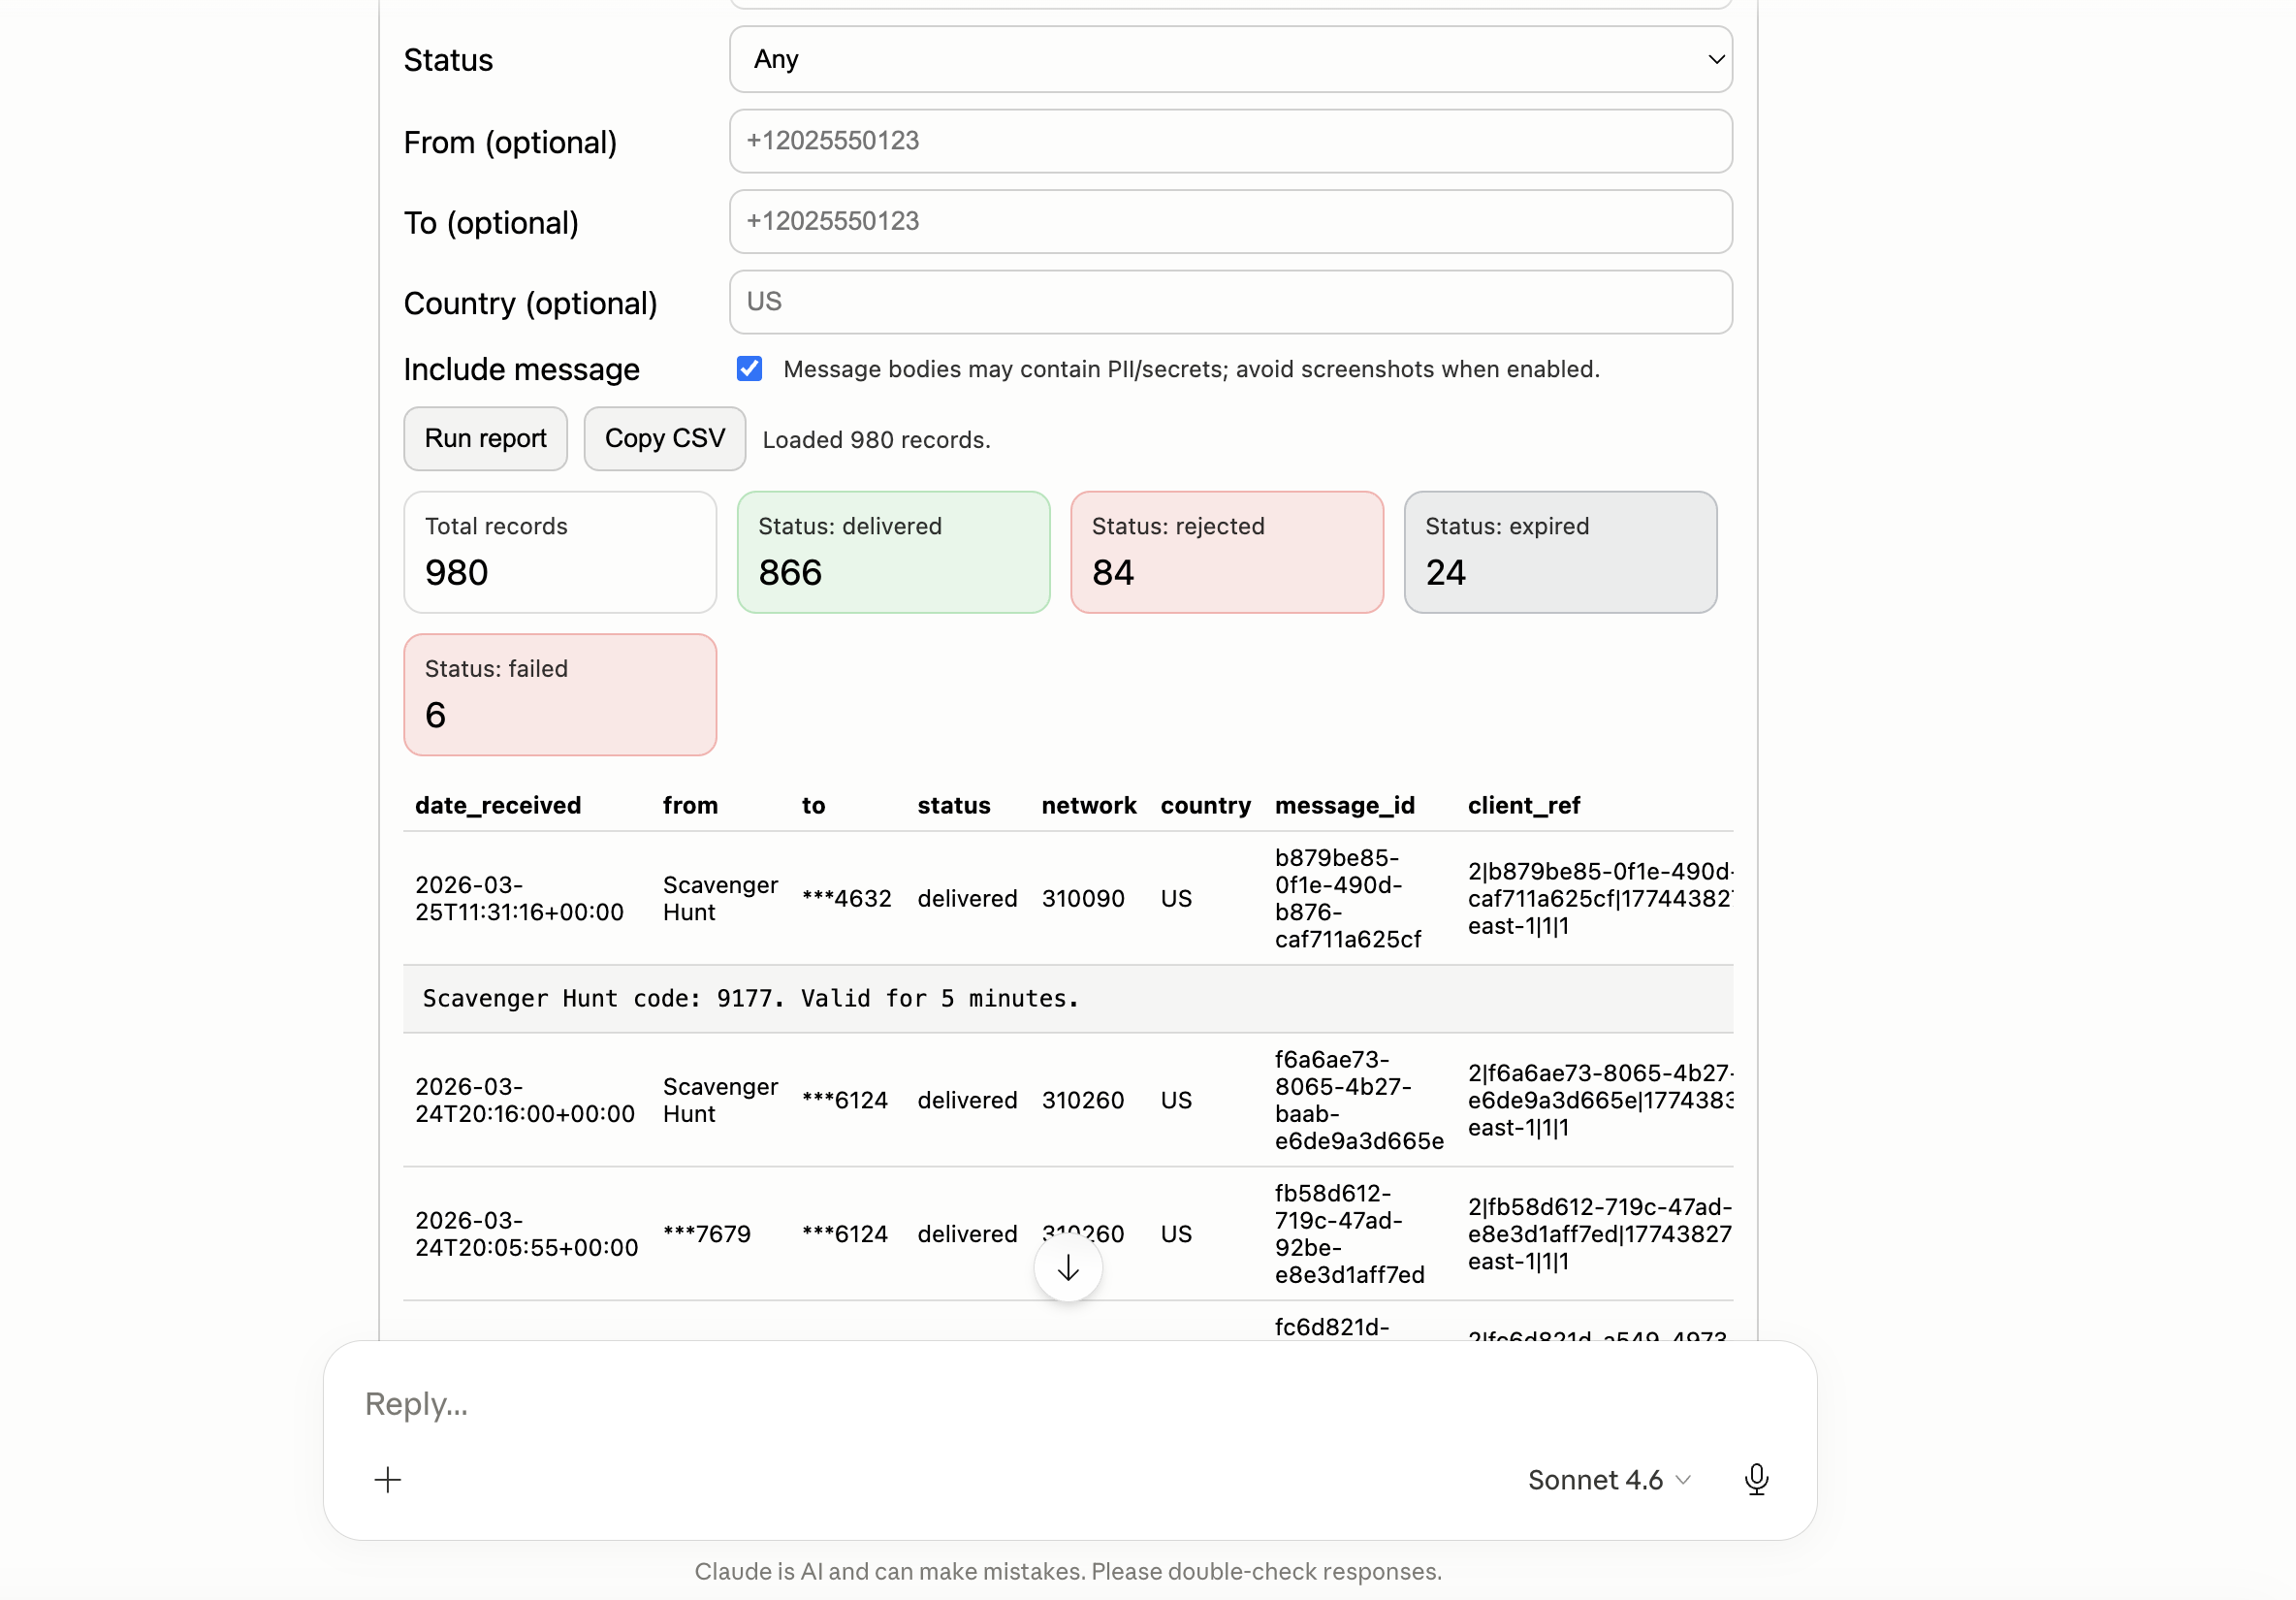 Detailed SMS report results displayed in the MCP App dashboard with KPI summaries and a paginated data table.
The Voice Report tab works similarly. Pick a date range, optionally filter by status or call direction (inbound/outbound), and run the report. Results show when calls started, duration, from/to numbers, status, and more. Click the ▶ button on any row to see all available fields for that call.
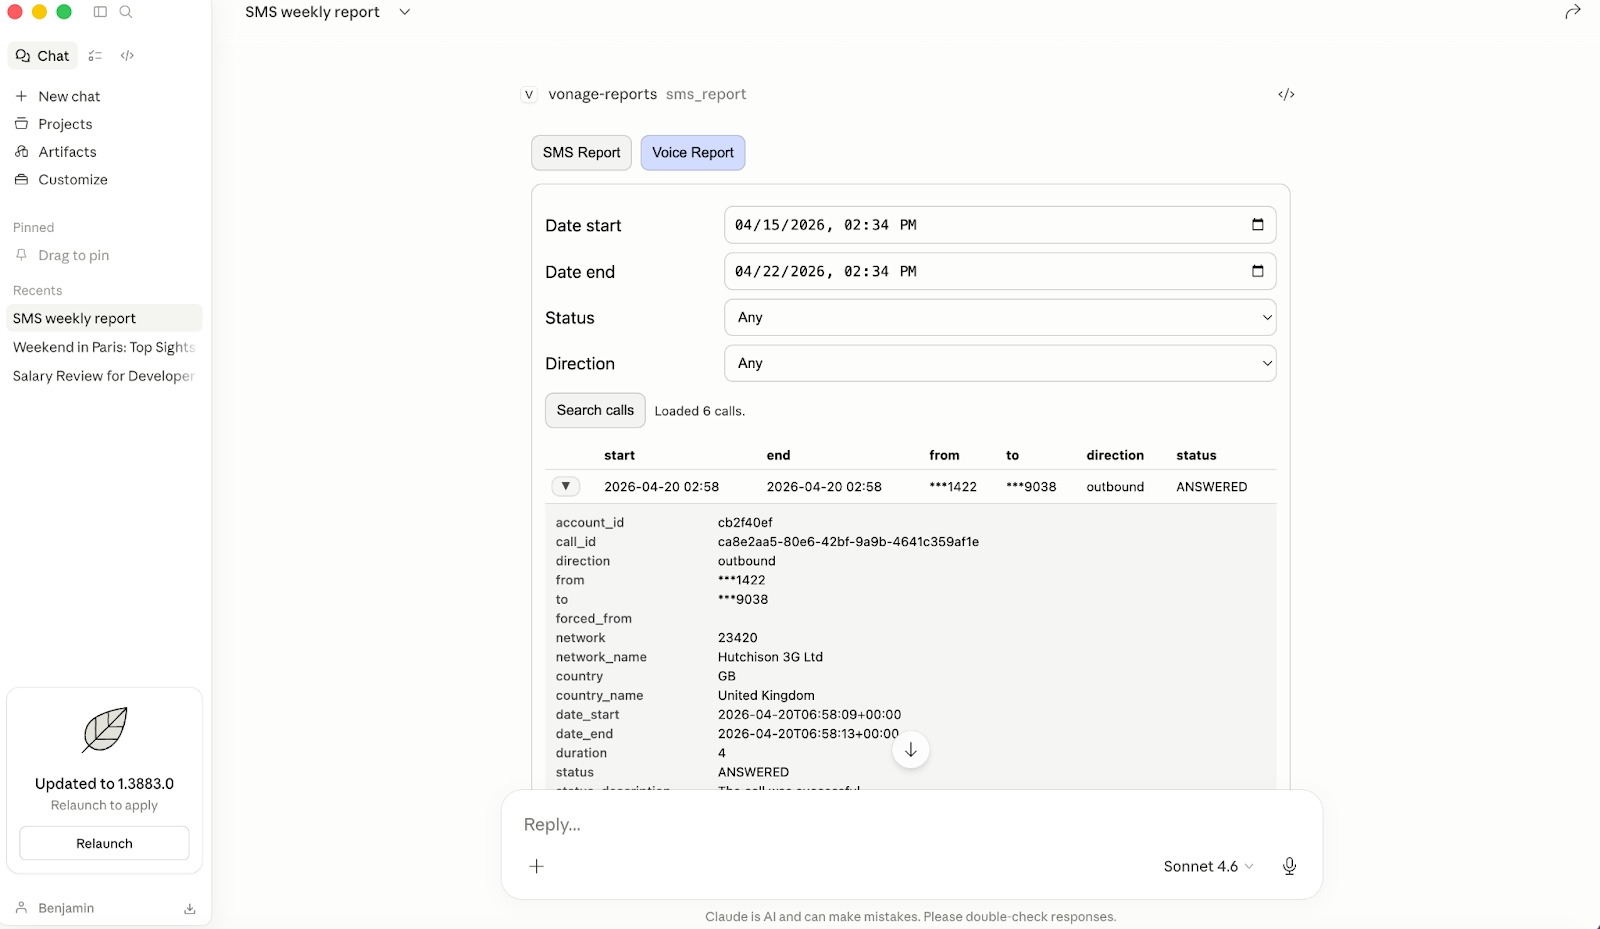 Claude Desktop displaying the MCP App Voice report dashboard with call filters and detailed results.
This MCP app was built using AI Agents (starting with GPT 5.2 in Windsurf and then moving to Claude Code in Claude Desktop), so a step-by-step tutorial is a little difficult with probabilistic coding. Like any app, this wasn't a clean, linear build. It went through four main phases I outline below.
In addition to Claude Code, I needed to give the agent a few resources:
Install the MCP Apps skill
The Vonage MCP Tooling Server and Documentation Servers
The MCP Apps skill lets the agent understand how to build an MCP App. The Tooling server gives an agent access to the get-records-report tool, which calls the Reports API. And lastly, the Documentation Server helps the agent understand exactly how the Vonage APIs work and use the most up-to-date documentation instead of potentially hallucinating answers or using old documentation from internet resources.
The project started with a single prompt:
"I want to create a cool, meaningful MCP app for the Vonage Developer Blog using the get-records-report tool from the Vonage MCP server. Something like:‘Can you get a report of all outbound SMS sent over the last week?’‘Can you get the report for Voice Call ID 1234-abcd-5678-efgh?’
Could you help me outline how to build such an application"
From there, GPT 5.2 asked a series of scoping questions:
How polished should the features be? Just a demo or something almost production-ready?
How to wire the UI to the data layer?
How to handle Personally Identifiable Information (PII) in message content? E.g., phone numbers and message content
After answering all these questions, the Agent was ready with a complete implementation plan that defined the architecture, the two-tab UI structure, the proxy pattern, and the data safety defaults upfront. Read the full initial plan.
The first version was built in Windsurf. But I couldn’t get the App to actually work inside the chat. I tried to move to Cursor and VS Code. Theoretically, MCP Apps work in all of these environments. But I spent way longer trying to figure this out than it took to actually create the app itself.
The default environment for MCP Apps to render their UI is Claude Desktop. So I downloaded it. After configuring my Vonage credentials properly, it worked immediately! The dashboard appeared on the first try.
If you're building an MCP App: test it in Claude Desktop from day one. Don't fight the environment.
Once the app was running in Claude Desktop, there were four code-level issues to work through. This is where having the Vonage Docs MCP server really helped because the agent could quickly find where it made incorrect assumptions about how Vonage or MCP Apps behaved.
The first issue was that structured content was never populated. The ext-apps framework (MCP Apps) requires tools to return a
structuredContentfield alongside the text response. But the Vonage MCP server doesn't returnstructuredContentas a field. It returns everything as a JSON string embedded incontent[0].text. The server was readingres.structuredContent, getting undefined, and the framework validation failed. The fix was anextractStructured()helper that reads the text field and parses it instead.The Vonage response has a human-readable prefix. Even after fixing the
structuredContentissue,JSON.parse()was still failing. The raw text from the Vonage server looks like this:Records report for SMS: Total records: 47 {"records": [...]}CopyA plain
JSON.parse()on that string fails because of the prefix. The fix was a regex to extract just the JSON block before parsing.A schema type mismatch between the voice report tool and MCP Apps
The voice tool'soutputSchemausedz.record()at the root level. The ext-apps framework requiresz.object() — z.record(), which caused a runtime crash (Cannot read properties of undefined (reading '_zod')). A small change, but not something the error message made obvious.Missing required parameter on voice callsThe original voice tool only sent
call_idto the Vonage API. The API requires adate_starteven for ID-based lookups and returns a 422 without it. Adding a default ofisoDaysAgo(7)resolved it.
Once the data was flowing correctly, I got to the fun part: making the dashboard useful and fun to use! This happened in small steps:
Pagination
The initial table dumped all results at once. With hundreds of records, this was unusable. Adding 10-records-per-page pagination with Prev/Next controls made it navigable.
KPI cards with color
A plain count of records by status is fine. Color-coded cards let you read the status breakdown at a glance without scanning numbers.
Click-to-filter
Making the KPI cards clickable, so tapping "Status: rejected" filters the table to just those rows, turned the summary from decorative to functional.
This was a bonus feature I would’ve probably skipped before AI Agents made coding so much easier! This little extra feature made me very happy, turning a small demo into something really nice/fun.
Reworking the Voice tab
The original Voice tab was a single input field: paste a call ID, get the details back. This only works if you already know which call you're looking for. During an incident, you don't.
The tab was rebuilt from scratch to match the SMS pattern: a date range + filters first, a browsable list of calls, and then a click-to-expand detail panel for any individual call. This turned it from a lookup tool into an investigation tool.
Each of these changes came from actually using the dashboard and noticing what felt wrong. With coding agents assisting the UI development process, it’s so enjoyable to go in smaller steps, test each thing out, and then iterate until you’ve built something beautiful!
The Vonage Reports MCP App demonstrates how MCP Apps bring dashboard-style UIs into Claude. It's production-ready for basic reporting, and you can extend it:
Add charts to see how your call status’ change over time
Export to CSV
Originally, the CSV was supposed to be downloadable. But the API required to do this is blocked by Claude’s embedded browser. I didn’t want to add unnecessary complexity to the app, so the text solution worked well enough for this demo.
Real-time updates
Poll the API on an interval and stream live stats
Custom alerts
Highlight unusual patterns (spike in failures, unusual costs) and then use the Vonage Tooling Server to send a text, RCS, or make a phone call alert.
The full source code is available on GitHub, and the pre-built release is ready to download and run in 5 minutes. Fork it, modify it, and let us know what you build!
Have a question or want to share what you're building?
Subscribe to the Developer Newsletter
Follow us on X (formerly Twitter) for updates
Watch tutorials on our YouTube channel
Connect with us on the Vonage Developer page on LinkedIn
Stay connected and keep up with the latest developer news, tips, and events.
Share:
Benjamin Aronov is a developer advocate at Vonage. He is a proven community builder with a background in Ruby on Rails. Benjamin enjoys the beaches of Tel Aviv which he calls home. His Tel Aviv base allows him to meet and learn from some of the world's best startup founders. Outside of tech, Benjamin loves traveling the world in search of the perfect pain au chocolat.