Share:
Hamza is a Software Engineer based in Chicago. He works with Webrtc.ventures, a leading company in providing WebRTC solutions. He also works as a Full Stack Developer at Vonage helping out with the Video Platform to better serve its customer’s needs. As a proud introvert, he likes to spend his free time playing with his cats.
Attention Detection with Vonage Video API
Time to read: 6 minutes
This article was written in collaboration with Talha Ahsan
In today’s world more and more of our interactions are going online. Over the past few years, online classes and meetings have become a normal part of life. While this transition has had numerous benefits, it has also created interesting issues to be tackled. One such issue is ensuring user attention.
Using attention detection technology can have a big impact in areas like the education field or online meetings. It can allow presenters to understand how participant interest fluctuates over certain parts of their meetings or lectures. It can also be used to help teachers ensure that students are paying attention.
Today we’ll be building a Video Conferencing application with Vonage Video API that leverages Face Landmark detection to calculate a participant's attention score.
To setup the app on your machine first clone the repo:
git clone https://github.com/hamzanasir/attention-detection.git
Great! Now move into the repository and install the associated packages via:
npm install
Now we need to setup our Vonage API Key and Secret. Let’s start off by copying the env template:
cp .envcopy .env
Now all you need to do is replace the TOKBOX_API_KEY and TOKBOX_SECRET in the .env file to your credentials. You can find your API Key and Secret on the project page of your Vonage Video API Account.
You can start the app with:
npm start
All of the code we talk about in this blog can be found in the `public/js/app.js` file.
To calculate the attention of the user, we will first have to obtain the face landmarks of the user in 3-dimensional space. Once we have obtained these, we can calculate the pose of the user’s face in 3-dimension, specifically, we can calculate the yaw, pitch, and roll (see diagram below) of the user’s face using some trigonometry. For simplicity, we will only be interested in the yaw and pitch.
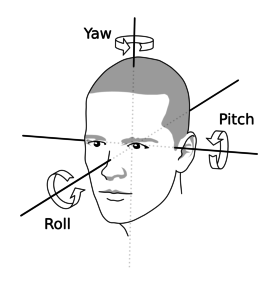 The yaw, pitch and roll angles in the human head motion
Based on these two angles, we can provide the users with an overall attention score.
We’ll be using TensorFlow’s MediaPipe face detection model to obtain the face landmarks. The reason we use MediaPipe is that it provides 3-dimensional landmarks out of the box, using machine learning to infer the depth of the facial surface without the need for a depth sensor.
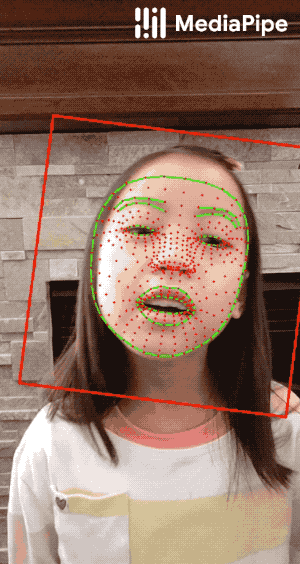 Face landmarks visualization from MediaPipe
You can learn more about MediaPipe here
In order to calculate the pitch, we use the 468 facial landmarks (provided by the face mesh library) corresponding to the top and bottom of the user’s face in the y and z planes. Similarly, for yaw, we use landmarks corresponding to the outside corners of the user’s eyes in the x and z planes.
For both of these, we then calculate the middle point between these two points and calculate the angle relative to the user’s camera by using the atan2 (inverse tangent) function which calculates the counterclockwise angle between the x-axis and the point we’re interested in. You can see the example code below:
const radians = (a1, a2, b1, b2) => Math.atan2(y: b2-a2, x: b1-a1);
const angle = {
  yaw: radians(mesh[33][0], mesh[33][2], mesh[263][0], mesh[263][2]),
  pitch: radians(mesh[10][1], mesh[10][2], mesh[152][1], mesh[152][2])
};
We now need to use the pitch and yaw that we calculated to assign some kind of an attention score to the user. The approach that we’ll use in our case is influenced by “Attention Span Prediction Using Head-Pose Estimation With Deep Neural Networks”, published in IEEE Access.
Essentially, we will assign a score from 0 - 2 (0 being a low attention score and 2 being a higher attention score) based on the computed value for each of the angles. We will assign a score with the following getScore function, based on the IEEE Access paper:
const getScore = (degree) => {
  degree = Math.abs(radiansToDegrees(degree));
  if (degree < 10) {
    return 2;
  }
  if (degree < 30) {
    const adjust = (degree - 10) * 0.05;
    return 2.0 - adjust;
  }
  return 0;
};
We then take the product of the two scores to get the final attention scoring of the user. Once we have the overall attention score, we then categorize the attention to allow users to easily visualize their attention level. We break down this categorization into 4 different categories ranging from no concentration to high concentration. You can see the procedure to calculate the overall attention level:
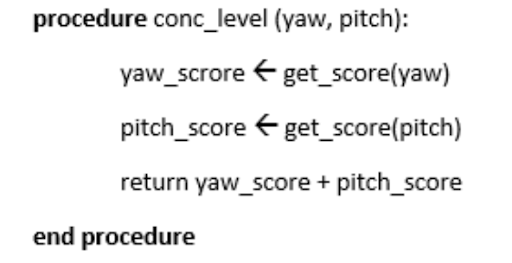 Pseudocode for our function to evaluate concentration level.
And the categories for attentiveness are below:
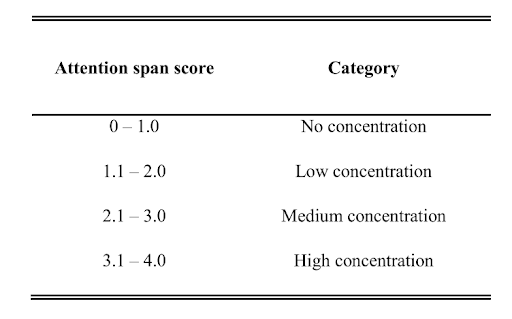 Attention score categorization
It’s important to note that these diagrams represent a theoretical algorithm to calculate the attention score. In reality, you may wish to tweak a few things such as the attention span score categories. One such change that we made in our application is that instead of adding the yaw_score and the pitch_score we chose to multiply them to get us a nice linear progression of attention score.
To save CPU/GPU of each participant, instead of having each participant run the face mesh analysis for each participant on their machine, let’s have everyone in the call be responsible for their own attention score metrics. So we’ll initialize the algorithm in the session.publish endpoint:
session.publish(publisher, async (err) => {
  if (err) {
    console.log('Error', err);
  } else {
    const publisherElement = document.getElementById('publisher');
    streamId = publisher.stream.id;
    const webcam = publisherElement.querySelector('video');
    await runFacemesh(webcam);
  }
});
Let’s take a closer look at the runFacemesh method:
const runFacemesh = async (webcamRef) => {
  const net = await faceLandmarksDetection.load(faceLandmarksDetection.SupportedPackages.mediapipeFacemesh, { maxFaces: 1 });

  setInterval(() => {
    detect(net, webcamRef);
  }, 500);
};
We use the detect function, which we'll need to build, but essentially the number of times we run this function we’ll get an attention score metric for the frame that is rendered by your camera. So the number of times we run this a second determines the frames per second of our attention metric analysis. Currently, it is set to run every 500 milliseconds so that means we’re effectively looking at a model FPS (Frames Per Second) of 2. This can be tinkered with depending on your use case.
Now let’s look at the meaty part of our algorithm that is responsible for generating a score and signaling the score to all other participants:
// This runs face landmark model
const face = await net.estimateFaces({ input: video, predictIrises: true });

// Getting points from the model
const { mesh } = face[0];
const radians = (a1, a2, b1, b2) => Math.atan2(b2 - a2, b1 - a1);

// Generating angles between points and axis
const angle = {
  yaw: radians(mesh[33][0], mesh[33][2], mesh[263][0], mesh[263][2]),
  pitch: radians(mesh[10][1], mesh[10][2], mesh[152][1], mesh[152][2]),
};

// Calculating attention score
const score = getScore(angle.yaw) * getScore(angle.pitch);
const signalScore = { attention: score, streamId };


// Sending attention score to all other participants in call
session.signal(
  {
    type: 'attentionScore',
    data: JSON.stringify(signalScore)
  },
  function(error) {
    if (error) {
      console.log("signal error ("+ error.name+ "): " + error.message);
    }
  }
);
This chunk of code may look intimidating but in reality, all we’re doing is running the facial landmark library on the current frame of the publisher, running our getScore algorithm on the angles between certain points on the detected face, and then broadcasting the attention score to all participants.
Once the attention score is signaled we need to make sure we’re handling it on the receiving end and do with it as we please. You could display it as a real-time UI (like we did in this project) or store it in a data store that can be used to map attention metrics over the duration of the call. The possibilities are endless!
Attention is a key factor for gauging conversations, speeches, lectures, and just about any interaction between people. We have now learned how to estimate it using face mesh analysis and integrate it into our video calls. This estimate can be further improved via more data sources such as getting iris movement, multiple face recognition, etc.
Find a fully working version of this app on GitHub
Let us know if you were able to get attention detection to work! Join us on the Vonage Developer Slack Community or tweet at us at VonageDev.
Share:
Hamza is a Software Engineer based in Chicago. He works with Webrtc.ventures, a leading company in providing WebRTC solutions. He also works as a Full Stack Developer at Vonage helping out with the Video Platform to better serve its customer’s needs. As a proud introvert, he likes to spend his free time playing with his cats.