
Share:
Alvaro is a former member of the Vonage Team. He was a developer advocate at Vonage, focusing on Network APIs. Passionate about Developer Experience, APIs, and Open Source. Outside work, you can often find him exploring comic shops, attending sci-fi and horror festivals or crafting stuff with those renowned tiny plastic building blocks.
Announcing the New Network APIs Sandbox
Time to read: 1 minute
As the Introduction to the Network Registry blog post covered, accessing the Network APIs requires CSP (Communication Service Providers) approval. This process could take more or less time, but developers can only use the APIs once the first approvals arrive.
Today, we present the new Network Registry Sandbox, a secure environment that allows developers to explore the Network APIs from the beginning, ensuring the safety of users and CSPs.
The Sandbox uses live data and allows developers to configure up to 5 test numbers, ensuring that tests can only be performed with or from allowlisted numbers.
There are two main steps to use the Sandbox:
Allowlist phone numbers
Create a new application linked with the Sandbox
Open the Vonage Network Registry Sandbox in your dashboard and select the “Network API Sandbox” tab button. Then, click “View Available CSPs” to uncollapse the list of available network partners that can be used in the Sandbox. Remember, you can add up to 5 numbers to be allowlisted from one or more available CSPs.
 Sandbox tab overview
Click on the “Add numbers” button, and for each test phone number, do the following:
Choose the country code from the available countries
Input your test number
Check the box to confirm the number will only be used for test purposes
 Dialog to add a new phone number to the Sandbox
Our Verify API will send the phone number an authentication code via SMS. Enter the code provided to complete the number verification.
 Sandbox verification code when adding new phone numbers
Once the verification code is added and verification is successful, the test number will be allowlisted successfully.
 Confirmation dialog when adding phone to the Sandbox
Once you have allowlisted the phone numbers you want to test, you will need to create an application.
Click the “Create Application" button or navigate to the Applications section of your dashboard and "Create a new application".
Generate a public and private key pair for JWT creation during authentication. You'll need this JWT token to generate access tokens. Additional details about Network APIs authentication are available.
Finally, enable the Network APIs capability in your application and select the “Sandbox” access type.
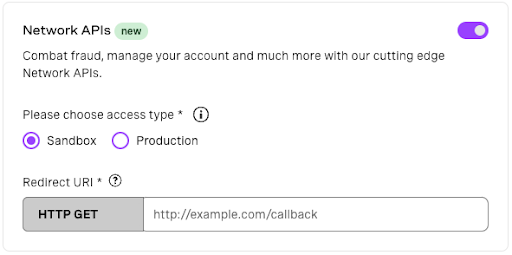 Sandbox selecting in Application
Once the Sandbox is configured and the Network APIs capability is added to your application, you can begin testing Vonage Network APIs.
Have you used the Sandbox already? We’d love to hear your feedback! Join us on the Vonage Community Slack or message us on X, and we will get back to you.
Thanks for reading!
Share:
Alvaro is a former member of the Vonage Team. He was a developer advocate at Vonage, focusing on Network APIs. Passionate about Developer Experience, APIs, and Open Source. Outside work, you can often find him exploring comic shops, attending sci-fi and horror festivals or crafting stuff with those renowned tiny plastic building blocks.