
Erstellen Sie einen Storytelling-Dienst mit RCS Rich Cards und Gemini
Dieses Tutorial zeigt Ihnen, wie Sie einen generativen KI-Storytelling-Dienst mit der Vonage Messages API für RCS und Googles Gemini KI. Sie erfahren, was RCS ist, wie Sie RCS-Rich-Card-Nachrichten senden und empfangen und wie Sie Gemini integrieren, um kurze Gute-Nacht-Geschichten zu generieren.
Inspiriert von der Schlafenszeit meines Kleinkindes wollte ich etwas Nützliches schaffen. Also habe ich RCS Messaging mit Gemini AI kombiniert, um einen einfachen Storytelling-Dienst zu entwickeln.
 RCS Story Demonstration
Den kompletten Quellcode finden Sie auf dem Vonage Community GitHub Repository.
Node.js ist installiert auf Ihrem Rechner.
Ein API-Tunneldienst, wie zum Beispiel ngrok.
Ein registrierter RCS Business Messaging (RBM) Agent.
Vonage API-Konto Um dieses Tutorial durchzuführen, benötigen Sie ein Vonage API-Konto. Wenn Sie noch keines haben, können Sie sich noch heute anmelden und mit einem kostenlosen Guthaben beginnen. Sobald Sie ein Konto haben, finden Sie Ihren API-Schlüssel und Ihr API-Geheimnis oben auf dem Vonage-API-Dashboard.

Um RCS-Nachrichten in Ihrer Vonage-Anwendung zu senden und zu empfangen, benötigen Sie einen registrierten RBM-Agenten und ein Telefon mit RCS-Funktionen.
RCS über Vonage ist derzeit nur für verwaltete Accounts verfügbar. Sie müssen sich Ihren Account Manager kontaktieren kontaktieren, um den Entwicklermodus zu aktivieren, der Tests mit zugelassenen Nummern ermöglicht.
Wenn Sie keinen verwalteten Account haben, wenden Sie sich an das Vonage Vertriebsteam für Unterstützung.
RCS (Rich Communication Services): Ein Industriestandard, der herkömmliche Nachrichten mit Rich Media, Markeninhalten und Lesebestätigungen erweitert. Wenn das Gerät oder Netzwerk des Empfängers RCS nicht unterstützt, werden die Nachrichten automatisch per SMS zugestellt, um sicherzustellen, dass sie trotzdem zugestellt werden.
Erfahren Sie mehr in unserer RCS-Dokumentation.
SMS (Short Message Service): Die herkömmliche SMS unterstützt nur reinen Text. RCS ermöglicht Schaltflächen mit Markenzeichen, Bilder und Statusaktualisierungen. Lernen Sie, SMS-Nachrichten mit Node.js zu versenden.
MMS (Multimedia Messaging Service): Im Gegensatz zu MMS, das häufig eine geringere Medienqualität und Dateigrößenbeschränkungen aufweist, unterstützt RCS hochwertige Medien und Funktionen wie Tippanzeigen und Aktualisierungen des Zustellungsstatus. Erfahren Sie was Sie mit MMS machen können und wie man MMS sendet mit Node.js.
Um eine Anwendung zu erstellen, gehen Sie auf die Seite Erstellen einer Anwendung auf dem Vonage Dashboard und legen Sie einen Namen für Ihre Anwendung fest.

Wenn Sie eine API verwenden möchten, die Webhooks nutzt, benötigen Sie einen privaten Schlüssel. Klicken Sie auf "Generate public and private key", der Download sollte automatisch starten. Bewahren Sie ihn sicher auf; dieser Schlüssel kann bei Verlust nicht erneut heruntergeladen werden. Er folgt der Namenskonvention privat_<Ihre App-ID>.key. Dieser Schlüssel kann nun zur Authentifizierung von API-Aufrufen verwendet werden. Hinweis: Ihr Schlüssel funktioniert erst, wenn Ihre Anwendung gespeichert ist.
Wählen Sie die benötigten Funktionen (z. B. Voice, Nachrichten, RTC usw.) und stellen Sie die erforderlichen Webhooks bereit (z. B. Ereignis-URLs, Antwort-URLs oder URLs für eingehende Nachrichten). Diese werden im Lernprogramm beschrieben.
Zum Speichern und Bereitstellen klicken Sie auf "Neue Anwendung generieren", um die Einrichtung abzuschließen. Ihre Anwendung ist nun bereit für die Verwendung mit Vonage-APIs.
Wenn Sie ngrok noch nicht benutzt haben, können Sie hier beginnen. Ich habe die Schritte zur Ausführung einer Instanz unterhalb des Bildes im nächsten Abschnitt hinzugefügt.
Führen Sie den folgenden Befehl aus, um eine ngrok-Tunneling-Instanz zu starten.
ngrok http 3000In der Ausgabe finden Sie eine URL, die mit https:// beginnt und in .ngrok.app/ endet. Notieren Sie sich diese, da Sie sie im nächsten Schritt für die Konfiguration Ihrer Webhooks benötigen.
Forwarding https://94cd51b63460.ngrok.app/ -> http://localhost:8000
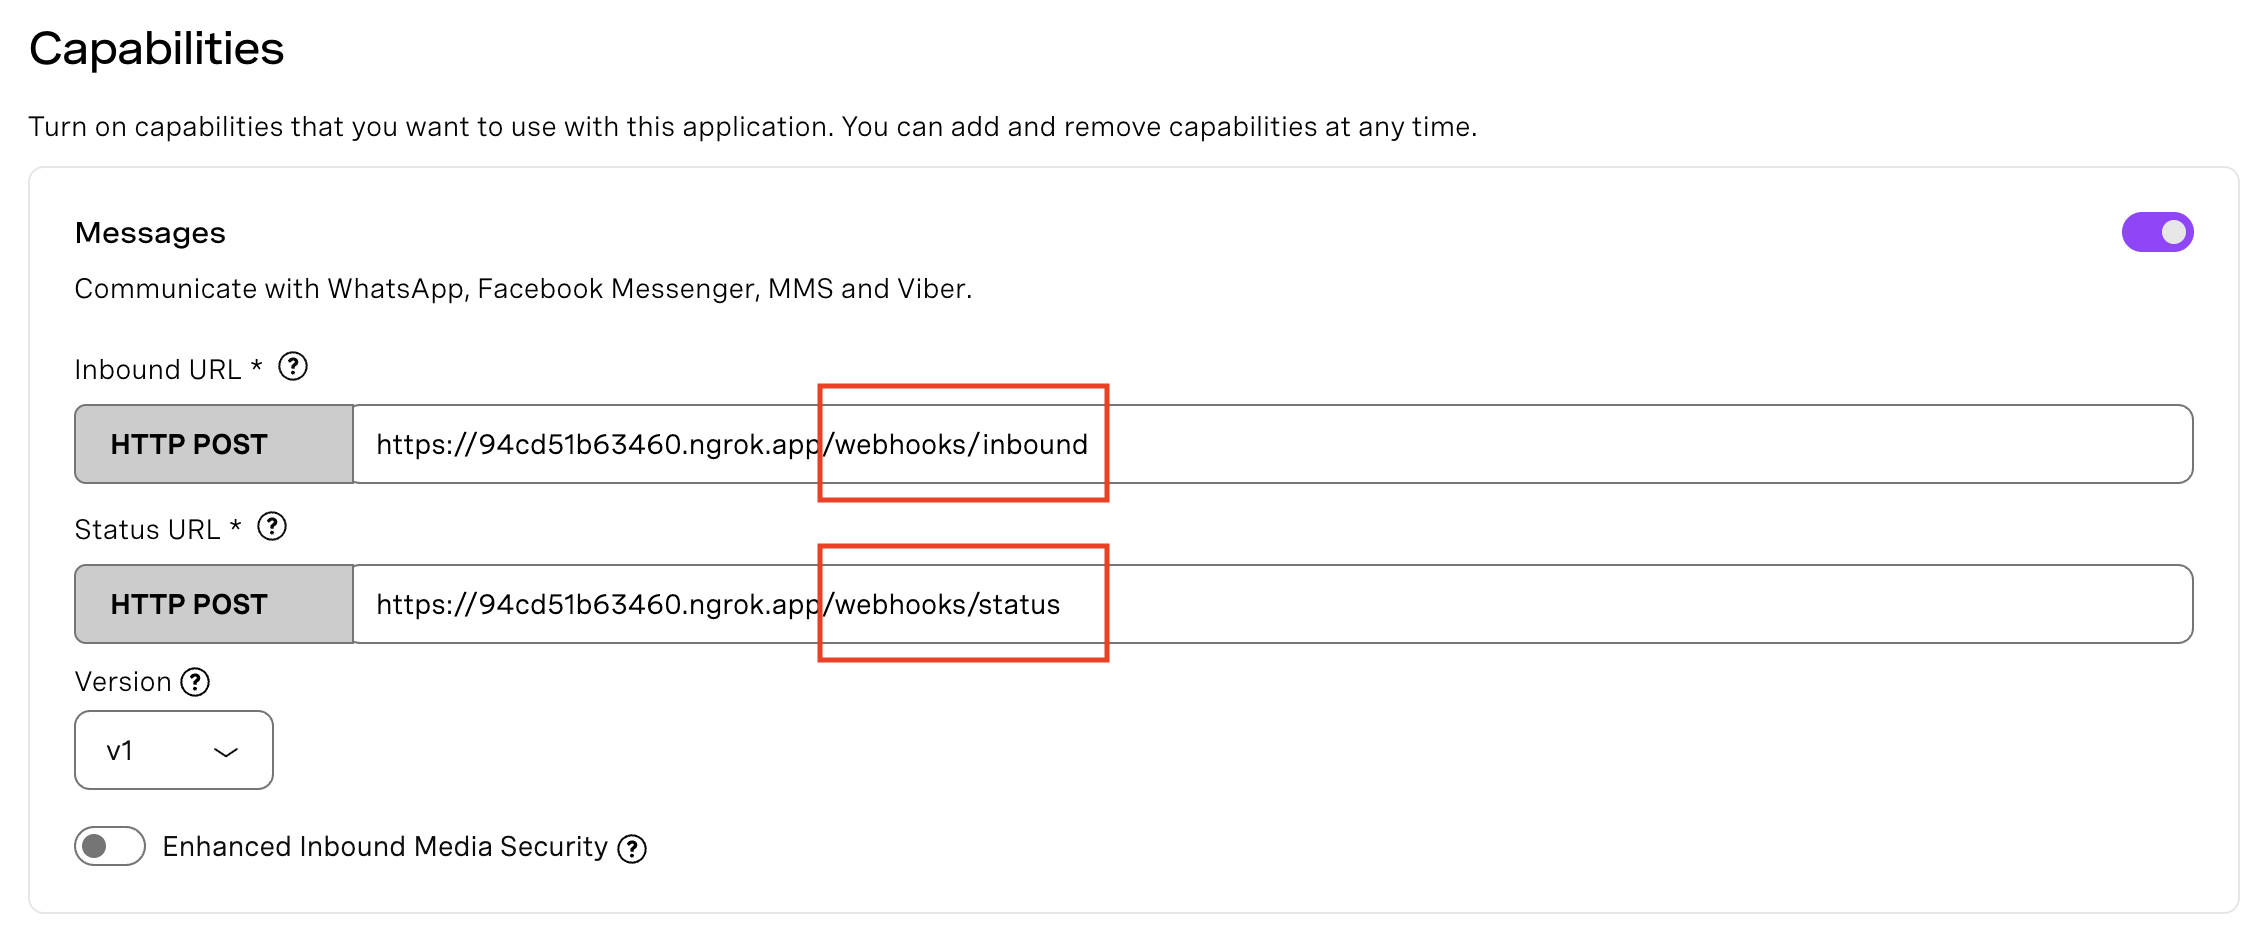
Zurück im Vonage API Dashboard, unter Ihren Apps, schalten Sie die Option "Messages" unter "capabilities" um und setzen Sie die öffentliche URL Ihres Servers von ngrok als Endpunkt für eingehende Nachrichten und Ereignisse. es sollte wie folgt aussehen https://94cd51b63460.ngrok.app/webhooks/inbound für eingehende Nachrichten und https://94cd51b63460.ngrok.app/webhooks/status für den Status. Wenn Sie mehr über Webhooks erfahren möchten, finden Sie Informationen in unserer Vonage-Dokumentation.
 webhooks
Klonen Sie das Vonage Community GitHub-Repository für dieses Projekt und npm install die Abhängigkeiten.
npm install express debug @vonage/messages @vonage/server-sdk dotenv
Erstellen Sie eine .env Datei in Ihrem Projektstamm.
VONAGE_APPLICATION_ID=YOUR_VONAGE_APPLICATION_ID, can be found within the application you’ve created

VONAGE_PRIVATE_KEY=./private.key, is the path to the private.key file that was generated when you created your application

RCS_SENDER_ID=YOUR_RCS_SENDER_ID

PHONE_NUMBER=YOUR_PHONE_NUMBER_E164 that will receive the RCS messages

PORT=3000

VONAGE_API_SIGNATURE_SECRET= is the secret used to sign the request that corresponds to the signature secret associated with the api_key included in the JWT claims. You can identify your signature secret on the Dashboard settingsIn Ihrem Projekt finden Sie auch eine vonage.js-Datei die das Dotenv und Vonage Client Setup enthält.
Fügen Sie eine JWT-Verifizierungsfunktion hinzu, um zu überprüfen, ob die eingehende Anfrage (z. B. eine Nachricht oder ein Anruf) von Vonage stammt.
Die Variable VONAGE_API_SIGNATURE_SECRET ist das Geheimnis, das zum Signieren der Anfrage verwendet wird und dem Signaturgeheimnis entspricht, das mit dem in den JWT-Ansprüchen enthaltenen API-Schlüssel verbunden ist. Sie können Ihr Signaturgeheimnis in den Dashboard-Einstellungen.
Sie können mehr erfahren über die Überprüfung des Antrags.
const verifyJWT = (req) => {
  // Verify if the incoming request came from Vonage
  const jwtToken = req.headers.authorization.split(" ")[1];
  if(!verifySignature(jwtToken, process.env.VONAGE_API_SIGNATURE_SECRET)) {
    console.error("Signature does not match");
    throw new Error("Not a Vonage API request");
  }

  console.log("JWT verified");
}Stellen Sie sicher, dass Sie die @vonage/jwt-Abhängigkeit installieren.
npm install @vonage/jwt
In Ihrer server.js Datei, finden Sie den fertigen Code mit der Gemini-Integration, aber ich wollte Ihnen einen Ausgangspunkt geben, wie man eine Rich Card Message in RCS mit einem fest kodierten Text sendet, damit Sie eine erste Erfahrung damit machen und sehen können, wie es läuft, bevor Sie eine komplexere Einrichtung vornehmen, mit allem, was wir bisher eingerichtet haben.
Fügen Sie zunächst die Importe hinzu und definieren Sie Ihre Variablen.
import Express from "express";

import { RCSCustom, RCSText } from "@vonage/messages";

import { vonage } from "./vonage.js";

import "dotenv/config";

const app = new Express();

const port = process.env.PORT || 3000;

const recipientNumber = process.env.PHONE_NUMBER;

if (!recipientNumber) {

  process.exit(1);

}

if (!process.env.RCS_SENDER_ID) {

  process.exit(1);

}Wir werden auch einen asynchronen Wrapper für die Fehlerbehandlung in Routen verwenden.
const catchAsync = (fn) => (req, res, next) => {

  fn(req, res, next).catch(next);

};

app.use(Express.json());

app.get(

  "/send-story-request",

  catchAsync(async (req, res) => {

    await sendBedtimeStoryRequest(recipientNumber);

    res.status(200).json({ message: "Bedtime story request sent!" });

  })

);Erstellen Sie den /webhooks/status Endpunkt.
app.post(

  "/webhooks/status",

  catchAsync(async (req, res) => {

    res.status(200).json({ ok: true });

  })

);
Erstellen Sie den /webhooks/inbound Endpunkt.
app.post(

  "/webhooks/inbound",

  catchAsync(async (req, res) => {

    const { channel, message_type, reply, from } = req.body;

    if (channel === 'rcs' && message_type === 'reply' && reply) {

      const receivedId = reply.id;

      const receivedTitle = reply.title;

      if (receivedId === 'GENERATE_STORY_REQUEST' || receivedTitle === 'Generate Story') {

        const replyToNumber = from;

        const helloWorldMessage = "Hello world!";

        await sendRCSGreeting(replyToNumber, helloWorldMessage);

      } else {

        // Unhandled reply

      }

    } else if (channel === 'rcs' && message_type === 'text') {

      if (req.body.text && req.body.text.toLowerCase() === 'generate story') {

        await sendRCSGreeting(from, "Hello world!");

      } else {

        await sendRCSGreeting(from, "I received your message: " + req.body.text);

      }

    }

    res.status(200).json({ ok: true });

  })

);Fügen Sie einige Meldungen zur Fehlerbehandlung hinzu, und die Anwendung lauscht auf dem definierten Port (3000).
app.all("*", (req, res) => {

  res.status(404).json({

    status: 404,

    title: "Not Found",

  });

});

app.use((err, req, res, next) => {

  res.status(500).json({

    status: 500,

    title: "Internal Server Error",

    detail: err.message,

  });

});

app.listen(port);Erstellen Sie die sendBedtimeStoryRequest die eine neue benutzerdefinierte RCS-Nachricht mit der Aufschrift "Bedtime Story Generator" sendet, die eine Schaltfläche zur Erstellung einer neuen Geschichte enthält.
const sendBedtimeStoryRequest = async (number) => {

  const message = new RCSCustom({

    to: number,

    from: process.env.RCS_SENDER_ID,

    custom: {

      contentMessage: {

        richCard: {

          standaloneCard: {

            cardOrientation: "VERTICAL",

            cardContent: {

              title: "Bedtime Story Generator",

              description: 'Tap "Generate Story" for a magical tale!',

              media: {

                height: "MEDIUM",

                contentInfo: {

                  fileUrl:

                    "https://cdn-icons-png.flaticon.com/512/2917/2917637.png",

                },

              },

              suggestions: [

                {

                  reply: {

                    text: "Generate Story",

                    postbackData: "GENERATE_STORY_REQUEST",

                  },

                },

              ],

            },

          },

        },

      },

    },

  });

  try {

    await vonage.messages.send(message);

  } catch (err) {

    if (err.response) {

      err.response.text().catch(() => {});

    }

  }

};
Erstellen Sie die sendRCSGreeting die eine RCS-Nachricht über die Vonage Messages API sendet.
const sendRCSGreeting = async (to, messageText) => {

  const message = new RCSText({

    to: to,

    from: process.env.RCS_SENDER_ID,

    text: messageText,

  });

  try {

    await vonage.messages.send(message);

  } catch (err) {

    if (err.response) {

      err.response.text().catch(() => {});

    }

  }

};Um die Anwendung auszuführen, starten Sie den Server:
node server.jsRufen Sie dann die folgende URL in Ihrem Browser auf, wodurch die erste Nachricht an das Telefon des Benutzers ausgelöst wird, in der er aufgefordert wird, eine Geschichte zu erstellen. Die JSON-Bestätigung in Ihrem Browser sowie die empfangene RCS-Nachricht auf Ihrem Telefon sind Zeichen dafür, dass das System funktioniert.
http://localhost:3000/send-story-request
Jetzt, wo RCS-Messaging und Webhook funktionieren, können wir Google Gemini zu unserem Storytelling-Dienst hinzufügen.
Wenn Sie zu AI Studioeinloggst und einen neuen Chat erstellst, kannst du oben rechts '<\>Get Code' sehen und die Programmiersprache deiner Wahl auswählen. Wähle das Modell. Ich habe "Gemini 1.5 Flash Experimental" verwendet, aber Sie können die Sprache wählen, die für Ihr Projekt am sinnvollsten ist.
Um mehr zu erfahren, besuchen Sie die Gemini Entwickler API Dokumentationsseite.
npm install @google/generative-aiFügen Sie Ihren Gemini-API-Schlüssel zu .env.
GEMINI_API_KEY="YOUR_GEMINI_API_KEY"
import { GoogleGenerativeAI } from "@google/generative-ai";

const genAI = new GoogleGenerativeAI(process.env.GEMINI_API_KEY);

const geminiModel = genAI.getGenerativeModel({ model: "gemini-1.5-flash" });
Nachdem Gemini initialisiert wurde, aktualisieren wir unseren /webhooks/inbound Handler. Wenn der Benutzer auf "Generate Story" klickt, rufen wir statt der Antwort "Hello world!" nun geminiModel.generateContent mit einer speziellen Aufforderung für eine Gute-Nacht-Geschichte auf.
Der generierte Text wird dann an den Benutzer zurückgeschickt, indem sendGeneratedStory. Wir haben auch eine Funktion für Benutzer hinzugefügt, die "Story generieren" manuell eingeben könnten.
Die Funktion sendGeneratedStory Funktion nimmt nun den generierten Text und verwendet RCSText, um ihn als reguläre RCS-Textnachricht zurückzusenden.
Um die Anwendung auszuführen, starten Sie den Server (erneut):
node server.jsRufen Sie dann die folgende URL in Ihrem Browser auf: http://localhost:3000/send-story-request
Auf Ihrem Gerät erhalten Sie eine RCS-Nachricht. Tippen Sie auf "Story generieren", um eine von Gemini erstellte Gute-Nacht-Geschichte zu erhalten.
 RCS Project
Schlussfolgerung
In diesem Tutorial habe ich Ihnen gezeigt, wie Sie einen Gemini-basierten Storytelling-Dienst mit der RCS-API von Vonage erstellen können. Das letzte Mal, dass ich etwas mit RCS zu tun hatte, war 2020. Ich habe an einem Workshop teilgenommen, bei dem jeder Teilnehmer eine RCS-fähige SIM-Karte erhalten hat. Es war schön, wieder mit RCS zu arbeiten, und ich kann es kaum erwarten, weitere Blogbeiträge darüber zu schreiben.
Haben Sie eine Frage oder möchten Sie uns mitteilen, was Sie gerade bauen?
Beteiligen Sie sich am Gespräch auf dem Vonage Community Slack
Abonnieren Sie den Entwickler-Newsletter
Folgen Sie uns auf X (früher Twitter) für Updates
Sehen Sie sich die Tutorials auf unserem YouTube-Kanal
Verbinden Sie sich mit uns auf der Vonage Entwickler-Seite auf LinkedIn
Bleiben Sie auf dem Laufenden und halten Sie sich über die neuesten Nachrichten, Tipps und Veranstaltungen für Entwickler auf dem Laufenden.