
Share:
Benjamin Aronov is a developer advocate at Vonage. He is a proven community builder with a background in Ruby on Rails. Benjamin enjoys the beaches of Tel Aviv which he calls home. His Tel Aviv base allows him to meet and learn from some of the world's best startup founders. Outside of tech, Benjamin loves traveling the world in search of the perfect pain au chocolat.
JWT Authentication in Go with Gin
Time to read: 9 minutes
A JSON Web Token (JWT) is a compact, signed way to securely transmit information between parties as a JSON object. In Web APIs, JWTs are a common choice for authentication because the server can validate them without looking anything up in a database.
They’re popular with developers because they are:
Stateless: A valid JWT contains all the data needed for verification, so no persistence layer is required.
Tamper-resistant: A JWT’s signature is always verified before trusting the payload.
Configurable expiry: You can set a short lifespan to limit damage if a token is compromised.
In this tutorial, you’ll build a secure authentication system in Go using the Gin framework, JSON Web Tokens (JWTs), and Redis to manage token storage, rotation, and revocation.
>> TL;DR: Find the complete working code on our Vonage Community GitHub.
To follow along, you’ll need:
To complete this tutorial, you will need a Vonage API account. If you don’t have one already, you can sign up today and start building with free credit. Once you have an account, you can find your API Key and API Secret at the top of the Vonage API Dashboard.

A JSON Web Token is three Base64 URL-encoded parts joined by dots:
<header>.<payload>.<signature>Header: the type of token and the signing algorithm used. The type of token is typically “JWT” while the Signing Algorithm can either be HMAC or SHA256.
Payload: the second part of the token which contains the claims. These claims include application specific data(e.g, user id, username), token expiration time(exp), issuer(iss), subject(sub), and so on.
Signature: the encoded header, encoded payload, and a secret you provide are used to create the signature.
Let’s use a simple token to understand the above concepts. This token is signed with the secret key "my-secret-key".
Token: eyJhbGciOiJIUzI1NiIsInR5cCI6IkpXVCJ9.eyJhdXRob3JpemVkIjp0cnVlLCJ1c2VyX2lkIjo3fQ.bK73DLHVXVmtLXBYwl_TVLVf21OEJ0bzfZHXRbiAboA

Secret: my-secret-keyDon’t worry, the token is invalid, so it won’t work on any production application.
Navigate to the JWT Debugger and paste the token in the “Encoded” section, enter the secret in the “Verify Signature” section, and confirm it shows “Signature Verified”.
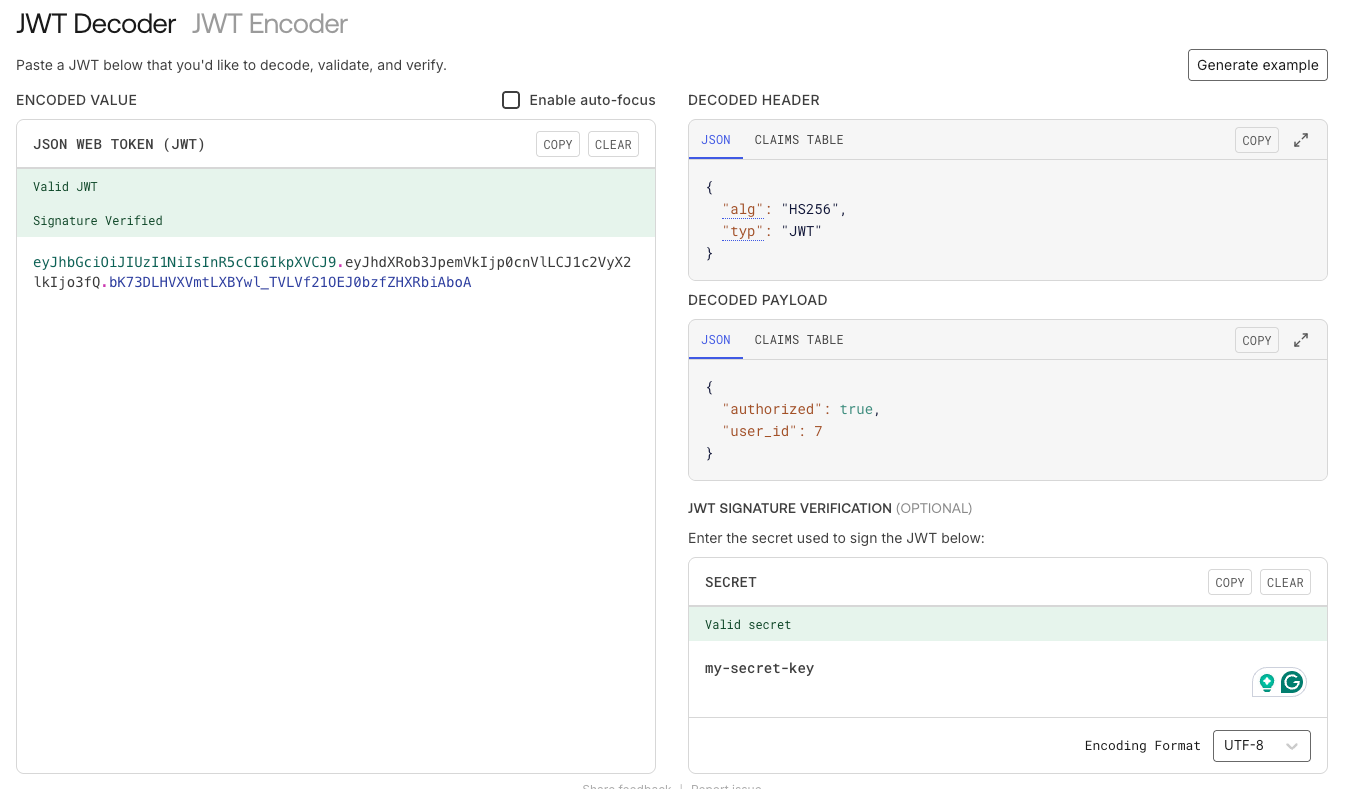 Example of a successfully verified JWT using jwt.io's decoder interface
Since a JWT can be set to expire after a particular period of time, two tokens will be considered in this application:
Access token: short-lived (we use ~15 minutes). Sent on each request.
Refresh token: longer-lived (we use ~7 days). Exchanged for a new access+refresh pair using a dedicated endpoint. We’ll implement rotation (old refresh becomes invalid once used).
For a production web application, it is highly recommended to store JWTs in an HttpOnly cookie:
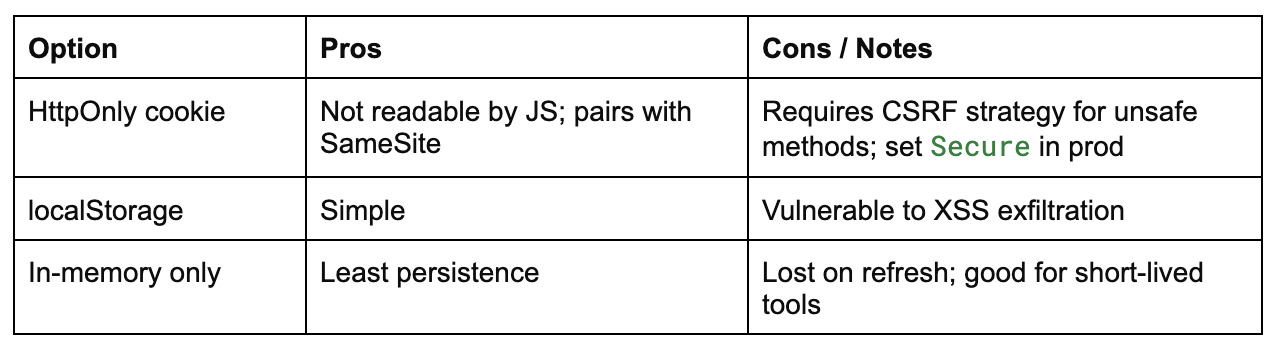 Comparison of HttpOnly cookies, localStorage, and in-memory options for storing JWT tokens in a Go (Gin) application
We’ll set cookies with HttpOnly; Secure; SameSite=Lax (or SameSite=None; Secure for cross-site), and we’ll enable CORS with credentialson the API.
JWT signing algorithms define how tokens are cryptographically secured. Two algorithms we’ll use:
HS256 (HMAC): a shared secret; simple for a single service (we use HS256 in this tutorial).
RS256 / EdDSA: asymmetric keys; better when multiple services must verify without sharing a secret (we’ll also show an RS256 example for Vonage APIs).
Before diving into code, let’s understand what we’ll build. You will put together a small, secure API for a to-do list app. Users need to log in, see their personal tasks, and log out. Nothing fancy, but it must be safe enough to handle real credentials.
In this tutorial, we’ll use Go with the Gin framework to create a minimal JWT-powered authentication system. For simplicity, we won’t connect to a real database. Instead, we’ll define a “dummy” user in our code. The /login route will accept a username and password, verify them against our in-memory user, and issue two tokens: a short-lived access token and a longer-lived refresh token.
Once logged in, the /todo route will only respond if you send a valid access token. You’ll also have a /logout route to instantly revoke tokens (using Redis) and a /token/refresh route to rotate refresh tokens and keep sessions alive securely.
JWTs are normally stateless. This means that once issued, the server can’t take them back. By storing their jti (unique ID) in Redis with a Time to Live (TTL), we can: revoke them instantly at logout, rotate refresh tokens to prevent reuse, keep multiple device sessions without invalidating all of them.
Let’s start by creating and initializing the project:
mkdir jwt-todo && cd jwt-todo
go mod init jwt-todoAnd now we can install our dependencies:
gin: A fast and lightweight HTTP web framework for building our API routes.
golang-jwt: Provides JWT creation, signing, and validation functions for our authentication flow.
go-redis: A Redis client for Go, used to store and revoke tokens instantly.
uuid: Generates unique token IDs (jti) for each JWT, allowing precise revocation.
gin-contrib/cors: Middleware to configure Cross-Origin Resource Sharing (CORS) rules, enabling browser-based clients to talk to our API securely.
godotenv: Loads environment variables from a .env file
go get github.com/gin-gonic/gin
go get github.com/golang-jwt/jwt/v5
go get github.com/redis/go-redis/v9
go get github.com/google/uuid
go get github.com/gin-contrib/cors
go get github.com/joho/godotenv
We’ll use the following project structure:
├── cmd/
│   └── server/main.go
├── internal/
│   ├── auth/auth.go
│   ├── auth/middleware.go
│   ├── store/redis.go
│   └── todo/handler.go
├── go.mod
└── .env
So you can add the corresponding files:
mkdir -p cmd/server internal/auth internal/store internal/todo && \
touch cmd/server/main.go \
      internal/auth/auth.go \
      internal/auth/middleware.go \
      internal/store/redis.go \
      internal/todo/handler.go \
      .env \
      .gitignore
Our app needs a few secret values and configuration settings to run securely. These will live in a .env file during development, and in real environment variables when deployed.
We need two signing keys: one for access tokens and one for refresh tokens. They should be long, random, and impossible to guess. A good rule is at least 32 bytes of randomness.
On macOS / Linux:
# 32 bytes, Base64-encoded
openssl rand -base64 32On Windows (PowerShell):
[Convert]::ToBase64String((1..32 | % {Get-Random -Max 256}))Each command will output a secure string, for example:
lbme36L7N2gqbwR5lOKg1BkIcVu+GTk8K1/b+lQUlng=Execute the relevant command twice. Use one value for ACCESS_SECRET and the other for REFRESH_SECRET.
Open the app in your favorite text editor and add the following to your .env file:
ACCESS_SECRET=dev-access-secret-change-me
REFRESH_SECRET=dev-refresh-secret-change-me
REDIS_ADDR=localhost:6379
FRONTEND_ORIGIN=http://localhost:5173Here’s what each one does:
ACCESS_SECRET: used to sign short-lived JWT access tokens (~15 minutes).
REFRESH_SECRET: used to sign long-lived refresh tokens (~7 days).
REDIS_ADDR: tells the app where to find your Redis instance.
FRONTEND_ORIGIN: the allowed frontend URL for CORS.
>>Note: Always add .env to .gitignore so you don’t accidentally commit secrets to version control.
Our last bit of setup is to run Redis in the background. This will allow us to use Redis in our project in the next section.
If you have Homebrew installed, you can get Redis up and running in a couple of commands:
brew install redis
brew services start redis
On Windows, the easiest way is using Docker (recommended) or WSL. Make sure Docker Desktop is installed and running, then:
docker run --name jwt-redis -p 6379:6379 -d redis:7This will pull the latest Redis 7 image, run it in the background, and expose it on port 6379.
This section sets up a small wrapper around the Redis client so our application can easily interact with the Redis database. By defining a Redis struct that holds a *redis.Client, we create a clean and reusable way to manage Redis connections across the app. The code imports the official go-redis v9 package.
Here, the Client field will store a live Redis connection configured elsewhere in the code. By keeping this in its own package (store), we separate the persistence logic from the rest of the application, making it easier to maintain and test.
// internal/store/redis.go:
package store

import (
	"context"
	"os"
	"time"

	"github.com/redis/go-redis/v9"
)

type Redis struct{ Client *redis.Client }

func NewRedis() *Redis {
	addr := os.Getenv("REDIS_ADDR")
	if addr == "" {
		addr = "localhost:6379"
	}
	rdb := redis.NewClient(&redis.Options{Addr: addr})
	return &Redis{Client: rdb}
}

func (r *Redis) SetJTI(ctx context.Context, key, userID string, exp time.Time) error {
	return r.Client.Set(ctx, key, userID, time.Until(exp)).Err()
}

func (r *Redis) DelJTI(ctx context.Context, key string) error {
	return r.Client.Del(ctx, key).Err()
}

func (r *Redis) GetUserByJTI(ctx context.Context, key string) (string, error) {
	return r.Client.Get(ctx, key).Result()
}
In this step, we create short-lived access tokens and longer-lived refresh tokens using standard JWT registered claims like issuer, audience, subject, and expiration. The golang-jwt package handles the signing process, using our securely stored secrets to ensure the tokens can’t be tampered with. Once generated, both tokens are stored in Redis so they can be validated or revoked later, providing a secure and centralized way to manage active sessions.
// internal/auth/auth.go
package auth

import (
	"context"
	"errors"
	"net/http"
	"os"
	"time"

"jwt-todo/internal/store"

	"github.com/gin-gonic/gin"
	"github.com/golang-jwt/jwt/v5"
	"github.com/google/uuid"
)

type Tokens struct {
	Access   string
	Refresh  string
	JTIAcc   string
	JTIRef   string
	ExpAcc   time.Time
	ExpRef   time.Time
	UserID   string
	Issuer   string
	Audience string
}

func IssueTokens(userID string) (*Tokens, error) {
	now := time.Now().UTC()
	t := &Tokens{
		UserID:   userID,
		JTIAcc:   uuid.NewString(),
		JTIRef:   uuid.NewString(),
		ExpAcc:   now.Add(15 * time.Minute),
		ExpRef:   now.Add(7 * 24 * time.Hour),
		Issuer:   "jwt-todo-app",
		Audience: "jwt-todo-client",
	}

	acc := jwt.NewWithClaims(jwt.SigningMethodHS256, jwt.RegisteredClaims{
		Subject:   userID,
		ID:        t.JTIAcc,
		Issuer:    t.Issuer,
		Audience:  jwt.ClaimStrings{t.Audience},
		IssuedAt:  jwt.NewNumericDate(now),
		ExpiresAt: jwt.NewNumericDate(t.ExpAcc),
	})

	ref := jwt.NewWithClaims(jwt.SigningMethodHS256, jwt.RegisteredClaims{
		Subject:   userID,
		ID:        t.JTIRef,
		Issuer:    t.Issuer,
		Audience:  jwt.ClaimStrings{t.Audience},
		IssuedAt:  jwt.NewNumericDate(now),
		ExpiresAt: jwt.NewNumericDate(t.ExpRef),
	})

	var err error
	t.Access, err = acc.SignedString([]byte(os.Getenv("ACCESS_SECRET")))
	if err != nil {
		return nil, err
	}
	t.Refresh, err = ref.SignedString([]byte(os.Getenv("REFRESH_SECRET")))
	if err != nil {
		return nil, err
	}
	return t, nil
}

func Persist(ctx context.Context, r *store.Redis, t *Tokens) error {
	if err := r.SetJTI(ctx, "access:"+t.JTIAcc, t.UserID, t.ExpAcc); err != nil {
		return err
	}
	if err := r.SetJTI(ctx, "refresh:"+t.JTIRef, t.UserID, t.ExpRef); err != nil {
		return err
	}
	return nil
}

func SetAuthCookies(c *gin.Context, t *Tokens) {
	c.SetSameSite(http.SameSiteLaxMode)
	c.SetCookie("access_token", t.Access, int(time.Until(t.ExpAcc).Seconds()), "/", "", true, true)
	c.SetCookie("refresh_token", t.Refresh, int(time.Until(t.ExpRef).Seconds()), "/", "", true, true)
}

func ClearAuthCookies(c *gin.Context) {
	c.SetSameSite(http.SameSiteLaxMode)
	c.SetCookie("access_token", "", -1, "/", "", true, true)
	c.SetCookie("refresh_token", "", -1, "/", "", true, true)
}


func ParseAccess(tokenStr string) (*jwt.RegisteredClaims, error) {
	secret := os.Getenv("ACCESS_SECRET")
	return parseWithSecret(tokenStr, secret)
}


func ParseRefresh(tokenStr string) (*jwt.RegisteredClaims, error) {
	secret := os.Getenv("REFRESH_SECRET")
	return parseWithSecret(tokenStr, secret)
}

func parseWithSecret(tokenStr, secret string) (*jwt.RegisteredClaims, error) {
	if secret == "" {
		return nil, errors.New("jwt secret not configured")
	}

	parser := jwt.NewParser(jwt.WithValidMethods([]string{jwt.SigningMethodHS256.Alg()}))

	token, err := parser.ParseWithClaims(tokenStr, &jwt.RegisteredClaims{}, func(t *jwt.Token) (interface{}, error) {
		// Extra safety: ensure HMAC family
		if _, ok := t.Method.(*jwt.SigningMethodHMAC); !ok {
			return nil, errors.New("unexpected signing method")
		}
		return []byte(secret), nil
	})
	if err != nil {
		return nil, err
	}

	claims, ok := token.Claims.(*jwt.RegisteredClaims)
	if !ok || !token.Valid {
		return nil, errors.New("invalid token")
	}

	if claims.ExpiresAt != nil && time.Now().After(claims.ExpiresAt.Time) {
		return nil, errors.New("token expired")
	}

	return claims, nil
}
This step ensures that only requests from authenticated users can access certain endpoints. The middleware intercepts each request, checks for a valid access token, and verifies it hasn’t been revoked in Redis.
If the token passes all checks, the request continues to the intended handler; otherwise, it’s blocked with an appropriate error. This centralizes authentication logic so we don’t have to repeat token checks in every route, keeping the code cleaner and more secure.
// internal/auth/middleware.go
package auth

import (
	"context"
	"errors"
	"net/http"
	"strings"

"jwt-todo/internal/store"

	"github.com/gin-gonic/gin"
)

func bearerFromHeader(c *gin.Context) string {
	h := c.GetHeader("Authorization")
	if strings.HasPrefix(h, "Bearer ") {
		return strings.TrimPrefix(h, "Bearer ")
	}
	return ""
}

func AuthMiddleware(r *store.Redis) gin.HandlerFunc {
	return func(c *gin.Context) {
		tokenStr, _ := c.Cookie("access_token")
		if tokenStr == "" {
			tokenStr = bearerFromHeader(c)
		}
		if tokenStr == "" {
			c.AbortWithStatusJSON(http.StatusUnauthorized, gin.H{"error": "missing token"})
			return
		}

		claims, err := ParseAccess(tokenStr)
		if err != nil {
			c.AbortWithStatusJSON(http.StatusUnauthorized, gin.H{"error": "invalid token"})
			return
		}

		ctx := context.Background()
		if _, err := r.GetUserByJTI(ctx, "access:"+claims.ID); err != nil {
			c.AbortWithStatusJSON(http.StatusUnauthorized, gin.H{"error": "token revoked"})
			return
		}

		c.Set("userID", claims.Subject)
		c.Next()
	}
}

func MustCookie(c *gin.Context, name string) (string, error) {
	val, err := c.Cookie(name)
	if err != nil || val == "" {
		return "", errors.New("missing cookie: " + name)
	}
	return val, nil
}
This route demonstrates how an authenticated endpoint works in our app. The Create handler reads the userID from the validated token (set by the middleware) and combines it with the incoming todo payload. Instead of saving to a database, it simply returns this data as JSON, making it easy to verify that authentication is working. In a real-world app, this is where you’d insert logic to persist the todo in a database.
// internal/todo/handler.go
package todo

import (
	"net/http"

	"github.com/gin-gonic/gin"
)

type Todo struct {
	UserID string `json:"user_id"`
	Title  string `json:"title"`
}

func Create() gin.HandlerFunc {
	return func(c *gin.Context) {
		var in struct {
			Title string `json:"title" binding:"required"`
		}
		if err := c.ShouldBindJSON(&in); err != nil {
			c.JSON(http.StatusUnprocessableEntity, gin.H{"error": "invalid json"})
			return
		}
		userID, _ := c.Get("userID")
		td := Todo{UserID: userID.(string), Title: in.Title}
		// Here you’d save to a DB; we’ll just echo it back
		c.JSON(http.StatusCreated, td)
	}
}
In this final step, we bring together all the components (Redis store, authentication logic, middleware, and route handlers) into a single running Gin application. The main.go file initializes dependencies, configures routes, and starts the HTTP server. This is the glue that connects each part of the app so authentication, token storage, and protected routes work seamlessly from end to end.
// cmd/server/main.go

package main

import (
	"context"
	"log"
	"net/http"
	"os"

	"github.com/gin-contrib/cors"
	"github.com/gin-gonic/gin"
	"github.com/joho/godotenv"

	"jwt-todo/internal/auth"
	"jwt-todo/internal/store"
	"jwt-todo/internal/todo"
)

type User struct {
	ID       string `json:"id"`
	Username string `json:"username"`
	Password string `json:"password"`
}

var demoUser = User{ID: "1", Username: "user", Password: "pass"}

func main() {
	_ = godotenv.Load()

	for _, k := range []string{"ACCESS_SECRET", "REFRESH_SECRET"} {
		if os.Getenv(k) == "" {
			log.Fatalf("%s not set", k)
		}
	}

	rds := store.NewRedis()
	r := gin.Default()

	r.Use(cors.New(cors.Config{
		AllowOrigins:     []string{os.Getenv("FRONTEND_ORIGIN")},
		AllowMethods:     []string{"GET", "POST"},
		AllowHeaders:     []string{"Content-Type", "Authorization"},
		AllowCredentials: true,
	}))

	r.POST("/login", func(c *gin.Context) {
		var in struct {
			Username string `json:"username"`
			Password string `json:"password"`
		}
		if err := c.ShouldBindJSON(&in); err != nil {
			c.JSON(http.StatusUnprocessableEntity, gin.H{"error": "invalid json"})
			return
		}
		if in.Username != demoUser.Username || in.Password != demoUser.Password {
			c.JSON(http.StatusUnauthorized, gin.H{"error": "invalid credentials"})
			return
		}

		toks, err := auth.IssueTokens(demoUser.ID)
		if err != nil {
			c.JSON(http.StatusInternalServerError, gin.H{"error": "could not issue tokens"})
			return
		}
		if err := auth.Persist(c, rds, toks); err != nil {
			c.JSON(http.StatusInternalServerError, gin.H{"error": "could not persist tokens"})
			return
		}
		auth.SetAuthCookies(c, toks)
		c.JSON(http.StatusOK, gin.H{"ok": true})
	})

	r.POST("/todo", auth.AuthMiddleware(rds), todo.Create())

	r.POST("/logout", auth.AuthMiddleware(rds), func(c *gin.Context) {
		acc, _ := c.Cookie("access_token")
		ref, _ := c.Cookie("refresh_token")
		ctx := context.Background()

		if acc != "" {
			if claims, err := auth.ParseAccess(acc); err == nil {
				_ = rds.DelJTI(ctx, "access:"+claims.ID)
			}
		}
		if ref != "" {
			if claims, err := auth.ParseRefresh(ref); err == nil {
				_ = rds.DelJTI(ctx, "refresh:"+claims.ID)
			}
		}
		auth.ClearAuthCookies(c)
		c.JSON(http.StatusOK, gin.H{"ok": true})
	})

	r.POST("/token/refresh", func(c *gin.Context) {
		ref, err := auth.MustCookie(c, "refresh_token")
		if err != nil {
			c.JSON(http.StatusUnauthorized, gin.H{"error": "missing refresh token"})
			return
		}
		claims, err := auth.ParseRefresh(ref)
		if err != nil {
			c.JSON(http.StatusUnauthorized, gin.H{"error": "invalid refresh token"})
			return
		}
		ctx := context.Background()
		if _, err := rds.GetUserByJTI(ctx, "refresh:"+claims.ID); err != nil {
			c.JSON(http.StatusUnauthorized, gin.H{"error": "refresh revoked"})
			return
		}
		_ = rds.DelJTI(ctx, "refresh:"+claims.ID)

		toks, err := auth.IssueTokens(claims.Subject)
		if err != nil {
			c.JSON(http.StatusInternalServerError, gin.H{"error": "could not issue new tokens"})
			return
		}
		if err := auth.Persist(ctx, rds, toks); err != nil {
			c.JSON(http.StatusInternalServerError, gin.H{"error": "could not persist new tokens"})
			return
		}
		auth.SetAuthCookies(c, toks)
		c.JSON(http.StatusCreated, gin.H{"ok": true})
	})

	log.Fatal(r.Run(":8080"))
}
Now that our app and Redis are running, let’s walk through the full authentication cycle: logging in, creating a todo, logging out, failing an authenticated request, and refreshing tokens.
First start our Gin server:
go run ./cmd/serverIf everything is working, Gin will print routes and listen on :8080.
Ensure that you run each of these steps in a separate terminal tab from the server.
This simulates a user login and saves the access_token and refresh_token in cookies.txt for later requests.
curl -i -c cookies.txt \
  -H "Content-Type: application/json" \
  -d '{"username":"user","password":"pass"}' \
http://localhost:8080/loginExpected output:
HTTP 200 OK
Two Set-Cookie headers (access_token, refresh_token)
JSON: {"ok":true}
curl -i -b cookies.txt \
  -H "Content-Type: application/json" \
  -d '{"title":"write secure JWT blog"}' \
http://localhost:8080/todoExpected output:
HTTP 201 Created
JSON includes user_id and title.
curl -i -b cookies.txt -X POST http://localhost:8080/logoutExpected output:
HTTP 200 OK
access_token and refresh_token cookies set to empty with Max-Age=0.
Now that tokens are revoked, another create request should fail.
curl -i -b cookies.txt \
  -H "Content-Type: application/json" \
  -d '{"title":"should fail"}' \
http://localhost:8080/todoExpected output:
HTTP 401 Unauthorized
JSON: {"error":"token revoked"}
Test after logging back in.
curl -i -b cookies.txt -c cookies.txt \
-X POST http://localhost:8080/token/refreshExpected output:
HTTP 201 Created
New Set-Cookie headers for both tokens
JSON: {"ok":true}
Now that you’ve built your own JWT auth system, check out a quick and easy example of JWTs in Vonage APIs.Here we’ll trigger an outbound voice call using the Vonage Voice API:
Buy a Vonage Virtual Number
Create a new Vonage Application in the developer dashboard
Enable the Voice API
Generate a private.key
Generate a Vonage JWT using the Online JWT Generator
paste your Application ID + private.key
Set your environment variables directly in your terminal:
export VONAGE_FROM_VOICE="YOUR_VIRTUAL_NUMBER" \ VOICE_TO_NUMBER="YOUR_PERSONAL_NUMBER" \ VONAGE_JWT="paste-your-jwt-here"CopyCreate a robotic call to yourself with a CURL request:
curl -X POST https://api.nexmo.com/v1/calls \
  -H "Authorization: Bearer $VONAGE_JWT" \
  -H "Content-Type: application/json" \
  -d '{
    "to":   [{"type":"phone","number":"'"$VOICE_TO_NUMBER"'"}],
    "from": {"type":"phone","number":"'"$VONAGE_FROM_VOICE"'"},
    "ncco": [{"action":"talk","text":"Hello from Vonage! Aren't JWTS so cool?"}]
  }'
You’ve just built a complete, production-ready JWT authentication flow in Go with Gin! By issuing short-lived access tokens, rotating refresh tokens, storing them securely in HttpOnly cookies, and revoking them instantly via Redis you have created true security in a Go app. You now have middleware that supports both cookies and Bearer tokens, plus a working refresh mechanism to keep sessions alive without forcing re-login.
With this foundation, you can easily:
Replace the in-memory demo user with a real database lookup
Implement per-device refresh token tracking for more granular session control
Switch to RS256 or EdDSA signing for public key verification across services
Integrate with external APIs, like the Vonage Voice API example we covered, to trigger calls or messages after certain actions
JWTs aren’t just for authentication; they’re a building block for secure, stateless systems that scale. By combining them with Redis for revocation and careful token design, you’ve built a solution that balances performance, security, and developer productivity.
If you try this approach in your own project, or extend it with multi-factor authentication, OAuth flows, or API integrations, we’d love to hear about it. Join the conversation on the Vonage Community Slack, or reach out on X (formerly Twitter) to share what you’ve built.
Share:
Benjamin Aronov is a developer advocate at Vonage. He is a proven community builder with a background in Ruby on Rails. Benjamin enjoys the beaches of Tel Aviv which he calls home. His Tel Aviv base allows him to meet and learn from some of the world's best startup founders. Outside of tech, Benjamin loves traveling the world in search of the perfect pain au chocolat.