SMS APIからMessages APIへの移行
Vonage Messages APIはSMSの送受信に最適です。このAPIはSMS、MMS、RCS、WhatsAppなど複数のチャネルを単一の一貫したインターフェースでサポートします。このガイドではHTTPベースのSMS APIとMessages APIを比較し、アカウントセットアップ、アウトバウンドリクエスト、インバウンドペイロード、移行時に必要なステータストラッキングの変更について説明します。SMPPの統合はカバーしていません。
SMS APIは既存のお客様には引き続きサポートされます。しかし、Messages APIには新機能や改良のための強固な開発ロードマップがあり、すべての新規統合、または提供される追加のメッセージングチャネルや機能を利用したい既存の統合に推奨されるパスです。
Messages APIは現在2つのバージョンをサポートしている: v1 そして遺産 v0.1.SMS APIからMessages APIへの移行のためには、Messages APIのv1を使用することを強くお勧めします。
メッセージAPIを使用するためのVonageアカウントのセットアップ
ダッシュボードでMessages APIを選択します。
レガシーSMS APIからMessages APIへの移行の最初のステップは、次のように更新することである。 Messages API タイプ に設定する。 API設定 ページ を選択します。選択 Messages API として APIタイプ ここにある。
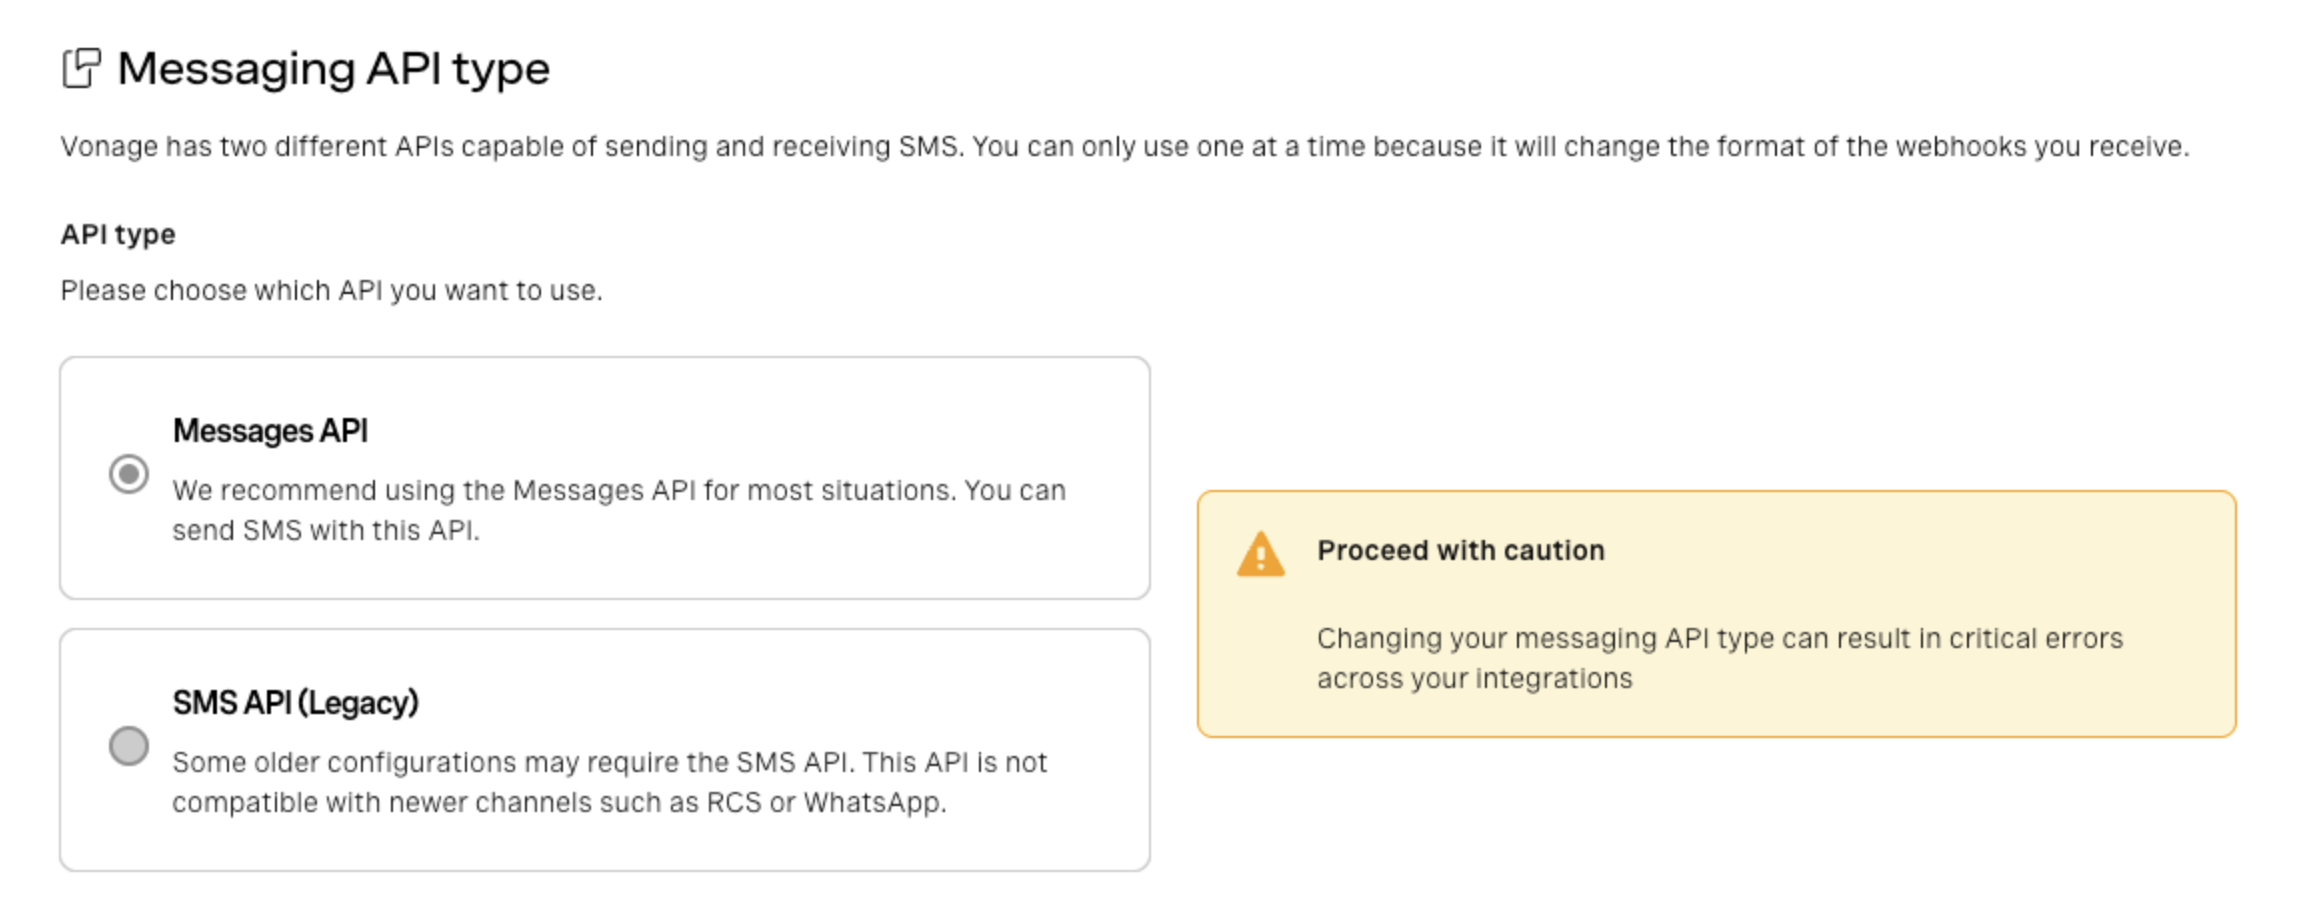
この設定をSMS API (レガシー)から変更しない場合、受信メッセージと配信レシートは引き続きダッシュボードのSMS API設定を使用します。
アカウントレベルの設定とVonageアプリケーションの比較
アカウントでMessages APIを使用するように設定したら、Messages API設定の方法を決める必要があります。これには2つの方法があります:
- アカウントレベルの設定
- Vonageアプリケーション
この2つの主な違いは、Webhookを設定する場所と、認証に使用する認証情報(したがって使用可能な認証方法)です。MessagesAPIをアカウントレベルで設定する方法は、SMS APIの設定方法に近い。以下の表は、その違いを詳細に比較したものです。
| 決定エリア | SMS API (レガシー) | Messages API(アカウントレベルの設定) | Messages API(Vonageアプリケーション) |
|---|---|---|---|
| 資格証明書 | APIキーとシークレット(または署名シークレット) | APIキーとシークレット | アプリケーションIDと秘密鍵 |
| 認証 | 基本認証または署名認証 | 基本認証 | 秘密鍵で署名されたJWT |
| インバウンドメッセージ | API設定のアカウントレベルのインバウンドウェブフックURLと、Your Numbersの下にある番号ごとのインバウンドオーバーライドのオプション | API設定のアカウントレベルの受信Webhook URL | 番号にリンクされたVonageアプリケーションのアプリケーション・レベルのインバウンド・ウェブフックURL |
| ステータス・コールバック1 | API設定のAccount-level webhook URL("Delivery receipts "と表示されています。) | API設定のアカウントレベルのWebhook URL | アプリケーションレベルのステータスURL |
| APIバージョン2 | バージョンは1つだけ | アカウントレベルのMessages APIバージョン設定 | アプリケーションレベルのMessages APIバージョン設定 |
| 追加設定 | なし | なし | セキュアなインバウンドメディア |
| コンフィギュレーション数 | つ(Accountレベル) | つ(Accountレベル) | 複数(各Vonage Applicationsには独自の設定があります。) |
- SMS API と Messages API の両方は、設定された DLR/Status Webhook URL をリクエストごとにオーバーライドすることもサポートしています。
- 移行にはMessages API v1の使用を強くお勧めします。移行には
Versionに設定されている。v1これは、アカウント設定または作成したVonageアプリケーションのいずれかで設定します(使用している設定方法によって異なります)。これは、すべての新しいVonageアカウントのデフォルトですが、次のように設定することができます。v0.1後方互換性のため、古いアカウントで使用できます。
一般的には、柔軟性が高く、認証にJWTを使用するため、Messages APIの統合にはVonage Applicationsを使用することをお勧めします。しかし、アカウントレベルの設定はSMS APIで使用されているアプローチに近いため、移行には2段階のアプローチを検討し、まずMessages APIのアカウントレベルの設定と基本認証に移行してから、Vonage Applicationsを使用することをお勧めします。
Vonageアプリケーションとは何ですか?
Vonageアプリケーションは、SMS APIから来た開発者にとっては新しい概念かもしれない。これは基本的にコンフィギュレーションとクレデンシャルのためのコンテナです。ソフトウェア・アプリケーションとは異なります。
各Vonage Applicationsには以下のものがあります:
- 名前
- 固有のアプリケーションID
- 生成された公開鍵と秘密鍵のペア(JWT認証に使用される)
- 製品固有の追加設定。Messages APIの場合、受信メッセージとメッセージステータス更新用のWebhook URLが含まれます。
SMS APIはアプリケーションを使用しません。Webhookはアカウントレベルでグローバルに設定されます。MessagesAPIでもアカウントレベルでの設定は可能ですが、以下のようになります。 また はVonage Applicationsの使用をサポートしています。各アプリケーションは独自のウェブフック構成と設定を持つため、複数の統合を独立して管理することが容易になります。
Vonageアプリケーションを推奨する理由
Messages APIでの設定方法の選択は、設定がどこで行われるか、また使用される認証方法にも影響します。
Vonageアプリケーションをお勧めする理由は以下の通りです:
- 設定は Vonage アプリケーション・レベルで定義され、多数のアプリケーションを作成できるため、異なるビジネス・ワークフローやユースケースに対して複数の統合を管理することが容易になります。
- Vonageアプリケーションは、Vonage CLIまたはアプリケーションAPIを使用してプログラムで作成および管理できます。
- Vonageアプリケーションでは、認証に公開/秘密鍵ペアを使用して生成されたJWTを使用できます。これにより、ベーシック認証と比較して、認証プロセスのセキュリティ層が追加されます。
アカウントレベルの設定の使用
Messages API webhooksでAccountレベルの設定を使いたい場合、基本的なセットアップの流れは以下のようになる:
- オープン API設定 での ダッシュボード.
- を設定する。 Messages APIバージョン への
v1. - Account レベルの受信とステータスの Webhook URL を設定します。
- レビュー あなたのナンバーズ ルーティングを変更する可能性のある、番号ごとのインバウンドオーバーライドのために。
- Basic 認証を使用して Messages API リクエストを送信します。
- 本番トラフィックを切り替える前に、受信メッセージとステータス・コールバックが期待されるアカウント・レベルのエンドポイントに到達していることを検証する。
メッセージAPI用Vonageアプリケーションの使用
アプリケーションレベルのルーティングとJWT認証が必要な場合、セットアップの流れは次のようになる:
- 新しいアプリケーションを作成するか、使用する既存のアプリケーションを開きます。
- を有効にする。 メッセージ 能力だ。
- アプリケーションの受信とステータスの Webhook URL を設定します。
- を設定する。 Messages APIバージョン への
v1. - SMS対応番号をそのアプリケーションにリンクする。.
- JWT 認証を使用して Messages API リクエストを送信します。
- 本番トラフィックを切り替える前に、受信メッセージとステータス・コールバックがアプリケーション・レベルのエンドポイントに届いていることを検証する。
Vonage APIアプリケーションの作成
Messagesアプリケーションの作成には3つの方法があります:
- Vonage CLIの使用
- ダッシュボードの使用
- アプリケーションAPIの使用
それぞれの方法については、以下のセクションで説明する。
Vonage CLIを使用してメッセージアプリケーションを作成する方法
Vonage CLIを使用してアプリケーションを作成するには、シェルに次のコマンドを入力します:
このコマンドは Messages API アプリケーションを作成します。 能力そして、ウェブフックURLは指定されたとおりに設定される。また、秘密鍵ファイル my_messages_app.key を作成または更新します。 vonage_app.json ファイル。
ダッシュボードを使ったメッセージアプリケーションの作成方法
でメッセージアプリケーションを作成できます。 ダッシュボード.
ダッシュボードを使用してアプリケーションを作成します:
-
アンダー Applications をクリックします。 新規アプリケーションの作成 ボタンをクリックする。
-
アンダー 名称アプリケーション名を入力します。後で参照しやすいように名前を決めてください。
-
ボタンをクリックする 公開鍵と秘密鍵の生成.これで公開鍵と秘密鍵のペアが作成され、秘密鍵はブラウザからダウンロードされる。
-
アンダー 能力 を選択する。 メッセージ ボタンをクリックする。
-
の中で インバウンドURL ボックスに、受信メッセージ・ウェブフックのURLを入力します、
https://example.com/webhooks/inbound-message. -
の中で ステータスURL ボックスに、メッセージ・ステータスWebhookのURLを入力します、
https://example.com/webhooks/message-status. -
をクリックする。 新規アプリケーションの作成 ボタンをクリックします。アプリケーション作成手順の次のステップに進み、Vonage API番号をアプリケーションにリンクしたり、Facebookなどの外部アカウントをこのアプリケーションにリンクしたりできます。
-
このアプリケーションをリンクさせたい外部アカウントがある場合は、そのアカウントをクリックします。 リンクされた外部アカウント タブをクリックし、対応する リンク ボタンをクリックします。
これでアプリケーションの作成は完了です。
注: アプリケーションをテストする前に、Webhookが設定され、Webhookサーバーが動作していることを確認してください。
アプリケーションAPIを使用したMessagesアプリケーションの作成方法
アプリケーションAPIを使用すると、ダッシュボードやCLIを使用せずに、プログラムでVonageアプリケーションを作成および設定できます。アプリケーションAPI経由で作成されたVonageアプリケーションは、ダッシュボード経由で作成されたものと同じように動作します。
Vonageアプリケーションの作成方法の詳細については、以下を参照してください。 Vonageアプリケーションの作成.
アプリケーションに電話番号をリンクする
ダッシュボードで Applications ページ使用したいアプリケーションを選択し、そのアプリケーションの リンク・ナンバー タブ
番号固有の受信ウェブフック設定は、次の場所からも管理できます。 あなたのナンバーズ.ダッシュボードは、番号ごとの受信 Webhook が Account レベルの受信 Webhook をオーバーライドすることを示しています。メッセージ・アプリケーションにもリンクされている Numbers を使用している場合は、オーバーライドの動作に依存する前に、アカウントで結果のルーティングを検証してください。
番号がMessages対応アプリケーションにリンクされていない場合、その番号への受信SMSメッセージは、次の場所で定義された受信メッセージウェブフックにリクエストを送信します。 アカウントレベル での API設定 ダッシュボードのコンフィギュレーションではなく、アプリケーションレベルのメッセージウェブフックのコンフィギュレーション。
SMSを送信する(送信メッセージ)
エンドポイント
| アスペクト | Messages API | SMS API (レガシー) |
|---|---|---|
| エンドポイントの送信 | ポスト /v1/messages |
ポスト /sms/json |
| 方法 | POST | POST |
| コンテンツタイプ | application/json | application/x-www-form-urlencoded |
リクエスト体制
Messages API ペイロード:
{
  "message_type": "text",
  "text": "Hello from Vonage",
  "to": "447700900000",
  "from": "Vonage",
  "channel": "sms"
}
SMS API(レガシー)のペイロード:
from=Vonage
text=Hello from Vonage
to=447700900000
リクエストボディの主な違い
| フィールド | Messages API | SMS API (レガシー) |
|---|---|---|
to |
to |
to |
from |
from |
from |
text |
text |
text |
| チャンネル | "channel": "sms" 必須 |
暗黙の了解(SMSのみ) |
| メッセージタイプ | "message_type": "text" 必須 |
暗黙の了解 |
コード・スニペット
以下のコード・スニペットには、cURLの例と、各APIで利用可能なServer SDKの例が含まれています。
Messages API コード・スニペット
| キー | 説明 |
|---|---|
VONAGE_APPLICATION_ID | The Vonage Application ID. |
VONAGE_PRIVATE_KEY | Private key for the Vonage Application. |
MESSAGES_TO_NUMBER | The number you are sending the to in E.164 format. For example |
SMS_SENDER_ID | The alphanumeric string that represents the name or number of the organization sending the message. |
コードを書く
send-sms.sh に以下を追加する:
curl -X POST https://api.nexmo.com/v1/messages \
  -H "Authorization: Bearer "$JWT\
  -H 'Content-Type: application/json' \
  -H 'Accept: application/json' \
  -d $'{
    "to": "'${MESSAGES_TO_NUMBER}'",
    "from": "'${SMS_SENDER_ID}'",
    "channel": "sms",
    "message_type": "text",
    "text": "This is an SMS sent using the Vonage Messages API."
  }'
コードを実行する
このファイルをあなたのマシンに保存し、実行する:
前提条件
npm install @vonage/server-sdk @vonage/messagessend-sms.js という名前のファイルを作成し、以下のコードを追加する:
const { Vonage } = require('@vonage/server-sdk');
const { Channels } = require('@vonage/messages');

/**
 * It is best to send messages using JWT instead of basic auth. If you leave out
 * apiKey and apiSecret, the messages SDK will send requests using JWT tokens
 *
 * @link https://developer.vonage.com/en/messages/technical-details#authentication
 */
const vonage = new Vonage(
  {
    applicationId: VONAGE_APPLICATION_ID,
    privateKey: VONAGE_PRIVATE_KEY,
  },
  {
    ...(MESSAGES_API_URL ? {apiHost: MESSAGES_API_URL} : {}),
  },
);コードを書く
send-sms.js に以下を追加する:
vonage.messages.send({
  messageType: 'sms',
  channel: Channels.SMS,
  text: 'This is an SMS text message sent using the Messages API',
  to: MESSAGES_TO_NUMBER,
  from: SMS_SENDER_ID,
})
  .then(({ messageUUID }) => console.log(messageUUID))
.catch((error) => console.error(error));コードを実行する
このファイルをあなたのマシンに保存し、実行する:
前提条件
コードを書く
SendSmsText ファイルのmain メソッドに以下を追加する:
val messageId = client.messages.send(
    smsText {
        to(MESSAGES_TO_NUMBER)
        from(SMS_SENDER_ID)
        text("This is an SMS text message sent using the Messages API")
    }
)コードを実行する
Gradle用のアプリケーション プラグインを使うことで、アプリケーションの実行を簡単にすることができます。build.gradle を以下のように更新する:
apply plugin: 'application'
mainClassName = project.hasProperty('main') ? project.getProperty('main') : ''以下のgradle コマンドを実行し、com.vonage.quickstart.kt.messages.sms をSendSmsText を含むパッケージに置き換えてアプリケーションを実行する:
前提条件
build.gradle に以下を追加する:
implementation 'com.vonage:server-sdk:9.3.1'SendSmsText という名前のファイルを作成し、main メソッドに以下のコードを追加する:
VonageClient client = VonageClient.builder()
		.applicationId(VONAGE_APPLICATION_ID)
		.privateKeyPath(VONAGE_PRIVATE_KEY_PATH)
.build();コードを書く
SendSmsText ファイルのmain メソッドに以下を追加する:
var response = client.getMessagesClient().sendMessage(
		SmsTextRequest.builder()
			.from(SMS_SENDER_ID).to(MESSAGES_TO_NUMBER)
			.text("This is an SMS text message sent using the Messages API")
			.build()
);
System.out.println("Message sent successfully. ID: " + response.getMessageUuid());コードを実行する
Gradle用のアプリケーション プラグインを使うことで、アプリケーションの実行を簡単にすることができます。build.gradle を以下のように更新する:
apply plugin: 'application'
mainClassName = project.hasProperty('main') ? project.getProperty('main') : ''以下のgradle コマンドを実行し、com.vonage.quickstart.messages.sms をSendSmsText を含むパッケージに置き換えてアプリケーションを実行する:
コードを書く
SendSms.cs に以下を追加する:
var credentials = Credentials.FromAppIdAndPrivateKeyPath(VONAGE_APP_ID, VONAGE_PRIVATE_KEY_PATH);

var vonageClient = new VonageClient(credentials);

var request = new Vonage.Messages.Sms.SmsRequest
{
    To = MESSAGES_TO_NUMBER,
    From = SMS_SENDER_ID,
    Text = "An SMS sent using the Vonage Messages API"
};

var response = await vonageClient.MessagesClient.SendAsync(request);前提条件
コードを書く
send-sms.php に以下を追加する:
$sms = new \Vonage\Messages\Channel\SMS\SMSText(
    TO_NUMBER,
    FROM_NUMBER,
    'This is an SMS sent using the Vonage PHP SDK'
);コードを実行する
このファイルをあなたのマシンに保存し、実行する:
コードを書く
send-sms.py に以下を追加する:
from vonage import Auth, Vonage
from vonage_messages import Sms

client = Vonage(
    Auth(
        application_id=VONAGE_APPLICATION_ID,
        private_key=VONAGE_PRIVATE_KEY,
    )
)

response = client.messages.send(
    Sms(
        to=MESSAGES_TO_NUMBER,
        from_=SMS_SENDER_ID,
        text='This is an SMS sent using the Vonage Messages API.',
    )
)
print(response)コードを実行する
このファイルをあなたのマシンに保存し、実行する:
前提条件
コードを書く
send-sms.rb に以下を追加する:
message = client.messaging.sms(
  message: "A SMS message sent using the Vonage Messages API"
)

client.messaging.send(
  from: SMS_SENDER_ID,
  to: MESSAGES_TO_NUMBER,
  **message
)コードを実行する
このファイルをあなたのマシンに保存し、実行する:
SMS API (レガシー) コード・スニペット
| キー | 説明 |
|---|---|
VONAGE_API_KEY | Your Vonage API key (see it on |
VONAGE_API_SECRET | Your Vonage API secret (also available on |
SMS_TO_NUMBER | The phone number you are sending the message to. |
SMS_SENDER_ID | The alphanumeric string that represents the name or number of the organization sending the message. |
コードを書く
send-sms.sh に以下を追加する:
curl -X POST https://rest.nexmo.com/sms/json \
  -u "$VONAGE_API_KEY:$VONAGE_API_SECRET" \
  -d "from=${SMS_SENDER_ID}" \
  -d "to=${SMS_TO_NUMBER}" \
  -d 'text=A text message sent using the Vonage SMS API'
コードを実行する
このファイルをあなたのマシンに保存し、実行する:
前提条件
npm install @vonage/server-sdksend.js という名前のファイルを作成し、以下のコードを追加する:
const { Vonage } = require('@vonage/server-sdk');

const vonage = new Vonage({
  apiKey: VONAGE_API_KEY,
  apiSecret: VONAGE_API_SECRET,
});コードを書く
send.js に以下を追加する:
vonage.sms.send({
  to: SMS_TO_NUMBER,
  from: SMS_SENDER_ID,
  text: 'A text message sent using the Vonage SMS API',
})
  .then((resp) => {
    console.log('Message sent successfully');
    console.log(resp);
  })
  .catch((err) => {
    console.log('There was an error sending the messages.');
    console.error(err);
});コードを実行する
このファイルをあなたのマシンに保存し、実行する:
前提条件
build.gradle に以下を追加する:
implementation 'com.vonage:server-sdk-kotlin:2.1.1'SendMessage という名前のファイルを作成し、main メソッドに以下のコードを追加する:
val client = Vonage {
    apiKey(VONAGE_API_KEY)
    apiSecret(VONAGE_API_SECRET)
}コードを書く
SendMessage ファイルのmain メソッドに以下を追加する:
val response = client.sms.sendText(
    from = SMS_SENDER_ID,
    to = SMS_TO_NUMBER,
    message = "Hello from Vonage SMS API"
)

println(
    if (response.wasSuccessfullySent())
        "Message sent successfully."
    else
        "Message failed with error: ${response[0].errorText}"
)コードを実行する
Gradle用のアプリケーション プラグインを使うことで、アプリケーションの実行を簡単にすることができます。build.gradle を以下のように更新する:
apply plugin: 'application'
mainClassName = project.hasProperty('main') ? project.getProperty('main') : ''以下のgradle コマンドを実行し、com.vonage.quickstart.kt.sms をSendMessage を含むパッケージに置き換えてアプリケーションを実行する:
前提条件
build.gradle に以下を追加する:
implementation 'com.vonage:server-sdk:9.3.1'SendMessage という名前のファイルを作成し、main メソッドに以下のコードを追加する:
VonageClient client = VonageClient.builder().apiKey(VONAGE_API_KEY).apiSecret(VONAGE_API_SECRET).build();コードを書く
SendMessage ファイルのmain メソッドに以下を追加する:
TextMessage message = new TextMessage(
        SMS_SENDER_ID, SMS_TO_NUMBER,
        "A text message sent using the Vonage SMS API"
);

SmsSubmissionResponse response = client.getSmsClient().submitMessage(message);

if (response.getMessages().get(0).getStatus() == MessageStatus.OK) {
    System.out.println("Message sent successfully.");
} else {
    System.out.println("Message failed with error: " + response.getMessages().get(0).getErrorText());
}コードを実行する
Gradle用のアプリケーション プラグインを使うことで、アプリケーションの実行を簡単にすることができます。build.gradle を以下のように更新する:
apply plugin: 'application'
mainClassName = project.hasProperty('main') ? project.getProperty('main') : ''以下のgradle コマンドを実行し、com.vonage.quickstart.sms をSendMessage を含むパッケージに置き換えてアプリケーションを実行する:
前提条件
コードを書く
SendSms.cs に以下を追加する:
var response = await vonageClient.SmsClient.SendAnSmsAsync(new Vonage.Messaging.SendSmsRequest()
{
    To = SMS_TO_NUMBER,
    From = SMS_SENDER_ID,
    Text = "A text message sent using the Vonage SMS API"
});
Console.WriteLine(response.Messages[0].To);前提条件
composer require vonage/clientsend-sms.php という名前のファイルを作成し、以下のコードを追加する:
$keypair = new \Vonage\Client\Credentials\Keypair(VONAGE_PRIVATE_KEY, VONAGE_APPLICATION_ID);
$client = new \Vonage\Client($keypair);コードを書く
send-sms.php に以下を追加する:
$response = $client->sms()->send(
    new \Vonage\SMS\Message\SMS(TO_NUMBER, BRAND_NAME, 'A text message sent using the Vonage SMS API')
);

$message = $response->current();

if ($message->getStatus() == 0) {
    echo "The message was sent successfully\n";
} else {
    echo "The message failed with status: " . $message->getStatus() . "\n";
}コードを実行する
このファイルをあなたのマシンに保存し、実行する:
前提条件
pip install vonage python-dotenvコードを書く
send-an-sms.py に以下を追加する:
from vonage import Auth, Vonage
from vonage_sms import SmsMessage, SmsResponse

client = Vonage(Auth(api_key=VONAGE_API_KEY, api_secret=VONAGE_API_SECRET))

message = SmsMessage(
    to=SMS_TO_NUMBER,
    from_=SMS_SENDER_ID,
    text="A text message sent using the Vonage SMS API.",
)

response: SmsResponse = client.sms.send(message)
print(response)コードを実行する
このファイルをあなたのマシンに保存し、実行する:
前提条件
gem install vonagesend.rb という名前のファイルを作成し、以下のコードを追加する:
client = Vonage::Client.new(
  api_key: VONAGE_API_KEY,
  api_secret: VONAGE_API_SECRET
)コードを書く
send.rb に以下を追加する:
client.sms.send(
  from: SMS_SENDER_ID,
  to: SMS_TO_NUMBER,
  text: 'A text message sent using the Vonage SMS API'
)コードを実行する
このファイルをあなたのマシンに保存し、実行する:
オプション・パラメーターと機能の違い
必要なSMSフィールドが移行されたら、次のステップは、統合が依存しているオプションのSMS APIパラメータを確認することです。
| SMS APIパラメータまたはアスペクト | Messages APIと同等。 | 備考 |
|---|---|---|
ttl |
ttl |
どちらのAPIもTTLをサポートしているが、単位と上限が異なる。SMS APIはミリ秒を使用し、その範囲は 20000 への 604800000.Messages API は秒を使用します。 20 への 604800.どちらもデフォルトは72時間。 |
trusted-number |
trusted_recipient |
同じ目的:対象アカウントに対して、メッセージ単位でFraud Defenderの保護をオーバーライドする。 |
message-class |
同等なし | SMS APIに相当する直接のMessages APIはありません。 message-class. |
status-report-req |
直接の同等品なし | SMS API では、明示的に DLR を要求できます。Messages API ステータスコールバックは、メッセージごとのブーリアンではなく、Webhook 設定によって駆動されます。 |
callback |
webhook_url |
どちらもデフォルトのステータス・コールバック先をメッセージごとに上書きする。 |
client-ref |
client_ref |
どちらも、相関関係のために自分のリファレンスを添付することができる。 |
entity-id |
sms.entity_id |
同じ規制目的。名称はハイフンからアンダースコアに変更。にネストされている。 sms オブジェクトがある。 |
content-id |
sms.content_id |
同じ規制目的。名称はハイフンからアンダースコアに変更。にネストされている。 sms オブジェクトがある。 |
pool-id |
sms.pool_id |
ハイフンからアンダースコアに変更。ネストは sms オブジェクトがある。 |
account-ref |
同等なし | SMS APIの請求/Account参照パラメータには、Messages APIに相当する直接のパラメータがありません。 |
type / エンコーディング・コントロール |
sms.encoding_type と text, unicodeあるいは auto |
SMS APIは以下の用途に使用します。 type と text, unicodeあるいは binary.Messages APIはデフォルトでエンコーディングを自動検出します。 |
body, udh, protocol-id / バイナリSMSフィールド |
同等なし | SMS API は、バイナリ SMS をサポートしています。 type=binary とともに body, udhそして protocol-id. |
HTTPレスポンスコード
これは、2つのAPI間の最も大きな動作の違いの1つである。
SMS API は常に 200 成功、失敗にかかわらず、HTTPレスポンスコードに status パラメーターの値は結果に対応する。
Messages API は 202 リクエストに成功した場合のレスポンス・コード 4xx または 5xx エラー応答のコード。
いくつかの例を下の比較表に示す。
| シナリオ | Messages API | SMS API (レガシー) |
|---|---|---|
| 成功 | リターン HTTP 202 Accepted 成功の上に。 |
常に戻る HTTP 200.実際のステータスはレスポンス・ボディ ("status": "0" 成功のために)。 |
| 認証エラー | HTTP 401 Unauthorized |
HTTP 200 ボディ・ステータス付き 4 (Invalid Credentials). |
| 無効なパラメータ | HTTP 422 Unprocessable Entity |
HTTP 200 ボディ・ステータス付き 2 (Missing Parametersまたは 3 (Invalid Parameters). |
参照 メッセージ API エラー, SMS APIエラーコードそして SMS API送信エンドポイント エラーの詳細については
SMS API 成功応答
{
  "message-count": "1",
  "messages": [
    {
      "to": "447700900000",
      "message-id": "0A0000000123ABCD1",
      "status": "0",
      "remaining-balance": "3.14159265",
      "message-price": "0.03330000",
      "network": "23410"
    }
  ]
}
SMS API エラー・レスポンス
{
  "message-count": "1",
  "messages": [
    {
      "status": "4",
      "error-text": "Bad Credentials"
    }
  ]
}
メッセージ API 成功レスポンス
{
  "message_uuid": "aaaaaaaa-bbbb-4ccc-8ddd-0123456789ab"
}
Messages API は、単一の message_uuid をメッセージオブジェクトの配列の代わりに使用する。この UUID を使用して、ステータス・コールバックを関連付けます。
Messages API エラー・レスポンス (401 Unauthorized)
{
  "type": "https://developer.vonage.com/api-errors#unauthorized",
  "title": "Unauthorized",
  "detail": "You did not provide correct credentials.",
  "instance": "bf0ca0bf927b3b52e3cb03217e1a1ddf"
}
SMSを受信する(受信メッセージ)
どちらのAPIも、インバウンドのSMSメッセージを設定したWebhook URLに配信します。2つのAPIには、受信ペイロードの構造とパラメータの命名にいくつかの違いがあります。ウェブフックのセットアップについては メッセージAPIを使用するためのVonageアカウントの設定.
SMS API受信ペイロード
メッセージがSMS APIで受信されると、Vonageは設定された受信Webhook URLにGETまたはPOSTリクエストを送信します。
ペイロードの例:
{
  "msisdn": "447700900001",
  "to": "447700900000",
  "messageId": "0A0000000123ABCD1",
  "text": "Hello from a user",
  "type": "text",
  "keyword": "HELLO",
  "message-timestamp": "2020-01-01 12:00:00"
}
Messages API インバウンドペイロード
Messages APIでメッセージを受信すると、Vonageはアプリケーションの設定された受信URLにPOSTリクエストを送信します。
ペイロードの例:
{
   "channel": "sms",
   "message_uuid": "aaaaaaaa-bbbb-4ccc-8ddd-0123456789ab",
   "to": "447700900000",
   "from": "447700900001",
   "timestamp": "2025-02-03T12:14:25Z",
   "text": "Hello From Vonage!",
   "sms": {
      "num_messages": "2",
      "keyword": "HELLO"
   },
   "usage": {
      "currency": "EUR",
      "price": "0.0333"
   },
   "origin": {
      "network_code": "12345"
   }
}
メッセージ・ステータスの追跡
Messages API は、ステータス・コールバックを使用して、メッセージの状 態が変化したときにアプリケーションに通知します。これは、SMS API で使用される Delivery Receipts (DLR) に相当する Messages API の機能です。
DLRステータス相当
SMS API DLR ステータスに最も近い Messages API の等価値を以下に示す:
| SMS API DLRステータス | 最も近いMessages APIに相当するもの | 備考 |
|---|---|---|
accepted |
submitted |
メッセージがプロバイダ・ゲートウェイに渡されたときに発生する。これは課金対象イベントである。 |
buffered |
同等なし | 実際にはほとんど使われず、転送もされない。 |
delivered |
delivered |
キャリアのサポートによっては、エンドユーザー・デバイスによる受信を示す。 |
expired |
rejected |
通常、Messages API のエラーコードに対応します。 1360. |
failed |
rejected |
プロバイダの障害またはネットワークエラーを示す。 |
unknown |
rejected |
通常、Messages API のエラーコードに対応します。 1330. |
rejected |
rejected |
参照 メッセージ API エラーコード. |
詳しくは Messages API ステータス・コールバック.
Messages APIの追加機能
このガイドでは、SMS統合の移行に焦点を当てていますが、Messages APIには、移行が完了したら試してみる価値のある追加機能が多数あります。
マルチチャンネル・メッセージング
Messages APIは、単一の一貫したAPIインターフェースを通じて複数のチャネルをサポートします。一度SMS統合を移行すれば、コア統合を変更することなく新しいチャネルを追加できます:
| チャンネル | 説明 |
|---|---|
| MMS | マルチメディアコンテンツ(画像、音声、ビデオ)を米国およびカナダの番号に送信。 |
| RCS | リッチコミュニケーションサービス - AndroidやiOSデバイスに、画像、返信候補、アクションボタン付きのインタラクティブなメッセージを送信します。 |
| 認証済みビジネスアカウントを使ってWhatsAppでメッセージを送受信。 | |
| フェイスブックメッセンジャー | メッセンジャーで顧客を引き込む |
| バイバー | Viberサービスメッセージを介してメッセージを送信します。 |
| 電子メール | 他のMessagesチャネルで既に使用しているのと同じ統合APIを使用して、トランザクションメールを送信します。 |
リクエストの構造はチャネル間で一貫している。別のチャネルでメッセージを送信するには、チャネルフィールドを変更し、チャネル固有のパラメータを追加します。ステータスコールバックと受信メッセージのための webhook ハンドラは、 チャネルに関係なく同じように動作します。
フェイルオーバー
Messages API はフェイルオーバーワークフローに対応しており、最初の送信が拒否された場合に、別のチャネルでメッセージを自動的に再送信することができます。たとえば、WhatsApp メッセージを送信し、メッセージが拒否された場合(受信者が WhatsApp を利用していないなどの理由による)、SMS に切り替えることができます。
現在、フェイルオーバーはメッセージが rejected.
参照 Messages API フェイルオーバー をご覧ください。
リッチコンテンツ
対応しているチャンネル(RCS、WhatsApp、MMS、Messenger、Viber)では、Messages APIを使って送信できます:
- 画像、ビデオ、オーディオ、添付ファイル
- インタラクティブ・メッセージ・テンプレート
- 返信ボタンとアクションボタンの提案(RCS、WhatsApp)
- リッチカードとカルーセル(RCS)