シェア:
マイケル・クランプはVonageのデベロッパーエクスペリエンスチームに所属し、コーダー、YouTuber、そして様々な.NETやクラウド/通信開発トピックについて頻繁に講演を行っています。彼は、開発者がそれぞれの利点を分かりやすく理解できるようにすることに情熱を注いでいます。
Node.jsでSMSメッセージを送受信する方法
所要時間:4 分
この記事は2025年6月に更新されました。
Vonage Messages API メッセージAPI を使えば、SMS、MMS、Facebook Messenger、Viber、WhatsApp、そしてRCSでもメッセージを送受信できます!そのため、顧客が最も好きなチャネルでコミュニケーションすることができます。
この記事では、Node.jsでSMSメッセージを送受信する方法に焦点を当てます。 とと Express.
はじめに、API の最も簡単な実装を行い、Node.js と Vonage メッセージ API.
次に、Expressを使って携帯電話からSMSメッセージを受信し、テキストメッセージを受信したらアクションを実行できるWebhookを構築します。
最後に、アプリケーションを拡張するためのいくつかのステップを紹介しよう。
を参照してください。 ドキュメントを参照してください。
作業を始める前に、以下のことを確認してください:
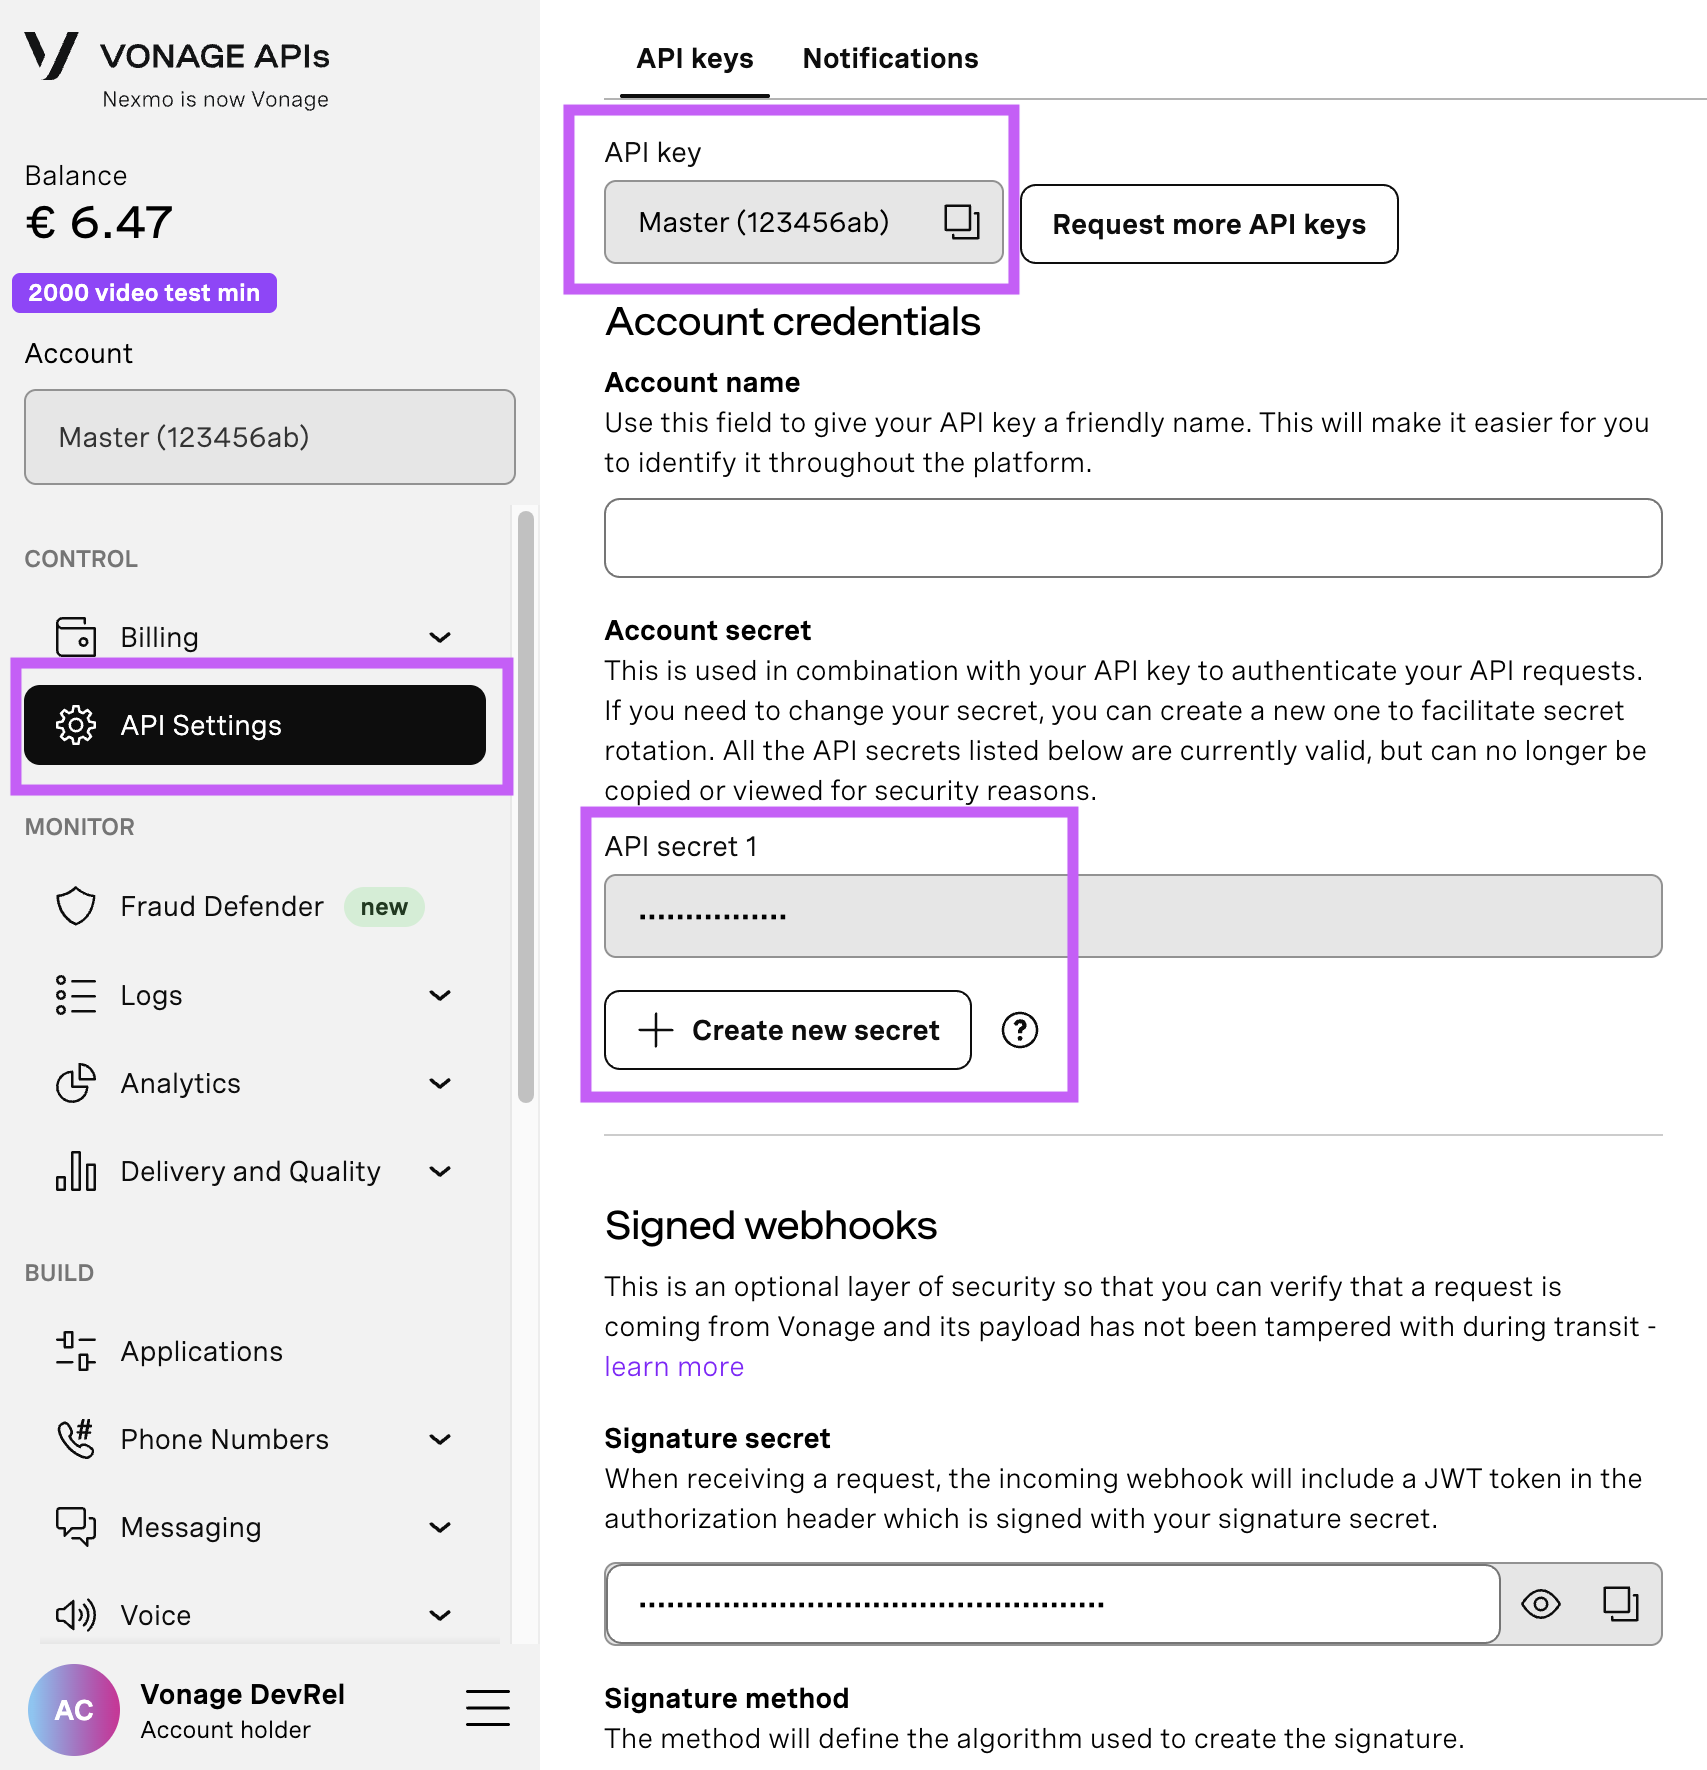
API設定ページを開く API設定ページを開き、Vonage API KeyとSecretにアクセスしてください。両者は以下のスクリーンショットのように表示されます。APIキーはページの上部にあり、APIシークレットにアクセスするには、"Account secret "サブセクションを参照してください。
注:以前に作成したAPIシークレットを覚えていない場合は、"+ Create new secret "をクリックし、安全に保存してください。
Node.jsinstalled - Node.jsはオープンソースのクロスプラットフォームJavaScript実行環境です。
ngrok- 無料アカウントが必要です。このツールを使用すると、開発者はローカルの開発サーバーをインターネットに公開することができます。
Vonage CLI- Node.jsがインストールされたら
npm install -g @vonage/cliを使ってインストールすることができます。このツールでVonageアプリケーションを作成・管理できます。
このチュートリアルの最初のパートでは、Node.jsを使ってテキスト・メッセージを送信する方法を説明します。ここでは Vonage Messages APIを使用します。Node.js と Vonage Messages API を使って SMS を送信するには、以下の手順に従います:
Vonage Node.js SDKをインストールします。
ngrokを走らせる
SMS対応アプリケーションの作成
SMSメッセージを送信する
Messages APIを使えば、Node.jsで簡単にSMSを送信できます。これを使用するには Vonage Node.js SDK.
npm install @vonage/server-sdkVonageにはSMSを送受信できる2つの異なるAPIがありますが、受信するWebhookの形式が変わってしまうため、一度に1つしか使用できません。
Messages APIがデフォルトとして設定されていることを確認してください。 APIキー次に SMS設定の アカウント.
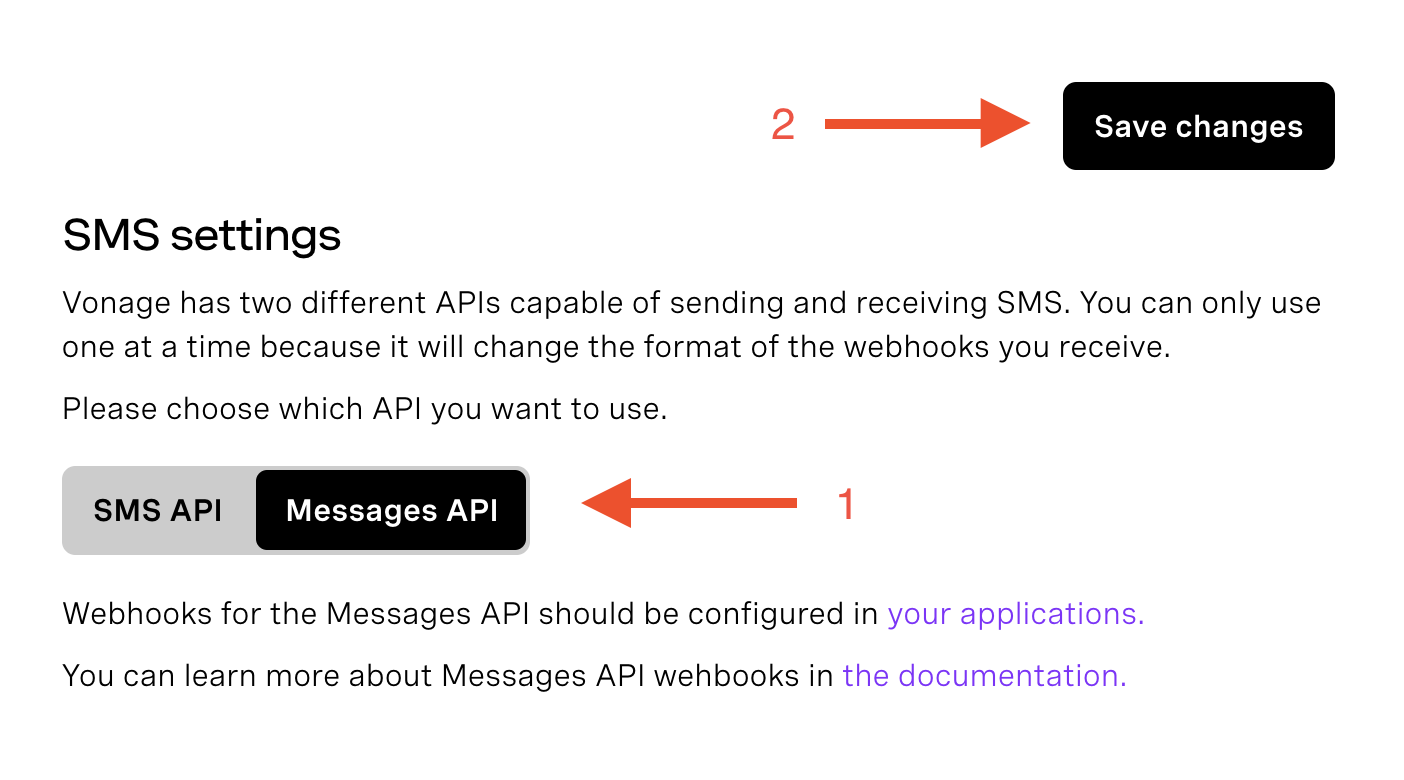 Set Messages API as the default API for sending SMS messagesに設定を切り替えます。 メッセージ APIに切り替えて 変更を保存する.
Messages APIをインストールしたら、次はngrokを実行する。
ngrokは、開発者が最小限の労力でローカルの開発サーバーをインターネットに公開することを可能にするクロスプラットフォームのアプリケーションです。我々のサービスをインターネットに公開するために使用する。ngrokを使ったことがない方は、以下のブログ記事を参照してください。 ブログ記事を参照してほしい。ngrokをセットアップしてログインしたら(これも無料アカウントでOK)、以下のコマンドを実行する:
ngrok http 3000ngrok が実行されると、次のようなメッセージが表示されます。 転送URL を取得します。この URL は、この記事の後半で Webhook のベースとして使用します。
Messages APIとやりとりするには、リクエストを認証するためのVonage APIアプリケーションを作成する必要がある。
アプリケーションをコンテナとメタデータのように考え、Vonageプラットフォーム上のすべてのデータをグループ化します。ここでは Vonage API Dashboardを使用して作成します。.
名前(「SMSメッセージの送受信」など)を入力し、以下をクリックします。 公開鍵と秘密鍵を生成する.秘密鍵をディスクに保存するプロンプトが表示されます。秘密鍵は後で必要になるので、プロジェクト・フォルダーに保存しておくとよいでしょう。アプリケーションは公開鍵/秘密鍵システムで動作しますので、アプリケーションを作成するときに公開鍵が生成され、Vonageに保管されます。秘密鍵は後でライブラリの呼び出しの認証に使います。
次に メッセージ機能を有効にし 受信URLと ステータスURL.
前のステップで取得したngrok URLを使用し、各フィールドに以下を追加して記入する。 /webhooks/inboundと /webhooks/statusを付加して、各フィールドに記入する。 受信URLと ステータスURL.
メッセージが メッセージAPIに到達すると、そのメッセージに関するデータは 受信URL.APIを使ってメッセージを送信すると、メッセージ・ステータスに関するデータは ステータスURL.
最後に、1つまたは複数のバーチャルナンバーをこのアプリケーションにリンクします。これらの番号で受信したメッセージはすべて、あなたの インバウンドURL.
 Create Messages enabled Vonage Application
最後に、SMSメッセージを送信するコードをNode.jsで作成します。
作成するアプリケーションのソースコードを保存する新しいフォルダを作成します。完了したら npm initを入力して、新しいNode.jsアプリケーションを初期化する。最後に index.jsファイルを作成し、先にインストールしたVonageノード・ライブラリを初期化します。
const { Vonage } = require('@vonage/server-sdk');

const vonage = new Vonage({
  applicationId: VONAGE_APPLICATION_ID,
  privateKey: VONAGE_APPLICATION_PRIVATE_KEY_PATH
});グッドプラクティスとして 環境変数を使うべきです。
を置き換える vonage_application_idをを アプリケーションIDに置き換えてください。vonage_application_pathを vonage_application_private_key_pathを、自動的にダウンロードされた秘密鍵のパスに置き換えます。注:私は private.keyファイルをアプリケーションのルートにコピーしました。 privateKeyが './private.key'
Messages API で SMS メッセージを送信するには、Vonage Node js ライブラリの vonage.messages.sendメソッドを使用します。このメソッドは、受信者、送信者、コンテンツに関する情報を持つオブジェクトをパラメータとして受け取ります。これらは異なるチャンネルによって異なるので、各チャンネルの API ドキュメントを確認する必要があります。
SMSの場合は、受信者と送信者を指定する必要がある。最後に contentオブジェクトは typeの textとテキスト・メッセージを受け取ります。コールバックはエラー・オブジェクトとレスポンス・オブジェクトを返し、操作の成否に関するメッセージを記録する。
const text = "👋Hello from Vonage";

vonage.messages
  .send({
    text: text,
    message_type: "text",
    to: TO_NUMBER,
    from: FROM_NUMBER,
    channel: "sms",
  })
  .then((resp) => console.log(resp.message_uuid))
.catch((err) => console.error(err));置換 TO_NUMBERを文字列として宛先の電話番号に置き換え、割り当てられた電話番号を FROM_NUMBERでコードを実行する:
node index.jsこれでNode.jsとVonage Messages APIを使ってSMSを送信したことになります!
Messages APIがもう少し冗長であることにお気づきかもしれないが、それでもVonageからの着信メッセージかどうかを確認するために必要なメソッドは1つだけだ。 受信メッセージがVonageから来たものであるかどうかを検証するためのたった1つのメソッドが必要です。以下を含める:
const verifyJWT = (req) => {
// Verify if the incoming message came from Vonage
const jwtToken = req.headers.authorization.split(" ")[1];
if(!verifySignature(jwtToken, process.env.VONAGE_API_SIGNATURE_SECRET)) {
console.error("Unauthorized request");
throw new Error('Not a messages API request');
}

console.log('JWT verified');
}
Vonage番号がSMSメッセージを受信すると、Vonageはそのメッセージを所定のWebhookに渡します。WebhookのURLは、Messages対応のVonageアプリケーションを作成したときに設定済みです: YOUR_NGROK_URL/webhooks/inbound
Node.jsを使ってSMSメッセージを受信するには、以下の手順に従ってください:
ウェブサーバーの作成
インバウンドURLのWebhookを作成する
テストメッセージの送受信
ウェブ・サーバーは エクスプレスを使用してWebサーバーを作成します。これは、この目的のために最も人気があり、使いやすいNode.jsフレームワークの1つだからです。また、インバウンドURLのリクエストボディを見ることになるので、npmから expressをインストールする必要がある。
npm install express --saveこのために新しいファイルを作成し、次のように呼びましょう。 server.js.このファイルは、先ほど作成したのと同じフォルダに置くことができる。
基本的な expressのJSONパーサーを使用する基本的なアプリケーションを作成します。 expressのJSONパーサーを使用し urlencodedオプションを true.作成した server.jsファイルを埋めてみよう。サーバーがリッスンするポートには3000番を使い、すでに3000番でngrokが動いている。
const express = require("express");

const { json, urlencoded } = express;

const app = express();

app.use(json());

app.use(
  urlencoded({
    extended: true,
  })
);

app.listen(3000, () => {
  console.log("Server listening at http://localhost:3000");
});
のPOSTリクエストハンドラを作成します。 /webhooks/inboundを作成し、リクエストボディをコンソールに記録します。Vonageにはリトライメカニズムがあるので、もしURLが 200 OKステータスを返します。 200ステータスを返します。
app.post("/webhooks/inbound", (req, res) => {
  console.log(req.body);

  res.status(200).end();
});このコードは次のようにして実行できる:
node server.js
携帯電話からVonage番号にSMSメッセージを送信します。端末を確認してください。すべてがうまくいっていれば、このように表示されるはずです:
そしてそのように、あなたは最初の SMS を送信しました!Vonage Messages API と Node.js を使って SMS メッセージを送受信する方法を学んだので、このプロジェクトを拡張して、受信した SMS メッセージに返信したり、現在または将来の SMS のニーズに合わせて、より複雑でインタラクティブな要素を含めることができます。
ご質問がある場合、またはあなたが作っているものを共有したい場合は、こちらをクリックしてください。
登録する 開発者ニュースレター
フォローする X(旧ツイッター)最新情報
チュートリアルを見る YouTubeチャンネル
LinkedInの LinkedIn の Vonage デベロッパーページ
最新の開発者向けニュース、ヒント、イベント情報をお届けします。
読んでくれて本当にありがとう!