Vue d'ensemble
Lors d'événements entrants tels qu'un nouveau message, ou un appel entrant, l'utilisateur s'attend souvent à recevoir une notification push, si l'app n'est pas active.
Il existe deux types de notifications push que vous pouvez utiliser :
- Poussée de la VoIP (PushKit) - le mieux adapté aux applications qui utilisent la fonctionnalité In-App Voice de Vonage. (Aller à la section)
Il existe un exemple de projet VoIP push sur le site GitHub et un document d'accompagnement article de blog qui vous montre comment intégrer CallKit dans un projet Vonage Client SDK existant.
- Poussée régulière (Notifications d'utilisateurs) - le mieux adapté aux applications qui utilisent la fonctionnalité In-App Chat de Vonage. (Aller à la section)
Créer un certificat push
Le service Apple Push Notifications (APNs) utilise l'authentification par certificat pour sécuriser les connexions entre les APNs et les serveurs Vonage. Vous devrez donc créer un certificat et le télécharger sur les serveurs Vonage.
Ajout d'une fonction de notification push
Pour utiliser les notifications push, vous devez ajouter la capacité de notification push à votre projet Xcode. Pour ce faire, sélectionnez votre cible et choisissez Signature et capacités:

Sélectionnez ensuite ajouter une capacité et ajoutez le Notifications push capacité :
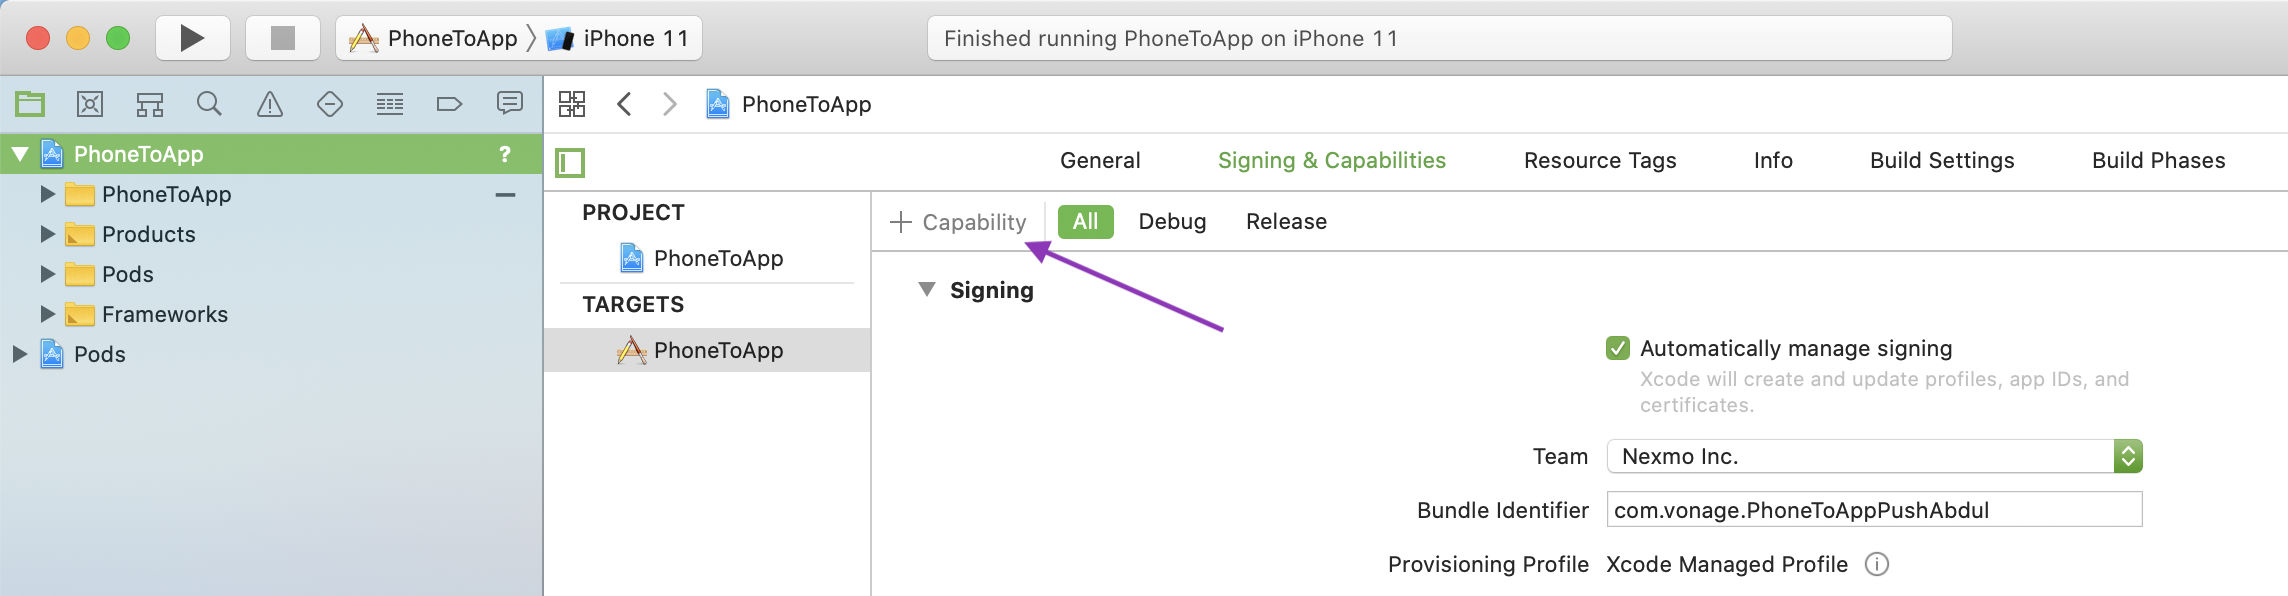
Si Xcode gère automatiquement la signature de votre application, il mettra à jour le profil de provisionnement lié à votre identifiant d'ensemble pour inclure la capacité.
Générer un certificat push
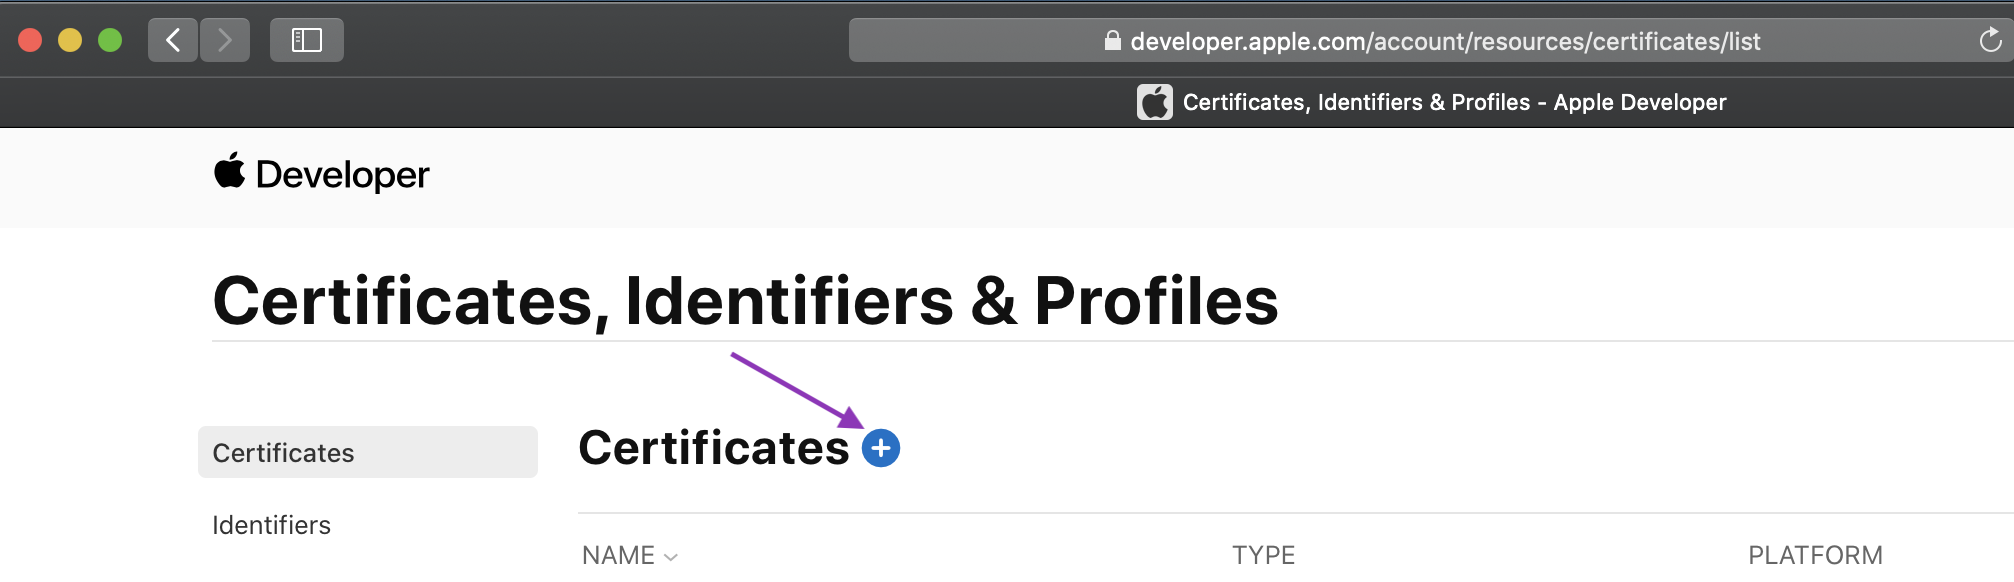
Pour générer un certificat push, vous devez vous connecter à votre Account de développeur Apple et vous rendre dans la section Certificats, identifiants et profils et ajoutez un nouveau certificat :
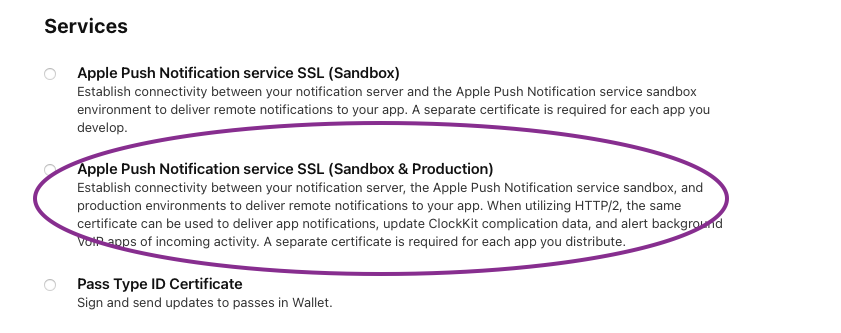
Choisir un Service Apple Push Notification SSL (Sandbox & Production) et continuer.
Si l'option de service Apple Push Notification n'est pas disponible pour vous, vous devrez demander à un administrateur de votre compte développeur Apple de réaliser cette étape pour vous.
Vous devez maintenant choisir l'identifiant de l'application à laquelle vous souhaitez ajouter des notifications push et continuer. Si votre application n'est pas listée, vous devrez créer un App ID. Xcode peut le faire pour vous s'il gère automatiquement votre signature pour vous, sinon vous pouvez créer un nouvel App ID sur la page Certificats, identifiants et profils page sous Identifiants. Veillez à sélectionner la fonction de notifications push lors de cette opération.
Vous serez invité à télécharger une demande de signature de certificat (CSR). Vous pouvez suivre les instructions sur Site d'aide d'Apple pour créer une CSR sur votre Mac. Une fois la CSR téléchargée, vous pourrez télécharger le certificat. Double-cliquez sur le .cer pour l'installer dans le trousseau d'accès.
Pour obtenir le certificat de notification push dans le format requis par les serveurs Vonage, vous devez l'exporter. Localisez votre certificat de service Apple Push Notification dans Keychain Access et cliquez avec le bouton droit de la souris pour l'exporter. Nommez l'exportation applecert et sélectionnez .p12 comme format :

Vous trouverez plus de détails sur la connexion aux APN dans la rubrique Documentation officielle d'Apple.
Téléchargez votre certificat
Vous téléchargez votre certificat vers les serveurs de Vonage en faisant une demande POST. L'outil iOS Push Certificate Uploading Tool, disponible sur GitHubL'interface web permet d'effectuer cette opération. L'une ou l'autre des méthodes suivantes nécessite votre ID d'application Vonage. Il peut être obtenu à partir de la page tableau de bord.
Utilisation de l'outil de téléchargement
Pour utiliser l'outil, vous devez l'exécuter localement ou le déployer. Vous pouvez suivre les instructions dans la page d'accueil du projet GitHub. LISEZ-MOI. Vous aurez également besoin de la clé privée de votre Applications Vonage.
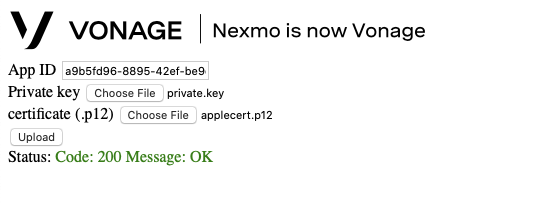
Une fois l'outil lancé, entrez votre ID d'application Vonage, votre fichier de clé privée et votre fichier de certificat, puis cliquez sur télécharger. L'état de votre téléchargement sera affiché sur la page une fois qu'il sera terminé :
Utilisation du terminal
En plus de votre ID d'application Vonage pour télécharger à l'aide du terminal, vous aurez également besoin d'un jwt_dev. Qui est un jwt sans sub réclamation. Pour plus de détails sur la manière de générer un JWT, voir la page guide d'installation.
Exécutez ensuite la commande Curl suivante, en remplaçant jwt_dev, applecert.p12, app_id avec vos valeurs :
NOTE Il n'y a pas de validation à ce stade. Les 200 signifie que Vonage a reçu les données et les a stockées, mais n'a pas vérifié que les valeurs étaient valides.
Intégrer les notifications push de VoIP dans votre application
Les notifications VoIP push sont adaptées aux applications VoIP. Entre autres avantages, elles vous permettent de recevoir des notifications même lorsque l'application est terminée. Après avoir téléchargé votre certificat sur Vonage, intégrez VoIP push dans votre application en suivant les étapes suivantes :
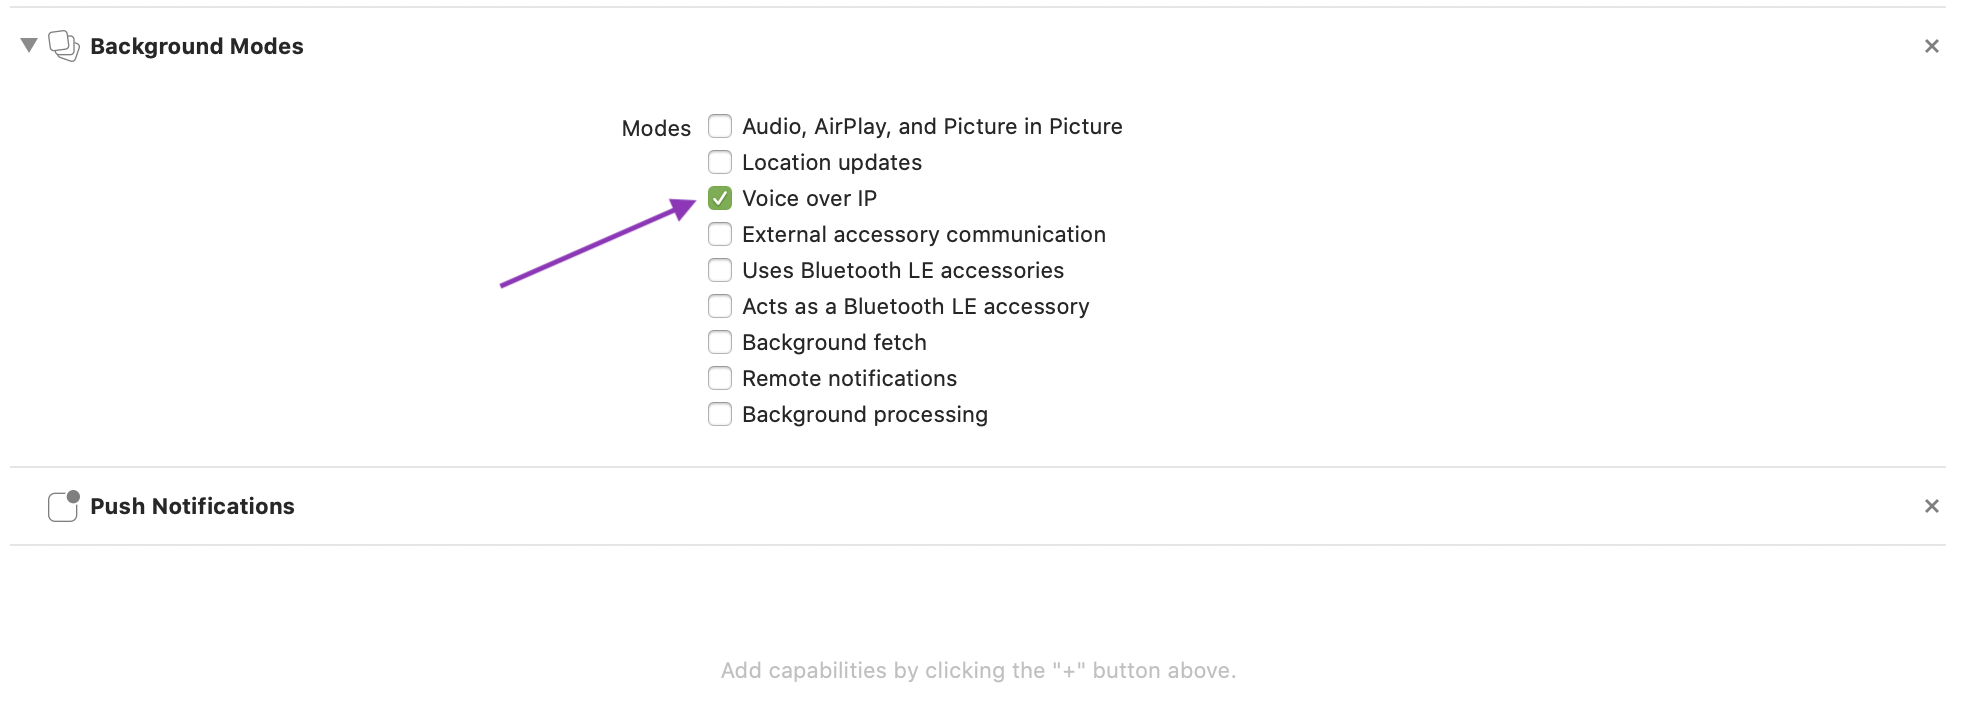
1. Activez le mode VoIP en arrière-plan pour votre application
De la même manière que pour l'ajout de la fonctionnalité de notifications push, dans Xcode, sous votre objectif, ouvert Capacités et sélectionnez Modes d'arrière-plan. Une fois la capacité ajoutée, cochez l'option "Voice over IP" :
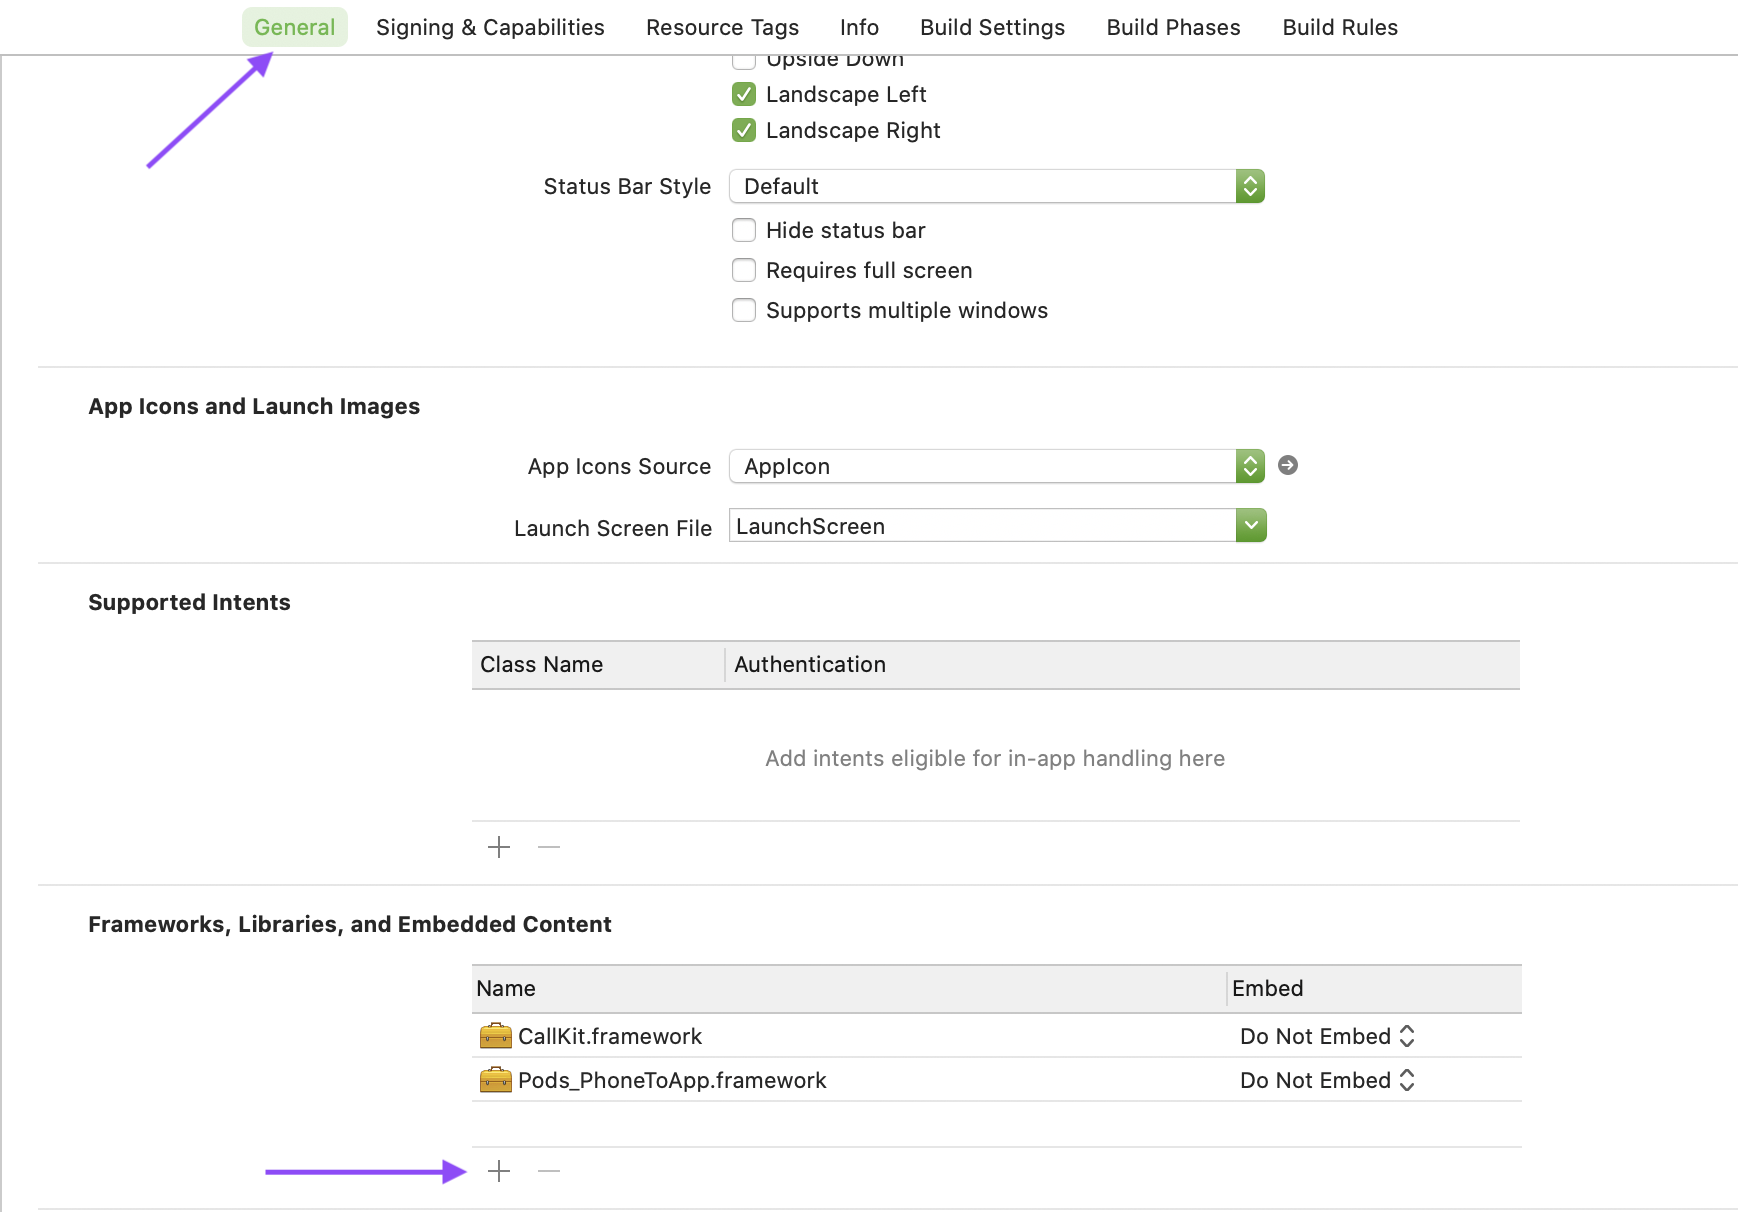
2. Relier le CallKit Le cadre
Lorsque vous utilisez des notifications push VoIP, vous devez utiliser le framework CallKit. Liez-le à votre projet en l'ajoutant sous Cadres, bibliothèques et contenu intégré sous la rubrique "Général" :
3. Importer PushKitadopter PKPushRegistryDelegateet s'inscrire aux notifications VoIP
Add a voipRegistry property:
let voipRegistry = PKPushRegistry(queue: nil)
and set it up:
func registerForVoIPPushes() {
    self.voipRegistry.delegate = self
    self.voipRegistry.desiredPushTypes = [PKPushType.voIP]
}
Add a voipRegistry property:
@property PKPushRegistry* voipRegistry;
and set it up:
- (void) registerForVoIPPushes {
    self.voipRegistry = [[PKPushRegistry alloc] initWithQueue:nil];
    self.voipRegistry.delegate = self;

    // Initiate registration.
    self.voipRegistry.desiredPushTypes = [NSSet setWithObject:PKPushTypeVoIP];
}
4. Activer les notifications VoIP push par l'intermédiaire d'un utilisateur connecté. NXMClient
NXMClient.shared.enablePushNotifications(withPushKitToken: pushKitToken,
        userNotificationToken: nil, isSandbox: true) { (error) in
    // code
}
[NXMClient.shared enablePushNotificationsWithPushKitToken:pushKitToken
        userNotificationToken:userNotificationToken isSandbox:YES
        completionHandler:^(NSError * _Nullable error) {
    // code
}];
'isSandbox'estYES/truepour une application utilisant les serveurs de push Apple sandbox et NO/false pour une application utilisant les serveurs de push Apple production.'pushKitToken'est le jeton reçu enpushRegistry(_:didUpdate:for:).
5. Implémentez la méthode de délégation suivante et ajoutez le code pour gérer une notification push VoIP entrante
func pushRegistry(_ registry: PKPushRegistry, didReceiveIncomingPushWith
        payload: PKPushPayload, for type: PKPushType, completion: @escaping () -> Void) {
    if(NXMClient.shared.isNexmoPush(userInfo: payload.dictionaryPayload)) {
        guard let pushPayload = NXMClient.shared.processNexmoPushPayload(payload.dictionaryPayload) else {
            NSLog("Not a Nexmo push notification")
            return
        }
    }
}
- (void)pushRegistry:(PKPushRegistry *)registry didReceiveIncomingPushWithPayload:(PKPushPayload *)payload
        forType:(PKPushType)type withCompletionHandler:(void (^)(void))completion {
    if ([NXMClient.shared isNexmoPushWithUserInfo:payload.dictionaryPayload]) {
        NXMPushPayload *pushPayload = [NXMClient.shared processNexmoPushPayload:payload.dictionaryPayload];
        if (!pushPayload){
           NSLog(@"Not a nexmo push");
           return;
        };
    }
}
Les pushPayload contient des informations sur l'appel entrant que vous pouvez utiliser pour signaler l'appel avec CallKit. Vous pouvez visualiser un échantillon du JSON contenu dans le fichier pousser la charge utile.
Pour que le SDK puisse activer les notifications push et les traiter correctement NXMClient doit être connecté. Vous pouvez stocker à la fois le jeton et la charge utile de push et les traiter lorsque le client se connecte avec succès. Pour un exemple, voir la page article de blog sur l'utilisation des notifications push avec CallKit et son accompagnement exemple de projet.
Intégrer des notifications push régulières dans votre application.
Les notifications push régulières sont adaptées aux apps de messaging, pour les intégrer dans votre app, suivez les étapes suivantes :
1. Activer les notifications à distance pour votre application
De la même manière que pour l'ajout de la fonctionnalité de notifications push, dans Xcode, sous votre objectif, ouvert Capacités et sélectionnez Modes d'arrière-plan. Une fois la capacité ajoutée, cochez l'option "Notifications à distance" :

2. Importer UserNotifications et s'inscrire pour recevoir des notifications push
Import UserNotifications:
import UserNotifications
Then request permissions and register for remote notifications:
@UIApplicationMain
class AppDelegate: UIResponder, UIApplicationDelegate {

    func application(_ application: UIApplication, didFinishLaunchingWithOptions launchOptions: [UIApplication.LaunchOptionsKey: Any]?) -> Bool {
        // Override point for customization after application launch.
        registerForPushNotificationsIfNeeded()
        return true
    }

    func registerForPushNotificationsIfNeeded() {
        UNUserNotificationCenter.current().requestAuthorization(options: [.alert, .sound, .badge]) { [weak self] granted, _ in
            print("Permission granted: \(granted)")
            if granted {
                self?.getNotificationSettings()
            }
        }
    }

    func getNotificationSettings() {
        UNUserNotificationCenter.current().getNotificationSettings { settings in
            print("Notification settings: \(settings)")
            guard settings.authorizationStatus == .authorized else { return }
            DispatchQueue.main.async {
                UIApplication.shared.registerForRemoteNotifications()
            }
        }
    }
 ...
}
Import UserNotifications:
#import <UserNotifications/UserNotifications.h>
Then request permissions and register for remote notifications:
@implementation AppDelegate


- (BOOL)application:(UIApplication *)application didFinishLaunchingWithOptions:(NSDictionary *)launchOptions {
    // Override point for customization after application launch.
    [self registerForPushNotificationsIfNeeded];
    return YES;


}

- (void)registerForPushNotificationsIfNeeded {
    UNAuthorizationOptions options = UNAuthorizationOptionAlert + UNAuthorizationOptionSound + UNAuthorizationOptionBadge;

    [UNUserNotificationCenter.currentNotificationCenter requestAuthorizationWithOptions:options completionHandler:^(BOOL granted, NSError * _Nullable error) {
        if (granted) {
            [self getNotificationSettings];
        }
    }];
}

- (void)getNotificationSettings {
    [UNUserNotificationCenter.currentNotificationCenter getNotificationSettingsWithCompletionHandler:^(UNNotificationSettings * _Nonnull settings) {
        if (settings.authorizationStatus == UNAuthorizationStatusAuthorized) {
            dispatch_async(dispatch_get_main_queue(), ^{
                [UIApplication.sharedApplication registerForRemoteNotifications];
            });
        }
    }];
}

...

@end
3. Activer les notifications push par le biais d'une connexion NXMClient
func application(_ application: UIApplication, didRegisterForRemoteNotificationsWithDeviceToken deviceToken: Data) {
    NXMClient.shared.enablePushNotifications(withPushKitToken: nil, userNotificationToken: deviceToken, isSandbox: true, completionHandler: nil)
}
- (void)application:(UIApplication *)application didRegisterForRemoteNotificationsWithDeviceToken:(NSData *)deviceToken {
    [NXMClient.shared enablePushNotificationsWithPushKitToken:nil userNotificationToken:deviceToken isSandbox:true completionHandler:nil];
}
4. Mettez en œuvre la méthode de délégation suivante et ajoutez le code permettant de gérer une notification push entrante
func application(_ application: UIApplication, didReceiveRemoteNotification userInfo: [AnyHashable : Any], fetchCompletionHandler completionHandler: @escaping (UIBackgroundFetchResult) -> Void) {
    if NXMClient.shared.isNexmoPush(userInfo: userInfo) {
        if UIApplication.shared.applicationState != .active {
            // create and add notification
        } else {
            // show in app banner etc.
        }
        completionHandler(UIBackgroundFetchResult.newData)
    } else {
        completionHandler(UIBackgroundFetchResult.failed)
    }
}
- (void)application:(UIApplication *)application didReceiveRemoteNotification:(NSDictionary *)userInfo fetchCompletionHandler:(void (^)(UIBackgroundFetchResult))completionHandler {
    if ([NXMClient.shared isNexmoPushWithUserInfo:userInfo]) {
        if (UIApplication.sharedApplication.applicationState != UIApplicationStateActive) {
            // create and add notification
        } else {
            // show in app banner etc.
        }
        completionHandler(UIBackgroundFetchResultNewData);
    } else {
        completionHandler(UIBackgroundFetchResultFailed);
    }
}
Les userInfo contient des informations sur le message entrant que vous pouvez utiliser pour créer une notification avec UNUserNotificationCenter. Vous pouvez visualiser un échantillon du JSON contenu dans le fichier informations sur l'utilisateur.
Configurer le TTL des notifications push
Vous pouvez configurer le temps de vie (TTL) pour les notifications push, ce qui empêchera les notifications push périmées d'être délivrées à un appareil après qu'elles ne sont plus pertinentes. La valeur par défaut est de 120 secondes. Pour définir le TTL, configurez le paramètre NXMClient:
let config = NXMClientConfig()
// TTL value is in seconds, TTL ranges from 0 to 300.
config.pushNotificationTTL = 30
NXMClient.setConfiguration(config)
NXMClientConfig *config = [[NXMClientConfig alloc] init];
// TTL value is in seconds, TTL ranges from 0 to 300.
config.pushNotificationTTL = 30;
[NXMClient setConfiguration:config];
Changements apportés à la NXMClient doit être effectuée avant le premier appel à NXMClient.shared.
Conclusion
Dans ce guide, vous avez vu comment mettre en place les notifications push. Vous pouvez trouver l'exemple de projet VoIP push sur GitHub et en savoir plus sur CallKit sur developer.apple.com. De plus amples informations sur les UserNotifications sont également disponibles sur le site suivant developer.apple.com