Getting Started with the Voice API
This page will talk you through all of the necessary steps to get up and running with the Vonage Voice API.
Prerequisites
Before you begin, you will need the following:
Create a Vonage account
To work with our APIs, you will need to sign up for an account. This will give you an API key and secret that you can use to access our APIs.
You can use the Voice API to make a voice call. Use the test number 123456789 as the caller ID, and call the number you originally provided during sign-up. Please note that this feature is only available for demo or trial accounts until you add credit to your account.
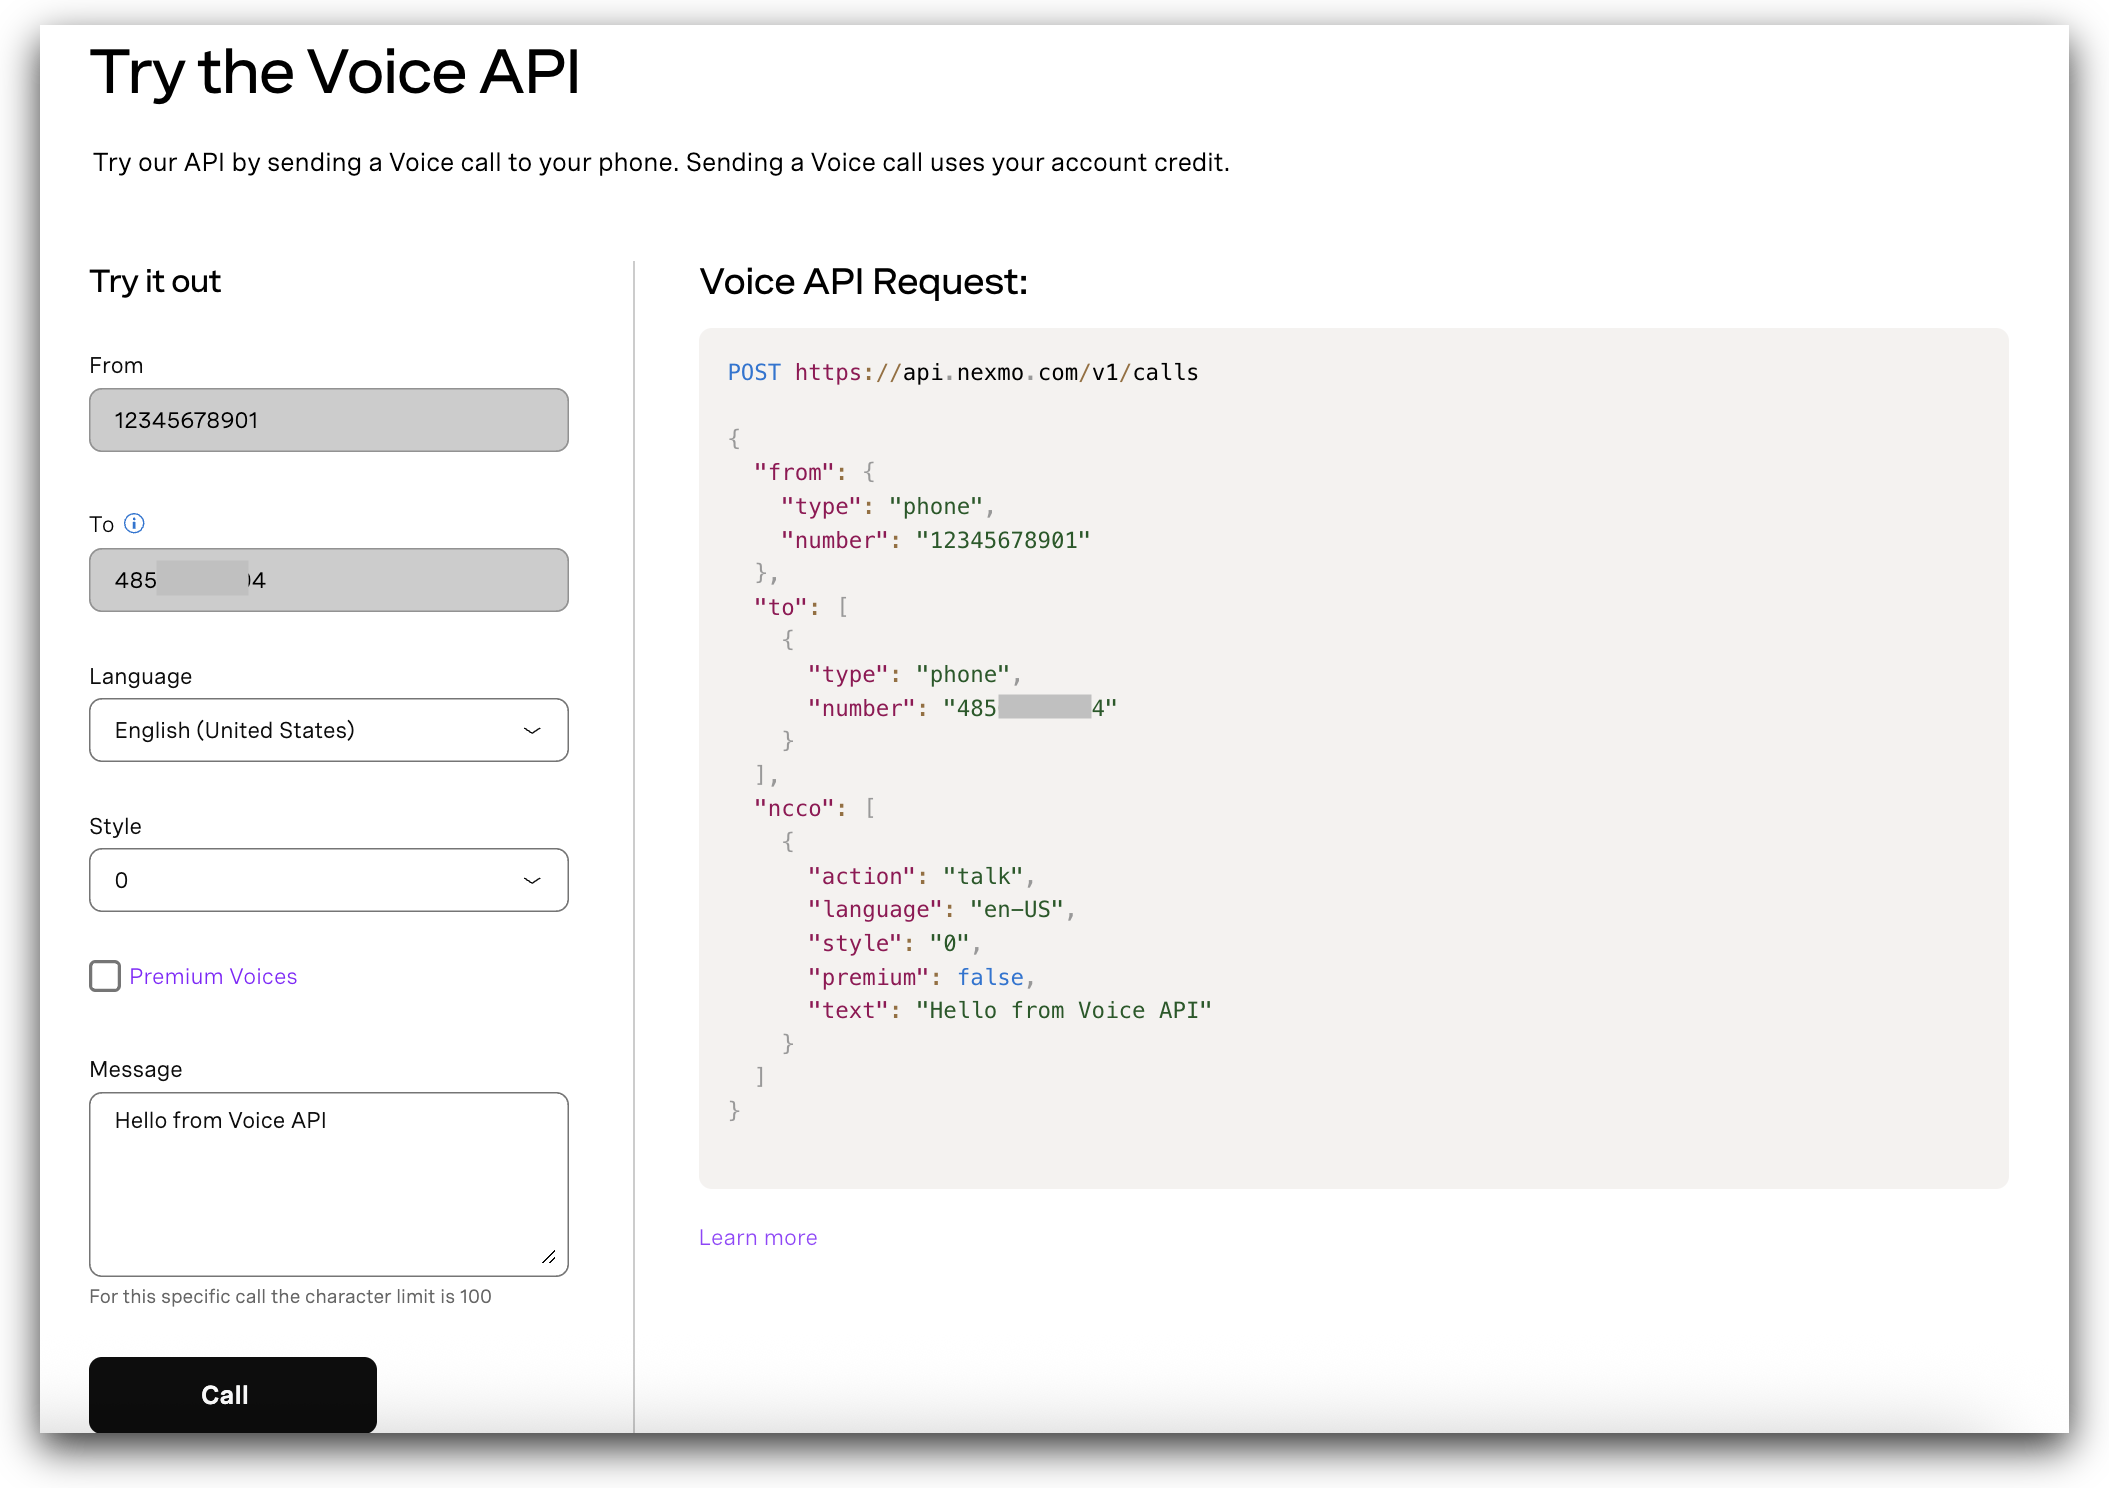
Try the Voice API
After signing up for a Vonage API account, access the Developer Dashboard and go to the Make a Voice Call section. Here, you can make a test call to see the Voice API in action.
Let’s now learn how to use the Voice API in your application.
Create an Application
Go to the Application's page on the Dashboard, and define a Name for your Application.
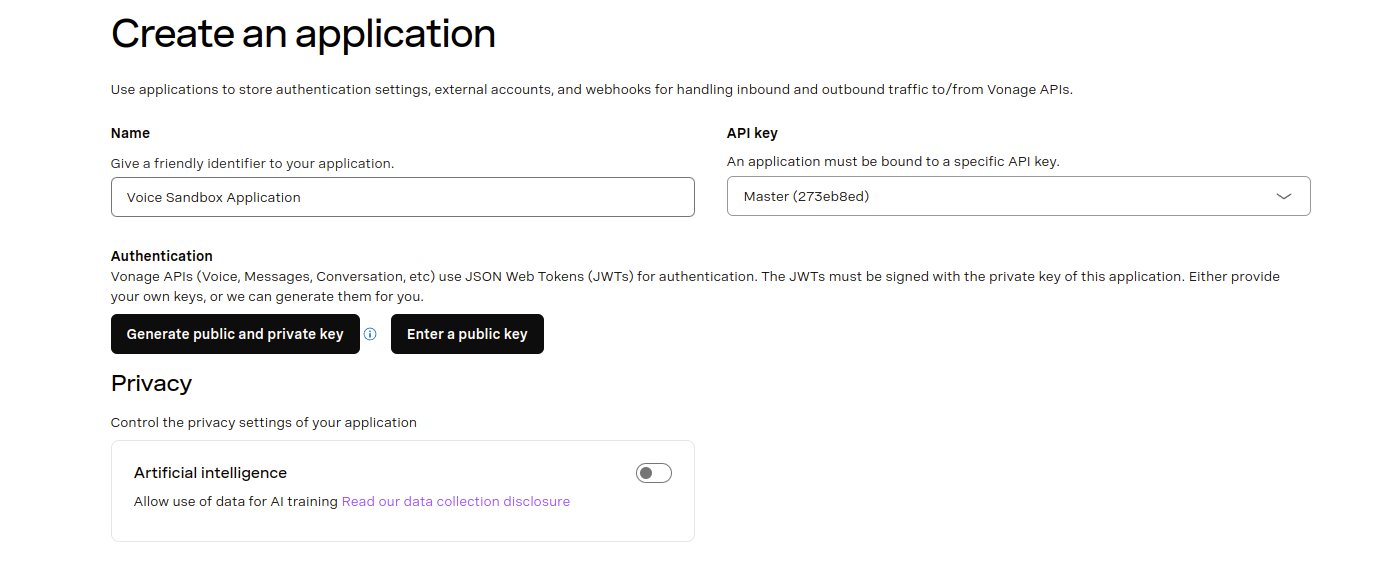
Make sure to click on the Generate public and private key button, and keep the file private.key around.
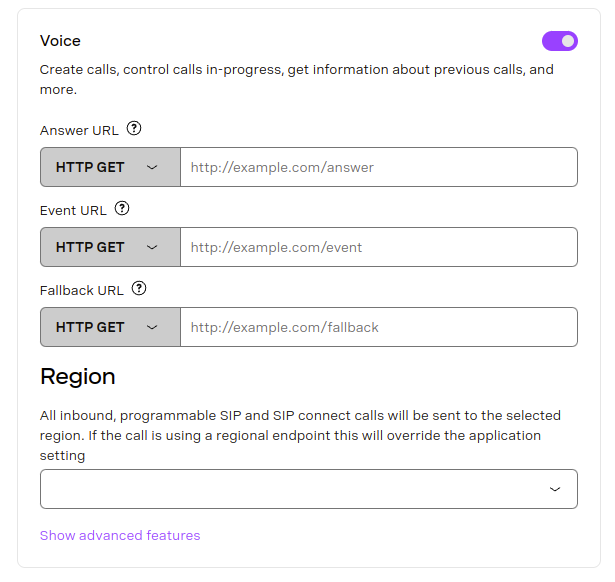
Then, enable the Voice capability. For the moment, leave everything by default.
Finally, click Generate new application at the bottom of the page.
Check out Getting Started with Vonage CLI for more information on how to install and configure the CLI.
Use the following command to create a Vonage application:
vonage apps create 'Your application'

✅ Creating Application
Saving private key ... Done!
Application created

Name: Your application
Application ID: 00000000-0000-0000-0000-000000000000
Improve AI: Off
Private/Public Key: Set

Capabilities:
  None Enabled
vonage apps create 'Your application'

✅ Creating Application
Saving private key ... Done!
Application created

Name: Your application
Application ID: 00000000-0000-0000-0000-000000000000
Improve AI: Off
Private/Public Key: Set

Capabilities:
  None Enabled
Once you have the application, you then need to add the voice capabilities; make sure you replace the webhook URLs with your own:
vonage apps capabilities update 00000000-0000-0000-0000-000000000000 voice `
  --voice-answer-url='https://example.com/webhooks/voice/answer' `
  --voice-event-url='https://example.com/webhooks/voice/event' `
  --voice-fallback-url='https://example.com/webhooks/voice/fallback'

✅ Fetching Application
✅ Adding voice capability to application 00000000-0000-0000-0000-000000000000

Name: Your application
Application ID: 00000000-0000-0000-0000-000000000000
Improve AI: Off
Private/Public Key: Set

Capabilities:
 VOICE:
    Uses Signed callbacks: On
    Conversation TTL: 41 hours
    Leg Persistence Time: 6 days
    Event URL: [POST] https://example.com/webhooks/voice/event
    Answer URL: [POST] https://example.com/webhooks/voice/answer
    Fallback URL: [POST] https://example.com/webhooks/voice/fallback
vonage apps capabilities update 00000000-0000-0000-0000-000000000000 voice ^
  --voice-answer-url='https://example.com/webhooks/voice/answer' ^
  --voice-event-url='https://example.com/webhooks/voice/event' ^
  --voice-fallback-url='https://example.com/webhooks/voice/fallback'

✅ Fetching Application
✅ Adding voice capability to application 00000000-0000-0000-0000-000000000000

Name: Your application
Application ID: 00000000-0000-0000-0000-000000000000
Improve AI: Off
Private/Public Key: Set

Capabilities:
 VOICE:
    Uses Signed callbacks: On
    Conversation TTL: 41 hours
    Leg Persistence Time: 6 days
    Event URL: [POST] https://example.com/webhooks/voice/event
    Answer URL: [POST] https://example.com/webhooks/voice/answer
    Fallback URL: [POST] https://example.com/webhooks/voice/fallback
The application is then created and has the required capabilities. Creating an application and adding application capabilities are covered in detail in the Application documentation.
Rent a Number
To rent a number, you must first add credit to your account.
You can skip this step if you want to use the test number 123456789 as a caller ID, and call the number you originally provided during sign-up.
In the Dashboard, go to the Buy Numbers page. Make sure to tick Voice in the search filter, and select the country you want to buy a number in. In some countries, you may need to request a number, as additional documents may be required.

You can then click the Buy button next to the number you want, and validate your purchase.
Congratulations! Your virtual number is now listed in Your Numbers.
You can rent a number using the Vonage CLI. The following command searches for an available number in the United States:
vonage numbers search US

✅ Searching for numbers

There is 1 number available for purchase in United States

Number       Type    Features         Monthly Cost  Setup Cost
-----------  ------  ---------------  ------------  ----------
16127779311  Mobile  MMS, SMS, VOICE  €0.90         €0.00

Use vonage numbers buy to purchase.
Use this command to purchase a number:
vonage numbers buy US 16127779311
✅ Searching for numbers
Are you sure you want to purchase the number 16127779311 for €0.90? [y/n] y

✅ Purchasing number
Number 16127779311 purchased

Number: 16127779311
Country: 🇺🇸 United States
Type: Mobile
Features: MMS, SMS, VOICE
Monthly Cost: €0.90
Setup Cost: €0.00
Linked Application ID: Not linked to any application
Voice Callback: Not Set
Voice Callback Value: Not Set
Voice Status Callback: Not Set
Specify an alternative two-character country code to purchase a number in another country.
Making an Outbound Call
The primary way that you'll interact with the Vonage API voice platform is via the public API. To place an outbound call, you make a POST request to https://api.nexmo.com/v1/calls.
To make your first call with the Voice API, choose your language below and replace the following variables in the example code:
| Key | Description |
|---|---|
VONAGE_NUMBER |
Your Vonage number that the call will be made from. For example 447700900000. If you skipped the Rent a Number step, use the test number “123456789”. |
TO_NUMBER |
The number you would like to call to in E.164 format. For example 447700900001. If you skipped the Rent a Number step, use the number you originally provided during sign-up. |
Prerequisites
Execute the following command at your terminal prompt to create the JWT for authentication:
export JWT=$(nexmo jwt:generate $PATH_TO_PRIVATE_KEY application_id=$NEXMO_APPLICATION_ID)Write the code
Add the following to make-an-outbound-call.sh:
curl -X POST https://api.nexmo.com/v1/calls\
  -H "Authorization: Bearer $JWT"\
  -H "Content-Type: application/json"\
  -d '{"to":[{"type": "phone","number": "'$VOICE_TO_NUMBER'"}],
      "from": {"type": "phone","number": "'$VONAGE_VIRTUAL_NUMBER'"},
"answer_url":["'"$VOICE_ANSWER_URL"'"]}'Run your code
Save this file to your machine and run it:
Prerequisites
npm install @vonage/server-sdkCreate a file named make-an-outbound-call.js and add the following code:
const { Vonage } = require('@vonage/server-sdk');

const vonage = new Vonage({
  applicationId: VONAGE_APPLICATION_ID,
  privateKey: VONAGE_PRIVATE_KEY,
});Write the code
Add the following to make-an-outbound-call.js:
vonage.voice.createOutboundCall({
  to: [
    {
      type: 'phone',
      number: VOICE_TO_NUMBER,
    },
  ],
  from: {
    type: 'phone',
    number: VONAGE_VIRTUAL_NUMBER,
  },
  answer_url: [VOICE_ANSWER_URL],
})
  .then((resp) => console.log(resp))
.catch((error) => console.error(error));Run your code
Save this file to your machine and run it:
Prerequisites
Add the following to build.gradle:
implementation 'com.vonage:server-sdk-kotlin:2.1.1'Create a file named OutboundTextToSpeechCall and add the following code to the main method:
val client = Vonage {
    applicationId(VONAGE_APPLICATION_ID)
    privateKeyPath(VONAGE_PRIVATE_KEY_PATH)
}Write the code
Add the following to the main method of the OutboundTextToSpeechCall file:
val callEvent = client.voice.createCall {
    toPstn(VOICE_TO_NUMBER)
    from(VONAGE_VIRTUAL_NUMBER)
    answerUrl(VOICE_ANSWER_URL)
}Run your code
We can use the application plugin for Gradle to simplify the running of our application. Update your build.gradle with the following:
apply plugin: 'application'
mainClassName = project.hasProperty('main') ? project.getProperty('main') : ''
Run the following gradle command to execute your application, replacing com.vonage.quickstart.kt.voice with the package containing OutboundTextToSpeechCall:
Prerequisites
Add the following to build.gradle:
implementation 'com.vonage:server-sdk:9.3.1'Create a file named OutboundTextToSpeech and add the following code to the main method:
VonageClient client = VonageClient.builder()
        .applicationId(VONAGE_APPLICATION_ID)
        .privateKeyPath(VONAGE_PRIVATE_KEY_PATH)
.build();Write the code
Add the following to the main method of the OutboundTextToSpeech file:
client.getVoiceClient().createCall(new Call(VOICE_TO_NUMBER, VONAGE_VIRTUAL_NUMBER, VOICE_ANSWER_URL));Run your code
We can use the application plugin for Gradle to simplify the running of our application. Update your build.gradle with the following:
apply plugin: 'application'
mainClassName = project.hasProperty('main') ? project.getProperty('main') : ''
Run the following gradle command to execute your application, replacing com.vonage.quickstart.voice with the package containing OutboundTextToSpeech:
Prerequisites
Install-Package VonageWrite the code
Add the following to MakeOutboundCall.cs:
var creds = Credentials.FromAppIdAndPrivateKeyPath(VONAGE_APPLICATION_ID, VONAGE_PRIVATE_KEY_PATH);
var client = new VonageClient(creds);

var answerUrl = "https://nexmo-community.github.io/ncco-examples/text-to-speech.json";
var toEndpoint = new PhoneEndpoint() { Number = VOICE_TO_NUMBER };
var fromEndpoint = new PhoneEndpoint() { Number = VONAGE_VIRTUAL_NUMBER };

var command = new CallCommand() { To = new Endpoint[] { toEndpoint }, From = fromEndpoint, AnswerUrl = new[] { answerUrl } };
var response = await client.VoiceClient.CreateCallAsync(command);Prerequisites
composer require vonage/clientWrite the code
Add the following to text-to-speech-outbound.php:
require_once __DIR__ . '/../config.php';
require_once __DIR__ . '/../vendor/autoload.php';

// Building Blocks
// 1. Make a Phone Call
// 2. Play Text-to-Speech

$keypair = new \Vonage\Client\Credentials\Keypair(
    file_get_contents(VONAGE_APPLICATION_PRIVATE_KEY_PATH),
    VONAGE_APPLICATION_ID
);
$client = new \Vonage\Client($keypair);

$outboundCall = new \Vonage\Voice\OutboundCall(
    new \Vonage\Voice\Endpoint\Phone(TO_NUMBER),
    new \Vonage\Voice\Endpoint\Phone(VONAGE_NUMBER)
);
$outboundCall->setAnswerWebhook(
    new \Vonage\Voice\Webhook(
        'https://raw.githubusercontent.com/nexmo-community/ncco-examples/gh-pages/text-to-speech.json',
        \Vonage\Voice\Webhook::METHOD_GET
    )
);
$response = $client->voice()->createOutboundCall($outboundCall);

var_dump($response);Run your code
Save this file to your machine and run it:
Prerequisites
pip install vonage python-dotenvWrite the code
Add the following to make-an-outbound-call.py:
from vonage import Auth, Vonage
from vonage_voice import CreateCallRequest, Phone, ToPhone

client = Vonage(
    Auth(
        application_id=VONAGE_APPLICATION_ID,
        private_key=VONAGE_PRIVATE_KEY,
    )
)

response = client.voice.create_call(
    CreateCallRequest(
        answer_url=[VOICE_ANSWER_URL],
        to=[ToPhone(number=VOICE_TO_NUMBER)],
        from_=Phone(number=VONAGE_VIRTUAL_NUMBER),
    )
)

pprint(response)Run your code
Save this file to your machine and run it:
Prerequisites
gem install vonageWrite the code
Add the following to outbound_tts_call.rb:
client = Vonage::Client.new(
  application_id: VONAGE_APPLICATION_ID,
  private_key: VONAGE_PRIVATE_KEY
)

response = client.voice.create(
  to: [{
    type: 'phone',
    number: VOICE_TO_NUMBER
  }],
  from: {
    type: 'phone',
    number: VONAGE_VIRTUAL_NUMBER
  },
  answer_url: [
    VOICE_ANSWER_URL
  ]
)Run your code
Save this file to your machine and run it:
To make this easier, Vonage provides Server SDKs in various languages that take care of authentication and creating the correct request body for you.
What Next?
Once you've made your first call, you're ready to try out other aspects of the Voice API. We recommend starting with the Technical Details page for a comprehensive overview of the Vonage Voice API. To understand various call flows, check out the Call Flow guide. If you're interested in building a basic Voice Notification application, refer to the Voice Notifications How-to guide. For more information, please refer to our Voice API documentation.