How to Set Up the Vonage Protection Suite for PingOne
Introduction
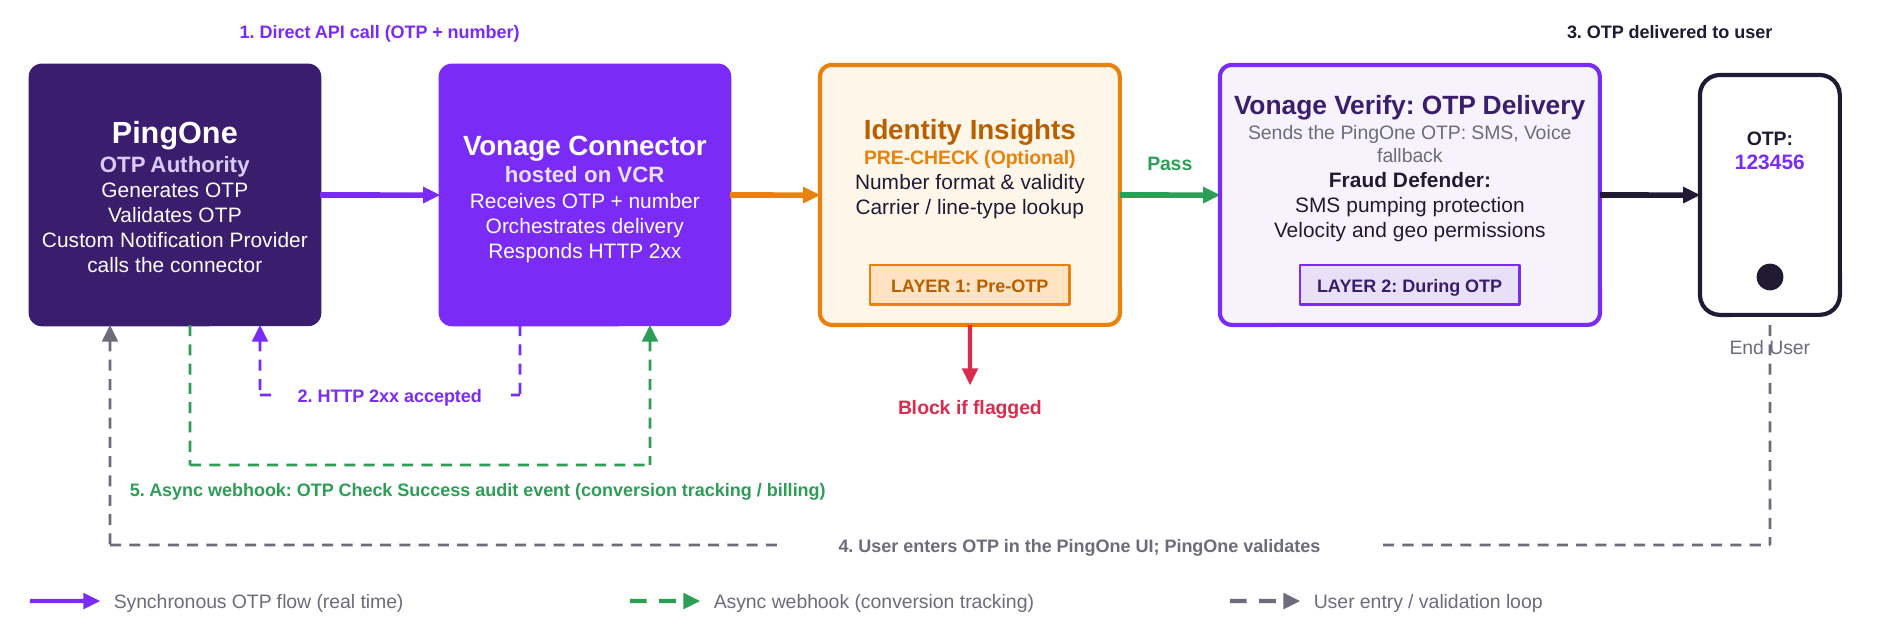
The Vonage Protection Suite for PingOne is a self-service, no-code connector built on Vonage Cloud Runtime (VCR). It integrates directly with your PingOne environment as a Custom Notification Provider and uses Vonage Verify to deliver one-time passwords (OTPs) through SMS and voice.
Before sending an OTP, the connector can perform optional security checks through Identity Insights, including number validation and carrier lookups. During OTP delivery, Vonage Fraud Defender provides an additional layer of protection through SMS pumping detection, geographic permissions, and velocity controls.
The connector is available through the Vonage Cloud Runtime (VCR) Marketplace, where you can deploy it and configure the integration with your PingOne environment without Vonage operational intervention.
Use of the Vonage Protection Suite for PingOne is subject to the Vonage Terms of Use and Connector Supplemental Terms.
Who this guide is for
This guide is organized around the following roles:
- Administrators and IT professionals: Deploy and configure the connector, set up the PingOne integration, manage authentication tokens, and monitor OTP delivery. Continue to Installation and Configuration Guide (Admin User).
- End users: Receive OTPs through SMS or voice during PingOne authentication. No configuration is required. For an overview of the authentication flow, see OTP Delivery Experience.
Two-layer security model
The Vonage Protection Suite for PingOne uses a two-layer security model:
| Layer | Product | When it runs | What it does | Cost |
|---|---|---|---|---|
| Layer 1: Pre-OTP | Identity Insights | Before the OTP is sent | Screens the destination number for validity and carrier information. It can flag or block compromised numbers before delivery. | Optional, charged per request. |
| Layer 2: During OTP delivery | Fraud Defender | During OTP delivery | Provides SMS pumping protection, geographic permissions, velocity controls, and rate limiting. | Advanced is included with Verify; Premium is paid. |
Connector flow
The following diagram shows how the connector handles OTP delivery between PingOne and Vonage Verify. PingOne remains responsible for generating and validating the OTP, while the connector delivers it through SMS or voice.
Prerequisites
Before you begin, make sure you have the following:
- An active PingOne environment with the PingOne SSO and PingOne MFA services included in the environment's Bill of Materials. To verify the included services, go to Environment > Properties.
- Admin access to the PingOne admin console with permissions to configure Senders, Notification Policies, MFA policies, Authentication policies, and Webhooks.
- A Vonage API account (you can sign up for free) along with an API Key, which you can find in your API settings within the Vonage Dashboard.
- Access to the Vonage Dashboard and Vonage Cloud Runtime with an Advanced Subscription.
Note: The Vonage Cloud Runtime Advanced tier is required for production deployments of this connector to ensure reliable handling of peak authentication volumes. This subscription is activated by your Vonage Customer Success Associate (CSA) as part of the deployment process. No action is required from the customer; your CSA will handle the activation before your connector instance goes live.
Install and Configure the Connector (Admin User)
As an admin, follow the steps in this guide to deploy the connector on Vonage Cloud Runtime, configure the integration in PingOne, and verify that it works.
Deploy the Connector on Vonage Cloud Runtime
To deploy a new instance of the Vonage Protection Suite for PingOne:
- Log into the Vonage Cloud Runtime Marketplace and click on the Vonage Protection Suite for Ping One tile.
- In the menu on the right, select the API Key you want to deploy the connector against. If your account has only one API key, this step is skipped automatically.
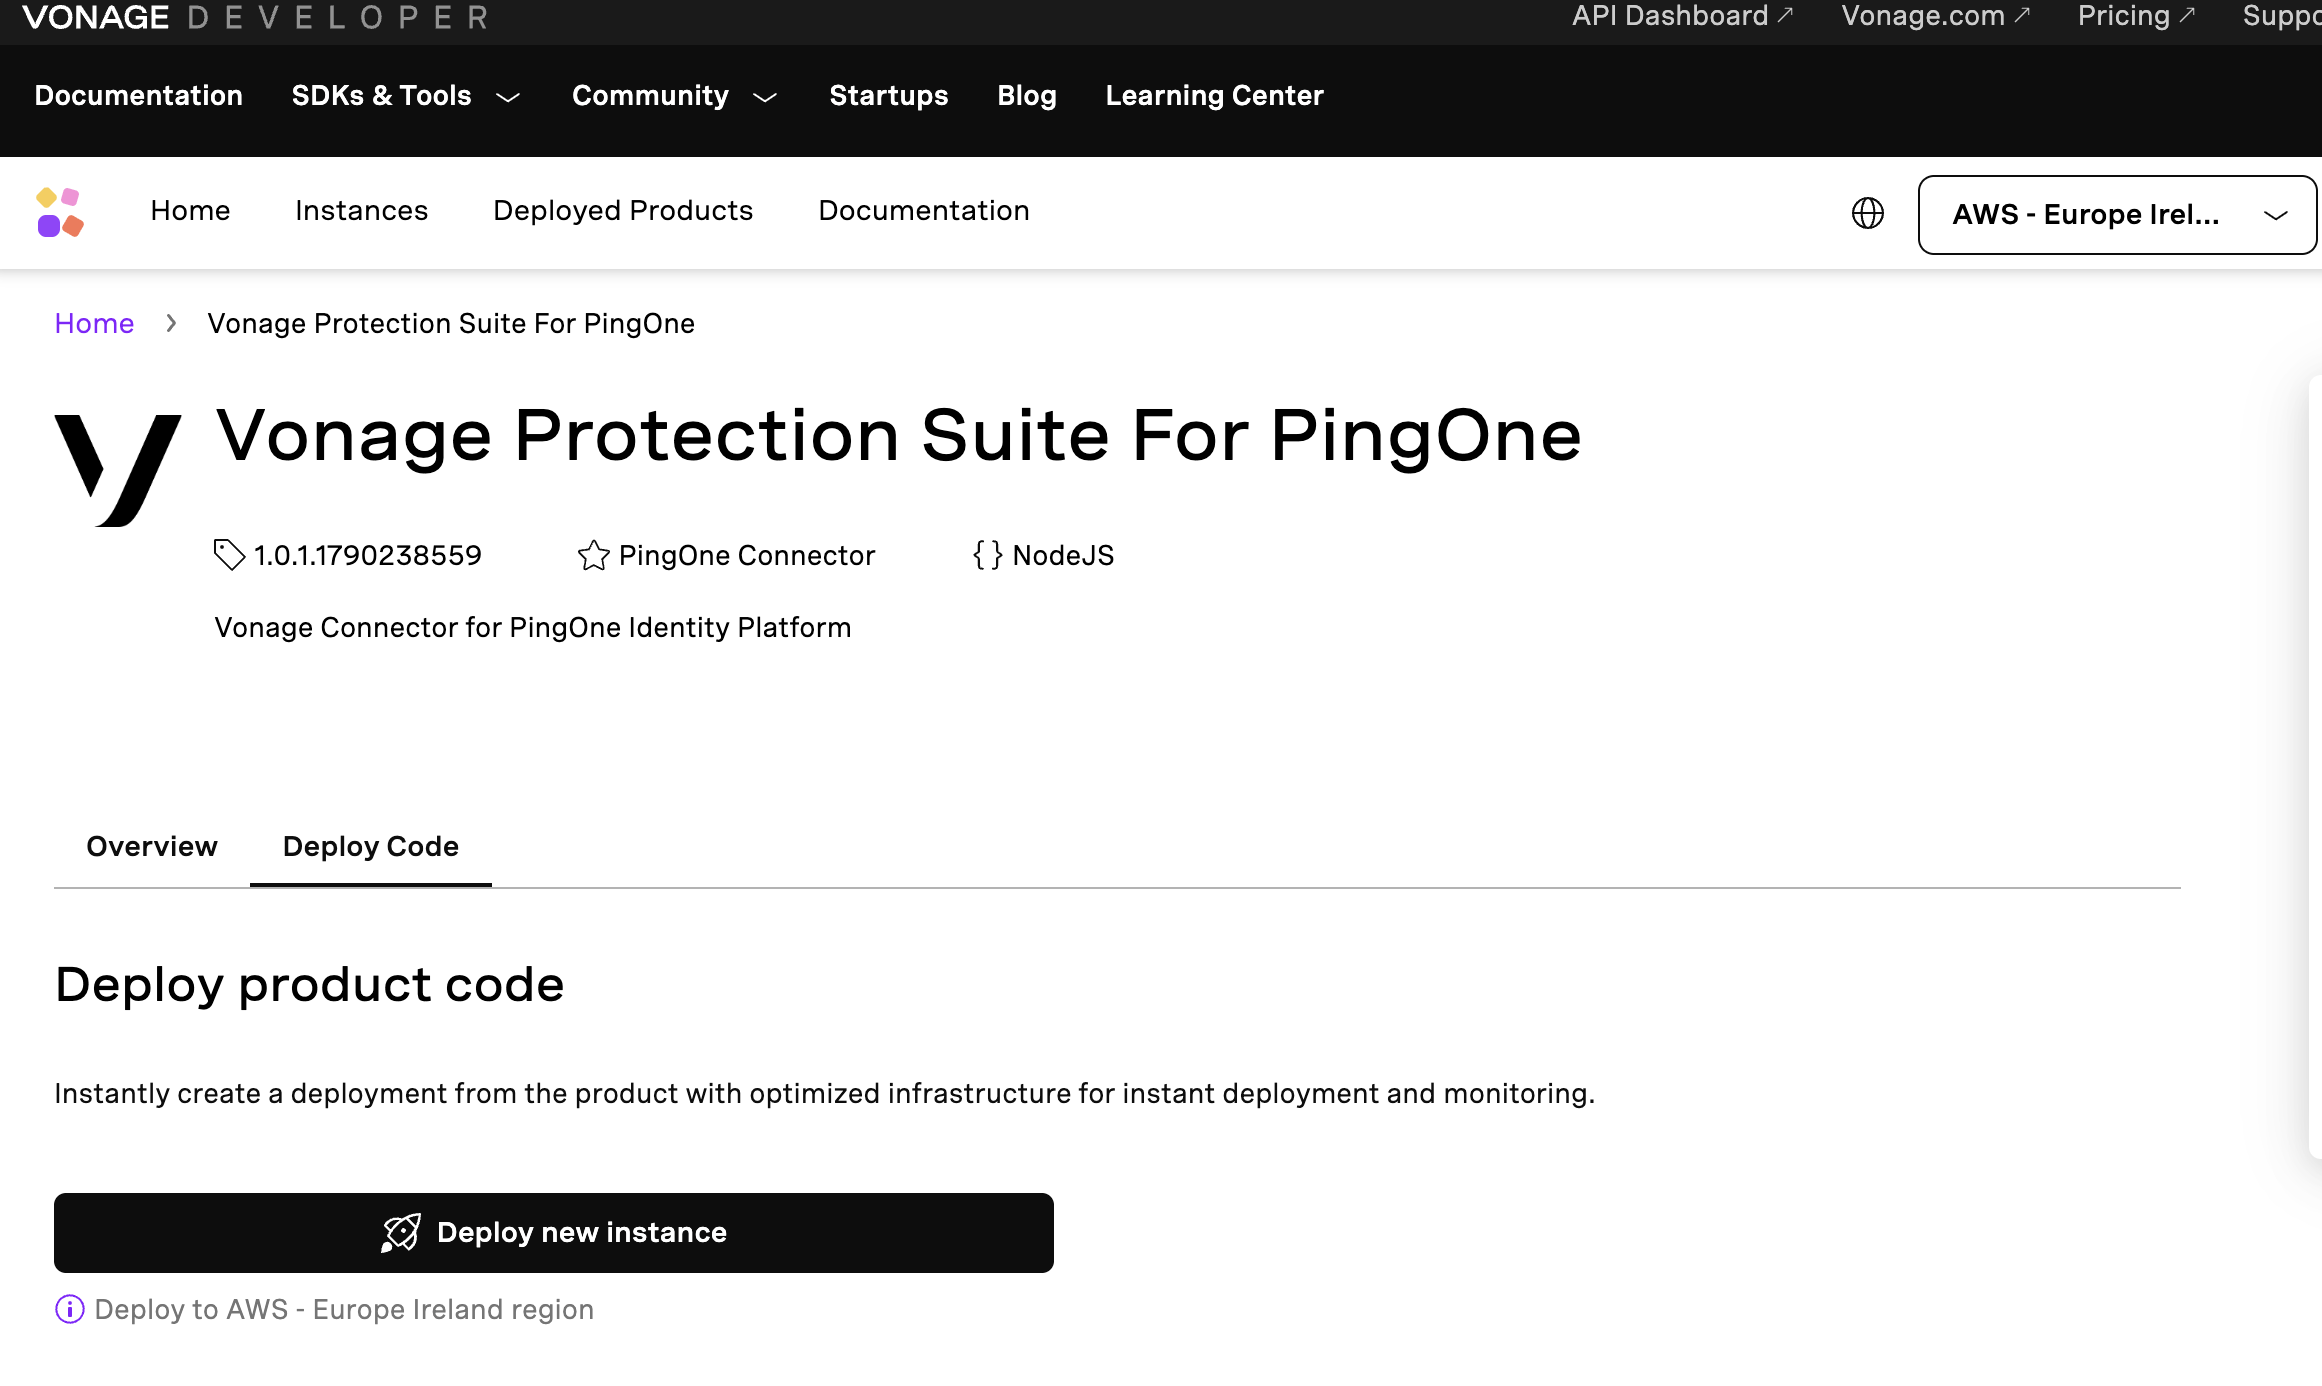
- Click Deploy a new instance.
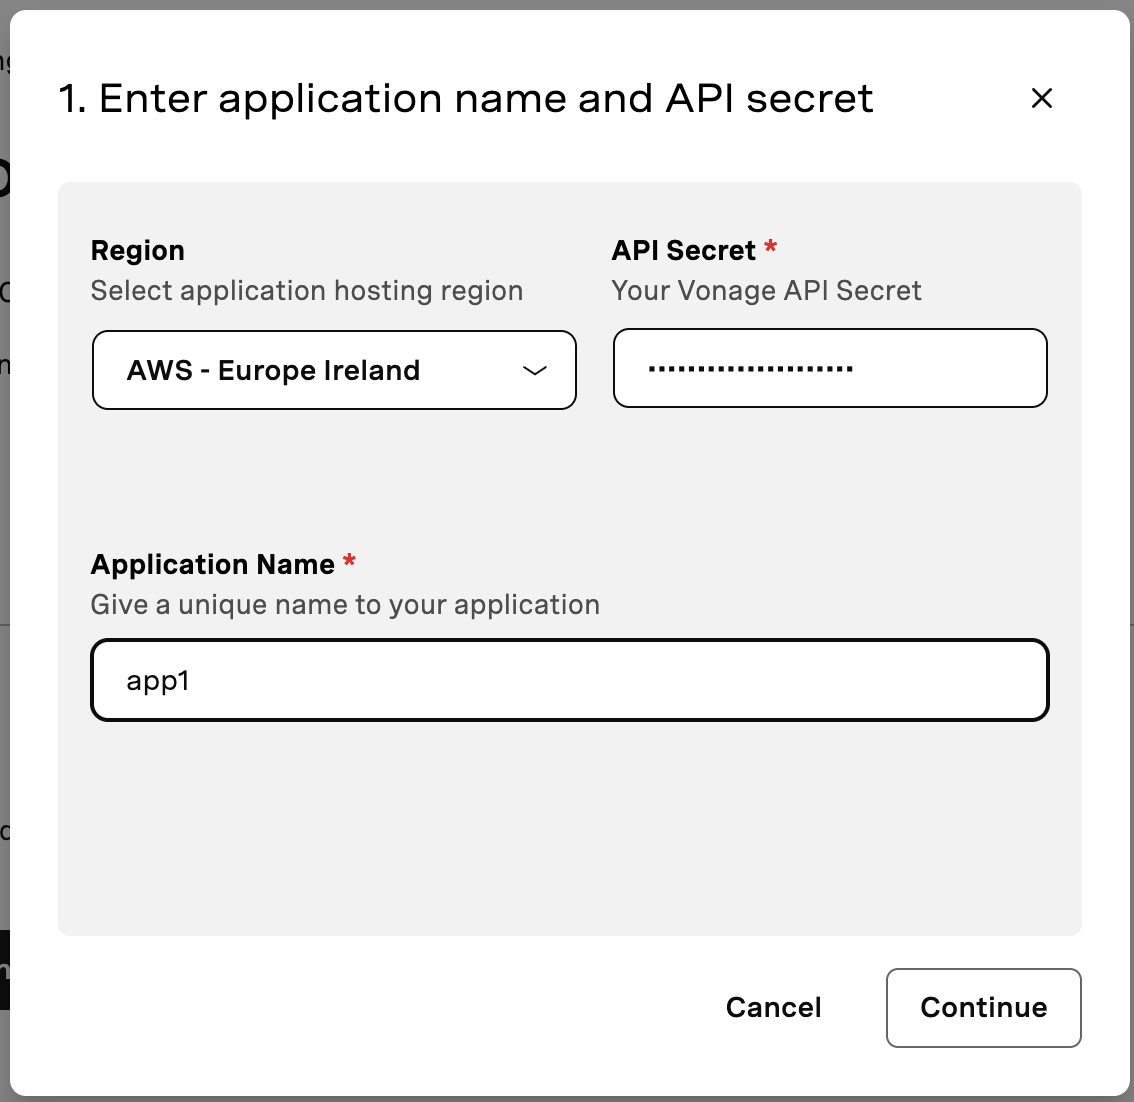
- Select a region for the instance and enter a unique, concise instance name.
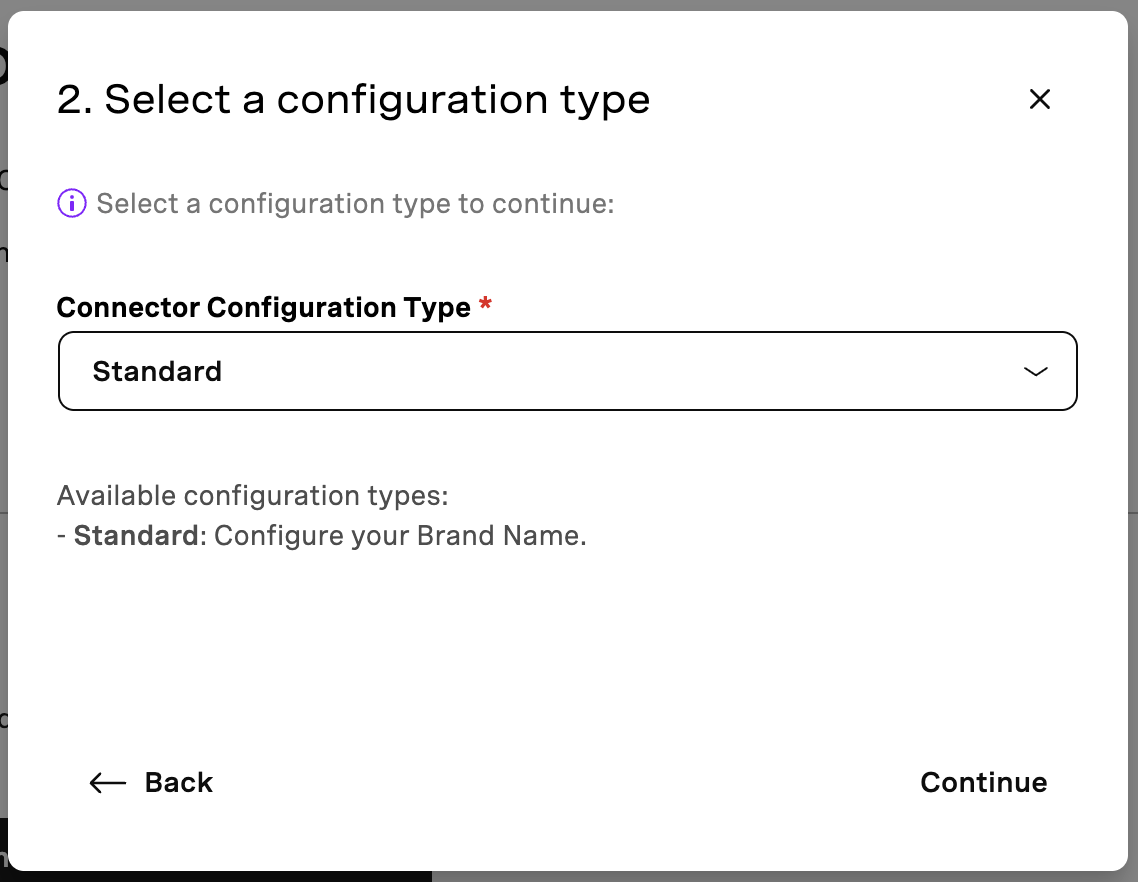
- Select Standard as the configuration type.
- Click Continue.
-
Configure the following settings:
- Vonage Number (optional): If configured, this number is used as the sender ID for SMS. Enter the number in E.164 format without the
+character. If you do not enter a number, the connector uses the configured Brand Name. This setting does not apply to voice calls - the caller number is randomly selected by Vonage Verify. - Brand Name (required): Enter the brand name to include it in the SMS message body. This setting does not apply to voice calls.
- Voice Call Fallback (required): Enable this option to retry delivery through a voice call if SMS delivery fails.
- Vonage Number (optional): If configured, this number is used as the sender ID for SMS. Enter the number in E.164 format without the
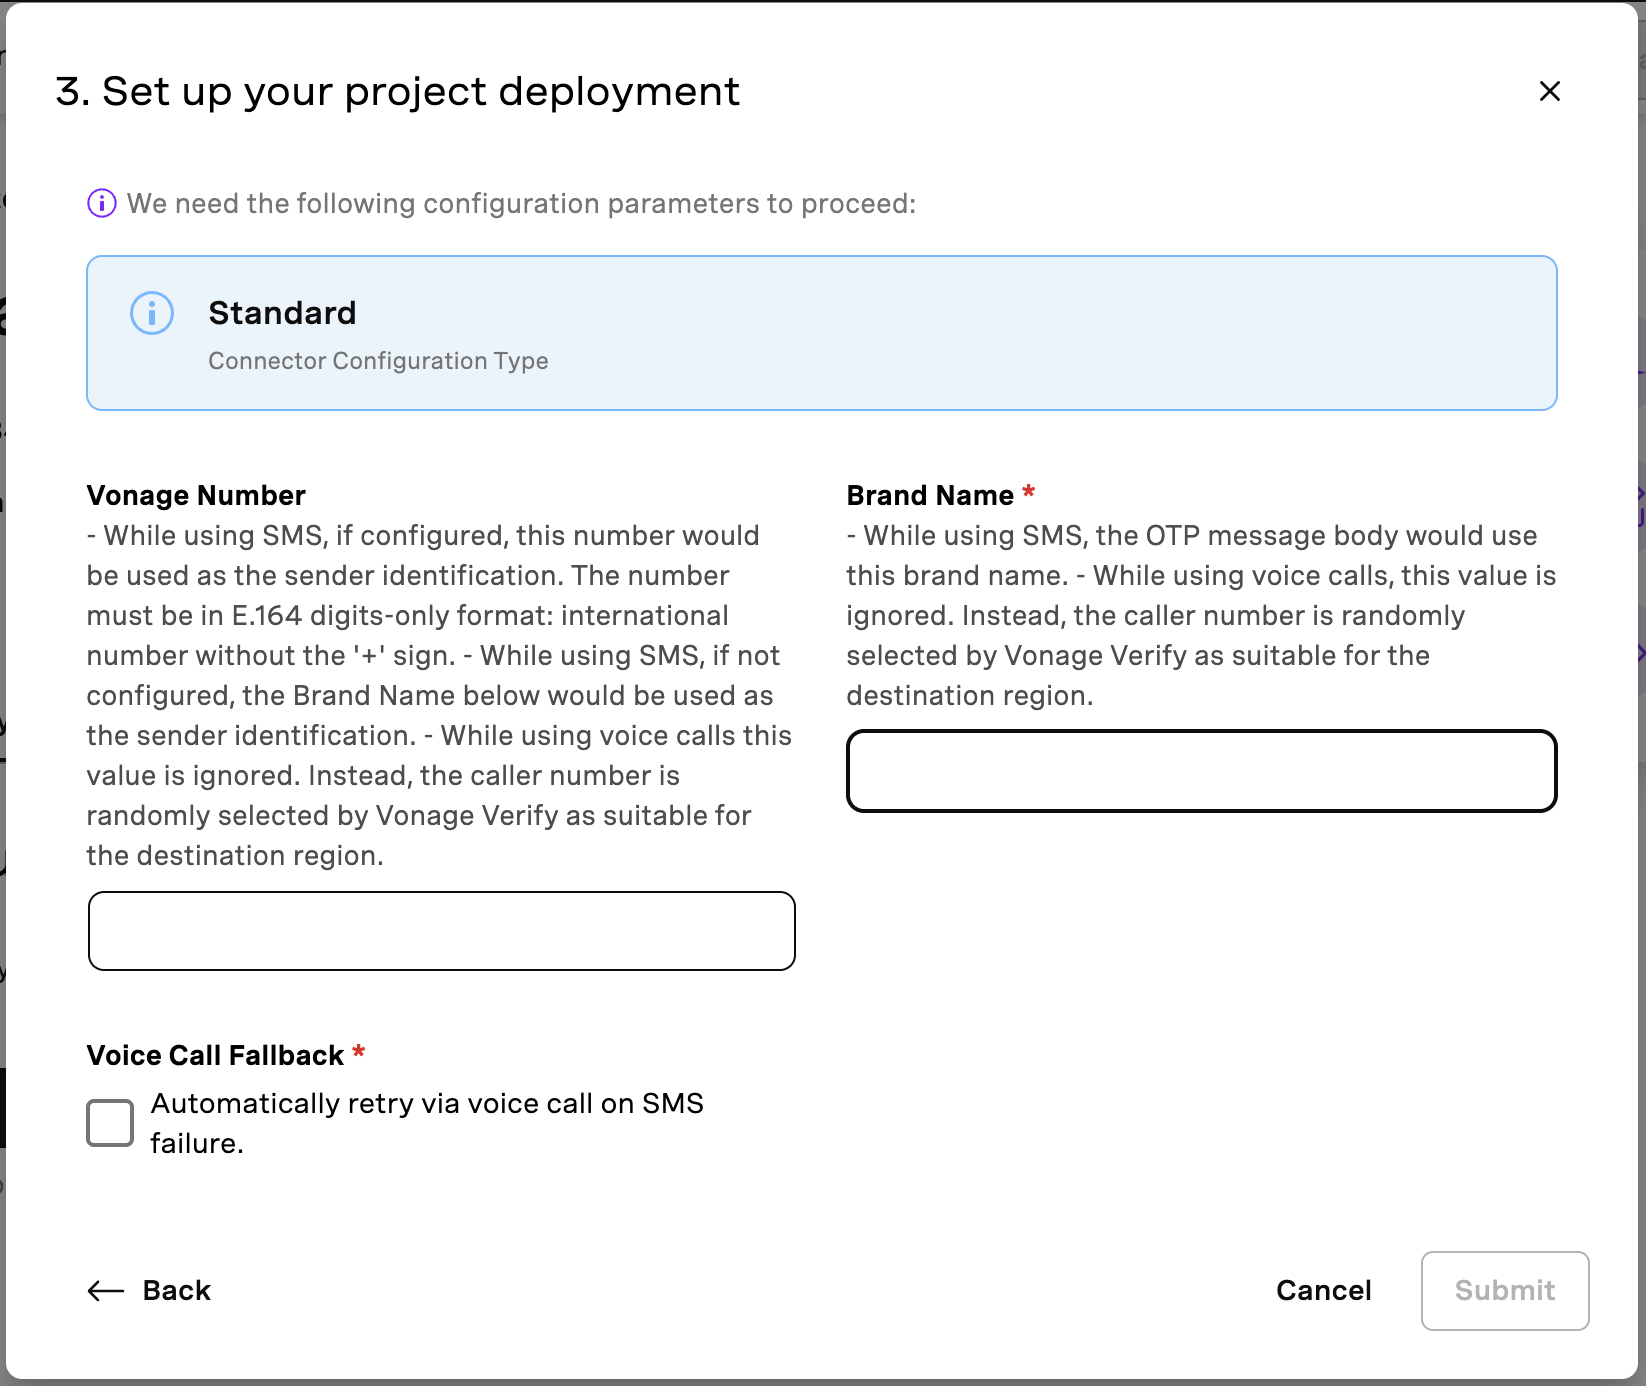
- Click Continue to deploy the instance.
Configure the Connector
After deploying the connector, launch its Admin Application to configure security policies and generate authentication tokens.
Launch the Admin Application
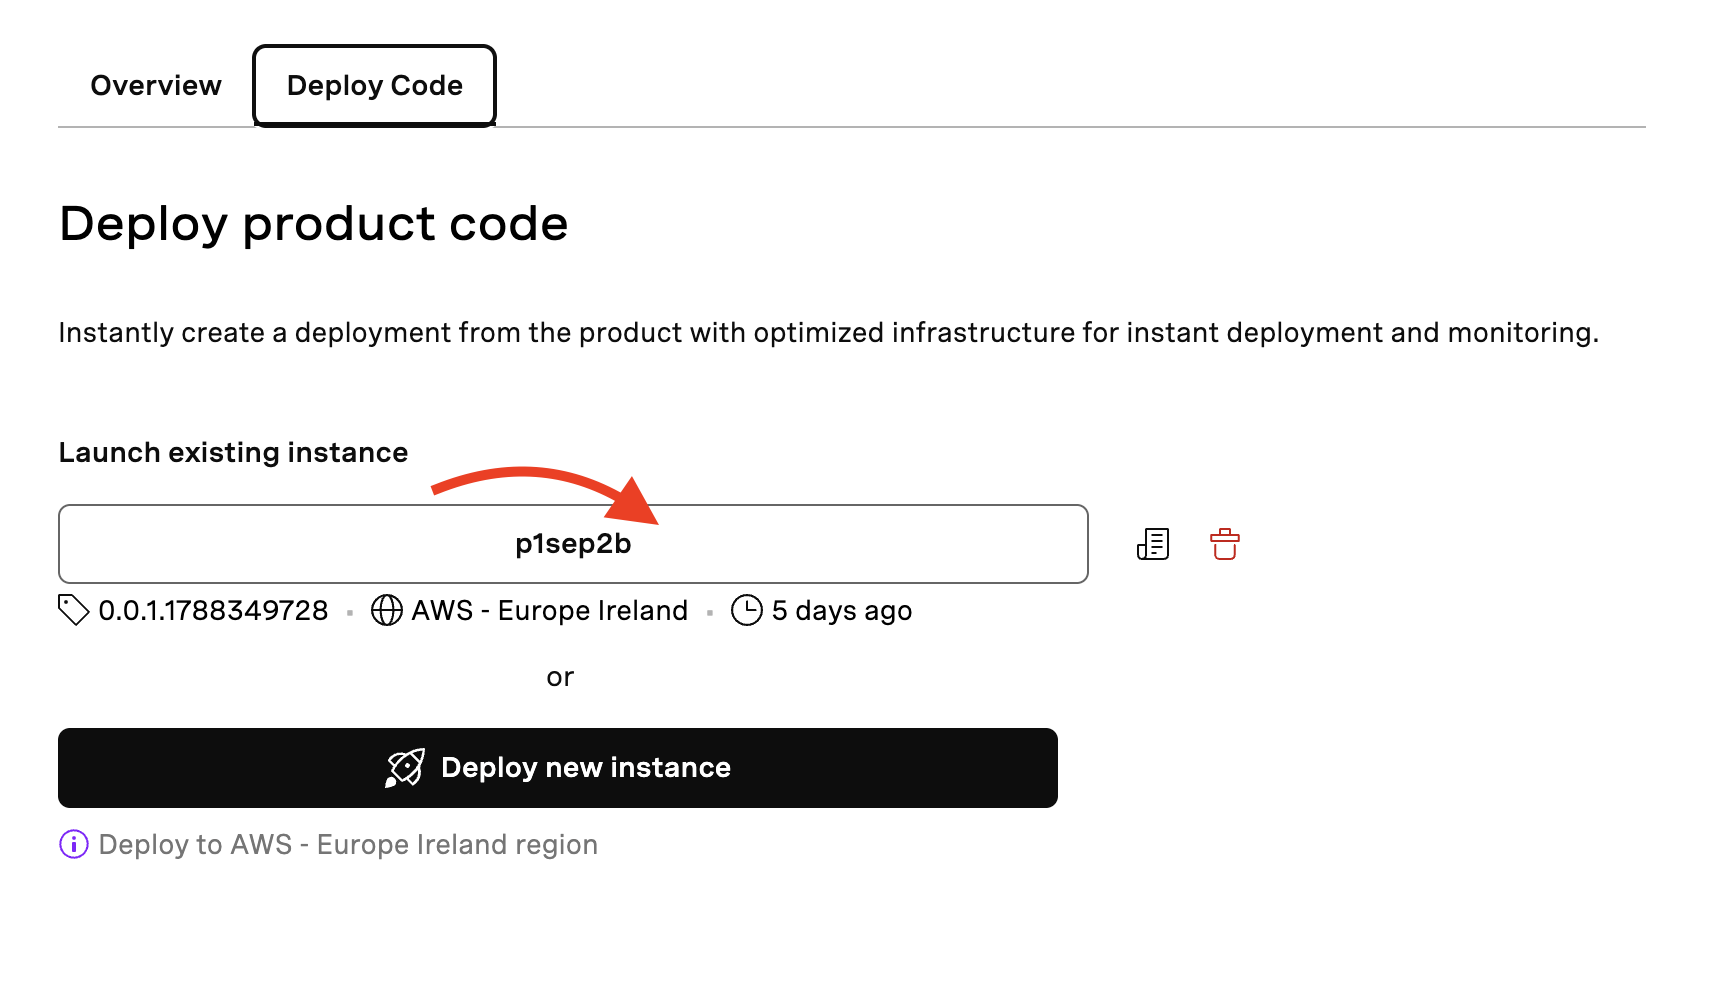
- Go to the Deploy Code tab and launch the existing instance.
- Authenticate with Vonage credentials by clicking the Verify Identity with Vonage button.
Dashboard Tab
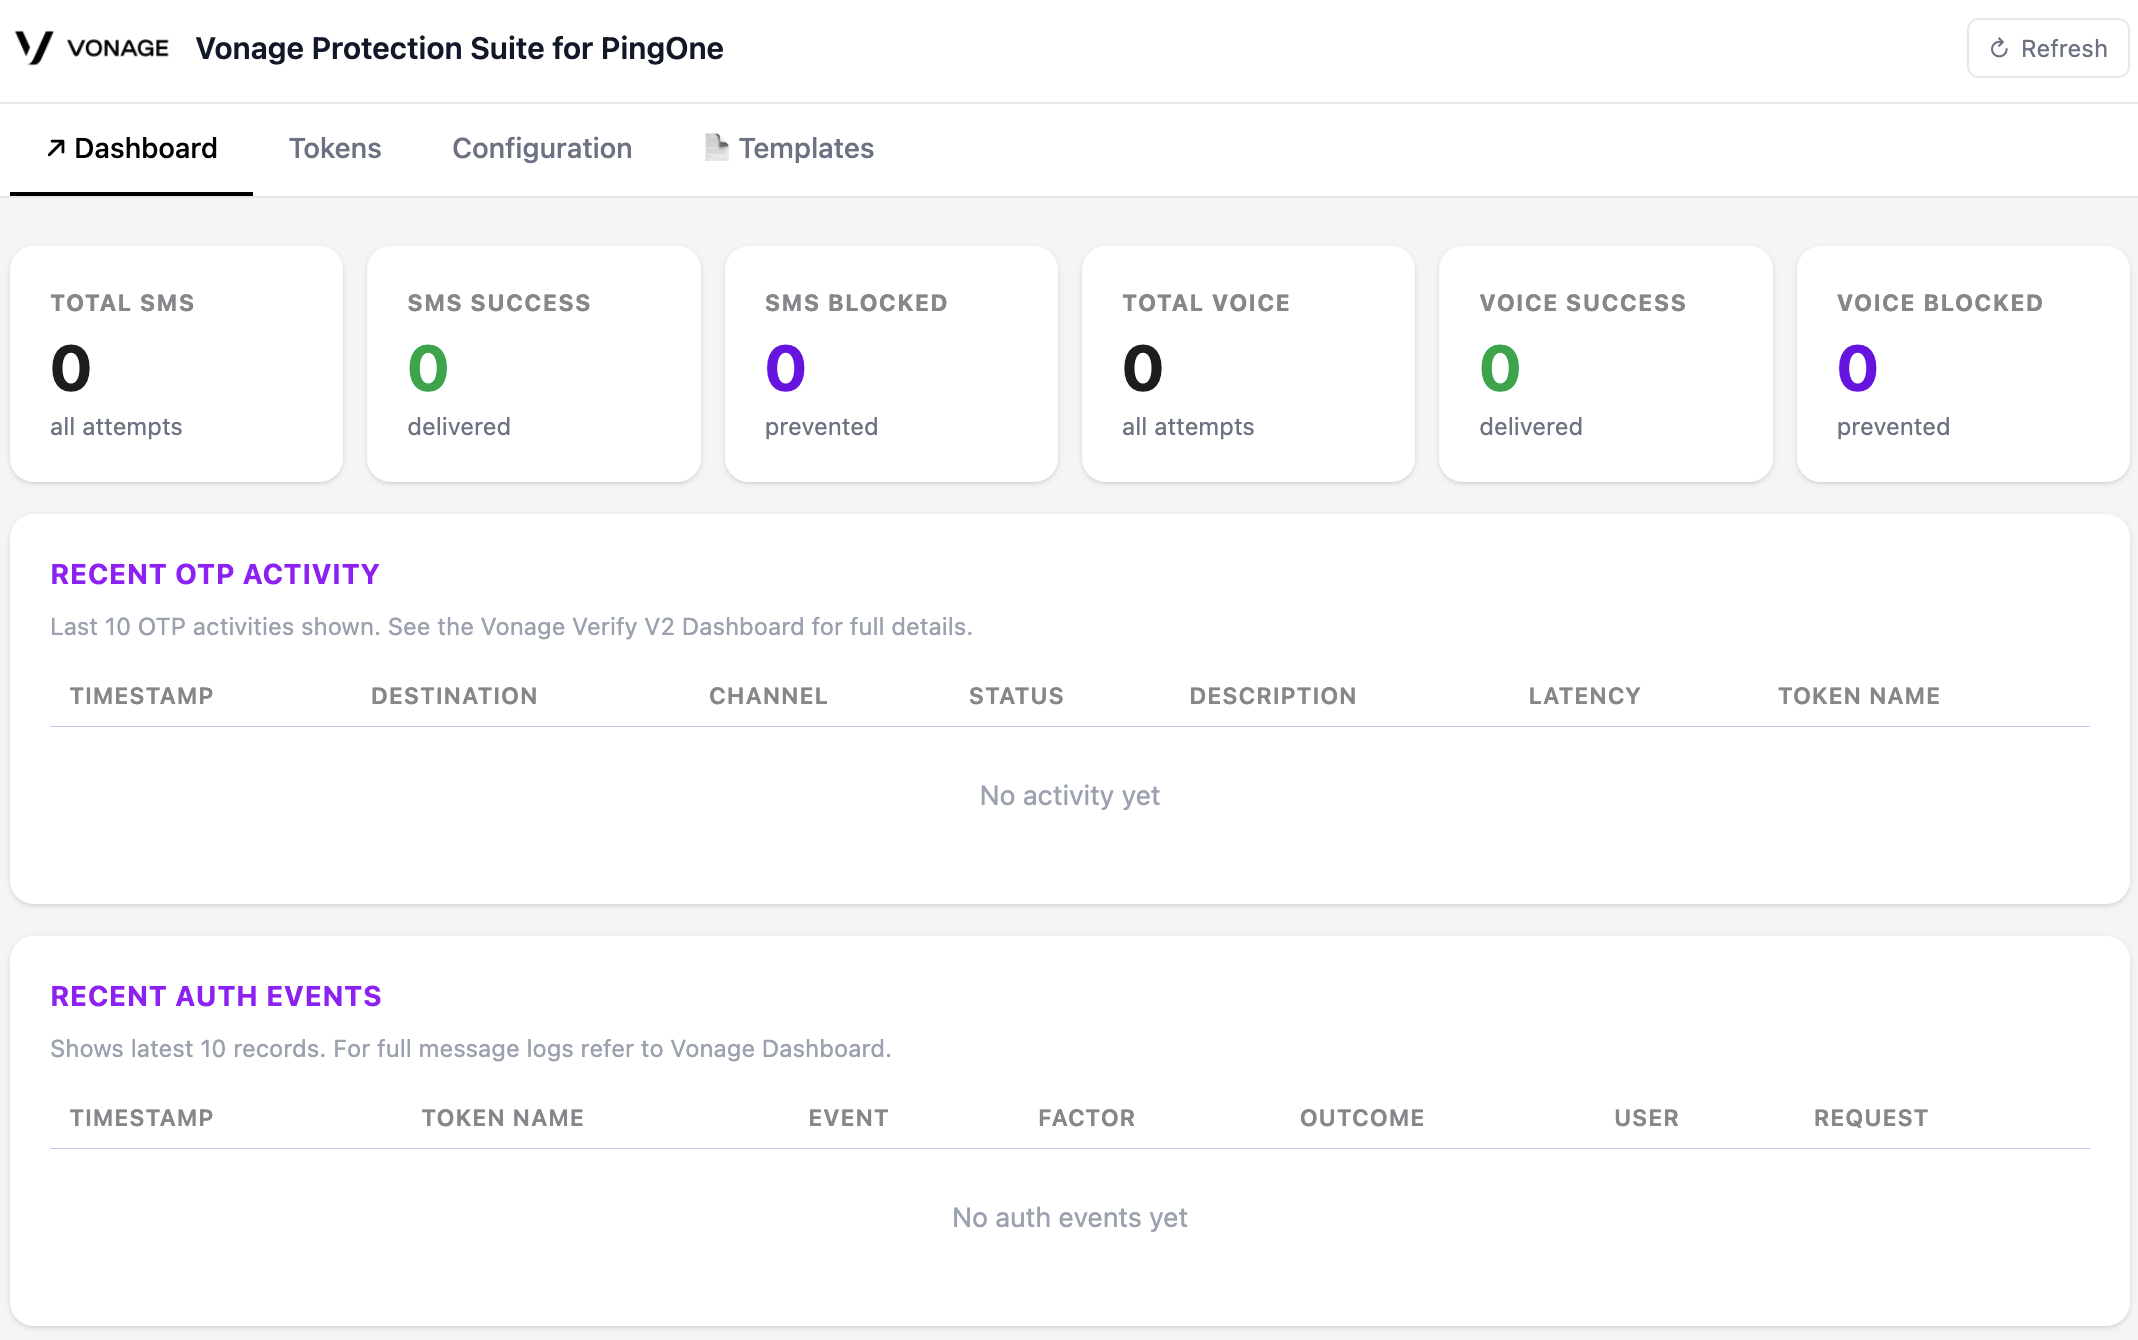
The Dashboard tab provides real-time visibility into OTP delivery and authentication activity.
Counters
The Counters section displays the following metrics:
- Total SMS: Total number of SMS delivery attempts, including successful and failed attempts.
- SMS Success: Number of successful SMS deliveries.
- SMS Blocked: Number of SMS deliveries blocked by Identity Insights or Fraud Defender.
- Total Voice: Total number of voice delivery attempts, including successful and failed attempts.
- Voice Success: Number of successful voice deliveries.
- Voice Blocked: Number of blocked voice deliveries.
Recent OTP Activity
The Recent OTP Activity section displays the 10 most recent OTP delivery events across all tokens:
- Timestamp: Time at which the delivery was attempted.
- Destination: Masked destination phone number.
- Channel: Delivery channel, either
SMSorVOICE. - Status: Delivery status, such as
SUCCESS,FAILED, orFLAGGED. - Description: Full reason for a failure or flag. Click the eye icon to view the description.
- Latency: Time required to complete the delivery, in milliseconds.
- Token name: Name assigned to the token when it was created.
Note: A FLAGGED event appears in amber and indicates that the OTP was delivered after the destination number was flagged.
Recent Auth Events
The Recent Auth Events section displays the 20 most recent successful verification events received from PingOne through the configured webhook (see the Configure a PingOne Webhook for Verification Events) section.
The connector records only OTP Check Success events. Failed and unrelated events are not stored.
The section displays the following information:
- Timestamp: Time at which PingOne published the event.
- Token name: Name assigned to the token when it was created.
- Event: PingOne event type, shown as
OTP Check Success. - Outcome: Verification outcome. The connector records only events with a
SUCCESSoutcome. - User: PingOne user identifier.
- Correlation: Reference used to associate the verification event with the original OTP delivery.
Tokens Tab
The Tokens tab displays all generated tokens with their current status:
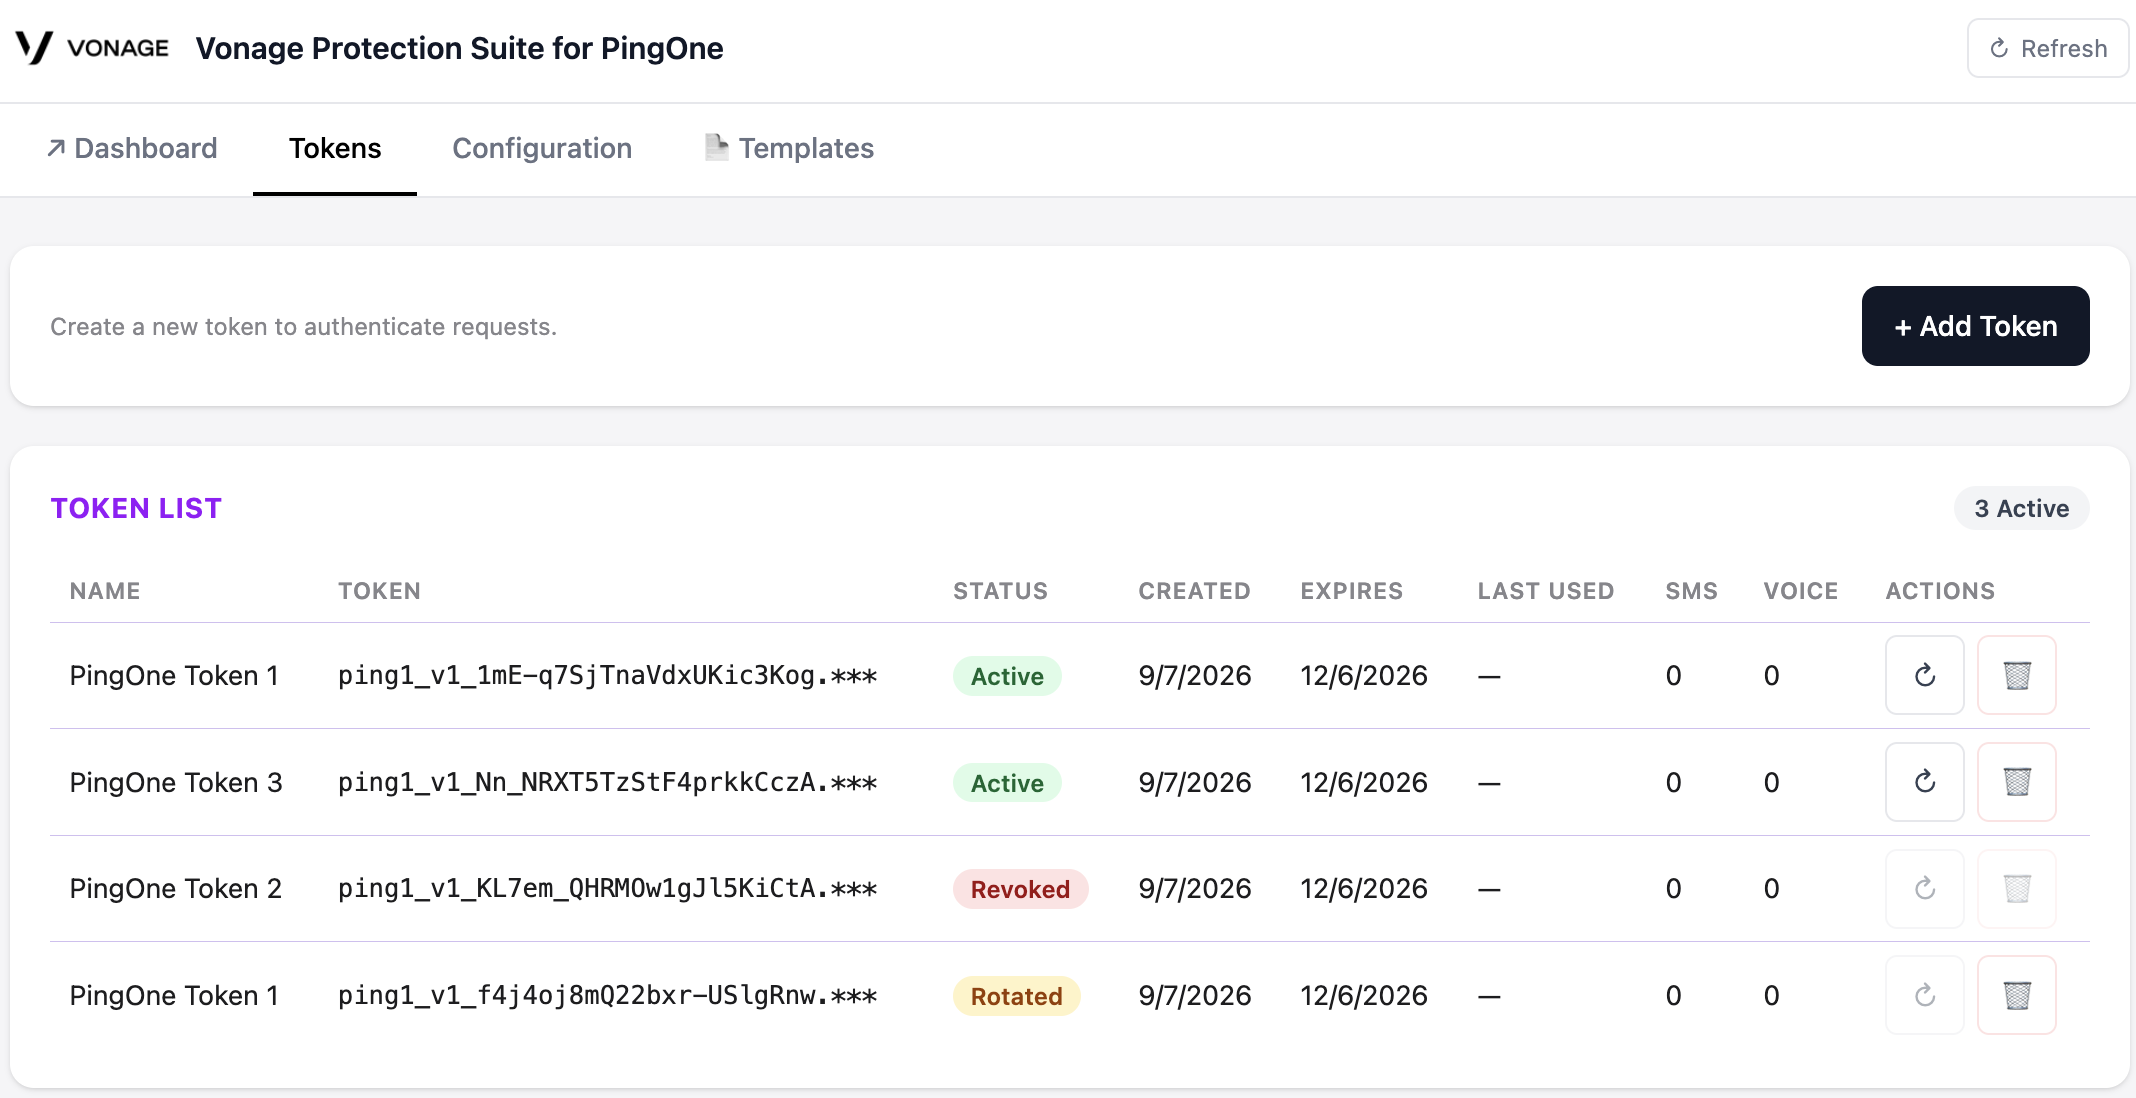
A token can have one of the following statuses:
- Active: The token is valid and can be used.
- Grace Period: The token has been replaced by a newer token. Both tokens remain valid during a 24-hour transition period.
- Expired: The token has passed its expiration date.
- Revoked: The token has been manually revoked and can no longer be used.
Add a token
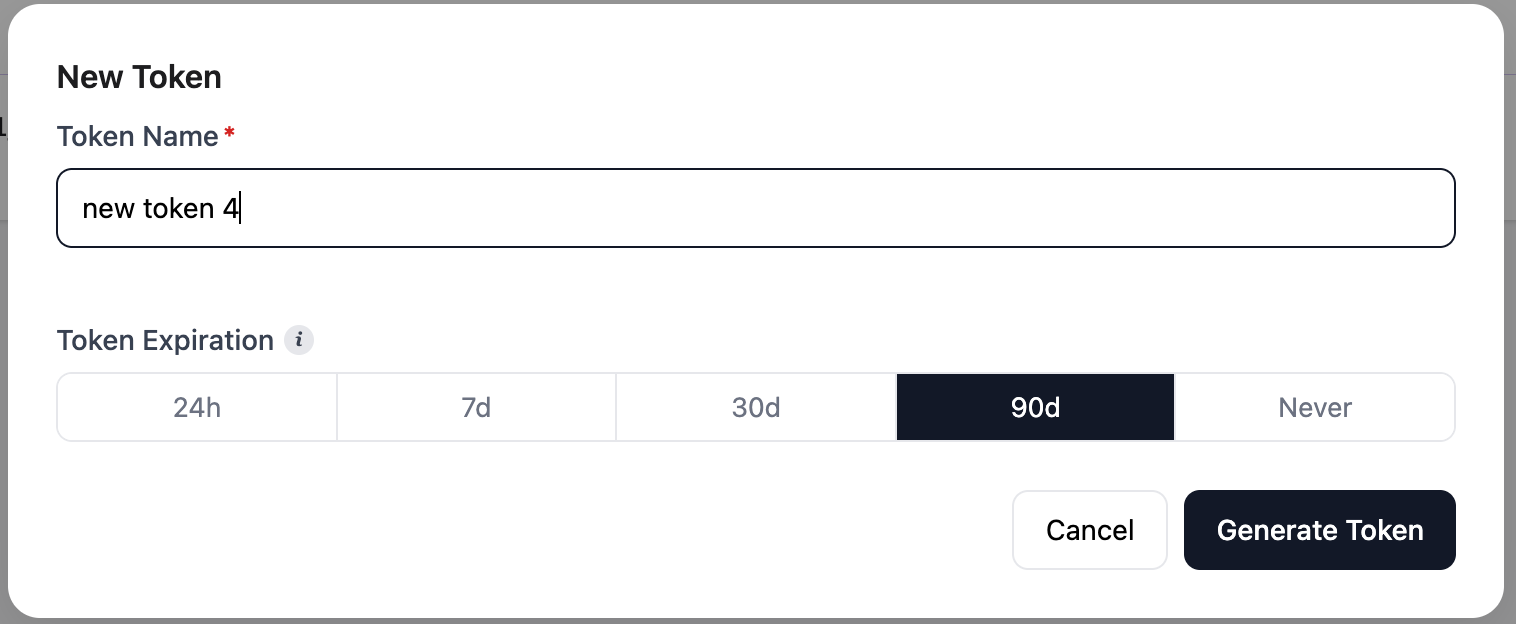
When you create a token, configure the following values:
- Token Name: A human-readable name used to identify the token in the Admin Application.
- Token Expiration: The period for which the token remains valid. Available options are 24 hours, 7 days, 30 days, 90 days, or Never. Shorter expiration periods improve security but require more frequent token rotation.
Rotate a token
Rotating a token generates a new token with the same name and expiration period as the original token. The original token enters a 24-hour grace period during which both tokens remain valid. Use rotation to regularly cycle credentials without downtime.
For the complete rotation procedure, see Manage and Rotate an Authentication Token.
Revoke a token
Revoking a token disables it immediately. Use this if a token has been compromised or is no longer needed. Revocation is immediate and irreversible.
Configuration Tab
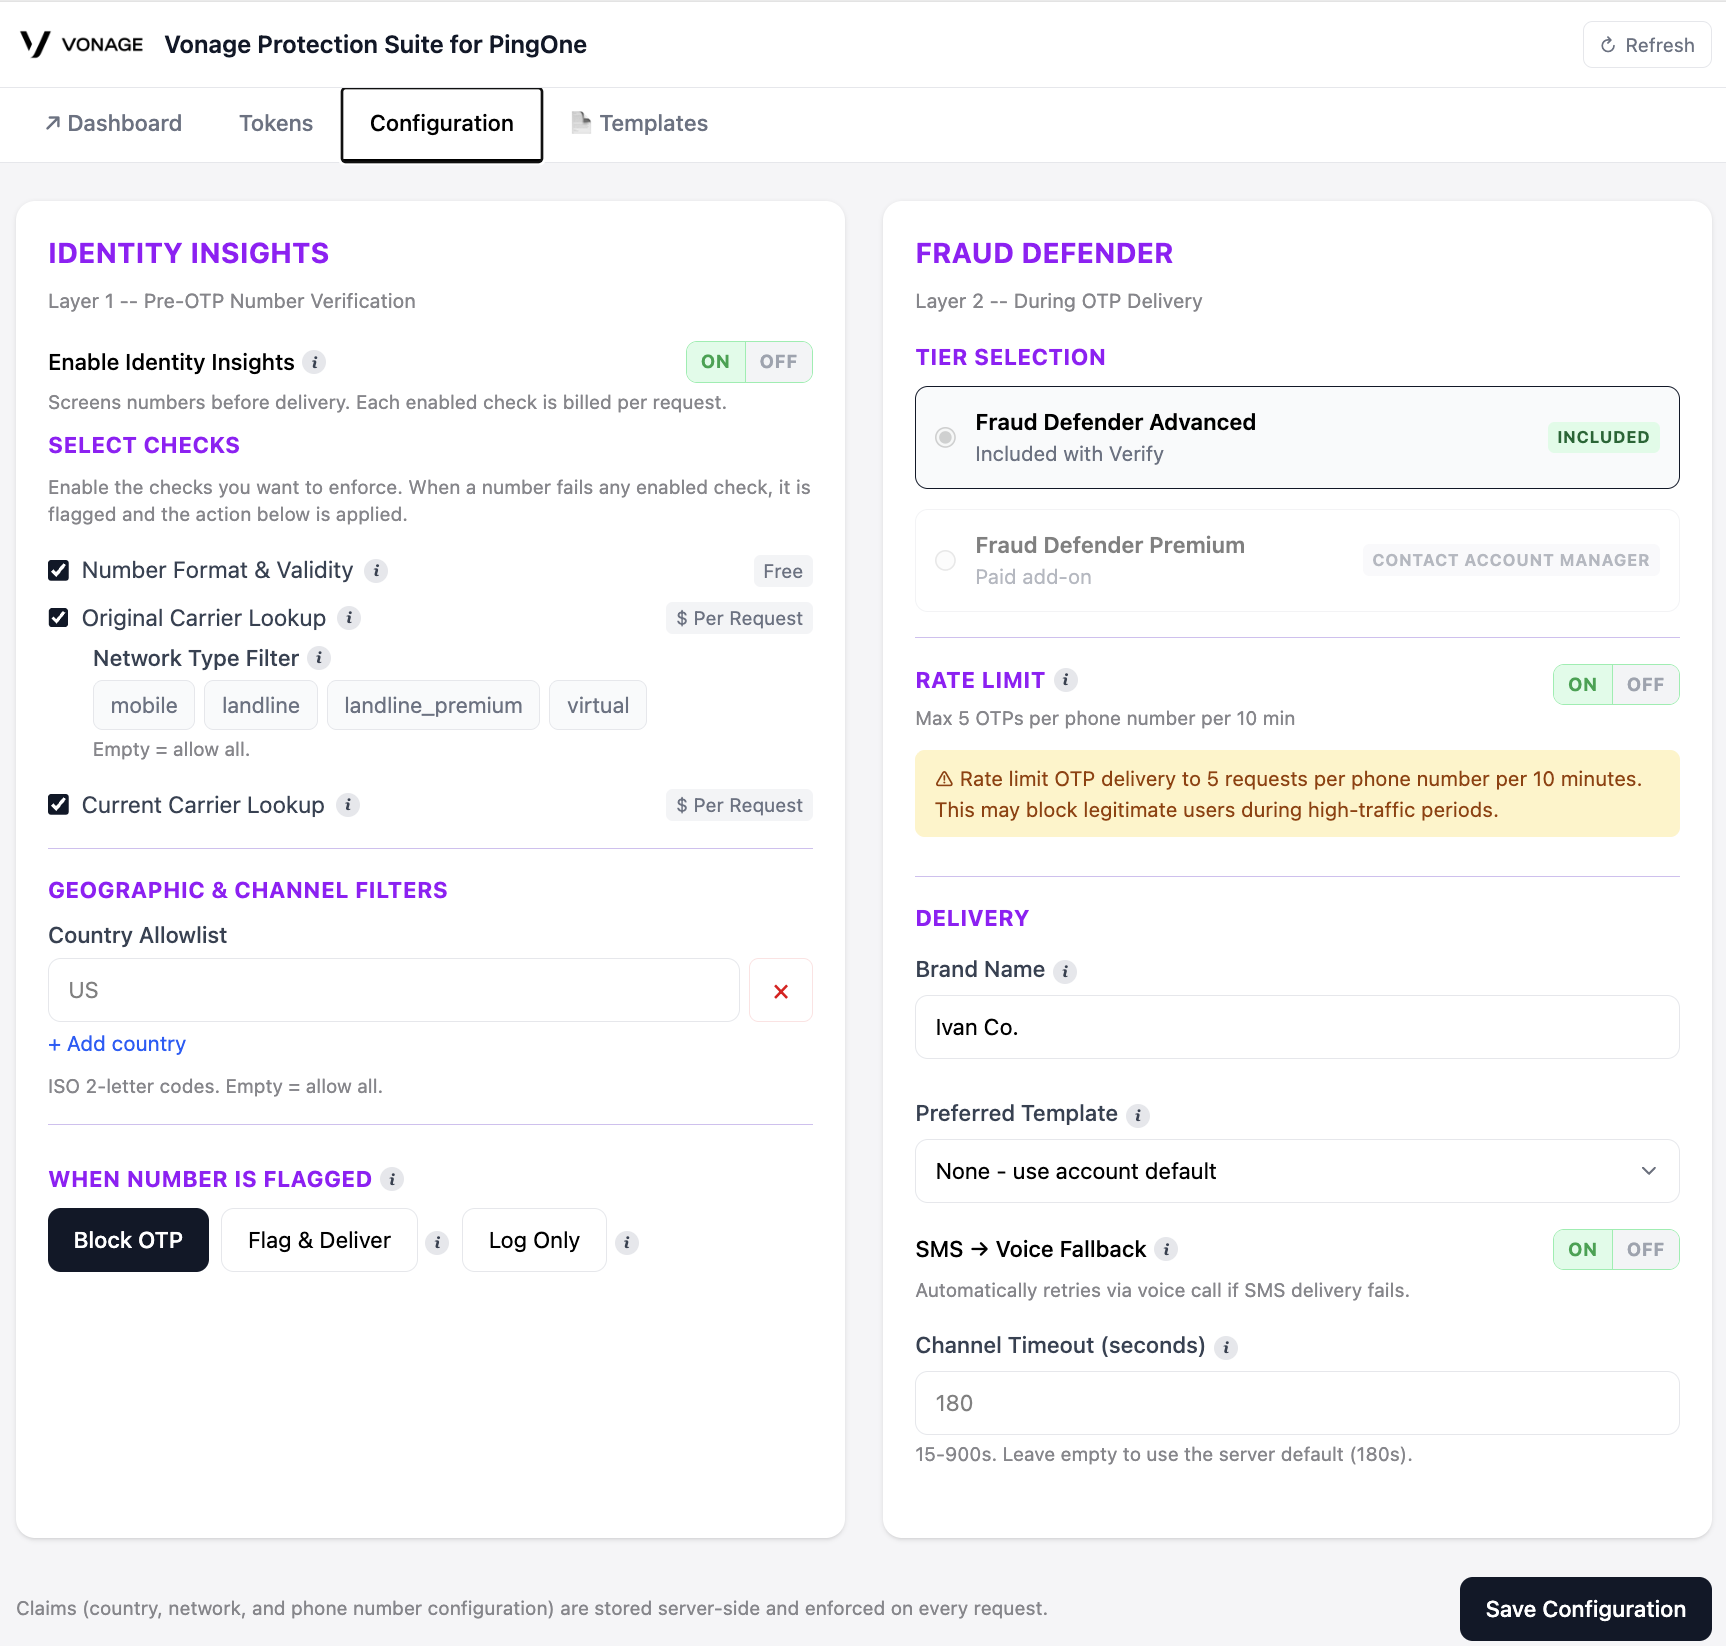
The token authenticates requests between PingOne and the Vonage connector. The Configuration tab contains the settings that apply to every token on the connector instance.
Layer 1 - Identity Insights (Pre-OTP)
Identity Insights performs optional checks before the connector sends an OTP. The connector takes the configured action based on the results of those checks.
Each enabled check is billed per request. Number Format and Validity is free. Original Carrier Lookup and Current Carrier Lookup are charged per request. Pricing details are available on the Vonage pricing page.
To configure Identity Insights:
- Toggle Enable Identity Insights on.
- Select one or more of the following checks:
- Number Format and Validity: Validates the phone number format and checks whether the number is reachable.
- Original Carrier Lookup: Identifies the carrier to which the number was originally assigned. This check flags VoIP and virtual numbers.
- Current Carrier Lookup: Identifies the carrier currently serving the number. This check detects ported numbers.
Geographic & Channel Filters
Country Allowlist: Enter ISO 3166-1 alpha-2 country codes (e.g., US, GB, DE). Only numbers associated with these countries will be allowed. Leave empty to allow all countries.
When Number Is Flagged
Choose the action to take when a destination number is flagged during verification checks:
- Block OTP: The OTP is not delivered. The blocked event appears in Recent OTP Activity.
- Flag and Deliver: The OTP is delivered but the event is flagged with an amber status in the Dashboard.
- Only Log: The check result is logged but no action is taken. The OTP is delivered normally.
Layer 2 - Fraud Defender (During OTP)
Fraud Defender provides protection during OTP delivery, including protection against SMS pumping, artificially inflated traffic, and traffic burst attacks.
Fraud Defender Advanced is included with Verify and appears as Included in the connector configuration. Fraud Defender Premium is available as a paid upgrade. Contact your Account Manager to enable it.
Important: Fraud Defender Advanced is included with your Verify traffic, but advanced protections such as AIT Protection and SMS Burst Protection require separate activation and configuration in the Vonage Dashboard. These protections are not automatically enabled. To set up Fraud Defender for your account, follow the onboarding guide.
You can configure the following protections in the Vonage Dashboard:
- Traffic Rules: Create blocking and allow rules by country or prefix to control where OTPs can be delivered (available with Fraud Defender Standard, included for all accounts).
- AIT Protection: Detect and block artificially inflated SMS traffic. Available protection levels are None, (alerts only, no blocking), Standard (blocks high-risk traffic, alerts on the rest), and High (blocks all potentially fraudulent traffic). Read more here.
- SMS Burst Protection: Configure per-country throttling limits. Read more here.
- Volumetric Alerts: Receive alerts when abnormal traffic increases are detected for a country. Read more here.
Configure the Rate Limit
The connector limits the number of OTP delivery requests that can be made for a user within a 10-minute window. The default limit is five requests per user every 10 minutes. This protects against toll fraud and repeated OTP requests targeting the same user.
Note: PingOne Notification Policies independently enforce their own delivery limits, cooldown rules, and per-country routing. Disable any PingOne-side velocity rules that duplicate the connector's rate limit, so that a blocked delivery always has a single, unambiguous cause.
Configure the Channel Timeout
The channel timeout determines how long the connector waits for the first delivery channel before proceeding to the next channel. You can configure a value from 15 to 900 seconds.
When Voice Call Fallback is enabled, this is the window after which an undelivered SMS triggers the automatic voice call.
Custom OTP Message Templates
By default, the connector uses the standard Vonage OTP message template for SMS and voice delivery.
Custom OTP Message Templates allow you to replace this default with your own message body, giving you control over the wording and language of the OTP notification your end users receive.
Once configured, the active template applies to all OTP deliveries on this connector instance.
Enable Custom Templates
Custom Template Management is disabled by default and must be enabled for your Vonage account. Contact your Vonage Account Manager or Vonage Support to enable it.
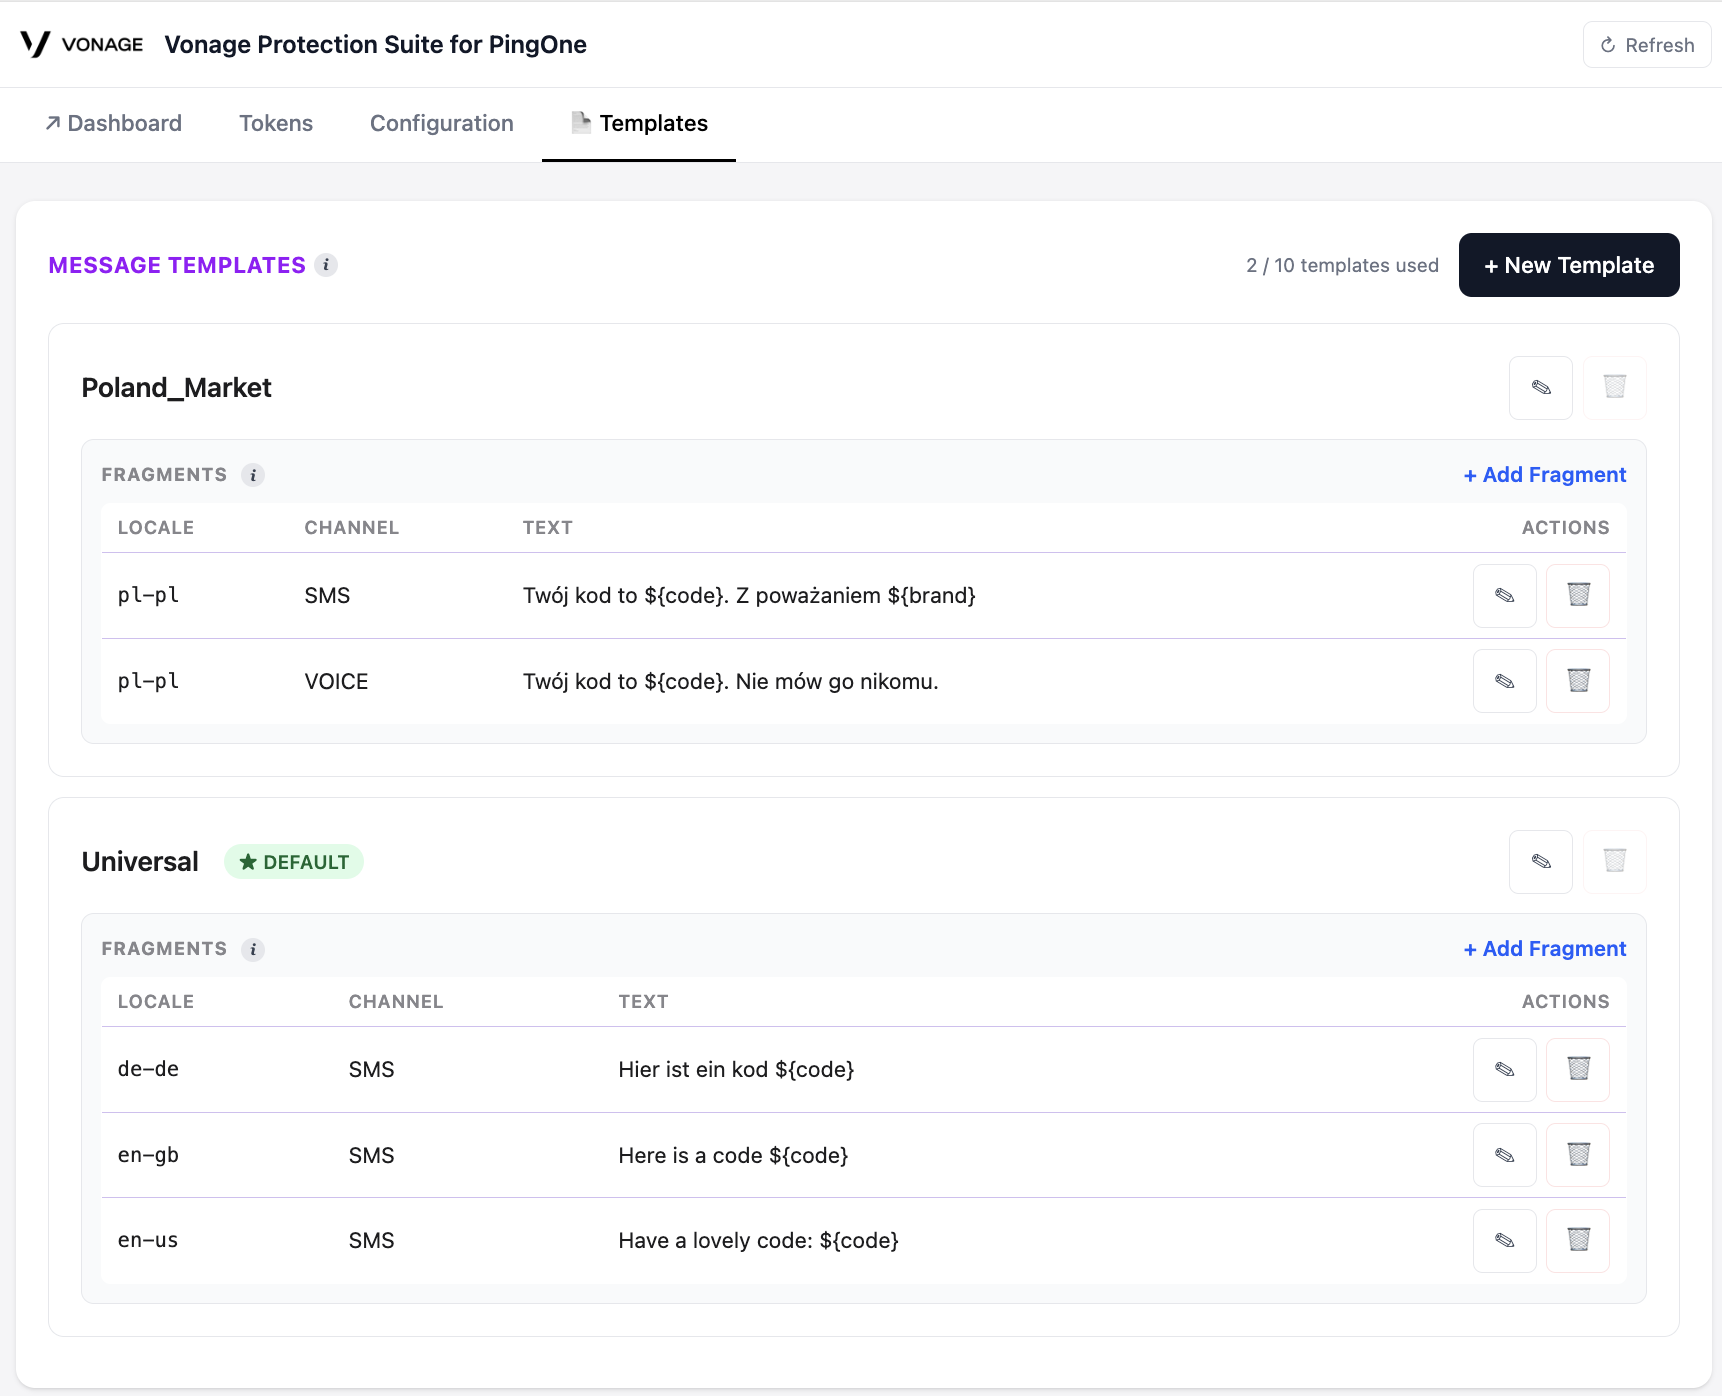
After Custom Template Management is enabled, you can create and manage templates in the Templates section of the Admin Application.
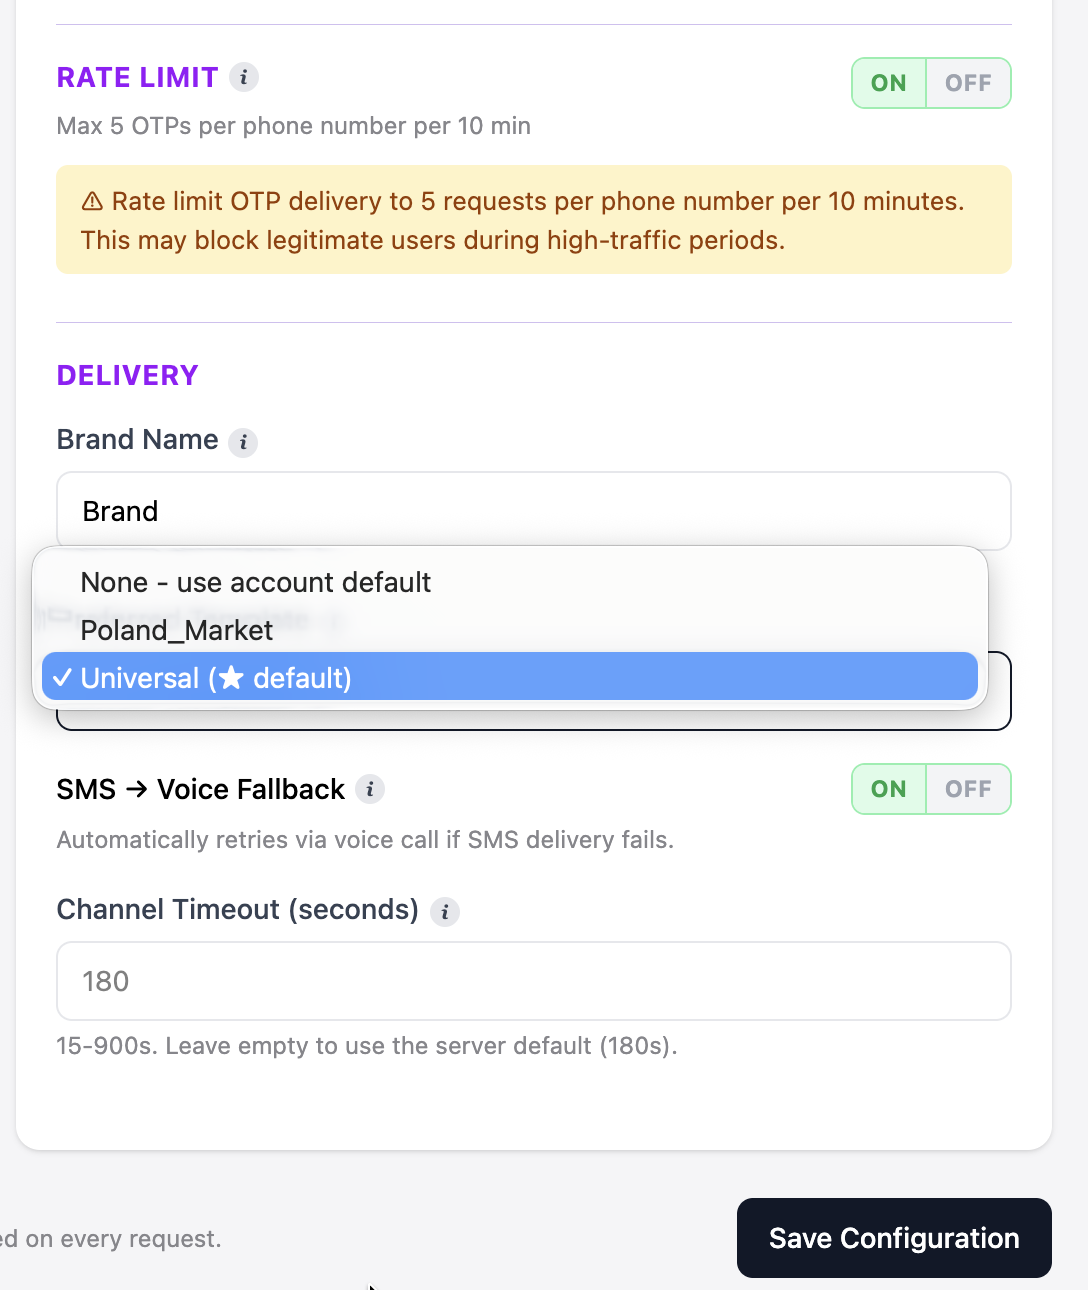
To make a template active for this connector instance:
- Open the Configuration tab.
- Under Preferred Template, select a template.
Configure a Template
Custom templates contain the following elements:
- Template: A named container. Name is a human-readable label for the template. If Is default is selected, the template is used when no preferred template is configured.
- Fragment: A message body associated with a delivery channel and locale. When creating a fragment, configure the delivery channel (SMS or Voice Call), the Locale, and the Text (a message body with placeholders). Read more here.
The message text can use the following placeholders:
${code}: Required. The OTP that the user must enter.${brand}: Brand name configured for the connector instance.${time-limit}: Numeric expiration period for the OTP.${time-limit-unit}: Unit used for the expiration period, such as minutes.
For example:
Your ${brand} verification code is ${code}. Valid for ${time-limit} ${time-limit-unit}.
Character limits follow standard SMS encoding rules:
- GSM-7 (standard Latin): 160 chars per single SMS, 153 per part if concatenated.
- UCS-2 (Arabic, Chinese, Cyrillic, etc.): 70 chars per single SMS, 67 per part if concatenated.
Templates are global to the instance: one preferred template applies to all tokens on the VCR instance. Individual tokens do not have their own template overrides.
Supported Languages
Fragments are matched by the locale field (e.g. en-us). If the locale is not provided in the verify request, Vonage attempts to detect it from the phone number prefix or falls back to en-us. See the locales available for SMS and Voice Call fragments here.
Locales marked default+custom have Vonage-built default messages and support custom overrides. Locales marked custom only require a custom fragment - no built-in Vonage message exists for them.
What Happens Without a Custom Template
If no preferred template is set (or it is set to none), Vonage's built-in default template is used for the channel and locale. The fallback order Vonage applies is:
- Fragment matching the requested locale in the preferred template.
- Fragment in the instance's default template matching the locale.
- Vonage's built-in default message for that locale and channel.
- Vonage's built-in English (en-us) message if no locale match is found.
For locales marked custom only, there is no Vonage built-in fallback: a custom fragment is required or delivery will fail for that locale.
Record the Generated Details
After configuring the security policies and generating an authentication token, record the following values. You will need them when configuring PingOne:
- Sender Endpoint URL: The single endpoint used for both SMS and voice delivery. The delivery channel is specified in the request body.
- Destination Webhook URL: The endpoint used for PingOne verification events.
- Authentication Token: The credential that PingOne includes with each request.
- Auth Header Name: Required only when using the Custom Header authentication scheme. The default value is
x-ping1-auth. - Request Body Templates: The SMS and voice templates displayed in the token generation dialog.
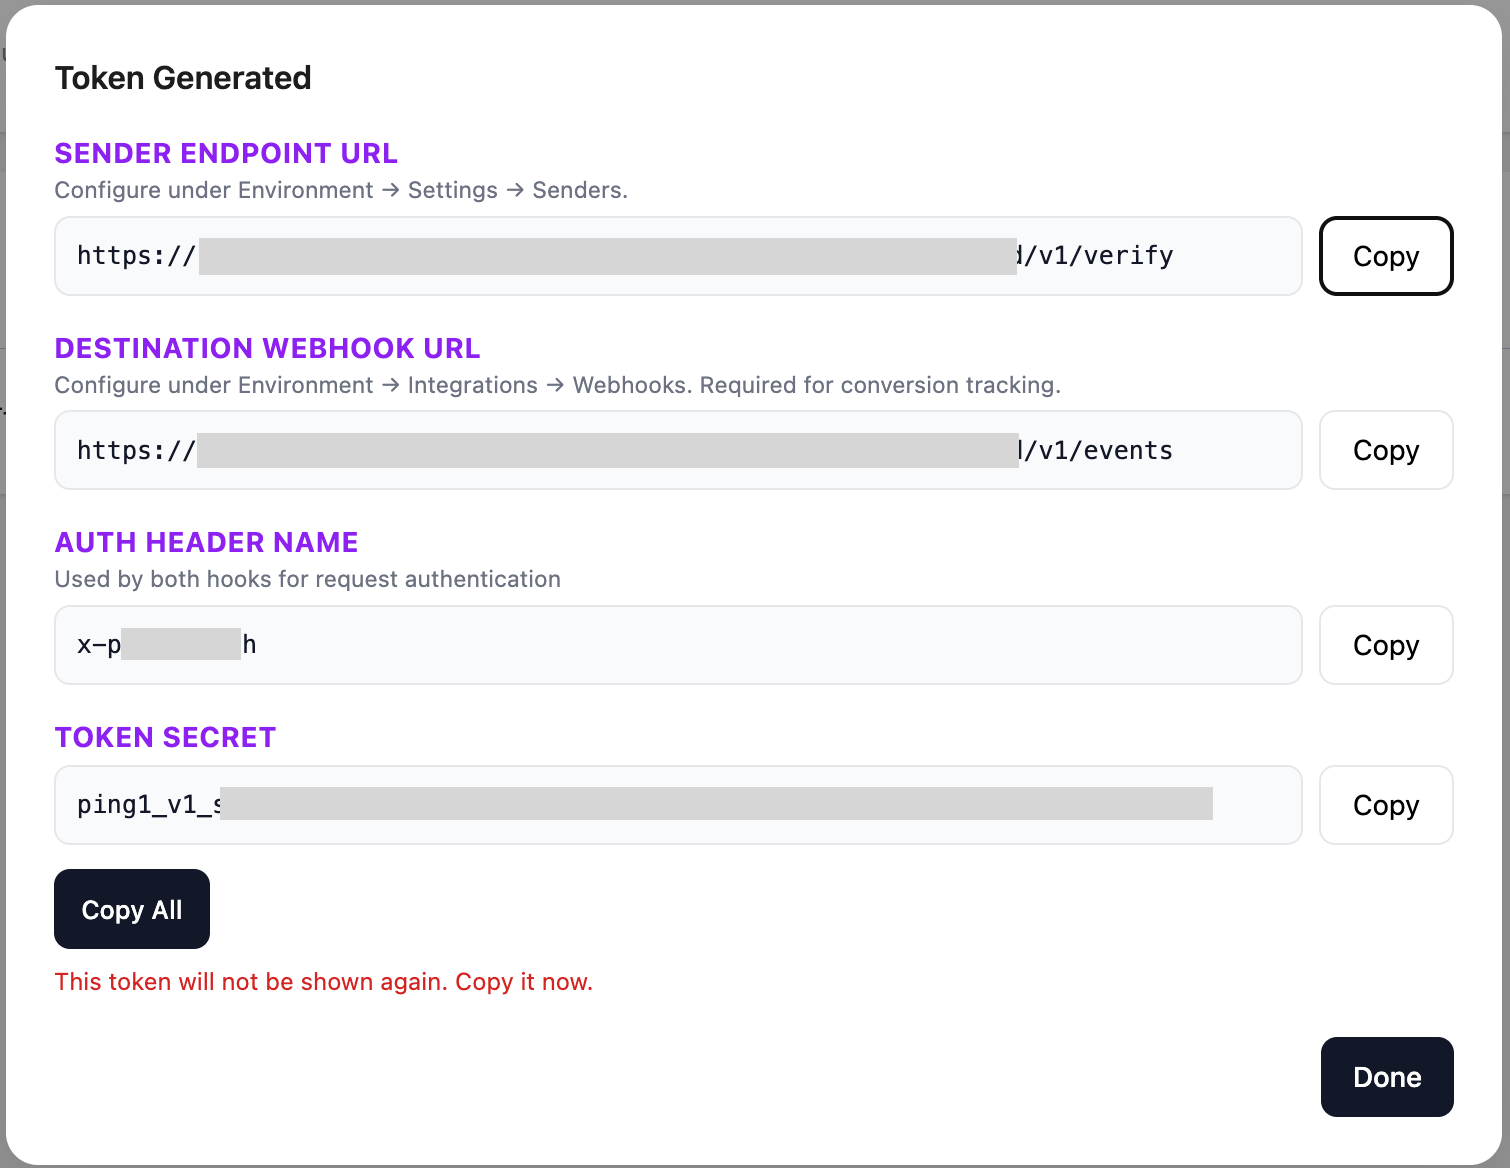
Note: The Authentication Token is displayed only once at creation. Store it securely before closing the dialog.
Configure PingOne
After deploying the connector and generating an authentication token, configure PingOne to route OTP delivery through the Vonage connector.
Add Vonage as a Custom Notification Provider
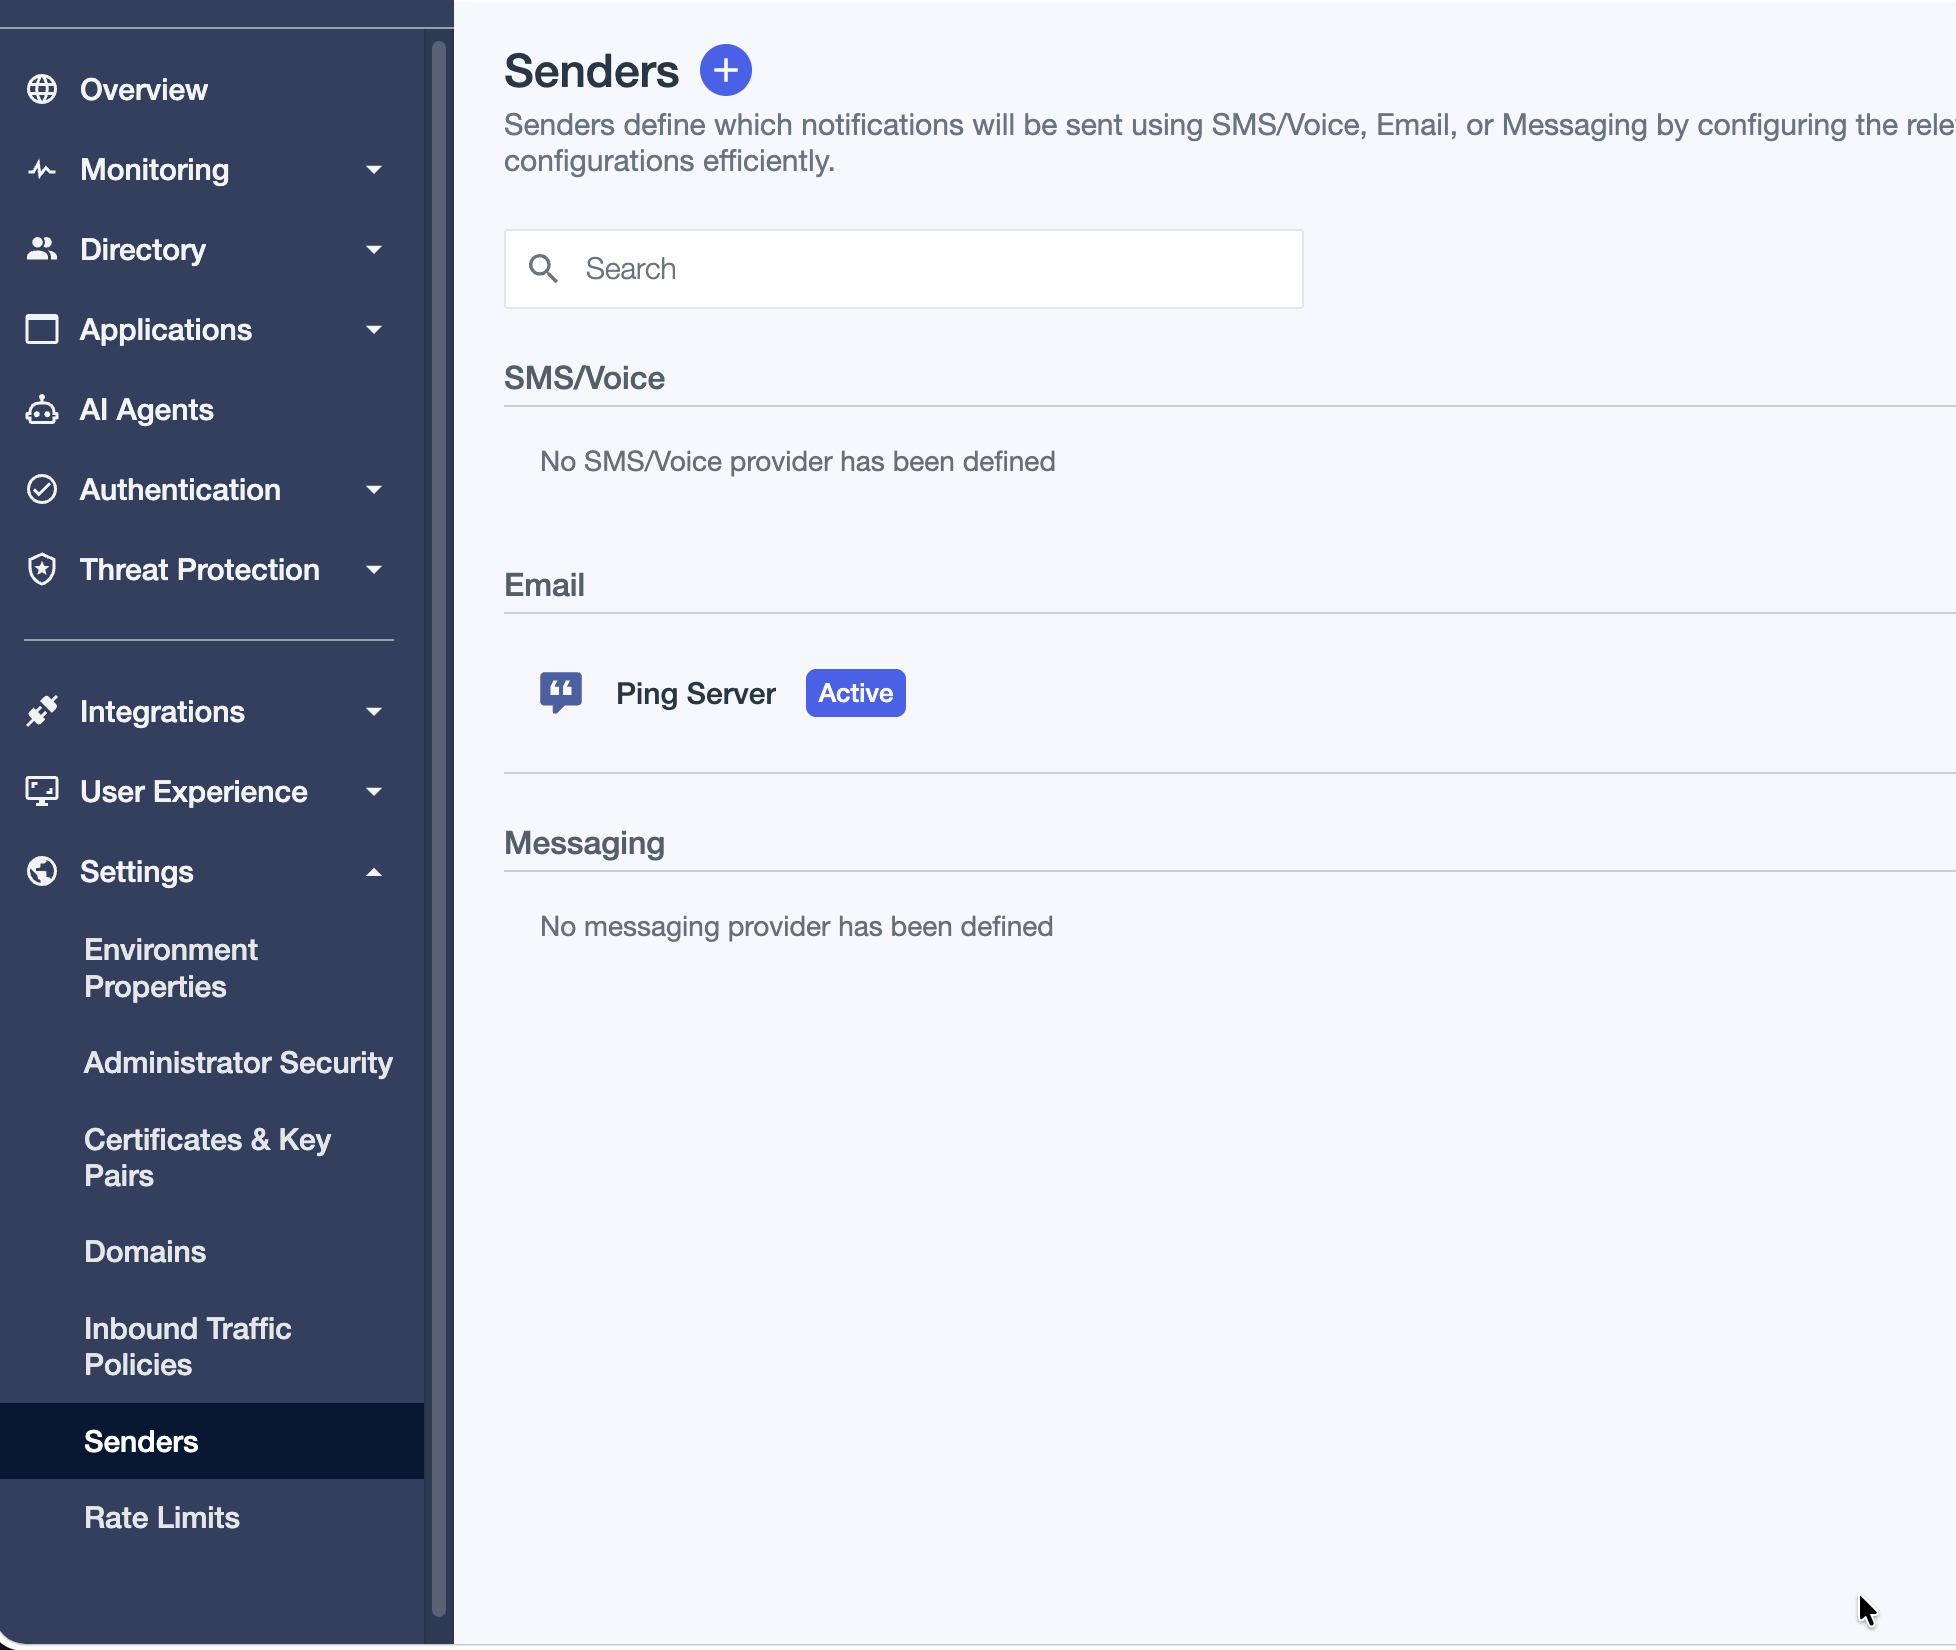
- Sign in to the PingOne admin console and confirm that you are in the correct environment.
- Go to Settings > Senders.
- Click the + icon to add a sender.
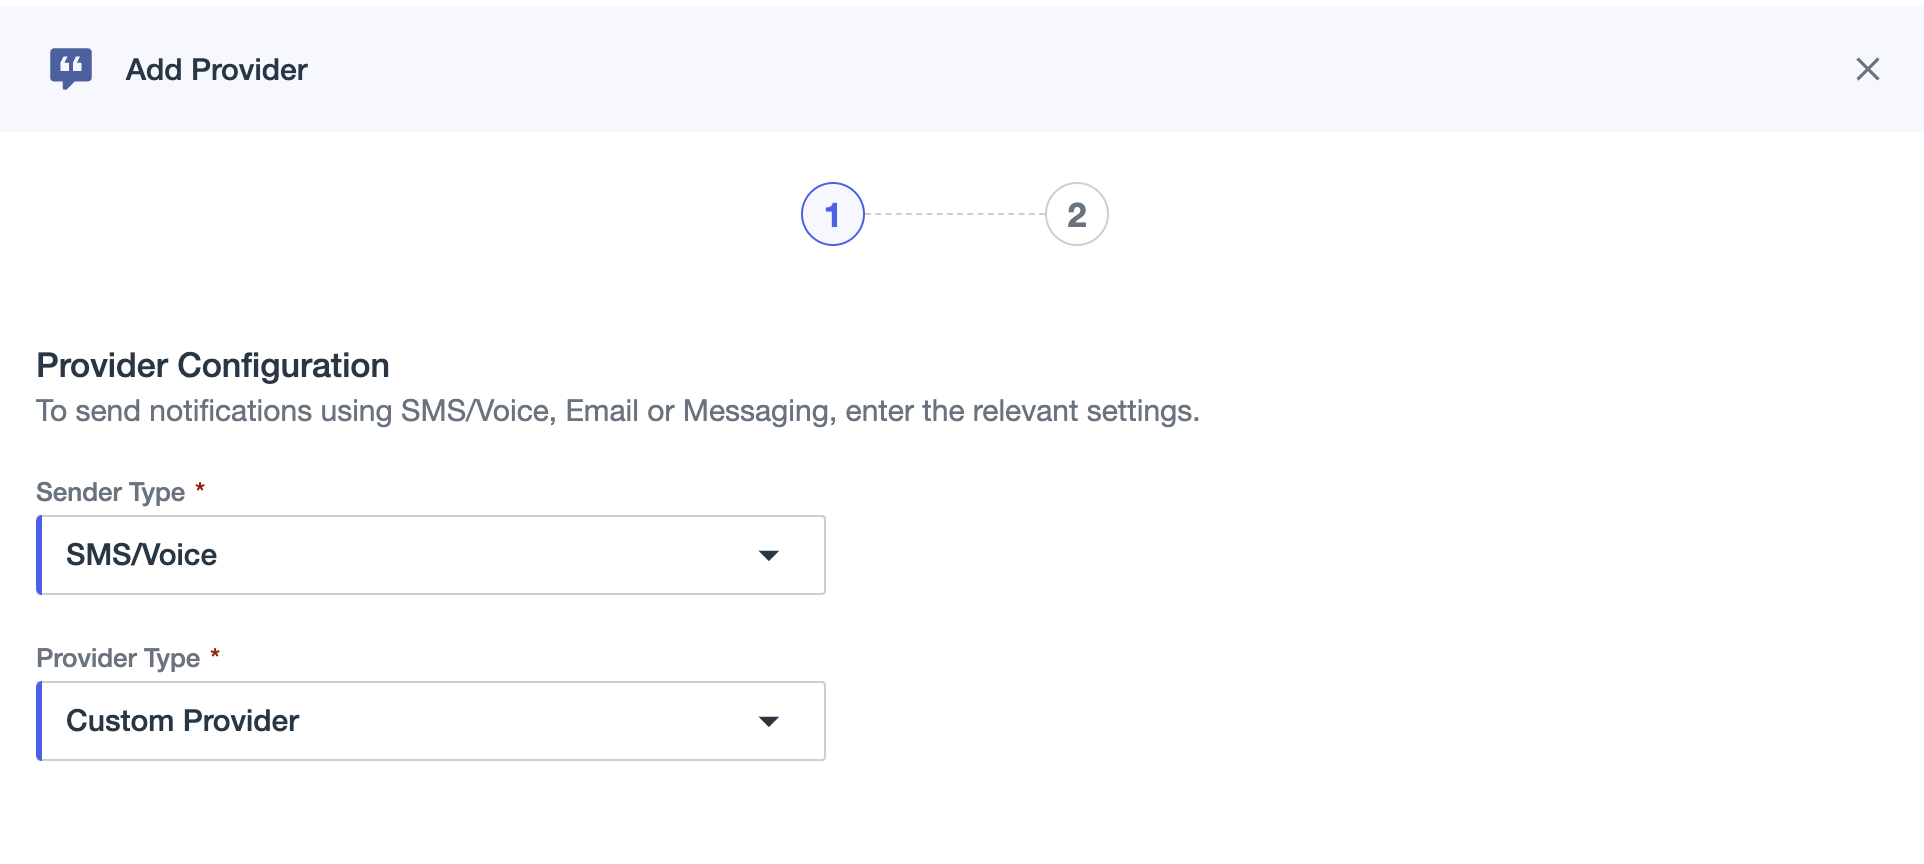
- For Sender Type, select SMS/Voice.
- For Provider Type, select Custom Provider.
- Configure the provider using the values you recorded in the Record the Generated Details step.
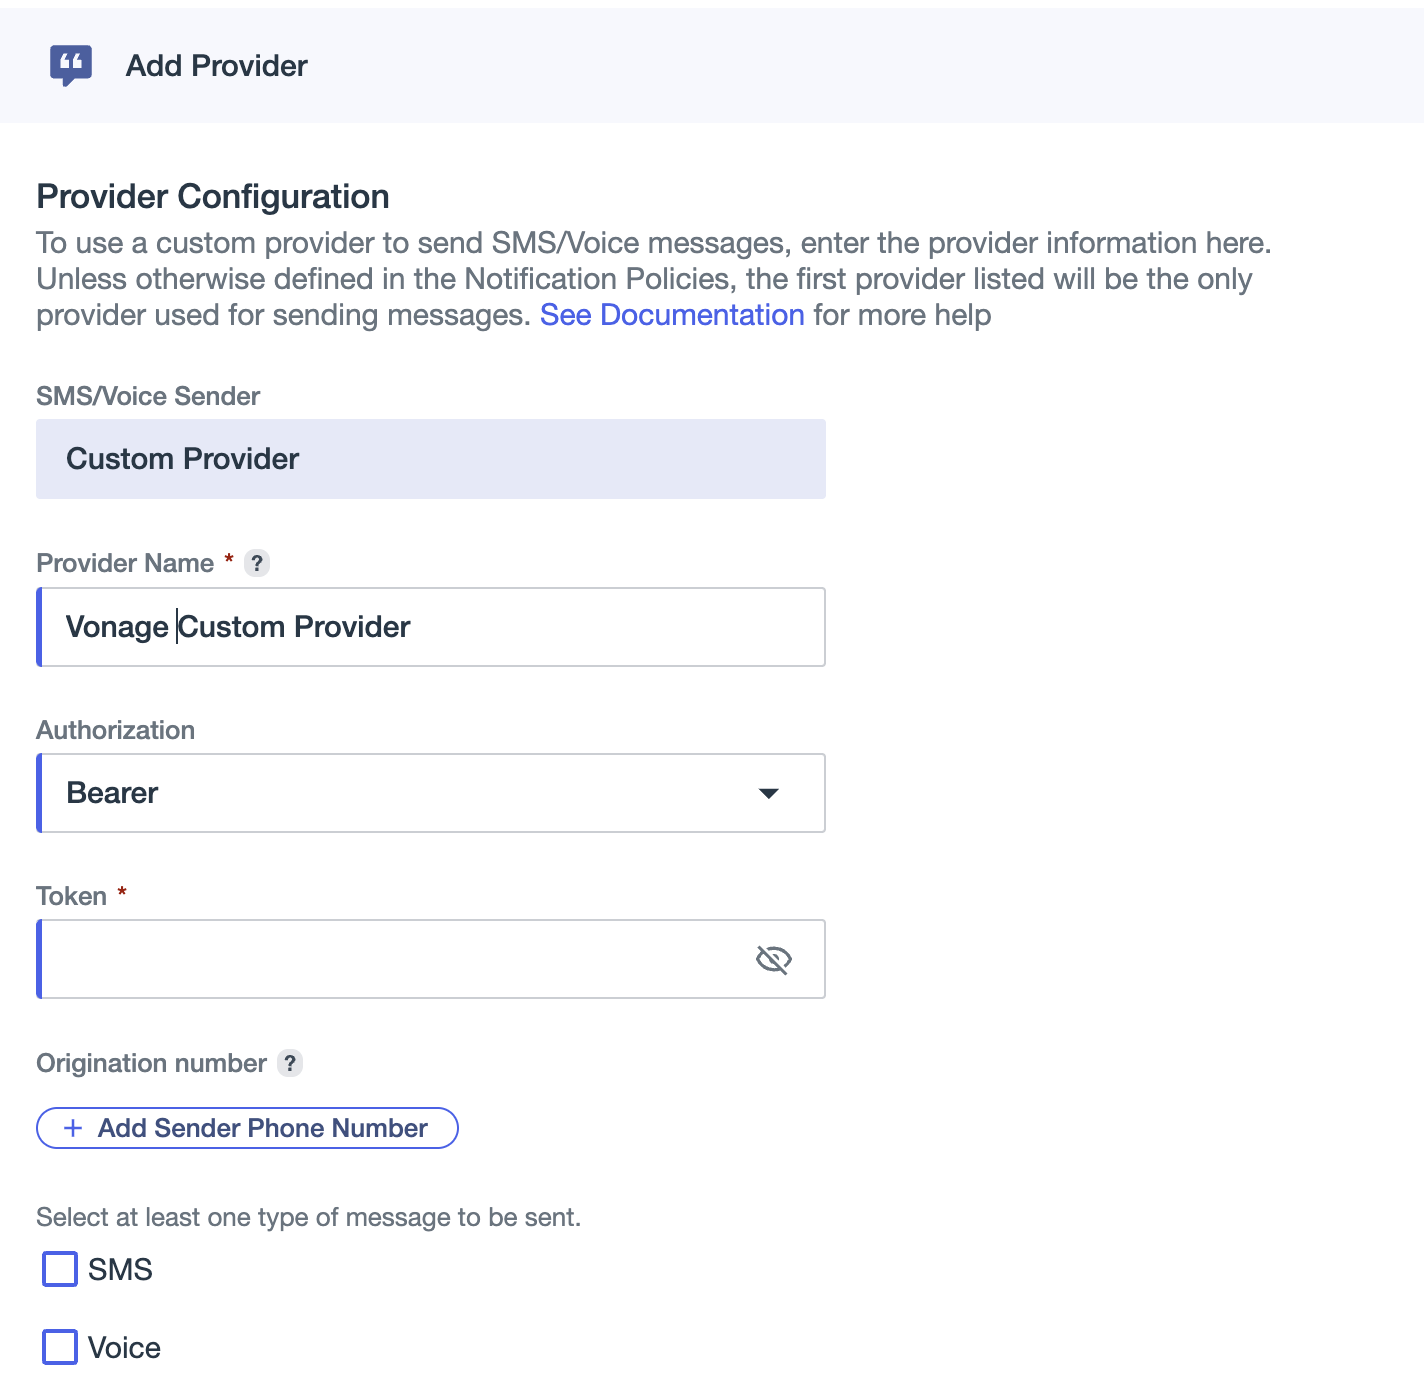
- Name: Enter a descriptive name, for example,
Vonage Protection Suite. - Authentication: Select Bearer Token and enter the Authentication Token as the bearer value. The connector also supports HTTP Basic, OAuth2 Client Credentials, and Custom Header authentication. If you select Custom Header, enter the Auth Header Name as the header key and the Authentication Token as the header value.
-
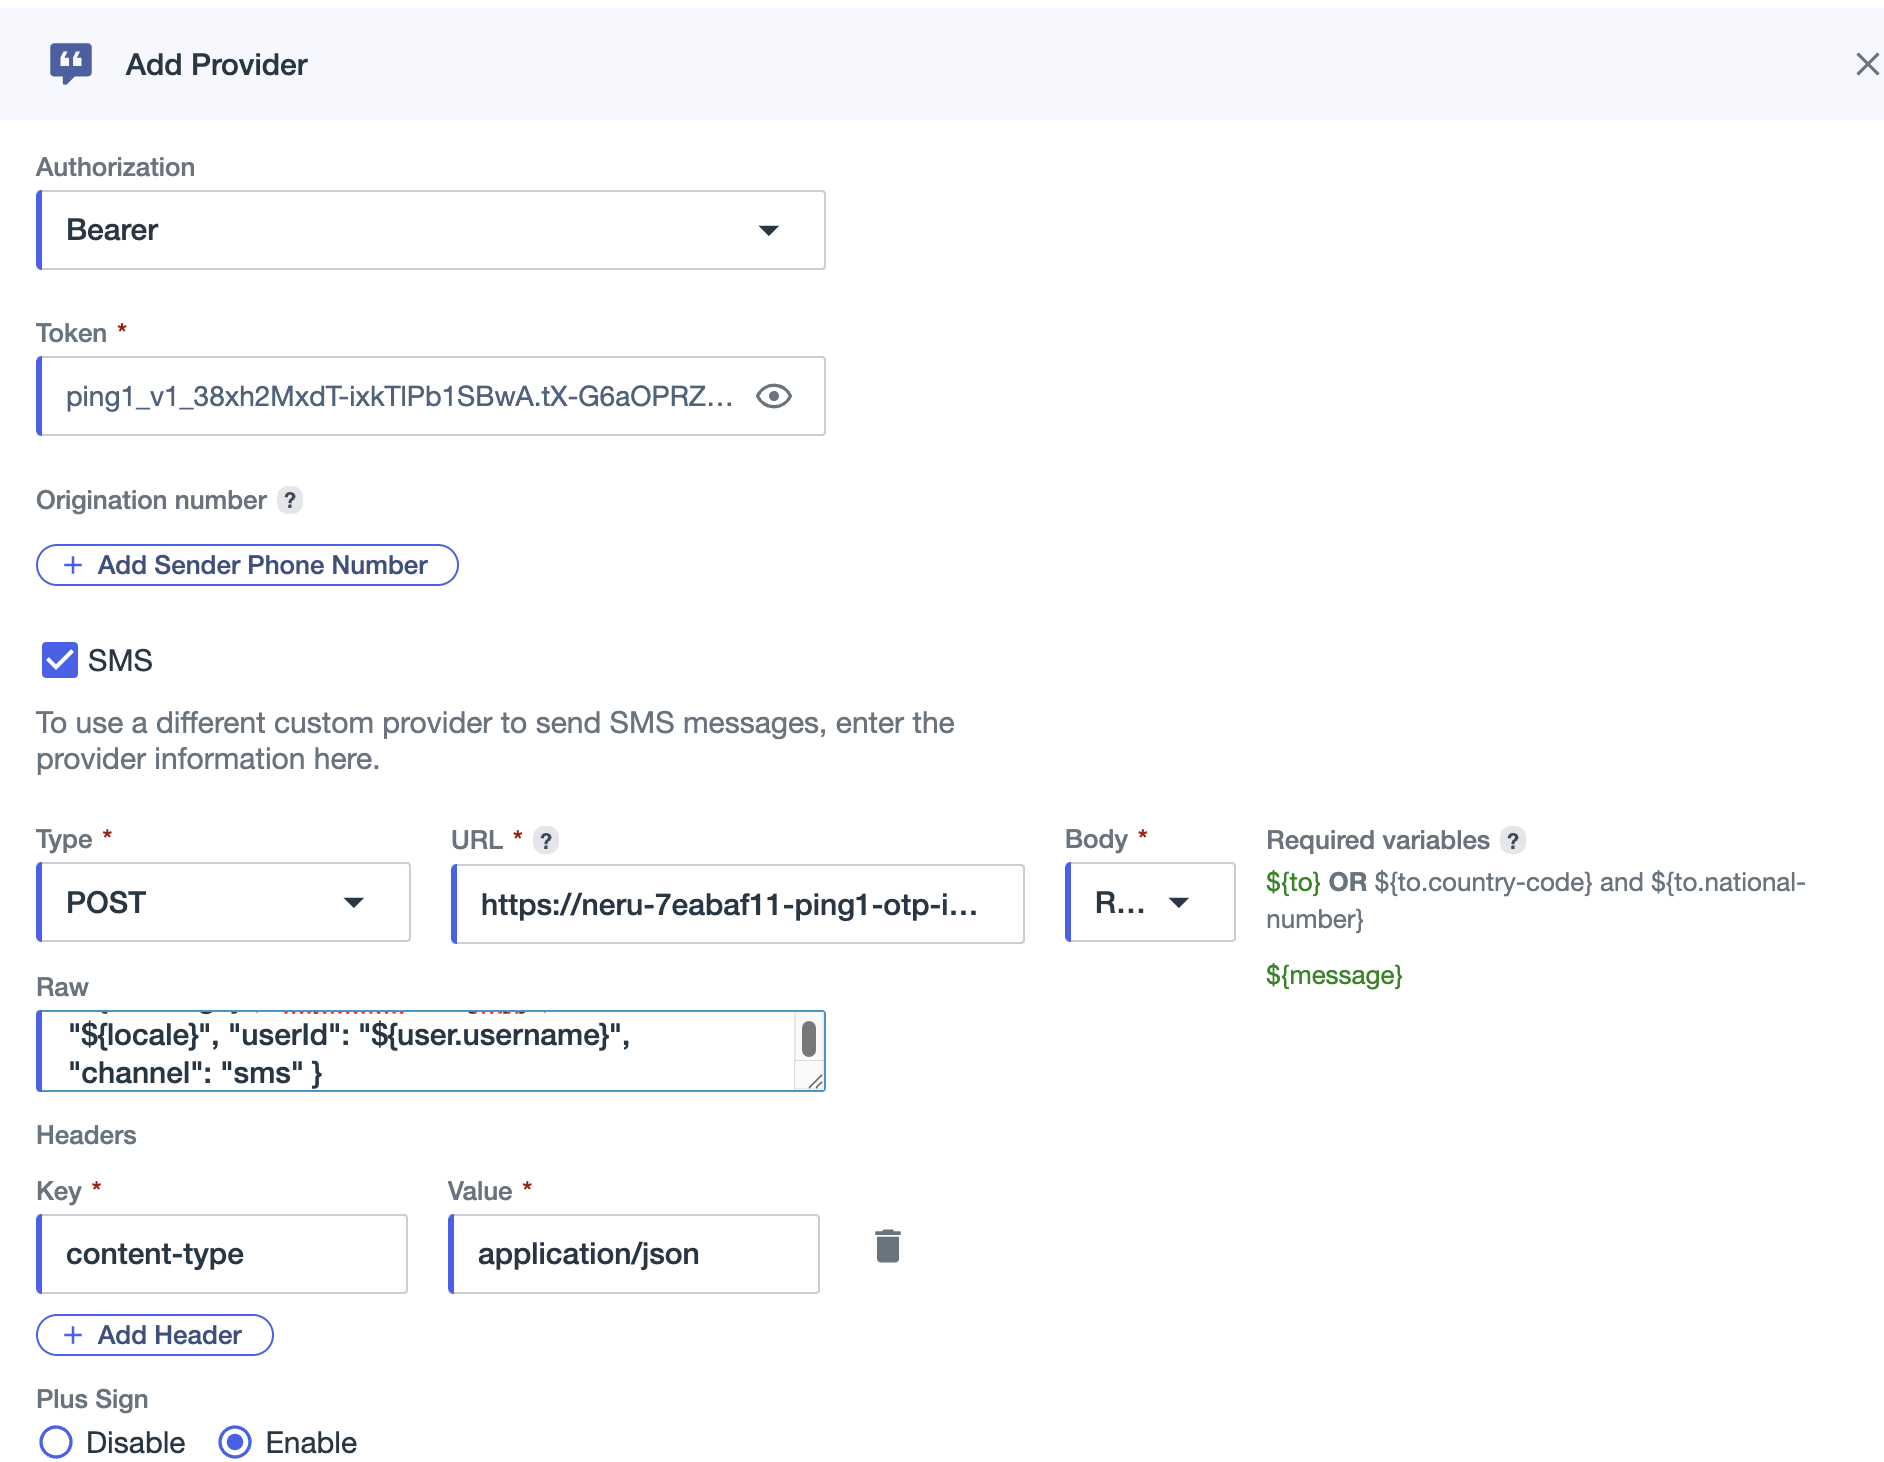
Configure SMS delivery:
- Set the request method to
POST. - Paste the OTP Delivery Endpoint URL.
- Select raw JSON as the request body format.
- Paste the SMS request body template. The body template uses PingOne's dynamic variables, including
${to}for the recipient number,${otp}for the generated passcode, and${message}for the complete message text:
- Set the request method to
{
 "phoneNumber": "${to}",
 "message": "${message}",
 "otpCode": "${otp}",
 "locale": "${locale}",
 "userId": "${user.username}",
 "channel": "sms"
}
Note: For Send Test SMS or Voice replace the values following fields:
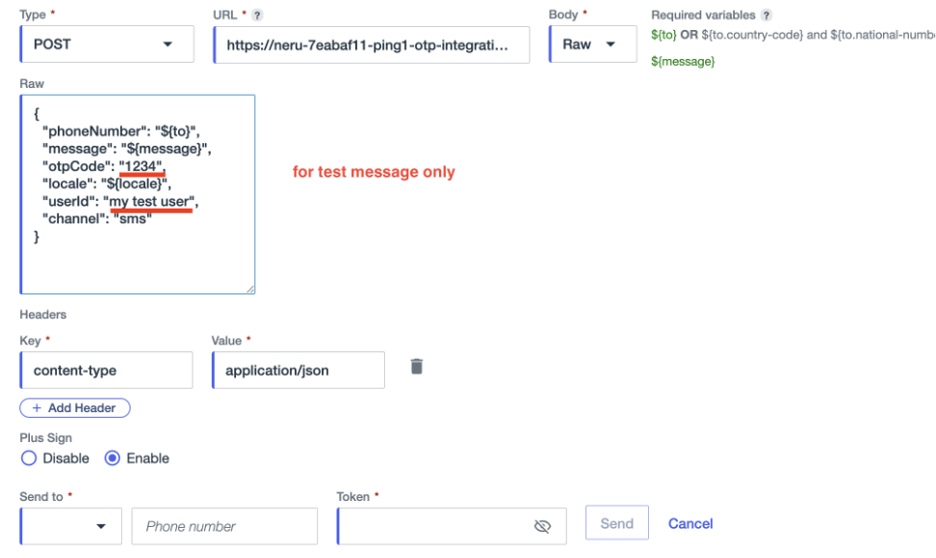
-
Configure voice delivery:
- Set the request method to
POST. - Paste the same OTP Delivery Endpoint URL.
- Paste the voice request body template using the same dynamic variables:
- Set the request method to
{
"phoneNumber": "${to}",
"message": "${message}",
"otpCode": "${otp}",
"locale": "${locale}",
"userId": "${user.username}",
"channel": "voice"
}
Note: The connector uses one delivery endpoint for both channels. The channel property in the request body identifies the delivery channel.
- Add the phone numbers to use as sender IDs and select their applicable SMS or voice capabilities.
- Check the Plus sign for numbers so that phone numbers use the E.164 format expected by the connector.
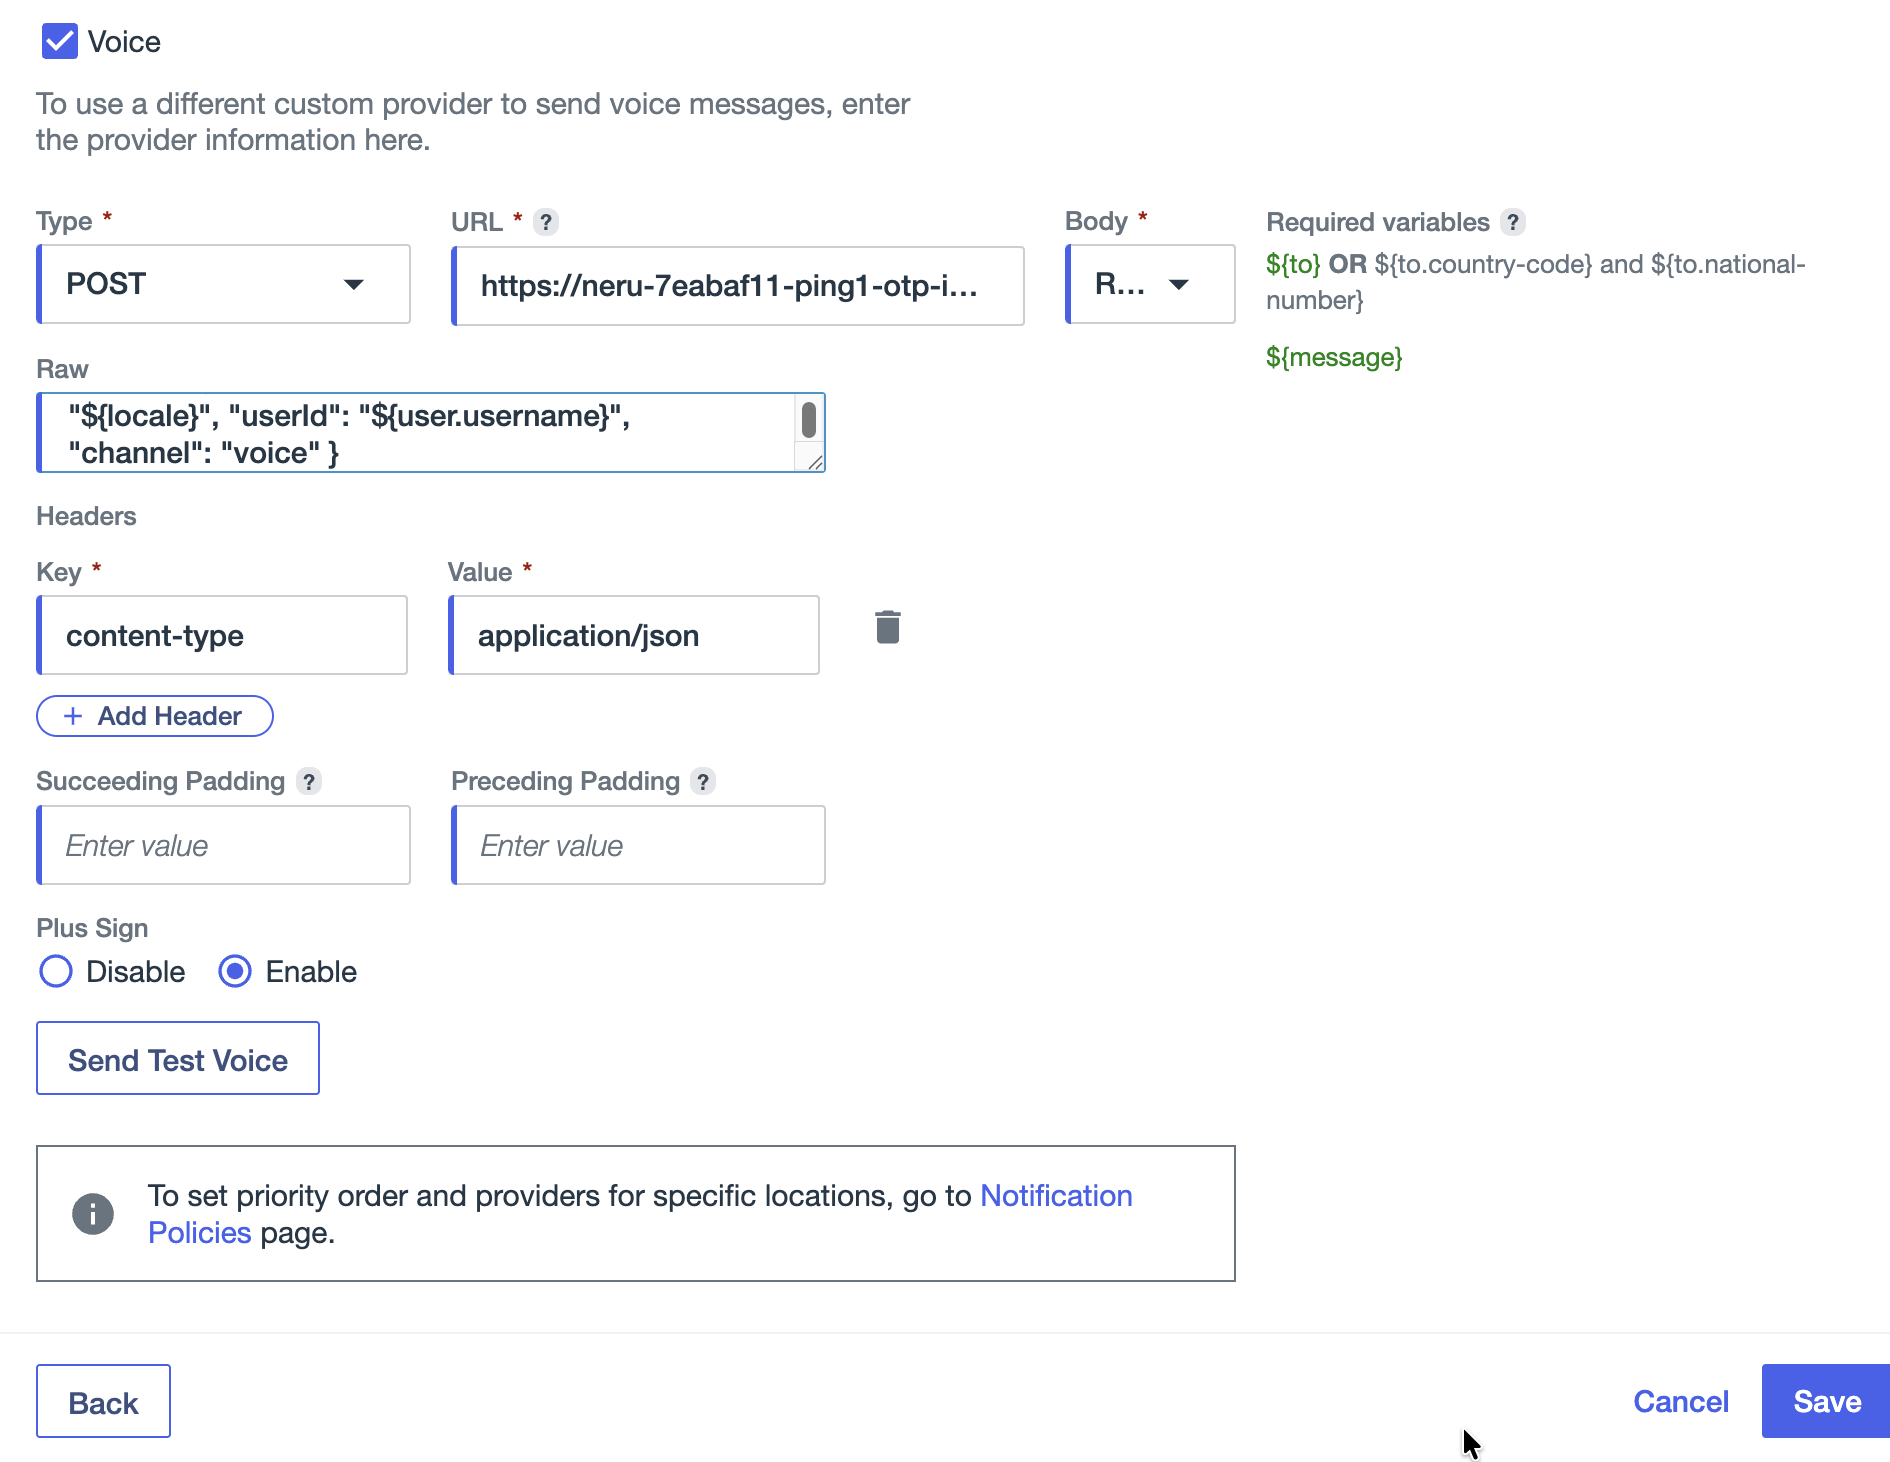
- Click Save.
For more information, see Configuring a custom notification provider for PingOne.
Link the Vonage provider to a Notification Policy
Note: This step must be completed before configuring MFA policies. PingOne locks the SMS and Voice checkboxes in MFA policies until a notification policy has a configured sender assigned for those channels.
- In the PingOne admin console, go to User Experience > Notification Policies.
- Edit the Default policy or click + Add Policy to create a new policy.
- Under SMS Provider, select your Vonage custom provider from the dropdown.
- Under Voice Provider, select your Vonage custom provider from the dropdown.
- Configure the provider priority and any per-country routing rules as needed.
- Click Save.
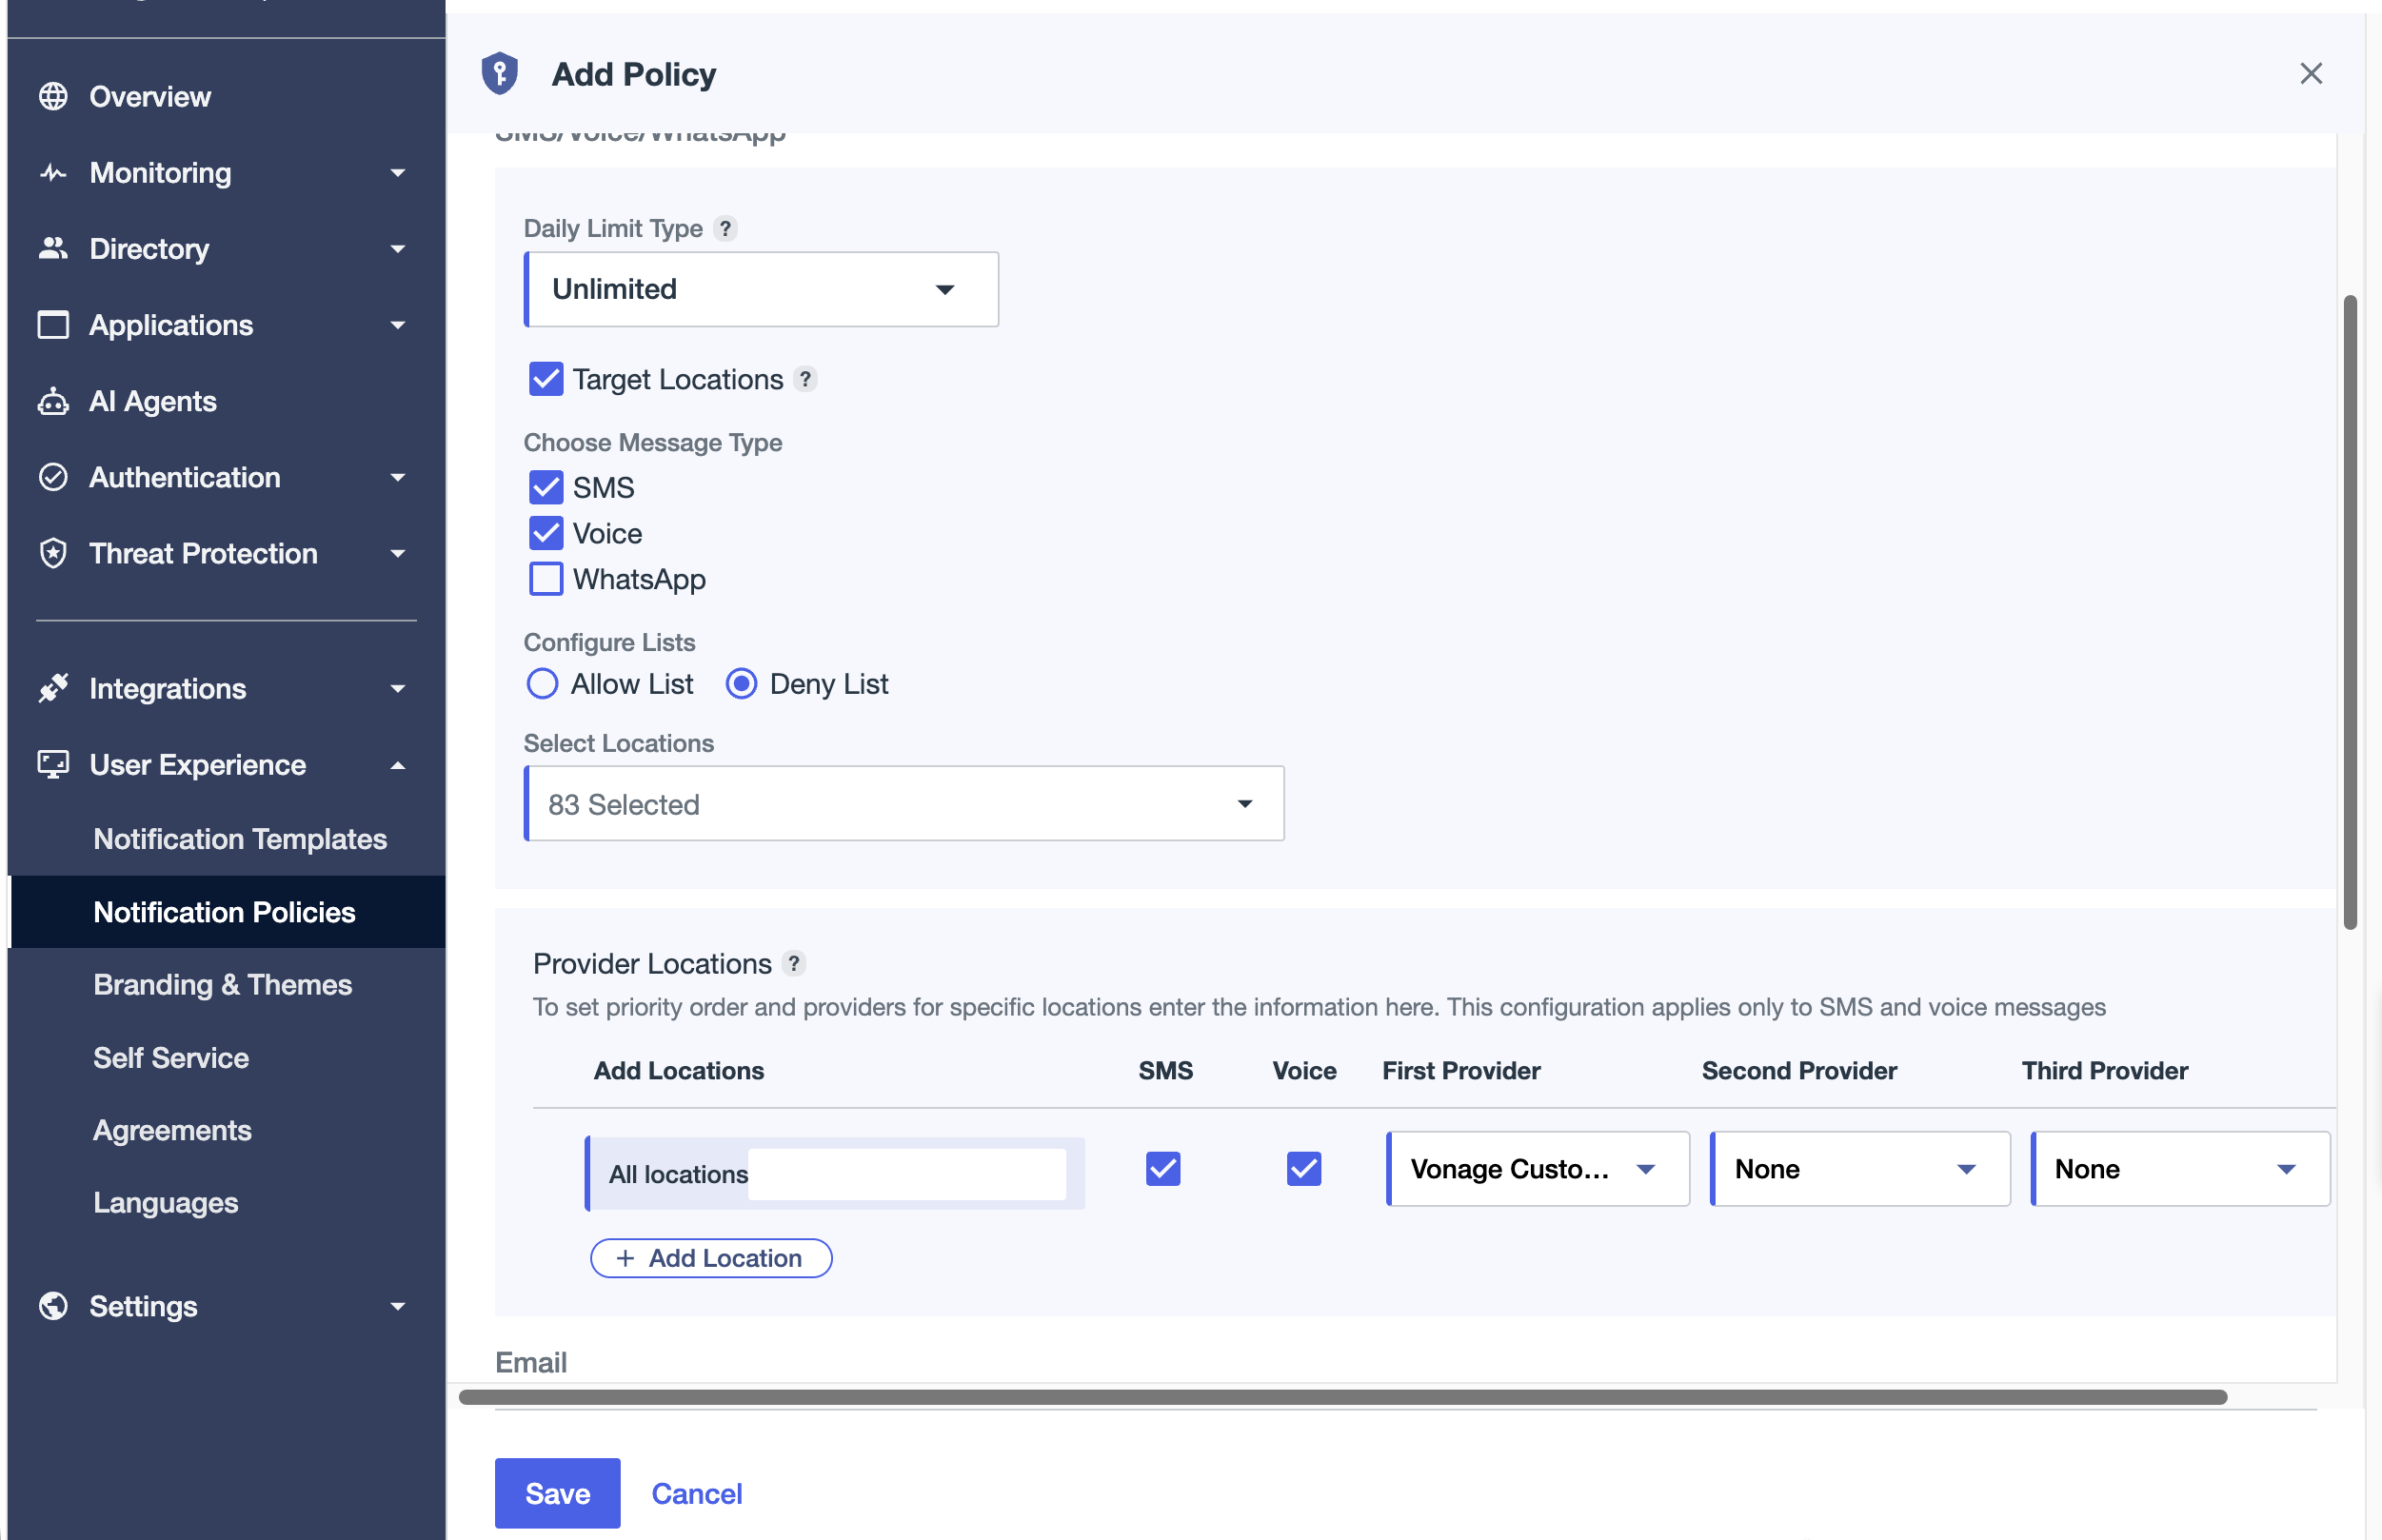
For more information, see Notification Policies.
Enable SMS and Voice in MFA Settings and MFA Policy
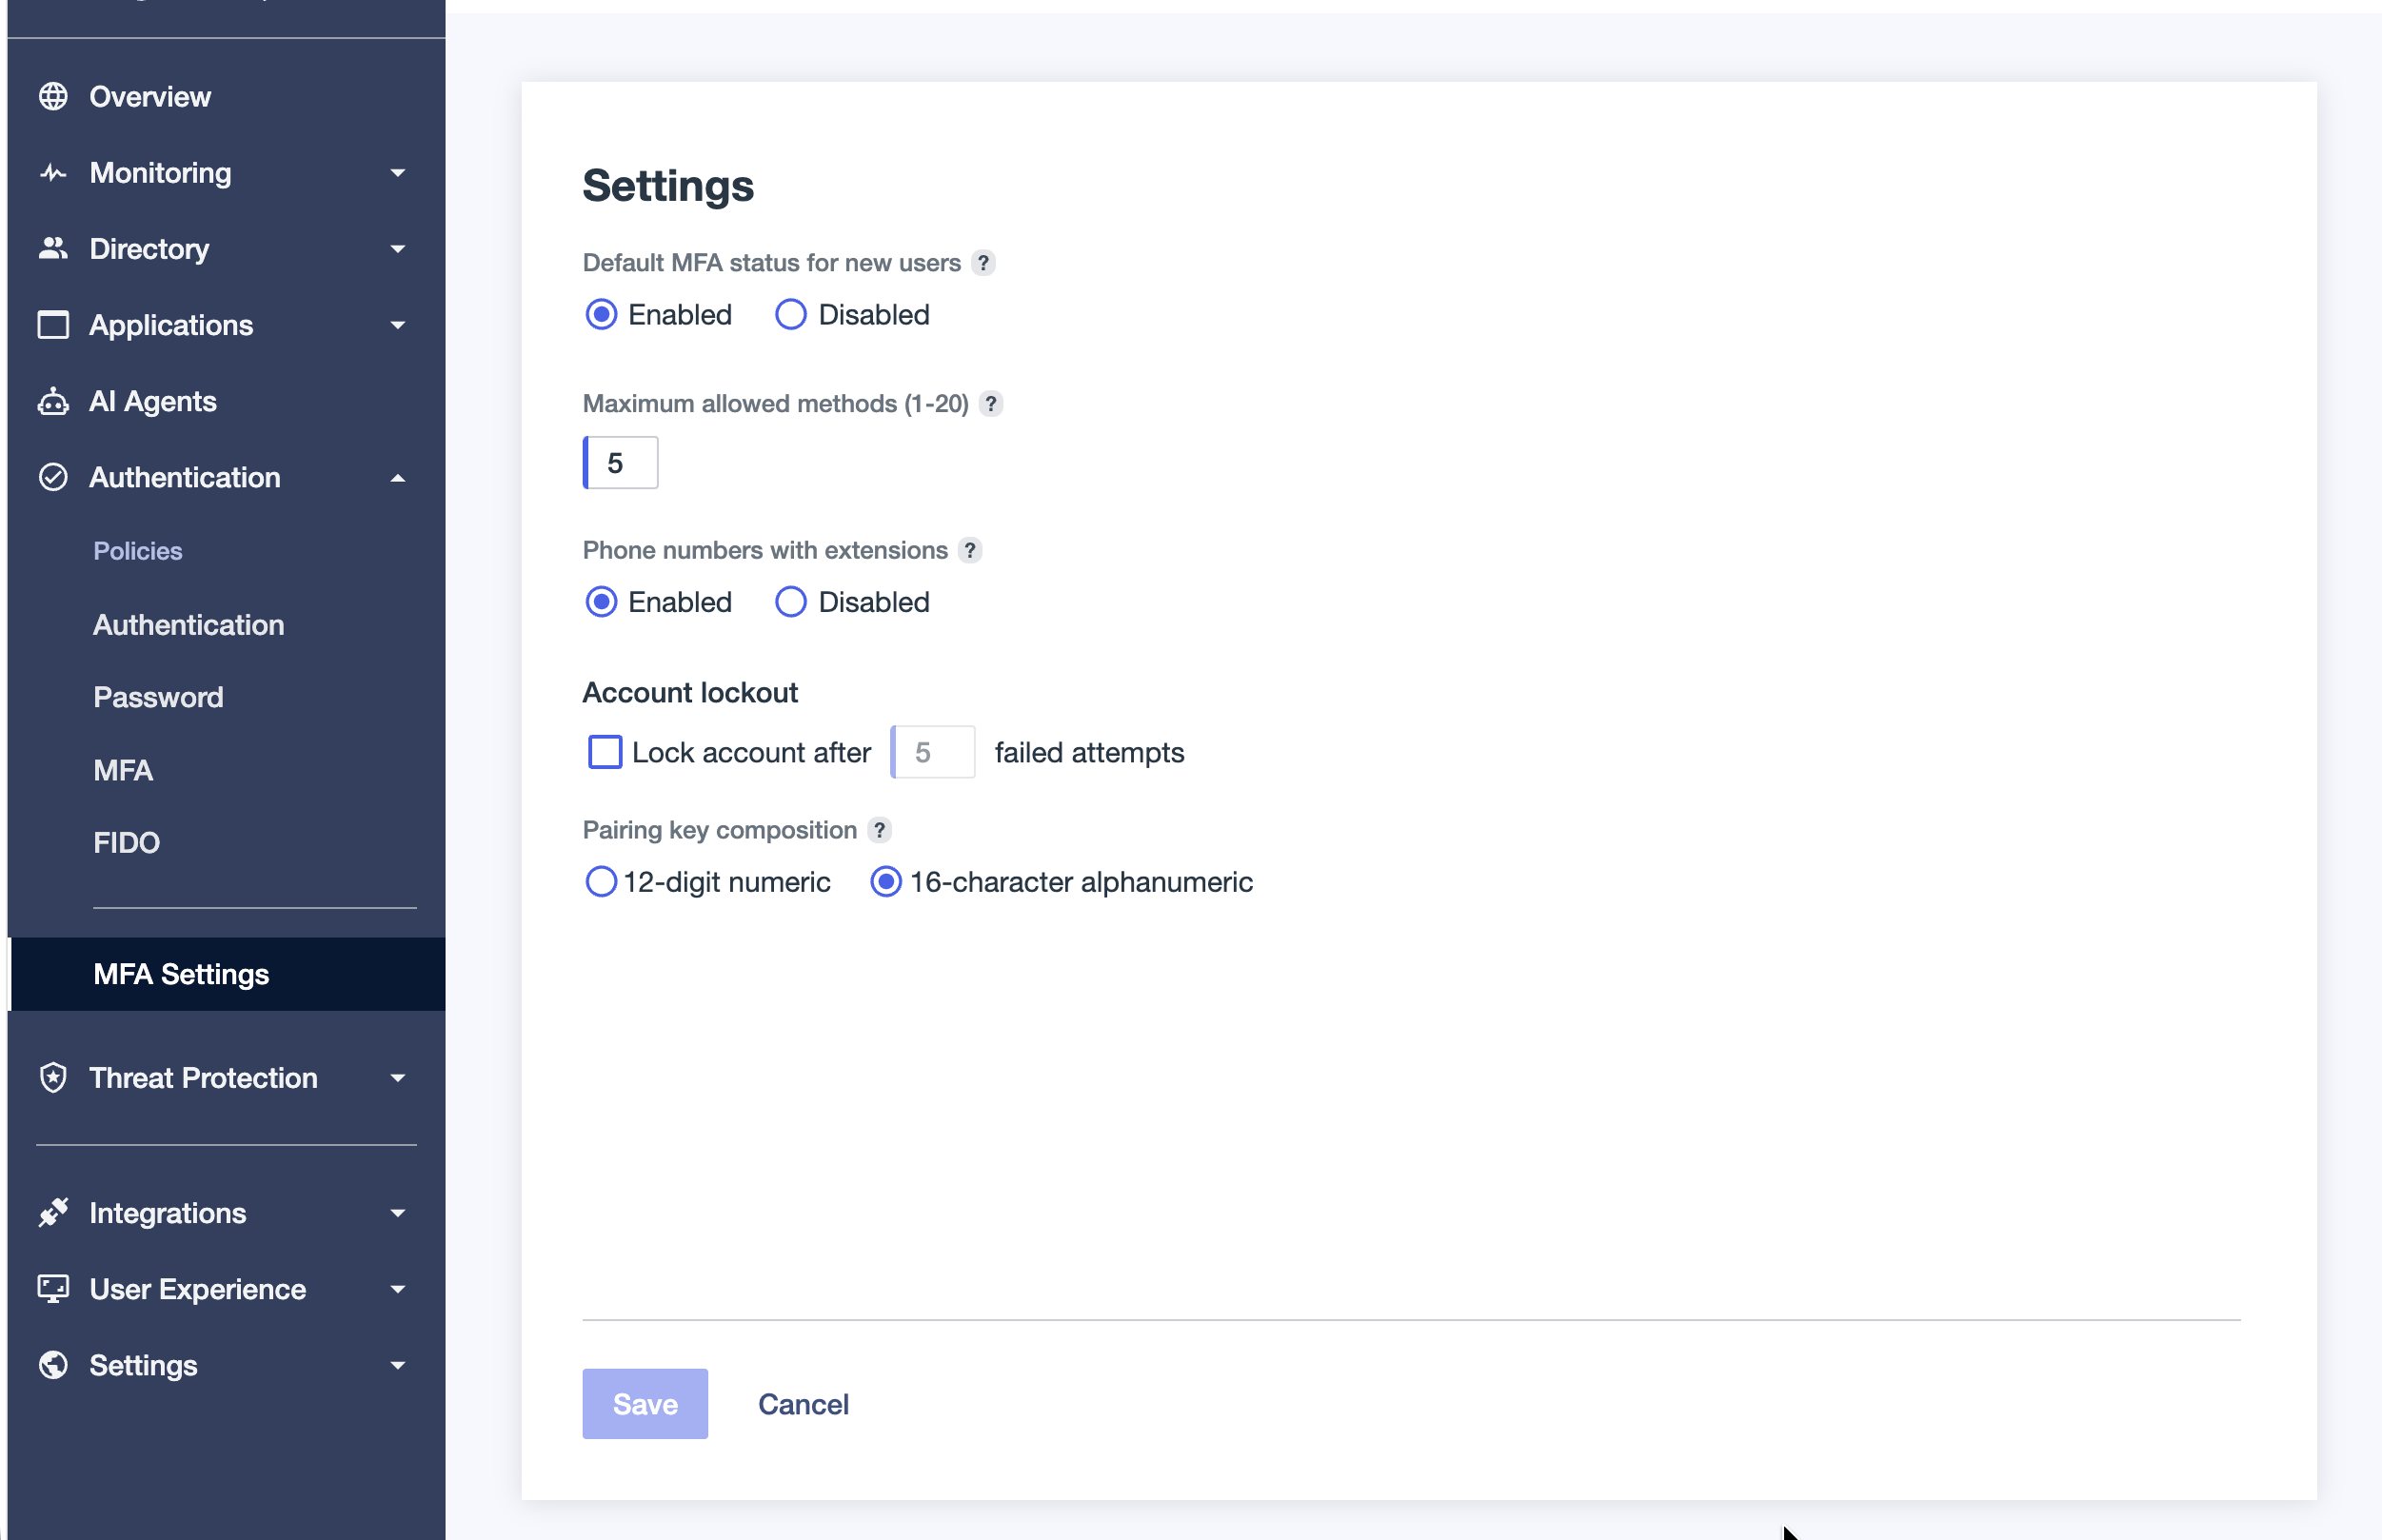
Configure MFA Settings
- Go to Authentication > MFA.
- Open MFA Settings by clicking the gear icon.
- Set MFA status for new users to Enabled, so MFA is automatically enabled for newly created users.
- Click Save.
Configure the MFA Policy
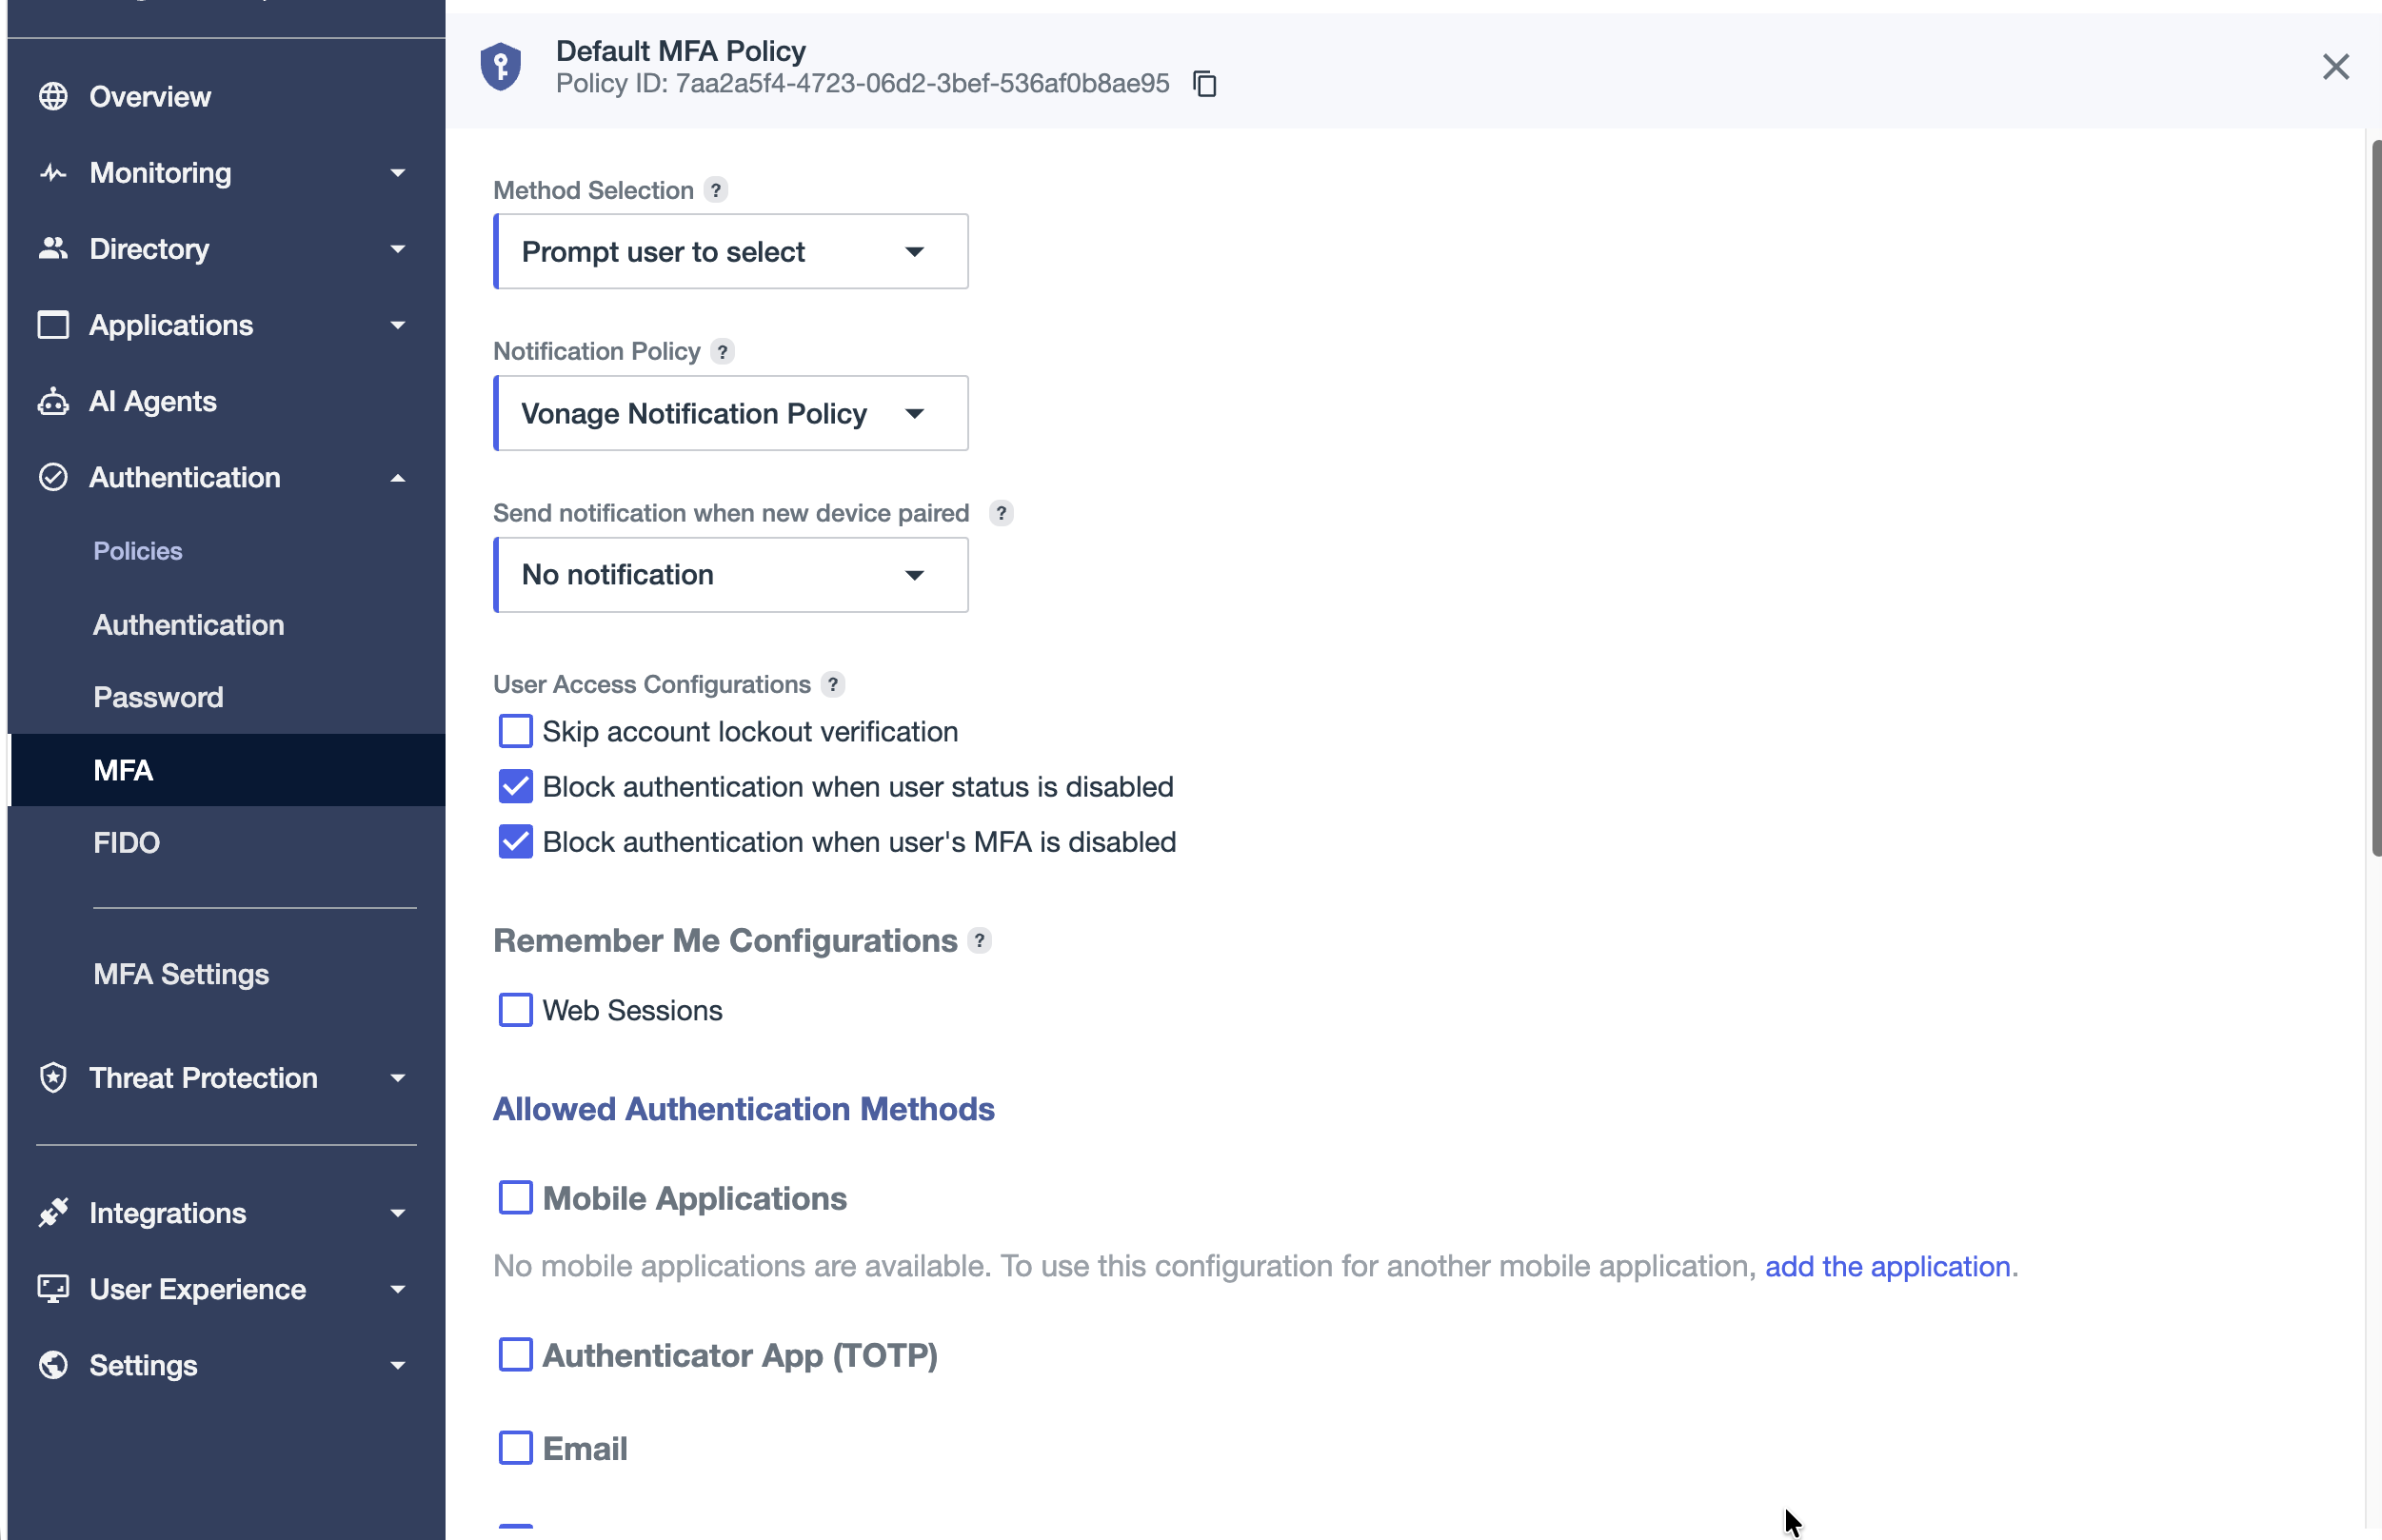
After assigning the Vonage provider to a Notification Policy, the SMS and Voice options become available in the MFA Policy.
- Go to Authentication > MFA > MFA Policies.
- Edit the Default MFA Policy by clicking the pencil icon, or create a new policy.
- Under Allowed Authentication Methods, select SMS and Voice.
- Under Notification Policy, select the notification policy you configured in the Link the Vonage provider to a Notification Policy step.
- Click Save.
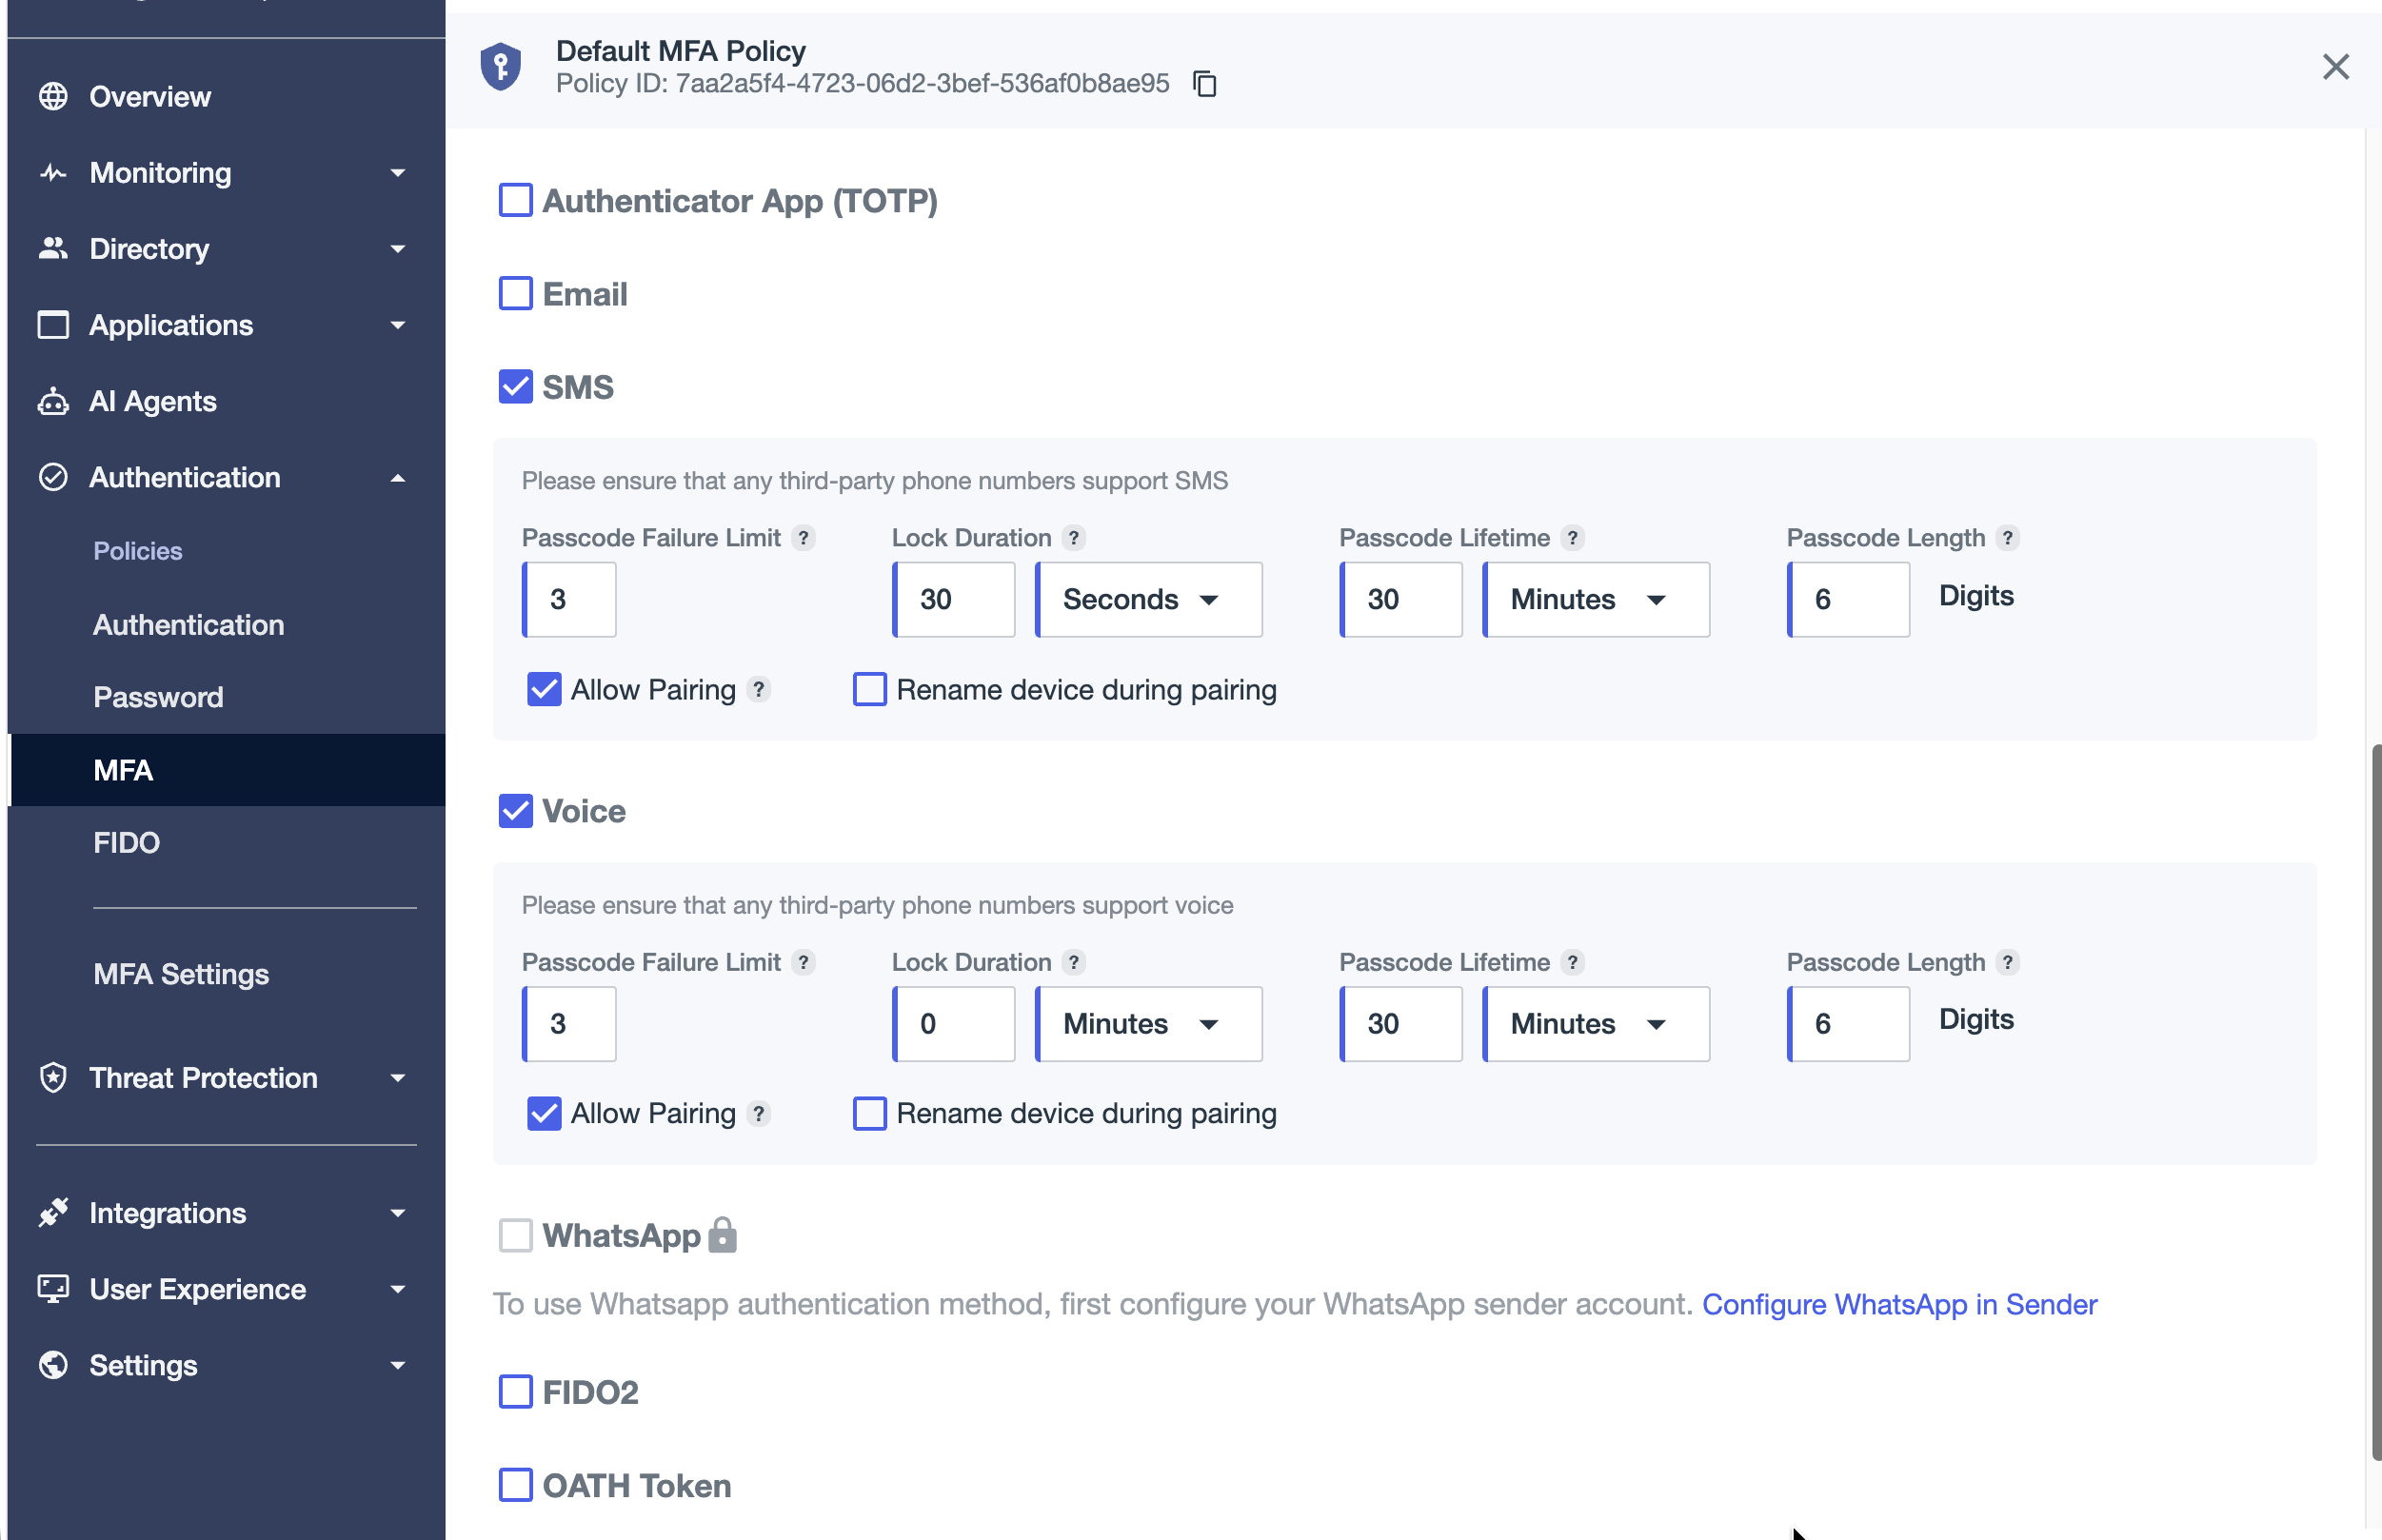
Note: If SMS/Voice are still locked, go back to the Link the Vonage provider to a Notification Policy step and verify if the Vonage custom provider is selected as the sender in the notification policy. Also confirm that PingOne MFA is included in your environment's Bill of Materials (Environment > Properties).
For more information, see:
Require MFA in an Authentication Policy
Configure an Authentication Policy that requires MFA after login to trigger the OTP delivery flow:
- Go to Authentication > Authentication.
- Edit the existing Multi_Factor policy or add a new policy.
- Confirm that Login is configured with username and password.
- Add a second step of type Multi-factor Authentication.
- Select the MFA Policy that you configured in the Configure the MFA Policy step.
- Assign the Authentication Policy to the applications that require phone-based MFA.
For more information, see Adding a multi-factor authentication step.
Configure a PingOne Webhook for Verification Events
The Custom Notification Provider handles OTP delivery, while the webhook returns the verification outcome to the connector. PingOne generates and validates the OTP.
When a user enters the correct code, PingOne records the OTP check outcome as an audit event and sends it asynchronously to the Event Webhook URL. The connector receives that event with the original OTP delivery, enabling the Recent Auth Events view and provide end-to-end conversion visibility.
Configuring the webhook is optional and enabled by the customer:
- In the PingOne admin console, confirm that you are in the correct environment.
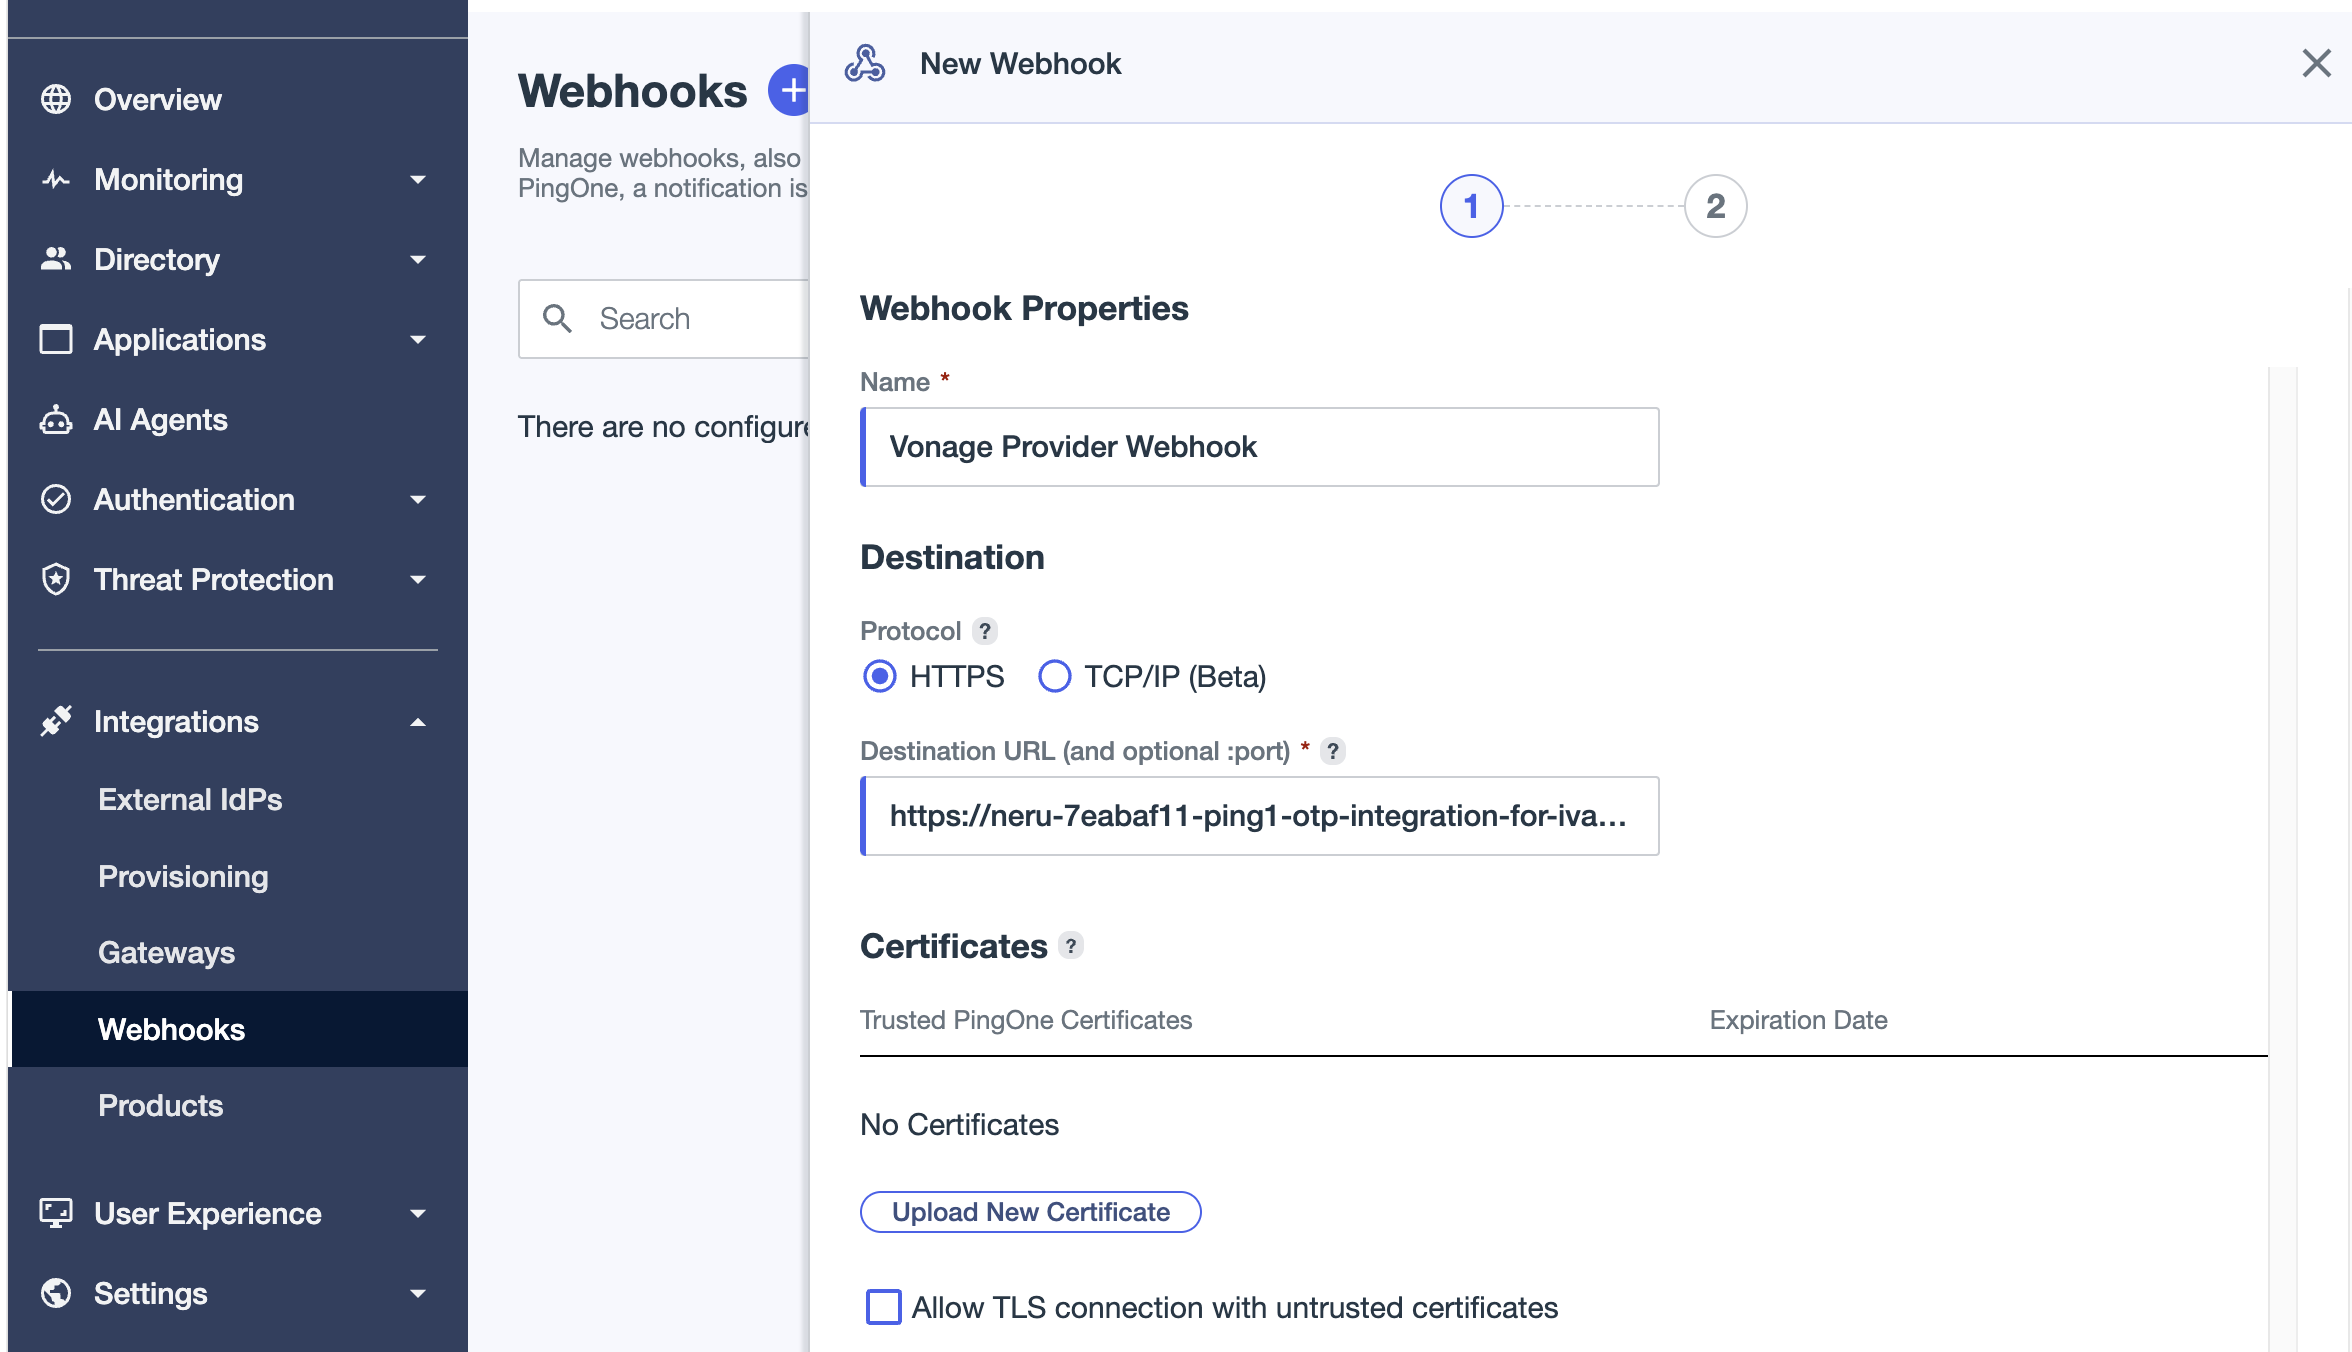
- Go to Integrations > Webhooks.
- Click Add Webhook.
- Enter a name, for example,
Vonage Verification Events. - For Destination URL, enter the Event Webhook URL you recorded in the Record the Generated Details step. The endpoint accepts HTTPS
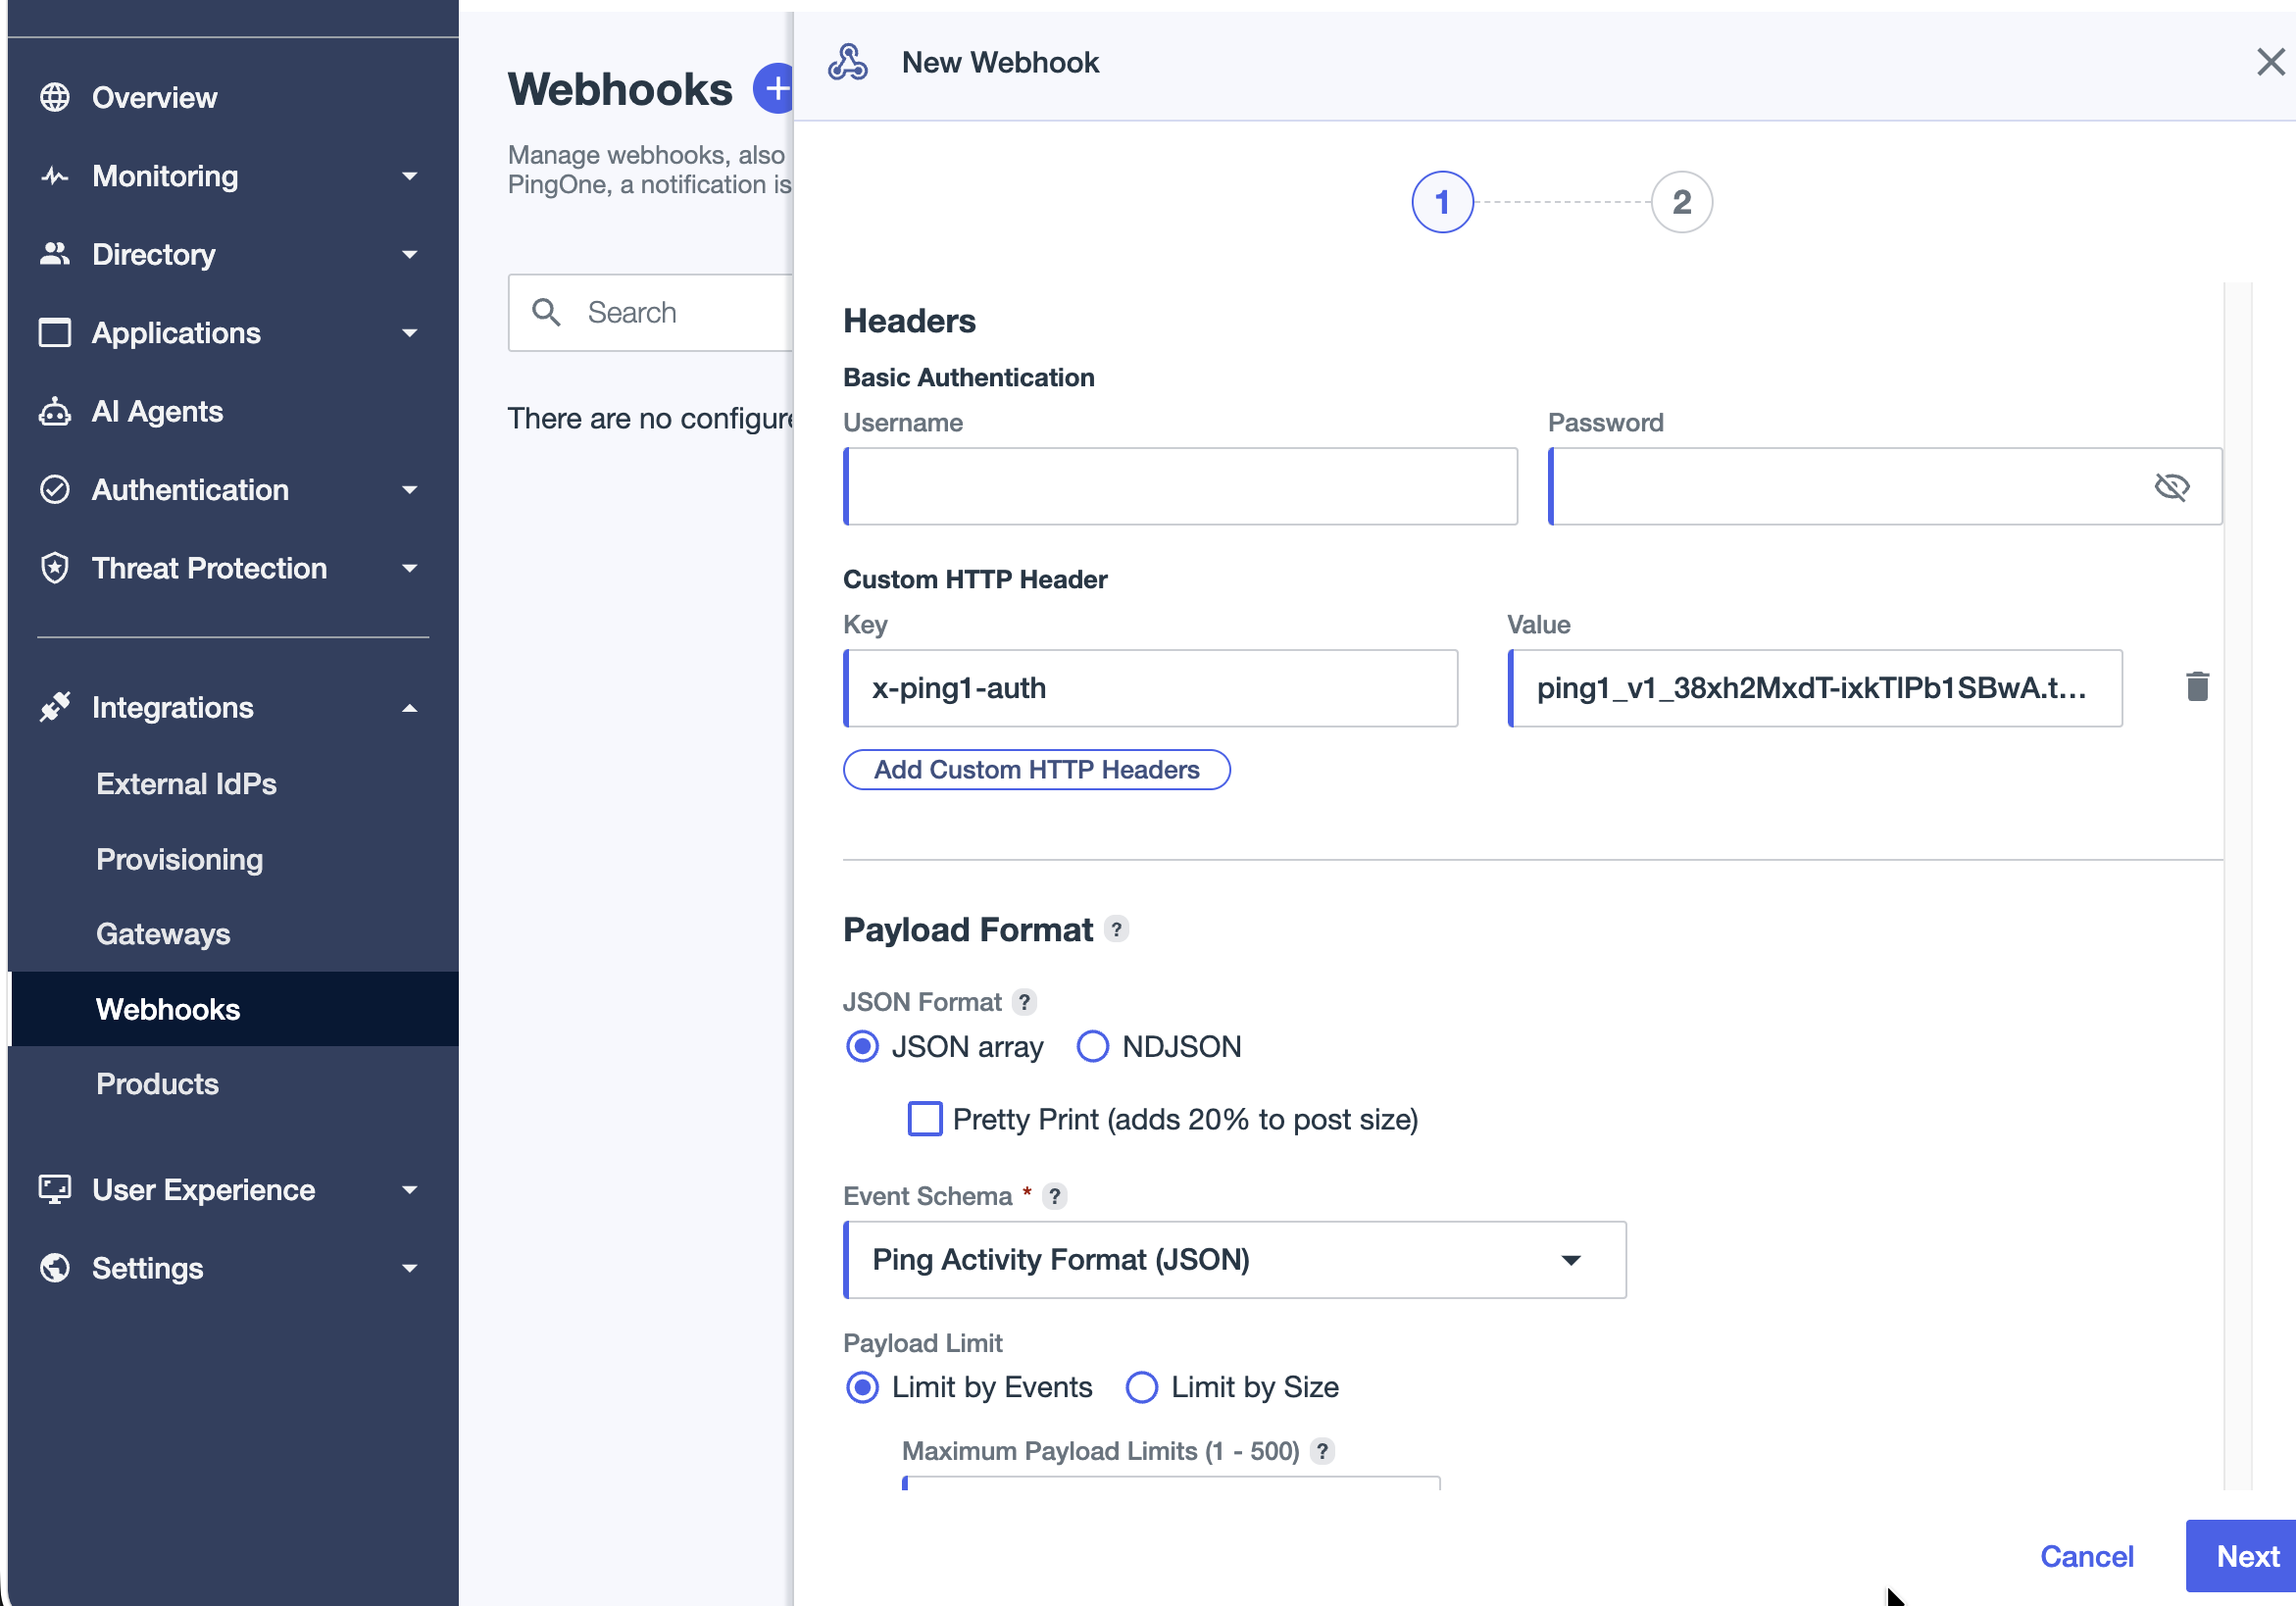
POSTrequests. - For Format, select Ping Activity Format. This is the generic JSON format used by the PingOne API for audit activities and is the correct format for the Vonage endpoint.
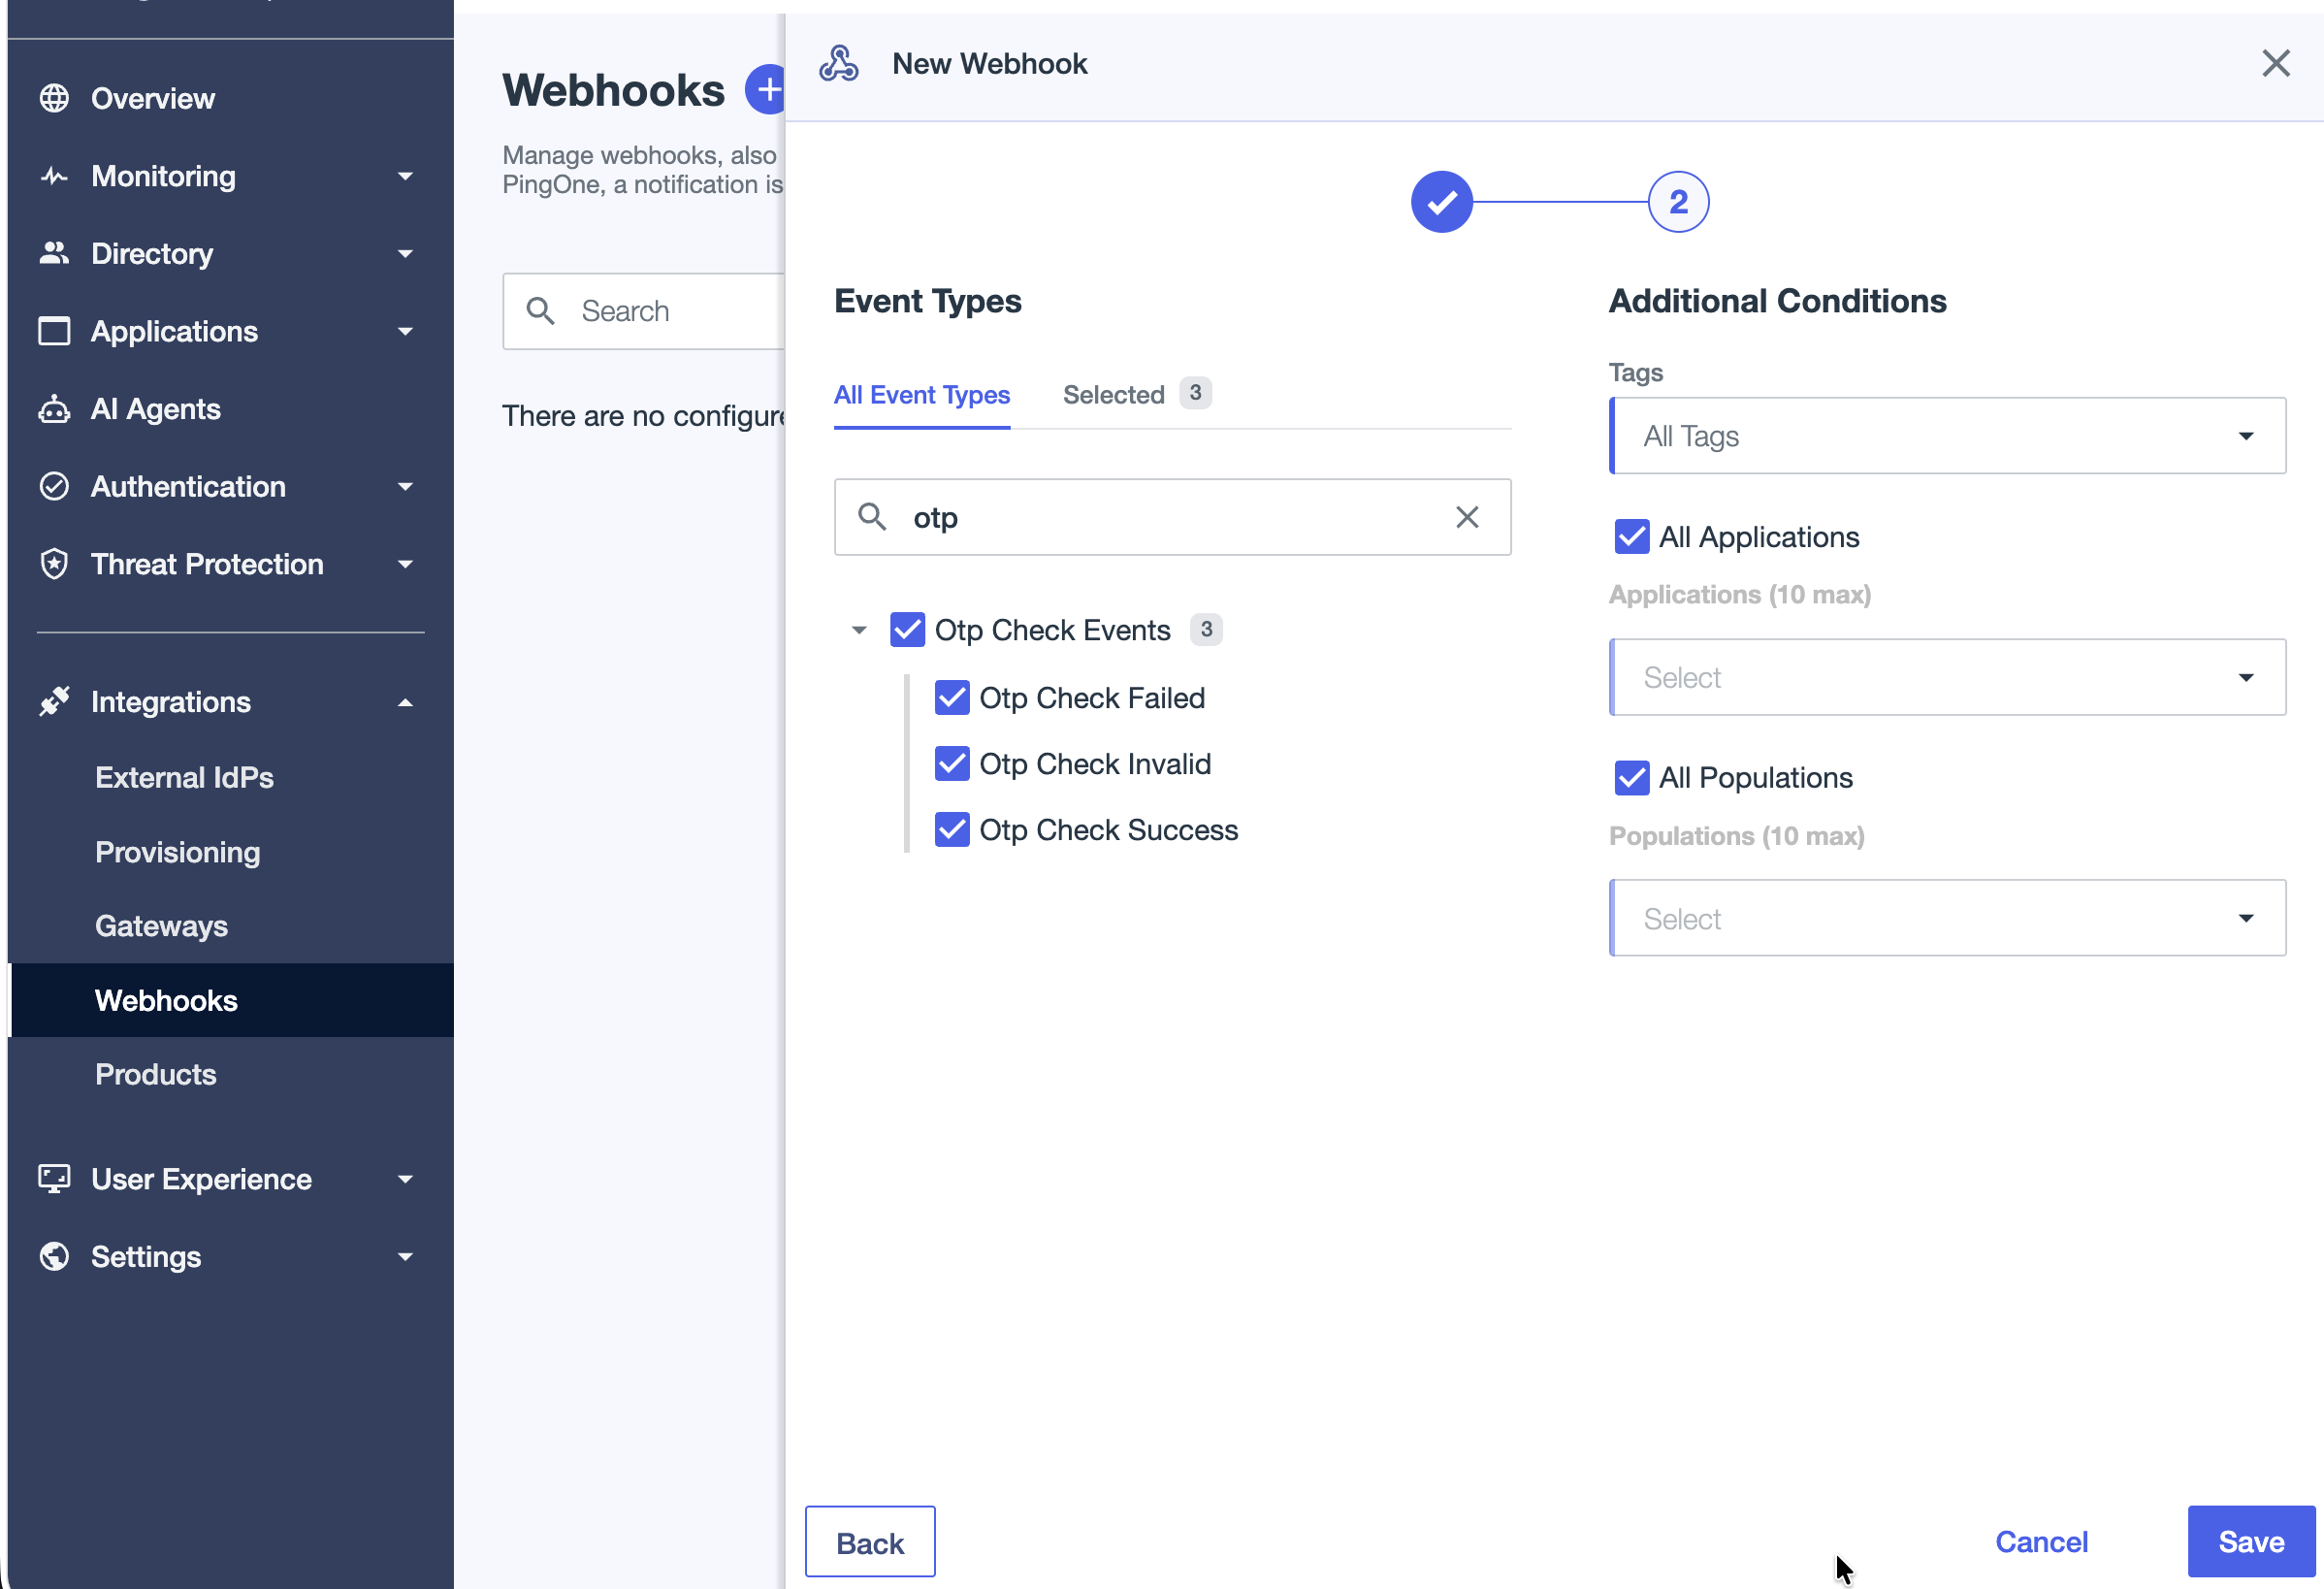
- Under Event Types, search for and select OTP Check Success. The connector uses this event to confirm a successful verification. It ignores and safely acknowledges other event types, so selecting additional events adds unnecessary data.
- Optionally, use Additional Conditions to limit events by tags, applications, or populations. Narrow the scope so only the relevant verification events are sent to avoid unnecessary data.
- Optionally, configure a Payload Limit by size in KB or by number of events. If you do not configure a payload limit, PingOne includes up to 500 events in each payload.
- Save and enable the webhook.
For more information, see:
Verify the Connector's Connectivity
After configuring the Custom Notification Provider and webhook in PingOne, verify if the connection between PingOne and the Vonage connector is active:
- In the PingOne admin console, go to Settings > Senders.
- Open the Vonage custom provider.
- Use the built-in test option to send a test SMS to a real phone number.
- Confirm that you received the SMS.
- In the connector Dashboard, confirm that the test delivery appears in Recent OTP Activity with a
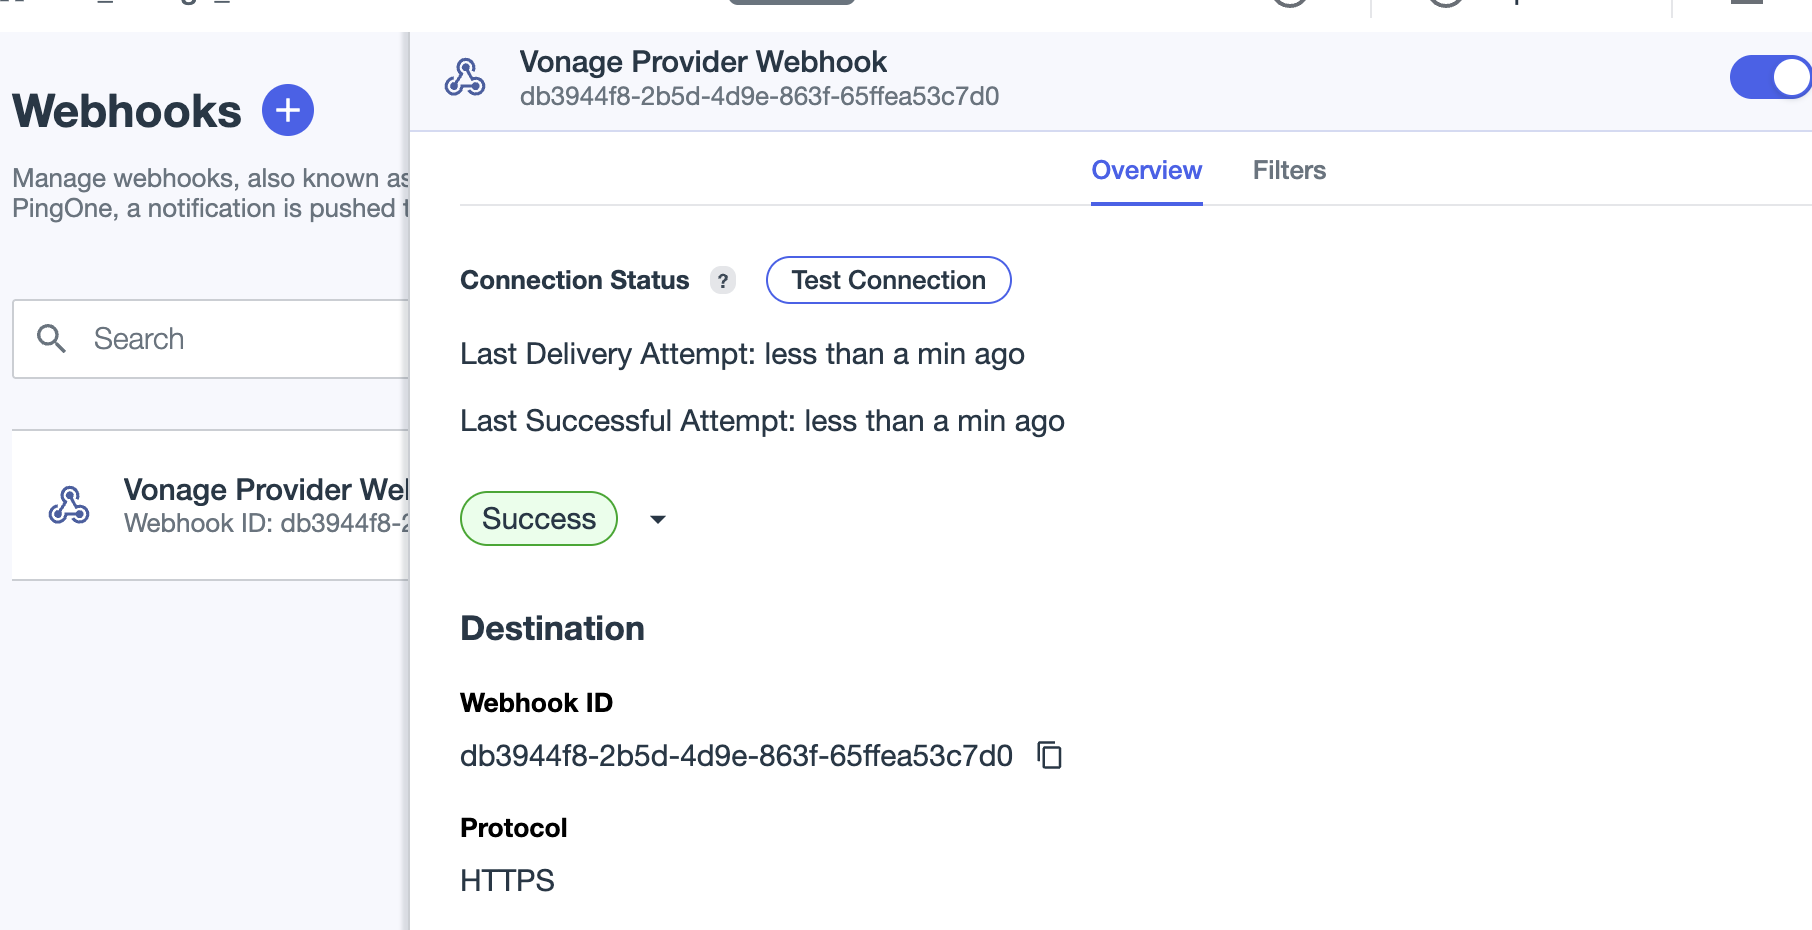
SUCCESSstatus. - In PingOne, go to Integrations > Webhooks and confirm that the Vonage webhook is enabled and healthy.
Test the Integration
Before going live, verify the complete end-to-end authentication flow with a test user.
Before you begin
Make sure you have one of the following:
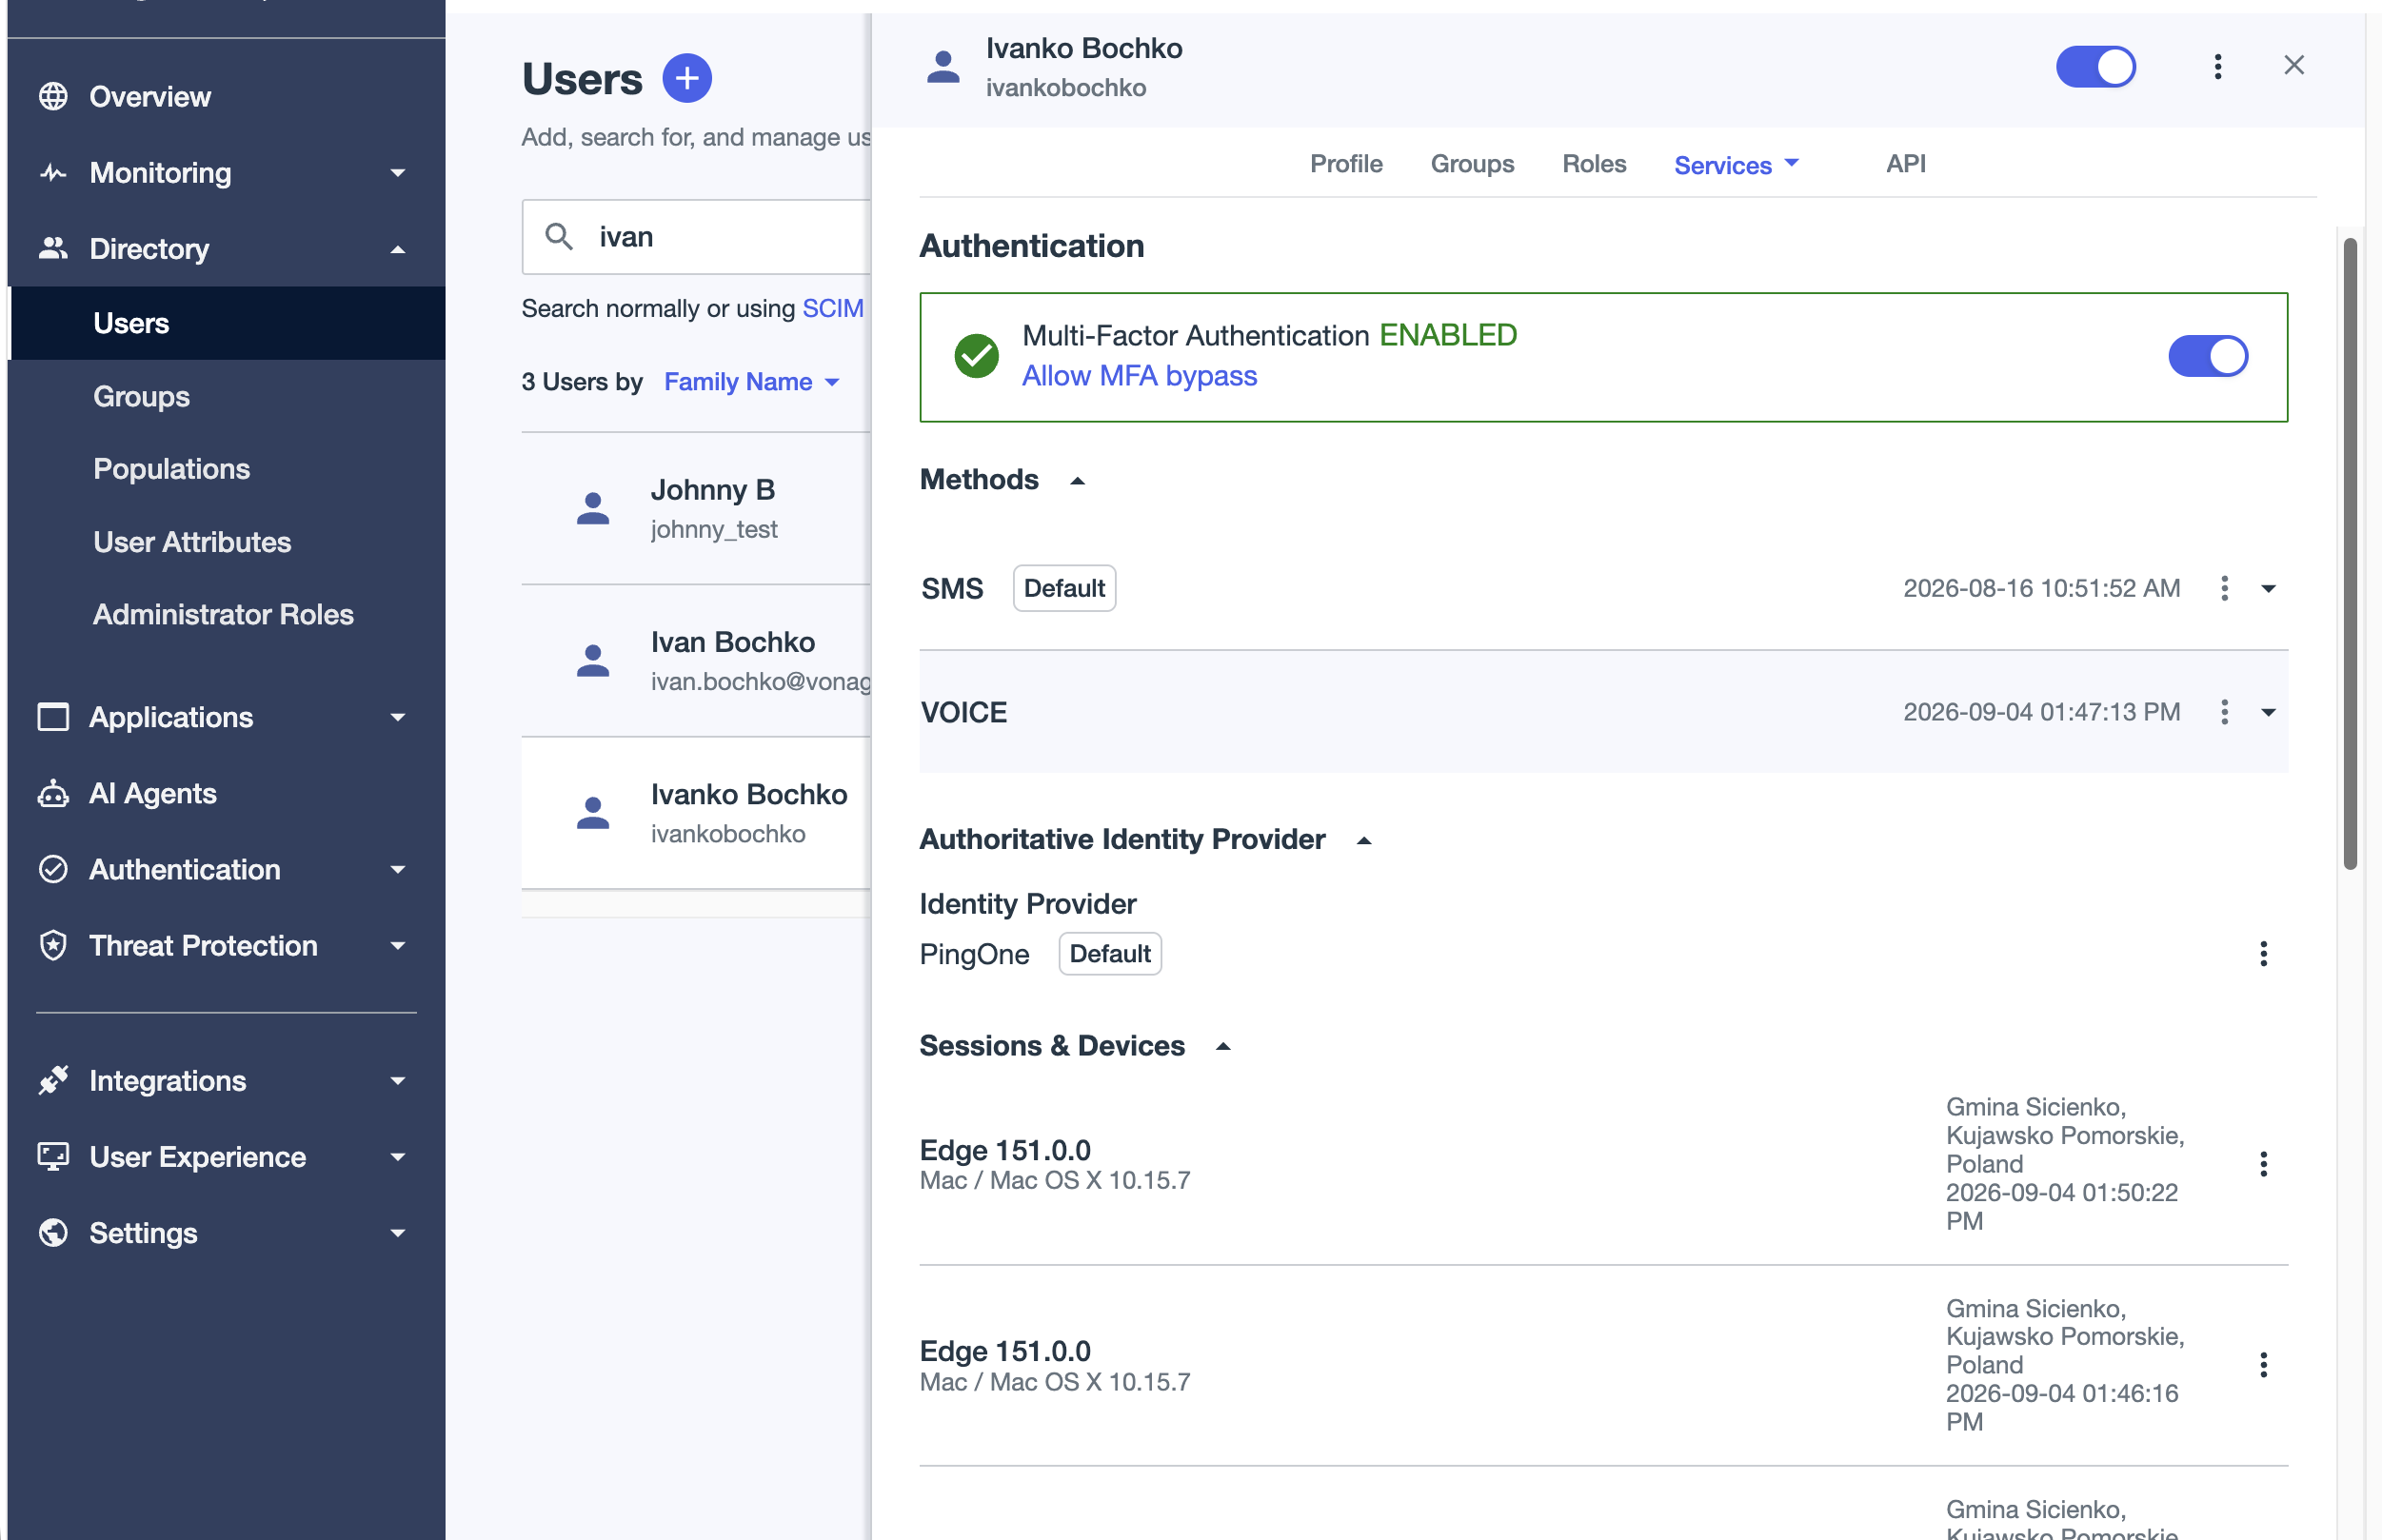
- An application under Connections > Applications with the MFA-enabled Authentication Policy assigned from the Require MFA in an Authentication Policy step. Alternatively, you can use the PingOne Self-Service Portal.
- A test user under Directory > Users with MFA enabled and a phone number that can receive SMS messages and voice calls.
Test Using a Browser
This is the recommended testing method.
- Open a private or incognito browser window.
- Go to the PingOne authorization URL for your test application:
https://auth.pingone.com/{environmentId}/as/authorize?response_type=code&client_id={clientId}&redirect_uri={redirectUri}&scope=openid
Replace {environmentId}, {clientId}, and {redirectUri} with the values from the application's Overview and Configuration tabs.
- On the PingOne login page, enter the test user's username and password.
- When PingOne prompts the user for MFA, select SMS or Voice. If the test user has not enrolled a phone number for MFA, PingOne prompts the user to complete the enrollment. Enter the phone number when prompted.
- Wait for Vonage to deliver the OTP through the custom provider that you configured.
- Enter the OTP on the PingOne screen.
- After successful verification, you are redirected to the application's redirect URI with an authorization code.
Test using the PingOne Self-Service Portal
- Go to the PingOne Self-Service Portal for your environment:
https://apps.pingone.com/{environmentId}/myaccount/
- Replace
{environmentId}with your PingOne environment ID. - Sign in using the test user's credentials.
- When PingOne prompts the user for MFA, complete the MFA challenge.
- Vonage delivers the OTP.
Confirm the Results
After completing the authentication flow, verify the results in the Vonage Dashboard and the connector Dashboard:
Vonage Dashboard
- In the Vonage Dashboard, go to Logs > SMS Logs or Voice Logs.
- Confirm that the OTP was sent to the test user's phone number.
- Review the delivery status, latency, and carrier information.
Connector Dashboard
- Confirm that the delivery appears in Recent OTP Activity.
- If you configured the PingOne webhook, confirm that an
OTP Check Successevent appears in Recent Auth Events.
A successful test confirms the following end-to-end flow:
PingOne > Vonage connector > SMS or voice delivery > user enters the OTP > PingOne validates the OTP > verification event returned to Vonage
Warning: If the connection between PingOne and Vonage fails, the OTP will not be delivered. Check the connector logs and verify the endpoint URLs, auth header, and token entered in the PingOne sender configuration are correct.
Manage and Rotate an Authentication Token
The authentication token secures communication between your PingOne environment and the Vonage connector. As a security best practice, you can rotate the token in the Admin Application or programmatically using the Token Management API.
Rotating a token generates a new token and starts a 24-hour grace period for the previous token. During this period, both tokens remain valid, allowing you to update the PingOne configuration without interrupting OTP delivery.
Rotate a Token in the Admin Panel
- Log in to the Admin Panel with your admin Vonage account.
- Open the Token List.
- Find the token that you want to rotate.
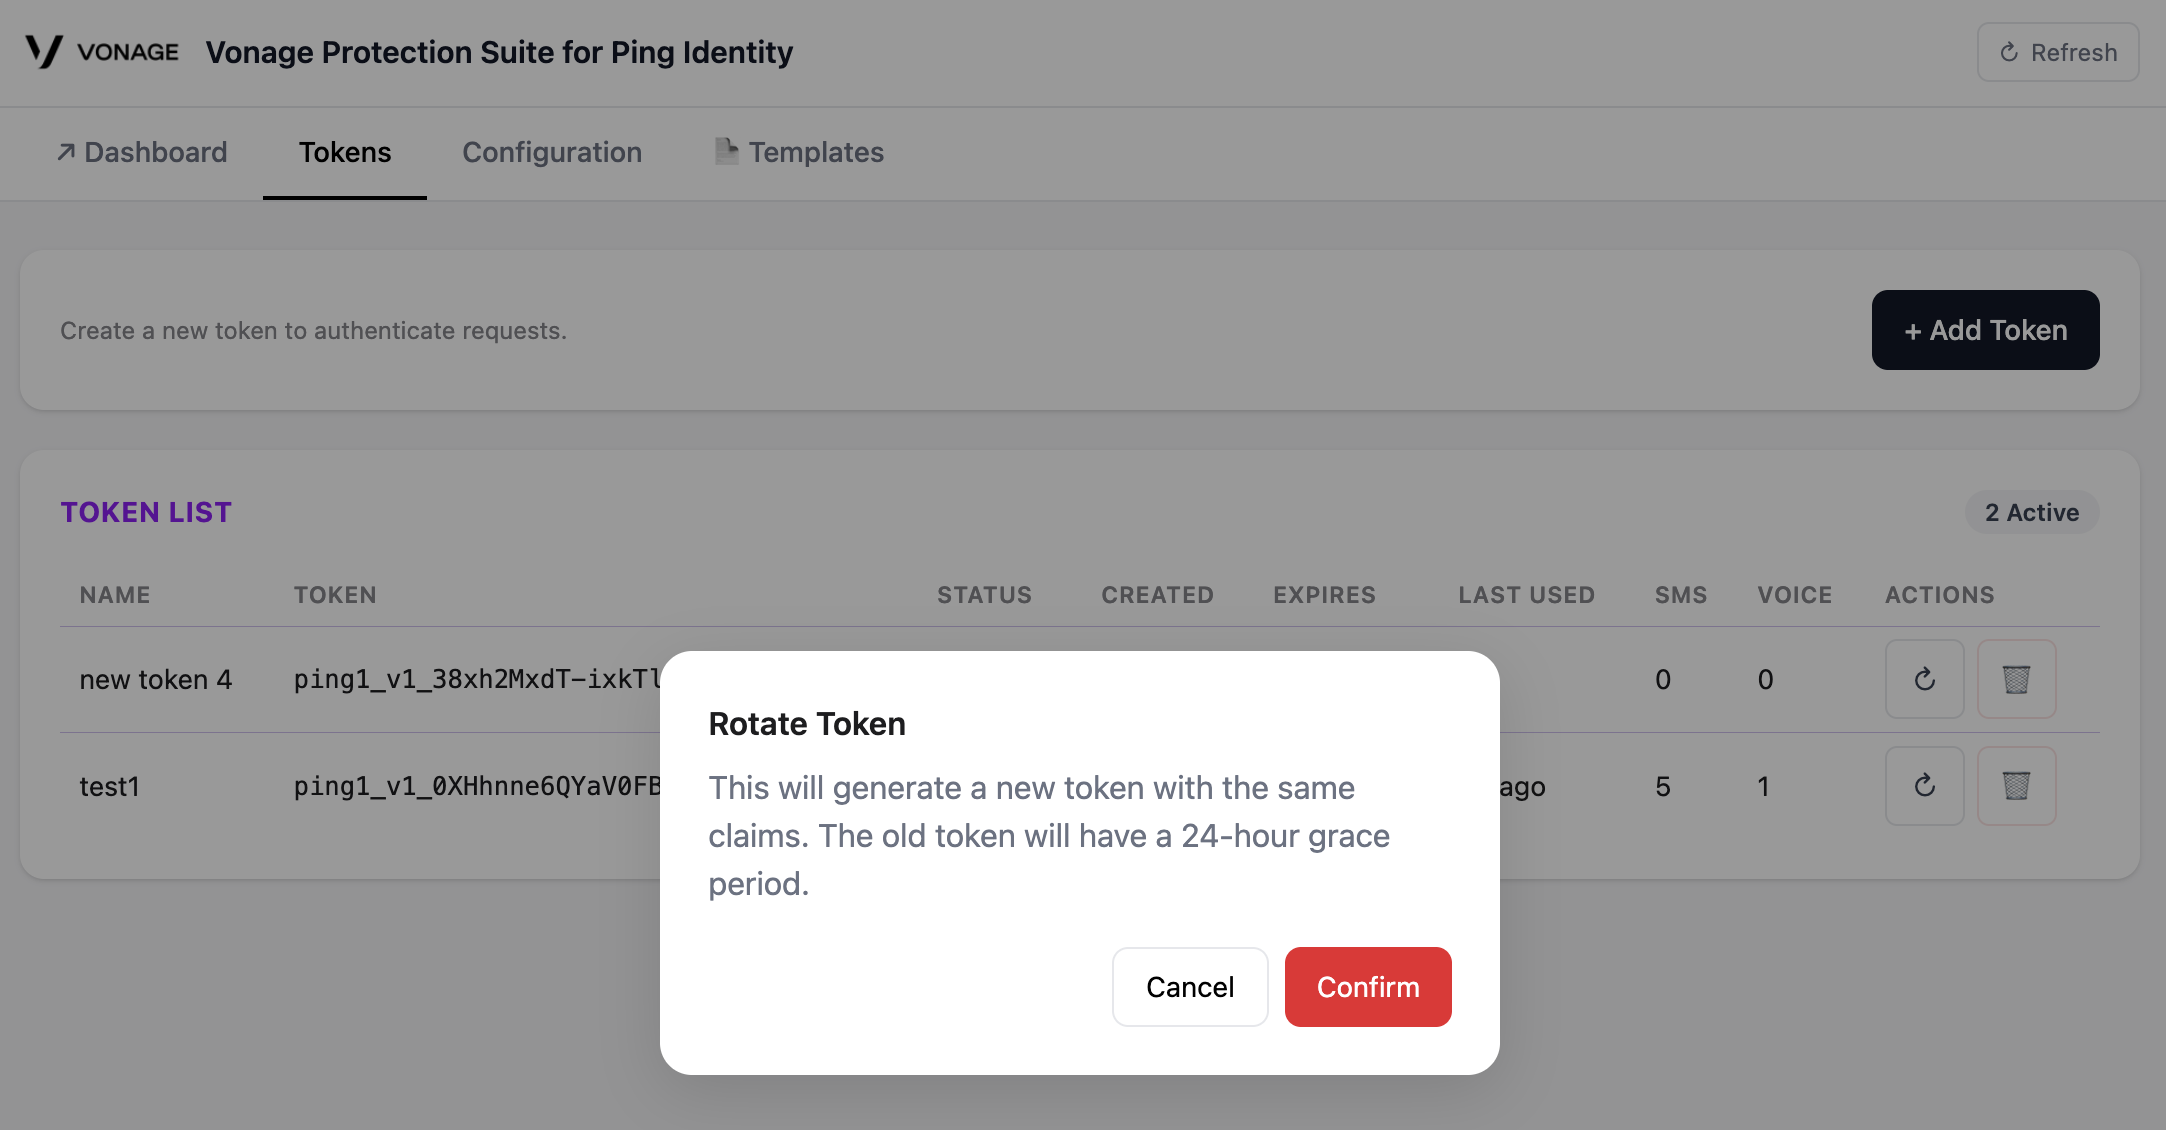
- Click Rotate.
- Click Confirm.
- Your new token will be displayed. Copy and securely store the new token. The new token is displayed only once.
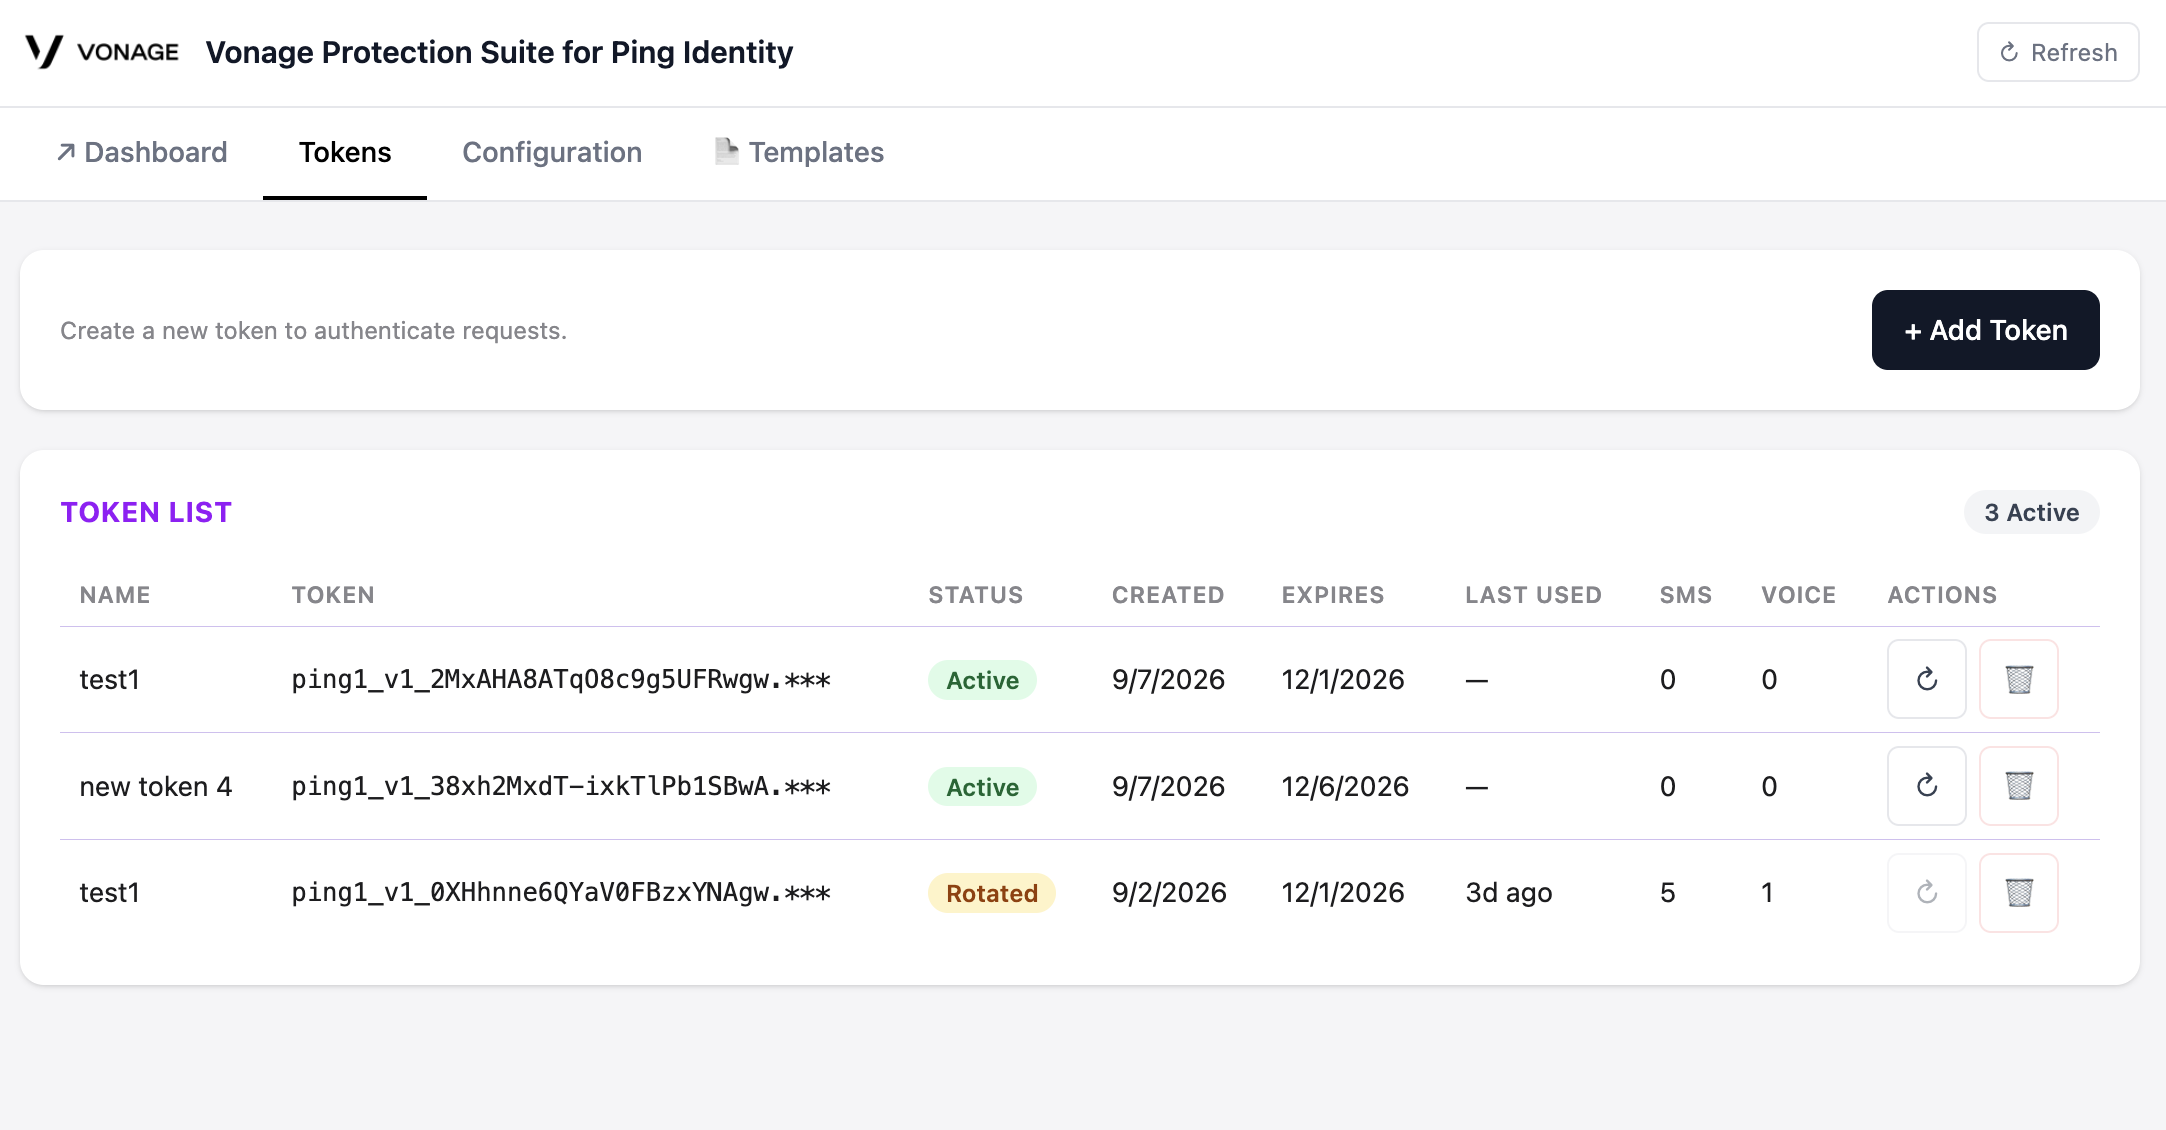
- Confirm that the new token appears in the token list. The old token is marked with
Rotatedstatus and it remains valid during the 24-hour grace period. After the grace period ends, it expires.
Rotate a token using the API
You can also rotate authentication tokens programmatically using the Token Management API.
The OpenAPI specification and Postman collection are available for reference in the Vonage Protection Suite for PingOne Knowledge Base article > step 6 > Rotate a Token - via API.
Authentication
The Token Management API endpoints use HTTP Basic authentication. Include your Vonage API Key and API Secret, separated by a colon and Base64 encoded, with each request:
Basic base64(API_KEY:API_SECRET)
Warning: The API Key must be the same key that is the owner of the PingOne Connector instance.
Fetch the Token List
Before rotating a token, retrieve its UUID using the List Tokens endpoint:
GET /admin/tokens
The endpoint returns a map of the tokens associated with the connector instance. Each entry contains the token ID, name, status, claims, and usage counters.
| Field | Type | Description |
|---|---|---|
id |
String (UUID) | Unique identifier for the token. Use this value for rotation, revocation, and other token management operations. |
name |
String | Human-readable token name assigned when the token was created. |
truncatedToken |
String | Masked representation of the token. The complete token value is not displayed after creation. |
expiresIn |
String | Expiration period selected when the token was created, for example 90d or 24h. |
revoked |
Boolean | Indicates whether the token has been revoked. |
createdAt / expirationDate |
String (ISO 8601) | Timestamps indicating when the token was created and when it expires. |
smsSuccessCount / voiceSuccessCount |
Integer | Number of successful SMS or voice OTP deliveries. |
smsErrorCount / voiceErrorCount |
Integer | Number of failed SMS or voice OTP delivery attempts. |
smsBlockedCount / voiceBlockedCount |
Integer | Number of SMS or voice OTP deliveries blocked, for example by fraud rules. |
Tip: Copy the id value for the token you wish to rotate; you will need it in the next step. The id always identifies a distinct token. When a new token is generated (via generate or rotate), the new token receives a new id.
Rotate the Token
Token rotation issues a new token with the same claims and a fresh timestamp, and begins the 24-hour grace period for the previous token, after which it is invalidated.
Send a request to the rotation endpoint:
POST /admin/rotate-token
In the request body, provide the UUID returned by GET /admin/tokens:
{
"id": "<token-uuid>"
}
Replace "<token-uuid>" with the UUID of the token that you want to rotate.
A successful request returns a 200 OK response containing the newly signed token and its identifier. The token value is returned only once.
The OTP Delivery Endpoint URL, Event Webhook URL, and Auth Header Name do not change when you rotate a token. You can retrieve these values using:
GET /admin/config
For the complete response schema, see the OpenAPI specification.
Warning: Save the new token immediately. The newToken value is only returned once at rotation time and cannot be retrieved again. Store it securely before closing the response. Also record the newId; it is the identifier you will need for all future management operations on this token, including subsequent rotations and revocation.
Update PingOne after Rotating a Token
After rotating a token, update the credentials in PingOne:
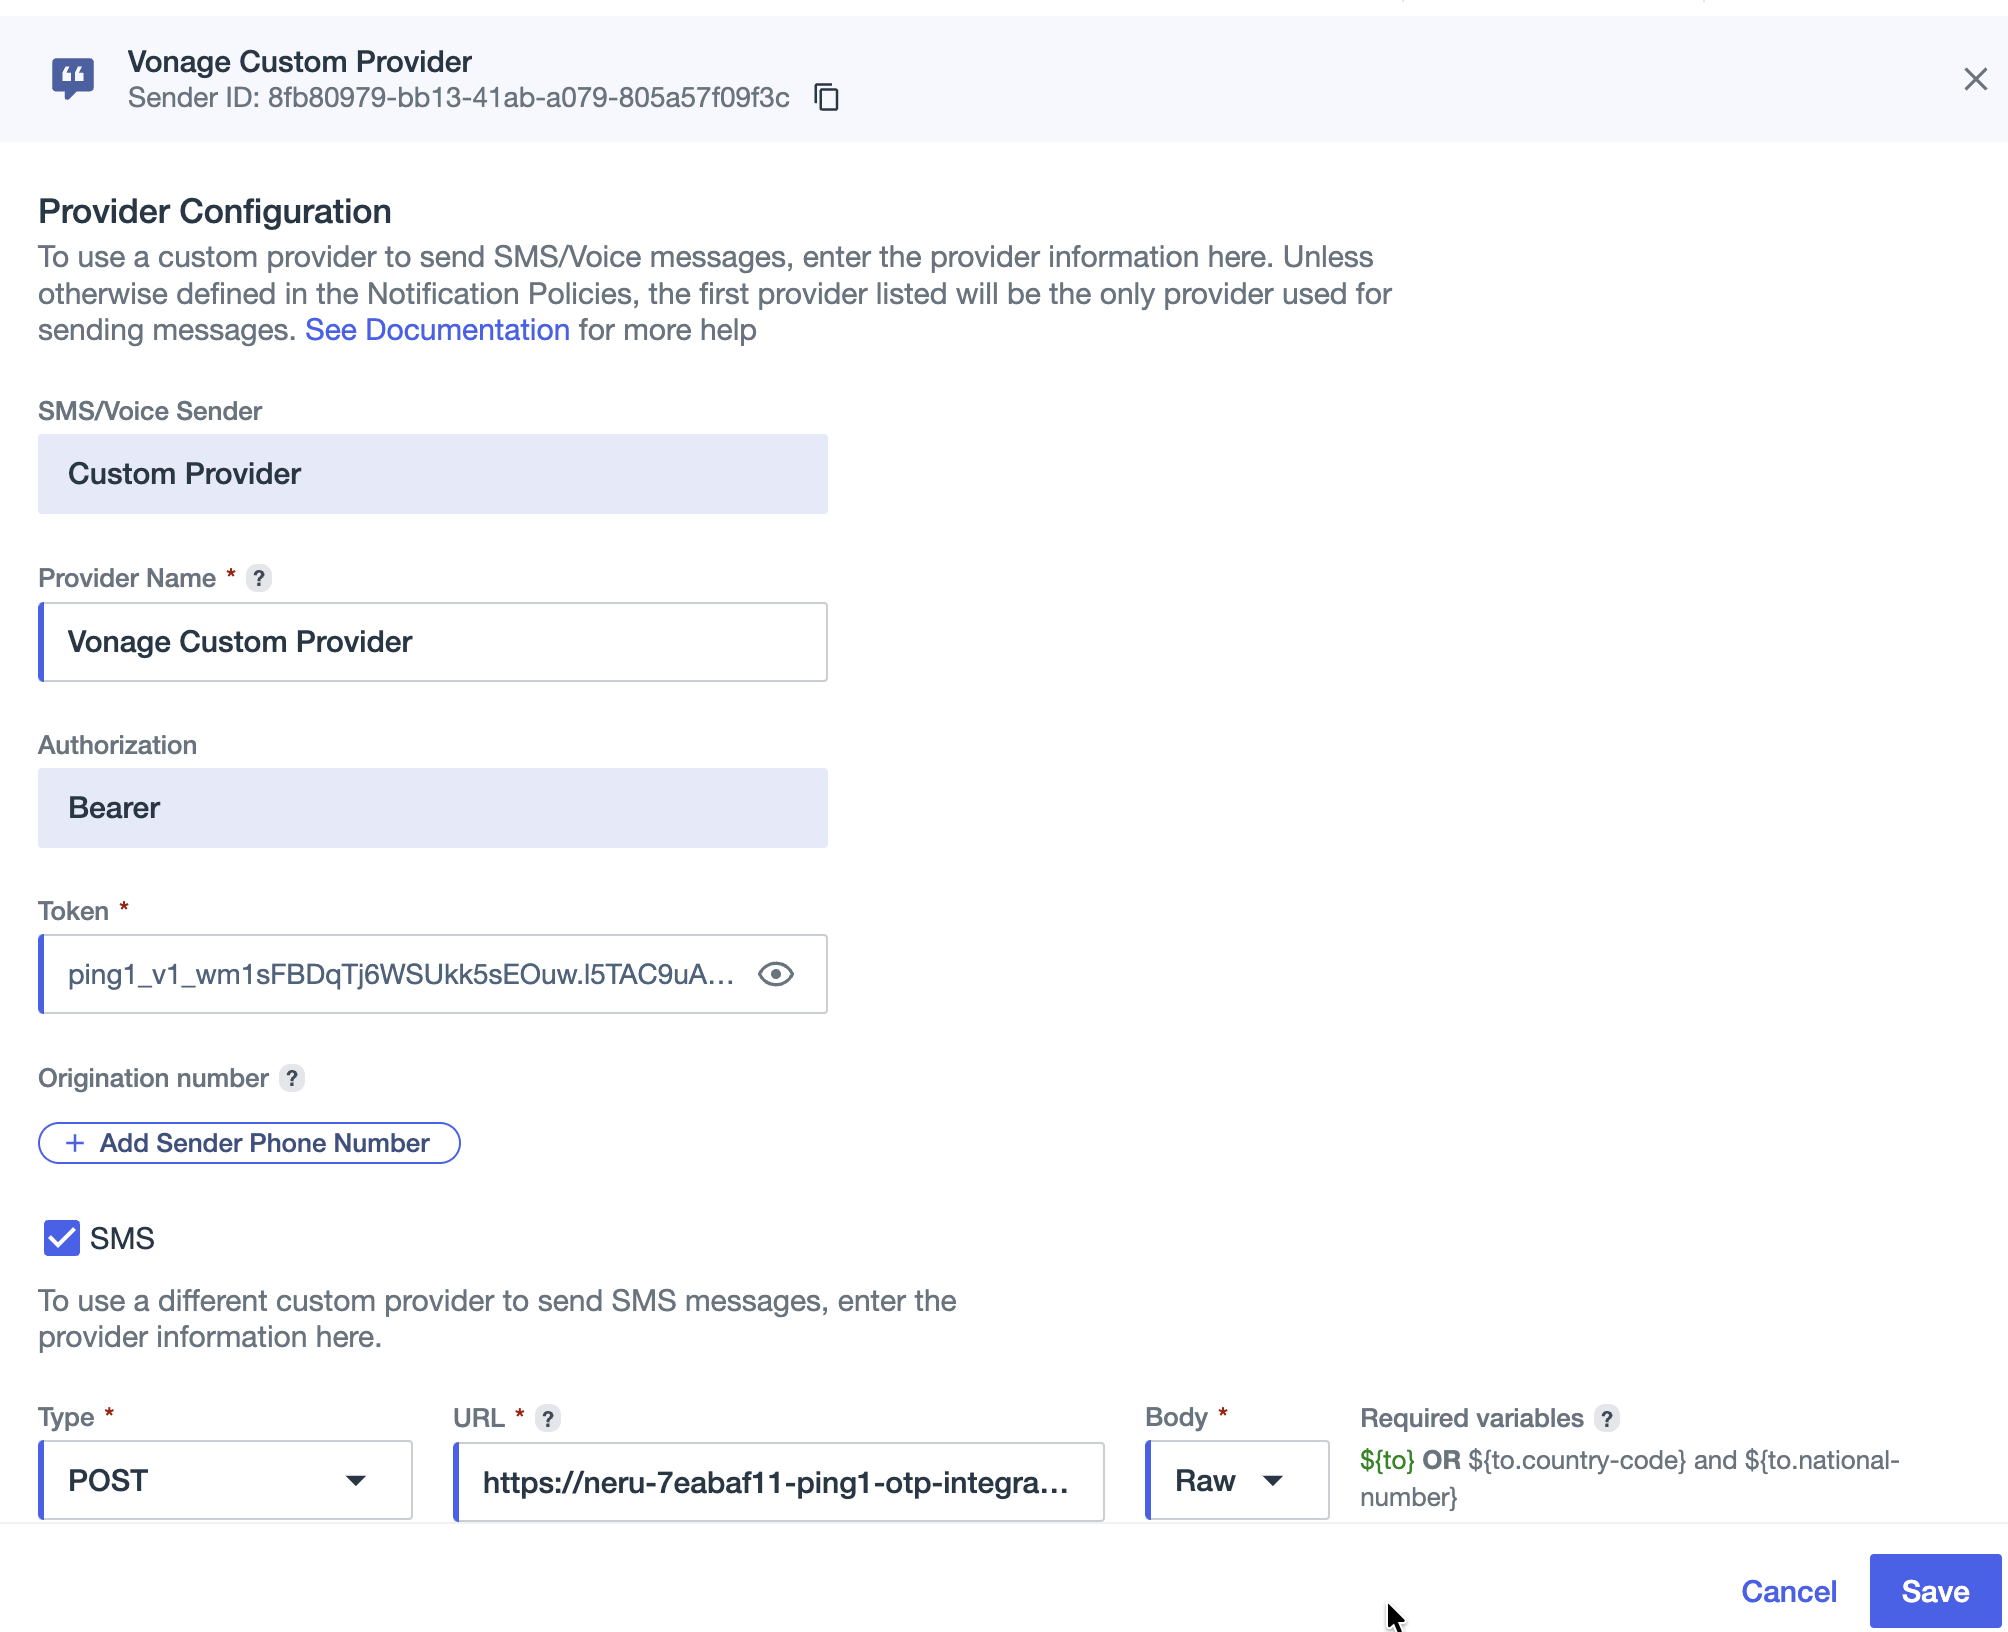
- Go to Settings > Senders.
- Edit the Vonage custom provider.
- In the Authentication section, replace the existing credential with the new token:
- If you use Bearer Token authentication, update the bearer value.
- If you use the Custom Header authentication scheme, update the custom header value.
- If the webhook authenticates using the token, go to Integrations > Webhooks, open the Vonage webhook, and update its credential.
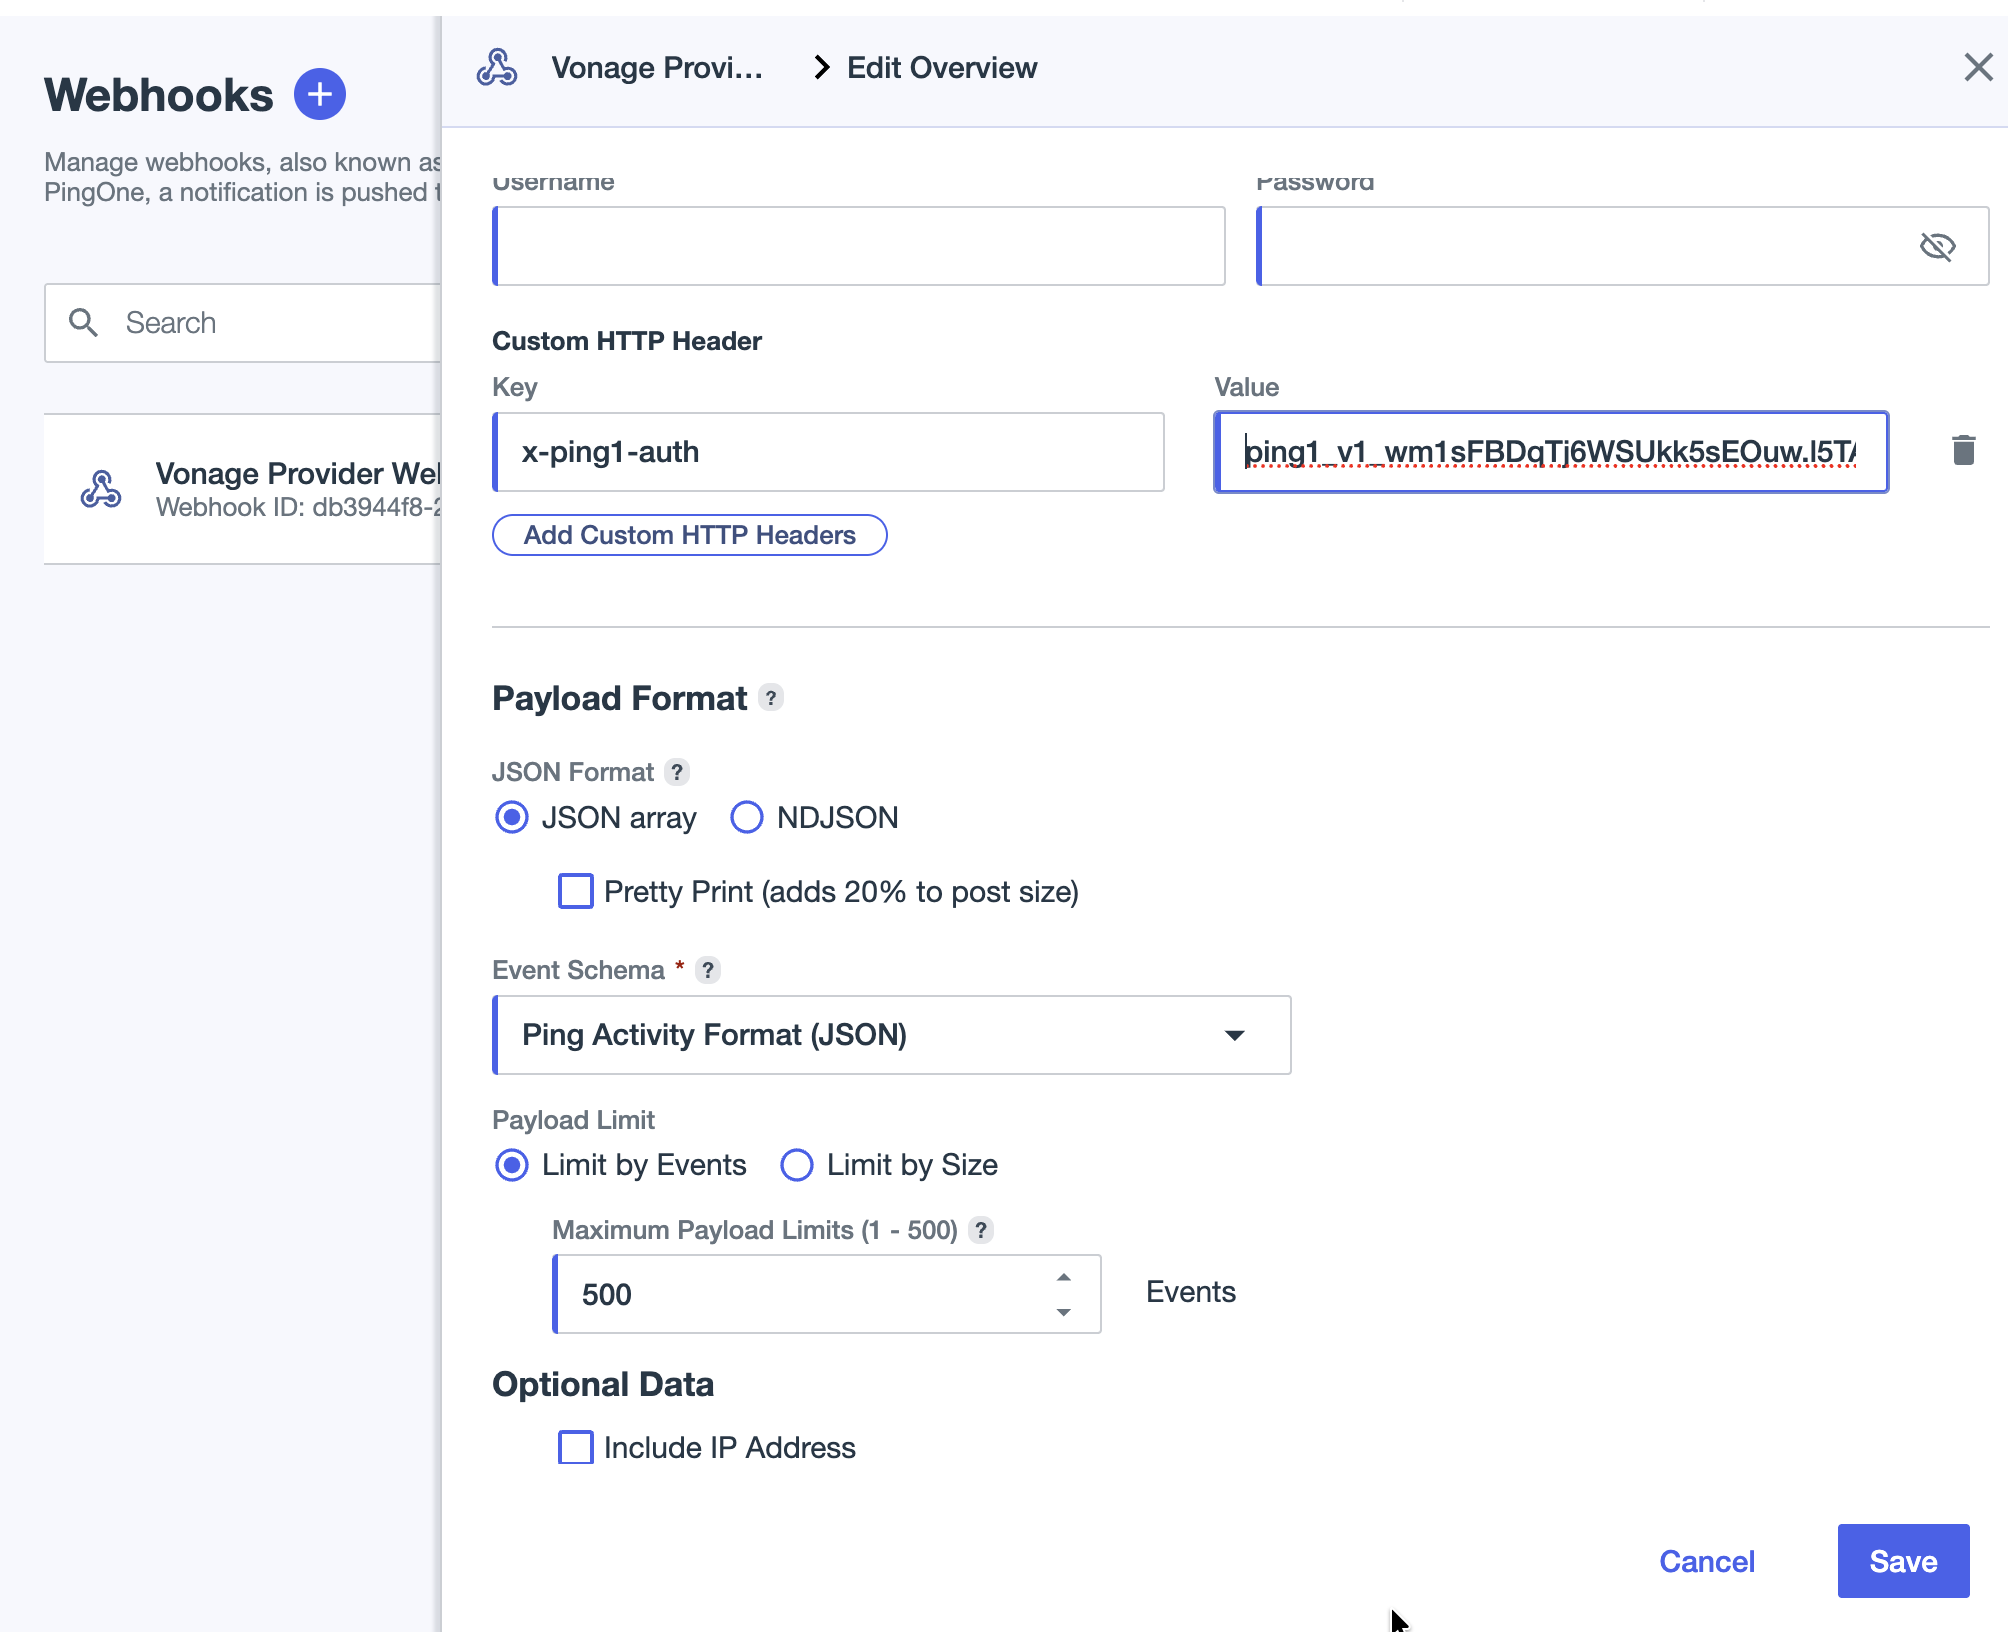
Failure to update PingOne will cause OTP delivery to fail once the old token is invalidated (after the 24-hour grace period).
Troubleshooting
If OTP delivery or verification does not work as expected, perform the following checks:
- Verify the connector credentials: Confirm that the OTP Delivery Endpoint URL, Event Webhook URL, authentication scheme, and Authentication Token in PingOne match the values from the token generation dialog.
- Check the Notification Policy: Confirm the Vonage custom provider is selected as the SMS and Voice provider in the Notification Policy, and that the MFA policy is linked to that Notification Policy. Check provider priority if multiple providers are configured.
- MFA configuration: Ensure SMS and Voice are enabled in the MFA policy, the MFA policy is linked to the authentication policy, and the user has MFA enabled.
- Review the Dashboard: In the connector Dashboard, check Recent OTP Activity for
FAILEDorFLAGGEDevents. Click the description icon to view the error details. - Check Identity Insights results: If the connector blocks the OTP, check whether Identity Insights flagged the destination number. For testing, consider adjusting the "When number is flagged" action (Block > Flag and Deliver or Only Log).
- Check the number format: Confirm that the Plus sign for numbers setting in the custom provider configuration matches the E.164 format expected by the connector.
For detailed end-to-end request tracing, log locations, and support information, see the Vonage Protection Suite for PingOne Knowledge Base article.
End-to-End OTP Lifecycle - Tracing a Single Request
For detailed instructions on tracing an OTP request across PingOne, Vonage Cloud Runtime, and Vonage Verify, see the Vonage Protection Suite for PingOne Knowledge Base article.
Error Codes and Identity Insights Reference
When an OTP request is blocked, fails, or is flagged, you can view the structured error in the Dashboard's Recent OTP Activity section. Click the eye icon next to a BLOCKED, FAILED, or FLAGGED event to view the error details.
Connector Error Codes
Connector errors can include:
errorCode: The connector error code.errorSummary: A human-readable description of the error.errorId: The request correlation identifier used to locate the request in the connector logs and can be quoted to Vonage Support.errorCauses: Details about the fields that failed validation.
| Error code | HTTP status | When it occurs |
|---|---|---|
INVALID_PAYLOAD |
400 |
The delivery request contains a malformed phone number, malformed OTP, unknown channel, or missing required field. The connector does not attempt delivery. |
FORBIDDEN |
403 |
The credential is invalid, revoked, expired, or past the grace period following rotation. |
DELIVERY_INITIATION_FAILED |
500 |
An upstream Verify API failure. |
UNKNOWN_TRANSACTION |
400 |
An event references a transaction that the connector does not recognize. |
Identity Insights sub-codes
When the error message contains Identity Insight flagged: <reasons>, the reasons field contains one or more of the following sub-codes. Multiple reasons can appear when more than one check flags the same number.
| Sub-code | Meaning |
|---|---|
Number is invalid |
The number failed the format or validity check. |
NI:networkType |
The current carrier is virtual or unknown. |
NI:country |
The number's country is not included in the per-insight allowlist. |
NI:countryOC |
The original carrier's country is not included in the allowlist. |
NI:countryCC |
The current carrier's country is not included in the allowlist. |
NI:CB |
The number's country is not included in the flat allowedCountries list. |
NI:NT |
The original carrier network type is not included in allowedNetworkTypes. |
Additional Troubleshooting Resources
For detailed instructions on tracing an OTP request through each stage of the delivery and verification flow, see the Vonage Protection Suite for PingOne Knowledge Base article. The article also provides a quick reference to PingOne navigation paths.
Need Help?
If you are unable to resolve the issue using the Troubleshooting section above, contact Vonage Help Center. When submitting a request, select the form titled Using Vonage Connectors and then select your connector > Using Vonage Protection Suite for PingOne so the ticket is routed directly to the PingOne Connector support group.
What to Include (for Faster Resolution)
| Item | Detail |
|---|---|
| Your email address | Customer contact. |
| Subject | Issue summary. |
| Description | Detailed issue description. |
| API Key | Vonage API Key (account ID only, not the secret). |
| PingOne Environment ID | The environment where the sender and webhook are configured. |
| Correlation / Request ID | From the connector's Recent OTP Activity or the PingOne audit event. |
| Message ID | Used for delivery troubleshooting. |
| Sender Type | Brand ID or number. |
| Channel Used | SMS or Voice (TTS). |
| Identity Insights Enabled | Yes or No. |
| Attachments | Screenshots, logs, and other supporting files. |
OTP Delivery Experience
End users do not need to configure the connector. After an administrator completes the setup in the Install and Configure the Connector section, the Vonage connector handles OTP delivery transparently. From the end user's perspective, the authentication flow remains identical to their existing PingOne experience:
- The user starts an authentication flow in a PingOne-protected application, such as login, MFA enrollment, or self-service account access.
- PingOne prompts the user to verify by phone.
- The user selects SMS or Voice.
- The Vonage connector delivers the OTP to the user's phone through Vonage Verify.
- The user enters the OTP in the PingOne interface.
- PingOne validates the OTP and completes the authentication.
The Vonage connector operates behind the scenes throughout this process. If Voice Call Fallback is enabled and SMS delivery fails, the connector retries delivery through a voice call without requiring any additional action from the user.