How to Set Up the Vonage Protection Suite for Okta
What's New in v2.0
If you are upgrading from v1.x, here is what has changed:
- Named Tokens — you can now give each token a human-readable name instead of relying on a truncated hash. This makes it easier to manage multiple tokens across your deployment.
- Instance-level Configuration — security settings (Identity Insights, Fraud Defender, rate limits) are no longer tied to individual tokens. They now live in a dedicated Configuration tab and apply to all tokens on the instance. Adding or rotating a token no longer requires reconfiguring security policies.
- Custom OTP Message Templates — admins can now define custom OTP message templates per language and per channel (SMS/Voice). Requires account-level enablement — contact your Vonage Account Manager to activate.
Upgrading from v1.6
v1.6 and v2.0 are not compatible and there is no in-place upgrade path. v2.0 must be deployed as a new VCR instance. The token model, instance-level claims, and state storage keys have changed. Tokens, usage statistics, and OTP activity from your v1.6 instance cannot be migrated and will not carry over. Before decommissioning your v1.6 instance, reconfigure your Okta Telephony Inline Hook and Event Hook with the credentials generated from your new v2.0 instance.
Introduction
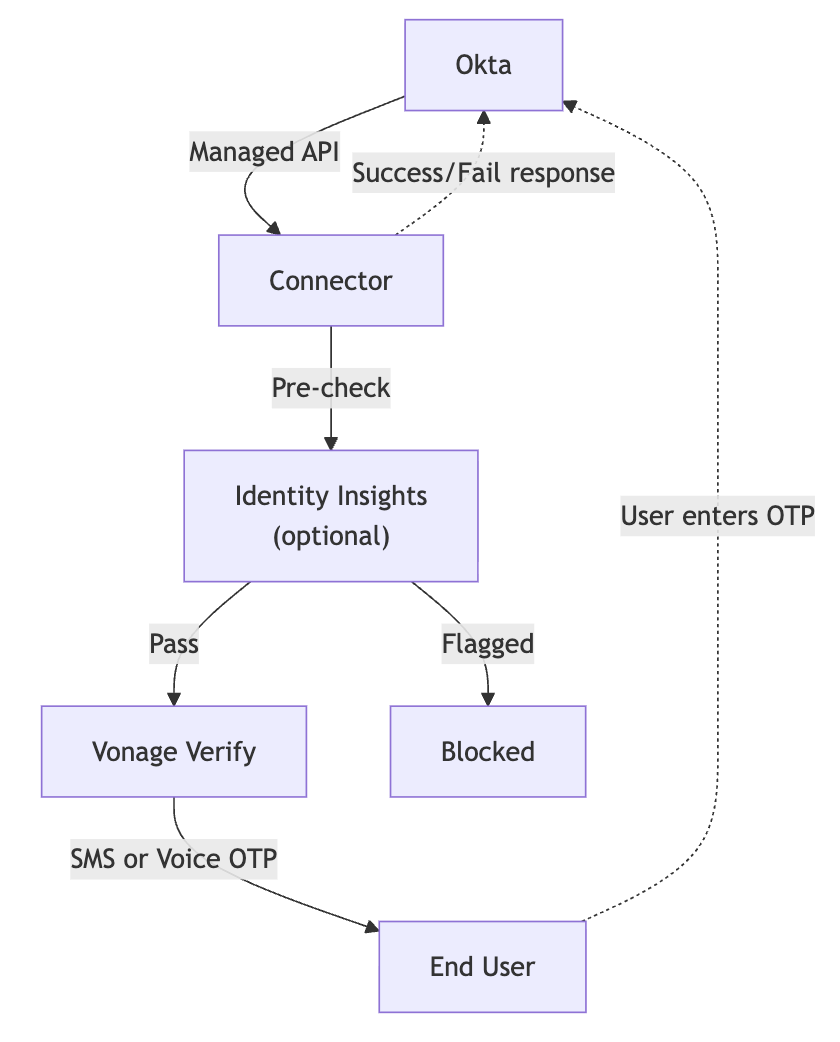
When a user needs to verify their identity in Okta, Okta generates a one-time password (OTP). However, Okta doesn’t send the OTP directly. Instead, it relies on external providers to deliver the OTPs to users. The Vonage Protection Suite for Okta serves this purpose by delivering a managed, plug-and-play connector for SMS and Voice OTP delivery. It integrates directly into your Okta Identity Engine via Telephony Inline Hooks and delivers OTPs through Vonage Verify via SMS or voice calls. The connector is built on Vonage Cloud Runtime (VCR).
Supported Okta Platforms
The Vonage Protection Suite for Okta integrates via Okta's Telephony Inline Hook, which is available in Okta Workforce Identity Cloud, including both the Okta Identity Engine (OIE) and the legacy Classic Engine. Auth0 (Okta Customer Identity Cloud) is not supported in this release. Auth0 uses a different extensibility model (Actions/custom credential providers) rather than Telephony Inline Hook, and requires a separate integration.
Two-Layer Fraud Intelligence Model
The Vonage Protection Suite for Okta uses a two-layer fraud intelligence model:
- Identity Insights Pre-OTP Number Verification (optional): Screens number against carrier databases (validity, carrier) and blocks fraud before OTP delivery is initiated. This is a passive intelligence layer as it doesn't require any action from the end user.
- Layer 2 Fraud Defender During OTP: SMS pumping protection, geographic permissions, velocity controls, and rate limiting.
In this guide, you will connect your Okta tenant to Vonage Verify using the Vonage Protection Suite for Okta, ensuring that OTPs are delivered via SMS or voice.
Connector Flow
The following diagram shows how the connector sits between Okta and Vonage Verify:
Prerequisites
Before you begin, make sure you have the following:
- An active Okta tenant with Okta Identity Engine (OIE).
- Phone authenticator enabled in Okta (Okta Admin Console > Security > Authenticators > Setup > Phone).
- Admin access to the Okta Admin Console to configure Inline Hooks and Event Hooks.
- A Vonage API account (you can sign up for free) along with an API Key (you can find these credentials in your API settings within the Vonage Dashboard).
- Access to the Vonage Dashboard.
- A Vonage Cloud Runtime Advanced subscription. If you don't have one, contact your Vonage Customer Success Associate (CSA) to activate it.
Deploy the Connector on Vonage Cloud Runtime
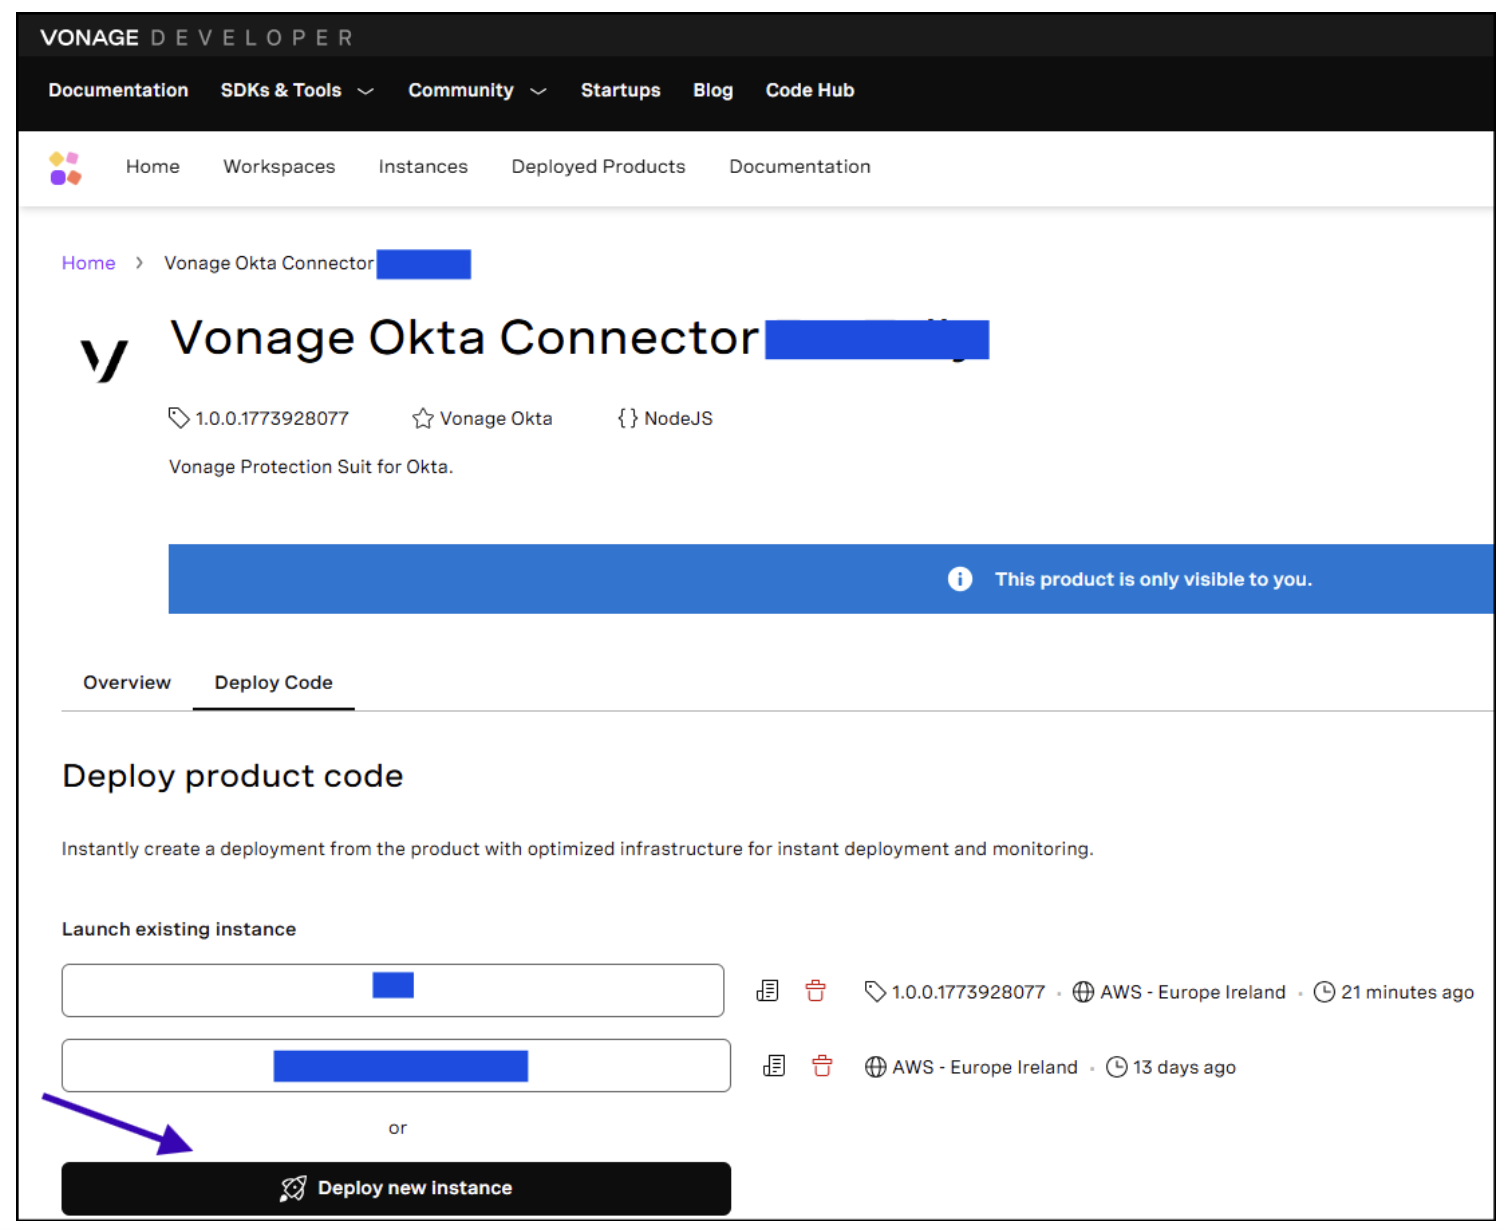
- Log into Vonage Cloud Runtime and click on the Vonage Protection Suite for Okta tile.
- In the menu on the right, select the API Key you want to deploy the connector against. If your account has only one API key, this step is skipped automatically.
- Click Deploy a new instance.
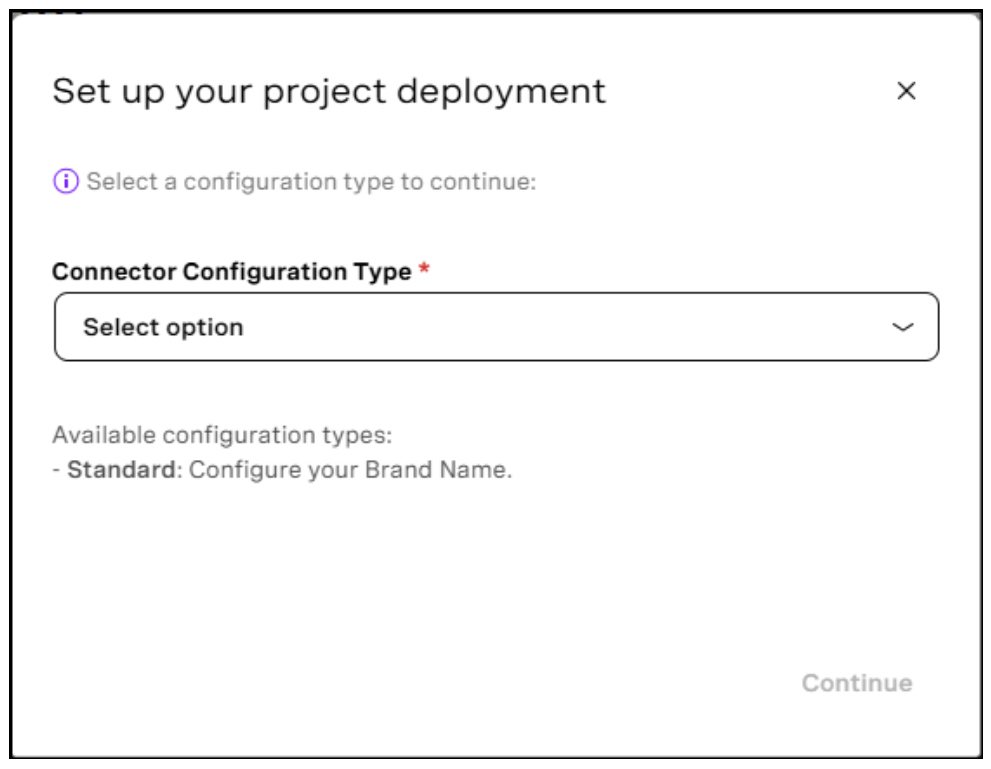
- In the Connector Configuration Type, select Standard and click Continue.
- Fill in the parameters:
- Region: Region where your entity will be hosted.
- Instance name: Unique name to your instance.
- Vonage Number (Optional): This number serves as the SMS sender ID and must be in E.164 format, consisting of digits only (an international number without the "+" sign). If this number is not configured, the Brand Name specified below will be used instead. Note that this value does not apply to voice calls, as the caller number is randomly selected by Vonage Verify.
- Brand Name (Mandatory): The OTP message body will use this brand name in SMS. This value is ignored for voice calls. Instead, the caller number is randomly selected by Vonage Verify as suitable for the destination region.
- Voice Call Fallback (Mandatory): When it’s enabled, the connector will automatically attempt to make a voice call if the SMS delivery fails.
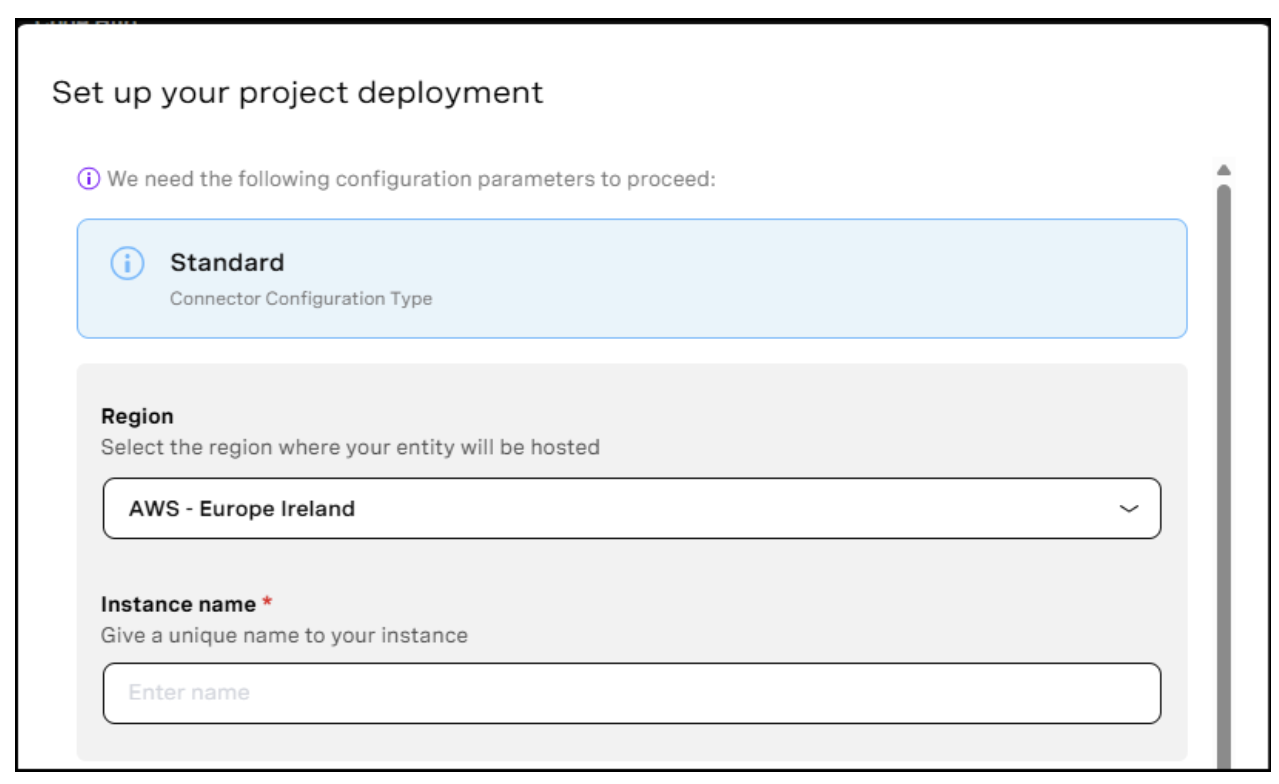
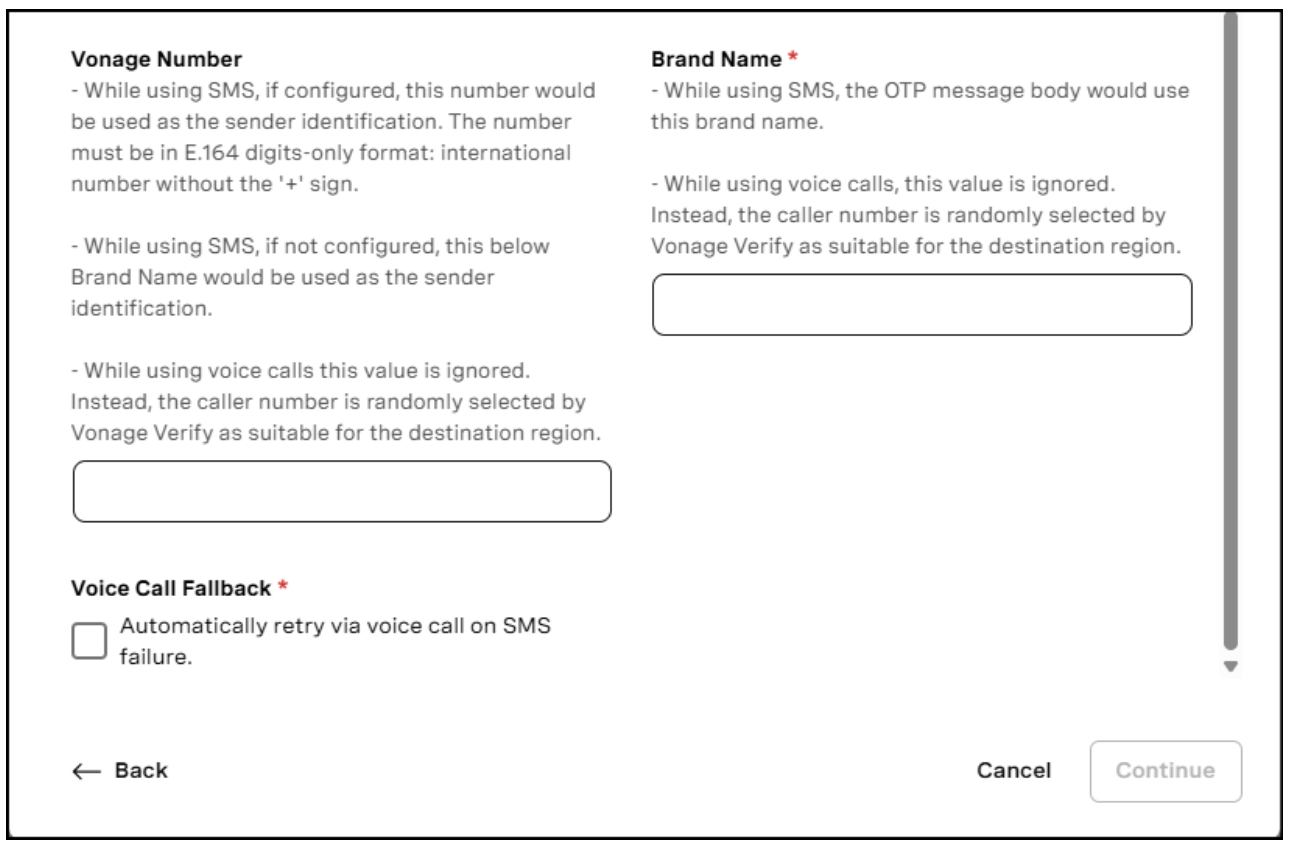
- Click Continue to deploy the instance.
Configure the Connector
Launch the Admin Application
After deploying the instance, launch the connector’s Admin Application. It allows you to configure security policies and generate authentication tokens. To do that, follow the below steps:
- Select the previously created instance and click the Launch button.
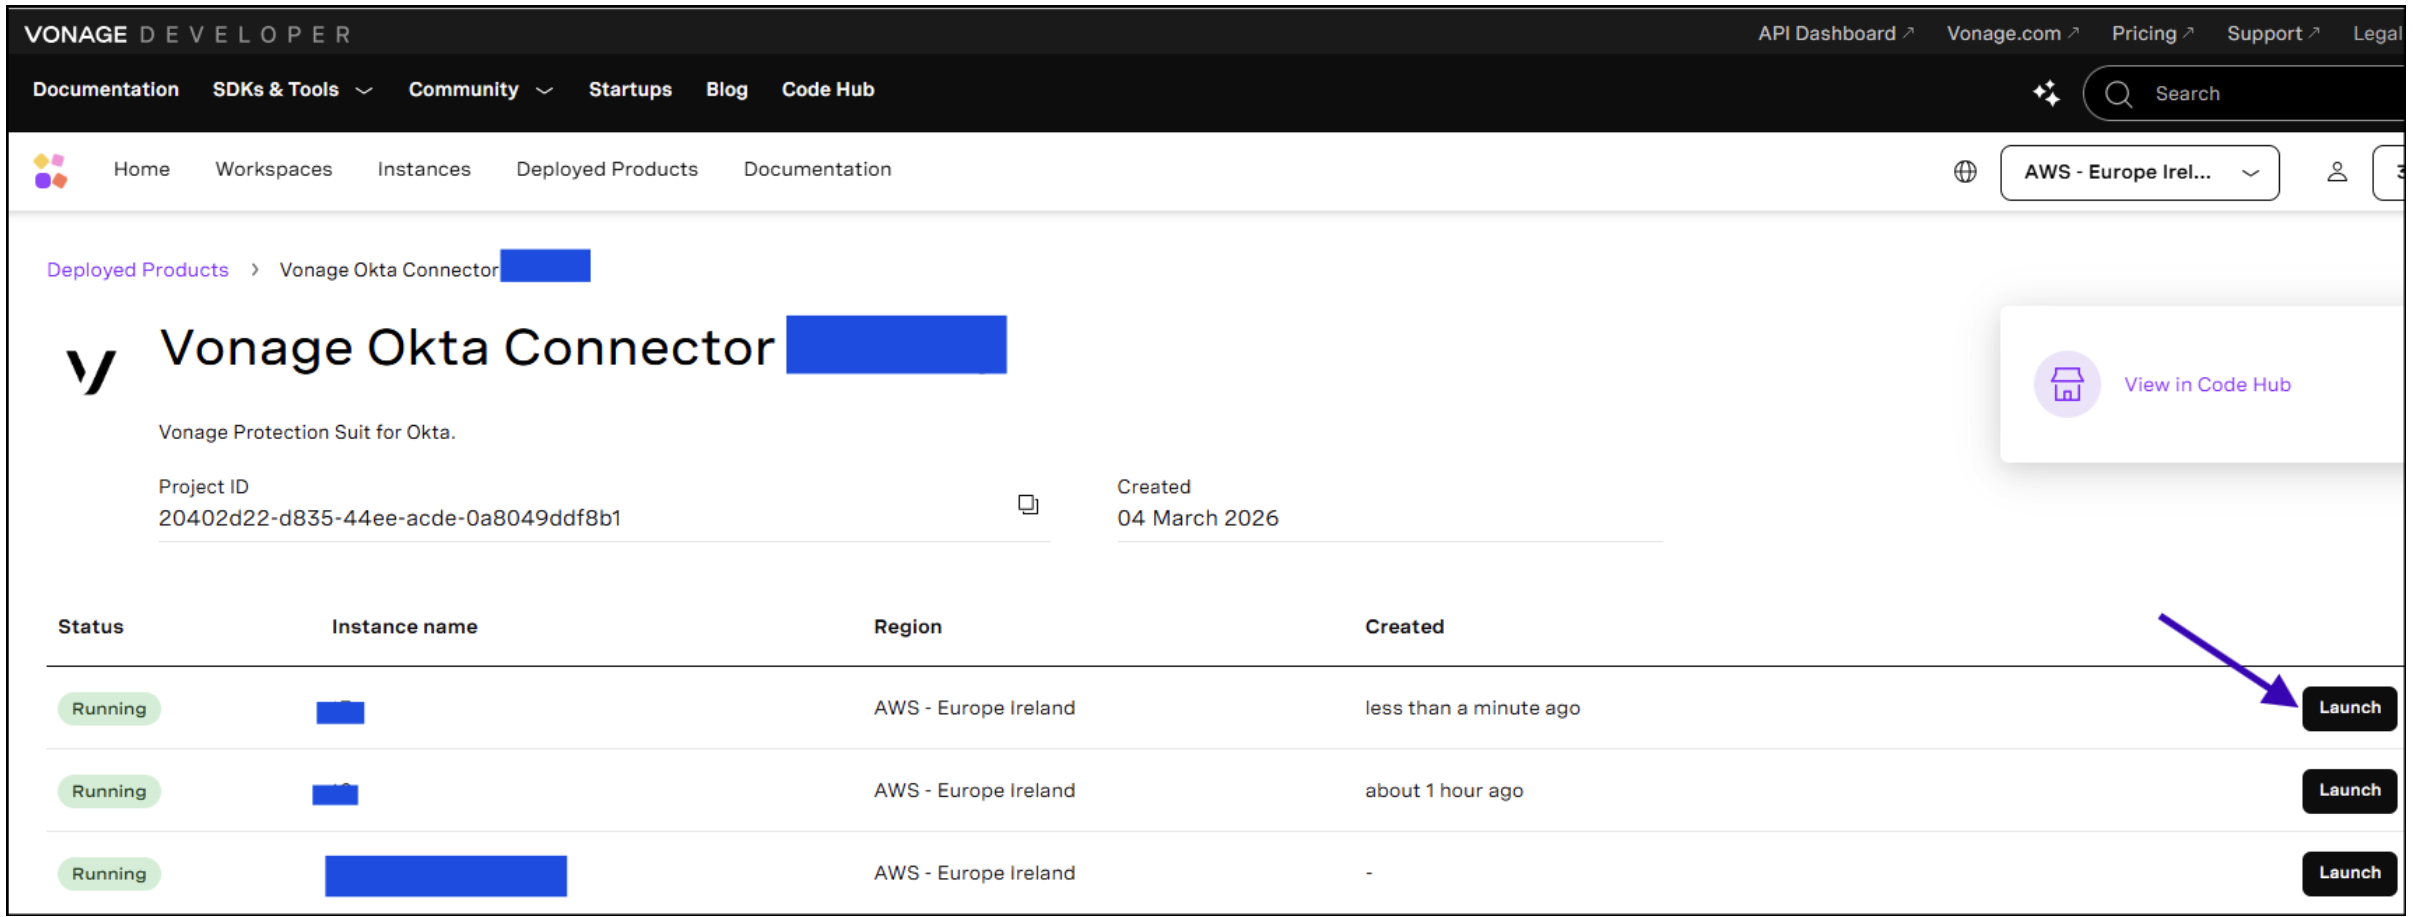
- Authenticate with Vonage credentials by clicking the Verify Identity with Vonage button.
Dashboard Tab
After launching the connector’s Admin Application, you're redirected to the Dashboard tab. It provides real-time visibility into the delivery of OTPs and authentication activity.
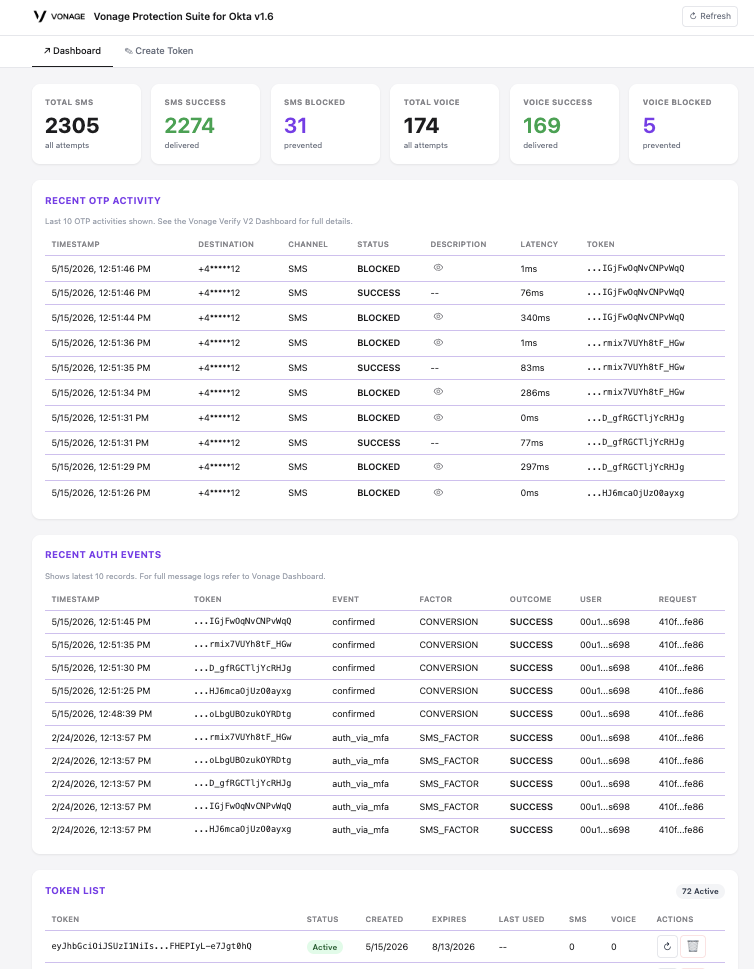
The Dashboard tab presents the following data:
- Counters section presents the following metrics:
- Total SMS: The overall number of SMS delivery tries (both successful and unsuccessful).
- SMS Success: The count of SMS deliveries that were successfully completed.
- SMS Blocked: The number of SMS deliveries that were blocked by Identity Insights or Fraud Defender.
- Total Voice: The total of voice delivery attempts (both successful and unsuccessful).
- Voice Success: The total number of voice deliveries that were successfully completed.
- Voice Blocked: The number of voice deliveries that were blocked.
- Recent OTP Activity shows the most recent 10 OTP delivery attempts for all tokens:
- Timestamp: When the delivery attempt was made.
- Destination: The masked phone number.
- Channel: SMS/VOICE.
- Status: SUCCESS, FAILED, or FLAGGED (amber, for flag-and-deliver).
- Description: Click the eye icon to see the complete reason for failure or flagging.
- Latency: Duration taken to complete the delivery in milliseconds.
- Token Name: The token name assigned at creation.
- Recent Auth Events shows the most recent 10 authentication events obtained from Okta:
- Timestamp: Indicates when the event was published
- Token Name: The token name assigned at creation.
- Event: The type of Okta event (e.g.,
user.authentication.auth_via_mfa). - Factor: The authentication factor used (e.g., SMS_FACTOR, CONVERSION).
- Outcome: SUCCESS, FAILURE, or UNKNOWN.
- User: The Okta actor ID.
- Request: The ID associated with the authentication request.
Tokens Tab
The Tokens tab gives you a full view of all the generated tokens. Each entry displays the token name, its current status, creation date, and expiration date.
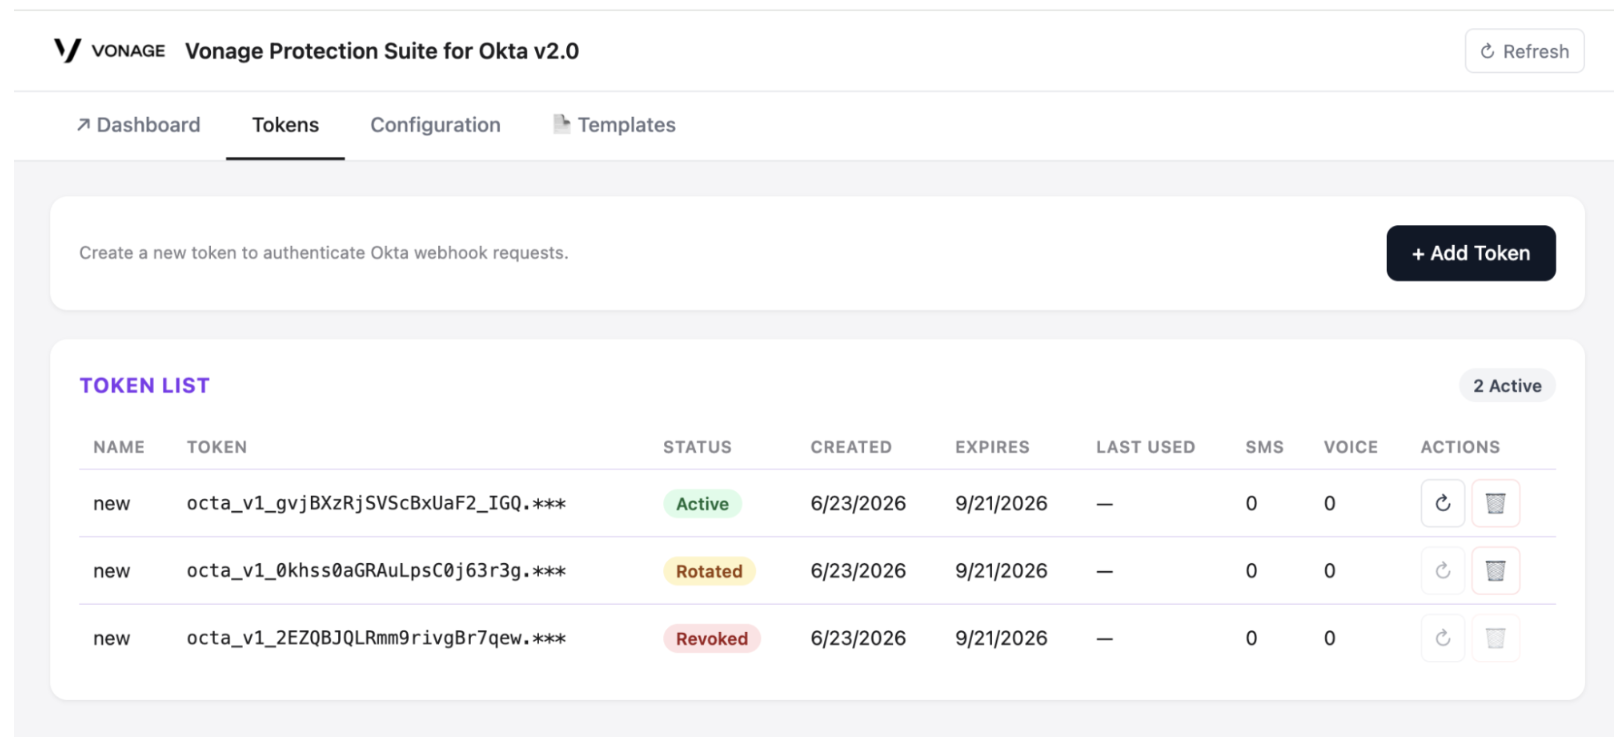
A token can have one of the following statuses:
- Active — the token is valid and currently in use.
- Grace Period — this token has been rotated. The replacement token is now active, but this one continues to work for 24 hours to allow time to update your Okta configuration without downtime.
- Expired — the token has passed its validity period and can no longer be used.
- Revoked — the token was manually disabled and can no longer be used.
Adding a Token
When adding a new token, you need to provide two values:
- Token Name — a human-readable label that helps you identify the token across the Dashboard, OTP Activity, and Auth Events views. This is especially useful when managing multiple tokens on the same instance.
- Token Expiration — how long the token remains valid: 24 hours, 7 days, 30 days, 90 days, or Never. Shorter periods reduce exposure in case of a compromise but require more frequent rotation.
Rotating a Token
Rotating a token issues a new one while keeping the existing token valid for a 24-hour grace period — both are accepted during that window so you can update your Okta configuration with no interruption to OTP delivery. The new token inherits the same name and expiration setting as the original. Use rotation to regularly cycle credentials without downtime. Read more in the Managing and Rotating Your Authentication Token chapter.
Revoking a Token
Revoking a token disables it immediately. Use this only when a token has been compromised or is no longer needed. Revocation is immediate and irreversible.
Configuration Tab
The Configuration tab is where you define the security policy that applies to every token.
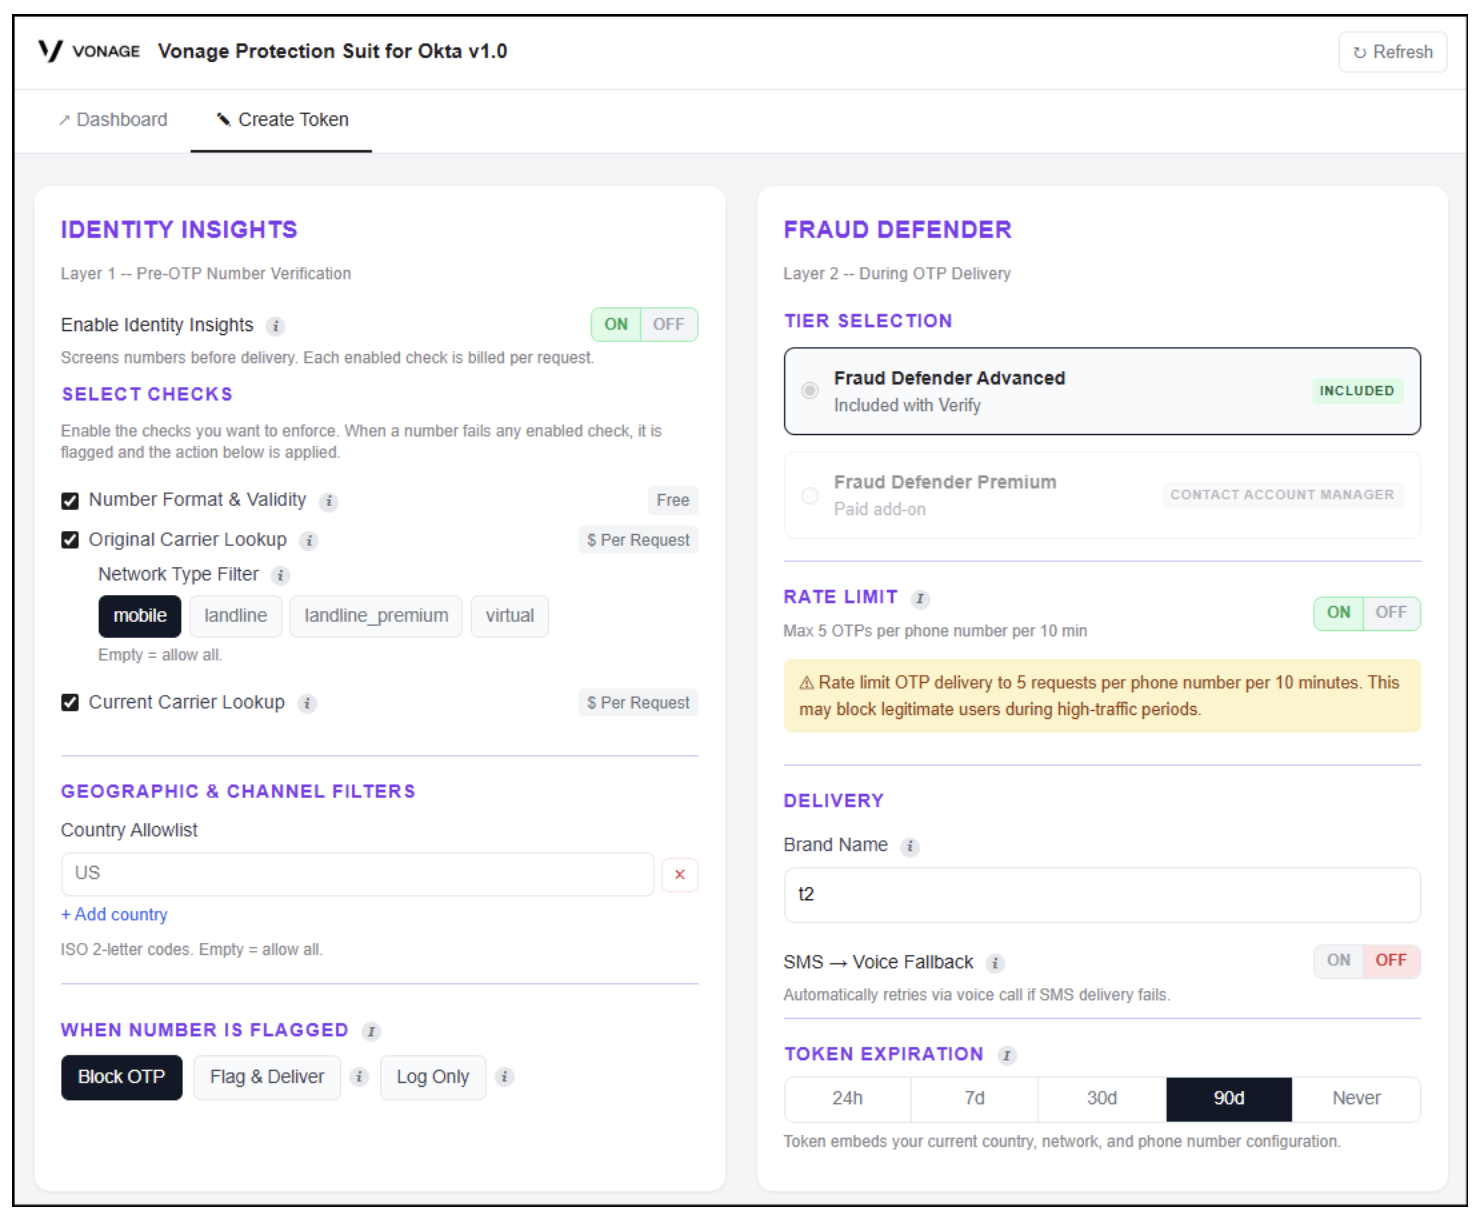
Layer 1: Identity Insights Pre-OTP Number Verification (optional)
The connector's two-layer security model starts with the optional Identity Insights Pre-OTP Number Verification.
Identity Insights is a Vonage API that gives you real-time access to mobile operator databases. It helps you assess the risk level of a phone number. In the connector, it acts as a screening tool before sending an OTP. The connector uses the results of these checks, which you can set up as you wish.
Note: Each check you activate is billed per request, while Number Format and Validity checks are free. Keep in mind that Original Carrier Lookup and Current Carrier Lookup charge fees per request. You can find detailed pricing information on the Vonage pricing page.
- To enable the Identity Insights functionality, set the toggle to ON.
- Select checks you want to enforce:
- Number Format & Validity (free): Confirms if the number is a valid mobile number, and automatically flags VoIP and virtual numbers.
- Original Carrier Lookup (charged per request): Identifies the network and line type assigned when this number was first issued. Useful for screening numbers registered as VoIP from the start. Will not catch a mobile number later ported to VoIP.
- Network Type Filter: Numbers on unselected network types will be flagged.
- Current Carrier Lookup (charged per request): Identifies the network and live line type currently serving this number, including any changes from porting.
- Geographic and Channel Filters: These filters restrict OTP delivery based on the geographic or network characteristics of the phone number.
- Country Allowlist: Provide ISO 3166-1 alpha-2 country codes (e.g., US, GB, DE). Only numbers associated with these countries will be permitted. Keep it empty to allow all countries.
- Choose which action to take if a destination number is flagged during verification checks:
- Block OTP: OTP is not delivered. You can view the failure reason in the Dashboard Tab > Recent OTP Activity > Description.
- Flag & Deliver: The OTP is delivered but flagged amber in the dashboard for further review. Use when you want visibility without blocking potentially legitimate users. You can view the status in the Dashboard Tab > Recent OTP Activity > Status.
- Log Only: The check result is logged, but no further action is taken. No flag is attached. Useful during initial rollout to understand your flag rate before committing to a block or flag policy. The OTP will be sent as usual. There will be no information visible in the Dashboard tab.
Layer 2: Fraud Defender During OTP
When a number successfully passes the Layer 1 checks (or if Identity Insights is disabled), the OTP is sent to Vonage Verify for delivery. At this stage, Fraud Defender takes over as an additional layer of protection.
Fraud Defender safeguards against SMS pumping, artificially inflated traffic (AIT), and traffic burst attacks. No action is needed to activate this feature. It is automatically applied to all OTP traffic processed through Vonage Verify.
Tier Selection
In the connector's configuration panel, Fraud Defender Advanced shows as Included, and is available at no additional cost for all Verify traffic. If you require Fraud Defender Premium, contact your Vonage Account Manager to enable it.
Important: Advanced protections such as AIT Protection and SMS Burst Protection are not automatically enabled. They require separate activation and configuration in the Vonage Dashboard. To set them up, follow the Fraud Defender onboarding guide.
Rate Limit
Set a maximum number of OTP requests per phone number within a 10-minute window. The default is 5 requests. This protects against repeated OTP requests targeting the same number. This functionality can be disabled if not needed.
Delivery
- Brand name: The brand name shown to recipients in the OTP message. Overrides the global brand name configured on the server.
- Preferred Template: This feature allows you to configure custom OTP message templates per language and per channel (SMS/Voice). Write your own OTP message using placeholders for the code and your brand. Set a preferred template which applies to every token on the instance; otherwise the standard Vonage template is used. To activate the feature, contact your Vonage Account Manager.
- SMS to Voice Fallback: Automatically retries via voice call if SMS delivery fails. This functionality can be disabled if not needed.
Record the Generated Token Details
Once the security policies have been set up and the token has been produced, make sure to record the generated token details. The token details will not be shown again, and this information is essential for the Okta setup in the Configure Okta step:
- Telephony Webhook URL
- Event Webhook URL
- Auth Header Name
- Token Secret
Configure Okta
After deploying the connector and generating the token, it’s time to set up Telephony Inline Hook and Event Hook in the Okta Admin Console with webhook URLs and token.
Configure the Telephony Inline Hook
Now, follow the below steps to configure the Telephony Inline Hook:
- Log into your Okta Admin Console.
- Navigate to Workflow > Inline Hooks. Click the Add Inline Hook, then select Telephony.
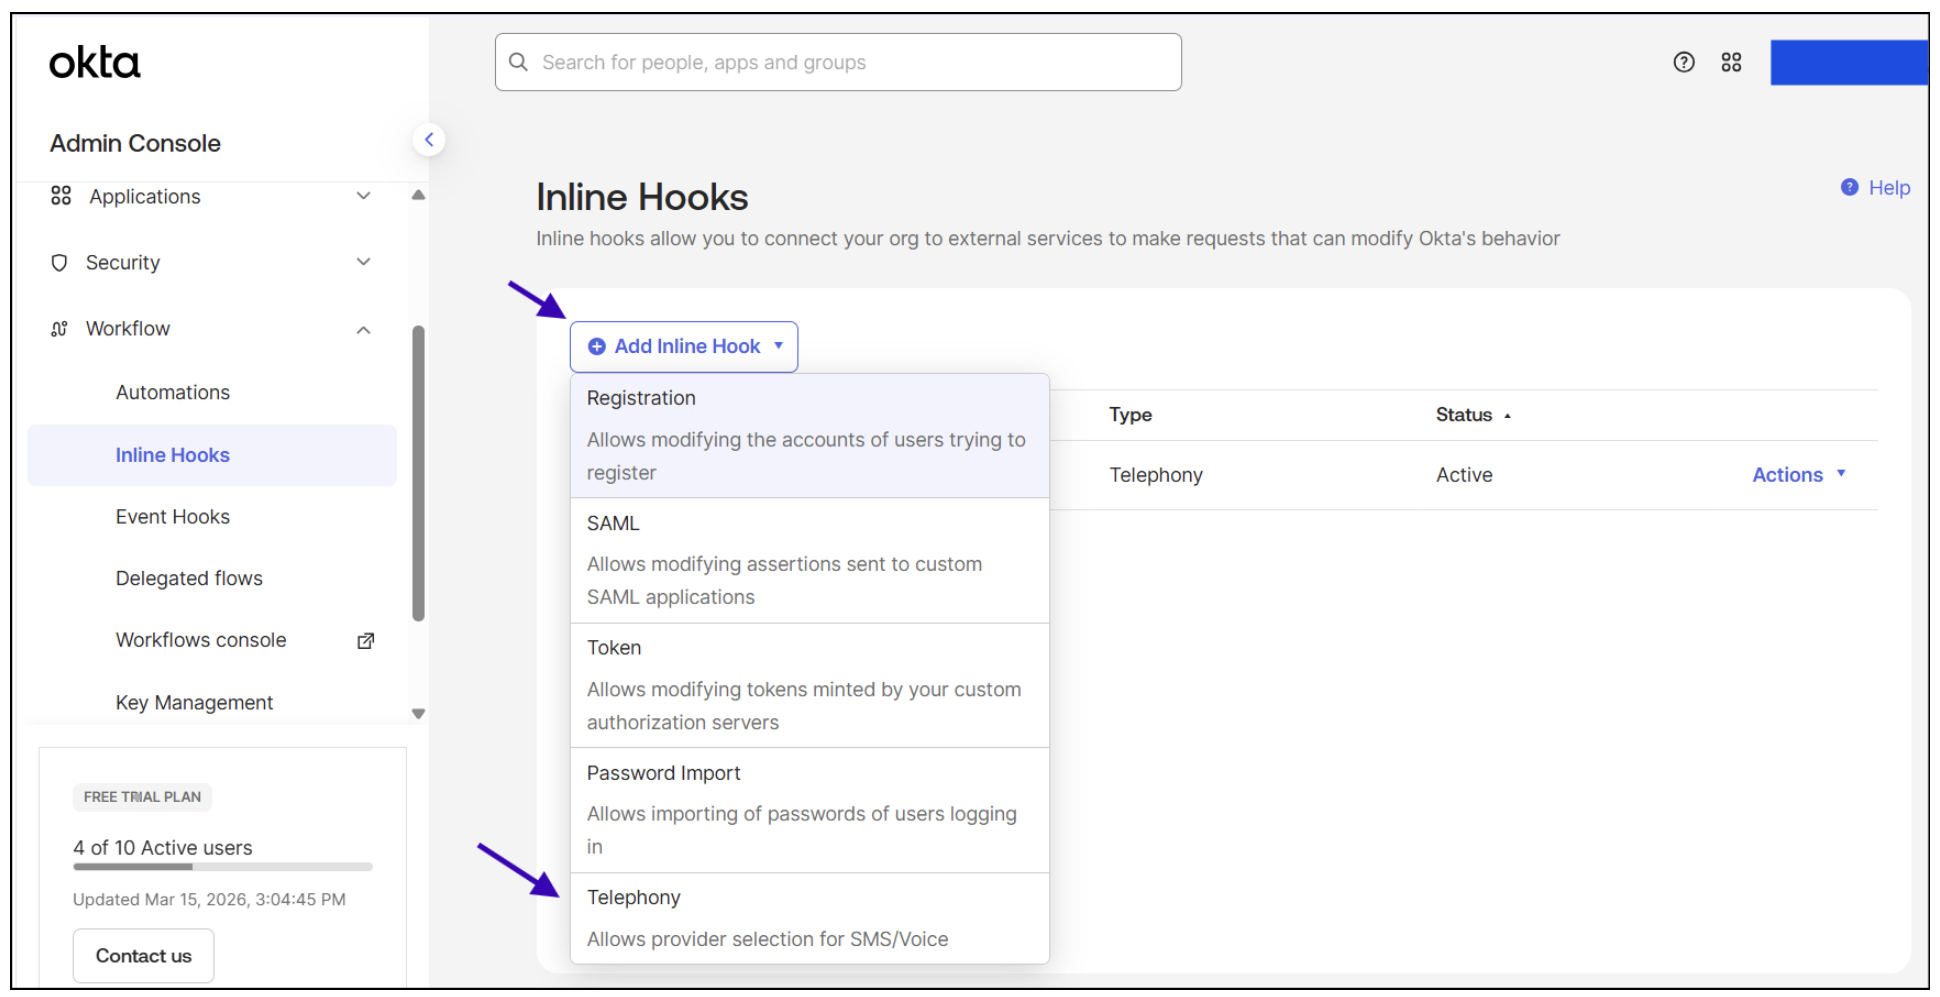
- Fill in the hook details:
- Name: Enter a name (e.g., "Vonage OTP").
- URL: Paste the Telephony Webhook URL from the generated token details.
- Authentication field: Paste the Auth Header Name from the generated token details.
- Authentication secret: Paste the Token Secret from the generated token details.
- Click Save.
Configure the Event Hook
Next, follow the below steps to configure the Event Hook:
- Navigate to Workflow > Event Hooks.
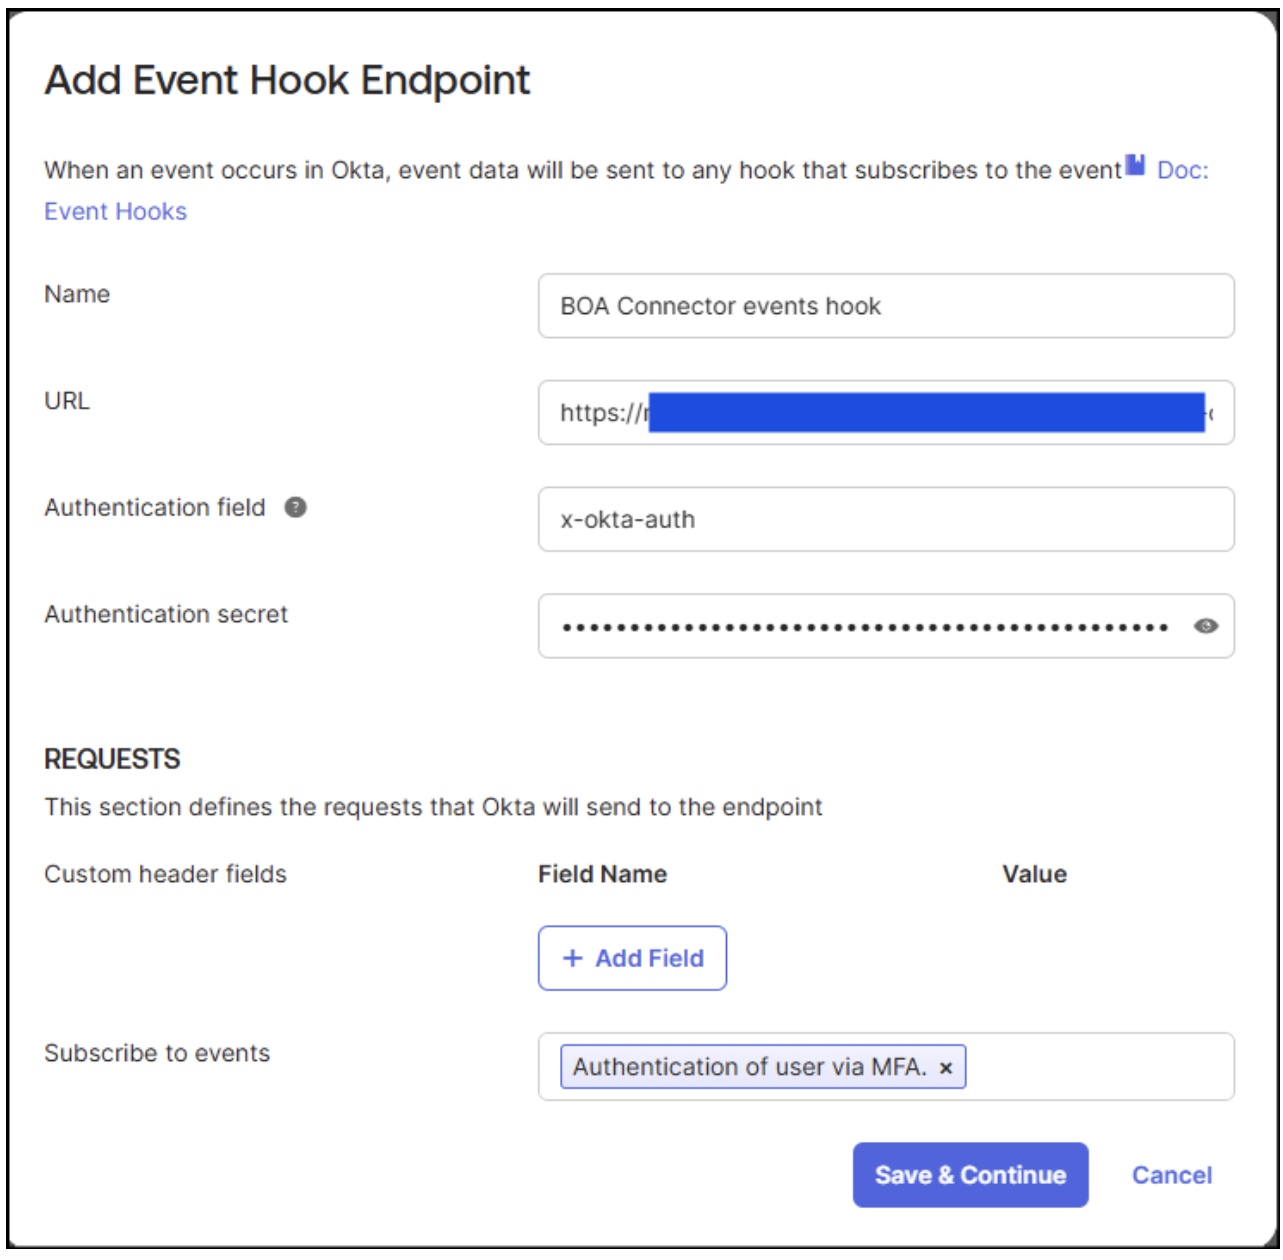
- Click the Create event Hook.
- Fill in the hook details:
- Name: Enter a name (e.g., "Vonage Events").
- URL: Paste the Event Webhook URL from the generated token details.
- Authentication field: Paste the Auth Header Name from the generated token details.
- Authentication secret: Paste the Token Secret from the generated token details.
- The Requests section defines the requests that Okta will send to the endpoint. Subscribe to the Authentication of user via MFA event.
- Click Save & Continue.
Verify Connectivity
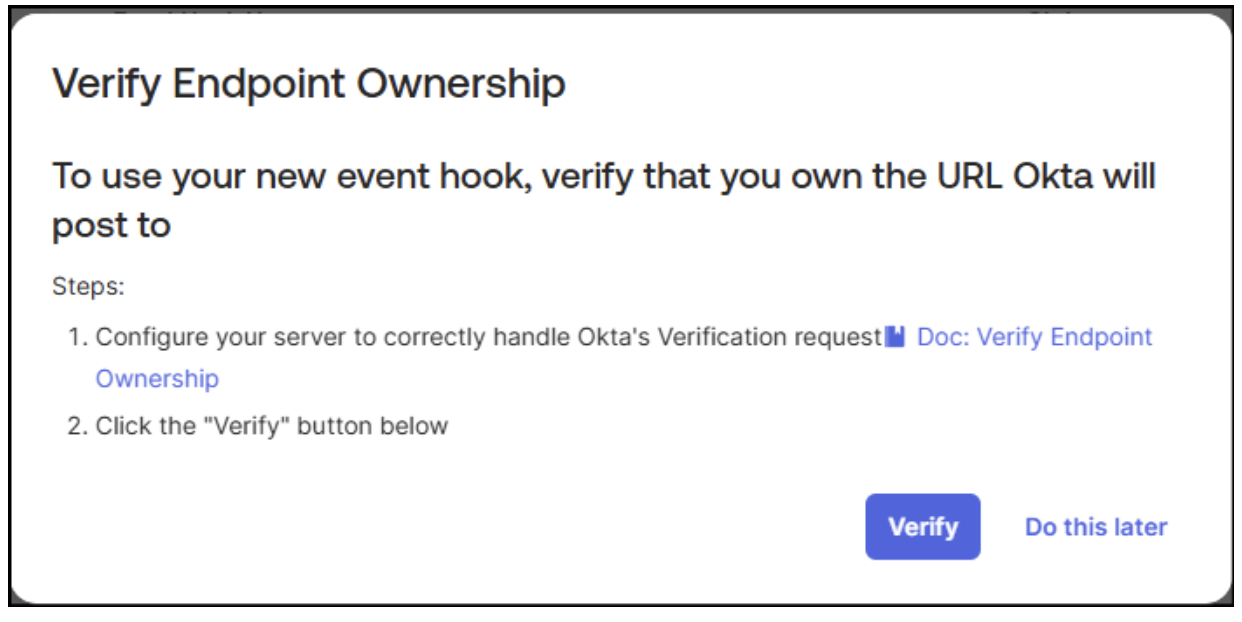
Now, it’s time to verify that the connection between Okta and the connector is active. To do that, we need to confirm both hooks show Active & Verified status in Okta Admin Console:
- Click the Verify button on the Verify Endpoint Ownership pop up that appears right after creating the Event Hook.
Test the Integration
You can test the integration using Okta's built-in preview tool following the steps:
- In the Okta Admin Console, navigate to Security > Authenticators > Setup > Phone to ensure that phone authentication is enabled in your Okta.
- Run the preview test:
- Navigate to Workflow > Inline Hooks.
- Find the telephony inline hook you created and click Actions > Preview.
- In Configure inline hook request:
- Enter a test user’s information:
data.userProfile(a user who has a phone as a valid authenticator). - Select
requestType(MFA enrollment, MFA verification, Account unlock, or Password reset).
- Enter a test user’s information:
- Click Generate request to build the JSON payload.
- Click Edit to modify the request if needed.
- Replace the default phone number (9876543210) with a real mobile number in E.164 format (e.g., +447700900000).
- Click View response to trigger the hook. A successful response will show status: SUCCESSFUL with the delivery duration.
Important: If the connection between Okta and Vonage fails, Okta will not generate an OTP. Check the connector logs and verify if the webhook URL and token are correct.
Managing and Rotating Your Authentication Token
The authentication token secures all communication between your Okta org and the Vonage connector. As a security best practice, you can rotate it at any time — either through the Vonage Admin Panel or programmatically via the Token Management API. When you rotate a token, a new one is issued immediately while the previous token remains valid for 24 hours, giving you time to update your Okta configuration without any interruption to OTP delivery.
Via Vonage Admin Panel
- Log in to the Vonage Admin Panel with your Vonage admin account.
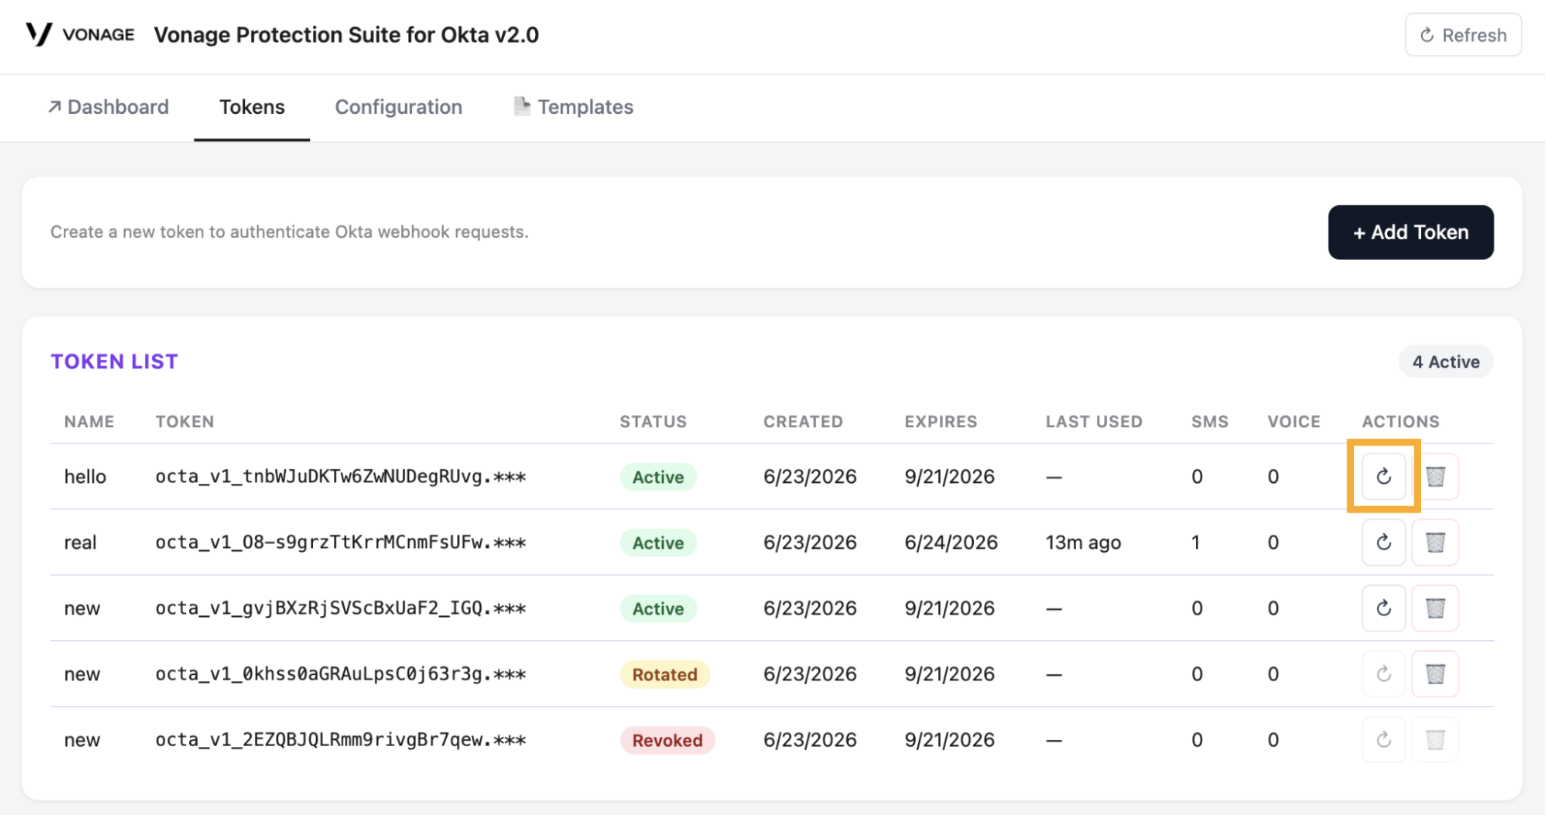
- Navigate to the Tokens tab and find the token you want to rotate.
- Click the Rotate button to rotate the token.
- Select Confirm to rotate the token.
- Your new token is displayed. Copy and save it immediately, as it is shown only once.
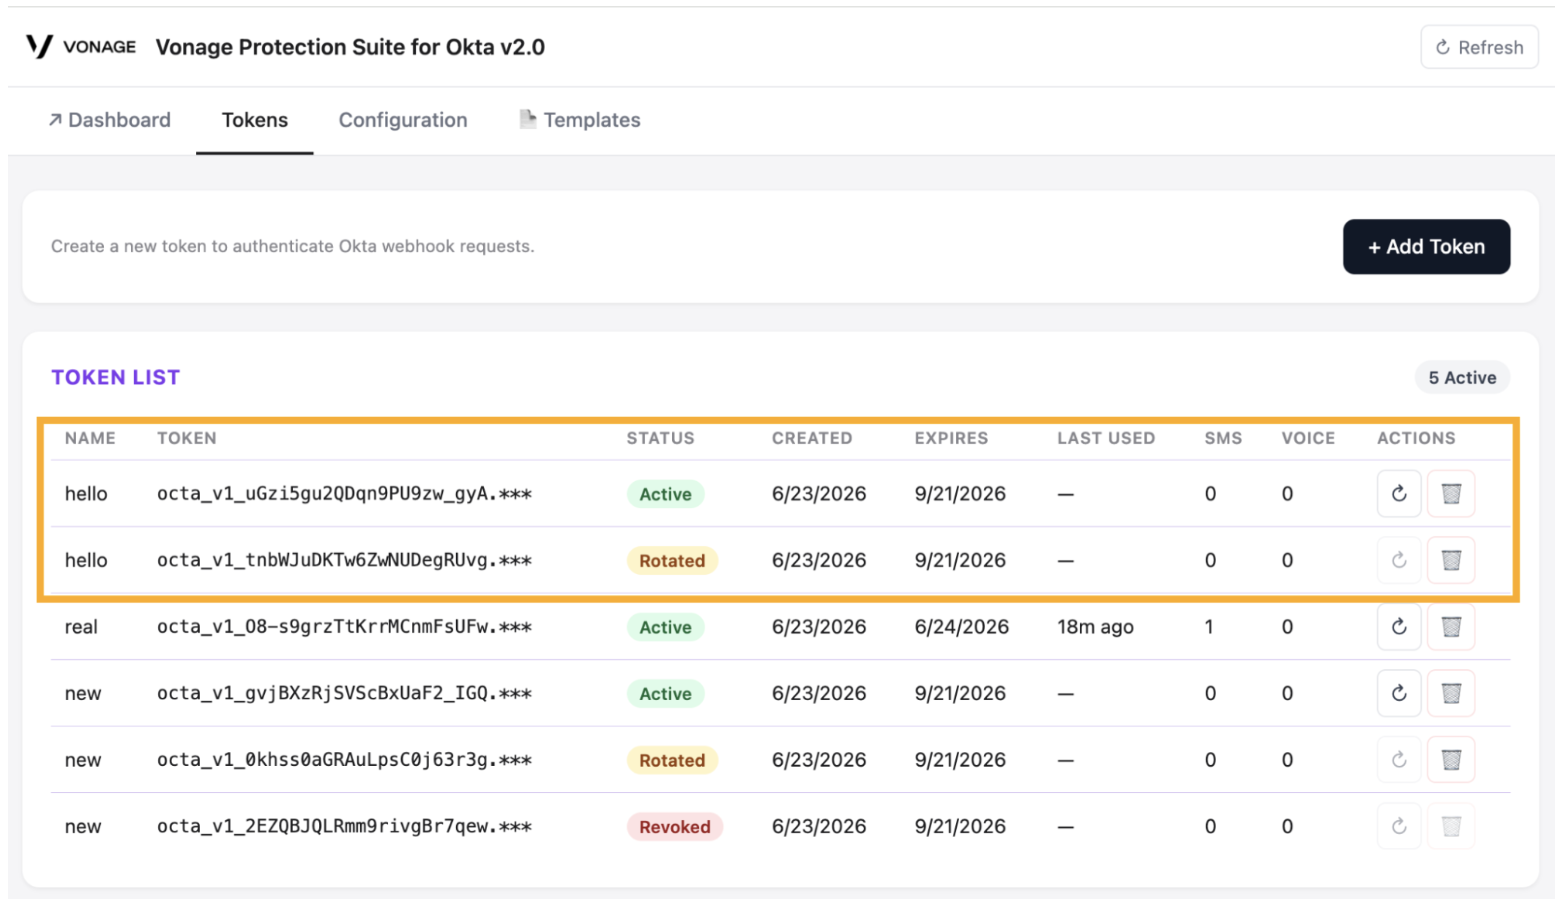
- The new token now appears as Active in the list. The old token is marked as Rotated and remains valid for the 24-hour grace period, after which it expires automatically.
Via API
An OpenAPI specification and Postman collection are available for reference in the Vonage Protection Suite for Okta User Guide > Step 6: Managing and Rotating Your Authentication Token > Rotate a token - via API.
Authentication
All API endpoints use HTTP Basic Auth. Include your credentials in every request. Encode your Vonage API Key and API Secret as a Base64 string:
Authorization: Basic base64(apiKey:apiSecret)
The API Key must be the same key associated with the connector instance.
Fetch the Token List
Before rotating a token, you need its UUID. Use the List Tokens endpoint to retrieve all active tokens and their IDs.
GET /admin/tokens
Returns a map of all tokens associated with the instance. Each entry includes the token's ID, status, claims, and usage counters.
Request
GET /admin/tokens
Authorization: Basic <credentials>
Response — 200 OK:
{
  "tokens": {
    "94c624db-d933-446c-be4d-bf35c0dbd13a": {
      "id": "94c624db-d933-446c-be4d-bf35c0dbd13a",
      "name": "Production Okta",
      "truncatedToken": "***",
      "expiresIn": "90d",
      "revoked": false,
      "revokedAt": null,
      "rotatedAt": null,
      "gracePeriodEnds": null,
      "createdAt": "2026-06-17T11:09:30.456Z",
      "expirationDate": "2026-09-15T11:09:30.000Z",
      "lastUsed": "2026-06-20T08:15:00.000Z",
      "smsSuccessCount": 0,
      "voiceSuccessCount": 0,
      "smsErrorCount": 0,
      "voiceErrorCount": 0,
      "smsBlockedCount": 0,
      "voiceBlockedCount": 0
    }
  }
}
Response Fields:
| Field | Type | Description |
|---|---|---|
| id | string (UUID) | Unique identifier for the token — used for rotation, revocation, and other management operations. |
| truncatedToken | string | Masked representation of the token value (full value is never shown after creation). |
| claims.expiresIn | string | Expiration duration the token was created with (e.g. 90d, 24h) |
| revoked | boolean | Whether the token has been revoked. |
| createdAt | string (ISO 8601) | Timestamp when the token was created. |
| expirationDate | string (ISO 8601) | Absolute date and time when the token expires. |
| smsSuccessCount | integer | Number of successful SMS OTP deliveries. |
| voiceSuccessCount | integer | Number of successful voice OTP deliveries. |
| smsErrorCount | integer | Number of failed SMS OTP attempts. |
| voiceErrorCount | integer | Number of failed voice OTP attempts. |
| smsBlockedCount | integer | Number of SMS OTPs blocked (e.g. by fraud rules). |
| voiceBlockedCount | integer | Number of voice OTPs blocked. |
Tip: Copy the id value of the token you want to rotate — you will need it in the next step. Note that when a new token is generated, it always receives a new id.
Rotate the Token
Token rotation issues a new token with the same claims and a fresh timestamp, and begins the 24hr grace period for the previous token, after which it is invalidated.
POST /admin/rotate-token
Request:
POST /admin/rotate-token
Authorization: Basic <credentials>
Content-Type: application/json

{
  "id": "3152b2c3-00b7-4900-b79c-77cfb2663b21"
}
Request body:
| Field | Type | Required | Description |
|---|---|---|---|
| id | string (UUID) | Yes | The UUID of the token to rotate. Obtain this from GET /admin/tokens. |
Response — 200 OK:
{
  "newToken": "<token>",
  "newId": "<uuid>",
  "webhookUrl": "https://<instance-url>/...",
  "authHeaderName": "x-okta-auth"
}
Response Fields:
| Field | Type | Description |
|---|---|---|
| newToken | string | The new signed token. |
| newId | string (UUID) | UUID identifier for the newly issued token. |
| webhookUrl | string | Webhook URL to (re-)configure in Okta |
| authHeaderName | string | HTTP header name used to pass the token in requests (e.g. x-okta-auth) |
Important: Save the new token immediately. The newToken value is only returned once at rotation time and cannot be retrieved again. Store it securely (e.g. in a secrets manager or Okta webhook configuration) before closing this response. Also, record the new ID. The newId returned in the response is the identifier you will need for all future management operations on this token — including subsequent rotations and revocation. Note it down alongside the token.
Update Okta (After Rotation)
After rotating the token, update both Okta hooks with the new credentials:
- In the Okta Admin Console, go to Workflow > Inline Hooks, open the Telephony Hook, click Actions > Edit, and update:
- Authentication field -
authHeaderNamevalue (default:x-okta-auth) - Authentication secret - new
newTokenvalue
- Go to Workflow > Event Hooks, open the Event Hook, and update:
- Authentication field -
authHeaderNamevalue (default:x-okta-auth) - Authentication secret - new
newTokenvalue
Warning: If you do not update Okta before the 24-hour grace period expires, OTP delivery will fail.
Troubleshooting
Quick Checks
Before tracing the full flow, verify the following:
Credentials: Confirm that the Telephony Webhook URL, Event Webhook URL, Auth Header Name, and Token Secret in Okta exactly match the values from the token generation details.
Hook status: In the Okta Admin Console, navigate to Workflow > Inline Hooks and confirm the hook status is Active and Verified.
Dashboard: Check the connector's Dashboard tab for recent OTP activity. Look for FAILED or FLAGGED events and click the description icon for error details.
Identity Insights: If OTPs are being blocked, check whether Identity Insights is flagging the destination number. Consider adjusting the When number is flagged action to Block > Flag and Deliver or Only Log for testing.
Phone authenticator: Confirm phone authentication is enabled in Okta: Okta Admin Console > Security > Authenticators > Setup > Phone.
Trace the Issue Step By Step
If something is not working as expected, trace the issue through the following stages:
- Okta sends the request: Check the Okta Admin Console > Reports > System Log for the hook call, target URL, and request status.
- Connector processes the request: Check Vonage Cloud Runtime > Instances > Your Instance > Logs for the incoming request, Identity Insights result, and Verify API call.
- OTP delivered: Check Vonage Dashboard > Message Logs for message status, channel, sender ID, error codes, and any Fraud Defender blocks.
- Auth event received: Check Connector Admin Dashboard > Recent Auth Events for event received, event type, factor, outcome, and token match.
- Conversion recorded: Check Vonage Dashboard > Verify Logs for converted status, conversion fee, and missing conversion.
Connector Error Codes & Identity Insights Sub-Codes
For a full list of connector error codes and Identity Insights sub-codes, see the Vonage Protection Suite for Okta User Guide.
Need Help?
If you are unable to resolve the issue using the Troubleshooting section above, contact Vonage Help Center. When submitting a request, select the form titled Using Vonage Connectors and then select your connector > Using Vonage Protection Suite for Okta so the ticket is routed directly to the Okta Connector support group. Include your API Key (account ID only, not secret), the Inline Hook event ID from the Okta System Log, and any relevant screenshots or logs to help with faster resolution.