Use Python and Flask to Manage Queues via SMS
While many human experiences can be improved with the application of technology, there is one clearly ripe for a modern solution: waiting in line. Whether you plan to renew your driver’s license or get a seat at a popular brunch spot, time spent crammed into waiting rooms with strangers is something you’d likely be happy to avoid. Fortunately, the ubiquity of cell phones means new text and web-based queue systems are becoming more common—send a text to reserve your place in line, check in for status updates, and get notified when you’ve reached the front of the line.
In this tutorial, I’ll be showing you how to use Python and the Flask framework to build a simple SMS queue management system. There are three main components:
A backend to respond to text messages and take appropriate action
A status page that can be accessed via the web or displayed at a kiosk
A management page that lists those in line and allows them to be notified or removed
To keep things simple, this application will only handle the most basic functions, but the skeleton it provides should make it easy to build out a robust system to fit your needs.
To get started, create and navigate to a new directory for the project:
If you’d prefer to start with the final code, you can clone the sample project from the Nexmo Community GitHub:
Once you are in your project directory, create and activate a virtual environment:
The virtual environment helps you manage and isolate your project dependencies. To install the necessary dependencies for this project, you’ll need to have a requirements.txt file. If you’ve cloned the sample repo you’re already set, but if you’re building from scratch your file should look like this:
Flask==1.1.1
Flask-SQLAlchemy==2.4.1
nexmo==2.4.0To install these dependencies, run the following in your project directory:
Before your application can run properly, you’ll need to set up a database to store information about the people waiting in line. Because the data storage requirements for this project are relatively simple, you’ll be using Python’s built-in database, SQLite. You’ll be managing your database with Flask-SQLAlchemy, which provides a layer on top of the database so you can make queries with simple functions rather than writing SQL.
If you haven’t downloaded the code from the sample repo, create a new file named main.py, containing the following:
from flask import Flask, render_template, request, Response
from flask_sqlalchemy import SQLAlchemy

db_path = "sqlite:///queue.db"

app = Flask(__name__)
app.config["SQLALCHEMY_DATABASE_URI"] = db_path

db = SQLAlchemy(app)

class User(db.Model):
    phone_number = db.Column(db.String, unique=True, nullable=False, primary_key=True)
    notified = db.Column(db.Integer)
    join_time = db.Column(db.DateTime)
    wait_time = db.Column(db.Integer)

if __name__ == '__main__':
app.run(debug=True, threaded=True)This script sets up your Flask application and basic database configuration, including defining a name and location for the database, as well as defining the names and datatypes of the columns within the database. Once you have this or the sample main.py, start up Python in interactive mode:
Then run the following commands to set up your database:
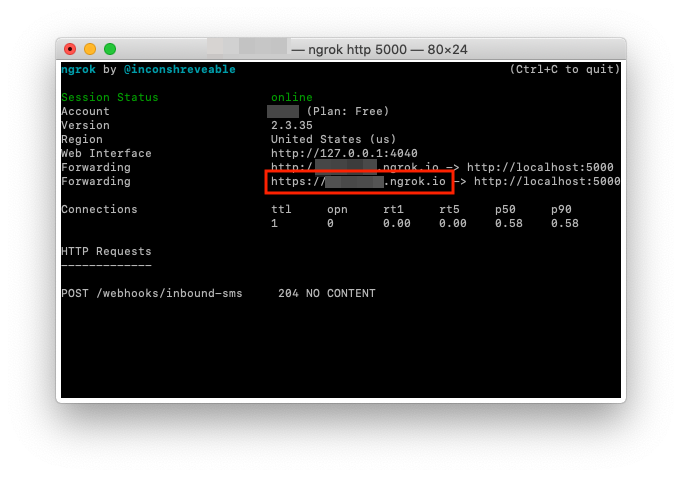
Now that you have a database ready to go, you’ll need to do some basic setup to use Nexmo for sending and receiving text messages. As a first step, make sure you have ngrok installed and running on port 5000:
When ngrok is running, you'll be presented with a URL to use for forwarding to your local server. Make a note of this URL, as you will use it soon:
On the main page of your Nexmo Dashboard, locate your Key and Secret:

Copy these and put them near the top of your main.py file as follows:
NEXMO_KEY = "<Your Nexmo Key>"
NEXMO_SECRET = "<Your Nexmo Secret>"
Then, add this line:
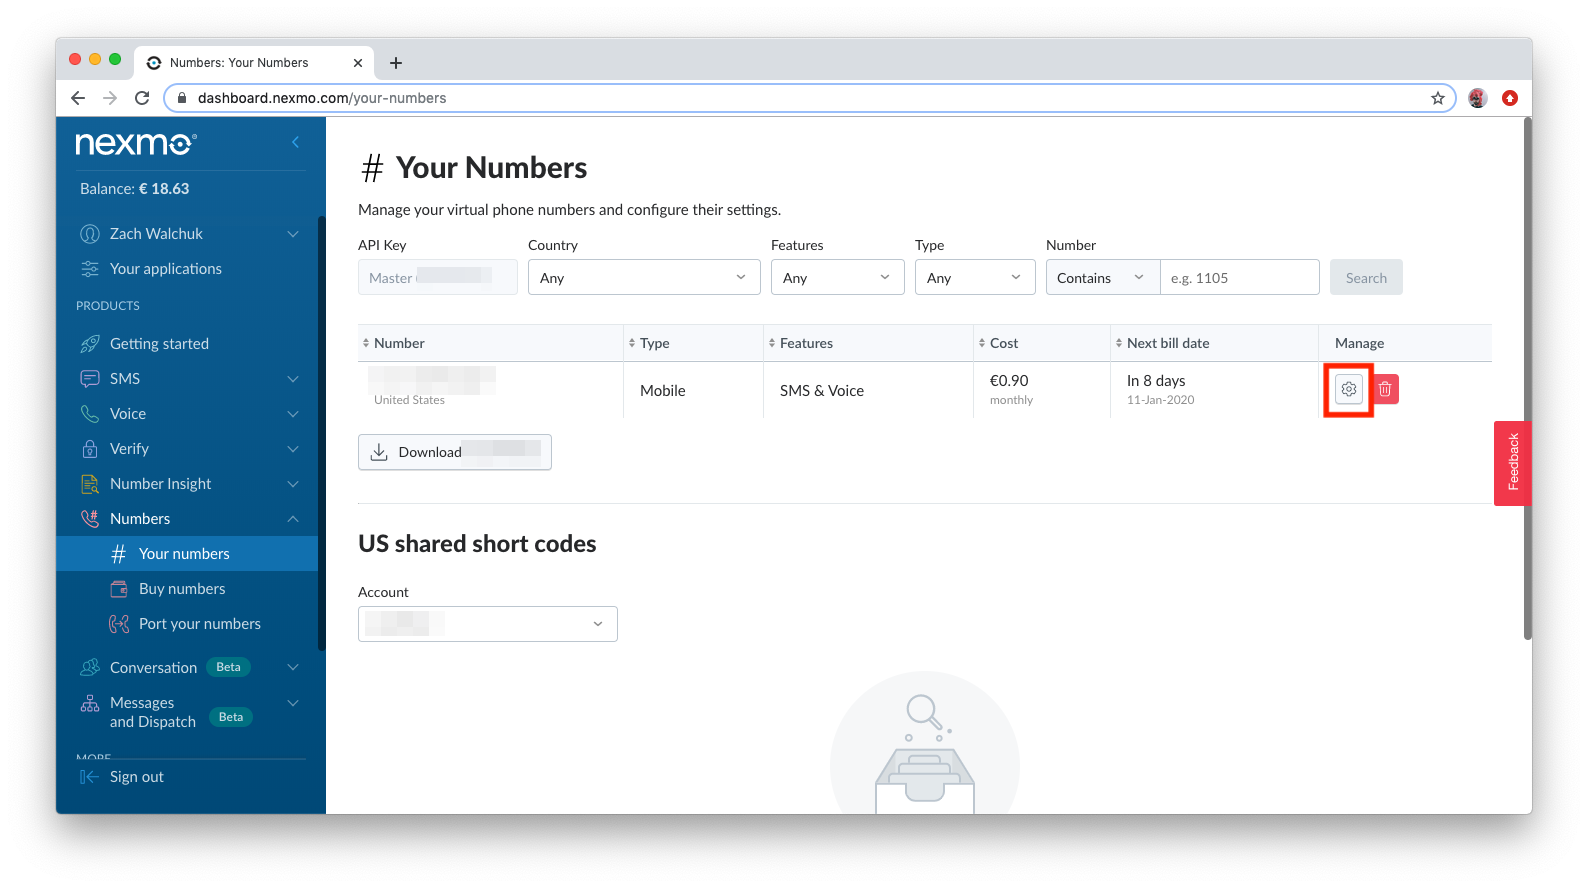
client = nexmo.Client(key=NEXMO_KEY, secret=NEXMO_SECRET)Back at the dashboard, navigate to Numbers -> Your numbers (if don’t have a number yet, go to Numbers -> Buy numbers first). Hover over your number until you see the Copy button. Click this, then paste the number in main.py like so:
NEXMO_NUMBER = "<Your Nexmo Number>"
While you're here, click on the gear icon under the Manage column:
In the Inbound Webhook URL field, enter the following, using the ngrok URL you gathered earlier:
<Your ngrok URL>/webhooks/inbound-sms
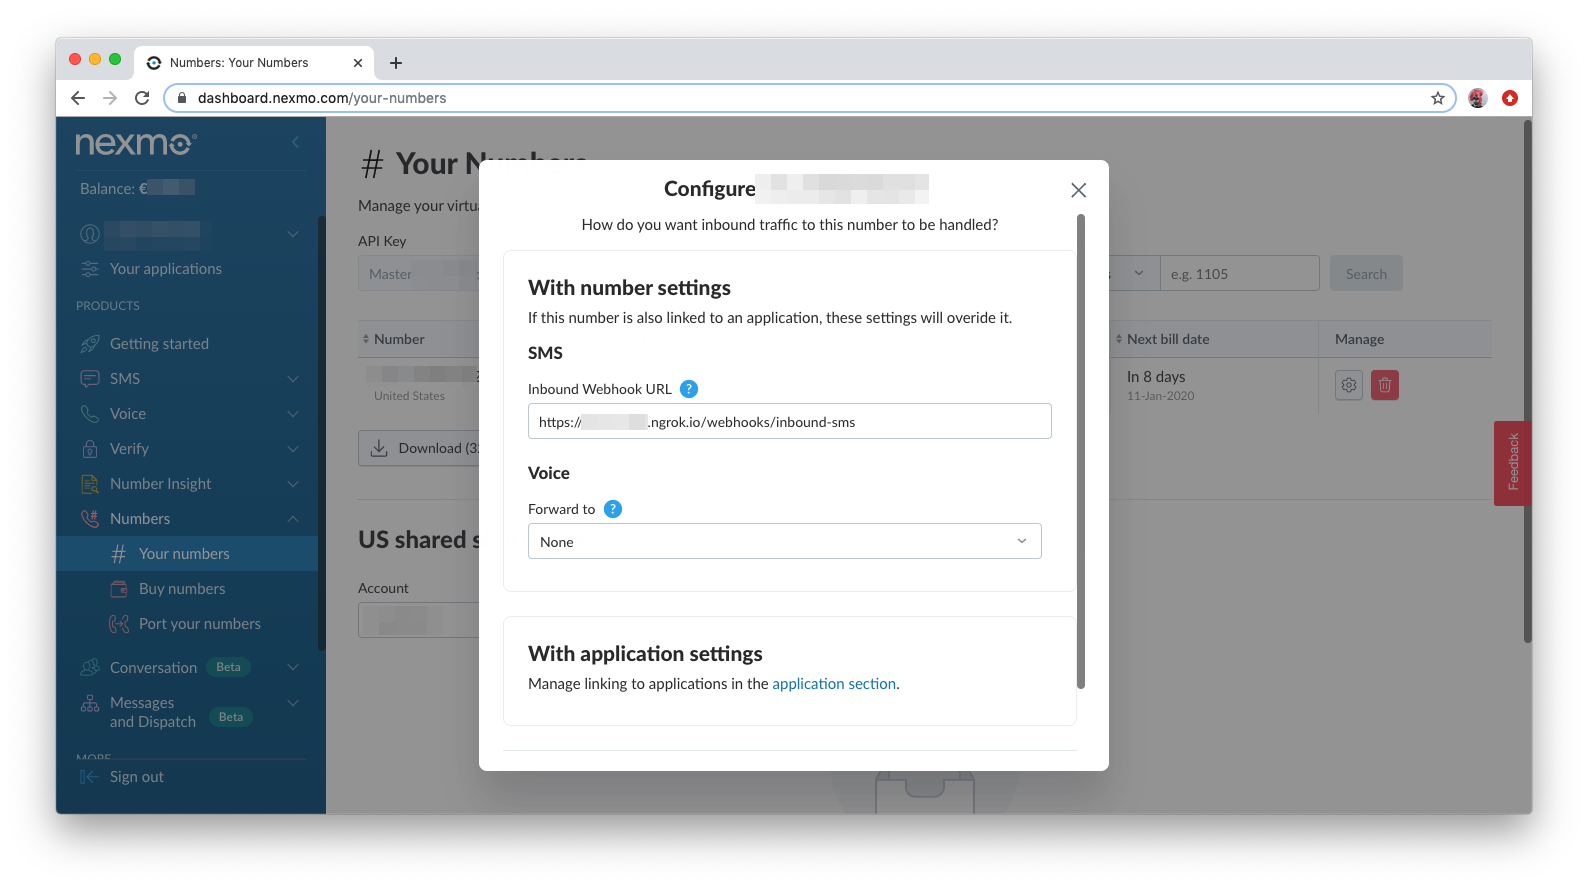
Save this setting.
If you are working from the sample repo, you now have everything you need to run the application. Enter the following in the terminal to kick off your development server:
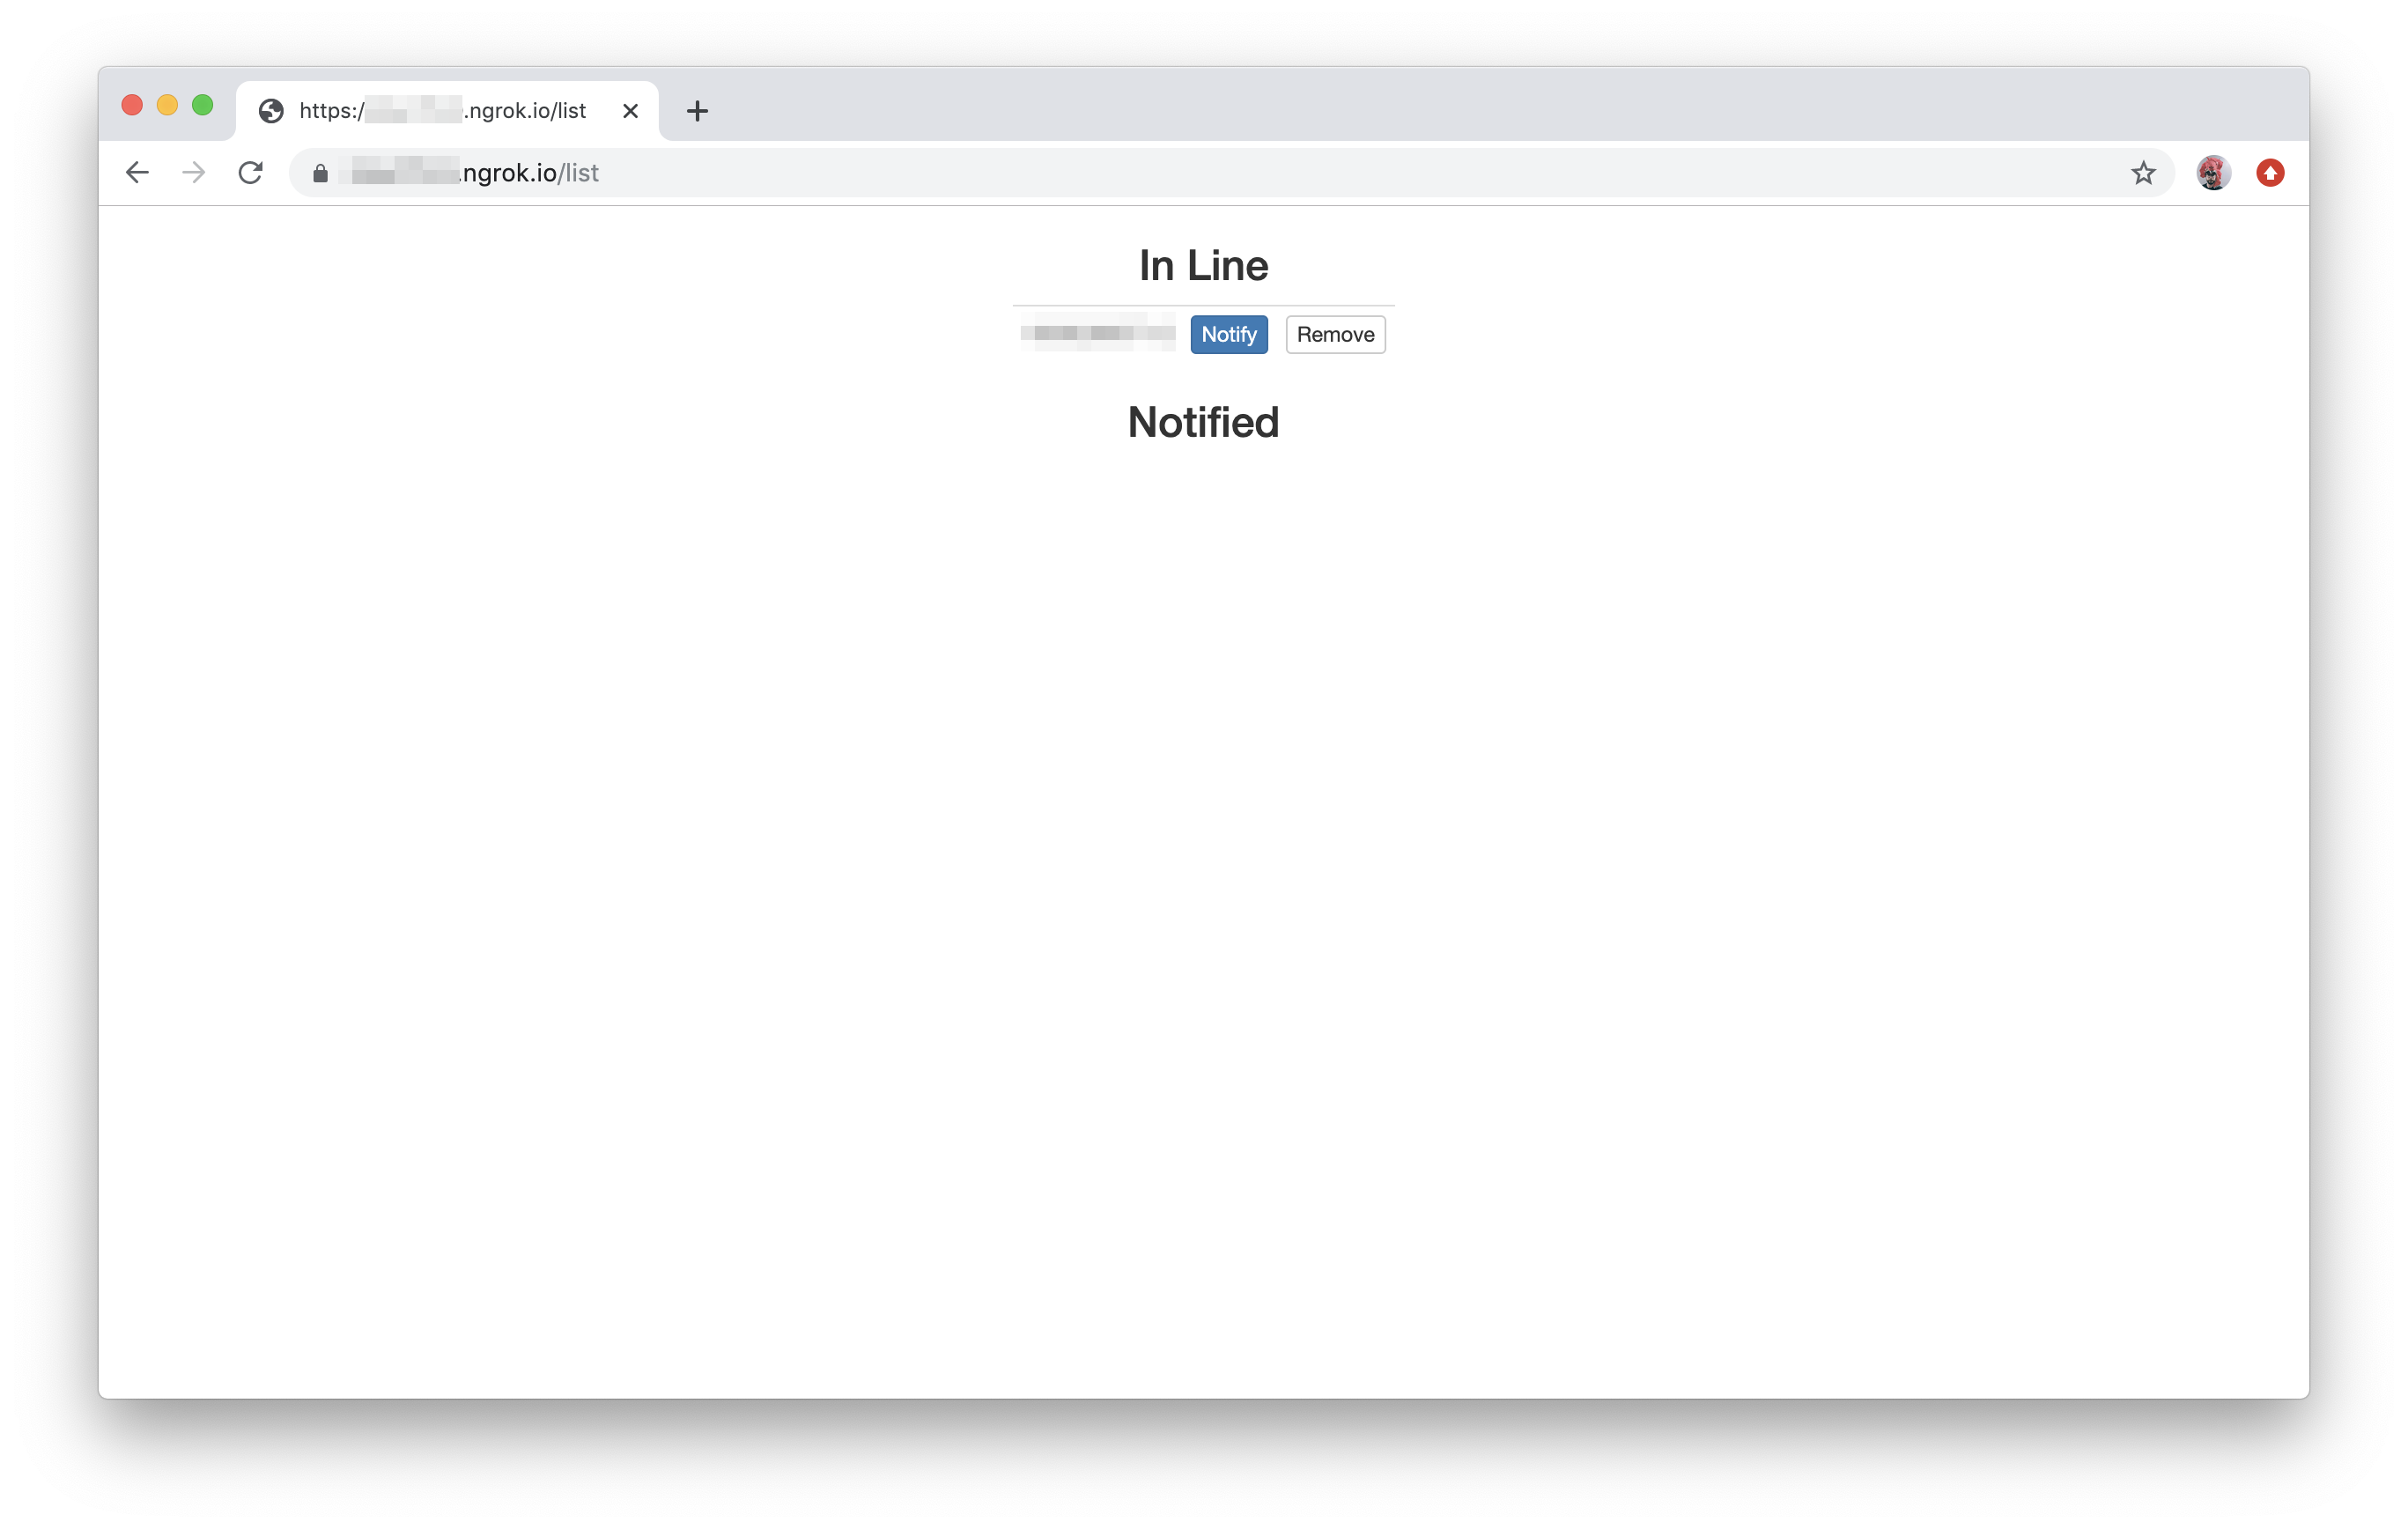
In a browser, navigate to your ngrok URL to see the status view, or go to <ngrok url>/list to see the management view. Then text 'Hi' to the number you've configured to add yourself to the list!
For those building from scratch, let's move on to creating your backend logic.
The backend structure for this application is relatively simple. You will create four routes—two associated with the frontend views, one webhook for receiving inbound SMS messages, and one stream to publish server-sent events. In addition to the routes, you'll need a set of functions that perform actions based on the messages received and other user input. Finally, you'll have a few helper functions to manage database queries and format text.
Let's start with the routes for the views. Add the following to main.py after the section where you initialize the database and before if __name__ == '__main__':
@app.route('/')
def index():
    return render_template('index.html', length=query_length(), number=phone_format(NEXMO_NUMBER))

@app.route('/list', methods=('GET', 'POST'))
def list():
    if request.method == 'POST':
        if 'notify' in request.form:
            notify(request.form['notify'])
        elif 'remove' in request.form:
            remove(request.form['remove'])
        elif 'arrived' in request.form:
            remove(request.form['arrived'])
    users = query_users()
return render_template('list.html', users=users)The index route is straightforward—when someone visits the site, they will see the contents of the index.html page (yet to be created), which will include information about the line length and the phone number to be called (helped by functions you'll be writing soon).
The list route has a little more information, as this page will allow for input. If the page is viewed (a GET request), the visitor will see the contents of list.html, complete with user information (phone numbers of people in line). If a POST request is made to this route via the form on the page, information from the request will be used to determine what button has been pressed. The notify, remove, and query_users functions will be defined shortly.
Now that you have these routes defined, it's time to add the webhook route:
@app.route('/webhooks/inbound-sms', methods=('GET', 'POST'))
def inbound_sms():
    if request.is_json:
        message = request.get(json())
    else:
        message = dict(request.form) or dict(request.args)
    num = message['msisdn']
    text = message['text'].lower()
    map = {
        "hi": add,
        "cancel": remove,
        "status": status,
        "help": help
    }
    action = map.get(text)
    if action:
        action(num)
    else:
        send(num, "Could not understand. Please try again")
return ('', 204)You may recognize this route from the configuration step earlier. When Nexmo gets an SMS message at the number you've configured with this webhook, you will get a request object containing the contents of the message and information about the sender. For our purposes, we pull out the sender's phone number and the text of the message, mapping the text to the appropriate action functions. If we cannot parse the message, we let the sender know so they can try again.
Before you create the final route, let's define our helper and action functions. Include the following in main.py after the route definitions:
def phone_format(num):
    return format(int(num[:-1]), ",").replace(",", "-") + num[-1]

def query_length():
    return User.query.filter(User.notified == 0).count()

def query_users():
    users_waiting = []
    users_notified = []
    for result in User.query.all():
        if result.notified == 0:
            time_diff = datetime.now() - result.join_time
            wait_time = divmod(time_diff.seconds, 60)[0]
            user = {"phone_number": str(result.phone_number), "wait_time": wait_time}
            users_waiting.append(user)
        else:
            wait_time = result.wait_time
            user = {"phone_number": str(result.phone_number), "wait_time": wait_time}
            users_notified.append(user)
    users = {"waiting": users_waiting, "notified": users_notified}
    return users

def send(num, text):
    response = client.send_message({'from': NEXMO_NUMBER, 'to': num, 'text': text})
    response = response['messages'][0]
    if response['status'] == '0':
        print('Sent message', response['message-id'])
    else:
        print('Error:', response['error-text'])
returnThese helper functions perform as follows:
phone_format: Split the configured phone number with hyphens for display purposes.query_length: Query the database to see how many people are waiting in line.query_users: Query the database for all users, and format the result such that those waiting in line and those that have already been notified are grouped separately.send: Send an SMS message with the number and text provided.
Next, add these action functions:
def add(num):
    if User.query.get(num):
        send(num, "Hello again!")
        status(num)
    else:
        user = User(phone_number=num, notified=0, join_time=datetime.now())
        db.session.add(user)
        db.session.commit()
        send(num, "You've been added to the list")
        help(num)
    return

def remove(num):
    user = User.query.get(num)
    if user:
        db.session.delete(user)
        db.session.commit()
        send(num, "You've been removed from the list")
    else:
        print("User not found")
    return

def notify(num):
    user = User.query.get(num)
    if user.notified == 0:
        send(num, "Your turn")
        user.notified = 1
        time_diff = datetime.now() - user.join_time
        user.wait_time = divmod(time_diff.seconds, 60)[0]
        db.session.commit()
    else:
        print("User already notified")
    return

def status(num):
    user = User.query.get(num)
    if not user:
        send(num, "Not in line")
    elif user.notified == 1:
        send(num, "Notified")
    else:
        users = query_users()
        users_sorted = sorted(users["waiting"], key = lambda i: i['wait_time'], reverse = True)
        i = 0
        while i < len(users_sorted):
            if users_sorted[i]["phone_number"] == num:
                i += 1
                break
            i += 1
        send(num, "Number " + str(i) + " of " + str(len(users_sorted)) + " in line")
    return

def help(num):
    send(num, "For updates, text 'status'nTo remove yourself from the list, text 'cancel'")
    return
To summarize:
add: Adds a new user when 'Hi' is sent. Will also return the user's status if they are already in line.remove: Removes a user from the list. Can be triggered from a button on the management page or if the user texts 'cancel'.notify: Lets the user know it is their turn. Triggered from a button on the management page. Also calculates the total wait time for that user and stores in the database.status: Tells the user what place they are in line.help: Provides basic information about commands the user can send.
With those routes and functions defined, you have almost everything you need for a complete backend. The fourth and final route gives us a way to dynamically update the views based on messages from the server, which is useful when people are added and removed from the list via SMS:
@app.route("/stream")
def stream():
    def eventStream():
        line_length = query_length()
        yield "data: {}nn".format(json.dumps(query_users()))
        while True:
            new_line_length = query_length()
            if new_line_length != line_length:
                line_length = new_line_length
                yield "data: {}nn".format(json.dumps(query_users()))
            time.sleep(1)
return Response(eventStream(), mimetype="text/event-stream")This route functions differently than the previous ones. After it is initially called by the client, the function continues running until the server shuts down. This allows it to maintain a connection with the client, pushing updates whenever the number of people in line changes.
Now that you have all the backend pieces, it's time to create the views!
You have two views to create: one for the status page and one for the management page. Start by creating a new directory, templates, and a new file within that directory, index.html. In that file put the following:
<!DOCTYPE html>
<html>

<head>
  <link rel="stylesheet" href="https://stackpath.bootstrapcdn.com/bootstrap/3.4.1/css/bootstrap.min.css" integrity="sha384-HSMxcRTRxnN+Bdg0JdbxYKrThecOKuH5zCYotlSAcp1+c8xmyTe9GYg1l9a69psu" crossorigin="anonymous">
</head>

<body>
  <div class="container-fluid center-block text-center">
    <div class="row">
      <div class="col-lg-12">
        <p id="line_length"  style="font-size: 20vh">{{ length }}</p>
        <p style="font-size: 5vh">in line</p>
      </div>
    <div class="row">
      <div class="col-lg-12" style="height: 20vh">
    </div>
    <div class="row">
      <div class="col-lg-12">
        <p class="lead" style="font-size: 7vh">Text <b>Hi</b> to <b>{{ number }}</b> to be added</p>
      </div>
    </div>
  </div>
</body>
<script>
    var targetContainer = document.getElementById("line_length");
    var eventSource = new EventSource("/stream");
    eventSource.onmessage = function(e) {
      var users = JSON.parse(e.data)
        targetContainer.innerHTML = users.waiting.length;
    };
</script>
<noscript>
    <meta http-equiv="refresh" content="30">
</noscript>

</html>
A few things to note here. First, you'll see we're using Bootstrap to provide some basic styling. You can read more about using Bootstrap in one of our posts from a few weeks ago. Second, notice the {{ length }} and {{ number }} fields where we get input from the backend when the template is rendered. Finally, see the short Javascript snippet at the end—this connects to our stream endpoint and processes server-sent events, updating the number of users in line dynamically.
There's also a short noscript section, which is set to refresh the page every thirty seconds if Javascript has been disabled. The way this application has been set up, it will still be able to function properly without Javascript, it just won't update quite as instantly.
For the management page, create a new file list.html and include the following:
<!DOCTYPE html>
<html>
    <head>
        <link rel="stylesheet" href="https://stackpath.bootstrapcdn.com/bootstrap/3.4.1/css/bootstrap.min.css" integrity="sha384-HSMxcRTRxnN+Bdg0JdbxYKrThecOKuH5zCYotlSAcp1+c8xmyTe9GYg1l9a69psu" crossorigin="anonymous">
    </head>

    <body>
        <form method="POST" class="center-block text-center" style="width: fit-content">
            <h3>In Line</h3>
            <table id="notified" class="table table-condensed">
            {% for user in users.waiting %}
                <tr>
                    <td>{{ user.phone_number }}</td>
                    <td><button name="notify" value="{{ user.phone_number }}" class="btn btn-primary btn-xs" type="submit">Notify</button></td>
                    <td><button name="remove" value="{{ user.phone_number }}" class="btn btn-default btn-xs" type="submit">Remove</button></td>
                </tr>
            {% endfor %}
            </table>
            <h3>Notified</h3>
            <table class="table table-condensed">
            {% for user in users.notified %}
                <tr>
                    <td>{{ user.phone_number }}</td>
                    <td><button name="arrived" value="{{ user.phone_number }}" class="btn btn-primary btn-xs" type="submit">Arrived</button></td>
                </tr>
            {% endfor %}
            </table>
        </form>
    </body>

    <script>
        var targetContainer = document.getElementById("notified");
        var eventSource = new EventSource("/stream");
        eventSource.onmessage = function(e) {
            var user;
            var users = JSON.parse(e.data);
            users = users.waiting.sort((a, b) => (a.wait_time < b.wait_time) ? 1 : -1)
            var user_table = '';
            for (user of users){
                user_table = user_table + '<tr>'
                + '<td>' + user.phone_number + '</td>'
                + '<td><button name="notify" value="' + user.phone_number + '" class="btn btn-primary btn-xs" type="submit">Notify</button></td>'
                + '<td><button name="remove" value="' + user.phone_number + '" class="btn btn-default btn-xs" type="submit">Remove</button></td>'
                + '</tr>'
            }
            targetContainer.innerHTML = user_table;
        };
    </script>
    <noscript>
        <meta http-equiv="refresh" content="30">
    </noscript>

</html>
On this page, you'll notice there's a form, which is used to submit data based on buttons being pressed. Also, like the status page, this one includes some Javascript for processing server-sent events, but will also continue to work properly if Javascript has been disabled.
With the backend and frontend complete, you can now run your application! As mentioned earlier, this is done with:
In a browser, navigate to your ngrok URL to see the status view:
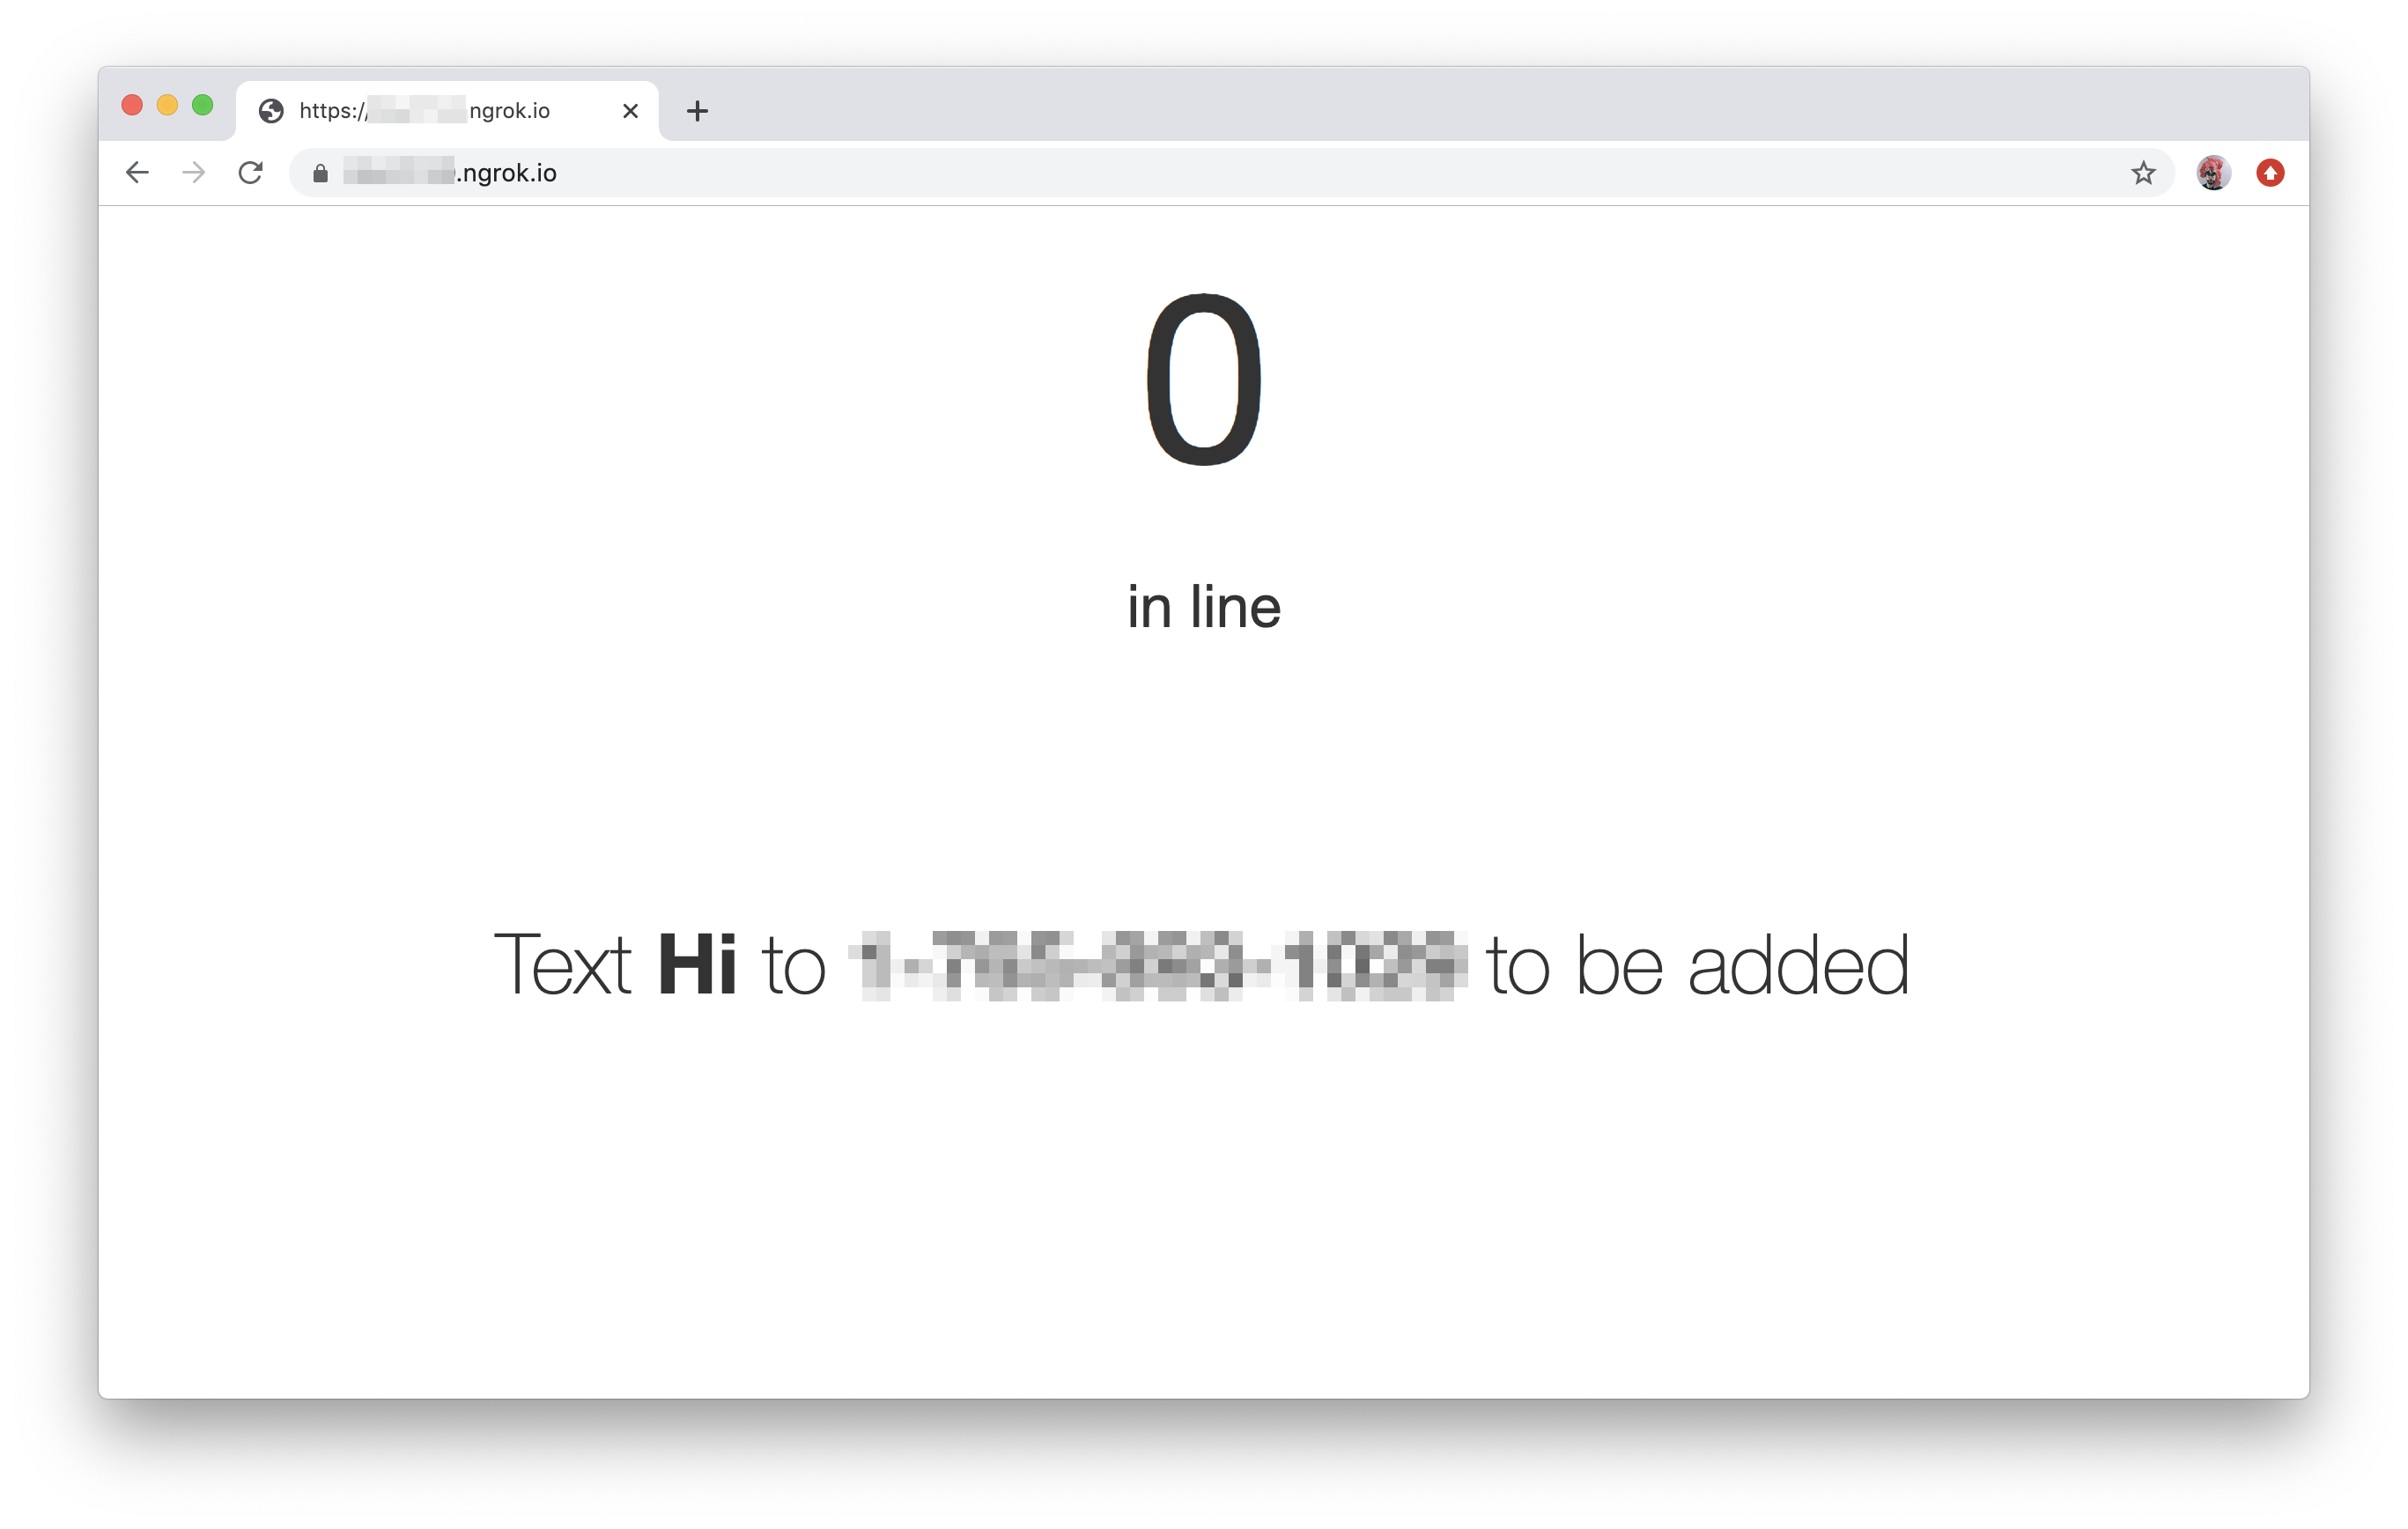
Go to <ngrok url>/list to see the management view. Then text 'Hi' to the number you've configured to add yourself to the list!
There are a number of ways this application could be enhanced to provide a more robust experience. The most obvious is to include an estimated wait time in the status updates. Wait times for those in line are already calculated and used to sort the list, so all you would need to do is settle on your preferred algorithm for making estimates. Another idea would be to support more options than SMS, such as Facebook Messenger or WhatsApp. If you'd like to take that route, be sure to check out Nexmo's Messages API.
If you run into any issues or have questions, reach out to us on our Community Slack. Thanks for reading!