Share:
A trained actor with a dissertation on standup comedy, I came into PHP development via the meetup scene. You can find me speaking and writing on tech, or playing/buying odd records from my vinyl collection.
Toot with Laravel, Vonage and Mastodon
Time to read: 12 minutes
You may have heard of Mastodon in recent months, given changes that are happening within the world of Social Media, but what is it, and what can I do with it?
In this article, I'm going to use Vonage, Laravel, and Expose to receive an incoming SMS sent from your phone to 'toot' it out on a Mastodon account.
Mastodon is a Social Media platform that is open source. In terms of its behaviour and UI, it's very similar to Twitter (the equivlent to a "tweet" is a "toot", for instance). There are, however, major differences; I've mentioned that it's open source, but it also works as a "decentralised" network. This aspect of it is what makes it unique: the idea is that you can spin up your own Mastodon instance, that is connected to "the Fediverse" (i.e. all the other Mastodon servers). The end result is that you, as a user, can choose a Mastodon instance to sign up to, but can see content from all other users across the platform.
To the surprise of probably nobody, the signup rate of Mastodon has been phenomenal: in November 2022 alone, it welcomed a million new users.
I suppose it's pretty poetic that Mastodon's mascot is an Mastodon, a distant relative of the elephant, given that I am firstly the PHP specialist in the Vonage Developer Relations Team, and secondly a user on Mastodon's PHP community server. So let's get started: firstly we want some Laravel scaffolding to fire off a request to the Mastodon API to create a new post.
It doesn't make much sense to write a whole paragraph on how to install Laravel when the documentation is pretty comprehensive, so let's work on building a command to fire off a Mastodon API request. Use the console to make a new command:
php artisan make:command PostToMastodonCommandIn the new command, I'm going to edit the signature (which is the command name to run from the console) and description.
protected $signature = 'app:post-to-mastodon';protected $description = 'Post a default message to Mastodon';To test execution, I'm going to write a placeholder string and then dump it out when running a command. Here's how the handle() method looks:
public function handle(): void
{
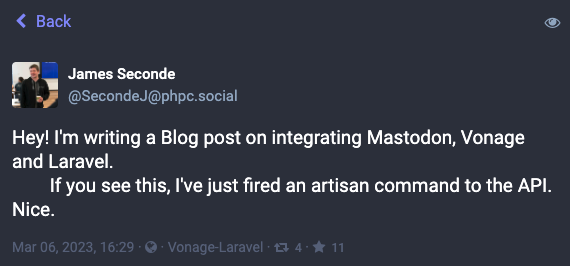
$exampleMessage = "Hey! I'm writing a blog post on integrating Mastodon, Vonage, and Laravel.
If you see this, I've just fired an artisan command to the API. Nice.";
$this->info($exampleMessage);
}
Run the command in your terminal:
php artisan app:post-to-mastodonOut comes the message in the terminal. Nothing particularly special here, but now it's time to configure Mastodon.
We're going to configure Mastodon for Laravel using Laravel conventions: the only thing we actually need to send a Toot is an access token (API keys for more advanced operations require full keypairs or rotation of keys because access has been configured via. OAuth).
Our first stop is getting the access key. In your Mastodon. Head to your preferences panel while logged in. You should be able to see a Development tab:
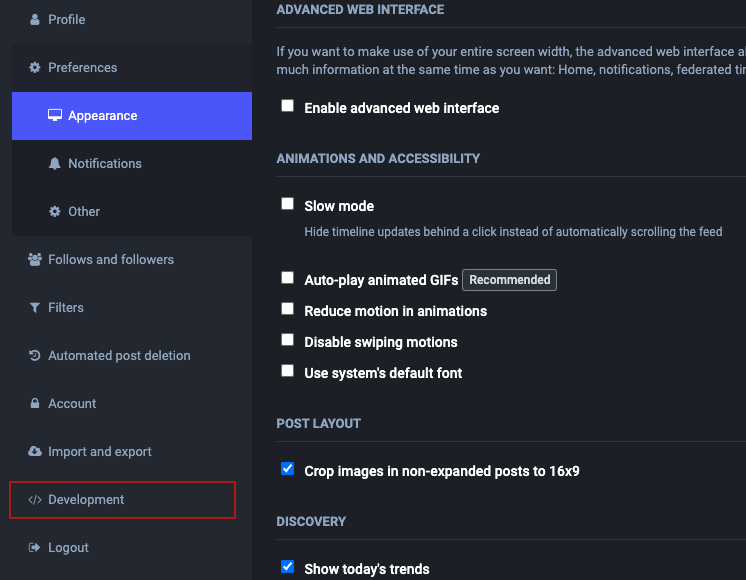
Create a new application with read access in the scope (this comes as default). Once created, what you are looking for is under Your access token:
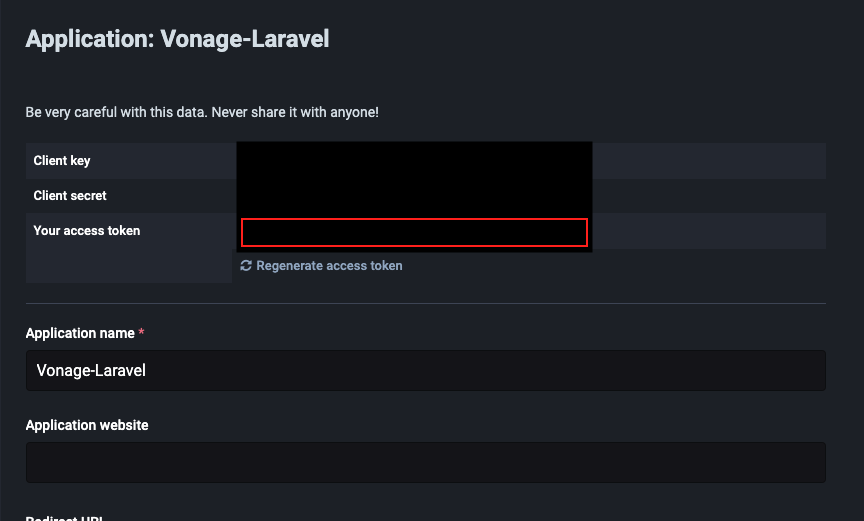
This is the value we'll need in the app. Copy this, then head back to your code.
In your Laravel config file, create a new file named mastodon.php and write the following code:
<?php

return [

    /*
    |----------------------------------------------------------------
    | Mastodon
    |----------------------------------------------------------------
    |
    |
    */

    'access_token' => env('MASTODON_ACCESS_TOKEN')
];
The config will now read your access token from your .env file, so copy your included Laravel .env.example (if you haven't already) and create your .env file. In there, add our new environment variable:
MASTODON_ACCESS_TOKEN=2sd09g-0h9hs-09ts-0risd-f9j4-s9d0g9s-0h8
Our last part is to hook up the config variable into the command and send it off to our Mastodon instance. In the PostToMastodonCommand handler, add the following code:
$response = Http::asForm()->withToken(config('mastodon.access_token'))->post('https://mymastodon.social/api/v1/statuses', [
    'status' => $exampleMessage
]);

$this->info($response->body());
Laravel's Http facade gives us a pretty fluid way to send the request off without having to fiddle with configuring a Client such as Guzzle directly. Breaking down the request, we have the following components:
asForm(): Mastodon's API for this endpoint requires the data in the request to be sent asmultipart/form-data.withToken()is a neat function to automatically add aBearertoken to theAuthorizationof the request.config(mastodon.access_token) retrieves our token out of the newly created config filepost()is the type of HTTP request we need to make
Fire the command into the console:
and hopefully, you'll get an HTTP200 response back, and your Toot should appear in Mastodon.
There is absolutely no reasoning behind this, apart from "why not?". We could send a text to a number, and have it toot out the contents if we wanted to... so, let's do that!
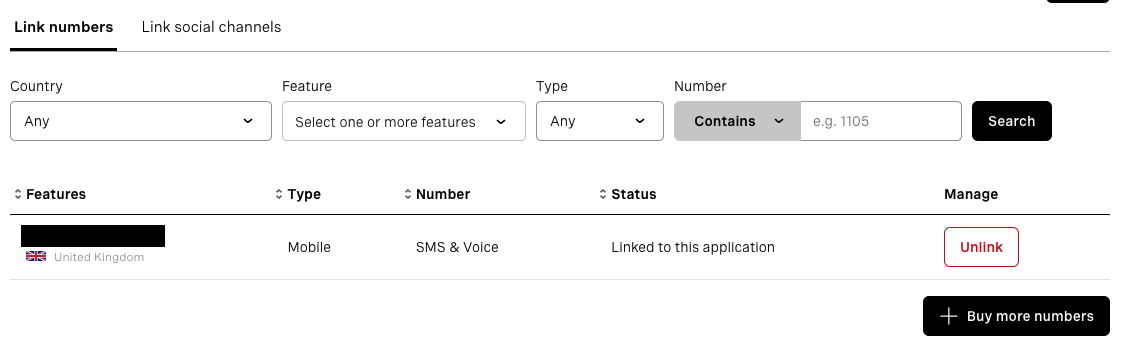
You'll need two things here: firstly, a new application created in the dashboard, and secondly a Vonage number tied to the application.
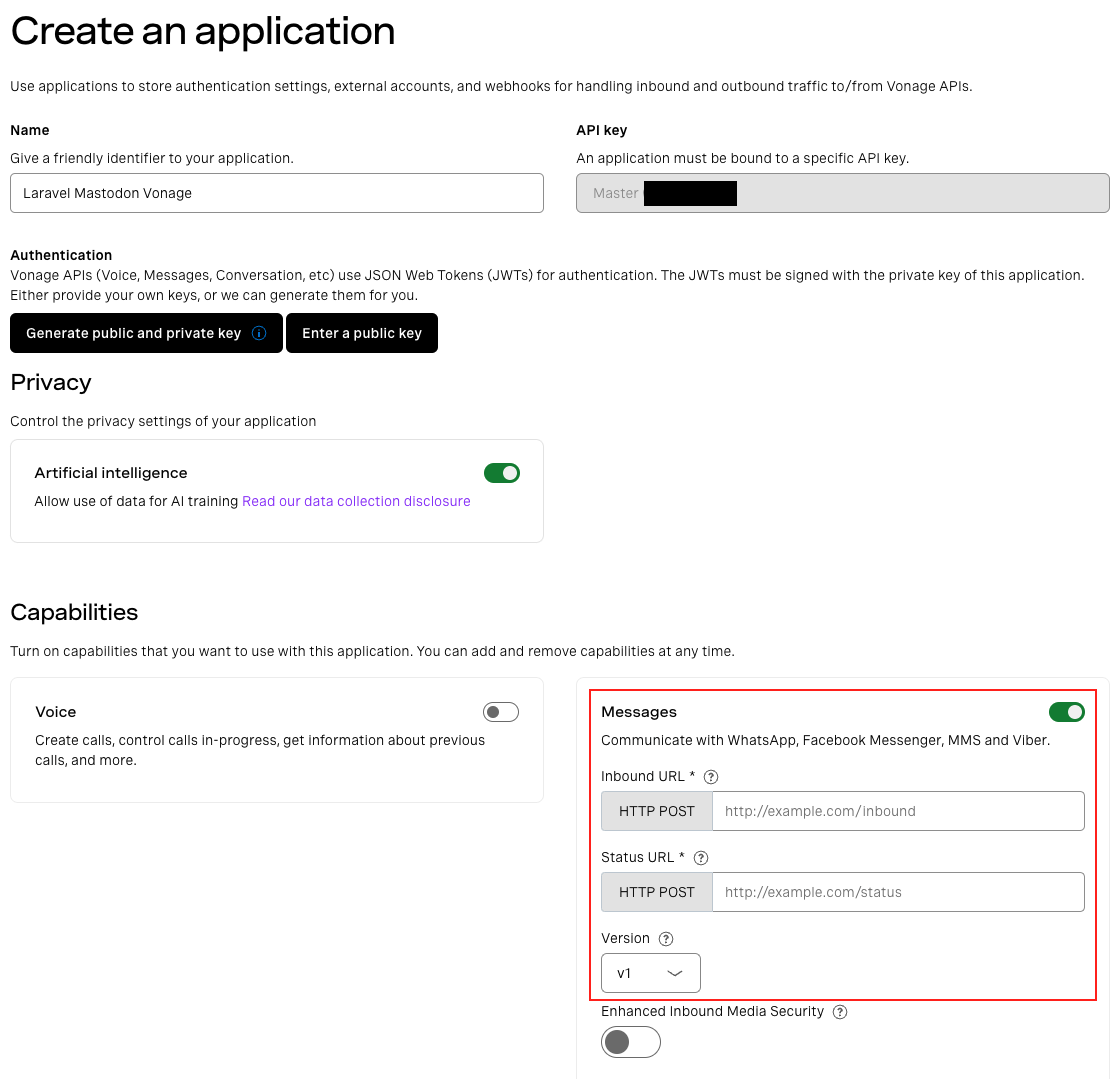
Head to the Applications tab in your Vonage Dashboard, and hit Create Application:

Our new application is going to use the Messages API to receive SMS messages, which will then fire off webhooks for our Laravel application to listen to. Toggle the Messages capability, and fill the Inbound URL/StatusURL with a placeholder for the time being; we'll revisit these shortly.
We'll need a number to connect incoming messages to the application's webhooks. Create your application, and then you should see the option to Buy more Numbers. It's this process where you can select a number, purchase it and then link it to the application. Your end result in the application dashboard should look like this:
The URL specified in the 'InboundURL' field on the dashboard is where our webhook is going to be sent, but we've not opened a route yet in our Laravel Application.
The webhook is designed to interact with our app at an API level rather than the web routing (which would be to load pages, dashboards, etc.). For this reason, we want our new route to be in routes/api.php. Open that up, then add the route:
Route::post('/incoming', IncomingSMSController::class);Hang on, IncomingSMSController doesn't exist yet! You would be correct: let's create it in the terminal:
Our new controller is going to handle the incoming webhook request, and then use the existing code we used to fire a Toot off to Mastodon. The controller looks like this:
<?php

namespace App\Http\Controllers;

use Illuminate\Http\Request;
use Illuminate\Support\Facades\Http;
use Symfony\Component\HttpFoundation\Response;

class IncomingSMSController extends Controller
{
    public function __invoke(Request $request)
    {        $body = json_decode($request->getContent(), true, 512, JSON_THROW_ON_ERROR);
        $message = $body['text'];

        $response = Http::asForm()->withToken(config('mastodon.access_token'))->post('https://mymastodon.social/api/v1/statuses', [
            'status' => $message
        ]);

        return response($response->body(), Response::HTTP_CREATED);
    }}
So, what we're doing here is replacing the placeholder message we sent to Mastodon originally in the command with the incoming SMS text contents.
There is one major missing piece here: Vonage needs a live URL to send that webhook to. So, how do we do that?
In previous examples I've written, I've turned to ngrok as an excellent tunnel application to expose your local stack to the internet. However, recently I have started using something else
Expose from Beyond Code essentially behaves the same as ngrok; It's a tunnel application that allows your local web application to be exposed to the internet. You can install it in several ways, but arguably the simplest way will be via. composer require global:
You'll want to add the executable to your operating system's path - check out the docs here to see how to do that.
Expose will need configuring with an access token - you can follow the steps here to create a token and assign it to your copy.
We need to take two steps: firstly, fire up the local server in your Laravel app:
And secondly, we start Expose which will give us a domain for our app (Laravel's built-in server defaults to 8000 as the port):
All being well, you should now see the Expose dashboard:
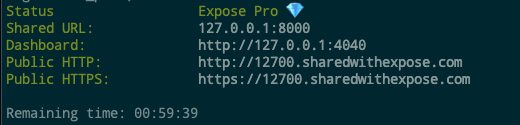
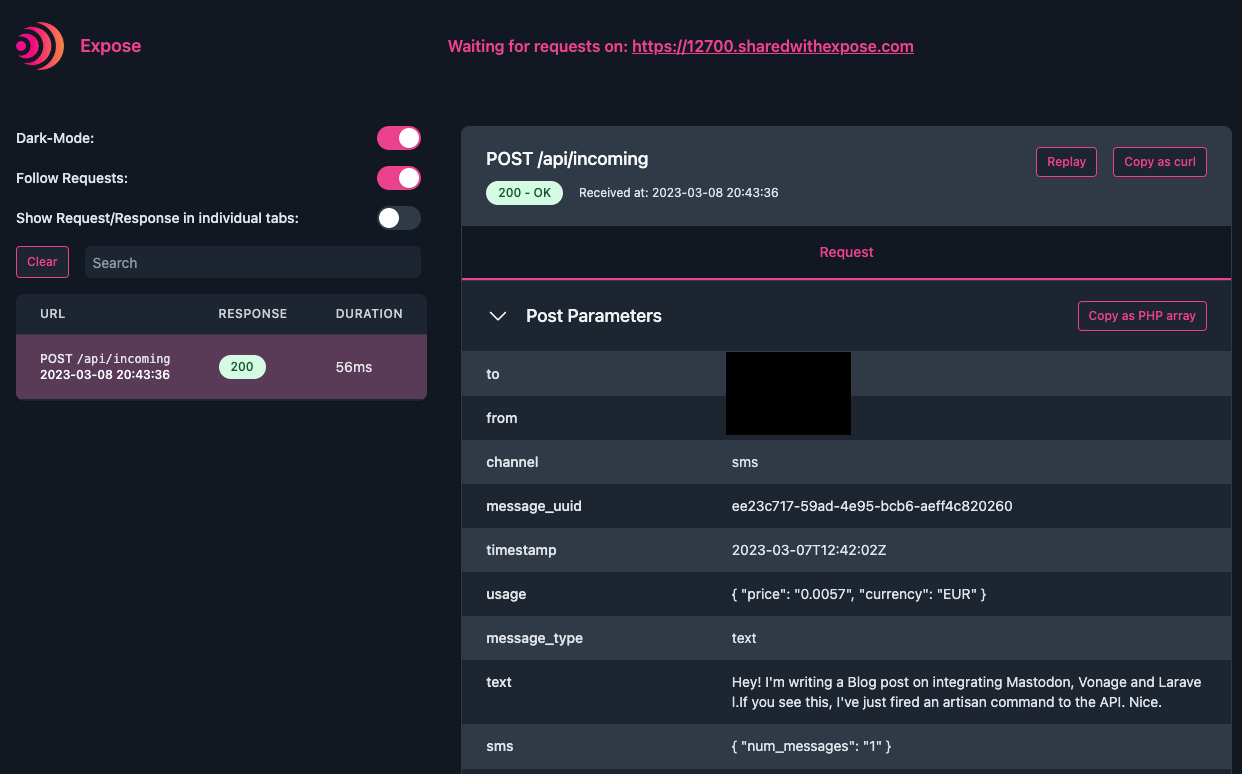
You can see that there is a dashboard URL: Expose runs a UI on port 4040. If you navigate to it, you'll be presented with a pretty nice set of tools for debugging:

We'll keep this window so we can see our webhook coming in. Our final bit of configuration is to take our new public HTTPS URL and paste it back into the application settings in the Vonage Dashboard:
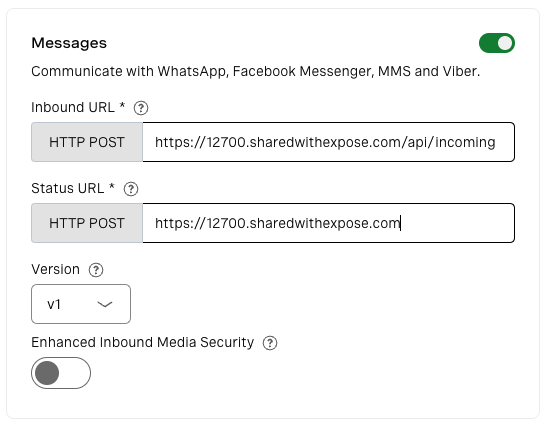
The only important thing here for our use case is that the Inbound URL matches the Laravel route we defined. The Status URL isn't important here as this is for deeper integrations that listen out for any changes, delivery failures, and network issues.
Everything is wired together: send an SMS with what you want to display in Mastodon, and watch our setup do its thing!
And here's our toot!
Mastodon's API is fully open by design, without 'premium features' due to the nature of the software being FOSS-first. Bearing that in mind, there is pretty much no limit to what you can do here - I wanted this to be a brief introduction, but in terms of proof-of-concept I've already got voice transcriptions using the Vonage Voice API to also Toot out recordings.
Thought of something else you could do with Laravel, Mastodon, and Vonage? Hit me up, I'm always up for experimenting. Come join in the conversation on our Vonage Community Slack or hit us up on Twitter.