Share:
Polyglot hacker and lifelong student trying a little bit of everything and documenting the experience.
Sending SMS from Python with Google Cloud Functions
Time to read: 6 minutes
The tutorial below shows how to deploy a function on Google Cloud Platform using Python 3.7.
The function uses the Vonage SMS API to send a text message to a user. The use case is to send a message inviting the user to download an app. This function can then be called from a JavaScript front-end. You can do more sophisticated things with a Google Cloud Function, but this is a simple demonstration of how to get to a simple working function.
You may have heard about "Functions-as-a-Service" or building "serverless" apps: the trend of deploying individual functions to a cloud service provider like Google, Amazon or Microsoft has been growing. The advantage of this kind of architecture is it lets you break down applications into the tiniest possible pieces—individual functions—and build them in a quick and scalable way, without having to manage servers, or pay for services you aren’t using.
This type of deployment is particularly useful for adding a very small bit of back-end code for a mostly static website. You can then host a site built using a static site generator on a platform like GitHub Pages or Netlify, without the hassle or expense of running a full web server just for one function.
To get started with Google Cloud Platform, go to cloud.google.com and sign up. You’ll need a Google account: if you already use a Google account for Gmail, Android, or other Google services, you can use that.
If you haven’t used Google Cloud Platform before, they give you a generous $300 (or equivalent in your local currency) worth of credit to use in your first year. Unless your site gets extremely popular and people are constantly hitting your site, you probably won’t use more than the free tier allows for.
Google Cloud Functions can be written to run either on Node.js or on Python 3. If you are using Node.js, Google uses the Express library, while for Python, the Flask framework’s API is used to handle requests and responses. Every request that comes in is handed to your function as a flask.Request and your function needs to return a response in the same way that it would in a Flask application.
One thing you’ll need to handle is Cross-Origin Resource Sharing (CORS). We can solve this by including Flask-CORS.
The first step in building our function is to go to click "Create a function" in the Cloud Functions section of the Google Cloud Platform console. You’ll then be prompted to set a name for your function and choose some options.
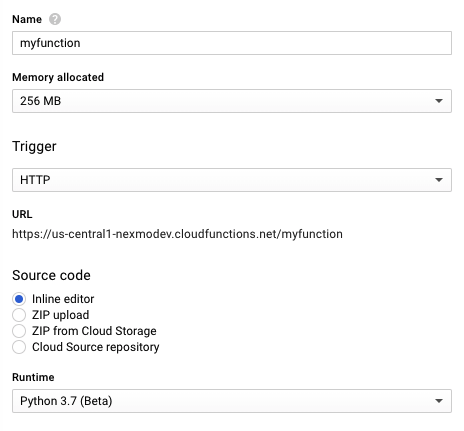 Create a Google Cloud Function
Let’s quickly run through these:
The name of your function is also used in the URL used to call the function.
The memory allocated to your function is the maximum amount of memory that can be used: if you were building a function that was memory intensive (if it were handling audio/video files, perhaps), you would need to assign more memory to it—leave this set to 256 MB.
The trigger is how your function is invoked. Because our function is going to be called from a form on a web page, we should leave it set to HTTP, but you could set it to act based on other actions.
The source code specifies where the code is located: for this tutorial, we will use the inline editor, but this can be changed to match how you develop code—it could be deployed from a ZIP file that you upload in the browser, a ZIP file that you deploy into Cloud Storage, or from a repository.
The runtime needs to be set: it defaults to Node.js, but we’ll be using Python for this tutorial.
Below the code editor, there are a number of advanced options that are worth looking at:
The region: it is set to us-central1 (Iowa, USA) as the default, but if the majority of your visitors are from Europe or Asia, you might want to set it to europe-west1 (Belgium) or asia-northeast1 (Tokyo) as appropriate. Changing this will change the URL.
The timeout is set to 60 seconds: this should be fine for our purposes, but you can adjust this. Remember, your use of Cloud Functions is billed by the millisecond.
The environment variables: you will need to set two environment variables: VONAGE_API_KEY and VONAGE_API_SECRET.
What your individual function does is up to you. I've written a simple example which you can see on Gist or read below. It takes two arguments:
phone: the phone number that we are going to send the message to. Vonage requires the number in E.164 format.platform: the OS of the user's device—this will either be ios or android. This will determine whether they receive a message linking them to the Apple App Store or the Google Play Store.
import vonage
from flask import jsonify

def send_sms(request):
    data = request.get_json()

    # VONAGE_API_KEY and VONAGE_API_SECRET are in env vars
    # which are set in the Google Cloud function
    client = vonage.Client()

    # you may prefer to use link shorteners to see how many clickthroughs happen
    ios_msg = "Download our iOS app from https://example.org/apple"
    android_msg = "Download our Android app from https://example.org/android"

    if data['platform'] == "ios":
        msg = ios_msg
    elif data['platform'] == "android":
        msg = android_msg

    # you need some more data checking here. just an example...
    args = {
        'from': 'MyApp',
        'to': data['phone'],
        'text': msg
    }
    response = client.send_message(args)
return jsonify(response)Once you've written your function, the simplest way to deploy it is to copy and paste it into the code editor on the Google Cloud Functions website. Underneath the code editor, you need to set the name of the function to execute—this tells Cloud Functions which function in your file to call. In the Advanced section, you also need to set the environment variables, VONAGE_API_KEY and VONAGE_API_SECRET.
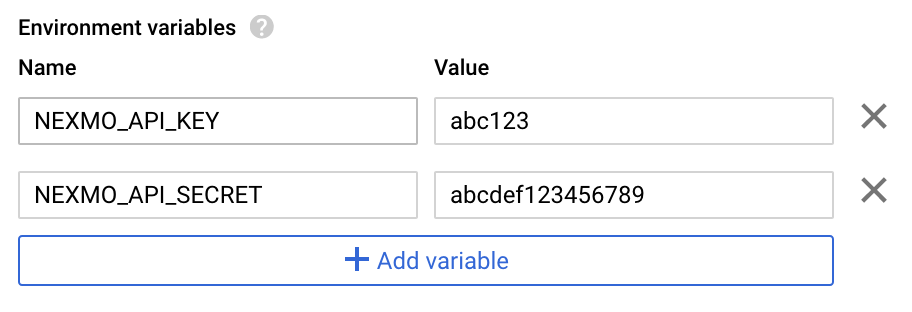 Set environment variables
Once you are done, press ‘Save’, wait a few moments for the magic robots at Google to deploy the function, and then you can test it.
Just for demonstration, this is what is sent back from the SMS API:
{
  "message-count": "1",
  "messages": [
    {
      "status": "0",
      "network": "23410",
      "remaining-balance": "10.00000000",
      "to": "447700900000",
      "message-price": "0.03330000",
      "message-id": "1500000000000AA1"
    }
  ]
}(It is highly recommended that you filter out information like the message-id rather than send it back to the front end.)
Once you have the function written, the next step is to integrate that function call into a front end. For a JavaScript-based front end, you'll need to make sure any Cloud Functions you are calling send back the Cross-Origin Resource Sharing (CORS) headers for the domains they are being called from.
Any code you write and use in production will need to be a little bit more sophisticated than the example provided here: you'll want to make sure to put checks in place to make sure you aren't sending too many messages. Just because your code is ‘server-less’ doesn't mean you don't have to think about security. Your functions are small and self-contained, which means they are unable to affect other code, but you still need to think about making sure you validate data coming in to your Function, and ensuring that the APIs called from your Function (including Vonage's APIs) are called safely.
Google's Cloud Functions, like Microsoft's Azure Functions and Lambda functions on Amazon Web Services, allow you to build very simple APIs that you only pay for upon execution. They are perfect for integrating into static sites, into JavaScript front-ends, or into mobile apps.
They can be used as a way to glue together services provided by multiple API providers. For instance, you could use Cloud Functions to:
respond to webhook events from Vonage's Voice services
receive notifications from GitHub or your Continuous Integration service, then trigger a text message if some condition is matched
pull together information from your e-commerce system and payment provider to send out a thank you message to a customer when their order is shipped
storing analytics data from your mobile app in a database like Firestore
Once you've built your first function, you start realising how they can solve all sorts of problems you are working on.