Share:
Joydip is a Microsoft Most Valuable Professional in ASP.NET, Speaker, and Author of several books and articles. He has more than 25 years of experience in IT with more than 18 years in Microsoft .NET and its related technologies. Several times, he was selected as MSDN Featured Developer of the Fortnight (MSDN) and was a Community Credit Winner at http://www.community-credit.com. He has authored more than 500 articles in some of the most reputed sites worldwide, including MSDN, Info World, CodeMag, Tech Beacon, Tech Target, etc.
Send SMS Notifications on Application Performance Using C#
When working on applications, you would often want to log meaningful data, such as where your application has been failing, CPU usage, and Memory usage. This would provide you with various vital insights that would give your business a boost and help detect bugs quickly. To help you respond quickly, you can use notifications that contain a summary of the performance stats or details about an error in the production.
This article talks about how you can retrieve performance stats of an ASP.NET Core 5 web application using C# and then take advantage of the Vonage SMS API to send out text notifications at pre-configured intervals of time.
Visual Studio 2019.
Windows OS
You’ll also need to install the following NuGet packages onto your project:
NLog
Quartz
Vonage
You can install them via the NuGet Package Manager while you’re within Visual Studio.
You can find a starter project on GitHub in the starter folder. The starter project contains an ASP.NET Core MVC 5 project with capabilities to read CPU and Memory usage information. In this tutorial, you will add the SMS notification functionality.
Quartz.NET is free and an open-source .NET version of the popular Java task scheduling framework Quartz. It offers excellent support for dealing with Cron expressions and is widely recommended for building applications that need job scheduling functionality.
Quartz.NET is comprised of three fundamental concepts:
A Job - This represents the background tasks that you want to run while you do other things. A job class extends the IJob interface and implements its members.
A Trigger - A trigger determines when a task is executed, and it is usually set to run on a predetermined schedule. In other words, you can use a trigger to specify the schedule of a job.
A Scheduler - This is a component responsible for coordinating the jobs and the triggers and executing jobs based on predefined schedules.
The blog will discuss more on these components shortly.
In the sample application, you'll use Vonage SMS API to send out notifications as soon as the CPU or memory usage exceeds a predefined threshold. Hence, our ASP.NET Core MVC 5 application would comprise the following components:
Custom Scheduler - You’ll use Quartz to build a custom scheduler that would keep an eye on the memory and CPU consumption in the computer system. It would check these values at predefined intervals of time in the background while working with the application in the front-end.
Custom Logger - You’ll also be using NLog to log data about application performance in this application. While the notifications will be sent out only if CPU or memory consumption crosses the predefined threshold, the log would contain CPU and memory consumption data collected every 5 or 10 seconds (based on the predefined interval) and stored in a text file.
For this project, here are the classes that you'll be creating in the application:
PerformanceHelper– This class is used to retrieve CPU and memory usage.NotificationManager– this class encapsulates the functionality to send out notifications.NotificationJob– This is the job class that takes advantage of theNotificationManagerclass to sends out notifications, as discussed earlier.CustomJobFactory– This class is responsible for creating jobs.CustomJobScheduler– This class is responsible for scheduling jobs.QuartzExtensions- This class contains an extension method called AddQuartz to simplify and organize the code.
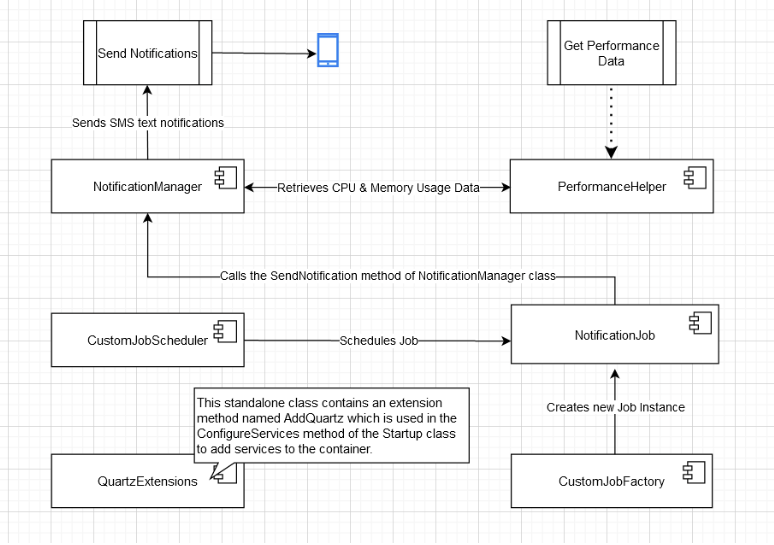 project architecture diagram
Windows Management Instrumentation (WMI) is an object-oriented, extensible and, standards-based framework that extends the Windows Driver Model and offers an operating system interface via which instrumented components give information and notifications. The primary objective of WMI is to create a proprietary set of environmentally independent specifications that enables the exchange of management information across applications.
To retrieve the CPU and Memory usages in percentage, you'll use the ManagementObjectSearcher class of the System Management namespace. This class can enumerate all disk drives, network adapters, processes, and other management objects on a system and retrieve a collection of management objects based on the query you've specified. When you instantiate this class, you'll need to pass a WMI query represented in an ObjectQuery and, optionally, a ManagementScope representing the WMI namespace to execute the query.
Create a class named PerformanceHelper.cs in the ASP.NET Core MVC 5 project you cloned earlier and write the following code:
public static class PerformanceHelper
{
  public static double GetCPUUsageInPercentage()
  {
    ObjectQuery objQuery = new ObjectQuery("SELECT * FROM Win32_PerfFormattedData_PerfOS_Processor WHERE Name=\"_Total\"");
    ManagementObjectSearcher managementObjectSearcher = new ManagementObjectSearcher(objQuery);
    ManagementObjectCollection managementObjectCollection = managementObjectSearcher.Get();
    double cpu_usage = 0;

    if (managementObjectCollection.Count > 0)
    {
      foreach (ManagementObject managementObject in managementObjectCollection)
      {
        try
        {
          cpu_usage = 100 - Convert.ToUInt32(managementObject["PercentIdleTime"]);
          break;
        }
        catch (Exception ex)
        {
          break;
        }
      }
    }

    return cpu_usage;
  }

  public static Dictionary<string, double> GetMemoryUsageInfo()
  {
    Dictionary<string, double> keyValuePairs = new Dictionary<string, double>();

    ObjectQuery objQuery = new ObjectQuery("SELECT * FROM Win32_OperatingSystem");
    ManagementObjectSearcher searcher = new ManagementObjectSearcher(objQuery);
    ManagementObjectCollection results = searcher.Get();
    Dictionary<string, double> resourceConsumptionResults = new Dictionary<string, double>();

    foreach (ManagementObject result in results)
    {
      var totalVisibleMemory = Math.Round(double.Parse(result["TotalVisibleMemorySize"].ToString()), 2);
      var totalFreeMemory = Math.Round(double.Parse(result["FreePhysicalMemory"].ToString()), 2);

      resourceConsumptionResults.Add("Total_Visible_Memory", totalVisibleMemory);
      resourceConsumptionResults.Add("Free_Physical_Memory", totalFreeMemory);
    }

    double totalVisibleMemorySize = Math.Round(resourceConsumptionResults["Total_Visible_Memory"] / (1024 * 1024), 2);
    double freePhysicalMemory = Math.Round(resourceConsumptionResults["Free_Physical_Memory"] / (1024 * 1024), 2);
    double totalUsedMemory = totalVisibleMemorySize - freePhysicalMemory;
    double memory_usage = 0;

    try
    {
      memory_usage = ((totalVisibleMemorySize - freePhysicalMemory) / totalVisibleMemorySize) * 100;
      keyValuePairs.Add("Total_Visible_Memory", totalVisibleMemorySize);
      keyValuePairs.Add("Total_Free_Memory", freePhysicalMemory);
      keyValuePairs.Add("Total_Used_Memory", totalUsedMemory);
      keyValuePairs.Add("Total_Used_Memory_Percentage", memory_usage);
    }
    catch
    {
      throw;
    }

    return keyValuePairs;
  }
}
Next, you'll create the job class. A job class in Quartz extends the IJob interface and implements its members. Create a class named NotificationJob in a file called NotificationJob.cs with the following content inside:
public class NotificationJob: IJob
{
  private readonly NotificationManager _notificationManager;
  public NotificationJob(NotificationManager notificationManager)
  {
    _notificationManager = notificationManager;
  }
  public async Task Execute(IJobExecutionContext context)
  {
    await _notificationManager.SendNotification();
  }
}The Execute method of the NotificationJob class calls the SendNotification method of the NotificationManager class. Create a new class named NotificationManager in a file called NotificationManager.cs with the following code in there:
public class NotificationManager
{
  private ILoggerFactory LoggerFactory { get; }
  private readonly ILogger Logger;
  public IConfiguration Configuration { get; set; }

  public NotificationManager(IConfiguration config, ILoggerFactory loggerFactory)
  {
    Configuration = config;
    LoggerFactory = loggerFactory;

    if (loggerFactory != null) {
      Logger = loggerFactory.CreateLogger("NotificationManager");
    }
  }

  public async Task SendNotification()
  {
    await SendResourceUsageInfo();
    await Task.CompletedTask;
  }

  private async Task SendResourceUsageInfo()
  {
    bool isMemoryUsageHigh = false;
    bool isCPUUsageHigh = false;

    var keyValuePairs = PerformanceHelper.GetMemoryUsageInfo();

    var memoryUsage = Math.Round(keyValuePairs["Total_Used_Memory_Percentage"], 2);
    var cpuUsage = Math.Round(PerformanceHelper.GetCPUUsageInPercentage(), 2);

    var memoryThreshold = Configuration["Memory_Threshold"];
    var cpuThreshold = Configuration["CPU_Threshold"];

    if (memoryUsage > double.Parse(memoryThreshold))
    {
      isMemoryUsageHigh = true;
    }
    if (cpuUsage > double.Parse(cpuThreshold))
    {
      isCPUUsageHigh = true;
    }

    if (isMemoryUsageHigh)
    {
      string memoryConsumptionAlertMessage = string.Format($"Alert!!! Memory Usage: " +
      $ "{keyValuePairs["
      Total_Used_Memory "]} GB " +
      $ "/ {keyValuePairs["
      Total_Visible_Memory "]} GB");
      SendTextMessage(memoryConsumptionAlertMessage);
    }

    if (isCPUUsageHigh)
    {
      string cpuConsumptionAlertMessage = string.Format("Alert!!! CPU Usage: {0}", cpuUsage);
      SendTextMessage(cpuConsumptionAlertMessage);
    }

    await Task.CompletedTask;
  }

    private void SendTextMessage(string message)
    {
      try
      {
        var apiKey = Configuration["API_KEY"];
        var apiSecret = Configuration["API_SECRET"];
        var credentials = Credentials.FromApiKeyAndSecret(apiKey, apiSecret);
        var client = new SmsClient(credentials);

        var request = new SendSmsRequest
        {
          To = Configuration["TO"],
          From = Configuration["FROM"],
          Text = message
        };

        var response = client.SendAnSms(request);
        Logger?.LogInformation(response.MessageCount);
      }
      catch (VonageSmsResponseException ex)
      {
        Logger?.LogError(ex.Message);
        throw;
      }
  }
}
The SendTextMessage function uses the Vonage package to send an SMS. SendTextMessage is called by SendResourceUsageInfo if the CPU or Memory usage has passed the threshold. You will set the thresholds and configuration variables later.
Next, you need to create our custom JobFactory class. This class is required to create new job instances and dispose of them when they are no longer needed. You need a custom implementation of Quartz IJobFactory since the default implementation doesn't allow you to use Dependency Injection (DI) when creating jobs. Create a class named CustomJobFactory in a file in the same name with the following code in there:
public class CustomJobFactory : IJobFactory
{
    private readonly IServiceProvider _serviceProvider;
    public CustomJobFactory(IServiceProvider serviceProvider)
    {
        _serviceProvider = serviceProvider;
    }

    public IJob NewJob(TriggerFiredBundle bundle, IScheduler scheduler)
    {
        var jobDetail = bundle.JobDetail;
        return (IJob)_serviceProvider.GetService(jobDetail.JobType);
    }
    public void ReturnJob(IJob job)
    {
        var disposableJobInstance = job as IDisposable;

        if (disposableJobInstance != null)
        {
            disposableJobInstance.Dispose();
        }
    }
}
Now, create a new class named CustomJobScheduler in a file called CustomJobScheduler.cs in the root folder of the project and replace the default source code of the CustomJobScheduler you just created with the following code:
public class CustomJobScheduler
{
    public static void ScheduleJob(IScheduler scheduler)
    {
      var jobName = "NotificationJob";

      var job = JobBuilder.Create<NotificationJob>()
      .WithIdentity(jobName)
      .Build();

      var trigger = TriggerBuilder.Create()
      .WithIdentity($"{jobName}.trigger")
      .StartNow()
      .WithSimpleSchedule(scheduleBuilder =>
          scheduleBuilder
              .WithInterval(TimeSpan.FromSeconds(5))
              .RepeatForever())
      .Build();

      scheduler.ScheduleJob(job, trigger);
    }
}
The ScheduleJob method of the CustomJobScheduler class accepts an instance of type IScheduler and uses it to schedule a job based on a given trigger, which in this case is a TimeSpan.
Now, create a class named QuartzExtensions with the following code in there:
public static class QuartzExtensions
{
  public static void AddQuartz(this IServiceCollection services, params Type[] jobs)
  {
    services.AddSingleton<IJobFactory, CustomJobFactory>();
    services.AddSingleton<NotificationJob>();

    services.AddSingleton(provider =>
    {
      var schedulerFactory = new StdSchedulerFactory();
      var scheduler = schedulerFactory.GetScheduler().Result;
      scheduler.JobFactory = provider.GetService<IJobFactory>();
      scheduler.Start();
      return scheduler;
    });
  }
}
As shown in the component diagram shown earlier, the QuartzExtensions class contains a method named AddQuartz. The method creates instances of JobFactory andNotificationJob, which both have a singleton lifespan. AddQuartz adds them both to the container. It also assigns our custom JobFactory class to the scheduler instance.
Add the Memory_Threshold, CPU_Threshold, TO, FROM, API_KEY, and API_SECRET keys in the appsettings.json file. Replacing FROM, API_KEY, and API_SECRET with your Vonage number, API Key, and API Secret. TO should be the number you want to send the SMS notifications to:
{
"AllowedHosts": "*",
"Memory_Threshold": 80,
"CPU_Threshold": 80,
"TO": "TO",
"FROM": "FROM",
"API_KEY": "API_KEY",
"API_SECRET": "API_SECRET"
}
You should also configure NLog.config and specify the log file name and path there.
<?xml version="1.0" encoding="utf-8" ?>
<nlog
  xmlns="http://www.nlog-project.org/schemas/NLog.xsd"
  xmlns:xsi="http://www.w3.org/2001/XMLSchema-instance"
      autoReload="true"
      internalLogLevel="Trace"
      internalLogFile="C:\Logs\InternalLog.txt">
  <targets>
    <target name="logfile" xsi:type="File"
            fileName="C:/Logs/${shortdate}_AppLog.txt"
            layout="${longdate} ${level:uppercase=true} ${message}"/>
  </targets>
  <rules>
    <logger name="*" minlevel="Debug" writeTo="logfile">
      <filters defaultAction='Log'>
        <when condition="contains('${message}','Quartz scheduler')" action="Ignore" />
      </filters>
    </logger>
  </rules>
</nlog>
Add the following line in the ConfigureServices method of the Startup class to add an instance of the NotificationManager class as a transient service to the built-in services container:
services.AddTransient<NotificationManager>();
Lastly, you should retrieve a scheduler instance from the application's service container and use it to schedule a job. To do this, you need to use the Configure method of the Startup class. The ConfigureServices and Configure methods of the Startup class are generated by default when creating a web project in ASP.NET Core or ASP.NET Core MVC. The ConfigureServices method is used to add services to the built-in container, and the Configure method is used to configure the HTTP request pipeline.
Write the following code in the Configure method of the Startup class:
public void Configure(IApplicationBuilder app, IWebHostEnvironment env)
{
    if (env.IsDevelopment())

    {
      app.UseDeveloperExceptionPage();
    }

    app.UseRouting();
    app.UseAuthorization();

    var scheduler = app.ApplicationServices.GetService<IScheduler>();
    CustomJobScheduler.ScheduleJob(scheduler);

    app.UseEndpoints(endpoints =>
    {
      endpoints.MapControllerRoute(
          name: "default",
          pattern: "{controller=Home}/{action=Index}/{id?}");
    });
}
To run this application:
Locate the .sln file and double click to open it in Visual Studio 2019
Press F5 to run the application
Once the application is running, wait for the application to generate logs. You can see log messages being created every 5 seconds in the C:\\Logs folder. You can change this duration as needed by making it configurable in the appsettings.json file. You’ll also see notifications sent to the pre-configured mobile number using the Vonage SMS API as soon as the CPU or Memory consumption crosses the threshold values.
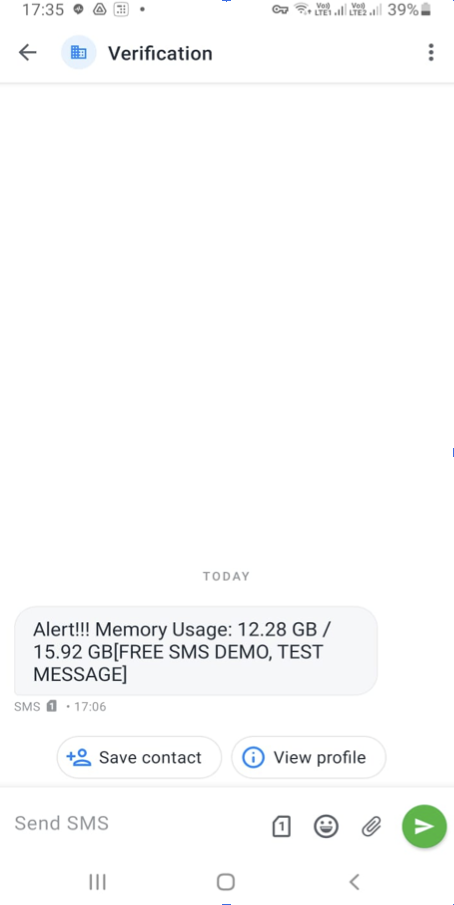 a text message generated by the application when the memory usage exceeds 80%
You can check out a completed version of the project on GitHub under the completed folder.
Share:
Joydip is a Microsoft Most Valuable Professional in ASP.NET, Speaker, and Author of several books and articles. He has more than 25 years of experience in IT with more than 18 years in Microsoft .NET and its related technologies. Several times, he was selected as MSDN Featured Developer of the Fortnight (MSDN) and was a Community Credit Winner at http://www.community-credit.com. He has authored more than 500 articles in some of the most reputed sites worldwide, including MSDN, Info World, CodeMag, Tech Beacon, Tech Target, etc.