
Share:
Phil is Head of Developer Relations at Hookdeck, an asynchronous messaging platform, and a proud Vonage alumni.
Omnichannel Conversations With Vonage, Postmark, and Hookdeck
Time to read: 10 minutes
In a single day, I can jump between SMS for a conversation with a friend, WhatsApp for general updates with family members, Facebook Messenger to coordinate a community activity, and email for work. And the preferred channel of communication can differ depending on the individual, time of day, geography, generation, and culture. Wouldn’t it be nice if there was one communication application that everybody could use and worked nicely across all communication channels!
Omnichannel conversations - allowing a conversation to cross communication mediums - is a possibility, but there are very few guides that demonstrate how to put it into practice. So, in this tutorial, we’ll walk through how to build an OmniText solution to enable a conversation across SMS using the Vonage Messages API and email using Postmark email API. We'll also use Hookdeck, a serverless asynchronous messaging platform, to receive webhooks and integrate Vonage and Postmark via their APIs.
If you just want to try out OmniText, you can grab the code along with simplified instructions in the OmniText repo on GitHub.
Before we take a step-by-step guide to configure and build the solution, here's an overview of how OmniText works.
Hookdeck has the concept of connections, which connect an input known as a source to an output called a destination. To support a conversation crossing SMS and email, we need two connections that:
Receive an SMS and trigger an email
Receive an email and trigger an SMS
 Connections in Hookdeck
For this setup, we'll support a single conversation between one phone number and one email. To support multiple conversations with this approach, you would need to create two connections for each conversation. As mentioned above, supporting multiple conversations is entirely possible but isn't covered in this article.
Both connections will make use of Hookdeck transformations.
The
inbound-smsconnection transforms the inbound Vonage Messages API SMS webhook payload to a payload used to send an email with Postmark.The
inbound-emailconnection transforms the inbound Postmark email payload into a structure required by the Vonage Messages API to send an SMS
When sending an email, it's also worth noting that whilst you can use email subjects and sub-addressing to enable a single email address to be part of multiple conversations, this is a much harder problem with phone numbers and SMS messages. So, in this solution, a phone number can only be associated with a single conversation.
Before you begin, sign up for free accounts with the services required for the OmniText solution and grab the respective credentials and additional details:
Vonage: take note of your API key and API secret. You will also need to buy a phone number to send and receive SMS messages.
Postmark: take note of your server API token from Servers > {Your Server Name} > API Tokens and the inbound email from Servers > {Your Server Name} > Default Inbound Stream > Settings > Inbound > Email section. See the Postmark configuring an inbound server docs docs for additional details. Also, remember to "Verify your signature" with Postmark, which means verify your email address.
Hookdeck: just create the account
Let's begin by creating a connection that will support the following flow:
A user sends an SMS to your Vonage API phone number
The Vonage API triggers an SMS webhook to Hookdeck
Hookdeck receives the SMS webhooks via a Source URL and converts the SMS payload to a format that can be used to send an email with Postmark
Hookdeck makes an HTTP request to a Destination URL, the Postmark email API endpoint, to send an email
A second user receives the email
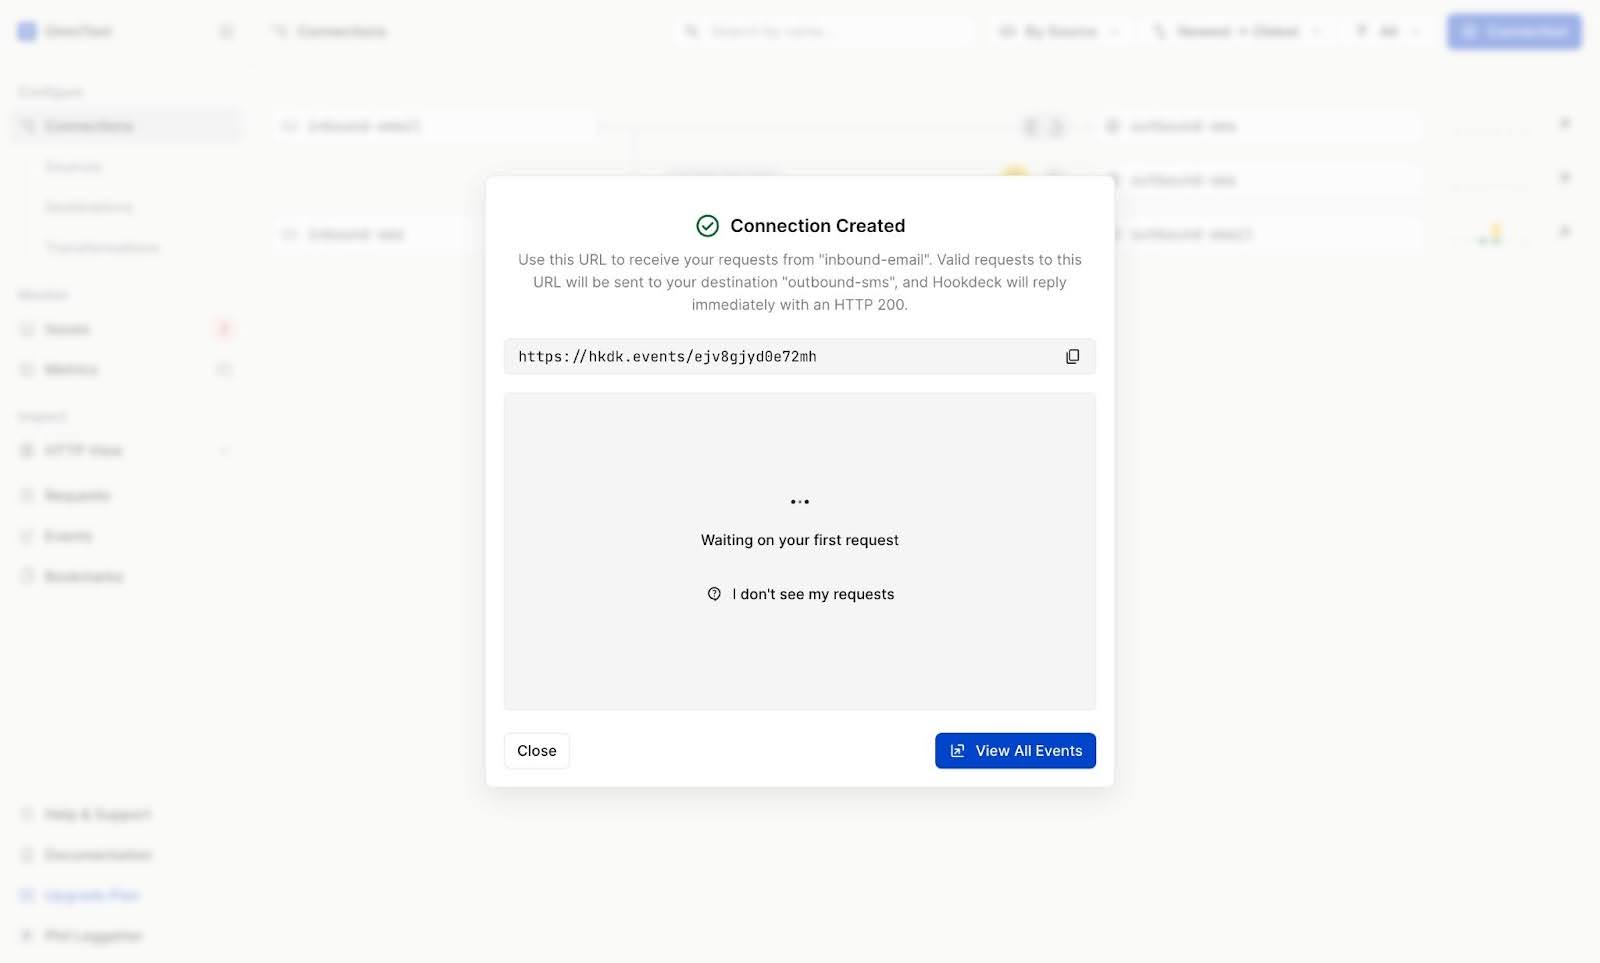
Head to the Hookdeck dashboard, select Connections, and click the + Connection button.
On the Create Connection page, in the Configure a Source, call the Source inbound-sms.
In Configure a Destination, set the Name to outbound-email.
For the Configure a Destination > Endpoint URL, use the Postmark email API endpoint, https://api.postmarkapp.com/email.
Expand Configure a Destination > Advanced Configuration, select API Key in the authentication dropdown, set the Parameter Name to X-Postmark-Server-Token, and use your Postmark server API token as the value for API Key.
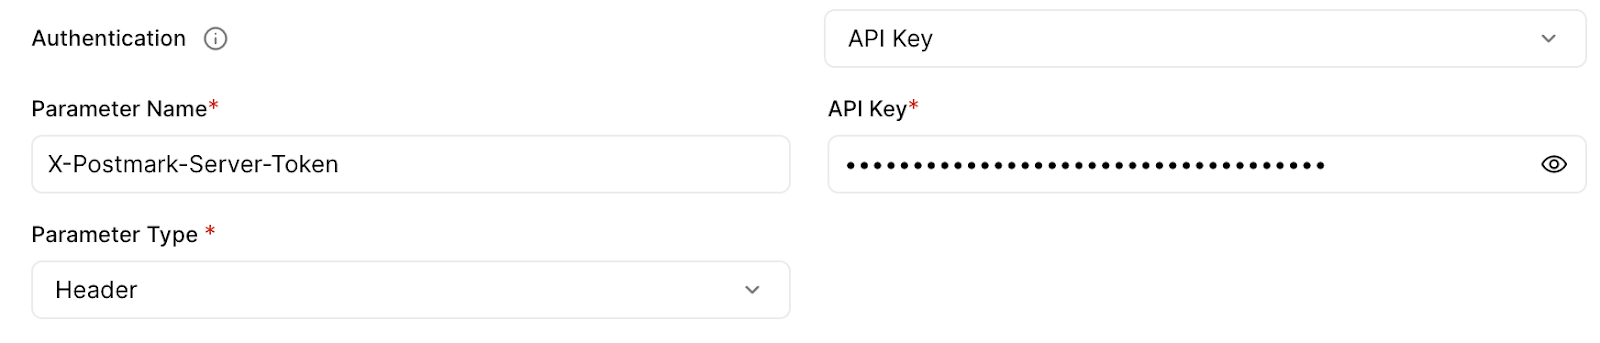 Authentication in Hookdeck for Postmark Request
In the Set Connection Rules section, click on Transform followed by Create new transformation, and you will see the in-browser transformation editor.
Enter the following in the code textarea:
const smsToEmail = (request, context) => {
 const replyToEmail = process.env.REPLY_TO_EMAIL;
 const fromEmail = process.env.FROM_EMAIL;
 const toEmail = process.env.TO_EMAIL;
 const subject = process.env.SUBJECT;


 const domain = toEmail ? toEmail.replace(/.*@/, "") : "example.com";
 const conversationId = `<omnitext/conversation/1@${domain}>`;


 const postmarkSendEmailRequest = {
   From: fromEmail,
   To: toEmail,
   ReplyTo: replyToEmail,
   Subject: subject,
   TextBody: request.body.text,
   MessageStream: "outbound",


   Headers: [
     {
       Name: "Message-ID",
       Value: conversationId,
     },
   ],
 };


 request.body = postmarkSendEmailRequest;


 return request;
};


addHandler("transform", smsToEmail);The majority of the code is contained within a function named smsToEmail. Here's a walkthrough of what the code does:
First, you'll notice the transformation code retrieves a number of environmental variables using the syntax process.env.VARIABLE_NAME. This makes use of Hookdeck transformation environment variables that are used to store secrets.
Open the Variables dropdown menu and create the following variables using your values from the Prerequisites section:
REPLY_TO_EMAIL: The Postmark email to ensure email replies go to Postmark and trigger a webhookFROM_EMAIL: Set this to the same asREPLY_TO_EMAILor the email you signed up for Postmark with. If you want to support sending email from other domains you'll need to verify your domain with Postmark. This may be useful to help email clients identify the contact in an address book.TO_EMAIL: The email address of the person on the email receiving part of the conversation.SUBJECT: The subject to be used in the email. You can make this more dynamic, if you like.
Once the environment variables have been retrieved within smsToEmail, a conversationId variable is assigned a value with contents and a format that ensures emails are kept on the same thread within an email client (for more information, see the Postmark threading support article and this post on sending emails that thread in Rails).
Then, the email API payload is built and assigned to the postmarkSendEmailRequest variable. The main points to be aware of within this payload are:
TextBodyis set to the text sent within the SMSMessageStreamis set tooutboundto tell Postmark that the transactional (outbound) stream should be used to send the emailThe
Headerscontain one header calledMessage-IDwith the value assigned from theconversationId. As mentioned, this is used to help email clients thread emails.
request.body is assigned the value of the Postmark email payload, postmarkSendEmailRequest. This is then used in the subsequent request sent to the destination of the connection, the Postmark email API endpoint.
The transformed request is returned from the function and used within the request to the Postmark API, as set in the connection's destination. The addHandler call instructs Hookdeck to call the smsToEmail any time a transform should be handled.
Click Confirm, name the transformation vonage-sms-to-postmark-email, and click Confirm to go back to the Connection setup page.
In Set Connection Name, enter sms-to-email. Finally, click +Create to create the connection.
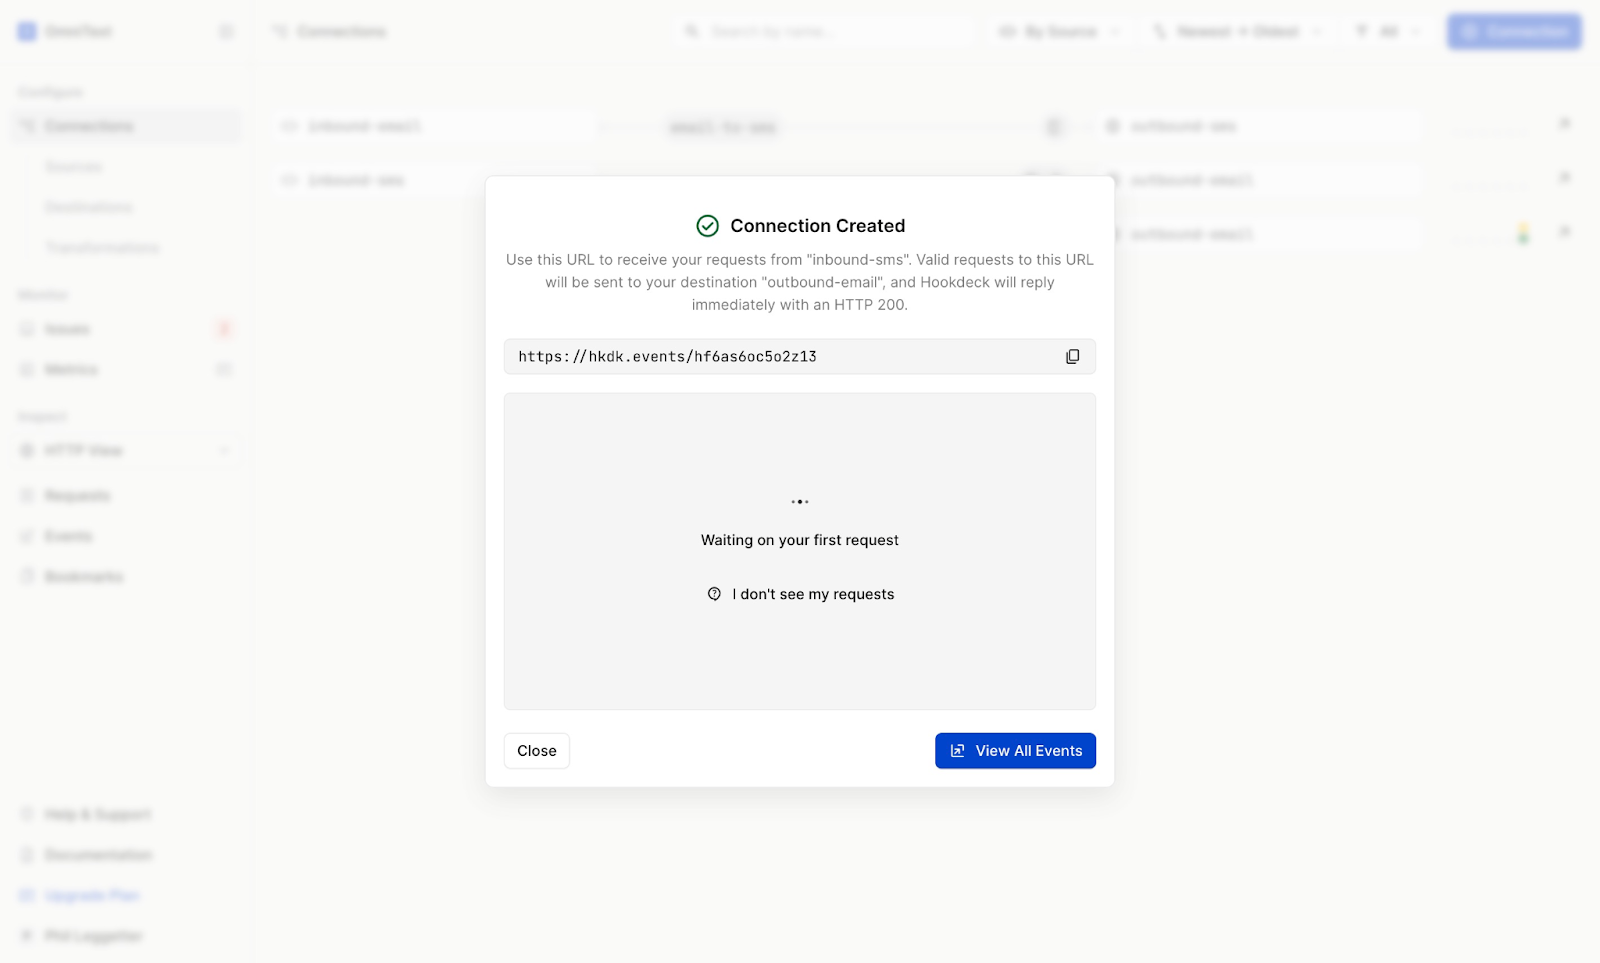 Successful Connection Created
Copy the Source URL from the dialog that appears and head to the Vonage APIs dashboard.
Within the Vonage API dashboard, select the Applications menu item on the left and click + Create a new application.
Name your application sms-to-email. In the Capabilities section, enabled Messages, and paste your Hookdeck Source URL into the Inbound URL and Status URL fields. Finally, click Generate new application.
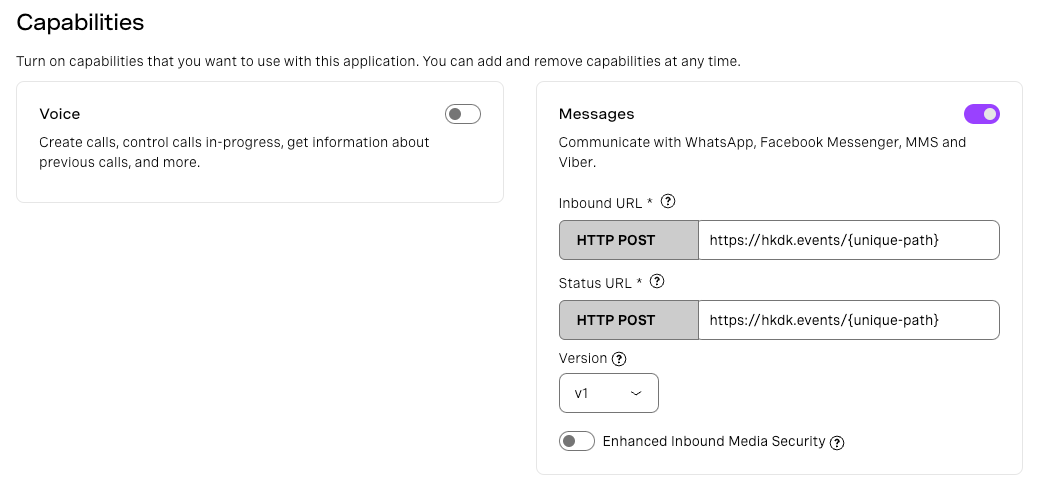 Add Hookdeck webhook to Messages API Application
On the next screen, you'll see your Vonage phone number. Link this to the application you just created by clicking Link.
 Link Your Messages API to Your Number
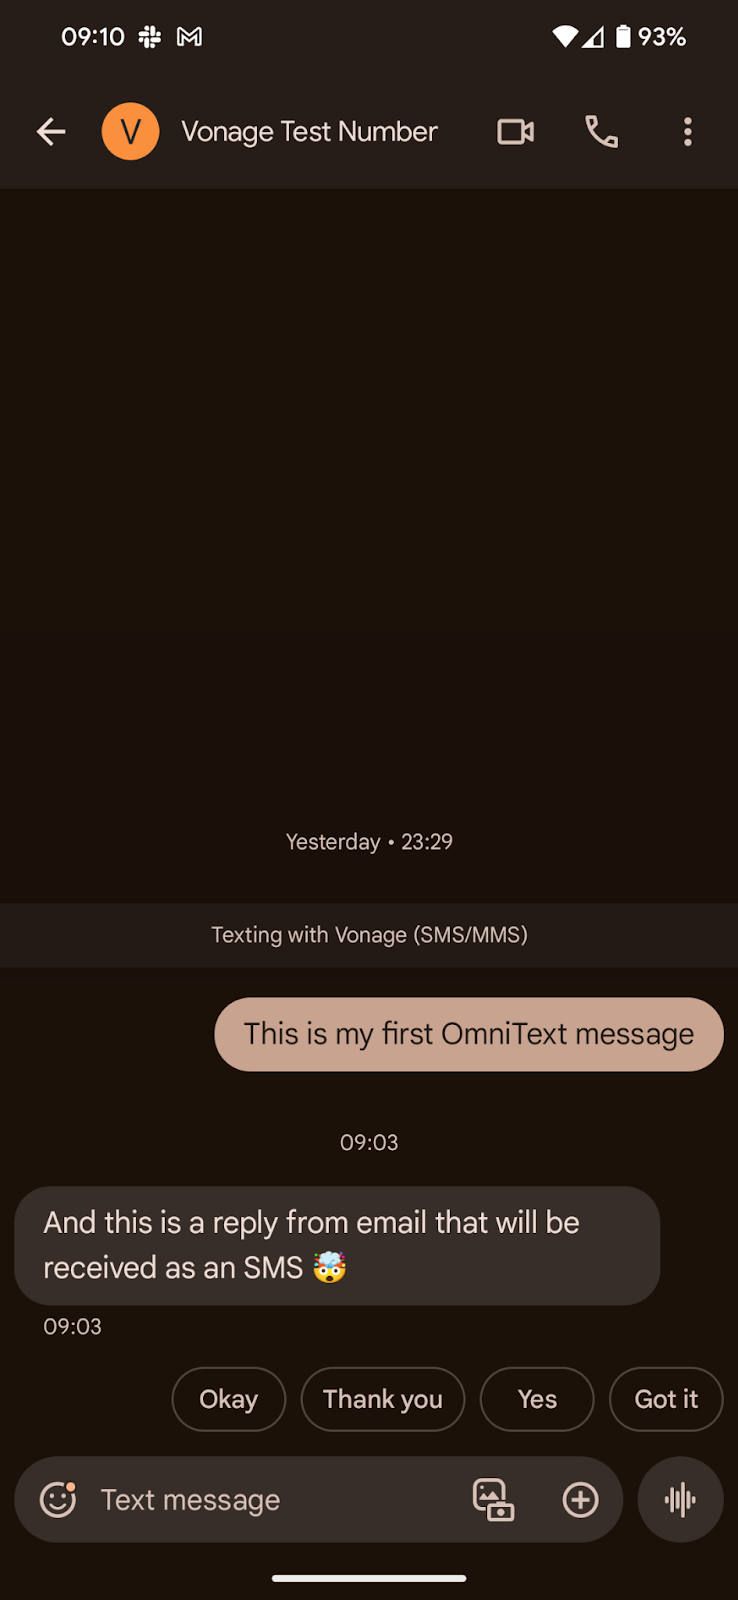
Now, send an SMS to your Vonage number.
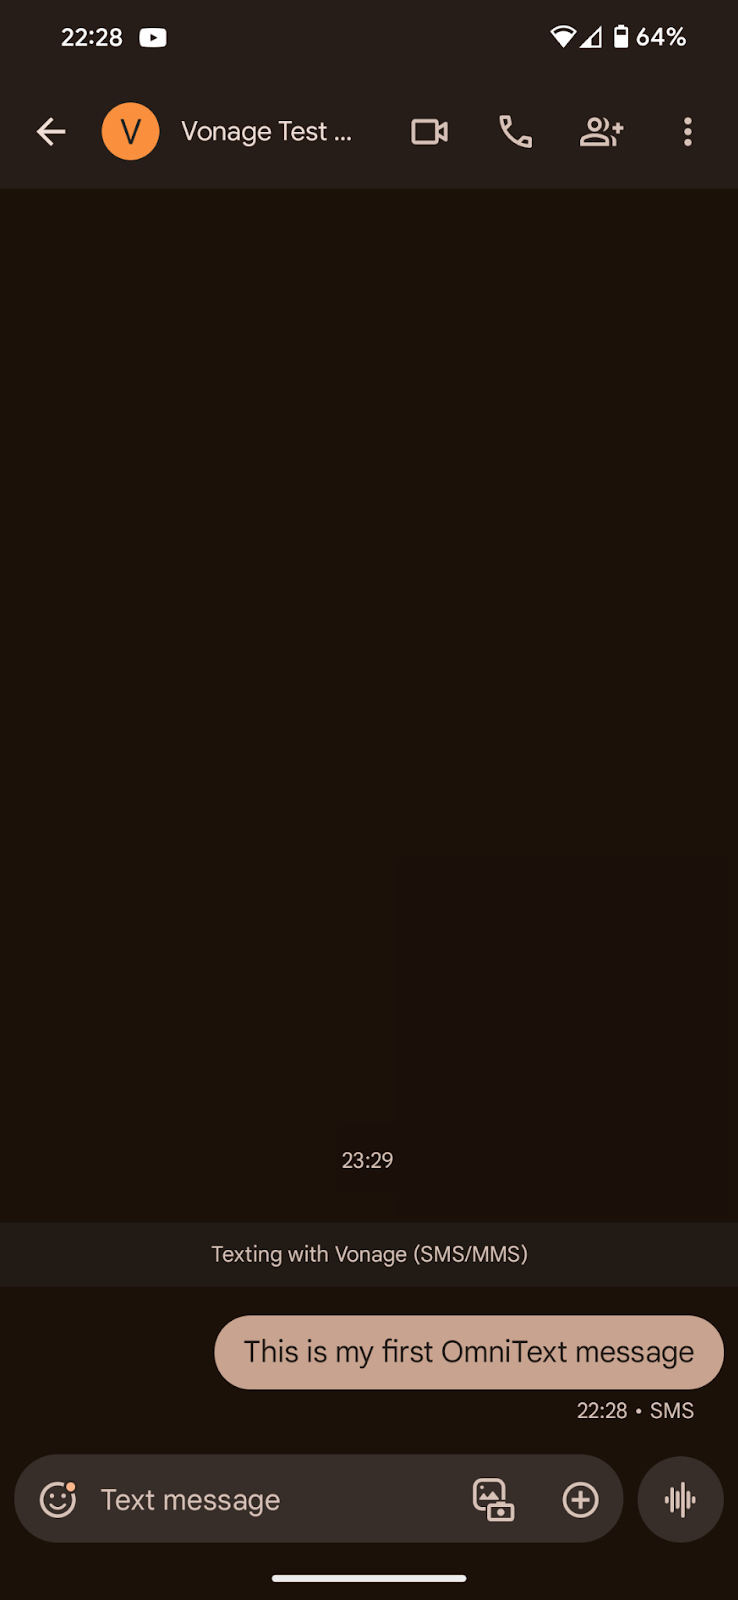 Test Your First Working OmniText
Head back to the Hookdeck Dashboard, and once Hookdeck receives the SMS webhook, the UI will update to show the received webhook event as follows:
 Hookdeck Successful Event Fired
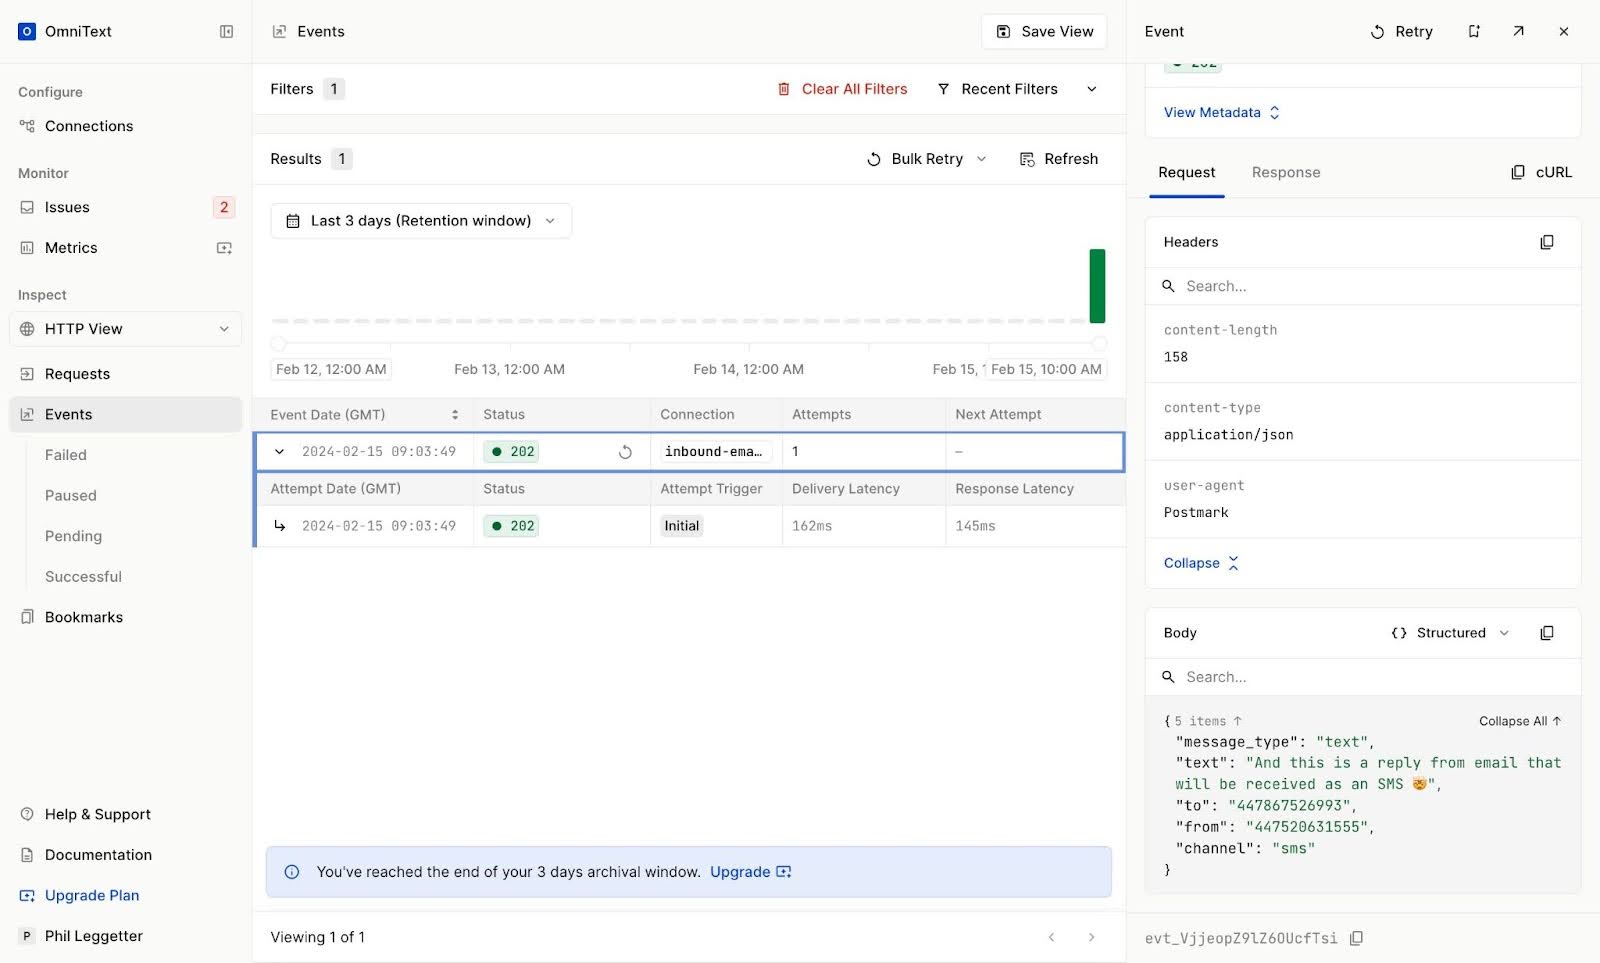
Click View All Events and select the event in the table to view more details.
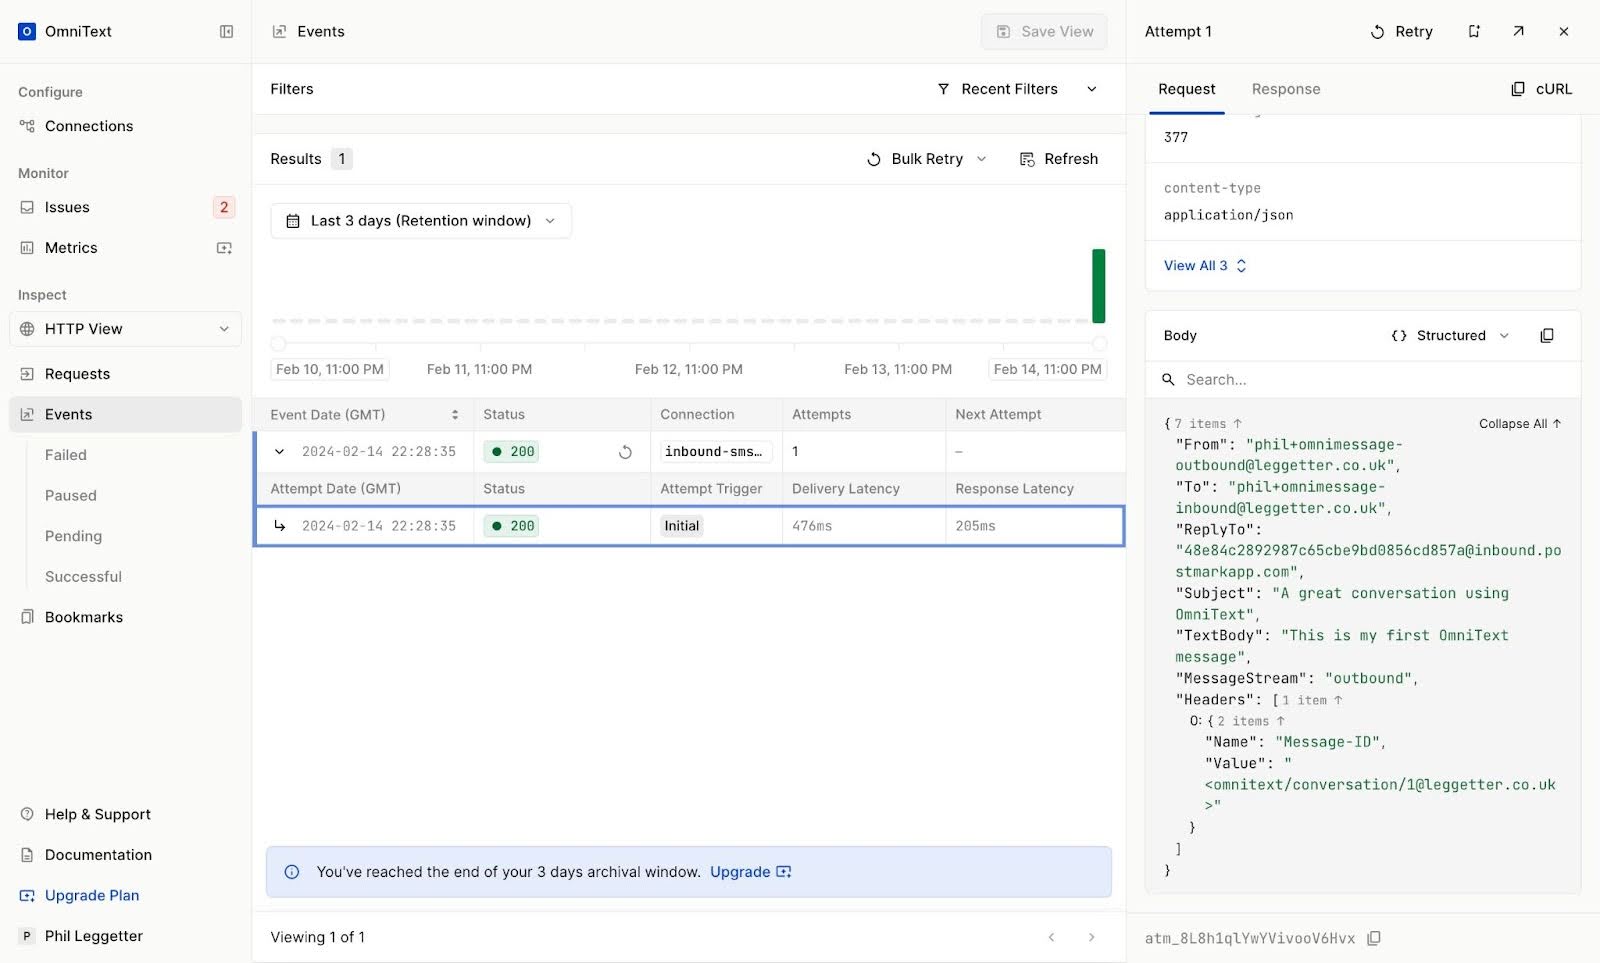 Detailed Hookdeck Events Dashboard
Next, check your email:
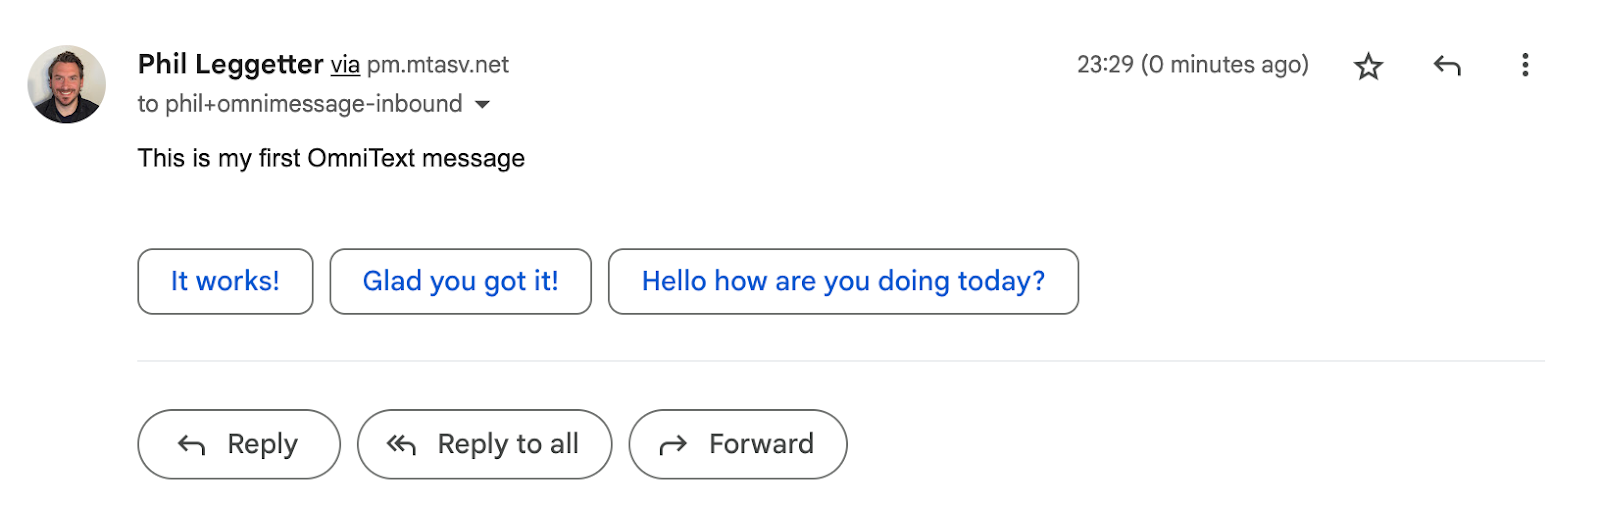 Successful SMS to Email
That's it. The SMS-to-email functionality is in place.
Now to create the connection that supports the flow, same as before but in reverse:
A user sends an email to an email associated with Postmark
Postmark triggers an inbound email webhook
Hookdeck receives the inbound email webhook and converts the payload of an outbound Voange API SMS payload
Hookdeck make an HTTP request to a Destination URL, the Vonage Messages API endpoint, to send an SMS
A second user receives the SMS
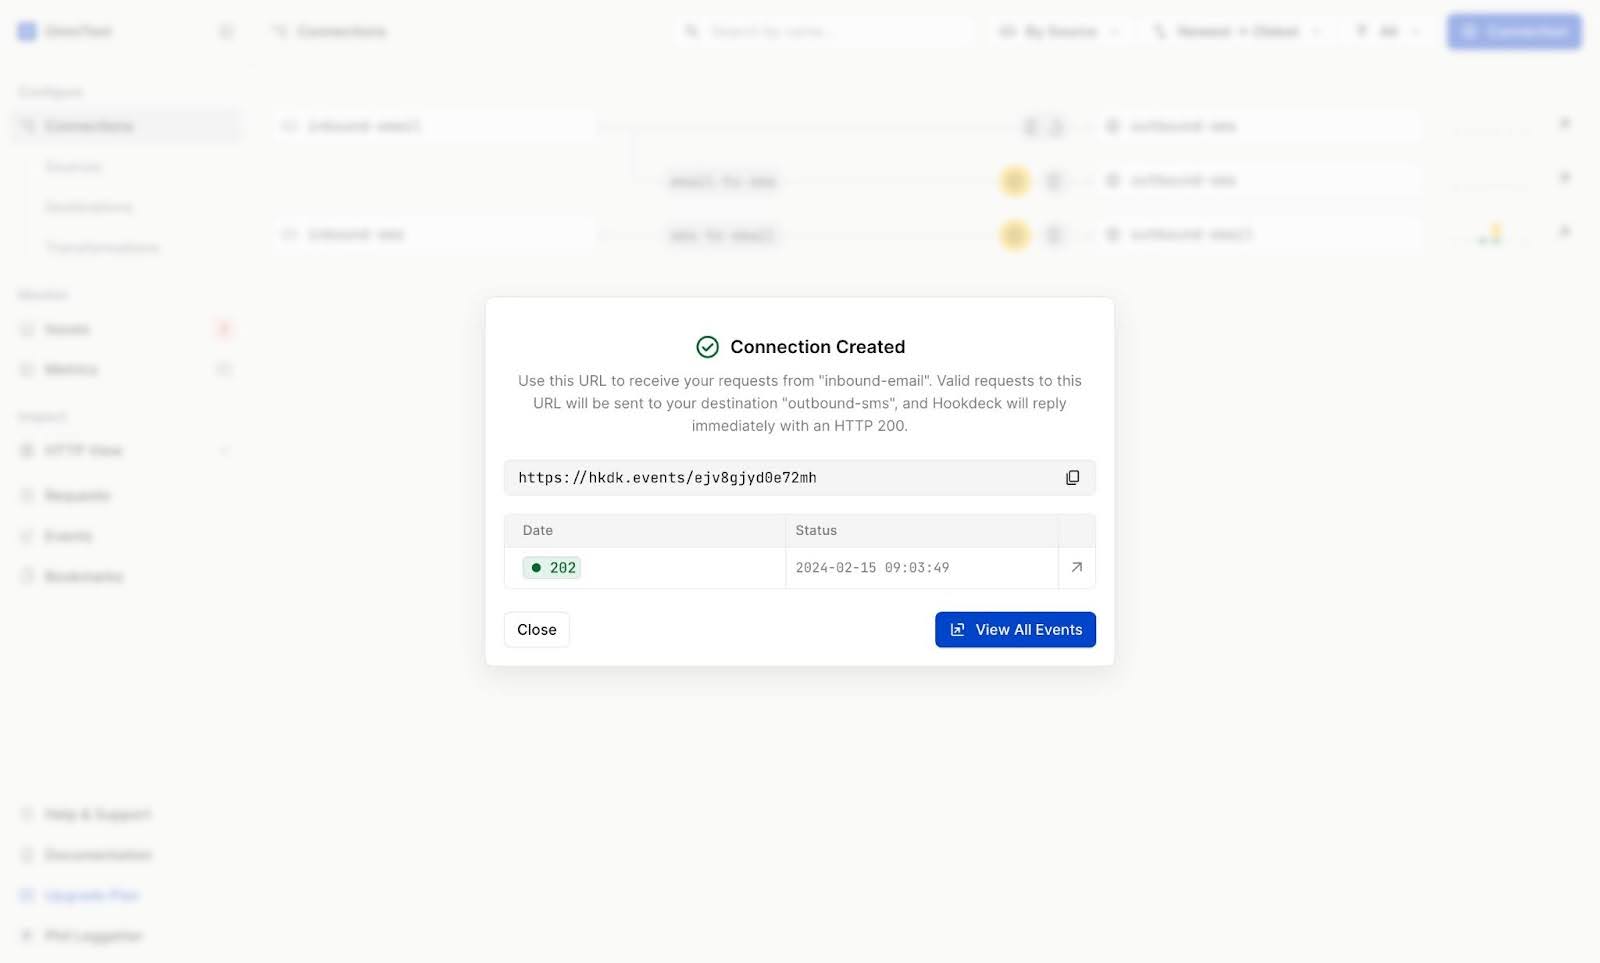
As before, go to the Hookdeck dashboard, select Connections, and click the + Connection button.
On the Create Connection page, in the Configure a Source section, give the Source the Name inbound-email.
In Configure a Destination, use the Name outbound-sms and set the Endpoint URL to the Vonage Messages API endpoint, https://api.nexmo.com/v1/messages.
Expand Configure a Destination > Advanced Configuration, choose Basic Auth from the Authentication dropdown, and use your Vonage API Key as the Username and Vonage API secret as your Password.
 Vonage API Authentication in Hookdeck
In the Set Connection Rules section, click on Transform followed by Create new transformation, and, as before, you will see the in-browser transformation editor.
Copy and paste the following transformation code into the editor:
const emailToSms = (request, context) => {
 const toNumber = process.env.TO_NUMBER;
 const fromNumber = process.env.FROM_NUMBER;


 const vonageRequestPayload = {
   message_type: "text",
   text: request.body.StrippedTextReply || request.body.TextBody,
   to: toNumber,
   from: fromNumber,
   channel: "sms",
 };
 request.body = vonageRequestPayload;


 return request;
};


addHandler("transform", emailToSms);The majority of the code is with a function. This time called emailToSms.
As before, begin by storing the following environmental variables via the Variables dropdown:
TO_NUMBER: The phone number of the recipient of the SMSFROM_NUMBER: The Vonage phone number used to send the SMS
Phone numbers should be formatted with international country code but without any leading + or 00
The rest of the code does the following:
A vonageRequestPayload variable is created and contains the Messages API request payload. The message_type has a value of text, and the channel has a value of sms to indicate an SMS message will be sent. The text property is the contents of the SMS, and the value is set to request.body.StrippedTextReply or, if that's not populated, the request.body.TextBody. The StrippedTextReply is the email body of a reply with only the new message portion and not the full email thread.
The request.body is assigned the value of the vonageRequestPayload variable, and the request returned to be used in the request to the connection's destination, the Vonage Messages API endpoint. The addHandler call instructs Hookdeck to call the emailToSms any time a transform should be handled.
Click Confirm, name the transformation postmark-email-to-vonage-sms and click Confirm to go back to the Connection setup page.
In Set Connection Name, enter email-to-sms. Finally, click +Create to create the connection.
 Email to SMS Connection Created
Copy the Source URL from the dialog, head to the Postmark dashboard, and go to the Servers > {Your Server Name} > Default Inbound Stream > Settings section. Scroll down to the Inbound webhook section, paste the URL into the Inbound Webhook field, and Save changes.
 Postmark Webhook Connecting to Hookdeck
Send an email to the Postmark inbound email address. You can do this by replying to the email you received in the previous step.
 Successful Programmatic Email Thread Reply
After sending the email, head back to the Hookdeck Dashboard, and you will see the webhook event has been received from Postmark.
 Hookdeck Successful Email to SMS Event
Click View All Events, select the event within the table, and inspect the details of the inbound Postmark webhook.
 Hookdeck Email to SMS Events Detailed
Check your SMS messages to see the email body within the SMS message:
 Successful Email to SMS
You can also try replying again from SMS to ensure the conversation is threaded in your email client:
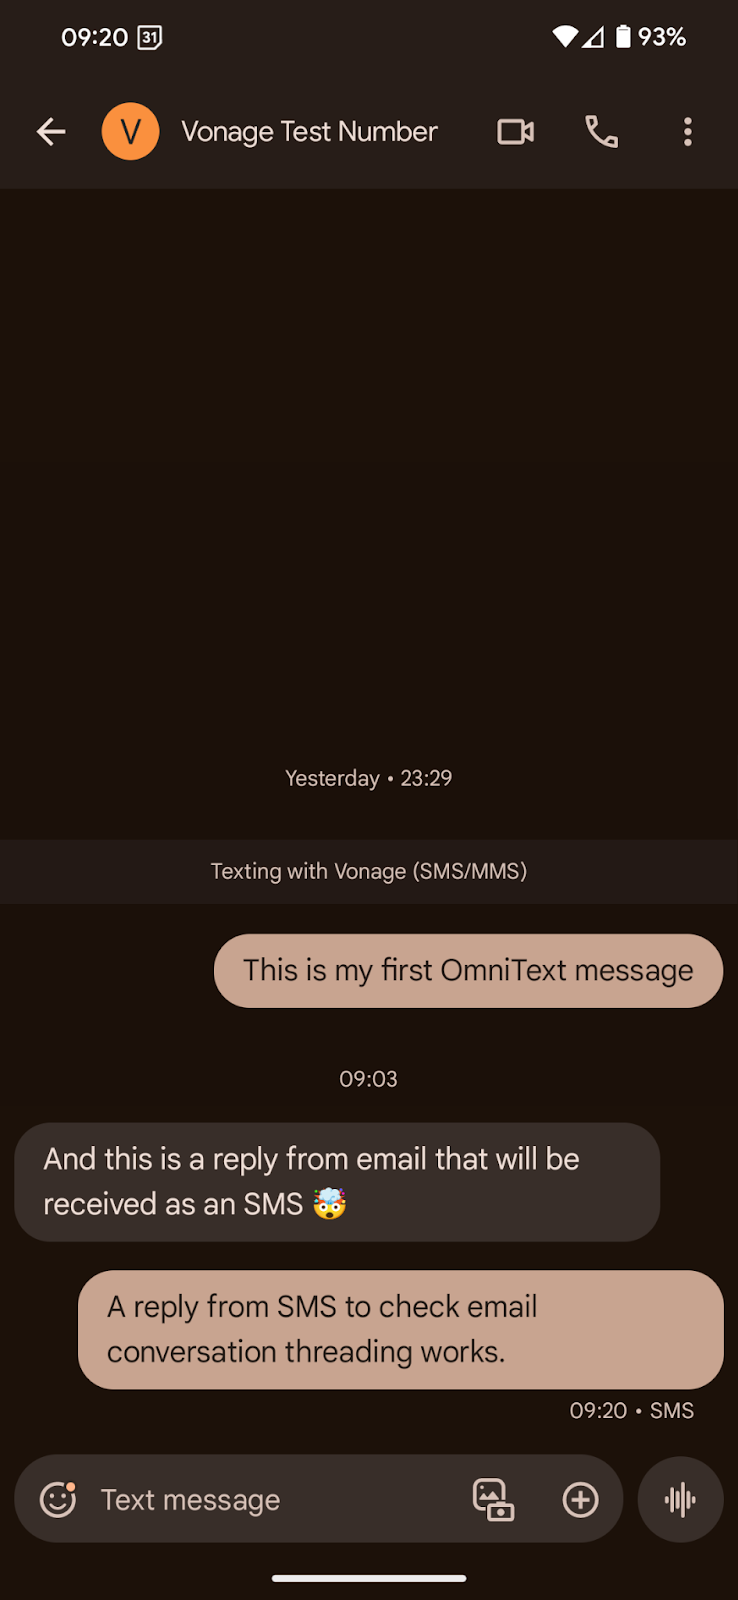 Successful SMS reply to Email Thread
So in your email you should see the thread:
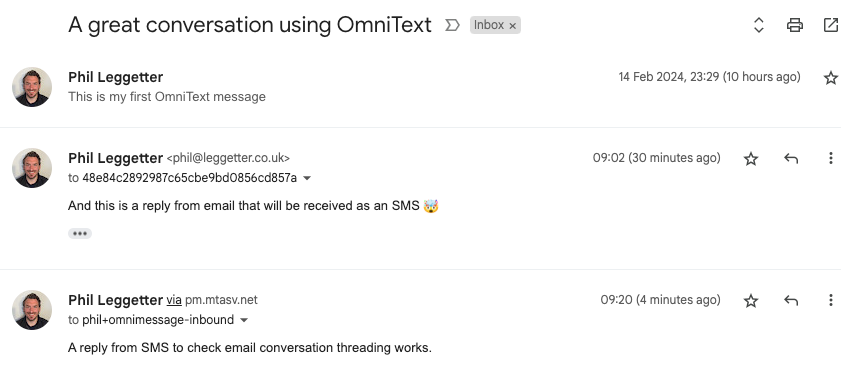 Successful Threading in Email From SMS
In this tutorial, we covered creating a connection in Hookdeck that received an SMS webhook from the Vonage Messages API, transforming the payload into a Postmark email API request, and sending the body of the SMS as the body of an email. We then created a second Hookdeck connection that receives a Postmark email Webhook. We transform the payload to a request payload for the Vonage Messages API and send the body of the email as the contents of an SMS message. In all cases, API credentials are securely stored within Hookdeck.
And with that, you have now built an omni-channel conversation solution, bridging SMS and email.
The OmniText GitHub repo contains the code that shows how to script setting up the connections within Hookdeck. Feel free to give that a try as an alternative way of working with Hookdeck.
This article walked through using the Hookdeck dashboard to achieve the functionality required to support a single conversation between a pre-defined phone number and email. However, everything we did is achievable using the Hookdeck API. Programmatically creating new connections is one potential approach you could take to support multiple conversations, or you could store an email to SMS bi-directional lookup upon some sort of conversation registration event.
If you're looking for a low-code/no-code solution, take a look at Vonage API Studio.
A few other things you can also try out with the technologies used in this article are:
Adding webhook verification to the inbound Postmark and Vonage Messages webhooks
Using the Hookdeck CLI to receive the webhooks in your local development environment (similar to what ngrok is best known for)
Creating a 2nd, 3rd, and nth, conversation. Feel free to discuss potential solutions for this by creating an issue in the OmniText repo.
Adding support for other messaging channels such as WhatsApp, Facebook Messenger, and Viber using the Vonage Messages API
Whatever you decide to do to next, we want to know about it! Join us on the Vonage Developer Community Slack or message us on X, formerly known as Twitter.