Share:
Chris is the Developer Relations Tooling Manager and leads the team that builds your favorite tools. He has been programming for more than 15 years across various languages and types of projects from client work all the way up to big-data, large scale systems. He lives in Ohio, spending his time with his family and playing video and TTRPG games.
Implement Vonage Video on Appwrite Cloud
Time to read: 14 minutes
We will build a demo application showing how to use our Vonage Video platform with Appwrite Cloud as a backend service.
A Vonage Video API Account. We will use it to set up the video part of the backend.
An Appwrite Cloud account. We will be using Appwrite to handle the backend portions of our application.
The Appwrite CLI tool. We will use this to set up various parts of our project.
A ngrok account. We will use this to access our video app on many devices.
The Demo Application available on GitHub.
Appwrite describes itself as "a backend platform for developing Web, Mobile, and Flutter applications." Originally this was offered as a Docker container a developer could run on their servers that provided various services and was very much a "backend in a box." When coupled with their SDKs, developers had user authentication, a NoSQL database, file storage, serverless function, a real-time database, and built-in security for their application backend.
Appwrite Cloud is a hosted solution for developers that want to use these features but want to avoid going through the process of running Appwrite locally. A developer can then get up and running immediately by letting Appwrite Cloud handle some of those yak-shaving questions like "How do we handle user logins?" or "Where can I set up a database?" A dashboard lets you set up the data for your application, and you can start writing your application right away.
Appwrite Cloud also removes the need for the developer to set up and manage a server to run the Appwrite software. In the early days of application development, especially at the proof-of-concept level, focusing on solving the problem at hand is much more important than all the DevOps or hosting options available. A single dashboard and system that handles authentication, data, and some basic code deployment help speed up the development process.
One of the significant advantages of Appwrite is the wide variety of languages they support. Their serverless system can work with Node, Ruby, PHP, Python, and Kotlin. Short of .NET, you can start to work with Vonage's APIs using our existing SDKs. This helps bridge the power of Appwrite Cloud with Vonage's APIs. Since Appwrite is built to scale with your application, you can be comfortable knowing that you can move from development to production without swapping anything out.
The one downside to Appwrite is that it does not come with a hosting solution outside of the serverless functions for web applications. This does mean you will need a service to host your static HTML files or frontend code to serve customers. While they can support any host, they suggest Vercel, Netlify, or Gitpod during application setup. If you are building a mobile application that runs on a device you can access the backends.
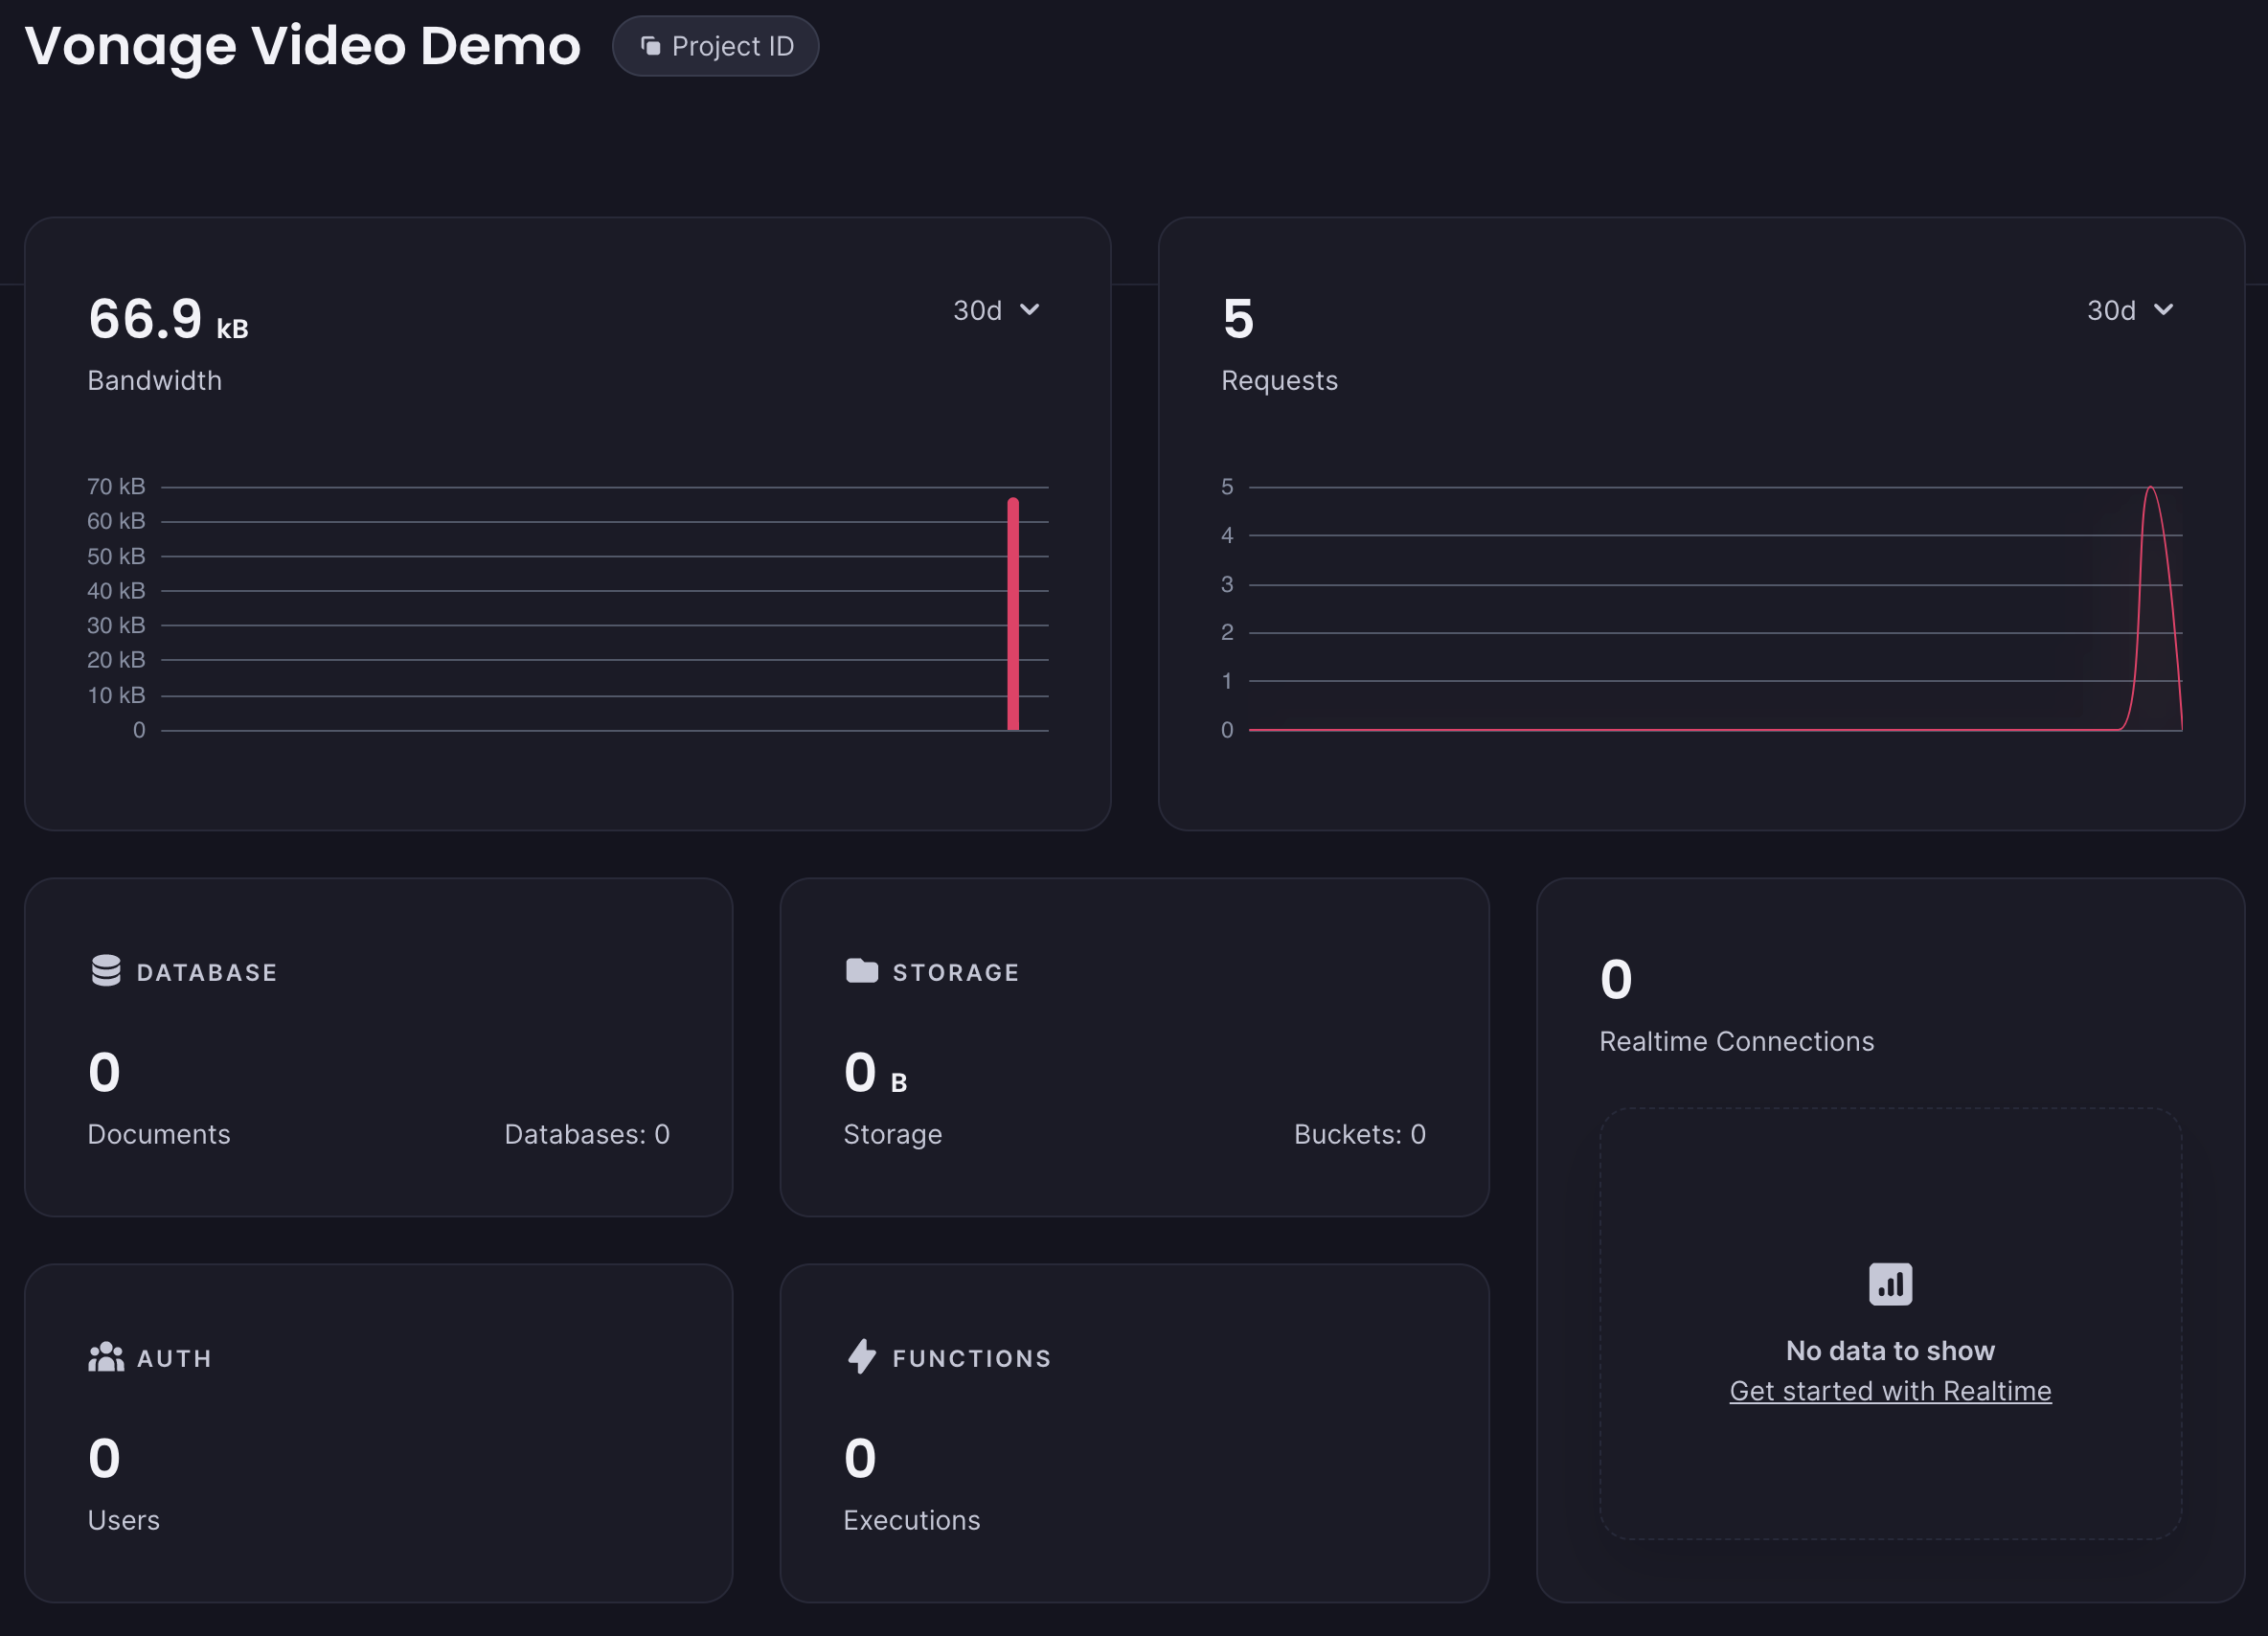
Log into the Appwrite Cloud dashboard. You will then set up a new Project, which is a collection of settings and data for individual projects. Click on Create a new project and give it a name. We will call ours "Vonage Video Demo." Click Create once you fill in a name.
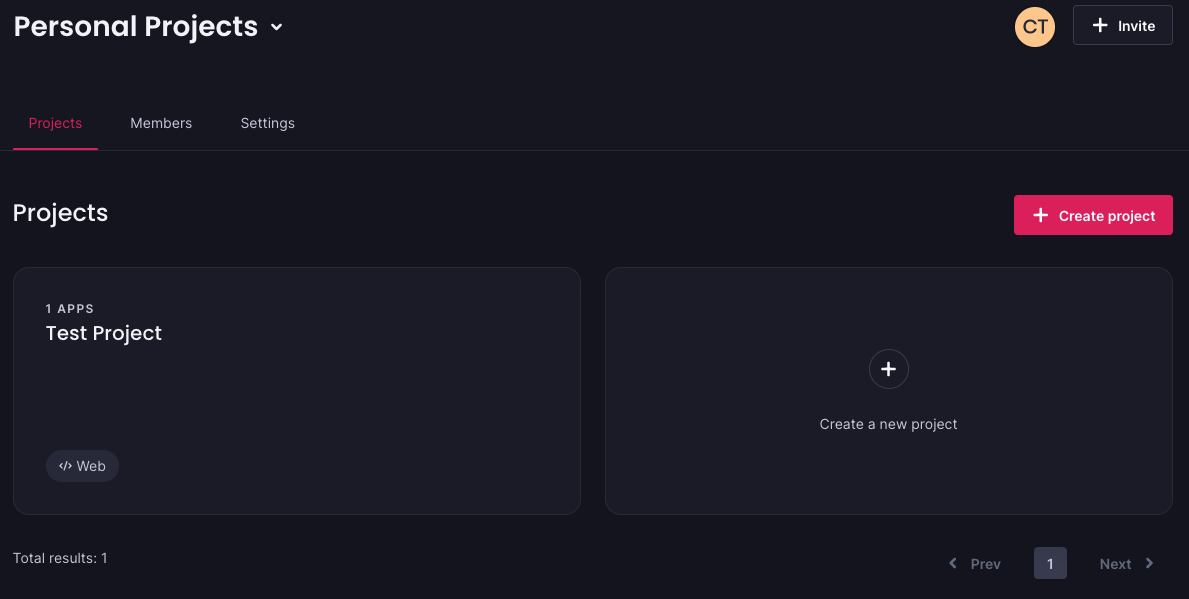 Appwrite Cloud Dashboard
You can set up an Appwrite application in a few ways, but since we want to take advantage of Appwrite Cloud's authentication mechanism, we will select Web App. This will allow us to call the Web SDK and Appwrite Cloud directly from a webpage instead of relying on a back-end web server.
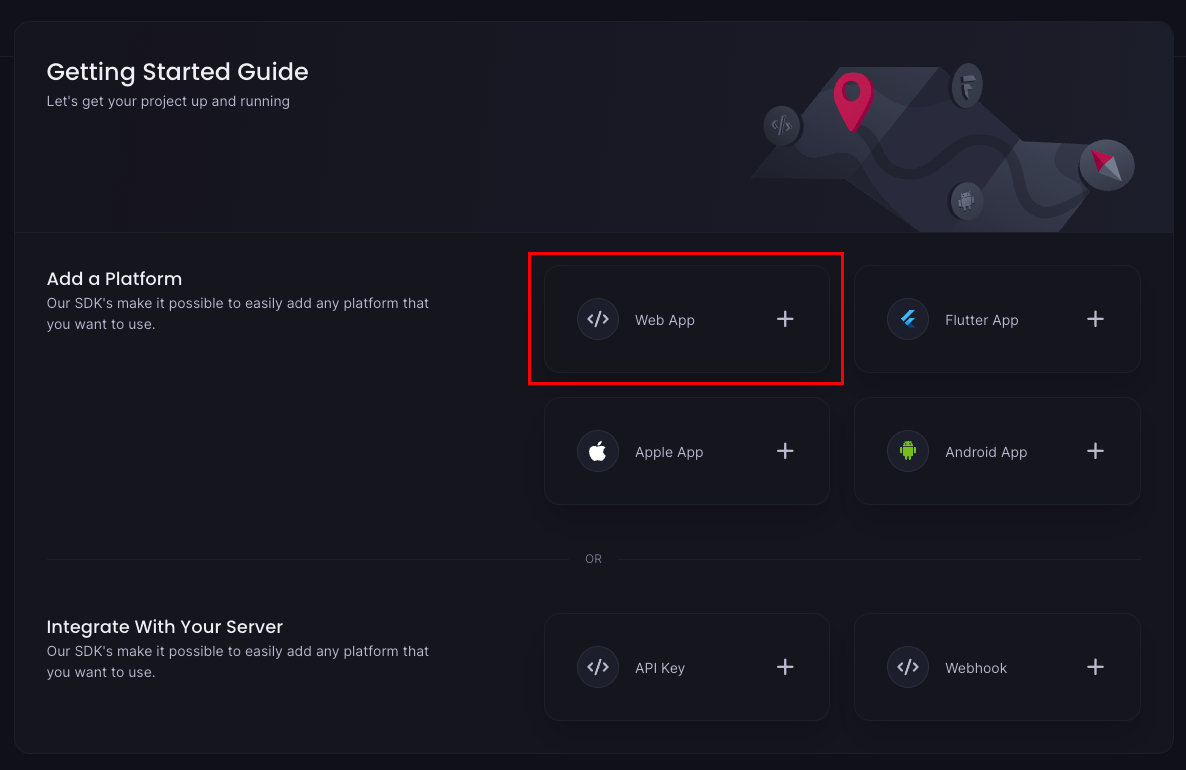 Adding the Web Platform
We then need to give our application a name and a domain name that is valid for requests to come from. For the demo, enter "Vonage Client App" and then an asterisk ("*") for the domain. In a production app, you would set this to the domain your JavaScript would be called from, but we will allow all domains for demo purposes. That lets us test locally and through ngrok later.
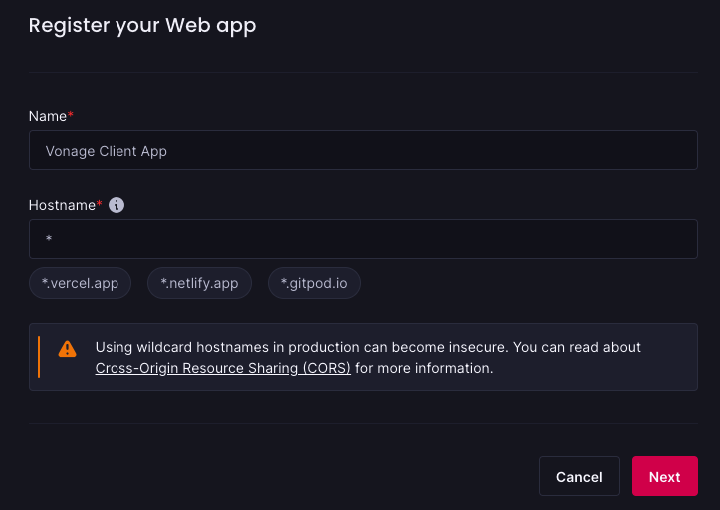 Registering a New Web App
Click on Next, and then on Skip optional steps. All the Appwrite dependencies will already be set up in the demo application, but this page shows you the packages to install in a Node.js application. We are finished setting up the application, so continue clicking any final Next buttons until you get to the dashboard.
 Appwrite Project Dashboard
Appwrite allows a variety of built-in authentication mechanisms. Developers can choose from basic username and password verification, which we will use, to various external OAuth providers like Discord, Apple, and Google. Our users will log in with a username and password to authenticate. Still, since Appwrite supports many OAuth providers, you could swap out the username and password authentication with a completely different service.
From your Appwrite dashboard, click on Auth in the left navigation menu, and then go to Settings. Toggle everything but "Email/Password" and "JWT" off. You can always toggle them back on later.
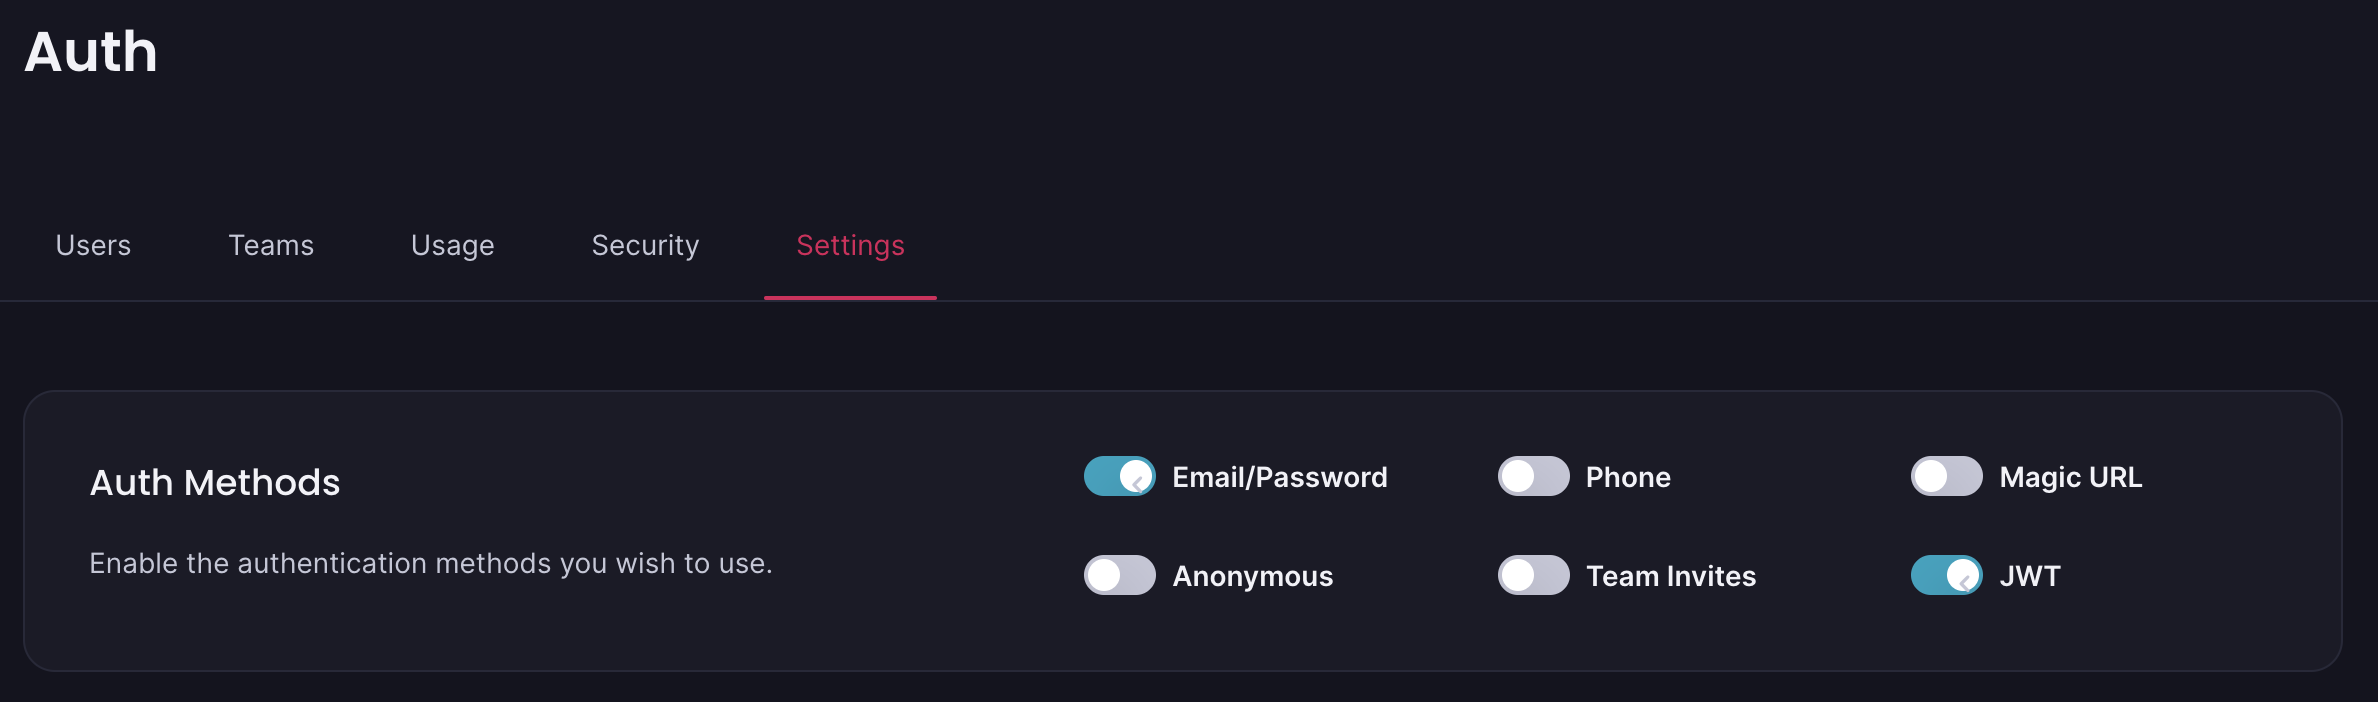 Appwrite Auth Settings
While we can create users programmatically through the Appwrite SDK, we will create a user through the UI for now. Click on Users, and then on + Create User. Fill in the Name, Email, Phone, and Password options for now. Click on the Create button to save the user.
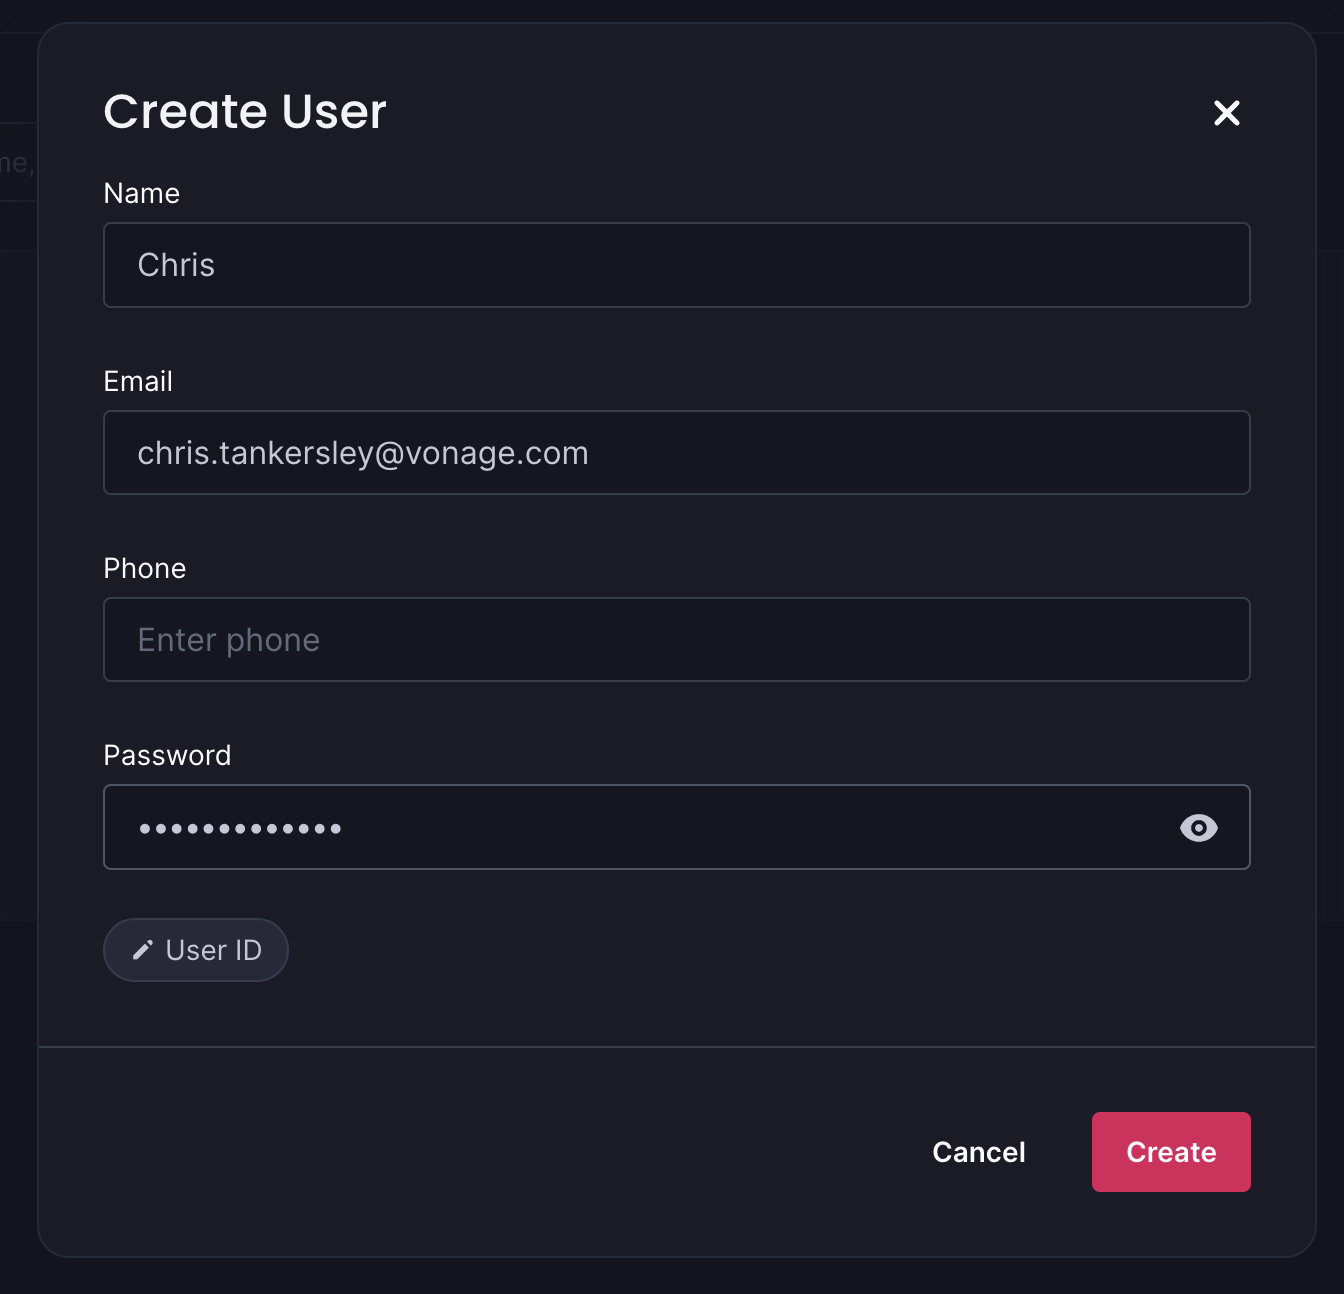 Creating an Appwrite User
In our web application, we can gate users from being able to access the actual meeting by making sure they have logged in through Appwrite. The Appwrite Web SDK allows you to take user credentials from a form and create a new login session, so we will use that to log the user in. We will then use a package called zustand, which will persist our user information from page to page.
const userStore = (set: any, get: any) => ({
	user: null,
	isLoggedIn: false,
	login: async (email: string, password: string) => {
		await account.createEmailSession(email, password)
			.then((resp: any) => {
				set(() => ({ user: resp, isLoggedIn: true}));
		})
	},
	logout: async () => {
		await account.deleteSession('current')
			.then(() => {
				set(() => ({ user: null, isLoggedIn: false}));
		})
	},
})The hook has a login and logout method, which will talk to Appwrite when we log in. Our form in the Login component will call a handler that invokes the userStore.login() method to log the user in.
We will gate routes in our application using the RequireAuth component. This component checks to see if the user is logged in, and if they are not will navigate them back to the login page.
import { Navigate } from "react-router-dom";
import { useUserStore } from "../hooks/userStore";

export default function RequireAuth({ children }) {
	const isLoggedIn = useUserStore((state) => state.isLoggedIn);
	return isLoggedIn === true ? children : <Navigate to="/login" replace />
}This lets us wrap any component inside this RequireAuth component to make sure users log in before they can access the meeting!
const router = createBrowserRouter(
	createRoutesFromElements(
		<Route path="/" element={<Root />}>
			<Route index element={<RequireAuth><Home /></RequireAuth>}></Route>
			<Route path="/login" element={<Login />}></Route>
			<Route path="/logout" element={<Logout />}></Route>
		</Route>
	)
)

function App() {
	return (
		<RouterProvider router={router}></RouterProvider>
	)
}
Appwrite Cloud gives access to a document-based NoSQL database. We will use this to store information about the video session we will create to generate proper credentials when a user logs in.
Appwrite Cloud allows you to create databases and collections through the web UI or use their CLI tool. Let's create the database and collection schema from the command line to speed things up.
We can use the appwrite databases create command to create a new database. We will give it an easy-to-remember ID and name:
Next, we need to define a collection inside the database. Collections are like a database table in a relational database. The collection will have a schema defined, and each document (like a row in a relational database) will have the following information. For now, we will store the session ID that the Tokbox platform returns to us and store it as a field named "session_id".
We use the appwrite databases createCollection command to create a new collection named "video-demo", and then define a single attribute (or field) called "session_id" that the documents must have:
We will use the database when someone goes to create credentials for the video session. Nothing is notable here as the Appwrite SDKs handle accessing the database and provide interfaces in various languages. In our case, we will look for a document that stores the video session ID, and if it does not exist, create a new document.
try {
	$document = $appwriteDatabases->getDocument('video-demo', 'sessions', 'video-session');
} catch (AppwriteException $e) {
	$session = $opentok->createSession();
	$document = ['session_id' => $session->getSessionId()];

	$appwriteDatabases->createDocument('video-demo', 'sessions', 'video-session', $document);
}Full documentation on using the Appwrite database through the SDKs can be found at https://appwrite.io/docs/getting-started-for-server.
Since our front end will worry about handling displaying a video conference room, we need some logic to run in the background. Appwrite allows functions deployed in various languages to handle scheduled or ad-hoc tasks as required. We will utilize the function capability to generate credentials for our video session.
So far, we have used the web GUI to configure the project and the Appwrite CLI to configure the database. We can also generate a configuration file with all our settings, named appwrite.json. If you are using the demo application, copy appwrite.json.dist to appwrite.json, and you can use it to deploy the backend code.
One advantage to using appwrite.json and the Appwrite CLI is the ability to deploy many things at the same time. Since we have three functions, we can use the Appwrite CLI to deploy them as defined in the configuration file.
If you open up appwrite.json, there will be a "functions" section. We define an object which details all the information about our function. Since our backend is decoupled from our front end, I have elected to write the functions in PHP instead of Nodejs. You can use a variety of languages that Appwrite supports, including Python, .NET, and even Deno.
The function config details the runtimes, the path to the code, any files we want to ignore, permissions for who can run the verifications, and more. We also supply a list of variables that need to be passed to the function to work, like our Vonage API key and secret. Fill in the variables with your account information.
We can deploy the function with a single call:
Our code will be bundled up and pushed to Appwrite's servers and will be available for use after a few seconds.
You can review the sample code for the functions in the functions/ folder. For the credentials function, we look for an existing Video session in the video-demo.sessions collection. If one is missing, we create a new video session using the OpenTok PHP SDK and save it to the collection. We then return the video session ID, video API key, and a generated client-side token.
As a side note, our demo application also supplies our database information as part of the config. You can deploy it with the Appwrite CLI like our functions:
Now that we can log into our application, let's build the front end for the video conference. Vonage offers three levels of Video API that allow you to decide how much control you want over the final video product.
Vonage Video API - A low-level customizable experience where you handle everything
Vonage Video Express - You handle the layout, and we'll handle all the best practices
Vonage Meetings - We handle everything. You visit a website as a host or guest
We will need a video application already created. Log into your video account at https://tokbox.com/account. Click " Projects " from the dashboard, and then "Create New Project." We are not doing an embedded project, so click "Create Custom Project." Enter "Vonage Appwrite Demo" as the name, and click "Create." You will be presented with an API Key and Secret, so enter those into your appwrite.json file and deploy the function with the updated credentials.
For this demo, we will utilize the Vonage Video Express. This cuts down on the amount of code we need to add to our application to create and maintain the room compared to the full Video API but still allows us to control the room's layout.
import { useEffect, useRef } from "react";
import { functions } from "../appwrite/config";
import { Room, getDevices } from "@vonage/video-express"

const Home = () => {
	let room = useRef(null)
	const getCredentials = async () => {
		const execution = await functions.createExecution('generate-creds')
		const log = await functions.getExecution('generate-creds', execution['$id'])
		return JSON.parse(log.response);
	}

	useEffect(() => {
		const boot = async () => {
			const creds = await getCredentials();
			room.current = new Room({
				apiKey: creds.apiKey,
				sessionId: creds.session_id,
				token: creds.token,
				roomContainer: 'roomContainer'
			});
			room.current.join()
		}
		boot();
	})

return (
	<>
		<div className="grid grid-cols-1 gap-4" id="roomContainer"></div>
		<button onClick={cycleVideo} className="btn btn-primary">Cycle Video</button>
	</>
	)
}

export default HomeVideo Express handles setting up all the actual layout divs and code for us, so we need to create a container for the room. Our component returns a <div> named "roomContainer", which we pass as the roomContainer key for the Room we create.
We do need to get some valid credentials for our application. Vonage Video requires an API key for our backend project, a session ID to connect to, and a special connection token that acts as our credentials. We can use the functions export from our Appwrite config object to generate a new "execution" of our function. We then read the response containing all the necessary connection info and pass it into the room object.
Now if we run our application and have two people log in (or, in my case, log in with the same account in two browsers), we have two people in a video meeting!
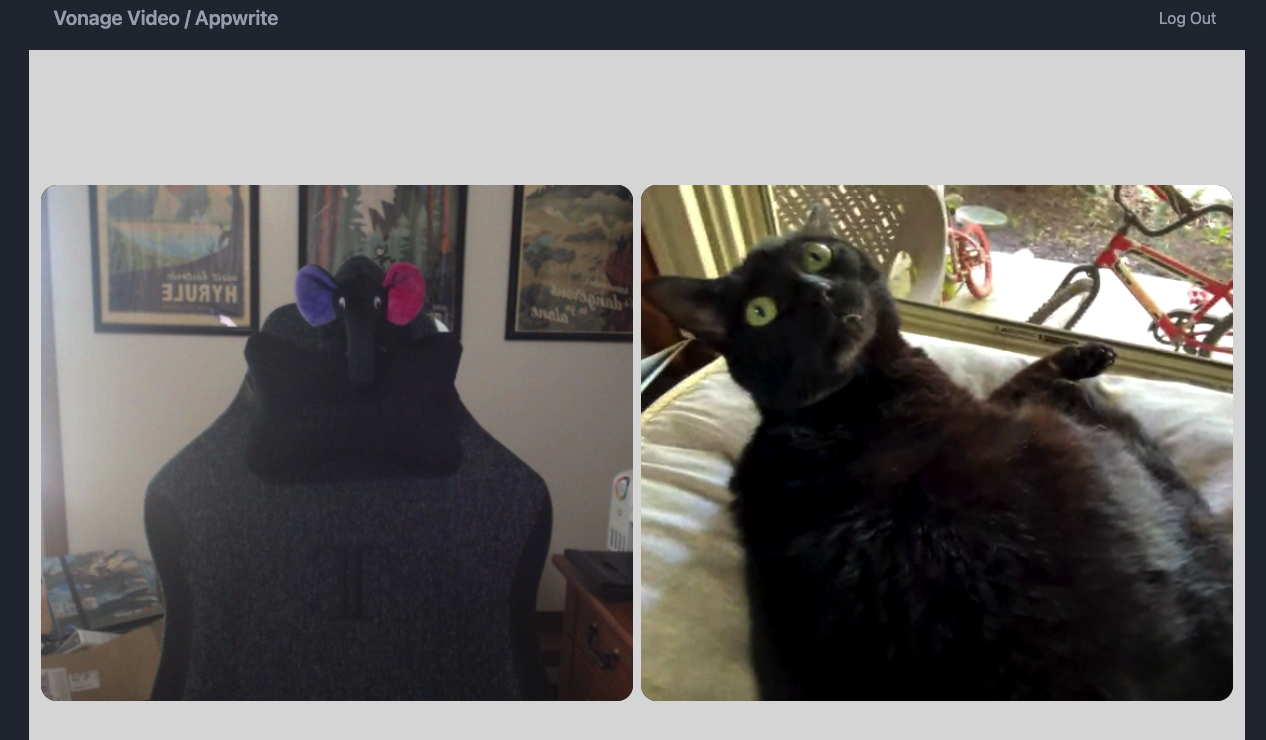 The Video Conference
This demo shows off a portion of Appwrite's features. You can expand the demo code to use different login methods, support many rooms, and even host and serve files with Appwrite's storage service. If you want more control over the video output, swap out Video Express for the lower-level APIs, or play with the CSS to change the visual parts.
Take a look at Appwrite and see if it helps speed up your development, and let us know what cool things you are building using Appwrite and the Vonage communication APIs.
Share:
Chris is the Developer Relations Tooling Manager and leads the team that builds your favorite tools. He has been programming for more than 15 years across various languages and types of projects from client work all the way up to big-data, large scale systems. He lives in Ohio, spending his time with his family and playing video and TTRPG games.