Share:
Steve is a former member of the Vonage Team. He was a .NET Developer Advocate @Vonage, a full-stack polyglottic Software Engineer, AI/ML
How to Handle Handset Input (DTMF) From a Phone Call in ASP.NET Core
Time to read: 11 minutes
The fundamental building block of any Interactive Voice Response (IVR) system is handling input. There are generally two types of input that you can take programmatically from a Public Switched Telephone Network (PSTN), both of which are supported by Vonage:
Dual-Tone Multi-Frequency (DTMF)—these are input events collected from your user's handset. E.g., "press 1 for sales, 2 for customer service"
Automatic Speech Recognition (ASR)—these are speech recognition events where the input is the user's voice.
In this tutorial, we're going to be using the Vonage Voice API to learn how to quickly snap the former (DTMF) into our ASP.NET core applications. Collecting DTMF from a user over a PSTN call will involve the following:
Setting up a Vonage API Account if you don't have one.
Creating a Vonage Application using the CLI.
Write some C# code.
Connect our app to the web.
If you'd like to skip this tutorial and pull in a working sample, you can find this sample in GitHub.
The Vonage CLI. If you don't have it, you can install it with
npm install @vonage/cli -gThe latest .NET Core SDK
Visual Studio or Visual Studio Code. I'm going to be using Visual Studio 2019
ngrok for testing. You only need the free tier.
To complete this tutorial, you will need a Vonage API account. If you don’t have one already, you can sign up today and start building with free credit. Once you have an account, you can find your API Key and API Secret at the top of the Vonage API Dashboard
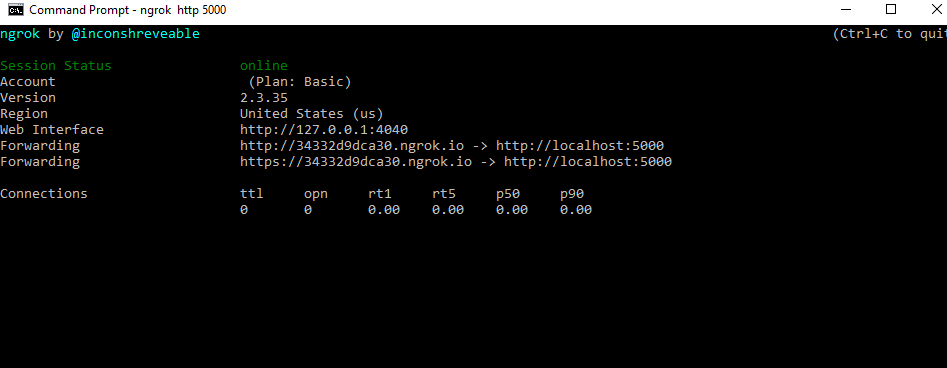
We are going to be using ngrok to expose our locally running ASP.NET Core application to the internet. After you've installed ngrok, doing so will be as easy as running the command ngrok http 5000 in your console. That will produce something that looks like this:
 ngrok
ngrok
NOTE: This tutorial uses Kestral for local debugging. If you'd like to use IIS Express instead, please see our explainer on using ngrok with IIS Express.
The critical thing to take note of here is the forwarding URL—in my case, that URL is http://34332d9dca30.ngrok.io. When you receive a call on your Vonage Number, Vonage will send your application what's called a WebHook, which is just an HTTP GET request, asking for something called a Call Control Object (NCCO). Our application will be listening on /webhooks/answer so the whole URL I will need will be http://34332d9dca30.ngrok.io/webhooks/answer.
If you've not set up the Vonage CLI yet, do so by running the command vonage config:set <api_key> <api_secret> where the API Key and Secret are the API key and secret found on your account's settings page
Now that your CLI is setup, we will purchase a number, create a Vonage Application, and link the number to that application, which will tell Vonage to forward to your app.
To buy a number, use the following command (substituting your Country ID for US)
Type confirm to complete the operation; it will output a number that you purchased.
Next, we're going to create an application. The create application command will take two URLs, the answer URL—which will be the number Vonage will send incoming calls to, and the event URL, which will be the URL that Vonage sends events that arise from one of your numbers. Remember to substitute 34332d9dca30 with whatever the random hash for your ngrok URL is:
This operation will respond with an application ID and a private key. Save both of these values. We will only be using the app ID in this tutorial, but you use the private key to authorize your application requests.
Next, we need to link our newly purchased number to our application. Linking our number will tell Vonage to send any calls received on that number to our application's webhook URL. To do this, we will need the application ID that we just received from the create app request (which will look like e7a25242-77a1-42cd-a32e-09febcb375f4) and the phone number we just purchased, and we'll run a command that looks like this:
All that's left to do now is build our app!
In your console, navigate to whatever directory you typically put code. We're going to create a Web API ASP.NET Core application. We will not configure https, which will make it easier to test. You can scaffold this easily with it with the following dotnet CLI command:
Run the cd command to take yourself into the VonageDtmf project folder and run the following command to add the Vonage Server SDK to your project.
Navigate into the directory it created and open up the csproj file in your IDE of choice. In the Controllers folder, add a new empty API Controller called VoiceController. In the VoiceController, we will add, in addition to the ApiController boilerplate using statements for System.Threading.Tasks, Vonage.Utility, Vonage.Voice.EventWebhooks, and Vonage.Voice.Nccos. Afterward, the controller should look like this.
using Microsoft.AspNetCore.Mvc;
using System.Threading.Tasks;
using Vonage.Utility;
using Vonage.Voice.EventWebhooks;
using Vonage.Voice.Nccos;

namespace VonageDtmf.Controllers
{
    [Route("api/[controller]")]
    [ApiController]
    public class VoiceController : ControllerBase
    {
    }
}
We are now going to add our route for /webhooks/answer. This route will be a GET request, as Vonage will be getting an NCCO from our server. This method will construct an NCCO with two actions (which are instructions for the call). Action one will be a talk action, which will tell the user to input a digit. Then the second action will be a MultiInput action. This action will be collecting input from the user. You can specify whether to collect DTMF and/or Speech input with this action. We will select DTMF by adding a DtmfSettings object to the action and setting its max digits to 1. We will pass it the event URL - which will be the base URL of our server at /webhooks/dtmf (we will define this route shortly.) Finally, we turn these actions into an NCCO and return the JSON from that action to Vonage.
[Route("/webhooks/answer")]
[HttpGet]
public ActionResult Answer()
{
    var responseUrl = $"{Request.Scheme}://{Request.Host}/webhooks/dtmf";
    var talkAction = new TalkAction
    {
        Text = "Hello please enter a digit.",
        BargeIn = "true"
    };
    var inputAction = new MultiInputAction
    {
        Dtmf = new DtmfSettings { MaxDigits = 1 },
        EventUrl = new[] { responseUrl },
        EventMethod = "POST"
    };
    var ncco = new Ncco(talkAction, inputAction);
    return Ok(ncco.ToString());
}
When the user inputs a digit on their handset, our app will receive another webhook from Vonage containing the user input digits. We will pull the MultiInput structure out of the request. We will then use the digits embedded in the Dtmf object within that structure to create a new Talk Action to tell the user what the input was.
[Route("/webhooks/dtmf")]
[HttpPost]
public async Task<ActionResult> Dtmf()
{
    var input = await WebhookParser.ParseWebhookAsync<MultiInput>
        (Request.Body, Request.ContentType);
    var talkAction = new TalkAction
    {
        Text = $"Thank you for inputting: {input.Dtmf.Digits}"
    };
    var ncco = new Ncco(talkAction);
    return Ok(ncco.ToString());
}
All that's left to do now is test the application. To run the application, use the following command:
NOTE: If you choose to run with IIS Express, make sure you read our article on using IIS Express with ngrok. Make sure in your answer method that you use the x-original-host to form the hostname rather than the Request Host.
Now that our application is running, you can dial into your Vonage number, et voila! You can receive DTMF input from your user.
Being able to manage DTMF input from your user and to respond to them over the PSTN line enables you to build all sorts of powerful integrations with voice. Check out our Interactive Voice Response (IVR) guide.
You can also check out some other cool voice integrations I've talked about with voice and .NET, including:
A copy of the project that this blog post produces can be found in GitHub.