How to Send SMS With Python, FastAPI and Vonage
Time to read: 24 minutes
Imagine you are on an island, stranded. You only have your computer and WiFi. The ocean waters are starting to creep up, and you’re worried you’ll be underwater if you don’t act quickly.
The only way out is to build a Python website and send a text message to someone. Luckily, you’re a coder and have recently tinkered with the new FastAPI web framework. You’ve also tried out the Vonage Messages API to send SMS messages.
Equipped with all this new knowledge, you whip out your laptop to get started.
The first thing you do is install the new Vonage CLI. It allows you to create a dashboard application quickly. You need a Vonage application to interact with the Messages API. From your terminal, you run these commands and talk yourself through them during the installation:
You have NodeJS and npm installed, so the first command should work depending on whether or not your $PATH is correct.
Bam! That worked! You now have the Vonage CLI installed on your machine.
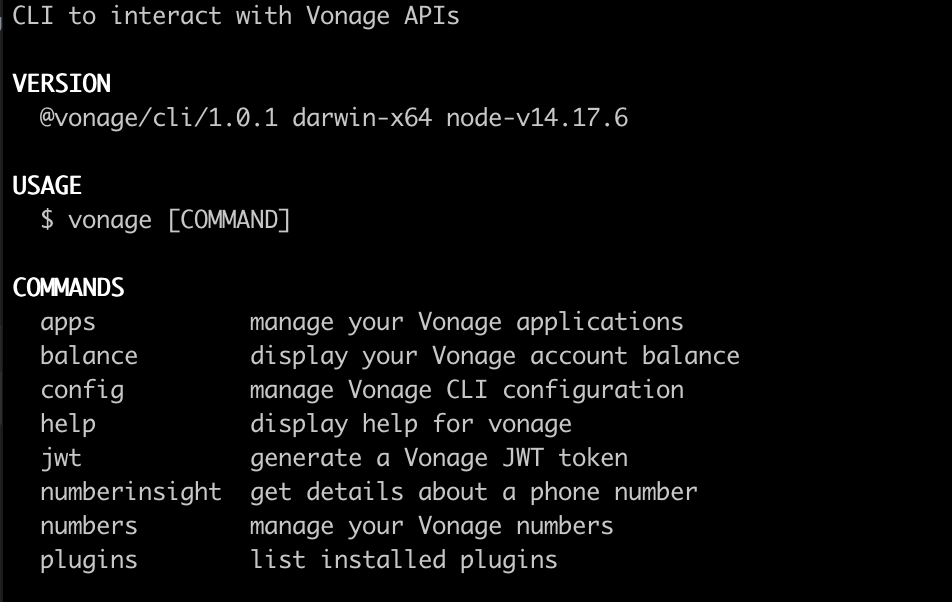
You want to make sure the installation was successful, so you type:

Next, you go to the dashboard to grab your API Key and API Secret. You’re already registered. All you have to do is sign in.
Then you set your keys by doing the following:
Success, you got this! In case you forgot a Vonage command, you can use the help flag:
Now for the fun part. You have to create your application, so you run this command:
You give it an Application Name of send sms and press Return.

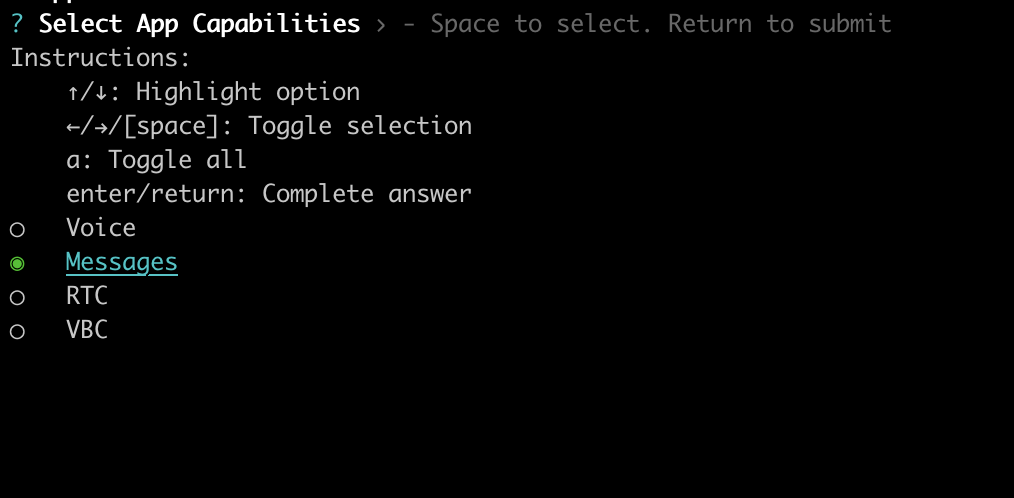
Then under the option Select App Capabilities, you choose Messages.
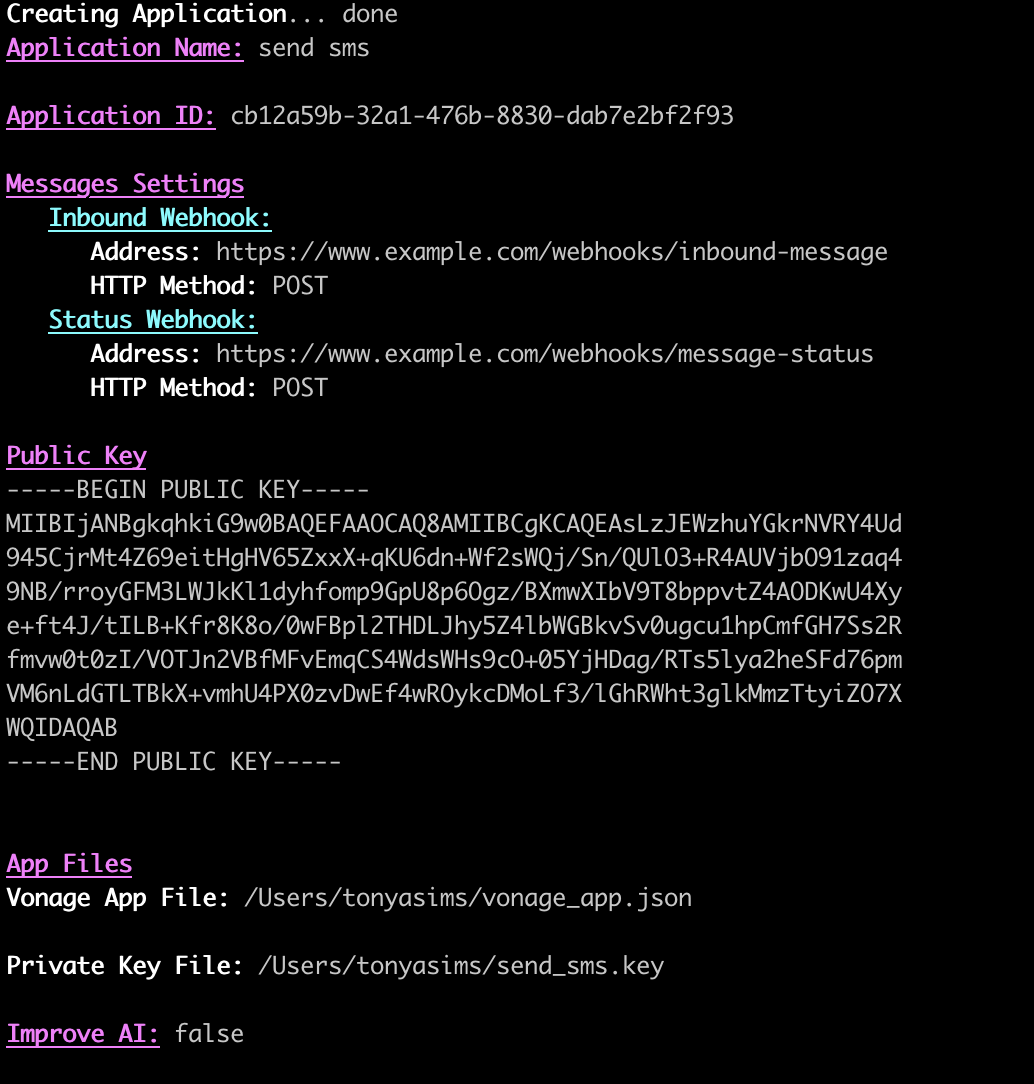
Now you create your inbound and status webhooks.
You choose “Y” for Create Message Webhooks.

Then you continue to use the default values by pressing Return for each option until you create your application.
You have an application now and are pretty darn happy about that. You will be able to binge-watch Loki in no time. You want to confirm its creation, so you go back to the dashboard. You click on Your Applications and see it.
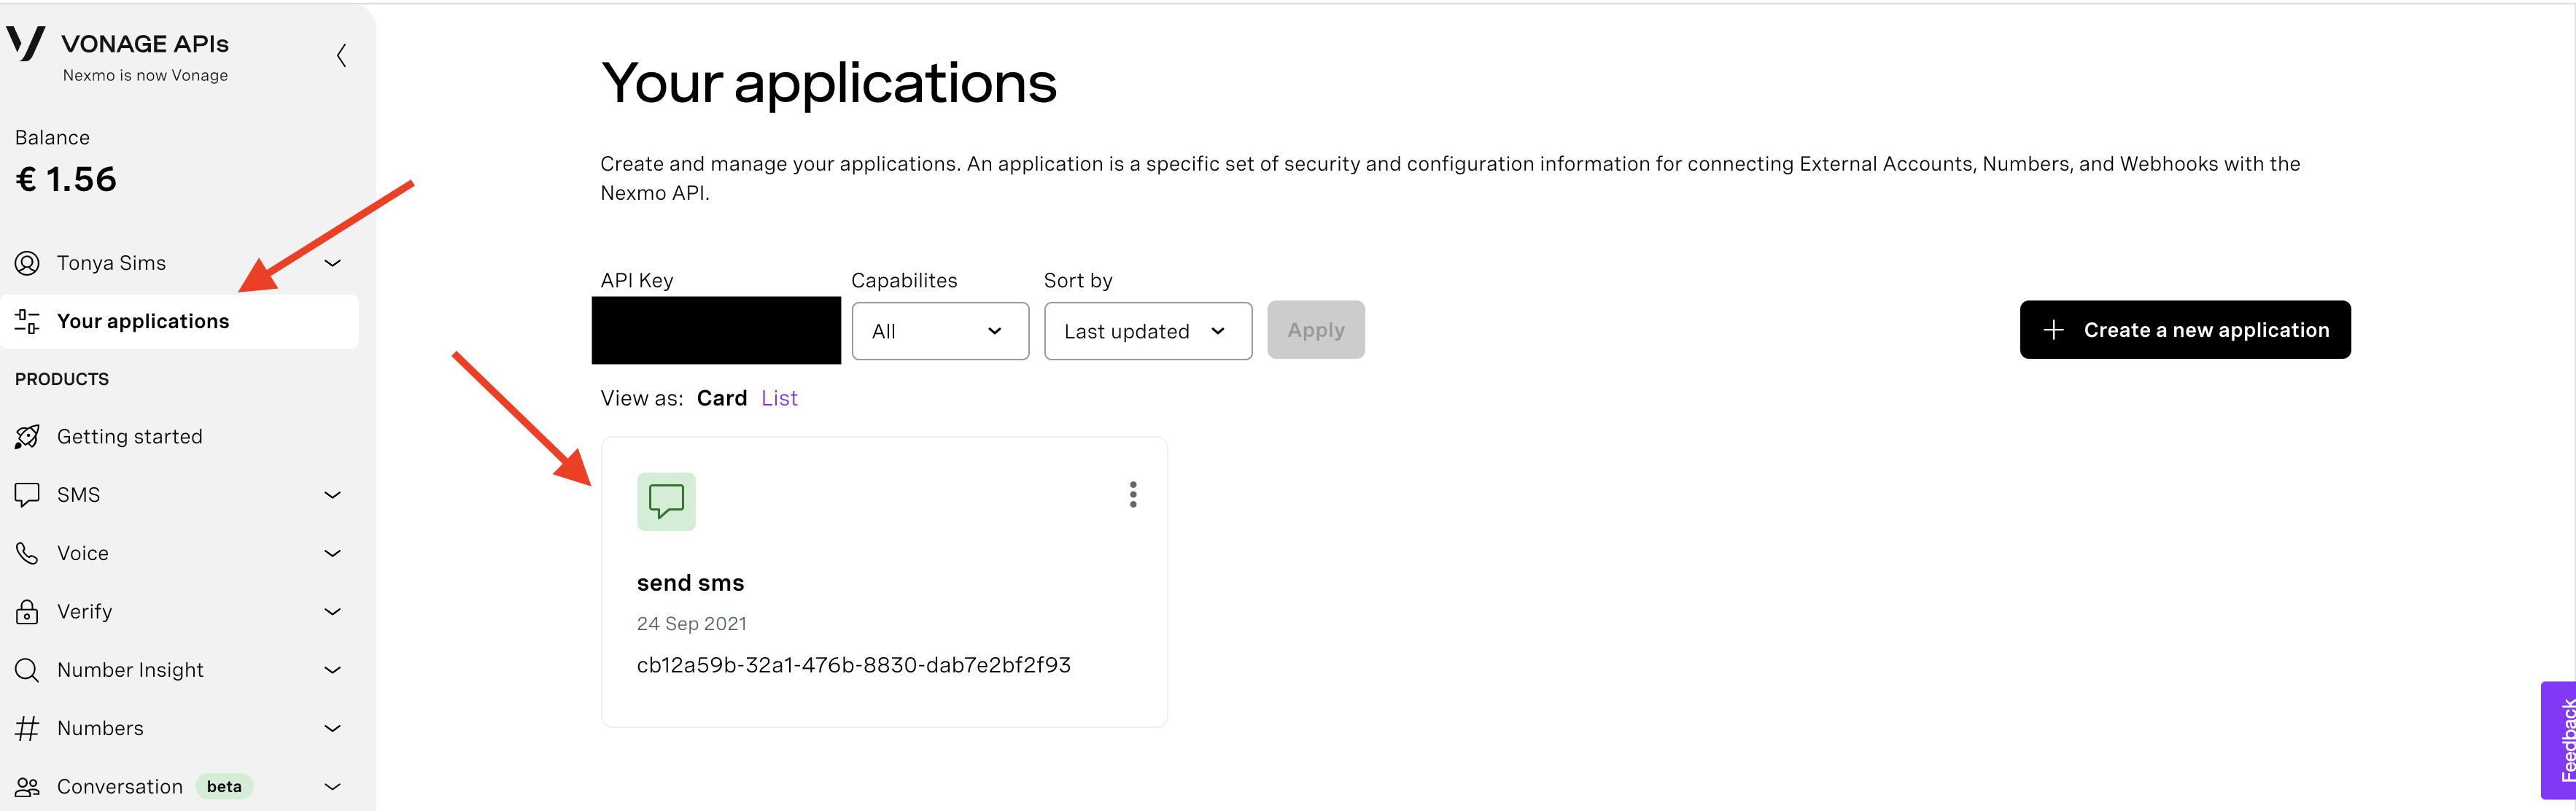
You check if the toggled option is on for Messages API. You also want to verify your webhooks made it, so you select to edit.
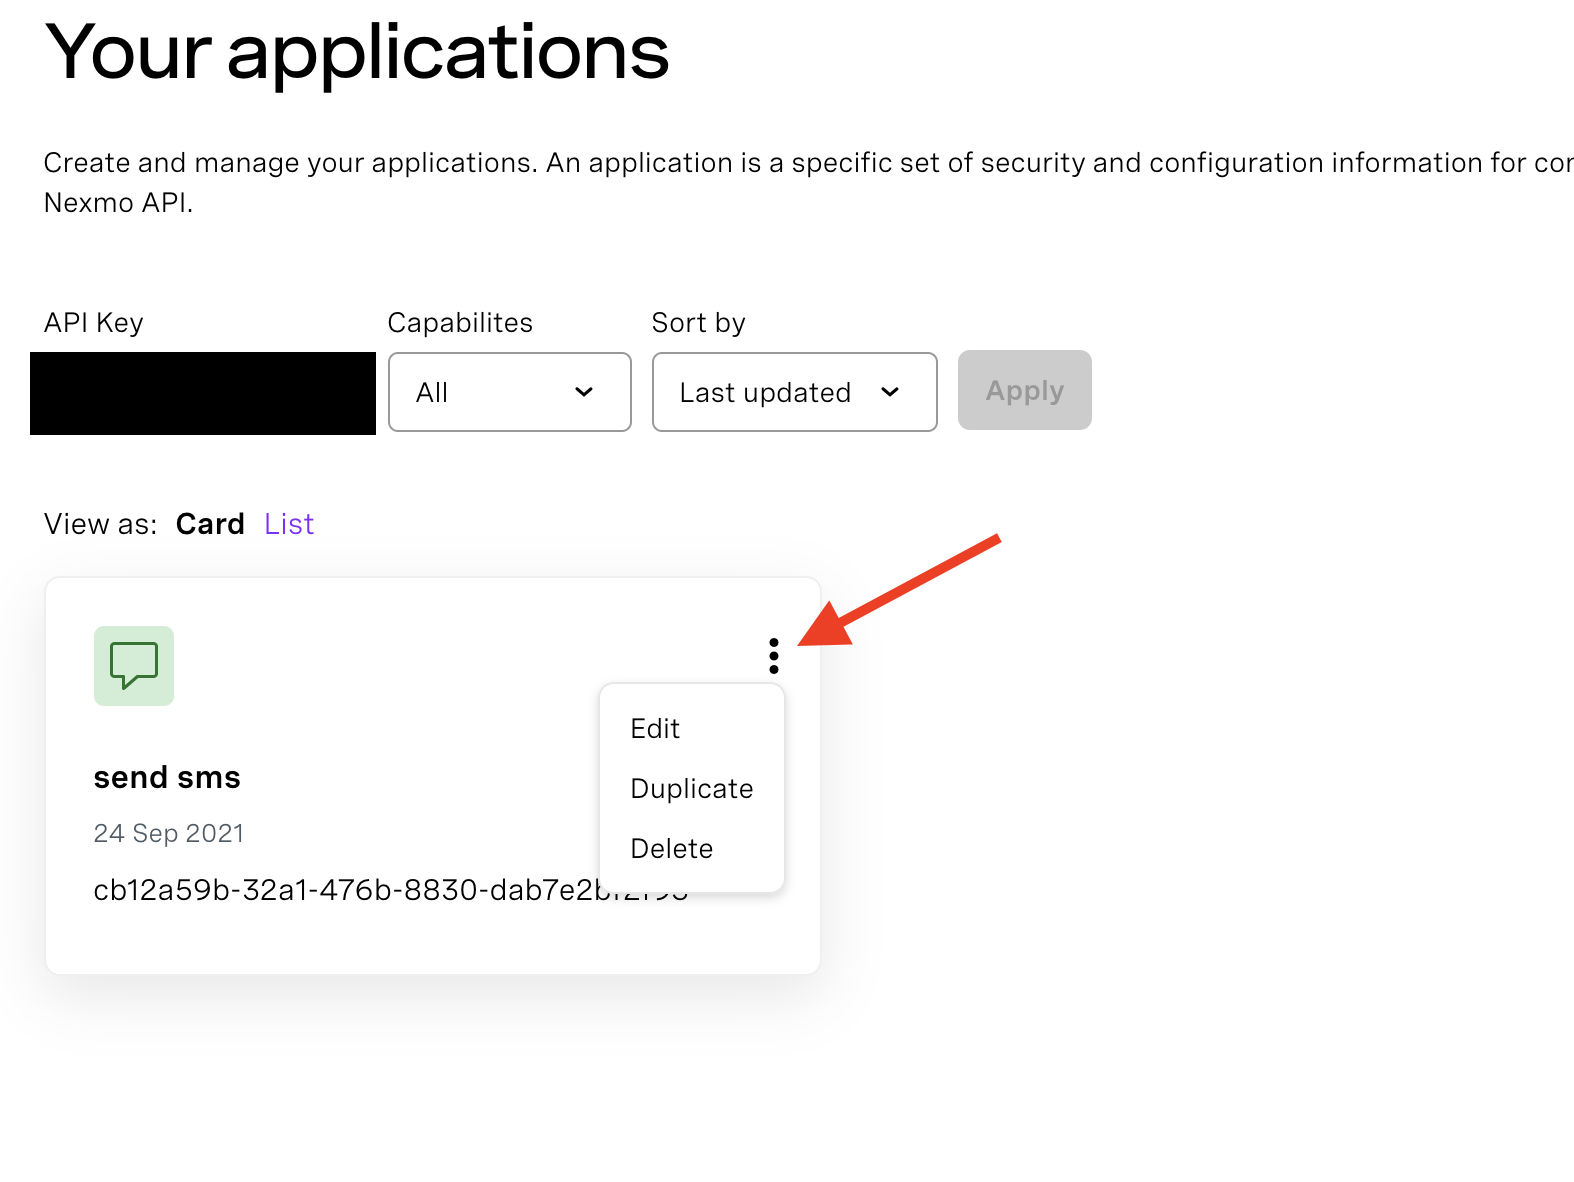
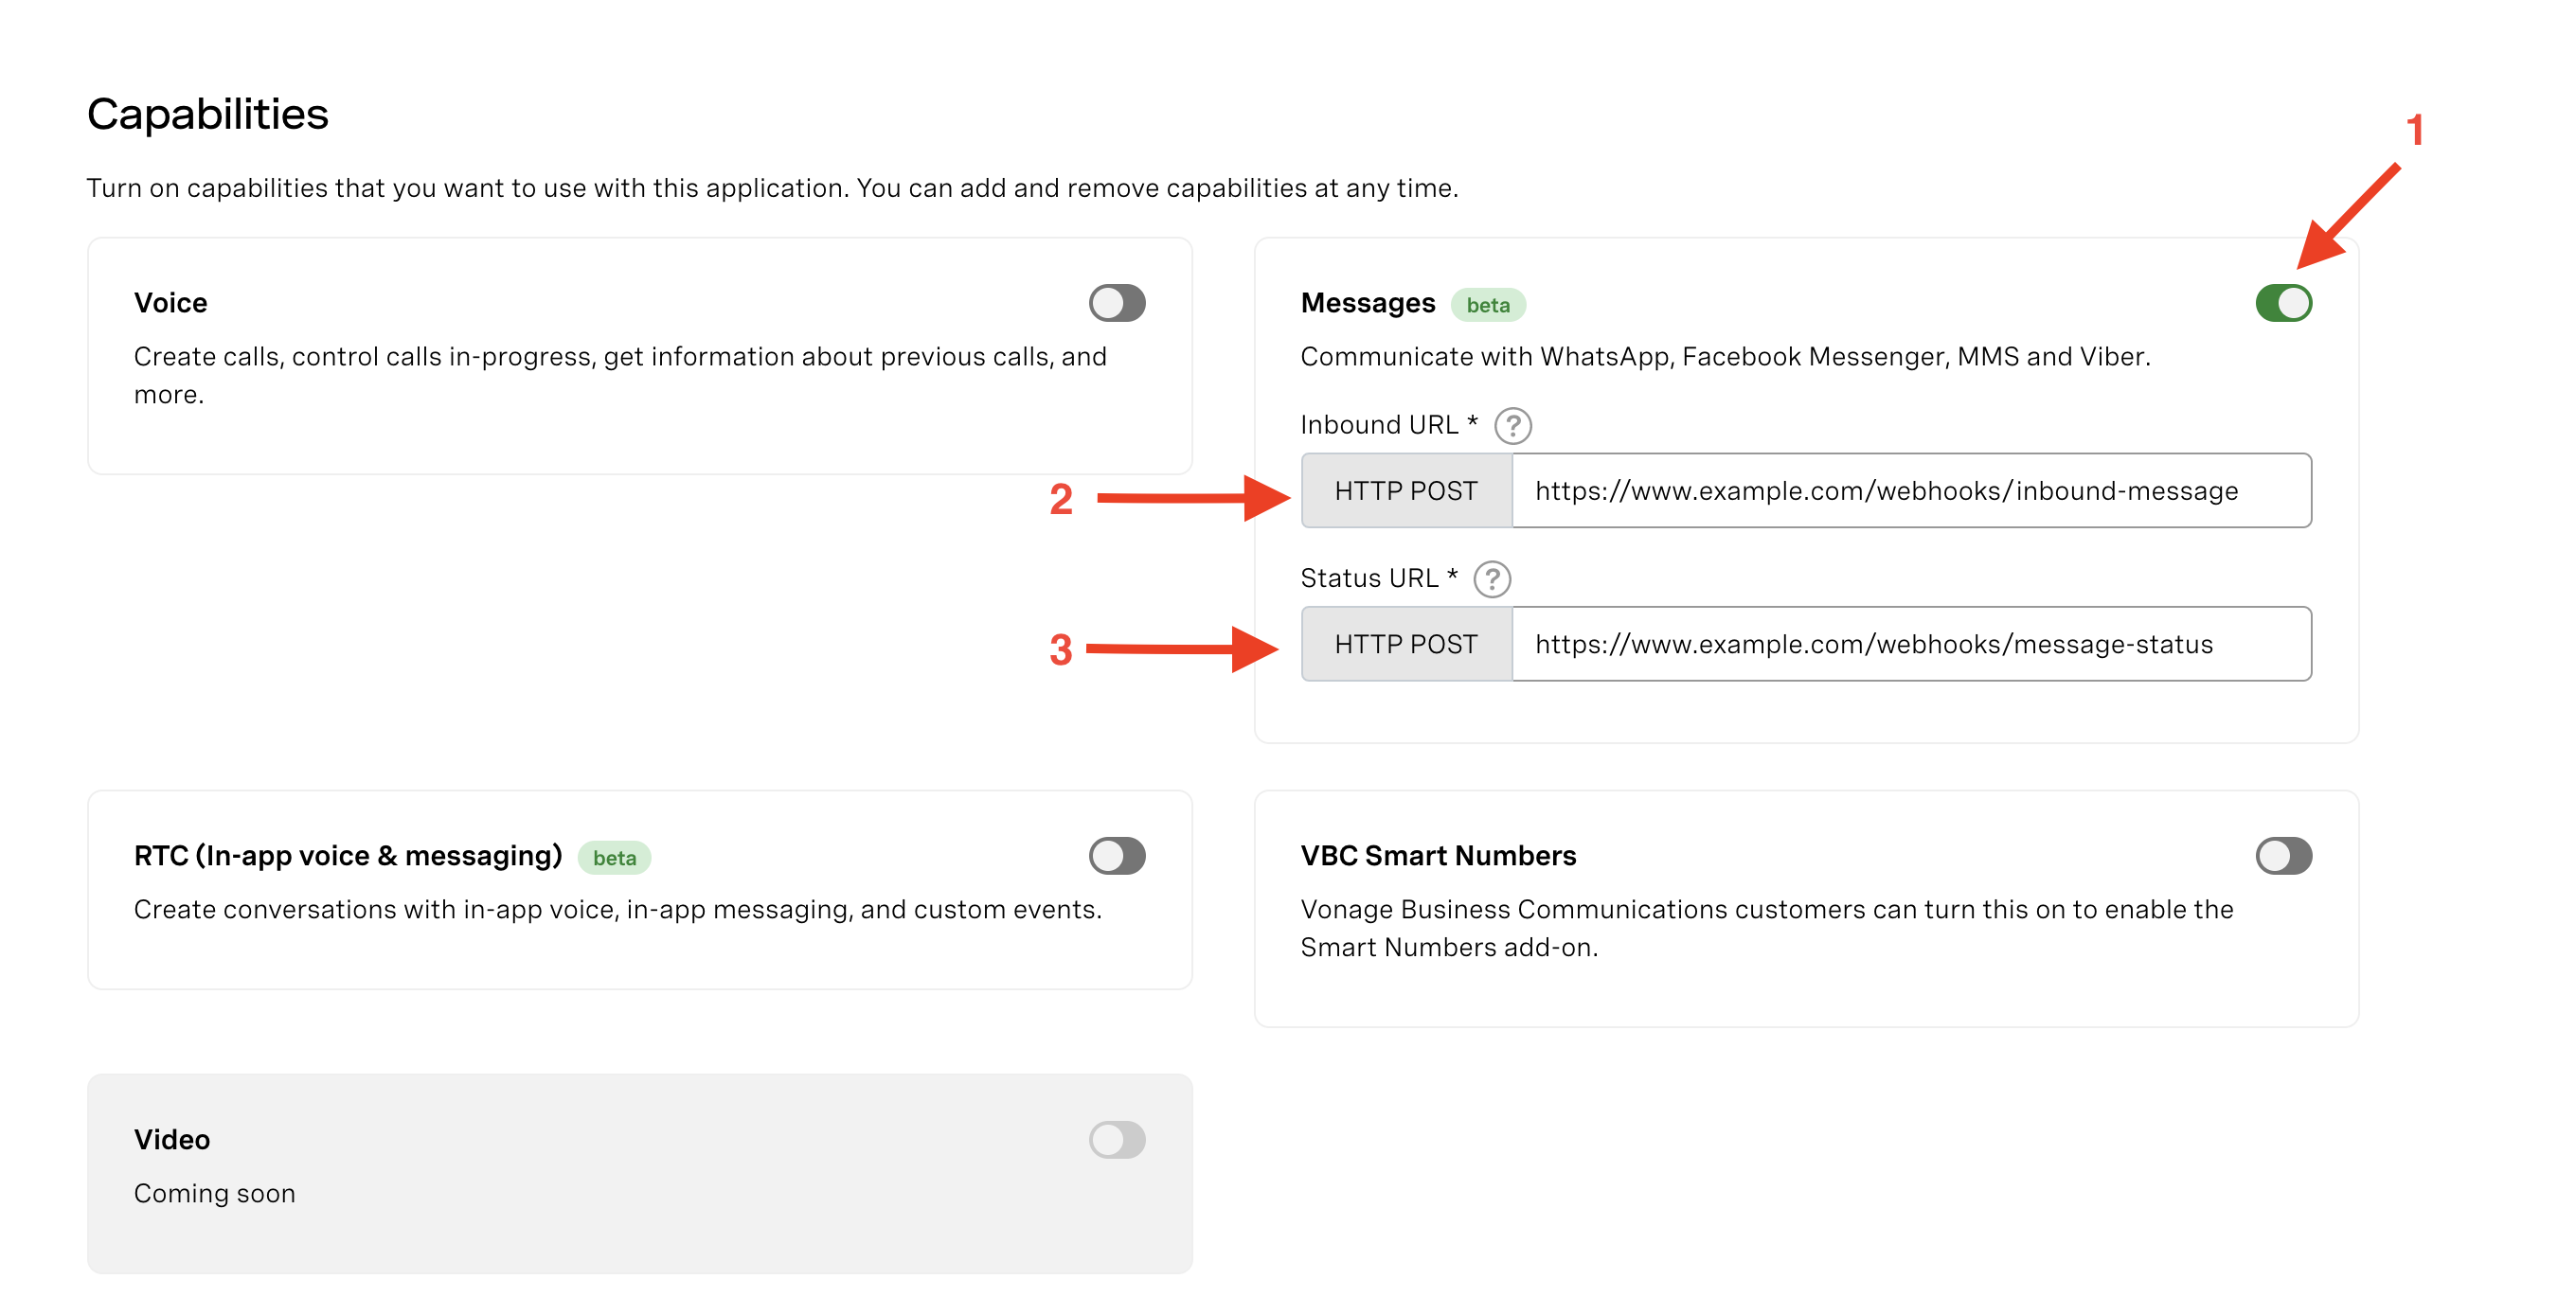
Everything looks great! You also realize that you don’t need to do this step every time, as it’s only to double-check.
The water is rising past your knees. Your biggest fear is you’ll be left alone on this island with a volleyball. You hated that movie.
Now it’s time for you to write your FastAPI application so you can send your SMS.
You’ve learned that FastAPI offers a wonderful developer experience and speeds up coding time. It’s also super fast in performance because of its asynchronous nature.
Perfect.
The first thing you do is navigate to or cd into the directory where you want to create your Python project.
Then you create a new folder called send_sms by running this command from your directory:
You change into that directory by doing this:
You think to yourself that this would be a good time to create a virtual environment, so you run:
To verify this new virtual environment was created, you check to see if one called venv is in your new directory, so you type:
Voilà!! There it is.
Now it’s time to activate it so you can install FastAPI and your other packages, so you do:
You see that (venv) is at the beginning of your user in your terminal, so you know it’s been activated.
Gosh, the sun is beating down on your face and there’s a glare on your computer screen. You can barely see anything and wish you had your sunglasses. You remember that right before leaving home and getting stranded, your dog ate them!
Now it’s time for you to install FastAPI.
The last time it was installed you had to upgrade pip first like this:
Now you install FastAPI like so:
You now have FastAPI installed and are thrilled you installed it with the [all] option because it gives you all the dependencies and features like async-generators, the requests module, JSON, Jinja2 for templating in HTML, Pydantic, etc.
You want to get a Hello World example up and running fast, so you can test if your install worked. You create a main.py file in your project directory.
from fastapi import FastAPI

app = FastAPI()

@app.get("/")
async def home():
return {"hello": "world"}The line from fastapi import FastAPI imports FastAPI as a Python class.
app = FastAPI() creates an instance of FastAPI called app.
Here @app.get("/") creates a route operation. A route refers to where you want to direct yourself when you hit your endpoint. You can also think of it as a URL. The root of the page or localhost (http://127.0.0.1:8000) is where you get directed. The operation refers to the HTTP method. To handle a GET use the decorator @app.get, which tells you to read the data and go to the route. The route here is (“/”) or the root page.
Here is an asynchronous function async def home():. They can process requests before others have completed them. They run in parallel, which is pretty sweet because it makes things much faster than running synchronously, or in order. You can also define a function here with just: def home(): if you don’t care about asynchronous code.
This line return {"hello": "world"} returns a dictionary to the browser.
You run your code in development mode by doing the following:
You can think of uvicorn as a super-fast ASGI (Asynchronous Server Gateway Interface) server implementation. In main:app, main is the name of your file main.py. The name of your FastAPI instance is app. The --reload flag allows you to use hot reloading which allows you to make live code changes.
In the terminal, you go to your localhost http://127.0.0.1:8000/ in the browser and see {"hello": "world"}. Perfect!
Now it’s time to write code to send your SMS.
The sky is dark and the wind is heavy. A tornado is brewing.
You need to hurry!
In your main.py you replace your Hello World code with this:
from fastapi import FastAPI, Request
from fastapi.templating import Jinja2Templates
from fastapi.responses import HTMLResponse

app = FastAPI()

templates = Jinja2Templates(directory="templates")

@app.get("/", response_class=HTMLResponse)
async def get_message(request: Request):
return templates.TemplateResponse("index.html", {"request": request})Here you are also importing Request like so:from fastapi import FastAPI, Request. This Request allows you to get incoming details or requests to your function.
Import Jinja so you can use its templating engine from fastapi.templating import Jinja2Templates.
In this line, from fastapi.responses import HTMLResponse you need to allow an HTMLResponse.
Here you mount the templates folder (you’ll create one in a bit) and tell it to hold all your HTML files in a directory called templates. Your line of code looks like this: templates = Jinja2Templates(directory="templates").
In the route decorator @app.get("/", response_class=HTMLResponse). The HTMLResponse indicates that the response you get back contains HTML.
This is another async function async def get_message(request: Request):. You declare a route operation function with a parameter of type Request.
Lastly, return templates.TemplateResponse("index.html", {"request": request}) renders your template or your response. It takes arguments in the HTML file (index.html) and the context, which keeps track of the data we get from our request.
You created the route that does the GET operation earlier. You also have to create a POST because you need to submit data to a form. Before that, you decide to make the templates folder in your project directory to hold your HTML files. You create two HTML files inside of templates: index.html and sent_sms.html.
Then in your index.html, you include this markup:
<!DOCTYPE html>

<html lang="en">
<head>
   <meta charset="UTF-8">
   <title>Title</title>
</head>
<body>
<h1>Send a Text Message</h1>
  <form action="/sent_sms" method="POST" novalidate>
      <input type="text" placeholder="Enter number to text" name="to_number">
      <button type=submit">Send Text</button>
  </form>
</body>
</html>
This line is crucial: <form action="/sent_sms" method="POST" novalidate>. The method attribute tells you how to send form data as a POST. The action attribute specifies which page to send the form data to. You send it to sent_sms.html. Note that the POST method here does not display the data in the URL as a GET would. Instead, it appends the data inside the body of the HTTP request.
Here <input type="text" placeholder="Enter number to text" name="to_number" > you define an input element of type text and give it some placeholder text which will display inside of the textbox. Next, you provide a name attribute called to_number that specifies the input element's name. It is important when you reference the attribute to get the number that you are sending the SMS.
In this line <button type=submit">Send Text</button> you define a button with type=”submit". The text will send when you click the button.
Next, you build the sent SMS page.
<!DOCTYPE html>

<html lang="en">
<head>
   <meta charset="UTF-8">
   <title>Title</title>
</head>
<body>
  <h1>Send a Text Message</h1>
  <h3>Thank you {{ number }} | {{ error}}!</h3>
</body>
</html>
If the SMS sends successfully, you will see this page. The only tricky thing is this: {{ number }} | {{ error}}, which is the Jinja templating language. It will render the phone number you put in the form or an error. The phone number is the one which you want to send the SMS. You’re about to write the POST route and will see how it works.
You’re feeling pretty good now because you’re in the home stretch. But it’s raining now, and you’re worried your laptop is going to get messed up. So your fingers get to coding.
You continue in the main.py file by adding this POST method:
from fastapi import FastAPI, Request, Form
from base64 import b64encode
import requests
import json

@app.post("/send_sms", response_class=HTMLResponse)
async def send_message(request: Request, to_number: str = Form(...)):

  payload = {

      "to": {
          "type": "sms",
          "number": to_number
      },

      "from": {
          "type": "sms",
          "number": [YOUR_VONAGE_NUMBER]
      },

      "message": {
          "content": {
              "type": "text",
              "text": "Help me! I need to watch Loki!"
          }
      }
  }

  key = 'abcde'
  secret = '12345'
  encoded_credentials = b64encode(bytes(f'{key}:{secret}',
                                     encoding='ascii')).decode('ascii')

  auth_header = f'Basic {encoded_credentials}'
  headers = {"content-type": "application/json", "Authorization": auth_header}
  response = requests.post("https://api.nexmo.com/v0.1/messages",
                        auth=(key, secret),
                        headers=headers,
                        data=json.dumps(payload))


  if response:
    return templates.TemplateResponse("send.html", {"request": request, "number": to_number})


return templates.TemplateResponse("send.html", {"request": request, "error": "There is an error!"})Here you import the Form object from fastapi import FastAPI, Request. Form allows you to receive form field data.
This line, from base64 import b64encode, is needed to encode the API key and API secret.
You import requests to send HTTP requests and import JSON because you have to do some things with JSON.
This line should look a little familiar @app.post("/send_sms", response_class=HTMLResponse). Here you have an @app.post route operation and pass in an HTML Response.
You have your async function again async def send_message(request: Request, to_number: str = Form(...)): . You define form parameters as a type hint and read it in by using Form(...).
The payload or body of data you’ll send to your request:
 payload = {

          "to": {
              "type": "sms",
              "number": to_number
          },
          "from": {
              "type": "sms",
              "number": [YOUR_VONAGE_NUMBER]
          },
          "message": {
              "content": {
                  "type": "text",
                  "text": "Help me! I need to watch Loki!"
              }
          }
}A few things to note about this key/value pair in the payload: "number": to_number. to_number is the same value as in our index.html with the name attribute set to to_number. To use it, you will have to use its key: number.
 "to": {
              "type": "sms",
              "number": to_number
},Another thing to notice in the payload is the number: [YOUR_VONAGE_NUMBER], which will be your Vonage phone number you buy here.
"from": {
              "type": "sms",
              "number": [YOUR_VONAGE_NUMBER]
},Lastly, in the payload, leave the type set to text like this "type": "text" and provide a message for your text like so "text": "Help me! I need to watch Loki!".
"message": {
              "content": {
                  "type": "text",
                  "text": "Help me! I need to watch Loki!"
}Next, you define the headers for the request, which indicates that the body request format is JSON:
headers = {"content-type": "application/json"}You pause here for a second and remember that you'll need to use authentication for the next line of code. You can choose between using a JWT or Basic Authentication, and you choose the latter.
You store your API key and secret in these variables:
key = 'abcde'
secret = '12345'You then create a variable called encoded_credentials and do the Base64 encoding by using an f-string and passing in your key and secret.
encoded_credentials = b64encode(bytes(f'{key}:{secret}',
encoding='ascii')).decode('ascii')You create your authorization header, a key/value pair including your Base64 encoded username and password. This pair authenticates your requests and allows you to access the API.
auth_header = f'Basic {encoded_credentials}'Next, you pass in the authorization header:
headers = {"content-type": "application/json", "Authorization": auth_header}Now the fun part! Here you use the requests module and send a post request requests.post to the Vonage API. You pass in the API URL (https://api.nexmo.com/v0.1/messages) and use HTTP Basic Auth from the requests module. The auth keyword provides a shortcut and allows you to do Basic Authentication. Then you pass in your headers headers=headers and the request body, a Python dictionary object. You convert it to a JSON string data=json.dumps(payload).
response = requests.post("https://api.nexmo.com/v0.1/messages",
                        auth=(key, secret),
                        headers=headers,
data=json.dumps(payload))The last step is to render the template. Here you check if the response is 200 or ok with if response. Then you pass in send.html, the request, and the context. The context "number": to_number will display the number on send.html. Finally, you render the error message if something goes awry.
if response:
    return templates.TemplateResponse("send.html", {"request": request, "number": to_number})


return templates.TemplateResponse("send.html", {"request": request, "error": "There is an error!"})Here’s do or die time.
You start your server:
You navigate to your localhost http://127.0.0.1:8000/
You enter a phone number to send an SMS to your friend.
You’re super nervous and wonder if they’ll receive the SMS. Great news! They got the text message!

You see a boat approaching and realize that it’s for you.
You hop on as it brings you to safety.
Later that evening, you lay in bed watching Loki, thinking to yourself: Thank goodness for Python.
The end.
Let me know if you sent an SMS using this tutorial. You can Tweet me at @tonyasims.