Share:
)
Benjamin Aronov is a developer advocate at Vonage. He is a proven community builder with a background in Ruby on Rails. Benjamin enjoys the beaches of Tel Aviv which he calls home. His Tel Aviv base allows him to meet and learn from some of the world's best startup founders. Outside of tech, Benjamin loves traveling the world in search of the perfect pain au chocolat.
Frictionless Authentication on iOS: Silent Network Verification with Vonage Verify
Time to read: 23 minutes
In this tutorial, you'll build frictionless authentication on iOS: ogin that verifies a phone number with zero user input, and a Dev Mode console that shows every invisible step as it happens.
Silent Network Authentication verifies a phone number without sending an SMS one-time code. Instead, your backend starts a Vonage Verify v2 workflow, your iOS app follows a check_url over cellular data, and the carrier confirms that the SIM in the device matches the phone number being verified.
The sample app for this post is a SwiftUI login backed by a small Node.js server. Silent Auth runs first, SMS and voice are available as fallbacks, and a Dev Mode console shows the API calls, webhooks, cellular request, fallback state, and final summary in real time.
>> TL;DR: Skip ahead and find the quickstart and app code on GitHub.
Big shout out to Mark Berkeland for helping with this article!
They wait for the text or call. They switch apps. They mistype the code. And maybe some of them get phished.
The industry is already voting with its feet: Juniper Research's 2025 A2P Messaging Market Report forecasts domestic SMS traffic will decline 15% annually (of which OTPs are roughly 40%) and international SMS will decline 23% annually, as authentication use cases migrate to lower-friction channels. (Source: Juniper Research, "A2P & Business Messaging Market Report 2025-30," https://www.juniperresearch.com/research/telecoms-connectivity/messaging/a2p-research-report/)
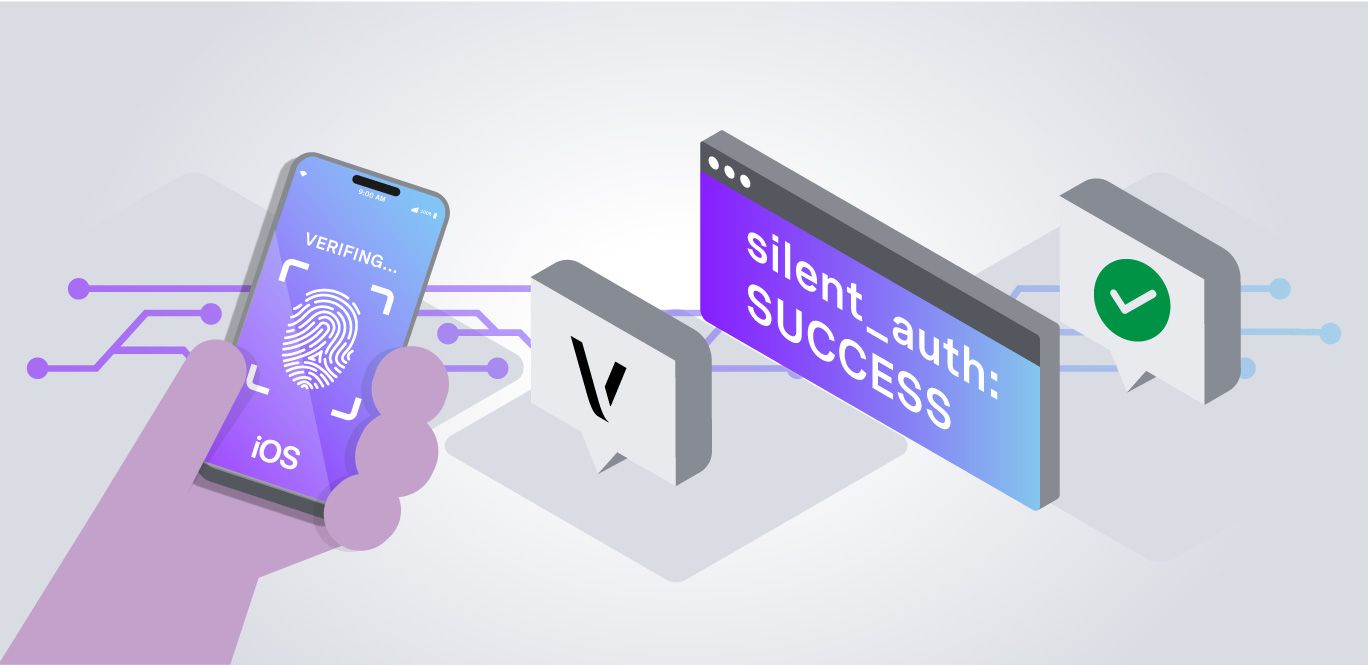
Silent Authentication fixes this: the phone number is verified by the carrier network itself, using the SIM card already in the device. This means no need for an SMS code or any action by the user at all. The user simply taps "Sign in" and after verification they're in.
But here's the catch: the whole flow is invisible, it feels like magic. When it works, you see nothing. When it fails, you also see nothing. Did the coverage check fail? Did the device go over Wi-Fi instead of cellular? Did the carrier reject it? Did the fallback SMS fire? You're debugging a black box.
So this demo app turns that black box inside out. It's a SwiftUI login screen backed by the Vonage Verify v2 API, with Silent Auth as the primary factor and automatic SMS and voice fallback. And it has a Dev Mode to help you understand how Silent Auth really works. With Dev Mode enabled the app renders a live, merged timeline of every API call the server makes, every webhook Vonage delivers, and every cellular request the device fires. It’s all grouped by channel, with plain-English notes explaining each step.
This post is partly a quickstart and partly a tutorial. You'll see how to run the app, how Silent Network Authentication works on iOS, and what I learned while trying to make an invisible authentication flow visible enough to debug.
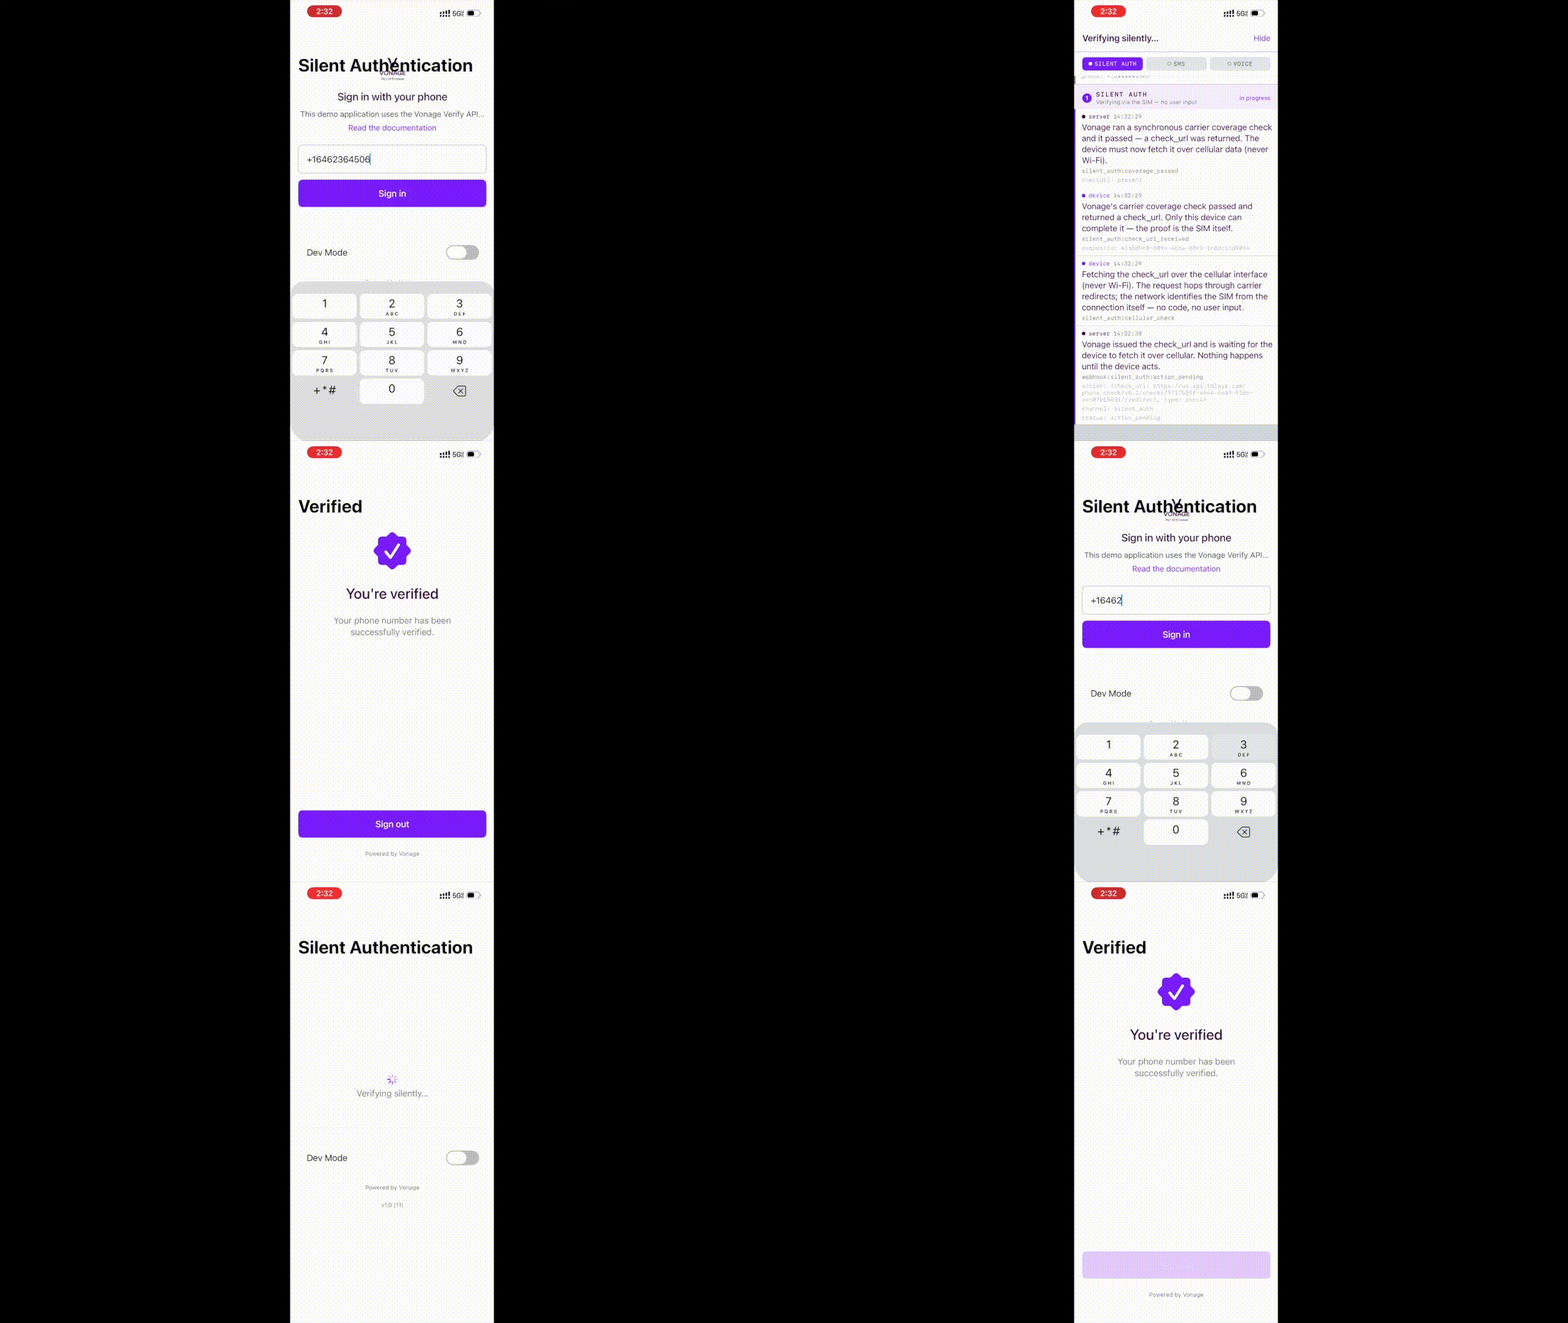 A short walkthrough of the sample app showing Silent Auth in action, from phone number sign-in to the Dev Mode timeline and final verified state.
Before you get started, make sure you have:
macOS with Xcode 15+
ngrok or another tunnel, to expose your local backend to Vonage webhooks
An iPhone with a SIM and cellular data for the real Silent Auth path
A simulator or test device if you only want to run the virtual-operator flow
You'll also need a Vonage Application with the Verify and Network Registry capabilities enabled. Network Registry is what unlocks Silent Authentication. The repo README walks through creating one.
A user enters their phone number and taps Sign in.
In a normal SMS OTP flow, that starts an annoying process we all know: wait for the message, leave the app, copy or remember the code, return, paste, submit, hope it worked.
In a Silent Network Authentication flow, the user sees a spinner. A few seconds later, they're verified.
Under the hood, two things happened:
Your backend started a Vonage Verify v2 request with silent_auth as the first workflow channel.
Your iOS app fetched the returned check_url over the cellular interface, so the carrier could confirm the SIM-to-number binding from the network connection itself.
The second step is the important one. The device, not your server, must follow the check_url, and it must do it over cellular data. If the request goes over Wi-Fi, the carrier cannot identify the mobile subscription from the network path. (WiFi capabilities are coming with Silent Auth Advanced, now in Alpha)
That's the whole mechanism. The mobile network identifies the SIM from the connection, the same way it knows which phone to bill. If the SIM matches the number being verified, the response contains a code, the app sends that code to your backend, and the backend completes the verification.
Silent Auth is part of the broader Number Verification / Network APIs ecosystem. But from the point of view of an iOS developer, the practical shape is simpler:
start a Verify request on your backend
receive a request_id and maybe a check_url
force the check_url request over cellular from the iOS app
send the returned code back to your backend
fall back to SMS or voice when the silent path cannot complete
The sample app makes that flow visible.
Silent Authentication is a SIM-bound phone number verification method. The carrier vouches that the phone number belongs to the device making the request. There is no code for the user to type, and there is no SMS message for an attacker to phish or forward.
It is useful when you want phone number verification with less friction than OTP. It can be part of sign-up, login, step-up authentication, account recovery, or account takeover protection. But it is not a universal replacement for every authentication factor.
It is not a passkey. Passkeys are device-bound credentials. Silent Auth is SIM-bound.
It is not biometrics. Face ID and Touch ID prove that a local user passed a device check. Silent Auth proves that the current device connection is associated with the phone number's SIM.
It is not SMS OTP. SMS OTP sends a code through a messaging channel. Silent Auth asks the carrier to confirm the device-number relationship without user input.
The best mental model is: Silent Auth verifies possession of a phone number with less user friction than SMS or phone call. In a modern auth stack, it can sit alongside passkeys, biometrics, app sessions, SIM Swap checks, and other risk signals.
Silent Authentication Advanced is a passwordless user verification technology that leverages the SIM card’s hardware-backed cryptographic features. It is currently in Alpha.
Feature | Silent Auth Standard | Silent Auth Advanced |
Basic idea | Carrier checks the mobile network path for the device-number match | Carrier-backed verification using an operating-system / entitlement-style flow |
iOS behavior | App follows a check_url over cellular data | App follows the Advanced flow supported by the carrier and device platform |
Works over Wi-Fi? | No. The check_url request must use cellular data | Designed for flows where Wi-Fi/VPN support may be available depending on implementation and carrier support |
Best for | Current production iOS demos and integrations that can require cellular for the silent check | Future-proofing and more flexible network conditions as coverage expands |
Fallback needed? | Yes. Always provide SMS, voice, or another fallback | Yes. Coverage and device support still matter |
Sample app support | Yes | Not in this sample app |
The practical takeaway: build your app behind a small PhoneVerificationService abstraction. Today that service can run the Standard check_url flow. Later, it can add Advanced support without rewriting every login screen.
protocol PhoneVerificationService {
    func startVerification(
        phoneNumber: String
    ) async throws -> VerificationStartResult

    func completeSilentAuth(
        requestId: String,
        checkURL: URL
    ) async throws

    func checkCode(
        requestId: String,
        code: String
    ) async throws
}
Here's what happens when a user taps Sign in:
The app sends the phone number to your backend in E.164 format, such as +12025550123.
The backend calls Verify v2 with a workflow of [silent_auth, sms, voice].
Silent Auth must be first. It can't be used as a fallback after SMS.
Vonage returns a request_id and, if the coverage check passed, a check_url.
The app fetches the check_url over the cellular interface using Vonage's iOS client library, even if the phone is also connected to Wi-Fi.
The response contains a code.
The app posts the request_id and code to the backend.
The backend calls Verify v2 to check the code.
If anything fails along the way (no check_url, cellular unavailable, carrier rejection, timeout) the workflow falls back to SMS.
If SMS also goes unanswered, Vonage falls back again and calls the user with a spoken code.
Meanwhile, every one of those steps emits a structured log event to a per-request buffer on the server. The app polls that buffer every 1.5 seconds and merges the server's events with its own device-side events into one timeline.
That's what gets displayed in Dev Mode.
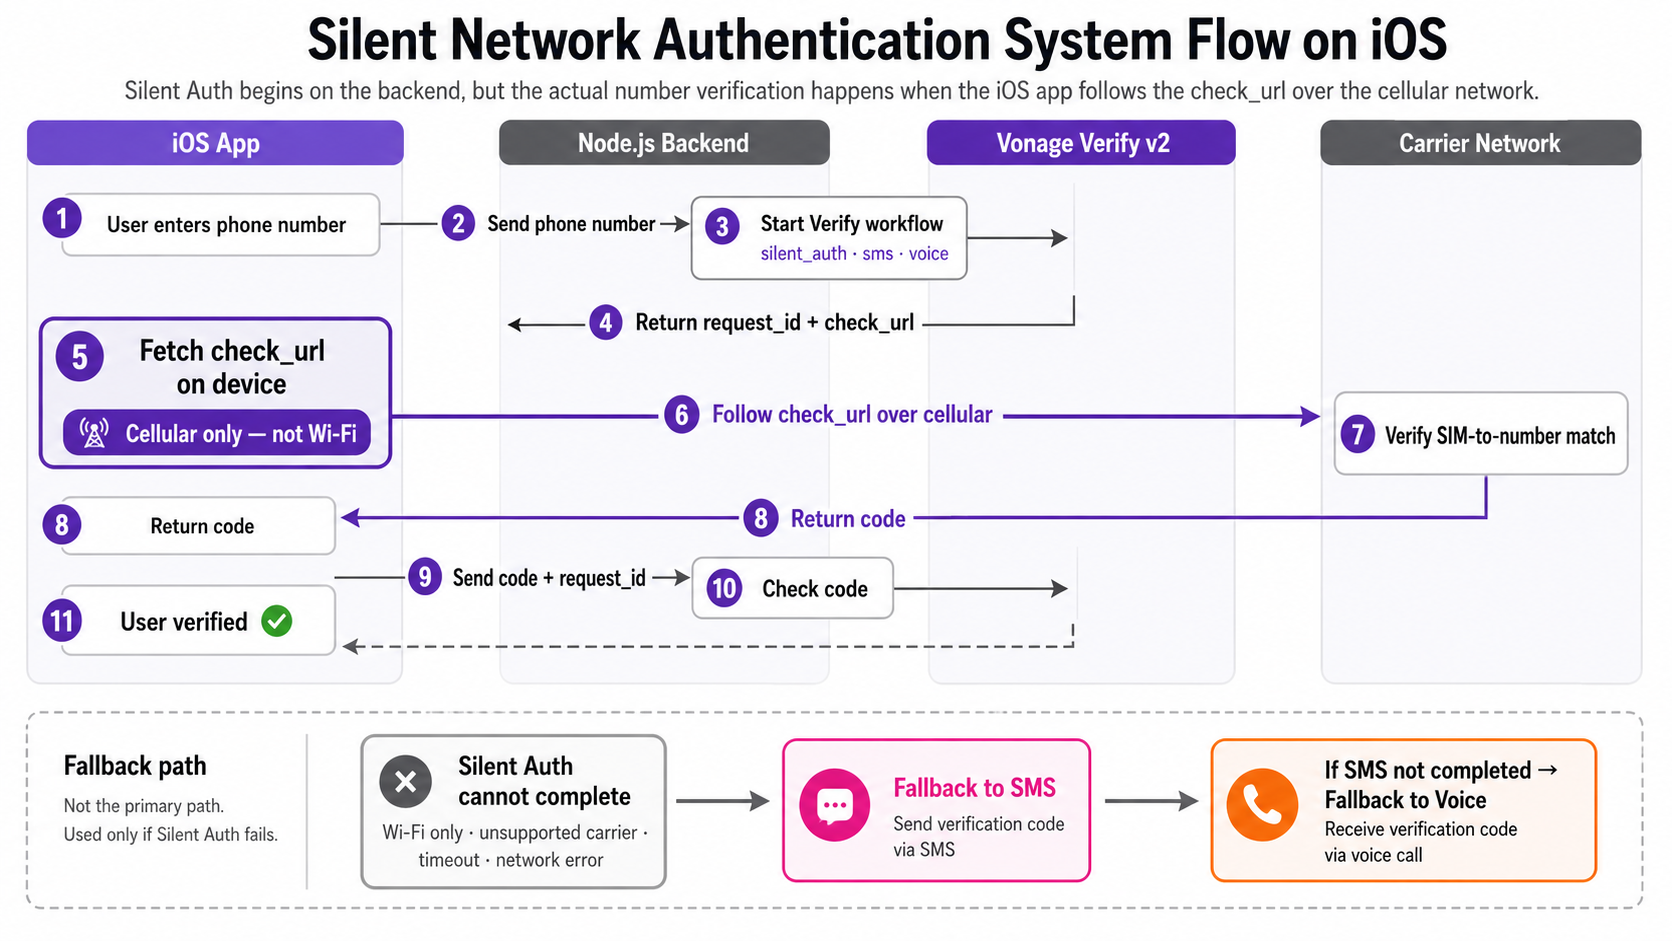 Silent Auth starts on the backend, but the key verification step happens on the device: the iOS app must fetch the check_url over cellular so the carrier can confirm the SIM-to-number match.
The server/ directory contains a small Express app that owns all Vonage credentials and API calls.
It exposes four endpoints the app cares about:
start a verification
advance the workflow
check a code
fetch logs
It also exposes a /callback route for Vonage webhooks.
The server authenticates to Verify v2 with an Application ID and private key JWT. Verify v2 does not use the classic API key / API secret pair for this flow. Keeping that authentication on the backend is important: the iOS app should never contain your Vonage credentials or private key.
The server also runs a channel-timeout mirror, which turned out to be one of the most important parts of the demo. More on that in the debugging section.
The ios/ directory contains a SwiftUI app for iOS 16+.
The verification flow is modeled as a value-type state machine: an enum whose cases carry the request_id as associated data. That means the state itself contains the request context.
For example, the app can move through states like:
idle
starting
awaitingSilentAuth(requestId: ...)
enteringSmsCode(requestId: ...)
enteringVoiceCode(requestId: ...)
verified
failed
The cellular request uses VGCellularRequestClient from the Vonage iOS client library. That client is what lets the app force the check_url request over the cellular interface even when Wi-Fi is active.
Anything that could end up in a screenshot is redacted at write time, not display time.
Phone numbers show as +14•••••1234, preserving only the last four digits. Codes never log more than their last two digits, enough to prove the flow worked, useless to an attacker.
Because redaction happens when the log event is created, exports and screen recordings are safe by default. This matters because the Dev Mode console is meant to be shared in demos, blog screenshots, and bug reports.
The heart of the iOS implementation is small:
POST the phone number to your backend.
Receive request_id and check_url.
Use the Vonage iOS client library to fetch the check_url over cellular.
Parse the returned code.
POST the code back to your backend.
In production, you should also check whether cellular is available before trying Silent Auth. If the user is on an iPad without cellular, or a device with mobile data disabled, you can skip the silent path and show the SMS fallback immediately.
A simple NWPathMonitor pre-check can help you avoid a confusing failure state:
import Combine
import Network

final class ConnectivityMonitor: ObservableObject {
    @Published private(set) var hasCellular = false

    private let monitor = NWPathMonitor()
    private let queue = DispatchQueue(label: "ConnectivityMonitor")

    init() {
        monitor.pathUpdateHandler = { [weak self] path in
            DispatchQueue.main.async {
                self?.hasCellular = path.usesInterfaceType(.cellular)
            }
        }

        monitor.start(queue: queue)
    }

    deinit {
        monitor.cancel()
    }
}That pre-check does not replace fallback handling. It just improves the user experience. You still need to handle carrier coverage failures, rejected checks, expired requests, and timeouts.
One easy detail to miss is that Standard Silent Auth only works when the request leaves the device over the cellular network. The flow can look like a normal URL request, but if the device sends it over Wi-Fi, Silent Auth will not be able to verify the user through the mobile network.
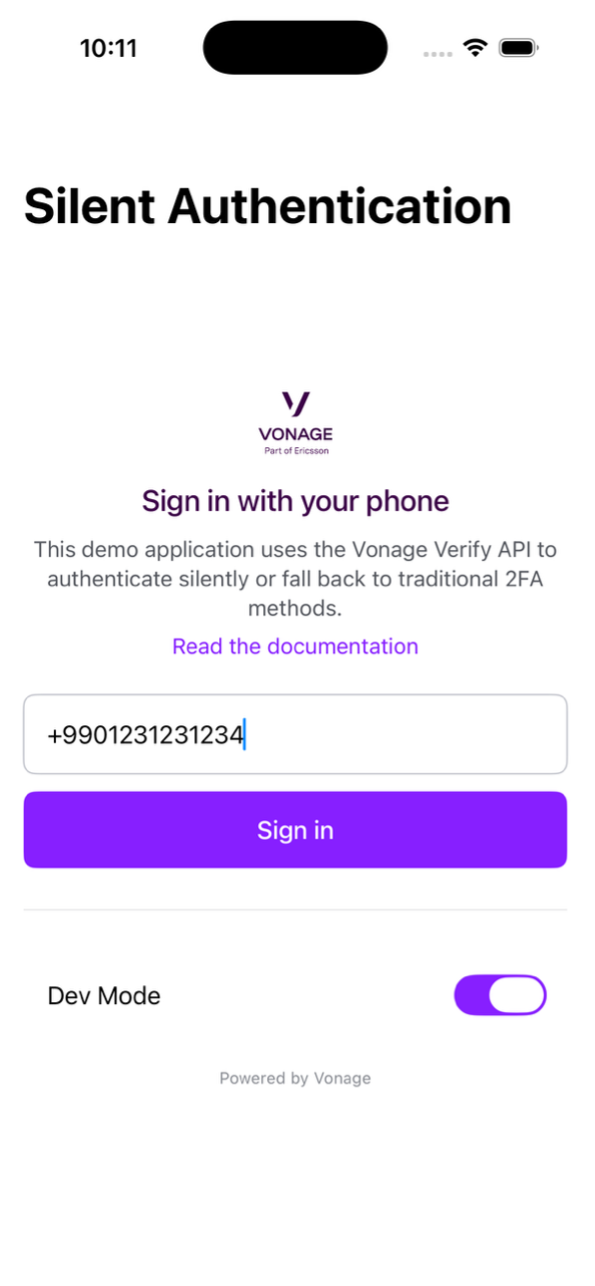 The sample app starts as a normal phone-number login screen, but enabling Dev Mode lets you watch the Silent Auth, SMS, and voice workflow after sign-in.
In the Vonage Dashboard, create an application, enable Verify and Network Registry, generate a key pair, and save private.key into server/. The file is gitignored in the sample app.
For production patterns, the Verify v2 Silent Authentication best practices page is worth reading after you get the demo running.
cd server
cp .env.example .env   # fill in VONAGE_APPLICATION_ID
npm install
npm run dev The app expects your backend to own the Verify API calls. This is the right split for a phone verification API integration: the mobile client handles user interaction and cellular routing, while the backend handles credentials, workflow creation, webhooks, and code checks.
ngrok http 4000Copy the HTTPS URL into your Vonage application's Verify callback URL as:
https://<your-ngrok-id>.ngrok.io/callback
Open ios/SilentAuthDemo.xcodeproj, copy ios/Config.xcconfig to ios/Config.local.xcconfig, set BASE_URL to your ngrok URL, and hit Cmd+R.
Enable the Dev Mode toggle on the login screen, enter a number, and tap Sign in.
The console takes over the screen and narrates the flow live.
A channel tracker pinned at the top (SILENT AUTH SMS VOICE) that fills in as each channel is tried: the active one highlighted, failed ones crossed out, the winner checked.
Stage-grouped events, each with a plain-English note first and the machine label underneath.
Source badges distinguishing what the server did from what the device did.
The summary webhook at the end, which is quietly the best teaching moment in the entire flow.
On a Silent Auth success, the final summary reads something like:
silent_auth: completed
sms: unused
voice: unused Those unused entries are every code your user didn't have to type.
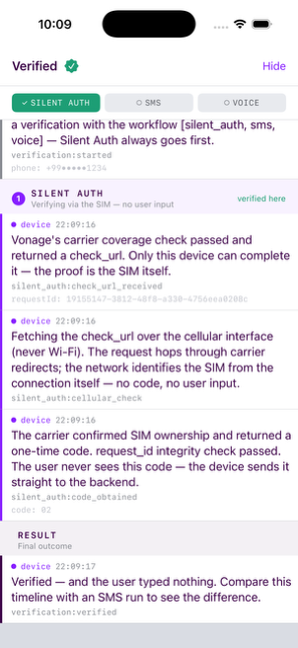 Dev Mode shows the happy path for Silent Auth: the app receives a check_url, performs the cellular check, and verifies the user without any SMS or voice code.
You don't need to burn real SMS credits, or even use a real SIM, to exercise most of the flow.
Vonage's Network Registry Playground includes a Virtual Operator. It routes any number starting with +990 to a simulated operator, and the last digit scripts the outcome:
Number ends in | Silent Auth outcome |
even digit | completed: verified instantly |
odd digit | user_rejected: falls back to SMS |
99 | failed: falls back to SMS |
So +99012345670 demos the happy path on a simulator, and +99012345671 demos the fallback cascade.
One important note: if you used the Virtual Operator before with the old sandbox:true request parameter, don't build new code around it. The current Playground / Virtual Operator flow replaced that approach.
The one thing the Playground cannot fake is the real on-device cellular round trip. For that, you need a physical iPhone on cellular data with a supported carrier.
Silent Auth should not be your only path.
Coverage varies by country, carrier, account type, device state, and network state. A user may be on Wi-Fi only. They may have cellular disabled. The carrier may not support the number. The check may time out.
That's why the backend starts the workflow with Silent Auth first, followed by SMS and voice:
{
  "brand": "SilentAuthDemo",
  "workflow": [
    { "channel": "silent_auth", "to": "+12025550123" },
    { "channel": "sms", "to": "+12025550123" },
    { "channel": "voice", "to": "+12025550123" }
  ]
}The user experience should follow the current channel:
If Silent Auth succeeds, show the success state.
If Silent Auth fails and SMS starts, show the SMS code UI.
If SMS times out and voice starts, show the voice code UI.
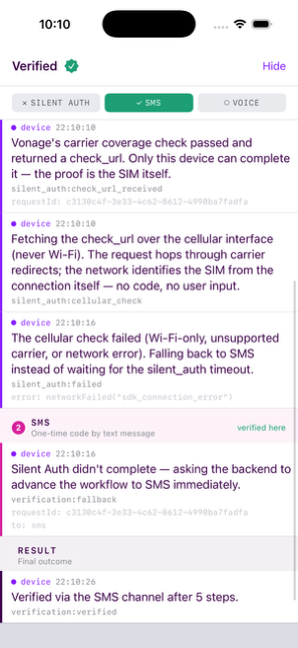 Dev Mode shows the fallback path clearly: the cellular Silent Auth check fails, the backend advances the workflow, and the user is verified through SMS instead.
This app was built with Claude Code, working from an AGENTS.md that encoded the workflow: plan every task into a checklist first, write tests before finishing, and for this blog post it appended "blog-worthy notes".
The first hazard with AI-assisted coding on a fast-moving API is stale training data, and Silent Auth has moved recently. So it was critical to use the Documentation MCP Server to stay up to date.
Three things the agent would have gotten wrong from memory were caught by checking current docs up front:
The older VGSilentAuthClient and Number Verification SDKs are archived. The current path is the unified VonageClientLibrary package.
Some older prose refers to the method as startCellularRequest, but the actual method in the shipped library is startCellularGetRequest. We verified against the checked-out package source rather than any prose.
The old sandbox: true path is not the right path for this demo anymore. The +990 Network Registry Playground flow is what we use here.
With agentic-driven development, some of the biggest issues are only obvious once you actually are able to interact with the app. In this case it was an obvious misalignment on UX.
Claude had modeled channel progression as app-driven: the user taps a “Didn't get it?” button, the app calls /next, and the workflow advances from SMS code to Voice fallback. Logical, but wrong.
Verify v2 workflows auto-advance on channel timeout. If the user just waits on the SMS screen, Vonage expires the SMS channel and places the voice call on its own without the need for /next.
In our first real-device test, the phone rang while the labels in the app still said "SMS."
Fine, so let’s listen for the webhook that says the SMS channel expired.
Claude wired that up, tested again, and then I watched six minutes of total silence: no webhooks between the fallback and the final summary. It turns out mid-flow event callbacks exist only for Silent Auth and WhatsApp. SMS and voice outcomes surface only in the end-of-request summary, after everything is over.
You cannot webhook your way out of this one.
For this demo, we added a small server-side timeout mirror. The workable, but not ideal, answer came from noticing who controls the clock. channel_timeout is a parameter we set on the request, so the server knows Vonage's schedule exactly. When a channel starts, the server arms a local timer for channel_timeout + 5 seconds of grace. If the request is still pending on that channel when it fires, the server advances its own record and logs the hop.
The grace period guarantees our clock fires after theirs, so the UI never gets ahead of reality. The app picks the change up on its next poll and switches screens.
Channel progression now has three drivers:
user tap
webhook, if one arrives
timeout mirror
All three funnel through the same forward-only, same-channel-guarded advancement. That guard matters because webhooks are at-least-once and unordered: a late duplicate SMS event must never drag the state backward from voice.
There were also two smaller bugs I only noticed while building and testing.
The first is the integrity check on the check_url response. The response includes the same request_id that was created at the start of the Silent Auth flow, and the app should compare that value against the original request before continuing. If the values do not match, the app should abort the flow.
This check is easy to skip because the happy path still appears to work without it. I added it anyway and logged the result as silent_auth:integrity_check passed, which also made the security step visible in the console during testing.
The second detail came from the test setup. The server tests injected a mock Verify client, but the app still created the real client whenever credentials were present in the environment. That worked until I added a real .env file to run the app locally, at which point several tests started failing.
The fix was to make the application wiring respect the test environment explicitly. “Tests never hit the real API” needs to be enforced not only by the test configuration, but also by the app’s dependency setup.
Once I got the app up and running, end to end without failures, it was time to make it actually useful and usable.
The first version of Dev Mode opened as a bottom sheet. Claude thought that was reasonable in theory: it kept the form visible and gave the logs a temporary place to live.
In practice, it covered the Sign In button.
That meant the console you opened to watch the sign-in flow could prevent you from starting the sign-in flow. The fix was to move Dev Mode to a full-screen takeover that appears only after the form is submitted. The user completes the action first, then the console takes over to show what happens next.
Starting with a mockup to hand over to the AI Agent would’ve helped avoid this issue.
The first timeline also put a step badge on every log event: STEP 1/5, STEP 2/5, and so on.
That looked fine when the flow was sketched as five high-level steps. It didn’t make sense once the app showed a merged device/server timeline, because each phase produced several events. The same step number appeared multiple times in a row. It was technically correct, but it read like the UI was stuck or confused.
The better question for the viewer was not “what step number is this?” It was “which channel is currently handling authentication?”
So the redesign made the channel the primary visual unit. A tracker pill gives the quick status at the top, stage headers make the scrollable log easier to scan, and individual events no longer carry step numbers.
The fallback path needed an adjustment. The default channel timeout is 300 seconds, which is a five-minute wait before SMS can fall back to voice. That makes sense in a production app, but it’s too slow for a demo.
Because the timeout is set on the server, the demo environment uses a 60-second default instead. That keeps the full silent_auth → sms → voice cascade inside a couple of minutes, while the mirrored timer in the console shows each hop as it happens.
The last pass was visual. Vonage brand guidelines restrict logo usage to approved assets, so the demo does not rely on the logo to feel branded.
Instead, the interface uses palette and type. Silent Auth uses purple, SMS uses magenta, and voice uses orange. Those colors are not just decorative; they also act as the timeline legend. The same visual system that makes the app feel closer to Vonage also helps explain which channel is active at each point in the flow.
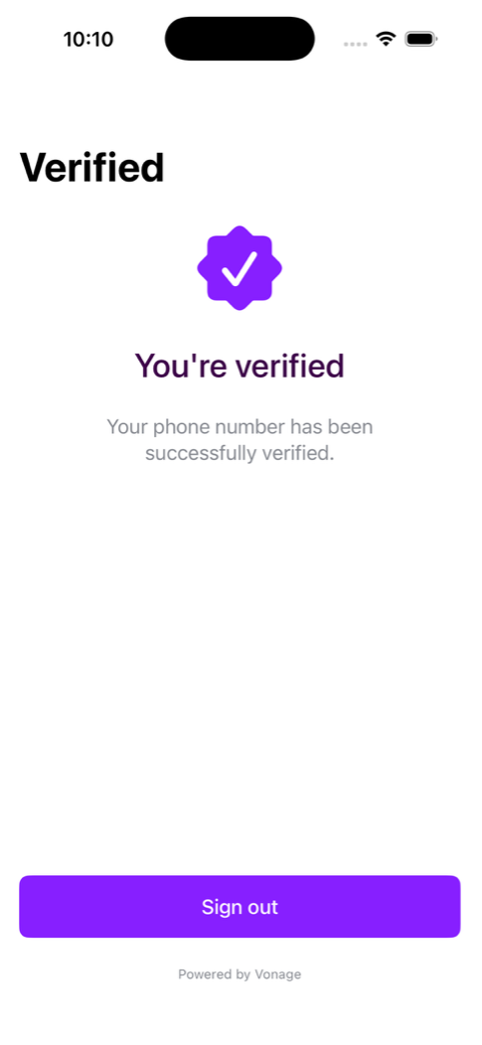 After Silent Auth succeeds, the user reaches the verified state without typing an SMS or voice code.
You can build and run this sample without becoming a telecom standards expert.
Still, it helps to know where Silent Auth fits.
CAMARA is an open-source project under the Linux Foundation that defines standardized APIs for exposing network capabilities to developers. Number Verification is one of those APIs: it lets an application verify that a phone number matches the device using the mobile network, without asking the user to type an SMS code.
Vonage exposes this kind of network-backed verification through Verify v2 and Network Registry. In practice, that means the app you build here is not just a custom Vonage trick. It follows the same general shape developers will see across CAMARA-aligned number verification flows:
the application asks for a verification
the network participates in proving number possession
the user avoids an OTP when the silent check succeeds
the app falls back when the network path is not available
That standards context matters, but I don't think it should dominate the tutorial. The code path is the useful part: start the workflow, force the cellular request, check the returned code, handle fallback.
Silent Auth's greatest strength, the user sees nothing, is exactly what makes it hard to build confidently.
A live console that narrates the flow turned out to be more than a demo gimmick. It's how we found the auto-advance behavior, the missing webhooks, and the timeout mechanics described above.
If you're integrating Verify v2, consider keeping a per-request log buffer even if you never ship a UI for it. It gives you a place to answer the questions that otherwise disappear into the silent flow:
Did the request include the right workflow?
Did Vonage return a check_url?
Did the device attempt the cellular request?
Did the request_id integrity check pass?
Which fallback channel is active now?
Did the final summary match what the UI showed?
Some ideas for extending the sample:
Adding a WhatsApp channel. Verify v2 supports WhatsApp in the workflow; slot it between SMS and voice.
Persist verified sessions for logged in users. The demo intentionally forgets everything; add Keychain-backed sessions.
Add SIM Swap checks. You could pair Silent Auth with the Vonage SIM Swap API for an additional possession and risk signal.
Improve number intelligence for more security. Use Vonage Number Insight before starting verification to understand number format, carrier, and reachability signals.
Add Android support. The same backend serves any client that can make a cellular-forced request.
Push the timeline further -
:export the merged log as JSON for bug reports, or replay a stored timeline in the console.[HS4]
Silent Network Authentication verifies a phone number by asking the carrier to confirm that the SIM in the device matches the number being verified. On iOS, your app receives a check_url from Vonage Verify v2 and follows that URL over cellular data using the Vonage iOS client library. If the carrier confirms the match, the app receives a code and sends it to your backend to complete the verification.
Silent Authentication is Vonage's name for this SIM-bound verification flow. It is a type of phone number verification where the user does not type a one-time code. The carrier confirms the phone-number-to-device relationship in the background.
Your backend creates a Verify v2 request with silent_auth as the first workflow channel. If the number is eligible, Vonage returns a check_url. The iOS app opens that URL over cellular data, receives a code, and sends the code back to your backend. Your backend then checks the code with Verify v2.
Standard Silent Auth requires the check_url request to go over cellular data. The phone can be connected to Wi-Fi, but the check_url request itself must use the cellular interface. The sample app uses VGCellularRequestClient from the Vonage iOS client library to force that request over cellular.
Passkeys and FIDO2 are device-bound authentication methods. Silent Authentication is SIM-bound phone number verification. They solve different problems and can be used together. For example, an app might use passkeys for login and Silent Auth as a low-friction phone possession check during sign-up or account recovery.
Your app should fall back. In this sample, the workflow starts with silent_auth, then falls back to SMS, then voice. If the silent check cannot complete because of carrier coverage, network conditions, or device state, the user can still verify with a code.
Use the Network Registry Playground / Virtual Operator with +990 numbers. For example, +99012345670 can demo a successful path, while +99012345671 can demo a fallback path. This is useful for local development and CI, but it does not replace testing the real cellular check_url flow on a physical iPhone.
The full source is on GitHub. Fork it, run the demo, and use the repo as a working baseline before you start adapting the flow for your own app.
A few exciting developments to be aware of
Coverage is expanding.
Vonage just commercially launched Silent Authentication and SIM Swap Detection in Canada, adding to existing availability across the US, UK, and Western Europe. Momentum for availability is taking off!
Silent Auth Advanced is moving fast.
This tutorial covers the standard check_url flow, which requires cellular data. Advanced (currently in alpha) is the TS.43 evolution that extends Silent Auth to Wi-Fi and VPN, removing the "force-cellular" requirement this sample works around.
The ecosystem is converging on this model.
Major carrier consortia across North America and Europe are now exposing network-backed identity signals through CAMARA-aligned APIs, — which means what you build on Vonage today already fits the shape the industry is standardizing on. Lydia, one of Europe's fastest-growing neobanks, deployed Vonage Verify with Silent Authentication and saw a 50% reduction in authentication latency and a 26% improvement in sign-up conversions, without adding a single step for the user.
Have a question or want to share what you're building?
Subscribe to the Developer Newsletter
Follow us on X (formerly Twitter) for updates
Prefer video? Watch tutorials on our YouTube channel
Connect with us on the Vonage Developer page on LinkedIn
Help us improve our developer experience by filling out our Voice of the Developer Feedback
Stay connected and keep up with the latest developer news, tips, and events.
Share:
Benjamin Aronov is a developer advocate at Vonage. He is a proven community builder with a background in Ruby on Rails. Benjamin enjoys the beaches of Tel Aviv which he calls home. His Tel Aviv base allows him to meet and learn from some of the world's best startup founders. Outside of tech, Benjamin loves traveling the world in search of the perfect pain au chocolat.