Share:
Megna is a software engineering intern at Vonage, based out of San Francisco. She is a third year computer engineering student at the University of Illinois Urbana-Champaign. Megna is passionate about learning about innovations and wants to build innovative technology for the future generations.
Using Experience Composer With Vonage Video API
Time to read: 6 minutes
The Experience Composer (EC) API is a powerful tool that allows you to capture your website’s layout as a stream published to a Vonage Video API (formerly OpenTok) session. The website needs to be a publicly accessible URL that the Experience Composer will access and from which it will generate a stream.
For example, below you can see a Vonage Video API session with me as the host and an Experience Composer stream of a YouTube video published to the session. It is streaming the youtube website, along with the video and audio of the youtube video.
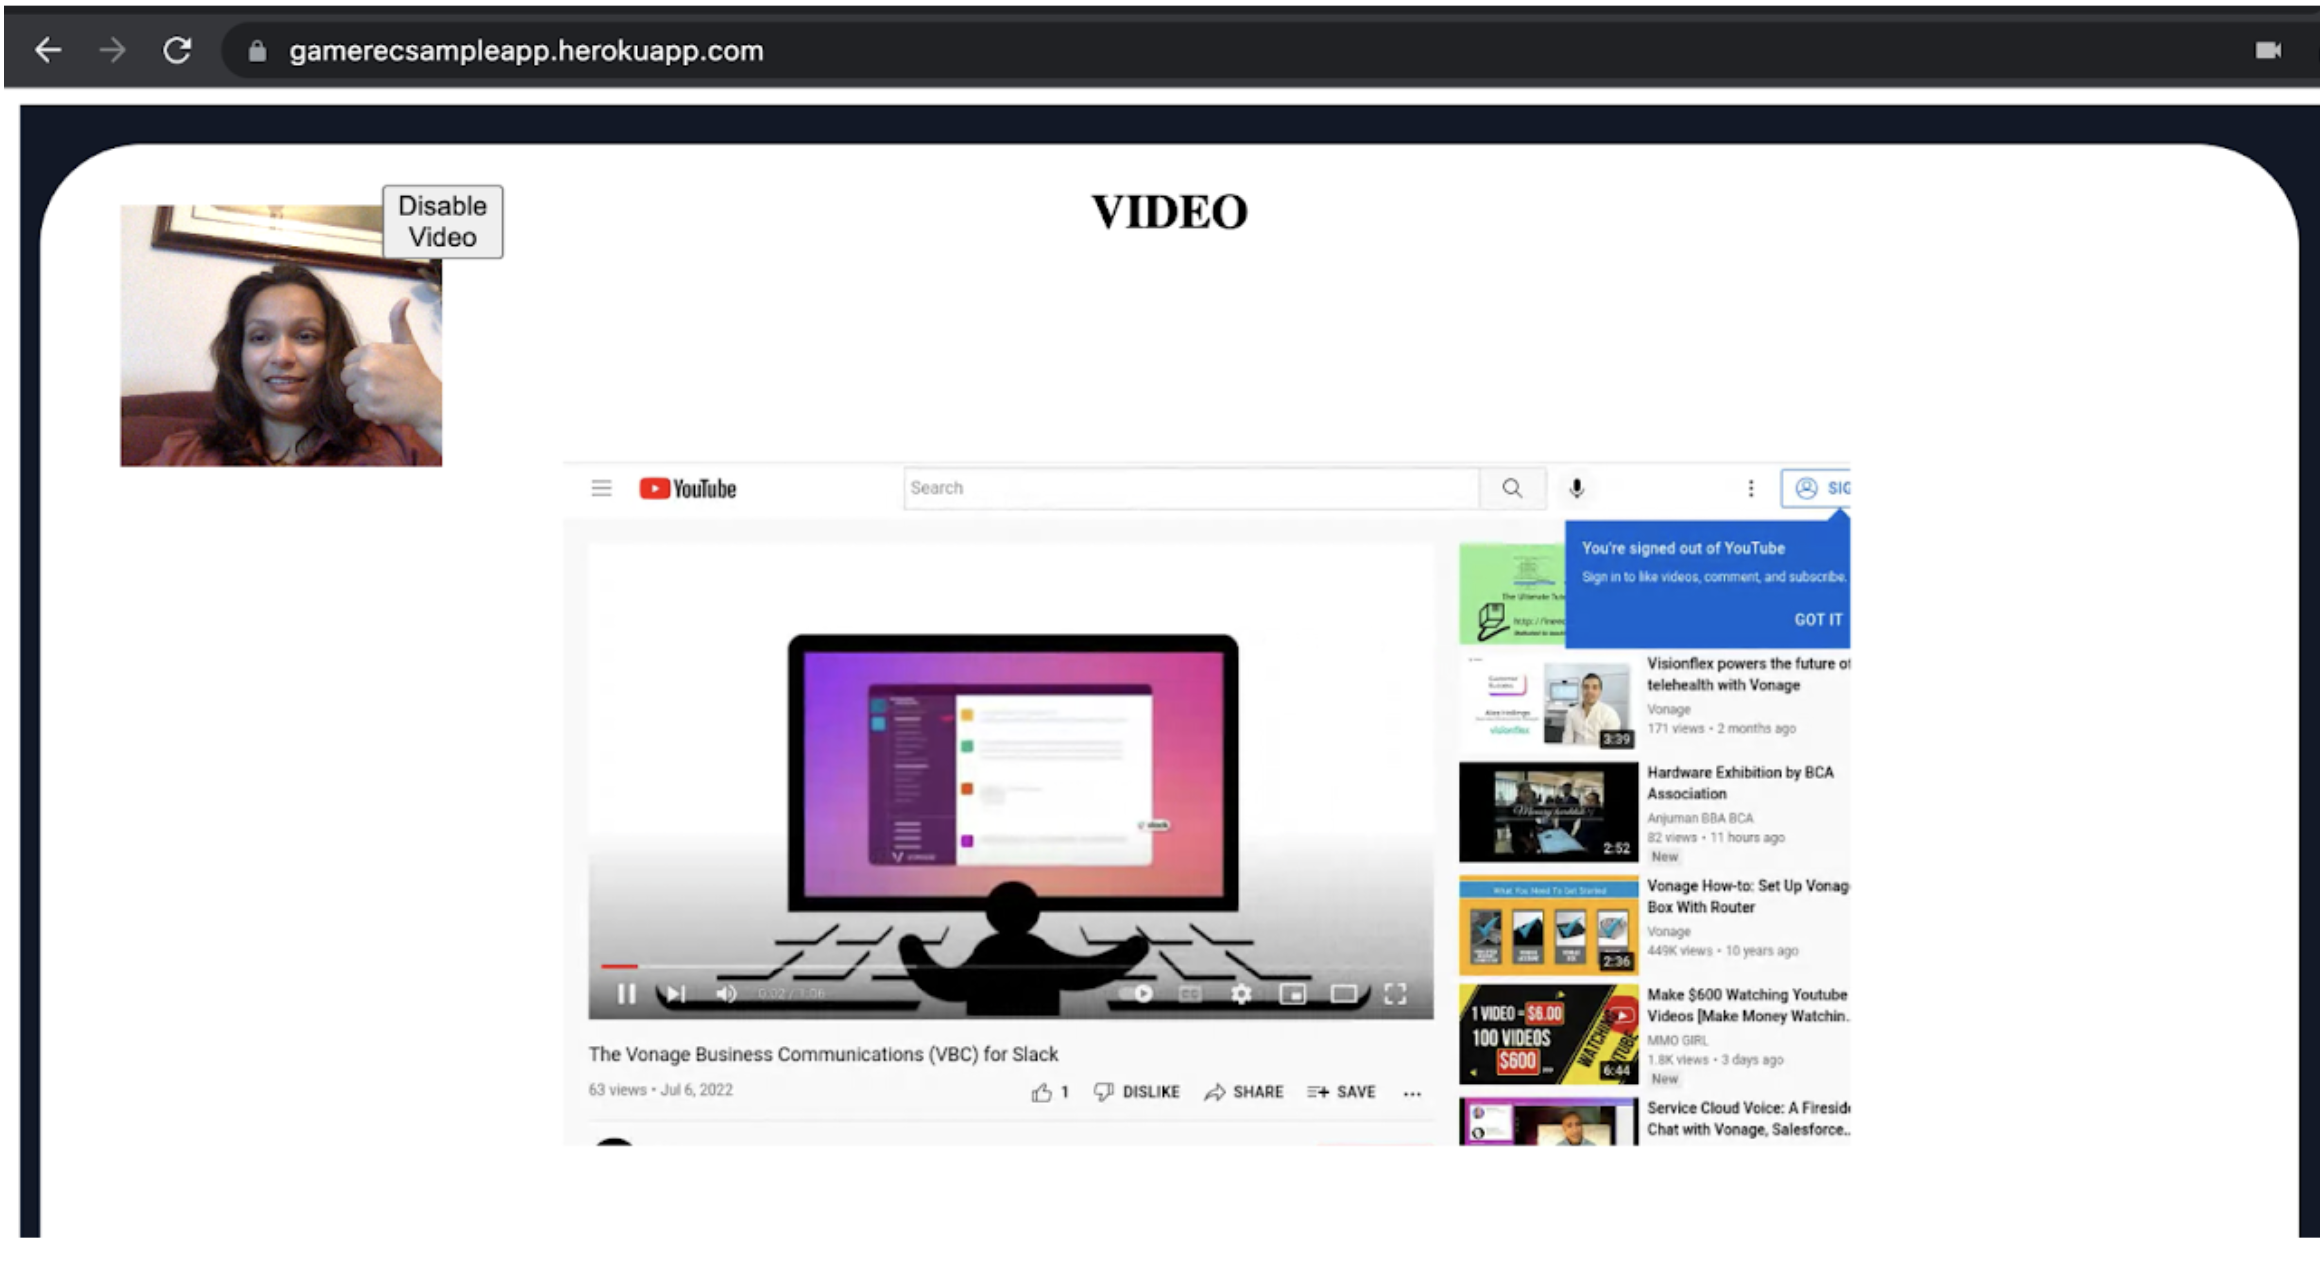 Vonage Video API session with Experience Composer stream of Youtube
This tool can be especially powerful for educational applications where there are components to share such as a whiteboard or slide. However, these components would not be captured by Vonage Video API’s archiving tool. This is where Experience Composer comes in, as it will publish the stream of the whiteboard, slides, custom layouts, dynamic components, and other web elements to the session allowing it to be captured in an archive.
This article will describe two applications of the many ways developers can use Experience Composer:
Publishing to a Vonage Video API Session
Capturing your website’s entire layout in an archived Vonage Video API stream
The goal of my sample application is to help video streamers save time editing their videos and allow them to spend time elsewhere. By using Vonage’s Experience Composer tool, streamers can record their live stream and video recording of their reaction, along with their own custom layout in the same location at the same time. Experience Composer can be used to record the entire application including the layout of the host and stream videos, and after recording, it is ready to be published to their audience.
This sample application allows the streamer to join a Vonage Video API session and send the URL of their livestream in the submission box for starting an Experience Composer. This allows the streamer to act as the publisher with their video in the top left corner, and the livestream to be published in the center via Experience Composer.
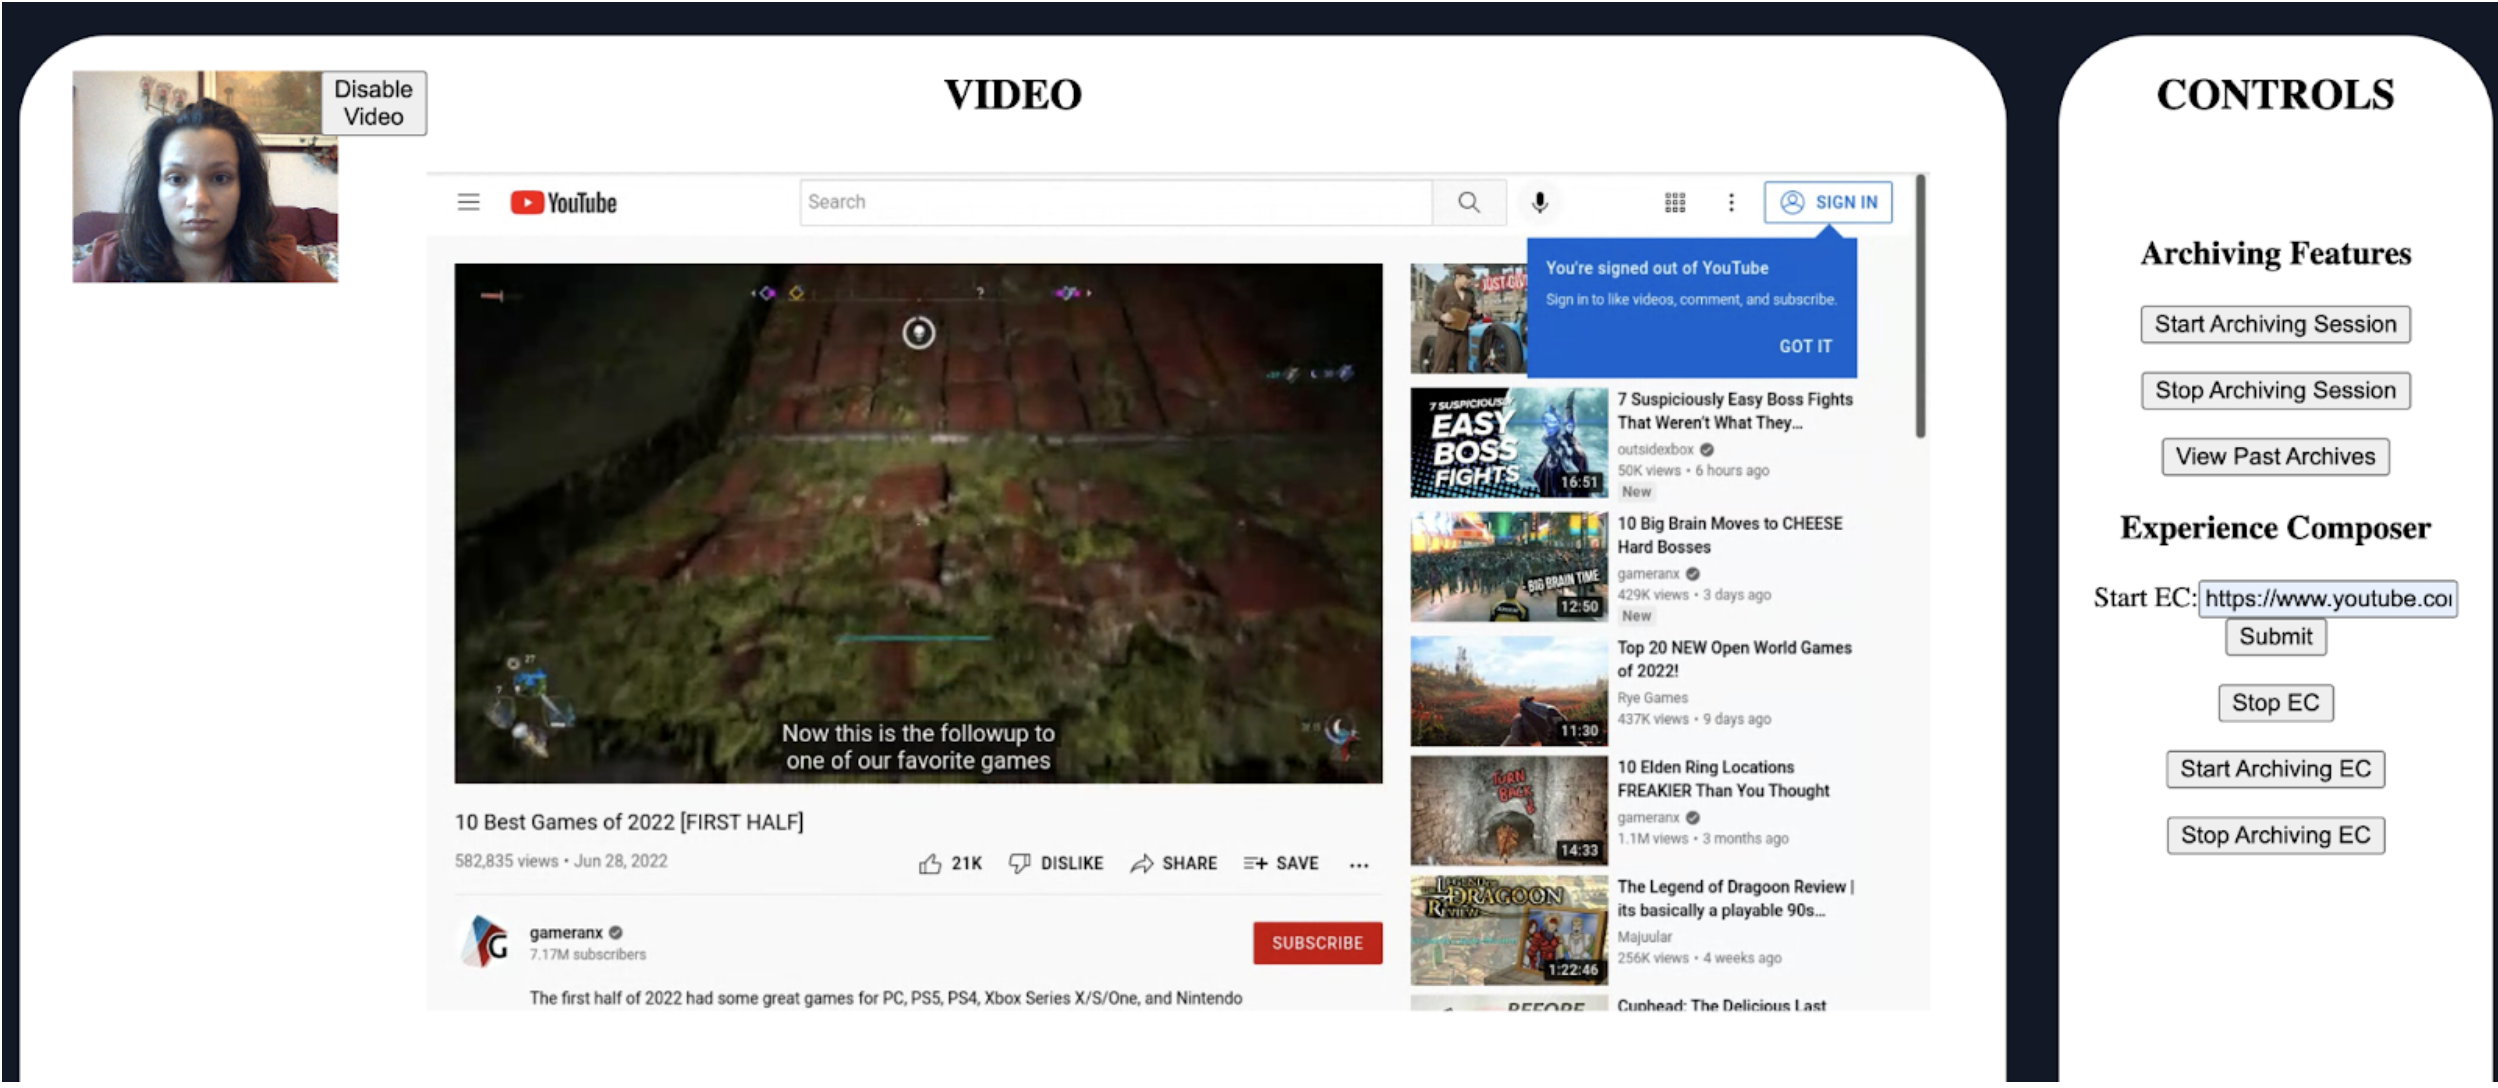 Vonage Video API session with Experience Composer
Archiving allows one to record a video stream of the website using Experience Composer to capture both the user and live stream, along with all of the CSS elements and layout. In order to archive the webpage, a new session and Experience Composer will need to be created by pressing the Start Archiving EC button. This new Experience Composer will subscribe to the original session and publish to the new session which will be archived and visible in the View Past Archives tab.
A Vonage Video API Account. If you do not already have an account, you will need to create one in the Video API Dashboard.
Additionally, you will need to add the Experience Composer add-on to your account and enable it for your project.
In your Video API Account, click on Account Settings in the left-hand menu. Then add Experience Composer in the list of account add-ons.
Now after enabling Experience Composer for your account, enable it for your project by selecting your project in the list of projects. Under Project settings, configure Experience Composer.
Node.js version >= 17.7.2
Opentok version >= 2.14.3
Start by creating a folder for the client-side code and a folder for server-side code. I will be focusing on the server-side aspect of the application; however, feel free to reference this article, Implement a Video API Application With React Hooks, to help build your client side application.
In the server folder, create a server.js file and a package.json. Be sure to download both Node.js and the Video Node SDK to use for your project. All of the code written in this article will be included in the server.js file, unless specified elsewhere.
Before you can create an Experience Composer, you will need to create a server for the application.
First, import all the dependencies and store your project’s apiKey and apiSecret in your server.
const https = require('https');
const express = require('express');
const OpenTok = require('opentok');

const apiKey = YOUR_API_KEY;
const apiSecret = YOUR_API_SECRET;For convenience, I recommend using Express.js to help build your application’s server. However, feel free to check out this article, 5 Ways to Build a Node.js API, to see other ways of building your application’s server.
Start by initializing your Express app and instantiating a new opentok object.
const app = express()
var opentok = new OpenTok(apiKey, apiSecret);Then create a Vonage Video API session by making a call to createSession. (Note that in order to archive your session, it needs to be routed).
opentok.createSession({mediaMode:"routed"},function (err, session) {
 if (err) return console.log(err);
 app.set('sessionId', session.sessionId);
});Set your server to run on an unused port.
app.listen(process.env.PORT || 3001, function () {
 console.log('Server listening on PORT 3001');
});Now you need to create a GET request to send your Vonage Video apiKey, sessionId, and token to the client.
app.get('/api', (req, res) => {
 var sessionId = app.get('sessionId');

 var token = opentok.generateToken(sessionId);
 app.set('token', token);

 res.json({apiKey:apiKey, sessionId:sessionId, token:token});
});
Finally, we can start using Experience Composer!
To create an Experience Composer, you will need to make an HTTP POST request to the following URL: https://video.api.vonage.com/v2/project/<API_Key>/render/
The request’s header should include the HTTP header X-OPENTOK-AUTH along with a valid JSON Web Token.
The request’s body should include the data of the Vonage Video API session’s id, token, and other properties. These properties include the input URL from the client. The URL needs to be publicly accessible so that an Experience Composer can capture the entire page.
(Follow the Experience Composer REST documentation for more information)
(Need to replace the <API_Key> with your Account’s API Key and <JSON_Web_Token> with a valid JWT token)
app.post('/store-data',(req, res) => {
 //retrieve URL from user input
 let URL= req.body.ecidURL;
 var ECID = '';

 const data = JSON.stringify({
     "sessionId": (app.get('sessionId')),
     "token": (app.get('token')),
     "url": (URL),
     "maxDuration": 1800,
     "resolution": "1280x720",
     "properties": {
       "name": "Live Stream"
     }
 });

 const options = {
   hostname: 'api.opentok.com',
   port: 443,
   path: '/v2/project/<API_Key>/render',
   method: 'POST',
   headers: {
     'X-OPENTOK-AUTH':<JSON_Web_Token>,
     'Content-Type': 'application/json'
   },
 };

 var body =[];
 const request = https.request(options, response => {

   response.on('data', (chunk) => {
     body.push(chunk);
   }).on('end', () => {
     body = Buffer.concat(body).toString();
     var InfoObj = JSON.parse(body);
     ECID = InfoObj.id;
     app.set('experienceComposerId', ECID);
   });
 });

 request.on('error', error => {
   console.error(error);
 });
  request.write(data);
 request.end();
  res.redirect('http://localhost:3000/');

});After this HTTP request is made, the server will redirect back to the client.
Now you have successfully started an Experience Composer, which is subscribed to your Vonage Video API session!
To stop this Experience Composer stream, submit an HTTP Delete request to the following URL:
https://video.api.vonage.com/v2/project/<API_Key>/render/<ExperienceComposerId>/
This request will be very similar to the POST request made above, however, the header method will be DELETE instead of POST, and the request’s body will only require the session id and token.
app.get('/stopEC', (req, res)=>{
 var experienceComposerId = '';
 experienceComposerId = app.get('experienceComposerId')

 const data = JSON.stringify({
   "sessionId": (app.get('sessionId')),
   "token": (app.get('token')),
   }
});
 const options = {
   hostname: 'api.opentok.com',
   port: 443,
   path: `/v2/project/47525941/render/` + String(experienceComposerId),
   method: 'DELETE',
   headers: {
     'X-OPENTOK-AUTH':(projectJWT),
     'Content-Type': 'application/json'
   },
 };
 const request = https.request(options, response => {
   console.log(`statusCode: ${response.statusCode}`);

   response.on('data', d => {
     process.stdout.write(d);
   });
 });
 request.write(data);
 request.end();
 res.redirect('http://localhost:3000/');
});
This should stop your Experience Composer stream and remove it from your Vonage Video API session.
To archive your current session and website layout, create a new session and token.
Make a call to the createSession and generateToken functions, and save the new session id and token in your express app.
opentok.createSession({mediaMode:"routed"},function (err, sessionECArchive) {
  if (err) return console.log(err);
  app.set('sessionIdECArchive', sessionECArchive.sessionId);
 });
 var tokenECArchive = opentok.generateToken(sessionIdECArchive, option);
app.set('tokenECArchive', tokenECArchive);Now that we have a new session id and token, make the same HTTP POST request call as above to start a new Experience Composer. The only changes required are getting the new session id and token that you saved above and changing the <host_link> to the URL that you are sharing your website to. (Remember the link needs to be publicly accessible, so I would recommend publishing your application to Heroku or ngrok). Additionally, you will need to store the Experience Composer id under a different name in your express app so that you have access to this Experience Composer.
app.post('/startArchivingEC', function(req, res){
 var ECIDArchive = '';

 const data = JSON.stringify({
     "sessionId": (app.get('sessionIdECArchive')),
     "token": (app.get('tokenECArchive')),
     "url": (host_link),
     "maxDuration": 1800,
     "resolution": "1280x720",
     "properties": {
       "name": "Live Stream"
     }
 });

 const options = {
   hostname: 'api.opentok.com',
   port: 443,
   path: '/v2/project/47525941/render',
   method: 'POST',
   headers: {
     'X-OPENTOK-AUTH':(projectJWT),
     'Content-Type': 'application/json'
   },
 };

 var body =[];
 const request = https.request(options, response => {
   response.on('data', (chunk) => {
     body.push(chunk);
   }).on('end', () => {
     body = Buffer.concat(body).toString();
     console.log(body);
     var InfoObj = JSON.parse(body);
     ECID = InfoObj.id;
     console.log(ECIDArchive);
     app.set('ECIDArchive', ECIDArchive);
   });
 });

 request.on('error', error => {
   console.error(error);
 });
  request.write(data);
 request.end();
You should see in your console that you have successfully created a new Experience Composer in the new session. Now we can start archiving this session by calling the startArchive function with the new session id. You will need to store the returned archive id in your express app to stop the archive when required.
setTimeout(() => {
   opentok.startArchive(app.get('sessionIdECArchive'), function (
     err,
     archive
   ) {
     if (err) {
       return console.log(err);
     } else {
       console.log("new archive:" + archive.id);
       app.set('archiveIdEC', archive.id);
     }
   }) }, 5000);
 res.redirect(host_link);
})
To stop archiving your current session and website layout, you will need to stop the Experience Composer by making the same HTTP DELETE request as shown above.
app.post('/stopArchivingEC', function(req, res){
  var ECIDArchive = '';
  ECIDArchive = app.get('ECIDArchive');
  console.log('ECID:    ');
  console.log(ECIDArchive);

  const data = JSON.stringify({
    "sessionId": (app.get('sessionIdECArchive')),
    "token": (app.get('tokenECArchive'))
  });

  const options = {
    hostname: 'api.opentok.com',
    port: 443,
    path: `/v2/project/47525941/render/` + String(ECIDArchive),
    method: 'DELETE',
    headers: {
      'X-OPENTOK-AUTH':(projectJWT),
      'Content-Type': 'application/json'
  },
 };

 const request = https.request(options, response => {
   console.log(`statusCode: ${response.statusCode}`);

   response.on('data', d => {
     process.stdout.write(d);
   });
 });
 request.write(data);
 request.end();
Followed by a call to the stopArchive function.
opentok.stopArchive(app.get('archiveIdEC'), function (err, archive) {
   if (err) return console.log(err);
   console.log("Stopped archive:" + archive.id);
 });
 res.redirect(host_link);
})
Experience Composer has a variety of applications. In this tutorial, we have shown that it can be used to create a stream of a website such as videos, documents, slides, whiteboards or other features and publish it to a Vonage Video API session. Additionally, it allows users to fully customize their own website with logos, web components, and formatted layouts to capture the full experience in the form of an Experience Composer stream.
Hopefully, this tutorial helped you learn the use cases of Experience Composer, and how it can be applied to your own projects! Let us know how you're enjoying Experience Composer on our Vonage Community Slack or send us a message on Twitter.
Share:
Megna is a software engineering intern at Vonage, based out of San Francisco. She is a third year computer engineering student at the University of Illinois Urbana-Champaign. Megna is passionate about learning about innovations and wants to build innovative technology for the future generations.