Share:
)
Paul is a Principal Architect at Vonage. A seasoned software engineer, trainer and speaker, he specialised in data-driven solutions on Apple platforms with an emphasis on prototyping, best practices and balance with agility.
Every Passkey Needs a Silent Partner
Time to read: 10 minutes
Passkeys dramatically improve authentication security, but they don't solve every identity problem. In this tutorial you'll learn why signup and account recovery remain difficult, how Silent Authentication fills those gaps, and how to build the complete flow using the Vonage Verify API.
Passwords are the oldest unfixed bug in software, and passkeys are the first fix that removes the shared secret rather than relocating it. Every earlier remedy, from one-time codes to magic links, only moved that secret somewhere better defended. If you want the full tour of that history, and of the two ceremonies that make a passkey work, I have written it up in Passkeys from first principles.
Passkeys are rapidly gaining adoption. By replacing the password with a public/private key pair, where the private key never leaves the user's device and the server keeps only the public half, they make phishing stop working by design. The browser will simply refuse to use the key on the wrong site, and a stolen credential database becomes a list of worthless public keys.
For all those strengths, though, passkeys still leave two doors unguarded. They cannot tell you who is standing at the door the very first time someone signs up, and they cannot let a legitimate user back in when their last passkey is gone. Both doors are exactly where Vonage Silent Authentication shines: it verifies possession of a phone number using the SIM card and the carrier network, with no codes to type and nothing for a phisher to intercept.
Two phishing-resistant, zero-friction factors, each covering the other's blind spot. Let's look at why they fit so well and then build the flow with the Verify v2 API.
Passkeys are WebAuthn credentials. At registration, the device mints a key pair inside secure hardware and sends the server the public key. At sign-in, the server issues a random challenge, the device signs it after a biometric or PIN gesture, and the server verifies the signature. One thumb-press is already multi-factor: something you have (the device) plus something you are (the gesture). Crucially, the browser only offers a passkey on the domain it was created for, so the human is no longer the one deciding whether a login page is genuine.
Silent Authentication verifies a user by their SIM card. Your backend starts a verification with the Verify v2 API, receives a check_url, and the user's device opens that URL over its cellular connection. The carrier confirms directly against its own records that the request is coming from the device that owns that phone number, and returns a verified GSM response. No SMS is sent, no six-digit code is typed, and there is nothing on screen for an attacker to socially engineer out of the user. Authentication happens directly between the carrier and the mobile device, which takes the classic OTP phishing playbook off the table entirely.
Notice the symmetry:
A passkey proves possession of a private key bound to your service.
Silent Auth proves possession of a SIM bound to a phone number.
Neither factor ever shows the user a secret, so neither gives the user a secret to give away.
It helps to notice that sign-up, sign-in, and recovery are not the same question asked three times. Sign-up asks "who is this?", sign-in asks "is this the same person who registered?", and recovery asks "is this really them, now that the thing that proved it is gone?".
Passkeys give a superb answer to the sign-in question and no answer at all to the other two.
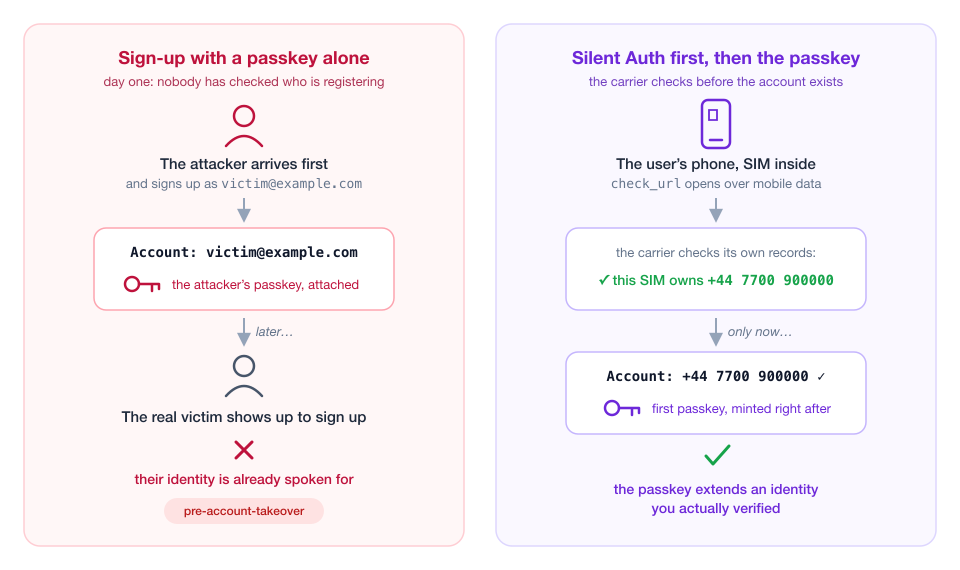
A passkey can only prove that the person signing in is the person who registered. It says nothing about who registered. On day one there is no passkey yet, so most passwordless sign-ups fall back to the weakest link in the whole system: an email address, unverified or verified by a link that is itself phishable. If an attacker creates the account for victim@example.com before the victim does, and attaches their own passkey to it, you have a pre-account-takeover problem before your user has even shown up.
Anchoring sign-up to a silently verified phone number changes the picture. The account is created against a number the carrier just confirmed is live in that device, and only then does the passkey ceremony run. The passkey now cryptographically extends an identity you actually verified, rather than one the user merely typed.
 The Day One Problem
The second door is recovery. A user with one device-bound passkey is one dropped phone away from being locked out, and even synced passkeys assume the user still has access to their platform account. Most products punt to an emailed magic link, which quietly reintroduces everything passkeys removed: a bearer token, sitting in an inbox, protected by a password.
Silent Auth gives you a recovery path with the same security posture as the thing it is recovering. New phone, same number: the carrier vouches for the SIM, the user re-registers a passkey, and at no point did a code travel over a channel an attacker could watch.
The Combined Flow
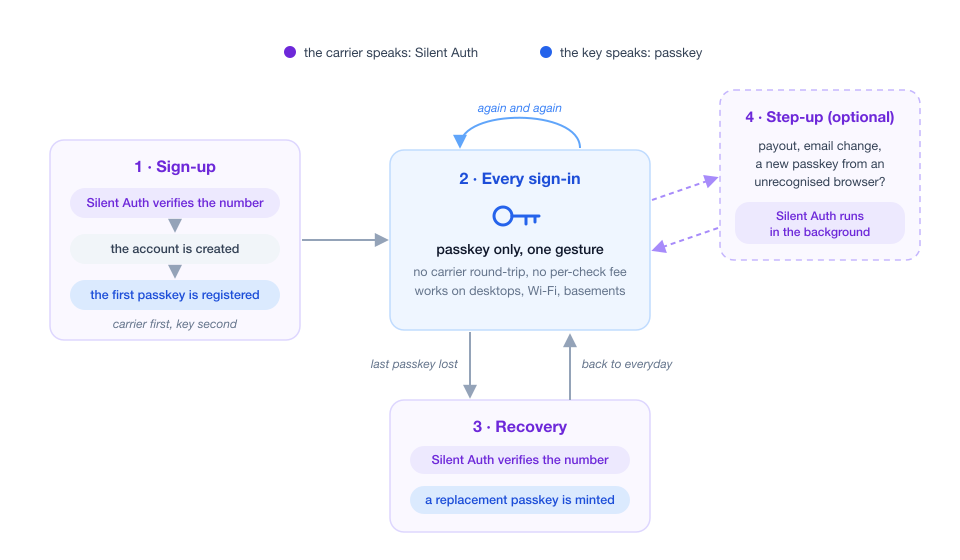
Here is the end-to-end lifecycle:
Sign-up: Verify the phone number with Silent Auth, create the account, then register the first passkey.
Every sign-in after that: Passkey only. One gesture, no network round-trip to a carrier, works on any device including desktops.
Recovery or a new device without sync: Silent Auth again, then register a replacement passkey.
Optional step-up: For high-risk actions (payout, email change, adding a new passkey from an unrecognised browser), run a Silent Auth check in the background as a second, independent factor.
 The Combined FlowPasskeys handle the everyday; Silent Auth handles the edges. Let's write the interesting parts.
Your application registered with the Network Registry for production use (during development, the sandbox has you covered, more on that below).
A backend that can keep a session; the snippets below use plain curl and browser JavaScript so you can translate them to your stack of choice.
A phone with a SIM and mobile data for testing the Silent Auth leg.
When a new user submits their phone number, your backend starts a verification. The workflow array is where the magic lives: silent_auth first, with an SMS fallback for the cases where Silent Auth cannot run.
curl -X POST https://api.nexmo.com/v2/verify \
  -H "Authorization: Bearer $JWT" \
  -H "Content-Type: application/json" \
  -d '{
    "brand": "ACME Inc",
    "workflow": [
      { "channel": "silent_auth", "to": "447700900000" },
      { "channel": "sms", "to": "447700900000" }
    ]
}' The response contains a request_id and, for Silent Auth, a check_url:
{
  "request_id": "b3a2f4d0-1234-4d6e-9f00-example00000",
  "check_url": "https://api-eu-3.vonage.com/v2/verify/b3a2f4d0.../silent-auth/redirect"
} Hand the check_url to the client, and have the device open it over its cellular connection. This is the one hard requirement of Silent Auth: if the request goes out over Wi-Fi, the carrier never sees it and the check fails. The Vonage iOS and Android client libraries exist precisely to force the request onto mobile data even when Wi-Fi is connected, so use them rather than rolling your own.
The device follows a short chain of redirects into the carrier's network and comes back with a code, which your client posts to your backend, and your backend forwards to Verify:
curl -X POST https://api.nexmo.com/v2/verify/$REQUEST_ID \
  -H "Authorization: Bearer $JWT" \
  -H "Content-Type: application/json" \
-d '{ "code": "'$CODE'" }' A "status": "completed" means the carrier has vouched for the SIM. The user has been verified and, here is the part worth savouring: , they never saw any of it happen. No code arrived, nothing was typed. From their point of view, they entered a phone number and were signed in automatically.
While developing, add "sandbox": true to the workflow entry and use the Network Registry Playground, so you can exercise the whole flow without carrier coverage.
Now, and only now, create the account and immediately run the WebAuthn registration ceremony. The browser's native API needs no dependencies these days:
// The server generated these options, including a random challenge
// and the user object: { id: userHandle, name: phoneOrEmail }
const options = PublicKeyCredential.parseCreationOptionsFromJSON(optionsJSON);


// The OS prompts for Touch ID / Face ID / Windows Hello and mints
// the key pair inside secure hardware. The private key never leaves.
const credential = await navigator.credentials.create({ publicKey: options });


await fetch("/registration", {
  method: "POST",
  headers: { "Content-Type": "application/json" },
  body: JSON.stringify({ credential: credential.toJSON() }),
}); Two server-side settings turn an ordinary credential into a passkey. These settings ask for a discoverable credential (resident_key: "required") so sign-in can be usernameless, and require user verification for the biometric gesture. Be aware that the user_verification option only requests the gesture from the browser; it is your verification step on the server that must also check the user-verified flag in the authenticator's response, otherwise a tampered client can skip the biometric and quietly demote your multi-factor login to a single factor. With that checked, verify the response against the challenge you issued, store the public key, and the account now has a phishing-resistant credential anchored to a carrier-verified phone number.
One design note: the phone number you verified makes a fine human-readable label for the passkey (user.name in the creation options), and the WebAuthn spec explicitly lists phone numbers alongside emails and usernames for exactly this purpose. Just never use it as the user handle (user.id); that must stay an opaque random identifier.
Day-to-day sign-in never touches the Verify API. The user taps a button, the browser shows the account picker, one gesture signs the server's challenge, and it’s done.
At this point you might ask: why not run Silent Auth on every sign-in too, as an extra layer of security? The answer is because then you would be paying for coverage you don't need and losing coverage you do. A passkey sign-in already proves possession of a registered device plus a fresh biometric, and it works on desktops, on Wi-Fi, and in a basement with no signal -- exactly the places a carrier check cannot reach. Each Silent Auth check also costs a network round-trip (and a per-check fee). This is fine for the occasional lifecycle moment, but noticeable as a tax on every login. In other words, save the carrier for the moments when the passkey cannot speak.
When a user loses their last passkey, recovery is just Step 1 followed by Step 2 again: silently verify the number they registered with, open a short-lived recovery session, and let them mint a fresh passkey. The workflow with the SMS fallback already handles the awkward cases, such as the user whose new phone has a SIM but who is currently on a desktop, where Verify simply moves down the workflow to the next channel.
It is worth being honest about the trade-off, since nothing is a fix-all when it comes to user verification. Recovery anchored to a phone number inherits the phone number's own lifecycle. Numbers get recycled, and SIM swap fraud exists, which is why Silent Auth checking the carrier's own records for recent SIM changes is a meaningfully higher bar than an SMS code, and why you should treat recovery as a good moment for extra scrutiny (notify every other channel you have, delay high-value actions, and log the event).
Step back and the picture is pleasingly clean:
| Passkey | Silent Auth |
Proves possession of | A private key in secure hardware | A SIM in the carrier's records |
Vouched for by | The browser and the device's secure hardware | The mobile network operator |
User friction | One gesture | None at all |
Phishable secret shown to the user | None | None |
Works on | Any device, any connection | A phone on mobile data |
When it runs | Every sign-in | Sign-up, recovery, step-up |
An attacker would need | The physical device plus the biometric or PIN | The victim's active SIM |
Every credential system has a bootstrap problem and a recovery problem, and most solutions quietly downgrade to a phishable channel at exactly those two moments. Pairing passkeys with Silent Authentication keeps the entire lifecycle on factors that never show the user a secret. The browser checks the origin, the carrier checks the SIM, and the user is never asked to judge anything a phisher could fake, which means there is never a secret for a user to be talked out of.
And that is the arrangement the title promised: Silent Auth is the silent partner. It puts up the trust that gets the venture started, steps back in when the business needs rescuing, and stays invisible the rest of the time, while the passkey runs the day-to-day.
If you want to go deeper on either half, the Silent Authentication guide covers coverage and Network Registry registration, the Getting Started with Silent Authentication tutorial walks the check_url flow end to end with a Node.js backend, and the best practices post digs into fallback workflow design.
Have you paired passkeys with network-based authentication, or are you planning to? We would love to hear how it goes.
Have a question or want to share what you're building?
Subscribe to the Developer Newsletter
Follow us on X (formerly Twitter) for updates
Prefer video? Watch tutorials on our YouTube channel
Connect with us on the Vonage Developer page on LinkedIn
Help us improve our developer experience by filling out our Voice of the Developer Feedback
Stay connected and keep up with the latest developer news, tips, and events.