Share:
Steve is a self-proclaimed Mathlete, and King of Snark. He is also a lover of Greyhounds, twisty puzzles, and European Board Games. When not talking math to non-math people, and Java to non-Java people, he can be found sipping coffee and hacking on code.
How to Create a Conference Call with Java
Time to read: 9 minutes
In this tutorial, you will learn how to initiate a conference call to connect multiple people who phone into a number. The example code is on GitHub.
Previously, we've shown you how to Receive a Phone Call and Forward a Phone Call so if you're not already familiar with those concepts, read those posts first.
You will be using Gradle to manage your dependencies and run your application. Additionally, you'll need to make sure you have a copy of the JDK installed. I will be using JDK 11 in this tutorial, but anything JDK 8 and higher should work.
Finally, you'll need the Vonage CLI installed. You'll use it to purchase a phone number and configure your Vonage account to point at your new application.
This tutorial will walk you through the following steps:
Using Gradle to set up a new Java project.
Using the Spark framework for controlling the call.
Purchasing a number and configuring your Vonage account to use that number with your application.
You will use Gradle to manage your dependencies and to create and run your Java application.
The gradle init --type=java-application command will create all of the folders you will need as well as a sample class where you will be writing your code.
From the command line, create a new Java project with the following commands, accepting any of the default prompts from Gradle:
Gradle will create the App class in the src/main/java/conference/call folder.
Inside of this class is a getGreeting and main method. You won’t need the getGreeting method, so feel free to remove it.
Your App class should look like this:
/*
 * This Java source file was generated by the Gradle 'init' task.
 */
package conference.call;

public class App {
    public static void main(String[] args) {
        // Future Code Goes Here
    }
}
You will use the Spark framework to receive an HTTP call made by Vonage when your number gets a call.
Add the following to the dependencies block in your build.gradle file:
// Spark Framework
implementation "com.sparkjava:spark-core:2.8.0"

// Nexmo Java Client
implementation "com.nexmo:client:5.1.0"Your dependencies block should look like this:
dependencies {
    implementation "com.sparkjava:spark-core:2.8.0"
    implementation "com.nexmo:client:5.1.0"

    // Use JUnit test framework
    testImplementation 'junit:junit:4.12'
}
When a call is received, Vonage will send a request to a pre-defined webhook URL. It expects to receive a Vonage Call Control Object (NCCO) containing a list of actions to execute.
You will be using the talk action to greet the incoming caller, and the conversation action to connect incoming calls to a conference.
This is the resulting NCCO that your application will create:
[
  {
    "text": "You will now be added to the conference call.",
    "action": "talk"
  },
  {
    "name": "team-meeting",
    "action": "conversation"
  }
]You will use the TalkAction and ConversationAction classes from the Vonage Java Server SDK for building the above NCCO.
Add the following code to the main method:
TalkAction talk = TalkAction.builder("You will now be added to the conference call.")
        .build();
ConversationAction conversation = ConversationAction.builder("team-meeting")
        .build();

Ncco ncco = new Ncco(talk, conversation);Now that you have defined the NCCO, you will configure Spark to serve the NCCO. Your application will listen on port 3000 and the route will be /webhooks/answer.
Add the following to the main method:
port(3000);
get("/webhooks/answer", (req, res) -> {
    res.type("application/json");
    return ncco.toJson();
});
The main method will now look like this:
public static void main(String[] args) {
    TalkAction talk = TalkAction.builder("You will now be added to the conference call.")
        .build();
    ConversationAction conversation = ConversationAction.builder("team-meeting")
        .build();

    Ncco ncco = new Ncco(talk, conversation);

    port(3000);
    get("/webhooks/answer", (req, res) -> {
        res.type("application/json");
        return ncco.toJson();
    });
}
You will need a Vonage number to receive phone calls. If you do not have a number, you can use the Vonage CLI to purchase one:
Note: NUMBER here represents the number you want to buy, and COUNTRYCODE the country code for that number. If you do no already know the number, you can search for available numbers in a specific country like so (here we're searching for numbers in the USA):
Make note of the number that you purchased. You will need this number to link your application and for testing.
To send an HTTP request to your application, Vonage needs to know the URL that your application is running on.
Instead of configuring your local network or hosting your application on an external service, you can use ngrok to expose your application to the internet safely.
Download ngrok and run the following command:
Take note of the forwarding address as you will need it when you configure your account. In the following picture, the forwarding address is http://99cad2de.ngrok.io.
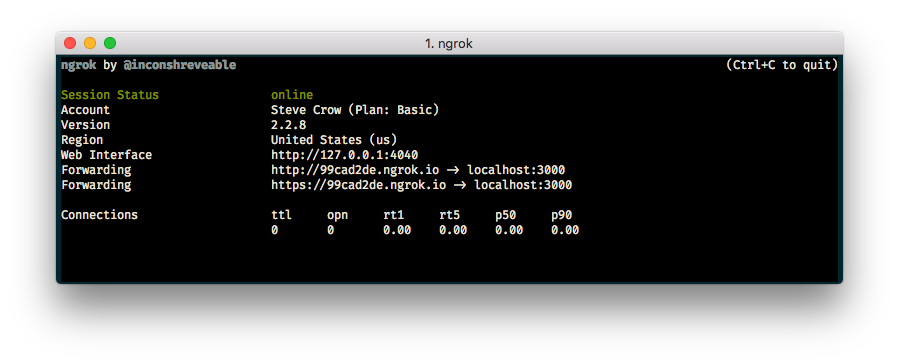 ngrok running in a terminal
If you do not have an application you can use the Vonage CLI to create one using your ngrok forwarding address:
After running this command, you will be shown an application id. For example: notreal-1111-2222-3333-appid. You will need this application id to link your phone number to the application.
You can use the Vonage CLI to link your phone number and application:
Start your application with the gradle run command inside of your conference-call directory.
Call your Vonage number and grab a friend, colleague, or another phone to do the same. Every new caller is entered into the conference call.
In a few lines of code, you have created an application that can create conference calls with multiple people.
Check out our documentation on Vonage Developer where you can learn more about call flow or Vonage Call Control Objects.
You can also take a look at the Conference Call code snippet for this example and more.